This content has been machine translated dynamically.
Dieser Inhalt ist eine maschinelle Übersetzung, die dynamisch erstellt wurde. (Haftungsausschluss)
Cet article a été traduit automatiquement de manière dynamique. (Clause de non responsabilité)
Este artículo lo ha traducido una máquina de forma dinámica. (Aviso legal)
此内容已经过机器动态翻译。 放弃
このコンテンツは動的に機械翻訳されています。免責事項
이 콘텐츠는 동적으로 기계 번역되었습니다. 책임 부인
Este texto foi traduzido automaticamente. (Aviso legal)
Questo contenuto è stato tradotto dinamicamente con traduzione automatica.(Esclusione di responsabilità))
This article has been machine translated.
Dieser Artikel wurde maschinell übersetzt. (Haftungsausschluss)
Ce article a été traduit automatiquement. (Clause de non responsabilité)
Este artículo ha sido traducido automáticamente. (Aviso legal)
この記事は機械翻訳されています.免責事項
이 기사는 기계 번역되었습니다.책임 부인
Este artigo foi traduzido automaticamente.(Aviso legal)
这篇文章已经过机器翻译.放弃
Questo articolo è stato tradotto automaticamente.(Esclusione di responsabilità))
Translation failed!
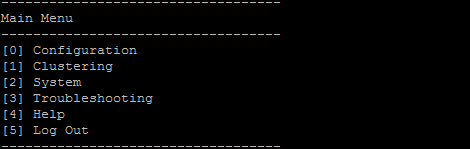
Command-line interface options
For an on-premises installation of XenMobile® Server, you can access the CLI options as follows:
- From the hypervisor on which you installed XenMobile: In your hypervisor, select the imported XenMobile virtual machine, start the command prompt view, and log on to your administrator account for XenMobile. For details, see the documentation for your hypervisor.
- If SSH is enabled in your firewall, by using SSH: Log on to your administrator account for XenMobile.
You can do various configuration and troubleshooting tasks using the CLI. The following figure shows the top-level menu for the CLI.
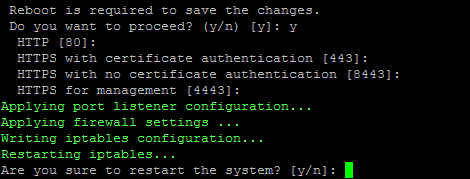
Configuration options
The following are samples of the Configuration Menu and the settings displayed for each option.
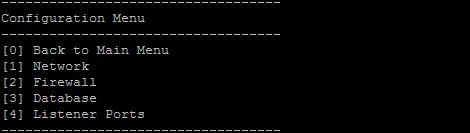
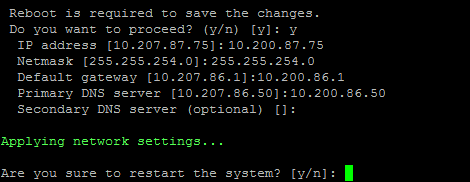
[1] Network
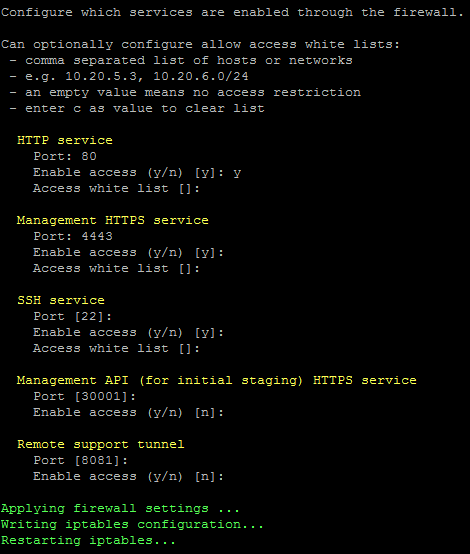
[2] Firewall
[3] Database
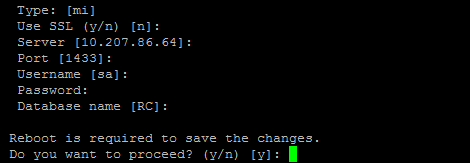
[4] Listener Ports
Clustering options
The following are samples of the Clustering Menu and the settings displayed for each option.
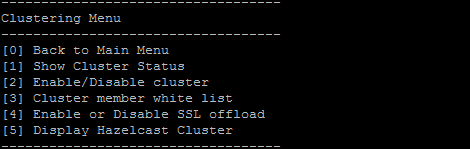
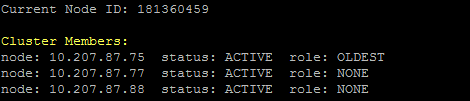
[1] Show Cluster Status
[2] Enable/Disable cluster
When you choose to enable clustering, the following message appears:
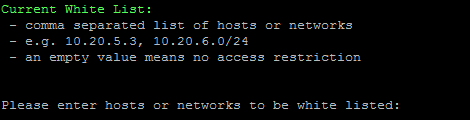
To enable real-time communication between cluster members, please open port 80 using the Firewall menu option in CLI menu. Also configure Access white list under Firewall settings for restricted access.
When you choose to disable clustering, the following message appears:
You have chosen to disable clustering. Access to port 80 is not needed. Please disable it.
[3] Cluster member white list
[4] Enable or disable SSL offload
When you select to enable or disable SSL offloading, the following message appears:
Enabling SSL offload opens port 80 for everyone. Please configure Access white list under Firewall settings for restricted access.
[5] Display Hazelcast Cluster
When you select to display the Hazelcast Cluster, the following options appear:
Hazelcast Cluster Members:
[IP addresses listed]
Note:
If a configured node is not part of the cluster, restart that node.
System options
From the System Menu, you can display or set system-level information, restart, or shut down the server, or access Advanced Settings.
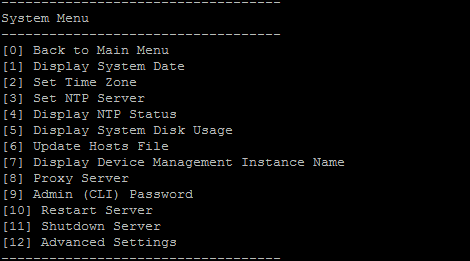
Set NTP Server enables you to specify NTP server information. If you have time zone issues when syncing XenMobile time with a hypervisor, you can avoid the issues by pointing XenMobile to an NTP server. Restart all cluster servers after changing this option.
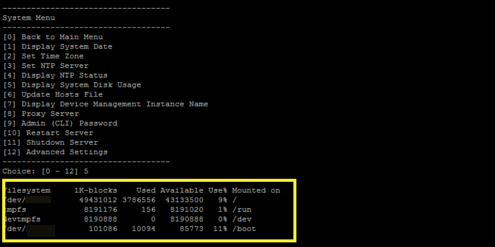
You can also check the disk space by viewing the [5] Display System Disk Usage menu item.
About shutting down server nodes
When you shut down a single server node in a cluster, other nodes can generally handle the workload if they meet the requirements documented in Scalability and performance. The impact can vary depending on how many nodes are down at the same time, the total number of users, and how long the nodes are down.
- Users can still access the Secure Hub and the store.
- Users can still access and launch deployed managed apps, if an available node can handle the number of users. Connections might be slower resulting in slower device check-ins.
- Device policies continue to work unless all nodes are down. Depending on resources and the number of devices, policies might deploy more slowly.
[12] Advanced Settings
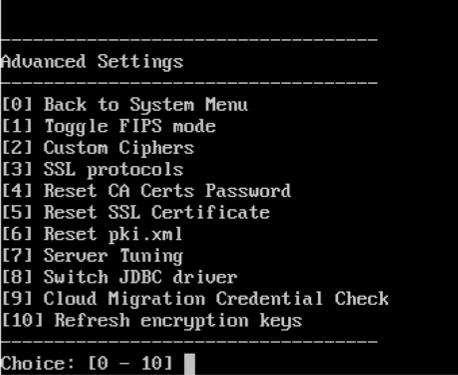
SSL protocols options default to all allowed protocols. After the prompt New SSL protocols to enable, type the protocols you want to enable. XenMobile disables any protocols that you don’t include in your response. For example: To disable TLSv1, type TLSv1.2,TLSv1.1 and then type y to restart XenMobile Server.
Server Tuning options include the server connection timeout, maximum connections (by port), and maximum threads (by port).
Switch JDBC driver options are jTDS and Microsoft JDBC. The default driver is jTDS. For information about switching to the Microsoft JDBC driver, see SQL Server drivers.
Troubleshooting options
The following are samples of the Troubleshooting Menu and the settings displayed for each option.
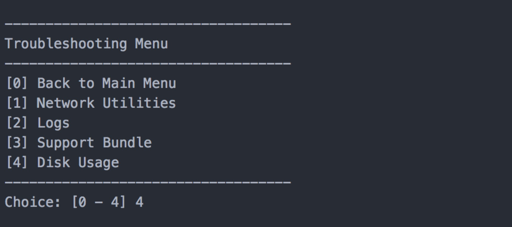
[1] Network Utilities
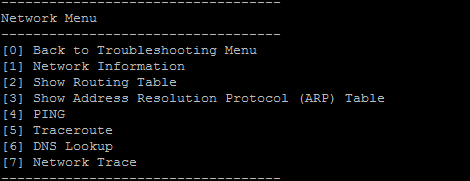
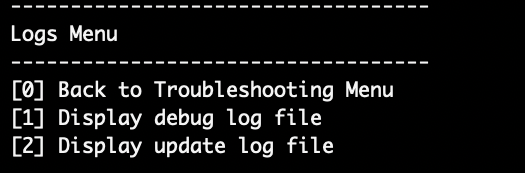
[2] Logs
[3] Support Bundle

[4] Disk Usage
To upload a support bundle by using Citrix Files as the FTP site
Before you start the upload of a support bundle, configure the following prerequisites on Citrix Files:
-
Verify the FTP logon details.
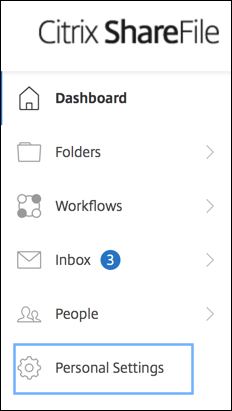
a. In a web browser, open https://citrix.sharefile.com.
b. Click Personal Settings and then click Advanced connections.
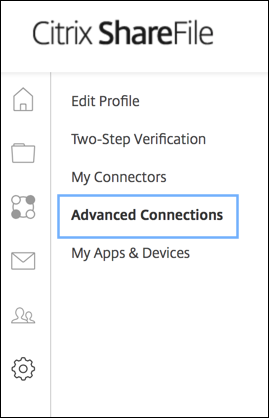
c. In FTP Server information, for User name, verify that an alphanumeric user ID appears, along with the default Subdomain/username details.

Notes:
- The file you are uploading from XenMobile is a Linux CLI-based FTP client. As a result, you cannot enter backslash () and at sign (@) characters as part of your user name.
- If you don’t see the alphanumeric user ID, you can request this user ID from your ShareFile admin or ShareFile support.
-
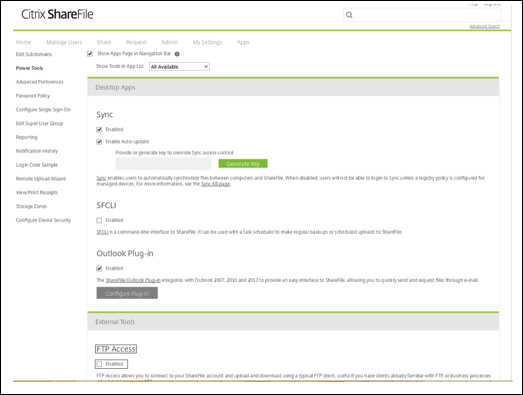
Verify that the Citrix Files server is enabled for FTP communication along with FTPS. Ideally, ShareFile admins allow a user account to be opened for FTP communication. Sometimes, however, only FTPS communication is allowed.
A user with administrator rights can verify and enable this setting by clicking Settings > Admin Settings > Advanced Preferences > Enable ShareFile Tools. In External Apps > FTP Access, verify that the Enable checkbox is selected.
-
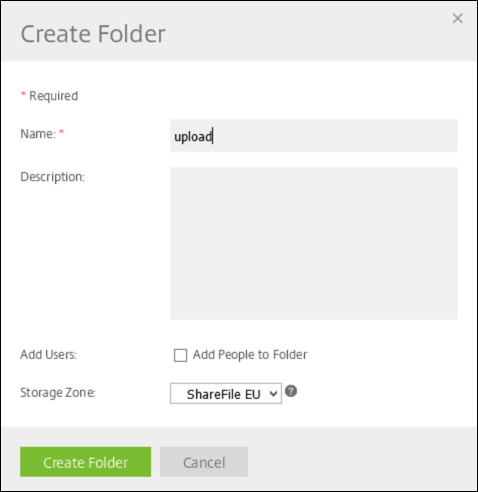
Create a shared folder for the FTP client to use as a directory for file uploads. Click Home, click Folders, and then click Personal Folders.
-
On the far right, click the plus sign (+) icon, click Create Folder and then enter a name for the folder.
-
In the XenMobile Server CLI, on the Main Menu, select Troubleshooting > Support Bundle. Then, on the Support Bundle Menu, select Generate Support Bundle.
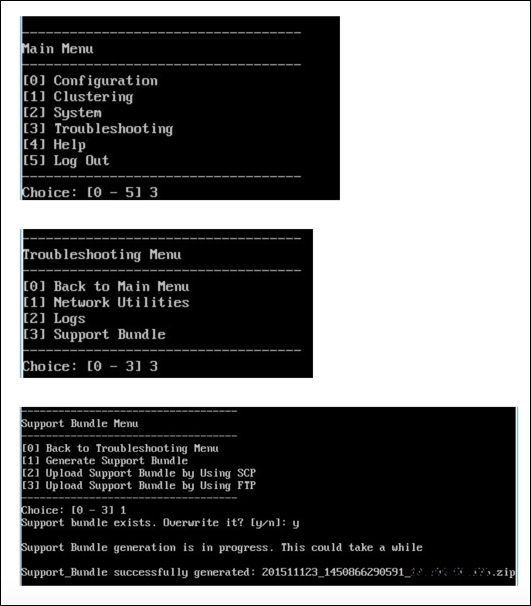
Note:
If a support bundle exists, when prompted, type y to override the bundle.
-
Upload the support bundle to the FTP server:
a. Select Upload Support Bundle by using FTP.
b. Enter remote host: When prompted, type your FTP server name. When Citrix Files is used as an FTP server, type your company name followed by Citrix Files FTP site name. For example citrix.sharefileftp.com.
c. Enter remote user name: When prompted, type the alphanumeric user ID.
d. Enter remote user password: When prompted, enter your password.
e. Enter remote directory: When prompted, enter the shared folder name you created in the Citrix Files and then press Enter.
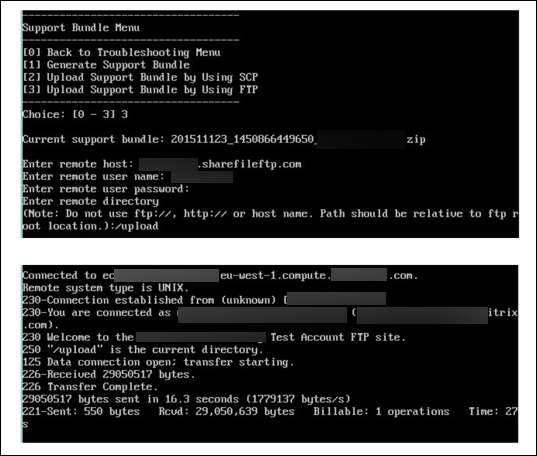
You can view the uploaded support bundle in the shared folder you created in the Citrix Files.
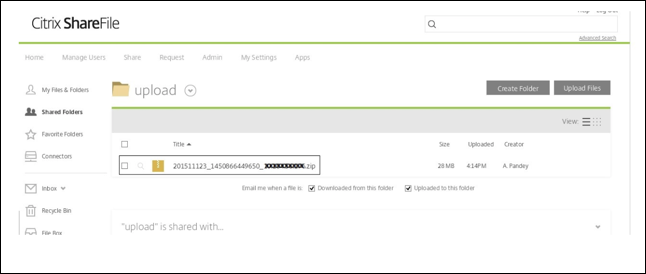
For more information about Citrix Files FTP, see this Citrix Support Knowledge Center article.
To check the disk space
You can check the system disk space in the CLI as follows:
- On the main menu, select the System menu.
-
In the System menu, select the Display System Disk Usage option.
The file system information appears.
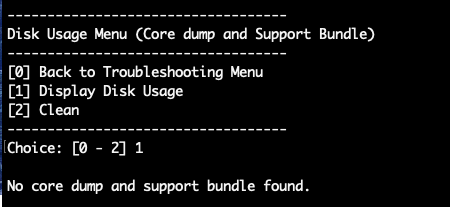
To do self-service disk cleanup
You can clean up the disk in the CLI as follows:
-
On the Troubleshooting menu, select Disk Usage. The Disk Usage list has the following options:
-
Type 1 to list the core dump file and support bundles file types. If there no files exist, you get the following message: No core dump and support bundles found.
-
Type 2 to clean the scanned core dump file and support bundle file.
Share
Share
This Preview product documentation is Citrix Confidential.
You agree to hold this documentation confidential pursuant to the terms of your Citrix Beta/Tech Preview Agreement.
The development, release and timing of any features or functionality described in the Preview documentation remains at our sole discretion and are subject to change without notice or consultation.
The documentation is for informational purposes only and is not a commitment, promise or legal obligation to deliver any material, code or functionality and should not be relied upon in making Citrix product purchase decisions.
If you do not agree, select I DO NOT AGREE to exit.