Client properties
Client properties have information that is provided directly to the Secure Hub on user devices. You can use these properties to configure advanced settings, such as the Citrix PIN. You get client properties from Citrix support.
Client properties are subject to change with every release of Secure Hub and occasionally for client apps. For details about more commonly configured client properties, see Client property reference, later in this article.
- In the XenMobile® console, click the gear icon in the upper-right corner. The Settings page appears.
-
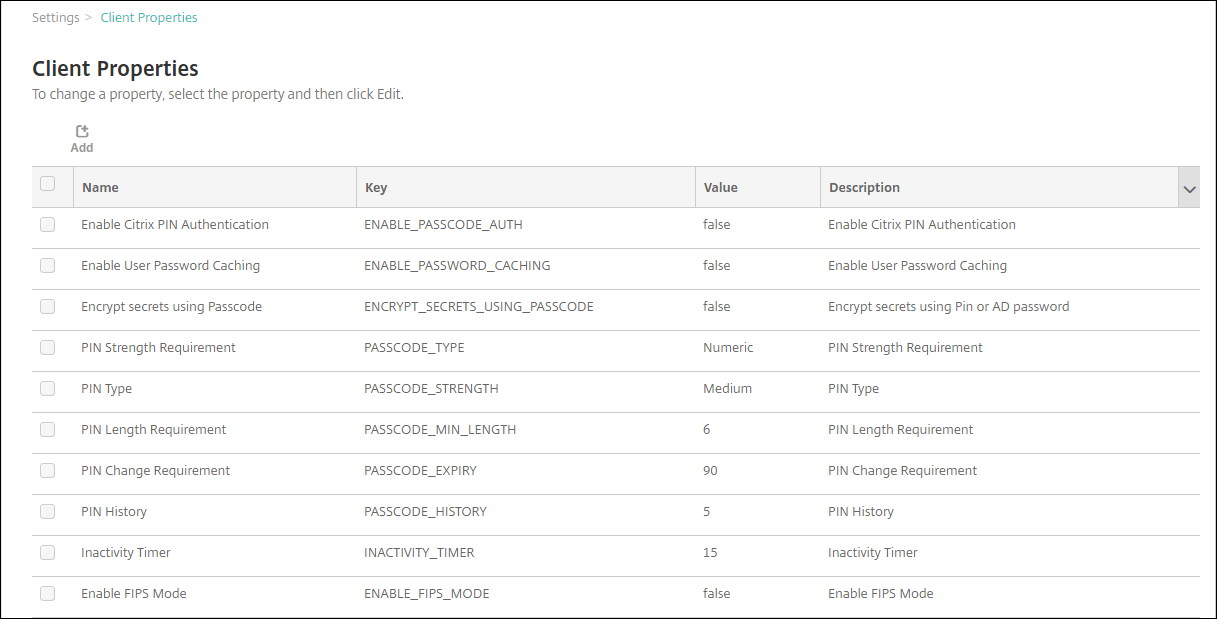
Under Client, click Client Properties. The Client Properties page appears. You can add, edit, and delete client properties from this page.
To add a client property
-
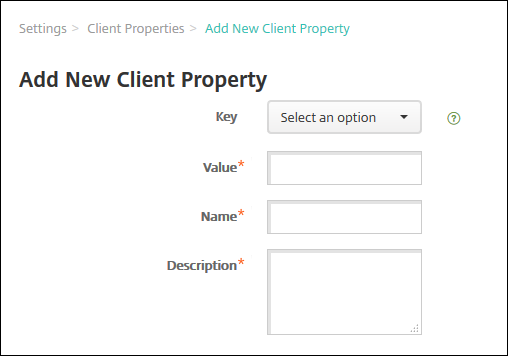
Click Add. The Add New Client Property page appears.
-
Configure these settings:
- Key: In the list, click the property key that you want to add. Important: Contact Citrix Support before updating the settings. You can request a special key.
- Value: The value of the selected property.
- Name: A name for the property.
- Description: A description of the property.
-
Click Save.
To edit a client property
-
In the Client Properties table, select the client property you want to edit.
When you select the checkbox next to a client property, the options menu appears above the client property list. When you click anywhere else in the list, the options menu appears on the right side of the listing.
-
Click Edit. The Edit Client Property page appears.

-
Change the following information as appropriate:
- Key: You cannot change this field.
- Value: The property value.
- Name: The property name.
- Description: The property description.
-
Click Save to save your changes or Cancel to leave the property unchanged.
To delete a client property
-
In the Client Properties table, select the client property you want to delete.
You can select more than one property to delete by selecting the checkbox next to each property.
-
Click Delete. A confirmation dialog box appears. Click Delete again.
Client property reference
The XenMobile predefined client properties and their default settings are as follows:
-
CONTAINER_SELF_DESTRUCT_PERIOD
- Display name: MDX Container Self-Destruct Period
-
Self-destruct prevents access to Secure Hub and managed apps, after a specified number of days of inactivity. After the time limit, apps are no longer usable. Wiping the data includes clearing the app data for each installed app, including the app cache and user data.
The inactivity time is when the server does not receive an authentication request to validate the user over a specific length of time. For example, if this property is 30 days and the user doesn’t use the app for more than 30 days, the policy takes effect.
This global security policy applies to iOS and Android platforms and is an enhancement of the existing app lock and wipe policies.
- To configure this global policy, go to Settings > Client Properties and add the custom key CONTAINER_SELF_DESTRUCT_PERIOD.
- Value: Number of days
-
DEVICE_LOGS_TO_IT_HELP_DESK
- Display name: Send device logs to IT help desk
- This property enables or disables the ability to send logs to the IT help desk.
- Possible values: true or false
- Default value: false
-
DISABLE_LOGGING
- Display name: Disable Logging
-
Use this property to prevent users from collecting and uploading logs from their devices. This property disables logging for Secure Hub and for all installed MDX apps. Users can’t send logs for any app from the Support page. Even though the mail composition dialog box appears, logs aren’t attached. A message indicates that logging is disabled. This setting also prevents you from updating log settings in the XenMobile console for Secure Hub and MDX apps.
When this property is set to true, Secure Hub sets Block application logs to true. As a result, MDX apps stop logging when the new policy is applied.
- Possible values: true or false
- Default value: false (logging is not disabled)
-
ENABLE_CRASH_REPORTING
- Display name: Enable Crash Reporting
- If true, Citrix collects crash reports and diagnostics to help troubleshoot issues with Secure Hub for iOS and Android. If false, no data is collected.
- Possible values: true or false
- Default value: true
-
ENABLE_CREDENTIAL_STORE
- Display name: Enable Credential Store
- Enabling the credential store means that Android or iOS users enter their password one time when accessing mobile productivity apps. You can use the credential store whether or not you enable Citrix PIN. If you don’t enable Citrix PIN, users enter their Active Directory password. XenMobile supports the use of Active Directory passwords with the credential store only for Secure Hub and public store apps. If you use Active Directory passwords with the credential store, XenMobile doesn’t support PKI authentication.
- Automatic enrollment in Secure Mail requires that you set this property to true.
- To configure this custom client policy, go to Settings > Client Properties, add the custom key ENABLE_CREDENTIAL_STORE, and set the Value to true.
-
ENABLE_FIPS_MODE
- Display name: Enable FIPS Mode
- This property enables or disables FIPS mode on mobile devices. After you change the value, Secure Hub passes the new value to the device when Secure Hub does the next online authentication.
- Possible values: true or false
- Default value: false
-
ENABLE_PASSCODE_AUTH
- Display name: Enable Citrix PIN Authentication
-
This property allows you to turn on Citrix PIN functionality. With the Citrix PIN or passcode, users are prompted to define a PIN to use instead of their Active Directory password. This setting is automatically enabled when ENABLE_PASSWORD_CACHING is enabled or when XenMobile is using certificate authentication.
For offline authentication, the Citrix PIN is validated locally and users are allowed to access the app or content they requested. For online authentication, the Citrix PIN or passcode unlocks the Active Directory password or certificate, which is then sent to do authentication with XenMobile.
If ENABLE_PASSCODE_AUTH is true and ENABLE_PASSWORD_CACHING is false, online authentication always prompts for the password because Secure Hub doesn’t save it.
- Possible values: true or false
- Default value: false
-
ENABLE_PASSWORD_CACHING
- Display name: Enable User Password Caching
- This property enables Active Directory passwords to cache locally on the mobile device. When you set this property to true, you must also set the ENABLE_PASSCODE_AUTH property to true. With user password caching enabled, XenMobile prompts users to set a Citrix PIN or passcode.
- Possible values: true or false
- Default value: false
-
ENABLE_TOUCH_ID_AUTH
- Display name: Enable Touch ID Authentication
-
For devices that support Touch ID authentication, this property enables or disables Touch ID authentication on the device. Requirements:
User devices must have Citrix PIN or LDAP enabled. If LDAP authentication is off (for example, because only certificate-based authentication is used), users must set a Citrix PIN. In this case, XenMobile requires the Citrix PIN even if the client property ENABLE_PASSCODE_AUTH is false.
Set ENABLE_PASSCODE_AUTH to false so that when users launch an app, they must respond to a prompt to use Touch ID.
- Possible values: true or false
- Default value: false
-
ENABLE_WORXHOME_CEIP
- Display name: Enable Worx Home CEIP
- This property turns on the Customer Experience Improvement Program. That feature sends anonymous configuration and usage data to Citrix periodically. The data helps Citrix improve the quality, reliability, and performance of XenMobile.
- Value: true or false
- Default value: false
-
ENCRYPT_SECRETS_USING_PASSCODE
- Display name: Encrypt secrets using Passcode
-
This property stores sensitive data on the device in a secret vault instead of in a platform-based native store, such as the iOS keychain. This property enables strong encryption of key artifacts and adds user entropy. User entropy is a user-generated random PIN code that only the user knows.
Citrix recommends that you enable this property to help provide higher security on user devices. As a result, users experience more authentication prompts for the Citrix PIN.
- Possible values: true or false
- Default value: false
-
INACTIVITY_TIMER
- Display name: Inactivity Timer
-
This property defines how long users can leave their device inactive and then access an app without a prompt for a Citrix PIN or passcode. To enable this setting for an MDX app, set the App Passcode setting to On. If the App Passcode setting is set to Off, users are redirected to Secure Hub to do a full authentication. When you change this setting, the value takes effect the next time that users are prompted to authenticate.
On iOS, the Inactivity Timer also governs access to Secure Hub for MDX and non-MDX apps.
- Possible values: Any positive integer
- Default value: 15 (minutes)
-
ON_FAILURE_USE_EMAIL
- Display name: On failure Use Email to Send device logs to the IT help desk
- This property enables or disables the ability to use email to send device logs to IT.
- Possible values: true or false
- Default value: true
-
PASSCODE_EXPIRY
- Display name: PIN Change Requirement
- This property defines how long the Citrix PIN or passcode is valid, after which the user is forced to change their Citrix PIN or passcode. When you change this setting, the new value is set only when the current Citrix PIN or passcode expires.
- Possible values: 1 through 99 recommended. To eliminate PIN resets, set the value to a high number (for example, 100,000,000,000). If you originally set the expiry period to between 1 and 99 days and then change to the large number during that period: PINs still expire at the end of the initial period, but never again afterward.
- Default value: 90 (days)
-
PASSCODE_HISTORY
- Display name: PIN History
- This property defines the number of previously used Citrix PINs or passcodes that users cannot reuse when changing their Citrix PIN or passcode. When you change this setting, the new value is set the next time that users reset their Citrix PIN or passcode.
- Possible values: 1 through 99
- Default value: 5
-
PASSCODE_MAX_ATTEMPTS
- Display name: PIN Attempts
- This property defines how many wrong Citrix PIN or passcode attempts users can make before being prompted for full authentication. After users successfully do a full authentication, they are prompted to create a Citrix PIN or passcode.
- Possible values: Any positive integer
- Default value: 15
-
PASSCODE_MIN_LENGTH
- Display name: PIN Length Requirement
- This property defines the minimum length of Citrix PINs.
- Possible values: 4 through 10
- Default value: 6
-
PASSCODE_STRENGTH
- Display name: PIN Strength Requirement
- This property defines the strength of a Citrix PIN or passcode. When you change this setting, users are prompted to create a Citrix PIN or passcode the next time they are prompted to authenticate.
- Possible values: Low, Medium, High, or Strong
- Default value: Medium
- The password rules for each strength setting based on the PASSCODE_TYPE setting are as follows:
Rules for numeric passcodes:
| Passcode strength | Rules for numeric passcode type | Allowed | Not allowed |
|---|---|---|---|
| Low | All numbers, any sequence allowed | 444444, 123456, 654321 | |
| Medium (default setting) | All numbers cannot be the same or consecutive. | 444333, 124567, 136790, 555556, 788888 | 444444, 123456, 654321 |
| High | Adjacent numbers cannot be the same. | 123512, 134134, 132312, 131313, 987456 | 080080, 112233, 135579, 987745, 919199 |
| Strong | Do not use the same number more than twice. Do not use three or more consecutive numbers in a row. Do not use three or more consecutive numbers in the reverse order. | 102983, 085085, 824673, 132312 | 132132, 131313, 902030 |
Rules for alphanumeric passcodes:
| Passcode strength | Rules for alphanumeric passcode type | Allowed | Not allowed |
|---|---|---|---|
| Low | Must contain at least one number and one letter | aa11b1, Abcd1#, Ab123~, aaaa11, aa11aa | AAAaaa, aaaaaa, abcdef |
| Medium (default setting) | In addition to the rules for Low passcode strength, letters and all numbers cannot be the same. Letters cannot be consecutive and numbers cannot be consecutive. | aa11b1, aaa11b, aaa1b2, abc145, xyz135, sdf123, ab12c3, a1b2c3, Abcd1#, Ab123~ | aaaa11, aa11aa, or aaa111; abcd12, bcd123, 123abc, xy1234, xyz345, or cba123 |
| High | Include at least one capital letter and one small letter. | Abcd12, jkrtA2, 23Bc#, AbCd | abcd12, DFGH2 |
| Strong | Include at least one number, one special symbol, one capital letter, and one small letter. | Abcd1#, Ab123~, xY12#3, Car12#, AAbc1# | abcd12, Abcd12, dfgh12, jkrtA2 |
-
PASSCODE_TYPE
- Display name: PIN Type
-
This property defines whether users can define a numerical Citrix PIN or an alphanumeric passcode. When you select Numeric, users can use numbers only (Citrix PIN). When you select Alphanumeric, users can use a combination of letters and numbers (passcode).
If you change this setting, users must set a new Citrix PIN or passcode the next time that they are prompted to authenticate.
- Possible values: Numeric or Alphanumeric
- Default value: Numeric
-
REFRESHINTERVAL
- Display name: REFRESHINTERVAL
- By default, XenMobile pings the Auto Discovery Server (ADS) for pinned certificates every 3 days. To change the refresh interval, go to Settings > Client Properties, add the custom key REFRESHINTERVAL, and set the Value to the number of hours.
- Default value: 72 hours (3 days)
-
SEND_LDAP_ATTRIBUTES
- For MAM-only deployments of Android, iOS, or macOS devices: You can configure XenMobile so that users who enroll in Secure Hub with email credentials are automatically enrolled in Secure Mail. As a result, users don’t provide extra information or take extra steps to enroll in Secure Mail.
- To configure this global client policy, go to Settings > Client Properties, add the custom key SEND_LDAP_ATTRIBUTES, and set the Value as follows.
- Value:
userPrincipalName=${user.userprincipalname},sAMAccountNAme=${user.samaccountname}, displayName=${user.displayName},mail=${user.mail} - The attribute values are specified as macros, similar to MDM policies.
-
Here is a sample account service response for this property:
<property value="userPrincipalName=user@site.com,sAMAccountName=eng1,displayName=user\,test1,email=user@site.com\,user@site.com" name="SEND_LDAP_ATTRIBUTES"/> - For this property, XenMobile treats comma characters as string terminators. So, if an attribute value includes a comma, precede it with a backslash. The backslash prevents the client from interpreting the embedded comma as the end of the attribute value. Represent backslash characters with
"\\".
-
HIDE_THREE_FINGER_TAP_MENU
- When this property is not set or is set to false, users can access the hidden features menu by doing a three-finger tap on their devices. The hidden features menu allowed users to reset application data. Setting this property to true disables users access to the hidden features menu.
- To configure this global client policy, go to Settings > Client Properties, add the custom key HIDE_THREE_FINGER_TAP_MENU, and set the Value.
-
TUNNEL_EXCLUDE_DOMAINS
- Display name: Tunnel Exclude Domains
- By default, MDX excludes from micro VPN tunneling some service endpoints that XenMobile SDKs and apps use for various features. For example, those endpoints include services that don’t require routing through enterprise networks, such as Google Analytics, Citrix Cloud™ services, and Active Directory services. Use this client property to override the default list of domains excluded.
- To configure this global client policy, go to Settings > Client Properties, add the custom key TUNNEL_EXCLUDE_DOMAINS, and set the Value.
-
Value: To replace the default list with the domains that you want to exclude from tunneling, type a comma-separated list of domain suffixes. To include all domains in tunneling, type none. The default is:
app.launchdarkly.com,cis.citrix.com,cis-staging.citrix.com,cis-test.citrix.com,clientstream,launchdarkly.com,crashlytics.com,events.launchdarkly.com,fabric.io,firehose.launchdarkly.com, hockeyapp.net,mobile.launchdarkly.com,pushreg.xm.citrix.com,rttf.citrix.com,rttf-staging.citrix.com,rttf-test.citrix.com,ssl.google-analytics.com,stream.launchdarkly.com
The custom client properties for XenMobile Server are as follows:
-
ENABLE_MAM_NFACTOR_SSO
- This property allows you to enable or disable the MAM nFactor SSO during the MAM enrollment or login for Secure Hub while using the advanced authentication policy in the NetScaler® Gateway. If the value is set to true, then the MAM nFactor SSO is enabled during the MAM enrollment or login for Secure Hub.
-
To configure this property, go to Settings > Client Properties and click Add. Select Custom Key in the Key drop-down menu and update the following information as appropriate:
- Key - ENABLE_MAM_NFACTOR_SSO
- Value - true or false
- Name - ENABLE_MAM_NFACTOR_SSO
- Description - Add the relevant description
-
MICROSOFT_CERTIFICATE_STRONG_MAPPING
-
This property controls whether existing client certificates are renewed to support certificate strong mapping feature by appending Security Identifier (SID) to Subject Alternative Name (SAN) when using Secure Mail with a Microsoft Public Key Infrastructure (PKI). If the value is set to true, then the existing client certificates will be renewed to include the SAN SID.
-
This property only applies to Microsoft PKI.
-
To configure this property, go to Settings > Client Properties and click Add. Select Custom Key in the Key drop-down menu and update the following information as appropriate:
- Key - MICROSOFT_CERTIFICATE_STRONG_MAPPING
- Value - true or false
- Name - MICROSOFT_CERTIFICATE_STRONG_MAPPING
- Description - Renew client certificates to include SAN SID
-