Bulk enrollment of Apple devices
You can enroll large numbers of iOS, iPadOS, and macOS devices in XenMobile® in two ways.
-
Use the Apple Deployment Program to enroll the iOS, iPadOS, and macOS devices that you buy directly from Apple, a participating Apple Authorized Reseller, or a carrier. That support includes Shared iPads. XenMobile supports the Apple Deployment Program for Apple Business Manager (ABM) and Apple School Manager (ASM) for Education. This article describes how to integrate multiple devices with your ABM account. For information on enrolling in ABM and connecting your ABM account with XenMobile, see Deploy devices through Apple Deployment Program. For information about Apple School Manager accounts, see Integrate with Apple Education features.
For enrollment of macOS devices, XenMobile requires that the devices run macOS 10.10 or later.
-
You can also use Apple Configurator 2 to enroll iOS devices whether you purchased them directly from Apple or not.
With ABM:
- You do not have to touch or prepare the devices. Instead, you submit device serial numbers or purchase order numbers through ABM to configure and enroll the devices.
- After XenMobile enrolls the devices, you can give them to users who can start using them right away. When you set up devices with ABM, you can eliminate some of the Setup Assistant steps that users might have to complete when they first start their devices.
- For more information on setting up ABM, see the documentation available from Apple Business Manager.
With Apple Configurator 2:
- You attach iOS devices to an Apple computer running macOS 10.7.2 or later and the Apple Configurator 2 app. You prepare the iOS devices and configure policies through Apple Configurator 2.
- After you provision the devices with the required policies, the first time the devices connect to XenMobile, the devices receive policies from XenMobile. You can then start managing the devices.
- For more information about using Apple Configurator 2, see the Apple Configurator Help.
Prerequisites
Open required ports for connectivity between XenMobile and Apple. For more information, see Port requirements.
Integrate your Apple Business Manager account with XenMobile
If you do not have an ABM account set up with XenMobile, complete the following steps in Deploy devices through Apple Deployment Program.
- Enroll in Apple Business Manager.
- Connect your Apple Business Manager account with XenMobile.
- Order Deployment Program enabled devices.
- Manage Deployment Program enabled devices.
Set a default server for bulk enrollment
To assign large orders of iOS, iPadOS, and macOS devices to an MDM server, you can set XenMobile as the default server.
- Sign in to Apple Business Manager using an administrator or device enrollment manager account.
- In the sidebar, click Settings > Device Management Settings.
- Choose an existing MDM server. Under Default Device Assignment, click Change. Select the default XenMobile server for each device type. Click Done.
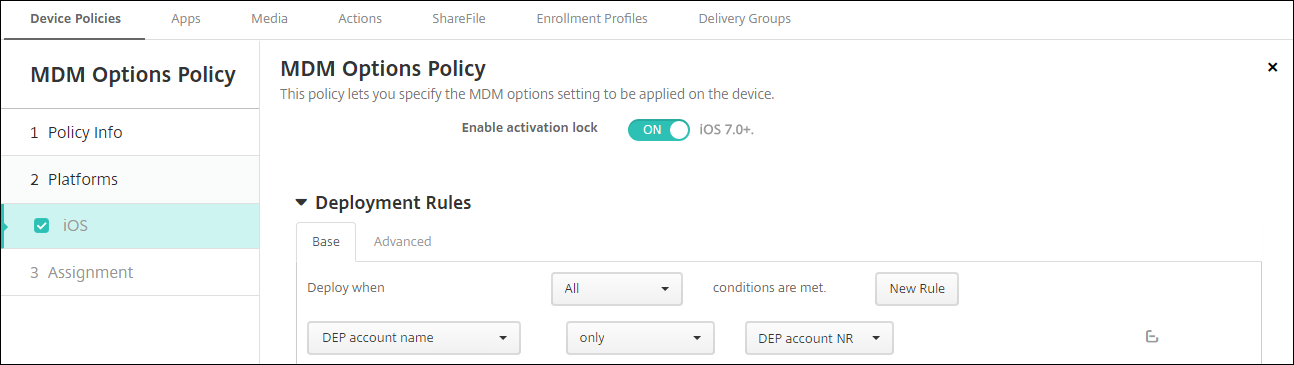
Configure deployment rules of device policies and apps for ABM accounts
You can associate ABM accounts with different device policies and apps by using the Deployment Rules section under Configure > Device Policies and Configure > Apps. You can specify that a policy or app either:
- Deploys only for a particular ABM account.
- Deploys for all ABM accounts except the one selected.
The list of ABM accounts includes only those accounts with a status of enabled or disabled. If the ABM account is disabled, the ABM device doesn’t belong to this account. So, XenMobile doesn’t deploy the app or policy to the device.
In the following example, a device policy deploys only for devices with the ABM account name “ABM Account NR”.
User experience when enrolling an Apple Deployment Program enabled device
When users enroll an Apple Deployment Program enabled device, their experience is as follows.
-
Users start their Apple Deployment Program enabled device.
-
XenMobile delivers the Apple Deployment Program configuration that you configured in the XenMobile console to the Apple Deployment Program enabled device.
-
Users configure the initial settings on their device.
-
The device automatically starts the XenMobile device enrollment process.
-
Users continue to configure the other initial settings on their device.
-
In the home screen, users might be prompted to sign in to the Apple App Store so that they can download Citrix Secure Hub.
Note:
This step is optional if you configure XenMobile to deploy the Secure Hub app using the device-based volume purchase app assignment. In this case, you don’t need to create an Apple App Store account or use an existing account.
-
Users open Secure Hub and type their credentials. If required by the policy, users might be prompted to create and verify a Citrix PIN.
XenMobile deploys any remaining required apps to the device.
To configure Apple Configurator 2 settings
You can configure and deploy iPhone and iPad devices in bulk using Apple Configurator 2 instead of Apple Business Manager.
Step 1: Configure settings in XenMobile
-
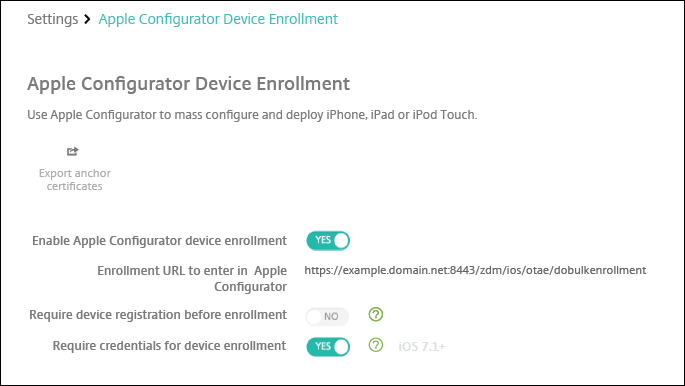
In the XenMobile console, go to Settings > Apple Configurator Device Enrollment.
-
Set Enable Apple Configurator device enrollment to Yes.
-
The Enrollment URL to enter in Apple Configurator is a read-only field. This setting provides the URL for the XenMobile Server that communicates with Apple. Copy and paste this URL when you configure settings in Apple Configurator 2. The enrollment URL is the XenMobile Server fully qualified domain name (FQDN), such as
mdm.server.url.com, or the IP address. -
To prevent unknown devices from enrolling, set Require device registration before enrollment to Yes. Note: If this setting is Yes, you must add the configured devices to Manage > Devices in XenMobile manually or through a CSV file before enrollment.
-
To require users of iOS devices to enter their credentials when enrolling, set Require credentials for device enrollment to Yes. The default is not to require credentials for enrollment.
-
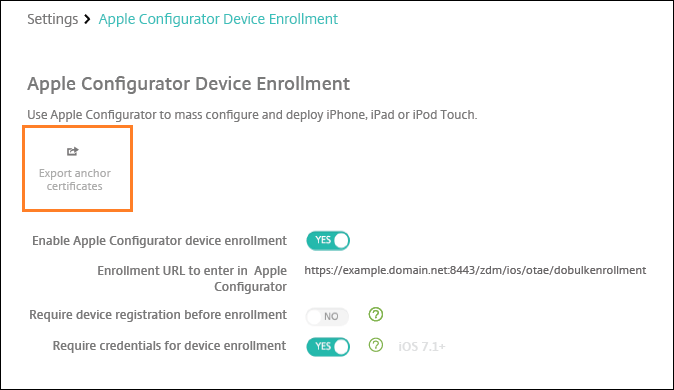
Note: If the XenMobile Server is using a trusted SSL certificate, skip this step. Click Export anchor certs and save the certchain.pem file to the macOS keychain (login or System).
Step 2: Configure settings in Apple Configurator 2
-
Install Apple Configurator 2 from the App Store.
-
Use a Dock Connector-to-USB cable to connect devices to the Mac running Apple Configurator 2. You can configure up to 30 connected devices simultaneously. If you do not have a Dock Connector, use one or more powered USB 2.0 high-speed hubs to connect the devices.
-
Start Apple Configurator 2. The configurator shows any devices that you can prepare for supervision.
-
To prepare a device for supervision:
-
Select Supervise devices if you intend to maintain control of the device by reapplying a configuration regularly. Click Next.
Important:
Placing a device into Supervised mode installs the selected version of iOS on the device, completely wiping the device of any previously stored user data or apps.
-
In iOS, click Latest for the latest version of iOS that you want to install.
-
-
In Enroll in MDM Server, choose an MDM server. To add a new server, click Next
-
In Define an MDM server, provide a name for the server and paste the MDM server URL from the XenMobile console.
-
In Assign to organization, choose an organization to supervise the device.
For more information on preparing devices with Apple Configurator 2, see the Apple Configurator help page, Prepare devices.
-
As each device is prepared, turn it on to start the iOS Setup Assistant, which prepares the device for first-time use.
To assign devices from Apple Configurator 2 to Apple Business Manager
You can associate iPhone and iPad devices from Apple Configurator 2 with your Apple Business Manager account. When you add devices, they appear in the Devices section. These devices no longer include enrollment settings assigned through Apple Configurator 2. For more information, see Assign devices added from Apple Configurator 2 to Apple Business Manager.
Renew or update certificates when using the Apple Deployment Program
When the XenMobile Secure Sockets Layer (SSL) certificate is renewed, you upload a new certificate in the XenMobile console in Settings > Certificates. In the Import dialog box, in Use as, click SSL Listener so that the certificate is used for SSL. After you restart the server, XenMobile uses the new SSL certificate. For more information about certificates in XenMobile, see Uploading Certificates in XenMobile.
It is not necessary to reestablish the trust relationship between Apple Deployment Program and XenMobile when you renew or update the SSL certificate. You can, however, reconfigure your Apple Deployment Program settings at any time by following the preceding steps in this article.
For more information about the Apple Deployment Program, see the Apple documentation.
Renew your connection between the Apple Deployment Program and XenMobile
XenMobile displays a License Expiration Warning when your Automated Device Enrollment server token expires.

Replace the token from Apple School Manager/Apple Business Manager.
Step 1: Download a public key from your XenMobile Server
- In the XenMobile console, go to Settings > Apple Deployment Program to download a new public key.
Step 2: Create and download a server token file from your Apple account
-
Sign in to the Apple Business Manager to download the token.
-
Open Settings and select the server from which you need a token. Click Edit.
-
Under MDM Server Settings, upload the new public key you downloaded from XenMobile and save the changes.
-
Click Download Token to download the new token.
Step 3: Upload a server token file in XenMobile
-
In Citrix XenMobile, go to Settings > Apple Deployment Program.
-
Select the Deployment Program account, click Edit, and upload your server token file.
-
Click Next and save the changes.
In this article
- Prerequisites
- Integrate your Apple Business Manager account with XenMobile
- Set a default server for bulk enrollment
- Configure deployment rules of device policies and apps for ABM accounts
- User experience when enrolling an Apple Deployment Program enabled device
- To configure Apple Configurator 2 settings
- To assign devices from Apple Configurator 2 to Apple Business Manager
- Renew or update certificates when using the Apple Deployment Program
- Renew your connection between the Apple Deployment Program and XenMobile