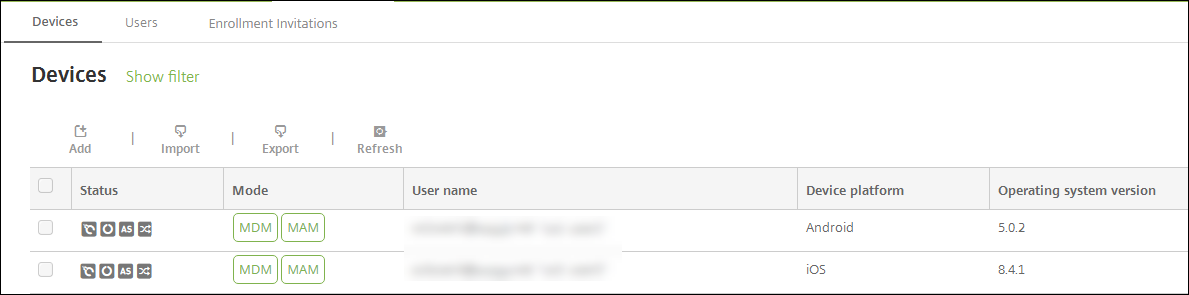
Security actions
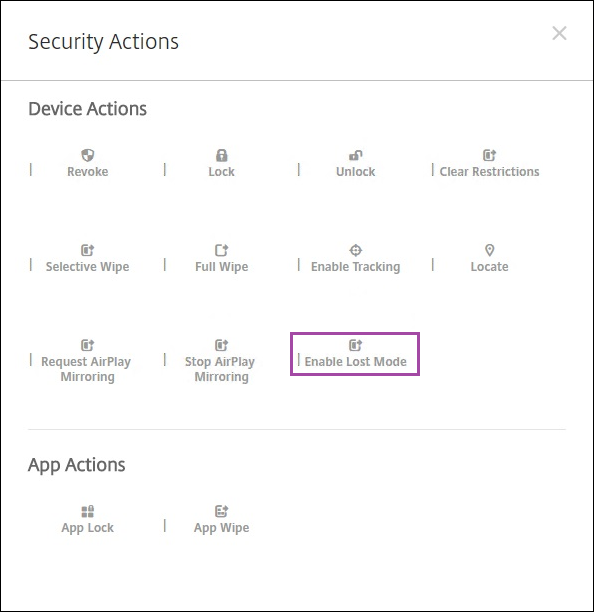
You do device and app security actions from the Manage > Devices page. Device actions include revoke, lock, unlock, and wipe. App security actions include app lock and app wipe.
-
Activation Lock Bypass: Removes the Activation Lock from supervised iOS devices before device activation. This command doesn’t require the personal Apple ID or password for a user.
-
App lock: Denies access to all apps on a device. On Android, after an app lock, users can’t sign in to XenMobile. On iOS, users can sign in, but they can’t access any apps.
-
App wipe: Removes the user account from Secure Hub and unenrolls the device. Users can’t re-enroll until you do the App unwipe action.
-
ASM Deployment Program Activation Lock: Creates an Activation Lock bypass code for iOS devices enrolled in Apple School Manager DEP.
-
Clear restrictions: On supervised iOS devices, this command allows XenMobile to clear the restrictions password and restrictions settings configured by the user.
-
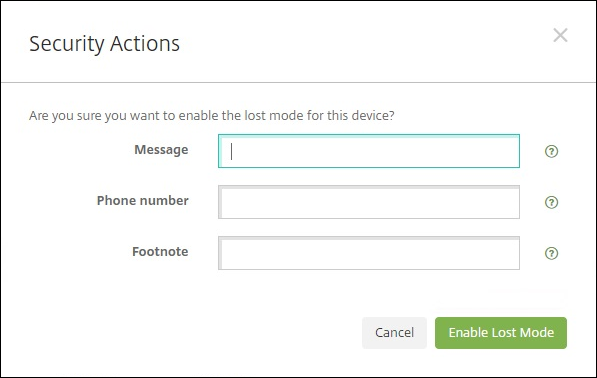
Enable/disable Lost Mode: Puts a supervised iOS device in Lost Mode and sends the device a message, phone number, and footnote to display. The second time that you send this command takes the device out of Lost Mode.
-
Enable tracking: On Android or iOS devices, this command allows XenMobile to poll the location of specific devices at a frequency you define. To view device coordinates and location on a map, go to Manage > Devices, select a device, and then click Edit. The device info is on the General tab under Security. Use Enable tracking to track the device continuously. Secure Hub reports the location periodically when the device is running.
-
Full wipe: Immediately erases all data and apps from a device, including from any memory cards.
-
For Android devices, this request can also include the option to wipe memory cards.
-
For Android Enterprise fully managed devices with a work profile (COPE devices), you can do a full wipe after a selective wipe removes the work profile.
- For iOS and macOS devices, the wipe occurs immediately, even if the device is locked.
- For iOS 11 devices (minimum version): When you confirm the full wipe, you can choose to preserve the cellular data plan on the device.
- For iOS 11.3 devices (minimum version): When you confirm the full wipe, you prevent iOS devices from doing proximity setup. When setting up a new iOS device, users can normally use an already configured iOS device to set up their own. You can block proximity setup on devices that are XenMobile Server managed and have been wiped.
- For iOS 17 devices (minimum version): When you confirm the full wipe, the device automatically wipes all user data, connects to the specified Wi-Fi network, and re-enrolls itself back into the MDM server using the provided enrollment profile.
-
If the device user turns off the device before the memory card content is deleted, the user might still have access to device data.
- You can cancel the wipe request until the request is sent to the device.
-
-
Locate: Locates a device and reports the device location, including a map, on the Manage > Devices page, under Device details > General. Locate is a one-time action. Use Locate to display the current device location at the time you do the action. To continuously track the device over a period, use Enable tracking.
- When applying this action to Android (except for Android Enterprise) devices or to Android Enterprise (corporate-owned or BYOD) devices, be aware of the following behavior:
- Locate requires the user to grant location permission during enrollment. The user can choose not to grant location permission. If the user doesn’t grant the permission during enrollment, XenMobile again requests location permission when sending the Locate command.
- When applying this feature to iOS or Android Enterprise devices, be aware of the following limitations:
- For Android Enterprise devices, this request fails unless the Location device policy has set the location mode for the device to High Accuracy or Battery Saving.
- For iOS devices, this command succeeds only if the devices are in MDM Lost Mode.
- When applying this action to Android (except for Android Enterprise) devices or to Android Enterprise (corporate-owned or BYOD) devices, be aware of the following behavior:
-
Lock: Remotely locks a device. This action is useful when you lose a device and don’t know if the device is stolen. XenMobile then generates a PIN code and sets it in the device. To access the device, the user types the PIN code. Use Cancel Lock to remove the lock from the XenMobile console.
-
Lock and Reset Password: Remotely locks a device and resets the passcode.
- Not supported for devices enrolled in Android Enterprise in work profile mode that are running Android versions before Android 8.0.
- On devices enrolled in Android Enterprise in work profile mode that are running Android 8.0 or greater:
- The passcode sent locks the work profile. The device is not locked.
- If no passcode is sent, or the passcode sent doesn’t meet passcode requirements, and no passcode is already set on the work profile: The device is locked.
- If no passcode is sent, or the passcode sent doesn’t meet passcode requirements, but a passcode is already set on the work profile: The work profile is locked but the device is not locked.
-
Notify (Ring): Plays a sound on Android devices.
-
Reboot: Restarts Windows 10 and Windows 11 devices. For Windows Tablet and PCs, the message “System will reboot soon” appears and then the reboot occurs in five minutes.
-
Request/Stop AirPlay Mirroring: Starts and stops AirPlay mirroring on supervised iOS devices.
-
Restart/Shut Down: Immediately restarts or shuts down supervised iOS devices.
-
Revoke: Prohibits a device from connecting to .
-
Revoke/Authorize (iOS, macOS): Performs the same actions as a Selective Wipe. After revocation, you can reauthorize the device to reenroll it.
-
Ring: If the device is in Lost Mode, Ring plays a sound on a supervised iOS device. The sound plays until you removed the device from Lost Mode or the user disables the sound.
-
Selective wipe: Erases all corporate data and apps from a device, leaving personal data and apps in place. After a selective wipe, a user can reenroll the device.
- Selectively wiping an Android device does not disconnect the device from Device Manager and the corporate network. To prevent the device from accessing Device Manager, you must also revoke the device certificates.
- Selectively wiping an Android device also revokes the device. You can reenroll the device only after reauthorizing it or deleting it from the console.
- For Android Enterprise fully managed devices with a work profile (COPE devices), you can perform a full wipe after a selective wipe removes the work profile. Or, you can re-enroll the device with the same user name. Re-enrolling the device recreates the work profile.
- If the Samsung Knox API is enabled, selectively wiping the device also removes the Samsung Knox container.
- For iOS and macOS devices, this command removes any profile installed through MDM.
- A selective wipe on a Windows device also removes the contents of the profile folder for any currently signed on user. A selective wipe doesn’t remove any web clips that you deliver to users through a configuration. To remove web clips, users manually unenroll their devices. You can’t reenroll a selectively wiped device.
- Unlock: Clears the passcode sent to the device when it was locked. This command doesn’t unlock the device.
In Manage > Devices, the Device details page also lists device Security properties. Those properties include Strong ID, Lock Device, Activation Lock Bypass, and other information for the platform type. The Full Wipe of Device field includes the user PIN code. The user must enter that code after the device is wiped. If the user forgets the code, you can look it up here.
Security actions for Android devices
| Security action | Android (except for Android Enterprise devices) | Android Enterprise (BYOD) | Android Enterprise (corporate-owned) |
|---|---|---|---|
| App Lock | Yes | No | No |
| App Wipe | Yes | No | No |
| Full Wipe | Yes | No | Yes |
| Locate | Yes: For devices running Android 6.0+, Locate requires the user to grant Location permission during enrollment. The user can opt not to grant Location permission. If the user doesn’t grant the permission during enrollment, XenMobile again requests location permission when sending the Locate command. | Yes: For devices running Android 6.0+, Locate requires the user to grant Location permission during enrollment. The user can opt not to grant Location permission. If the user doesn’t grant the permission during enrollment, XenMobile again requests location permission when sending the Locate command. | Yes: For devices running Android 6.0+, Locate requires the user to grant Location permission during enrollment. The user can opt not to grant Location permission. If the user doesn’t grant the permission during enrollment, XenMobile again requests location permission when sending the Locate command. |
| Lock | Yes | Yes | Yes |
| Lock and Reset Password | Yes | No | Yes |
| Notify (Ring) | Yes | Yes | Yes |
| Revoke | Yes | Yes | Yes |
| Selective Wipe | Yes | Yes | No |
Security actions for iOS and macOS devices
| Security action | iOS | macOS |
|---|---|---|
| Activation Lock Bypass | Yes | No |
| App Lock | Yes | No |
| App Wipe | Yes | No |
| ASM Deployment Program Activation Lock | Yes | No |
| Clear Restrictions | Yes | No |
| Enable/Disable Lost Mode | Yes | No |
| Enable/Disable Tracking | Yes | No |
| Full Wipe | Yes | Yes |
| Locate | Yes | No |
| Lock | Yes | Yes |
| Ring | Yes | Yes |
| Request/Stop AirPlay Mirroring | Yes | No |
| Restart/Shut Down | Yes | No |
| Revoke/Authorize | Yes | Yes |
| Selective Wipe | Yes | Yes |
| Unlock | Yes | No |
Security actions for Windows devices
| Security action | Windows Tablet 10 |
|---|---|
| Locate | Yes |
| Lock | Yes |
| Lock and Reset Password | No |
| Reboot | Yes |
| Revoke | Yes |
| Ring | No |
| Selective Wipe | Yes |
| Wipe | Yes |
The rest of this article provides the steps for doing various security actions. You can also automate some actions. For more information, see Automated actions.
Lock iOS devices
You can lock a lost iOS device with an accompanying display of a message and phone number that displays on the device lock screen. This feature is supported on devices running iOS 7 and above.
To display a message and phone number on a locked device, set the Passcode policy to true in the XenMobile console. Alternatively, users can enable the passcode on the device manually.
-
Click Manage > Devices. The Devices page appears.
-
Select the iOS device that you want to lock.
When you select the checkbox next to a device, the options menu displays above the device list. When you click anywhere else in the list, the options menu appears on the right side of the listing.
-
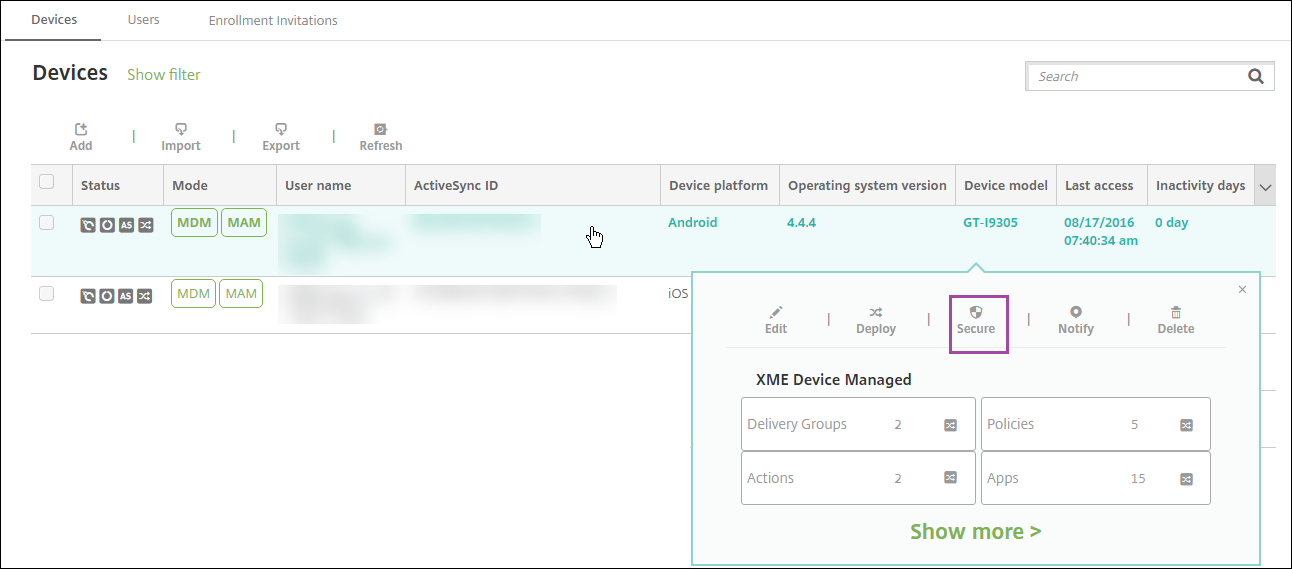
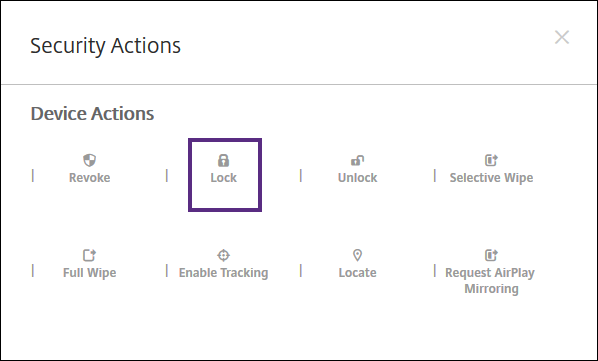
In the options menu, click Secure. The Security Actions dialog box appears.
-
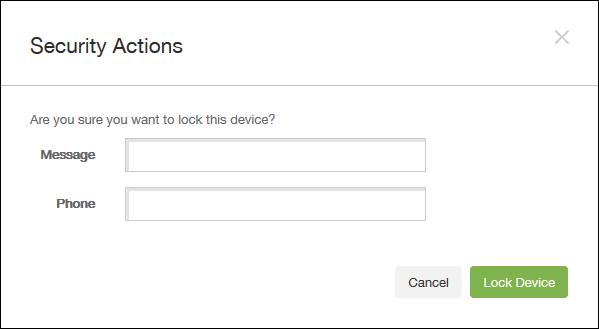
Click Lock. The Security Actions confirmation dialog box displays.
-
Optionally, type a message and phone number that appears on the lock screen of the device.
For iPads running iOS 7 and later: iOS appends the words “Lost iPad” to what you type in the Message field.
For iPhones running iOS 7 and later: If you leave the Message field empty and provide a phone number, Apple displays the message “Call owner” on the device lock screen.
-
Click Lock Device.
Remove a device from the XenMobile console
Important:
When you remove a device from the XenMobile console, managed apps and data remain on the device. To remove managed apps and data from the device, see “Delete a device” later in this article.
To remove a device from the XenMobile console, go to Manage > Devices, select a managed device, and then click Delete.

Selectively wipe a device
-
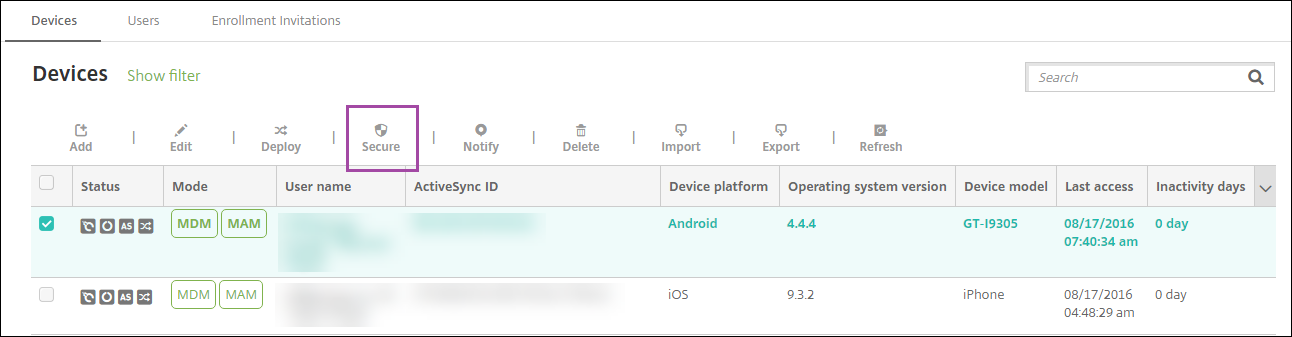
Go to Manage > Devices, select a managed device, and then click Secure.
-
In Security Actions, click Selective wipe.
-
For Android devices only, disconnect the device from the corporate network: After the device is wiped, in Security Actions, click Revoke.
To withdraw a selective wipe request before the wipe occurs, in Security Actions, click Cancel selective wipe.
Delete a device
This procedure removes managed apps and data from the device and deletes the device from the Devices list in the XenMobile console. You can use the Endpoint Management Public REST API to delete devices in bulk.
-
Go to Manage > Devices, select a managed device, and then click Secure.
-
Click Selective Wipe. When prompted, click Perform Selective Wipe.
-
To verify that the wipe command succeeded, refresh Manage > Devices. In the Mode column, the amber color for MDM and MAM indicates that the wipe command succeeded.

-
On Manage > Devices, select the device and then click Delete. When prompted, click Delete again.
Lock, unlock, wipe, or unwipe apps
-
Go to Manage > Devices, select a managed device, and then click Secure.
-
In Security Actions, click the app action.
You can also use the Security Actions box to check the device status for a user whose account is disabled or deleted from Active Directory. The presence of the App Unlock or App Unwipe actions indicate apps that are locked or wiped.
App wipe and unwipe
-
Go to Manage > Devices. Select a device.
- App wipe
- Click Secure > App Wipe. A dialog box with the following message appears: Are you sure you want to app wipe this device? Click App Wipe.
- App unwipe
- Click Secure > App Unwipe. A dialog box with the following message appears: Are you sure you want to app unwipe this device? Click Device App Unwipe.
-
Open the Secure Hub on the device and click Store.
- Launch Secure Hub.
Put iOS devices in Lost Mode
The XenMobile Lost Mode device property puts an iOS device in Lost Mode. Unlike Apple Managed Lost Mode, XenMobile Lost Mode doesn’t require a user to do either of the following actions to enable locating their device: Configure the Find My iPhone/iPad setting or enable the Location Services for Citrix Secure Hub.
In XenMobile Lost Mode, only the can unlock the device. (In contrast, if you use the XenMobile device lock feature, users can unlock the device directly by using a PIN code that you provide.
To enable or disable lost mode: Go to Manage > Devices, choose a supervised iOS device, and then click Secure. Then, click Enable Lost Mode or Disable Lost Mode.
If you click Enable Lost Mode, type information to appear on the device when it’s in lost mode.
Use any of the following methods to check Lost Mode status:
- In the Security Actions window, verify if the button is Disable Lost Mode.
- From Manage > Devices, on the General tab under Security, see the last Enable Lost Mode or Disable Lost Mode action.
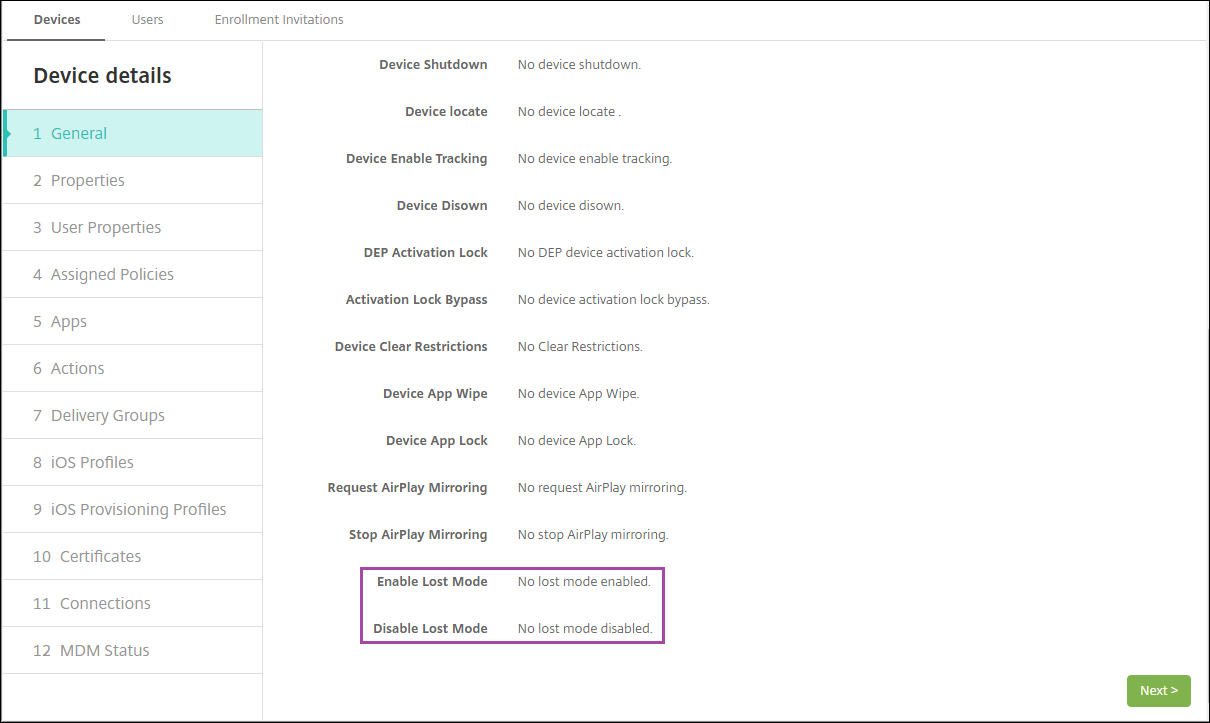
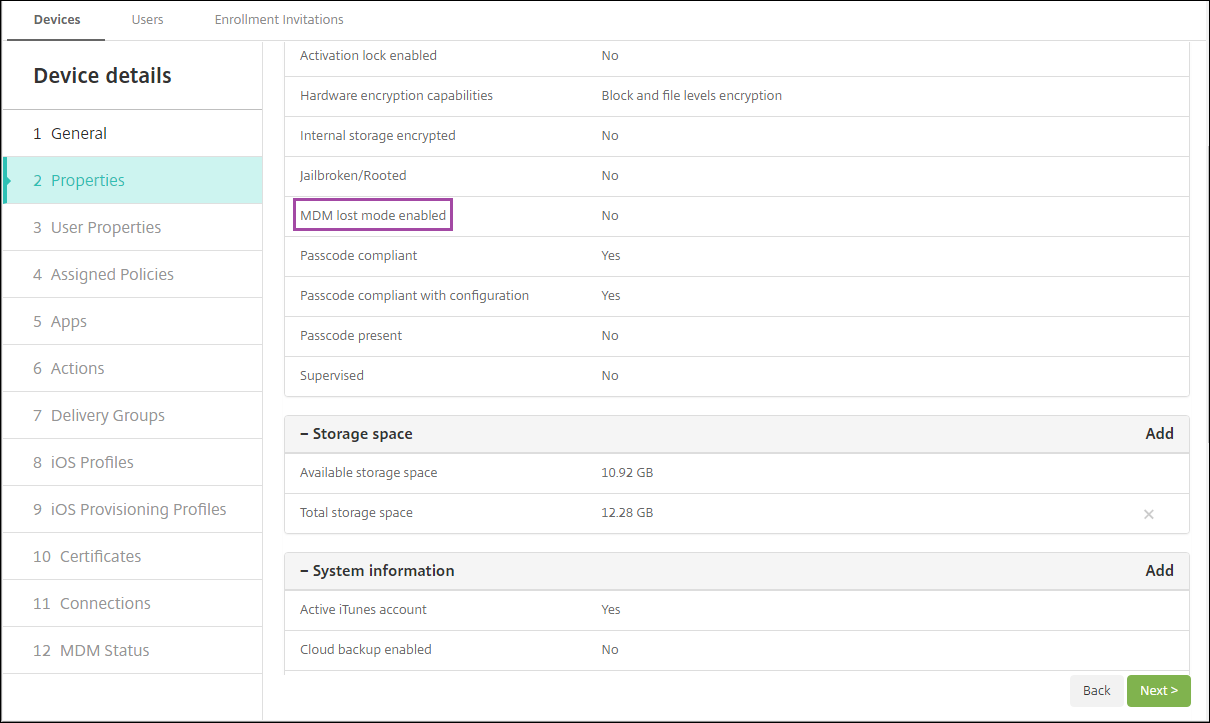
- From Manage > Devices, on the Properties tab, verify that the value of the MDM lost mode enabled setting is correct.
If you enable XenMobile Lost Mode on an iOS device, the XenMobile console also changes as follows:
- In Configure > Actions, the Actions list doesn’t include these automated actions: Revoke the device, Selectively wipe the device, and Completely wipe the device.
- In Manage > Devices, the Security Actions list no longer includes the Revoke and Selective Wipe device actions. You can still use a security action to do a Full Wipe action, as needed.
For iPads running iOS 7 and later: iOS appends the words “Lost iPad” to what you type in the Message in the Security Actions screen.
For iPhones running iOS 7 and later: If you leave the Message empty and provide a phone number, Apple shows the message “Call owner” on the device lock screen.
Bypass an iOS activation lock
Activation Lock is a feature of Find My iPhone/iPad that prevents reactivation of a lost or stolen supervised device. Activation Lock requires the user Apple ID and password before anyone can disable Find My iPhone/iPad, erase the device, or reactivate the device. For the devices that your organization owns, bypassing an Activation Lock is necessary to, for example, reset or reallocate devices.
To enable Activation Lock, you configure and deploy the XenMobile MDM Options device policy. You can then manage a device from the XenMobile console without the Apple credentials of the user. To bypass the Apple credential requirement of an Activation Lock, issue the Activation Lock Bypass security action from the XenMobile console.
For example, if the user returns a lost phone or to set up the device before or after a Full Wipe: When the phone prompts for the iTunes account credential, you can bypass that step by issuing the Activation Lock Bypass security action from the XenMobile console.
Device requirements for activation lock bypass
- iOS 7.1 (minimum version)
- Supervised through Apple Configurator or Apple DEP
- Configured with an iCloud account
- Find My iPhone/iPad enabled
- Enrolled in XenMobile
- MDM Options device policy, with activation lock enabled, is deployed to devices
To bypass an activation lock before issuing a Full Wipe of a device:
- Go to Manage > Devices, select the device, click Secure, and then click Activation Lock Bypass.
- Wipe the device. The activation lock screen doesn’t appear during device setup.
To bypass an activation lock after issuing a Full Wipe of a device:
- Reset or wipe the device. The activation lock screen appears during device setup.
- Go to Manage > Devices, select the device, click Secure, and then click Activation Lock Bypass.
- Tap the Back button on the device. The home screen appears.
Keep in mind the following:
- Advise your users not to disable Find My iPhone/iPad. Don’t do a full wipe from the device. In either of those cases, the user is prompted to enter the iCloud account password. After account validation, the user won’t see an Activate iPhone/iPad screen after erasing all content and settings.
- For a device with a generated Activation lock bypass code and with the Activation lock enabled: If you can’t bypass the Activate iPhone/iPad page after a Full Wipe, there is no need to delete the device from XenMobile. Either you or the user can contact Apple support to unblock the device directly.
- During a hardware inventory, XenMobile queries a device for an Activation lock bypass code. If a bypass code is available, the device sends it to XenMobile. Then, to remove the bypass code from the device, send the Activation Lock Bypass security action from the XenMobile console. At that point, and Apple have the bypass code required to unblock the device.
- The Activation Lock Bypass security action relies on the availability of an Apple service. If the action doesn’t work, you can unblock a device as follows. On the device, manually enter the credentials of the iCloud account. Or, leave the user name field empty and type the bypass code in the password field. To look up the bypass code, go to Manage > Devices, select the device, click Edit, and click Properties. The Activation lock bypass code is under Security information.
In this article
- Security actions for Android devices
- Security actions for iOS and macOS devices
- Security actions for Windows devices
- Lock iOS devices
- Remove a device from the XenMobile console
- Selectively wipe a device
- Delete a device
- Lock, unlock, wipe, or unwipe apps
- Put iOS devices in Lost Mode
- Bypass an iOS activation lock