Session experience
Boot to Virtual Desktop
Overview
The Boot-to-Virtual-Desktop feature simplifies access to virtual desktops. This feature allows administrators to configure local desktops so that users can directly access their virtual desktops without having to authenticate into any local applications.
The Boot-to-Virtual-Desktop feature is ideal where data protection, compliance, and simplicity are top priorities for organizations. This solution ensures users always work within the virtual desktop, keeping your data secure and reducing risk. It is ideal for kiosk mode and frontline use cases.
Key features
- Non-domain-joined machine support: While primarily intended for domain-joined environments, this feature also supports user authentication on non-domain-joined machines. However, manual authentication is required in this scenario.
- Flexibility: Direct-boot-to-Virtual-Desktop supports both shared and dedicated local desktops, catering to various use cases like kiosks and frontline users.
Prerequisites
- Citrix Workspace app prerequisites: All other system requirements are identical to that of the Citrix Workspace app. For more information, see System requirements.
- Store configuration: Before installing the feature, ensure that the store is configured.
Configure Boot-to-Virtual-Desktop using configuration file
This feature is disabled by default. To enable this feature, do the following:
-
Enable direct boot to Virtual Desktop:
-
Navigate to the
$ICAROOT/config/AuthManConfig.xmlconfiguration file. -
Add the following entries:
<key>DesktopLockEnabled</key> <value>true</value> <!--NeedCopy--> -
-
Provide StoreURL and ResourceName:
To use the boot-to-Virtual-Desktop feature, add StoreURL and ResourceName in
$ICAROOT/config/AuthManConfig.xml:<StoreURL>test.cloud.com</StoreURL> <ResourceName>EDaaS Desktop</ResourceName> <!--NeedCopy-->
Configure Boot-to-Virtual-Desktop using script
The script is designed to manage the configuration of the boot-to-Virtual-Desktop feature. To run the script, do the following:
- Open the terminal on your Linux machine.
-
Navigate to the installation directory of Citrix Workspace™ app.
Note:
$ICAROOTis the default installation directory of Citrix Workspace app. - Type
cd DesktopLock. - Type
configureDesktopLock.shto run the script.
The following command usage information appears:
usage: ./configureDesktopLock.sh <Citrix workspace installation path> <enable|disable>
To block shortcuts or create an autostart entry, you must provide a separate mechanism to disable shortcuts (if GSettings schema doesn’t exist).
To configure boot-to-Virtual-Desktop on endpoints, use the storebrowse command with the following syntax, depending on your Citrix Workspace app version: to create an autostart entry for boot-to-virtual-desktopp on endpoints, use the storebrowse command with the following syntax, depending on your Citrix Workspace app version:
For Citrix Workspace app version 2503:
./desktoplock <storeURL> <resourceName>
<!--NeedCopy-->
For Citrix Workspace app version 2505 and later:
./desktoplock --storeUrl <storeURL> --resource <resourceName>
<!--NeedCopy-->
Battery status indicator
The battery status of the device now appears in the notification area of a Citrix Desktop session.
Note:
Starting with the 2111 version, the battery status indicator appears for server VDAs also.
The battery status indicator is enabled by default.
To disable the battery status indicator:
- Navigate to the
<ICAROOT>/config/module.inifolder. - Go to the
ICA 3.0section. - Set the
MobileReceiver=Off.
App indicator icon
The app indicator starts when you launch Citrix Workspace app. It’s an icon that is present in the notification area. With the introduction of the app indicator, the Citrix Workspace app for Linux logon performance is improved.
You can observe performance improvement when you:
- First launch of Citrix Workspace app
- Close and relaunch the app
- Quit and relaunch the app
Note:
The
libappindicatorpackage is required for the app indicator to appear. Install thelibappindicatorpackage suitable for your Linux distribution from the web.
Workspace launcher
Citrix introduces the Workspace launcher (ctx-webhelper) to launch published desktops and applications.
Previously, the browser plug-in provided along with Citrix Workspace app for Linux enabled users to launch published desktops and applications was based on the NPAPI.
As a solution, Citrix is introducing the Workspace launcher (WebHelper). To enable this feature, configure StoreFront to send requests to the Workspace launcher to detect the Citrix Workspace app installation.
Starting with Version 1901, the Citrix Workspace launcher is compatible with direct connections to StoreFront and Citrix Gateway. This feature helps to launch the ICA file automatically and to detect the Citrix Workspace app installation.
Disabling new workspace web UI mode
When you launch the Citrix Workspace app for Linux using the self-service executable file from third-party thin-client vendors, the application can become unresponsive because of 100% CPU utilization.
As a workaround, to switch back to the old UI mode:
- Remove cached files by using the command:
rm -r ~/.ICAClient - Go to
$ICAROOT/config/AuthManconfig.xmlfile. - Change
CWACapableEnabledkey value to false. - Launch Citrix Workspace app for Linux. Observe that the self-service executable file loads the old UI.
Copy and paste files and folders between two virtual desktops
Previously, you can copy only text between two virtual desktops. Starting with Citrix Workspace app for Linux version 2309, you can copy and paste files and folders between two virtual desktops.
This feature is enabled by default.
Note:
Copy and paste files and folders between two virtual desktops is supported only on the x64 and ARM64 Linux distributions.
In the Linux Virtual Delivery Agent, the maximum transfer of data in one single copy-paste operation is 200 MB. For more information, see File copy and paste documentation.
To disable this feature, do the following:
- Navigate to the
/opt/Citrix/ICAClient/config/module.iniconfiguration file. - Edit the value of
VDGDTtoOff.
File type association
A Citrix Virtual Apps™ Services might also publish a file, rather than an application or desktop. This process is referred to as publishing content, and allows pnabrowse to open the published file.
There’s a limitation to the type of files that the Citrix Workspace app recognizes. Only when a published application is associated with the file type of the published file:
- The system recognizes the file type of the published content
- Users can view the file through Citrix Workspace app
For example, to view a published Adobe PDF file using Citrix Workspace app, an application such as Adobe PDF Viewer must be published. Unless a suitable application is published, users can’t view the published content.
To enable FTA on the client-side:
- Verify that the app that you want to associate is a favorite or a subscribed application.
-
To get the list of published applications and the server URL, run the commands:
./util/storebrowse -l ./util/storebrowse -S <StoreFront URL> <!--NeedCopy--> -
Run the ./util/ctx_app_bind command with the following syntax:
./util/ctx_app_bind [-p] example_file|MIME-type published-application [server|server-URI]for example,
./util/ctx_app_bind a.txt BVT_DB.Notepad_AWTSVDA-0001 https://awddc1.bvt.local/citrix/store/discovery - Verify that the file that you’re trying to open is client drive mapping (CDM) enabled.
- Double-click the file to open it using the associated application.
Associating a published application with file types
Citrix Workspace app reads and applies the settings configured by administrators in Citrix Studio.
Prerequisite:
Verify that you connect to the Store server where the FTA is configured.
To link a file name extension with a Citrix Workspace app for Linux application:
- Publish the application.
- Log on to Citrix Studio.
- Right-click the application and then select Properties.
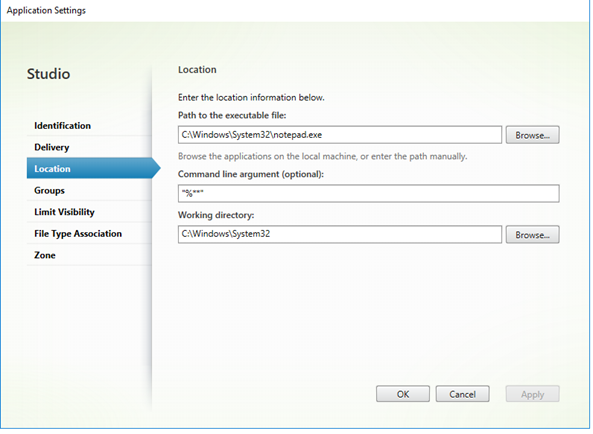
- Select Location.
-
Add “%**” in the Command-line argument (optional) field to bypass the command-line validation and then click OK.
- Right-click the application and select Properties.
- Select File Type Association.
- Select all the extensions that you want Citrix Workspace app to associate with the application.
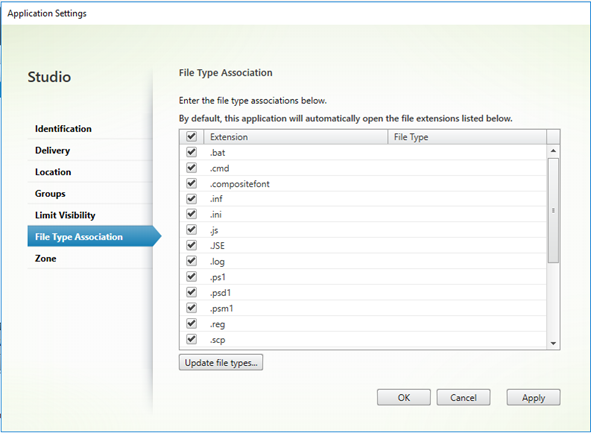
- Click Apply and Update file types.
- Follow the steps mentioned in File type association to enable FTA on the client-side.
Note:
The StoreFront file type association must be ON. By default, file type association is enabled.
Transparent user interface
The Citrix ICA protocol uses the Transparent User Interface Virtual Channel [TUI VC] protocol to transmit data between Citrix Virtual Apps and Desktops™ or Citrix DaaS and host servers. The TUI protocol transmits user interface [UI] component messages for remote connections.
Citrix Workspace app for Linux supports the TUI VC feature. This feature helps the client to receive the TUI packets sent by the server, and the client can access the UI-related components. This functionality helps you to control the display of the default overlay screen. You can toggle the VDTUI flag in the module.ini file: VDTUI - On/Off
Starting with version 1912, the VDTUI flag is set to On by default. As a result, the “Starting <Application>” dialog box no longer appears when you launch an app. Instead, a “Connecting <Application>” dialog appears with a progress bar. The dialog also displays the progress of the app launch. However, if you set the flag to Off, the “Starting <Application>” dialog rendered on top of other application windows, covering the login prompt.
For more information on Virtual Channels, see Citrix ICA virtual channels in the Citrix Virtual Apps and Desktops documentation.
Increase in the number of supported virtual channels
In earlier versions of the client, sessions supported up to 32 virtual channels.
Starting with the 2103 version, you can use up to 64 virtual channels in a session.
Enhanced desktop launch and screen resizing experience
Citrix Workspace app for Linux ensures a smooth transition and prevents black screens and flickers when resizing or stretching your virtual desktop screen.
Note:
The enhanced virtual desktop screen resizing experience and enhanced desktop launch experience features are enabled by default.
Starting with version 2408, the enhanced desktop launch experience feature is enabled by default for single monitor setups only. Starting with version 2411, this feature also supports multiple setups.
To disable the enhanced virtual desktop screen resizing experience feature, do the following:
- Navigate to the
$HOME/.ICAClient/wfclient.inifolder. - Go to the [WFClient] section.
- Add the following entry:
    EnhancedResizingEnabled=False
<!--NeedCopy-->
Starting with version 2411, Citrix Workspace app for Linux ensures an improved desktop launch experience. You’ll experience a seamless, flicker-free transition to your desktop without intermediate screens.
To disable the enhanced desktop launch experience feature, do the following:
- Navigate to the $HOME/.ICAClient/wfclient.ini folder.
- Go to the [WFClient] section.
- Add the following entry:
DesktopLaunchEnhancement=False
<!--NeedCopy-->
Improved loading experience for shared user mode
Starting with the 2408 version, the time taken to load the store is reduced and thus the loading experience for the shared user mode is improved.
Note:
This feature is applicable only on StoreFront™ stores.
This feature is disabled by default. To enable this feature, do the following:
- Navigate to the
AuthManConfig.xmlconfiguration file. - Set the following entry as True:
<key>KioskSFUIEnhanced</key>
<value>True</value>
<!--NeedCopy-->
For more information on shared user mode, see Kiosk mode.
Sustainability initiative from Citrix Workspace app
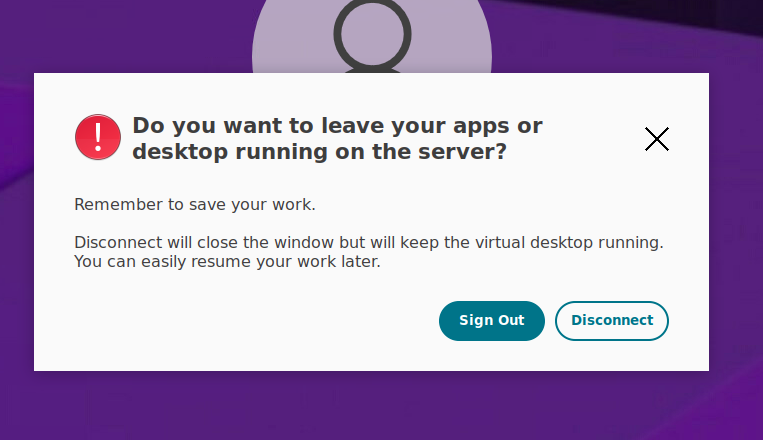
From the Citrix Workspace app 2402 version onwards, the following prompt might appear when you click disconnect, sign out, or close a virtual desktop.

Users can either Sign Out or Disconnect from the session.
Note:
By default, this feature is disabled. To enable the dialog box for end users, administrators must configure the feature.
Benefits
This feature allows organizations to encourage users to be more mindful of their energy consumption when using virtual desktops. This feature might help conserve energy by reminding end users to sign out of the unused VMs when not required. This way, organizations can conserve energy by reducing the number of unused VMs left running.
Enable sustainability feature
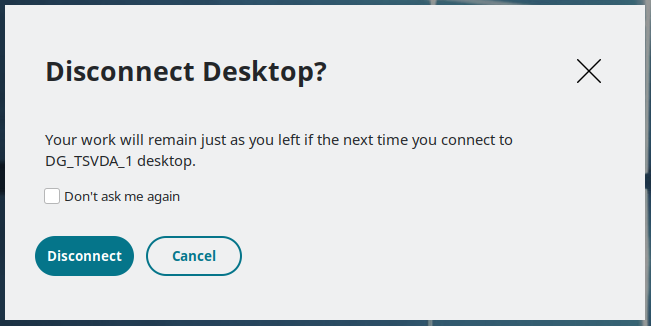
By default, this feature is disabled. If you don’t edit the client-side configuration, the following dialog box appears to the end users.
Starting with version 2411, enable the sustainability feature by editing the client-side configuration and adding the line CloseDialogVersion=1 in ~/.ICAClient/wfclient.ini. This means the end users don’t have an option to Sign Out. By default, you can force the end users to click Disconnect.
To use the sustainability feature with a custom message, modify the delivery group on DDC 2407 or later as follows:
Configure Save Energy message on TSVDA
To enable this feature on TSVDA, do the following:
- Navigate to Citrix Studio.
- Click Delivery Groups from the left navigation pane.
- Select the required TSVDA from the Delivery Group section.
- Click the Edit icon. The Edit Delivery Group page appears.
-
Click Desktops from the left navigation pane.
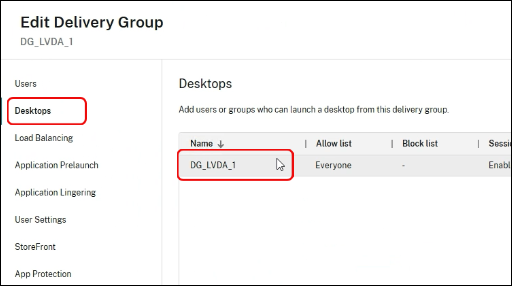
- Select the required VDA where you must add the keywords.
- Click Edit. The Edit Desktop page appears.
-
Set the
ICA-LogOffOnClosekeyword totruein the Description field.For example,
KEYWORDS:ICA-LogOffOnClose=true ICA-PromptMessage="Do you want to sign out from the session?" ICA-Title="Sign out or disconnect" ICA-Icon=true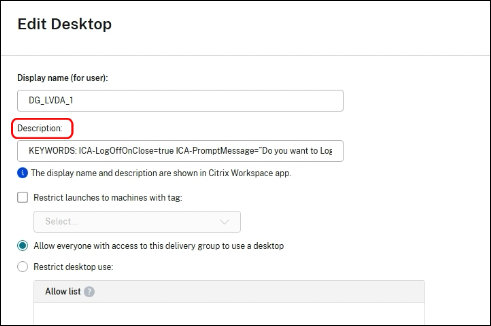
- Click OK, and then click Save.
The following dialog box appears when you close the virtual desktop.
Note:
If the configuration is done during an active session, you need to close the current session and restart it for this dialog box to appear.

Configure Save Energy message on WVDA
To enable this feature on WVDA, do the following:
- Navigate to Citrix Studio.
- Click Delivery Groups from the left navigation pane.
- Select the required WVDA from the Delivery Group section.
- Click the Edit icon. The Edit Delivery Group page appears.
- Click User Settings from the left navigation pane.
-
Set the
ICA-LogOffOnClosekeyword totruein the Description field.For example,
KEYWORDS:ICA-LogOffOnClose=true ICA-PromptMessage="Do you want to sign out from the session?" ICA-Title="Sign out or disconnect" ICA-Icon=true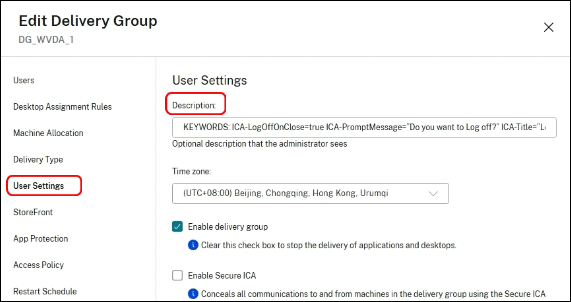
- Click Save.
The following dialog box appears when you close the virtual desktop.
Note:
If the configuration is done during an active session, you need to close the current session and restart it for this dialog box to appear.
Customization of Desktop Viewer toolbar
With the 2411 release, you have more control over the Desktop Viewer toolbar. You can customize toolbar options using the Global App Configuration service (GACS) or the .ini file.
You can customize:
- Show or hide the full Desktop Viewer Toolbar for end users.
- Choose which tabs appear on the Desktop Viewer Toolbar.
Configuration
You can customize the Desktop Viewer toolbar using GACS Admin UI or the .ini file.
Using GACS
To configure the customization of the Desktop Viewer toolbar through the GACS Admin UI, do the following:
-
Sign in to Citrix Cloud with your credentials.
Note:
Refer to the Sign Up for Citrix Cloud article for step-by-step instructions on creating a Citrix Cloud account.
-
Upon authentication, click the menu button on the upper left corner and select Workspace Configuration. The Workspace Configuration screen appears.
-
Click App Configuration > Citrix Workspace app.
-
Select the Linux checkbox.
-
You can now update the settings under Session Experience > Toolbar.
For more information, see Global App Configuration service documentation.
Using .ini file
To configure the customization of the Desktop Viewer toolbar through the .ini file, follow these steps:
To hide the toolbar:
- Navigate to the
$HOME/.ICAClient/All_Regions.inifile. - Under the
[Client Engine\GUI]section, findConnectionBar=. - Set
ConnectionBar=0;
To show the toolbar:
- Navigate to the
$HOME/.ICAClient/All_Regions.inifile. - Under the
[Client Engine\GUI]section, findConnectionBar=. - Set
ConnectionBar=*orConnectionBar=1;
To configure each button on the toolbar:
- Navigate to the
$HOME/.ICAClient/wfclient.inifile. -
Go to the
[WFClient]section and add the following entry as required.For Button “Switch Desktop”:
- To show: Don’t set or
SwitchDesktopButtonVisible=True - To hide:
SwitchDesktopButtonVisible=False
For Button “Ctrl+Alt+Del”:
- To show: Don’t set or
CtrlAltDelButtonVisible=True - To hide:
CtrlAltDelButtonVisible=False
For Button “Devices”:
- To show: Don’t set or
DevicesButtonVisible=True - To hide:
DevicesButtonVisible=False
For Button “Preferences”:
- To show: Don’t set or
PreferencesButtonVisible=True - To hide:
PreferencesButtonVisible=False
For Button “Connection”:
- To show: Don’t set or
ConnectionButtonVisible=True - To hide:
ConnectionButtonVisible=False
For Button “Multi-monitor”:
- To show: Don’t set or
MultiMonitorButtonVisible=True - To hide:
MultiMonitorButtonVisible=False
For Button “Minimize”:
- To show: Don’t set or
MinimizeButtonVisible=True - To hide:
MinimizeButtonVisible=False
For Button “Fullscreen / Restore”:
- To show: Don’t set or
FullscreenButtonVisible=True - To hide:
FullscreenButtonVisible=False
For Button “Disconnect”:
- To show: Don’t set or
CloseButtonVisible=True - To hide:
CloseButtonVisible=False
- To show: Don’t set or
To Customize the Toolbar:
- Navigate to the
$HOME/.ICAClient/wfclient.inifile. -
Go to the
[WFClient]section and add the following entry as required to hide options on the toolbar:DevicesButtonVisible=False
Connection strength indicator on Desktop Viewer toolbar
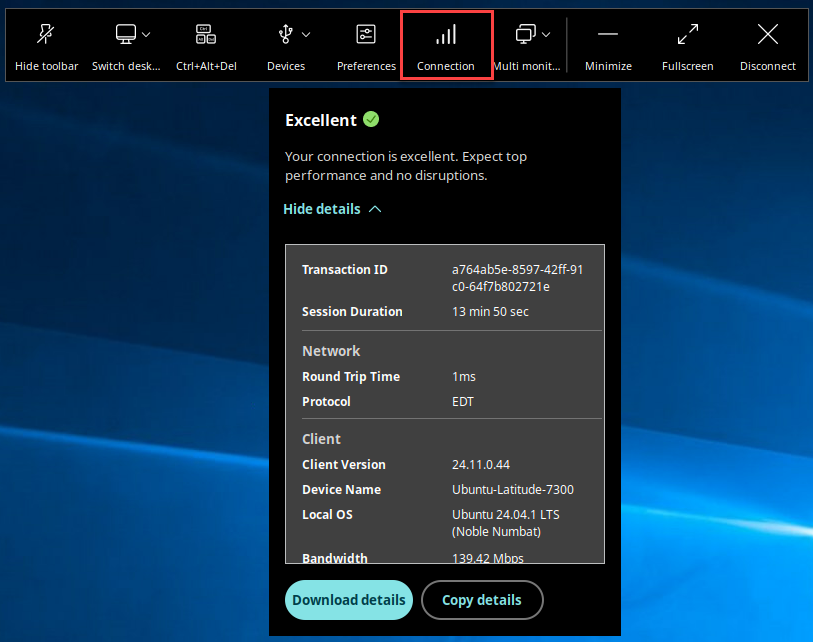
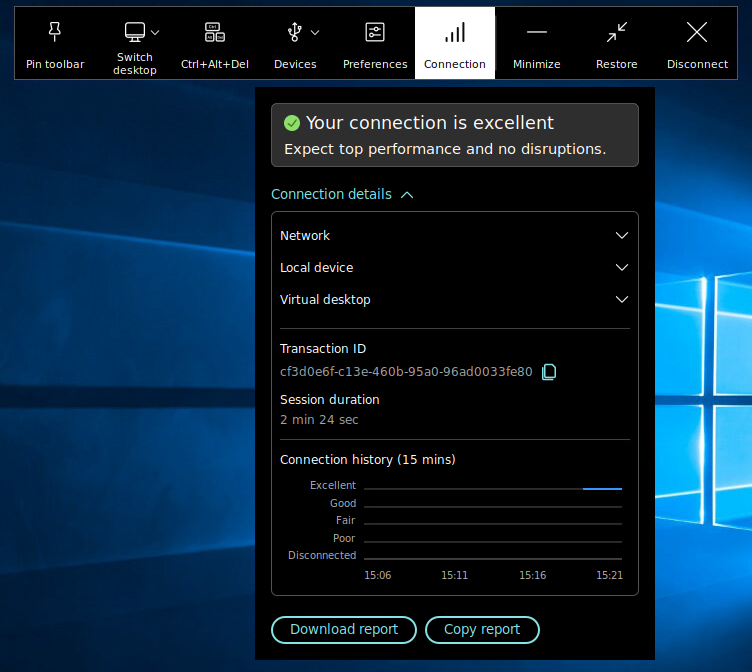
Starting with version 2503, Citrix Workspace app for Linux now supports the Connection Strength Indicator (CSI) on the Desktop Viewer toolbar. This feature displays a network strength icon that alerts you of network issues. You can click the indicator to view real-time connection statistics for the client and VDA, and copy diagnostic information to share with IT for advanced troubleshooting.
Note:
This feature is enabled by default.
Benefits
- Immediate feedback: The network strength icon provides users with instant alerts when network issues are detected.
- Enhanced troubleshooting: Real-time stats and diagnostics help users and IT teams quickly identify and resolve connectivity issues.
Prerequisites
-
This feature is only available when a session opened using:
- VDA 2407 or later
- VDA 2402 LTSR CU1 or later
-
The Supportability Virtual Channel must be enabled on the client side.
When you open the Citrix Workspace app session, you can see the Connection icon on the Desktop Viewer toolbar.
Note:
If you are using a lower version of VDA, the Connection icon won’t be visible.
The connection strength indicator on the Desktop Viewer toolbar provides users with immediate feedback on their network connectivity and offers detailed real-time stats for enhanced troubleshooting. This feature aims to improve user experience and reduce the time spent on resolving connectivity issues.
Enable ‘Download details’ and ‘Copy details’ options
Note:
These options are hidden by default.
Download details option: Saves the CSI metrics as a file to your local device.
Copy details option: Copies the CSI metrics directly to your clipboard for quick sharing or reference.
To show these options, do the following:
- Navigate to the
$HOME/.ICAClient/wfclient.inifolder. - Navigate to the [WFClient] section.
-
Add the following entry:
CsiDownloadButtonVisible=TrueCsiCopyButtonVisible=True
Enhancement to Fullscreen or Extend button behavior
Starting with the 2505 version, the Fullscreen or Extend button adjusts display behavior based on the current configuration:
- When labeled Fullscreen, it maximizes the window to a single display if only one screen is in use. If positioned at a screen border, it extends across multiple displays.
- When labeled Extend, it expands the session to all displays, or a custom layout selected in the Multi-Monitor Selector.
- The button label switches to Extend when the Multi-Monitor Selector is set to “Extend to all displays” or a “Custom Layout” option while in windowed mode.
- Display configurations persist even if monitors are unplugged, as long as a subset of the original configuration remains connected.
This feature is enabled by default.
Enhanced Connection Strength Indicator
Starting with version 2508, Citrix Workspace app for Linux features an improved Connection Strength Indicator that provides better connectivity insights and user control. The enhanced indicator helps you monitor network performance, identify connectivity problems quickly, and take corrective action before issues impact your work.
The key improvements include the following:
- Real-time Wi-Fi strength: Instantly view your current Wi-Fi signal quality for better connectivity awareness.
- Expanded device details: Access information such as CPU, memory usage directly from the indicator.
- Proactive notifications with snooze options: Receive alerts when your connection strength drops, with the ability to temporarily snooze notifications.
- Actionable recommendations: Get clear suggestions to resolve connectivity issues when your connection strength falls below optimal levels.
- 15-minute connection history: Review a visual history of your connection strength over the past 15 minutes to assist with troubleshooting and analysis.
Clipboard
Enhanced file transfer capabilities for Linux clients
Previously, you were able to copy and paste files and folders only between two virtual desktops. Starting with the Citrix Workspace app for Linux version 2508, you can copy files and folders from client to VDA.
This feature is enabled by default. To disable this feature, update the following policies on the Domain Delivery Controller™ (DDC):
- Set the Restrict session clipboard write policy to Enabled.
- Ensure that the CFX_FILE isn’t added into the session clipboard write allowed formats policy.
Clipboard Support for HTML-formatted text
Starting with version 2408, Citrix Workspace app for Linux supports copy and paste of the HTML-formatted text between local apps and virtual app or desktop sessions, and also between virtual app or desktop sessions. This feature ensures that the HTML content is accurately retained during the copy-and-paste procedure with no restrictions.
This feature is disabled by default in the clipboard redirection policy.
To enable the HTML format for clipboard, you need to add an entry for CF_HTML (and any other in “Client clipboard write allowed formats” and “Session clipboard write allowed formats”) in the ICA policy settings. For more information, see Client clipboard redirection.
NOTE
- Client clipboard write allowed formats do not apply if the Client clipboard redirection policy is set to Prohibited or Restrict client clipboard write policy is disabled.
- Session clipboard write allowed formats do not apply if the Client clipboard redirection policy is set to Prohibited or Restrict session clipboard write policy is disabled.
Improved session reconnection experience
Starting with version 2601, this feature enhances the end-user experience during session timeouts caused by inactivity or network interruptions. Users can reconnect directly from the timeout screen for both desktop and app sessions, and also reconnect after the Auto-Client-Reconnect (ACR) phase. This feature is enabled by default.
Prerequisites:
- Citrix Virtual Apps and Desktops: Version 2511 or later
- Citrix Workspace app: Version 2511 or later
The key features are as follows:
- Displaying specific reasons for session timeouts, such as Device went to sleep, or Network disruption.
- Allowing seamless reconnection to new or existing sessions based on administrator configuration.
- Supporting scenarios where auto reconnect might fail, such as network switches (for example, Wi‑Fi to LAN).
- Supporting direct reconnection after the Auto-Client-Reconnect (ACR) phase.
Note:
- The new reconnection feature does not support the hybrid-launched sessions.
If a customer experiences a “Failed to reconnect” error immediately after clicking the Reconnect button:
- Open
.HOME/.ICAClient/All_Region.ini.- If the following section is not present, add it to the end of the file:
[Network\Relaunch]
ResourceName=
ResourceID=
StoreURL=
<!--NeedCopy-->
Automatic Maximum Transmission Unit (MTU) adaptation
Starting with version 2601, Citrix Workspace app for Linux supports dynamic adjustment of the session’s Maximum Transmission Unit (MTU). This feature automatically detects and adjusts the MTU during a session if the network path changes. This feature is disabled by default.
To enable this feature:
- Navigate to the
$HOME/.ICAClient/wfclient.ini. -
In the [WFClient] section, add:
MtuRediscovery = On
<!--NeedCopy-->
For more information, see the EDT MTU Discovery section in the Citrix Virtual Apps and Desktops documentation.
In this article
- Boot to Virtual Desktop
- Battery status indicator
- App indicator icon
- Workspace launcher
- Copy and paste files and folders between two virtual desktops
- File type association
- Transparent user interface
- Enhanced desktop launch and screen resizing experience
- Improved loading experience for shared user mode
- Sustainability initiative from Citrix Workspace app
- Customization of Desktop Viewer toolbar
- Connection strength indicator on Desktop Viewer toolbar
- Enhanced Connection Strength Indicator
- Clipboard
- Improved session reconnection experience
- Automatic Maximum Transmission Unit (MTU) adaptation