Configure store URLs
Overview
When you first enable store, the system creates a store URL of the form customername.cloud.com that can be used to access the store from web browsers or locally installed Citrix Workspace™ app.
You can add additional cloud URLs. If you have defined multiple store URLs, you can use these URLs as policy inputs. For example, you might want different branding, authentication methods, and resources for different divisions within your organization.
You can also use your own custom domains linked as aliases for your cloud.com domains. For more information, see configure custom domain.
Store name
Each store URL has a Store name. This name is displayed in the Accounts list within Citrix Workspace app.
You configure whether the user can modify the store name within Citrix Workspace app. To allow users to edit their store name from the Citrix Workspace app, users must be on the following versions of the Citrix Workspace app clients:
- Citrix Workspace app for Windows version 2405 or later
- Citrix Workspace app for iOS version 24.2.0 or later
- Citrix Workspace app for Mac version 2402
Enable or disable cloud URL
You can disable all access to your stores using cloud URLs. This affects both locally installed Citrix Workspace app and browsers. Users can continue to use any custom URLs to access their stores. If you do not have any custom URLs then this blocks all access.
To disable access via cloud.com:
- Untick the Cloud URL radio button. This brings up a confirmation screen.
- Select the checkboxes to confirm you understand.
- Press Disable.
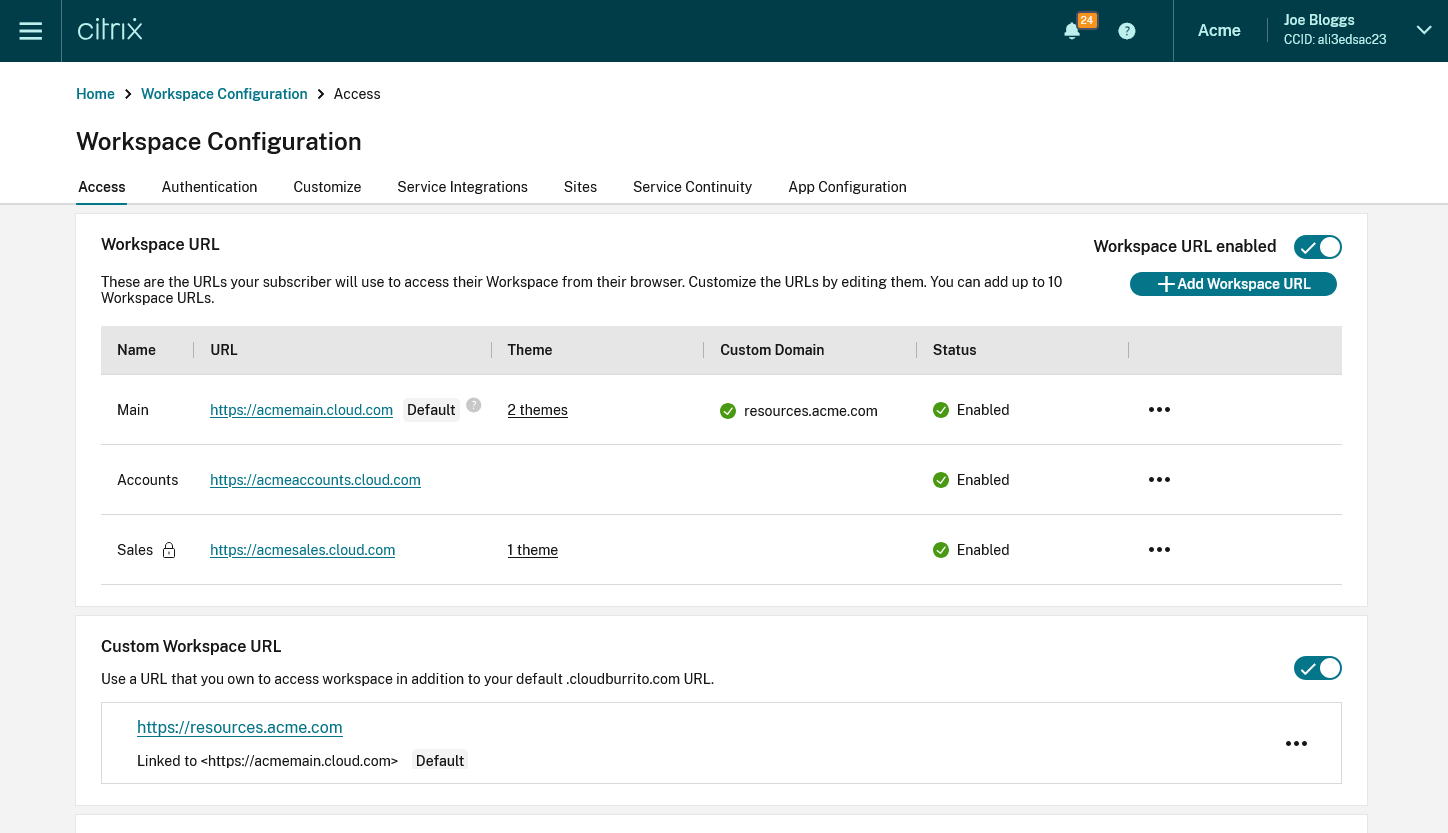
View URLs
- Go to Citrix Cloud™ and sign in with your credentials.
- Navigate to StoreFront Cloud > Access. Under Stores, you can find a list of existing URLs.
Add store (Cloud) URLs
Select a unique store URL. Citrix Cloud rejects store URLs that other customers already use. Use a naming convention that contains a string unique to your organization. Avoid generic URLs such as store.cloud.com or mystore.cloud.com.
For example, you can create URLs using the following format:
YourOrgsales.cloud.comYourOrgengineering.cloud.comYourOrgmarketing.cloud.com
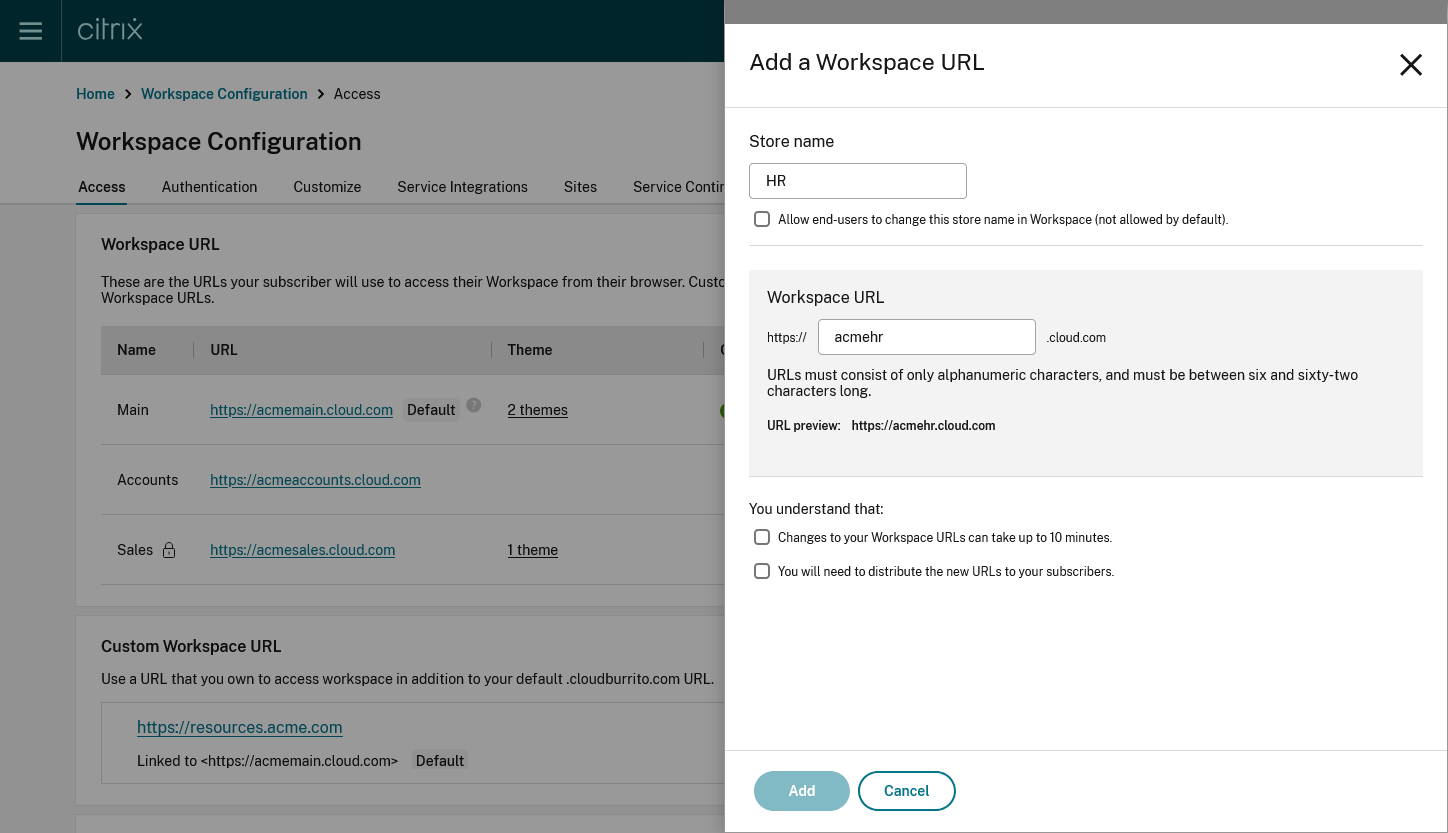
From the Access tab, to add a URL:
-
Click Add Store
-
Enter a store name.
-
Choose whether you wish the user to be able to modify the store name within Citrix Workspace app.
-
Enter the subdomain.
-
Select the checkboxes as an acknowledgment that you must provide the new URLs to your end users post configuration.
-
Click Add to save the URL.
Note:
You can create up to 10 URLs by default. Contact your Citrix representative if you need more URLs.
Modify store (Cloud) URL
Warning:
When you rename a URL, the old URL is immediately removed and is no longer available. Tell end users what the new URL is and manually update all local Citrix Workspace apps to use the new URL. The new URL will be unavailable for up to 10 minutes. If the URL is used in any policy then you must manually update that policy.
-
Click the … on the row of the store URL you wish to edit and select Edit store URL.
-
Modify the Store name and Cloud URL as required.
-
If you modified the URL then you must tick several checkboxes to acknowledge that you understand the consequences.
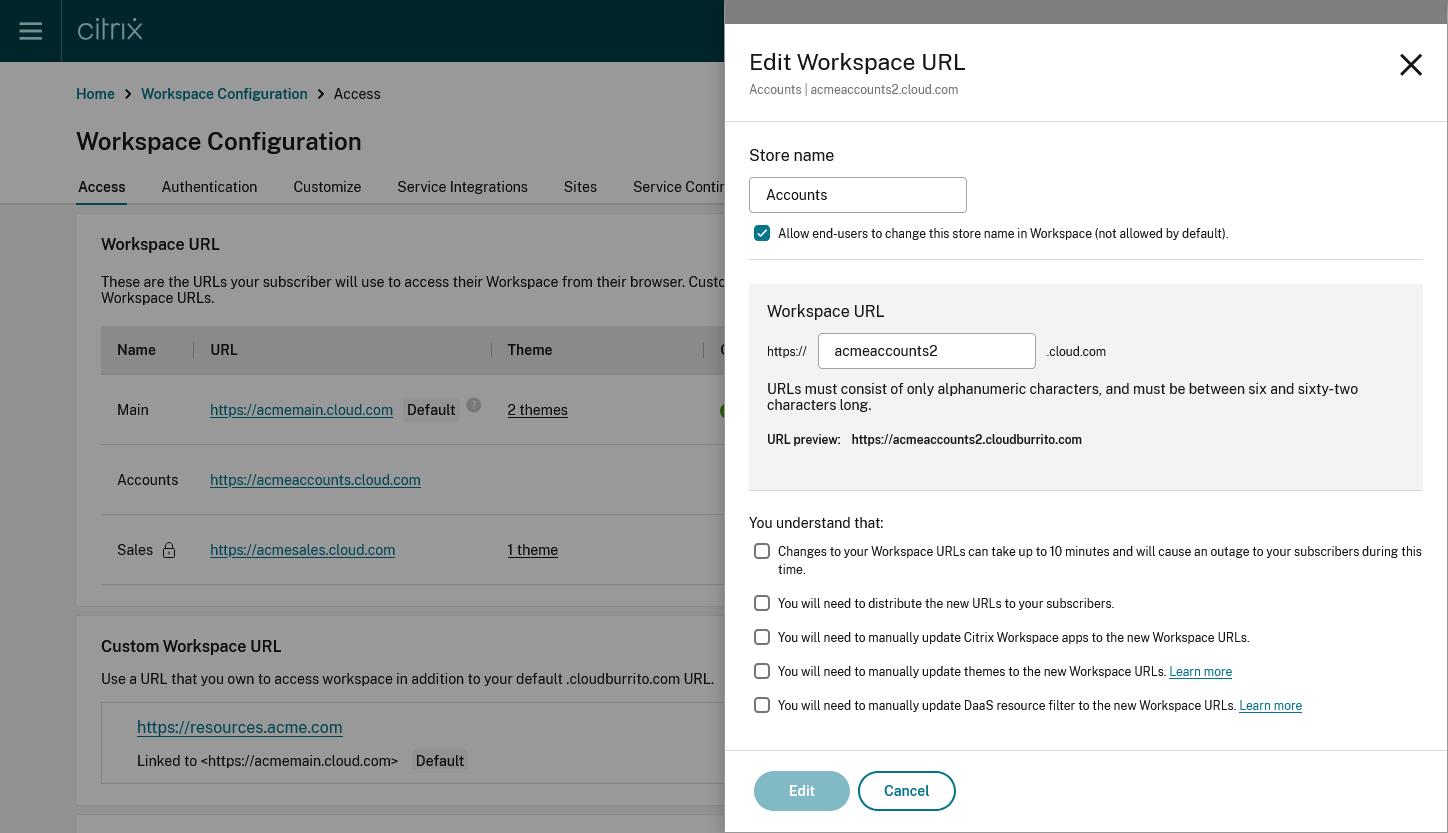
- Press Edit to save the changes
Configure store URLs using PowerShell
You can also use the PowerShell API to add or change store URLs.
Run the cmdlet Set-WorkspaceCustomConfigurations with the $storeHosts list as the argument to the -WorkspaceHosts parameter to update the URL list for the store. Give the existing URL as the argument to the -WorkspaceUrl parameter. For example:
#  Set a variable to the value of existing URL for the store.
$WSPURL = "wspmultiurlmain.cloud.com"

# Specify the new URLs that you want to create in a list, including any existing URLs.
$storeHosts = @($WSPURL,"wspmultiurl2.cloud.com","wspmultiurl3.cloud.com")

# Update the configuration
Set-WorkspaceCustomConfigurations -WorkspaceUrl $WSPURL `
                                  -WorkspaceHosts $storeHosts `
                                  -ClientId $APIClientID `
                                  -ClientSecret $APIClientSecret `
                                  -Verbose
<!--NeedCopy-->

Configure authentication methods
To configure different authentication methods per URLs:
- Create a conditional authentication profile.
- Add a Policy Condition of type Workspace URL and select the store URL the condition should apply to.
- Choose the authentication method for that store URL.
- Repeat for each store URL.
- In the Stores Authentication tab, choose the conditional authentication profile that you created.
Alternatively if you are using Adaptive Authentication, see Configure Adaptive Authentication policies.
Configure themes and logos
You can create and assign separate themes and logos for each store. For more information, see Appearance.
Resource filtering using Secure Private Access
While configuring Citrix DaaS™ with Secure Private Access, you can control the end user’s access to resources. You can implement this by configuring Access policies based on store URLs. Access Policies can be configured for delivery groups using the store URL filter.
For more information, see Citrix Secure Private Access
Send custom announcements
You can display a different custom announcement to your user depending on their store URL. For more information, see Send custom announcements.
Resource Filtering resources from DaaS
You can configure Access Policies for delivery groups based on store URLs. For more information, see Resource filtering using delivery group access policies.
Configure Adaptive Authentication policies
If you are using Adaptive Authentication, you can associate authentication policies with a store URL. This enables you to configure different authentication policies for the end users based on the store URL they’re using.
Step 1: Configure a series of authentication actions and policies that you want to use for the store URLs. The policy configuration depends on the type of authentication and the authentication factors that you want to use. Any supported nFactor authentication flow can be used.
For more information, see Adaptive Authentication
For example, consider the following scenario where:
- The first URL
<https://wspmultiurlmain.cloud.com>must be mapped to LDAP authentication and OTP. - The second URL
<https://wspmultiurl2.cloud.com>must be mapped to LDAP authentication. - The third URL
<https://wspmultiurl3.cloud.com>must have End User Cert authentication
Examples:
Check for a particular store URL using exact string matching.
AAA.USER.WSP.EQ("wspmultiurlmain.cloud.com")
<!--NeedCopy-->
Check whether a particular string is contained within a store URL, using substring matching.
AAA.USER.WSP.CONTAINS("wspmultiurlmain")
<!--NeedCopy-->
Step 2: Configure an authentication policy and add your store URL as the expression. The authentication policy is then valid for the store URL that you entered in the Expression text field.
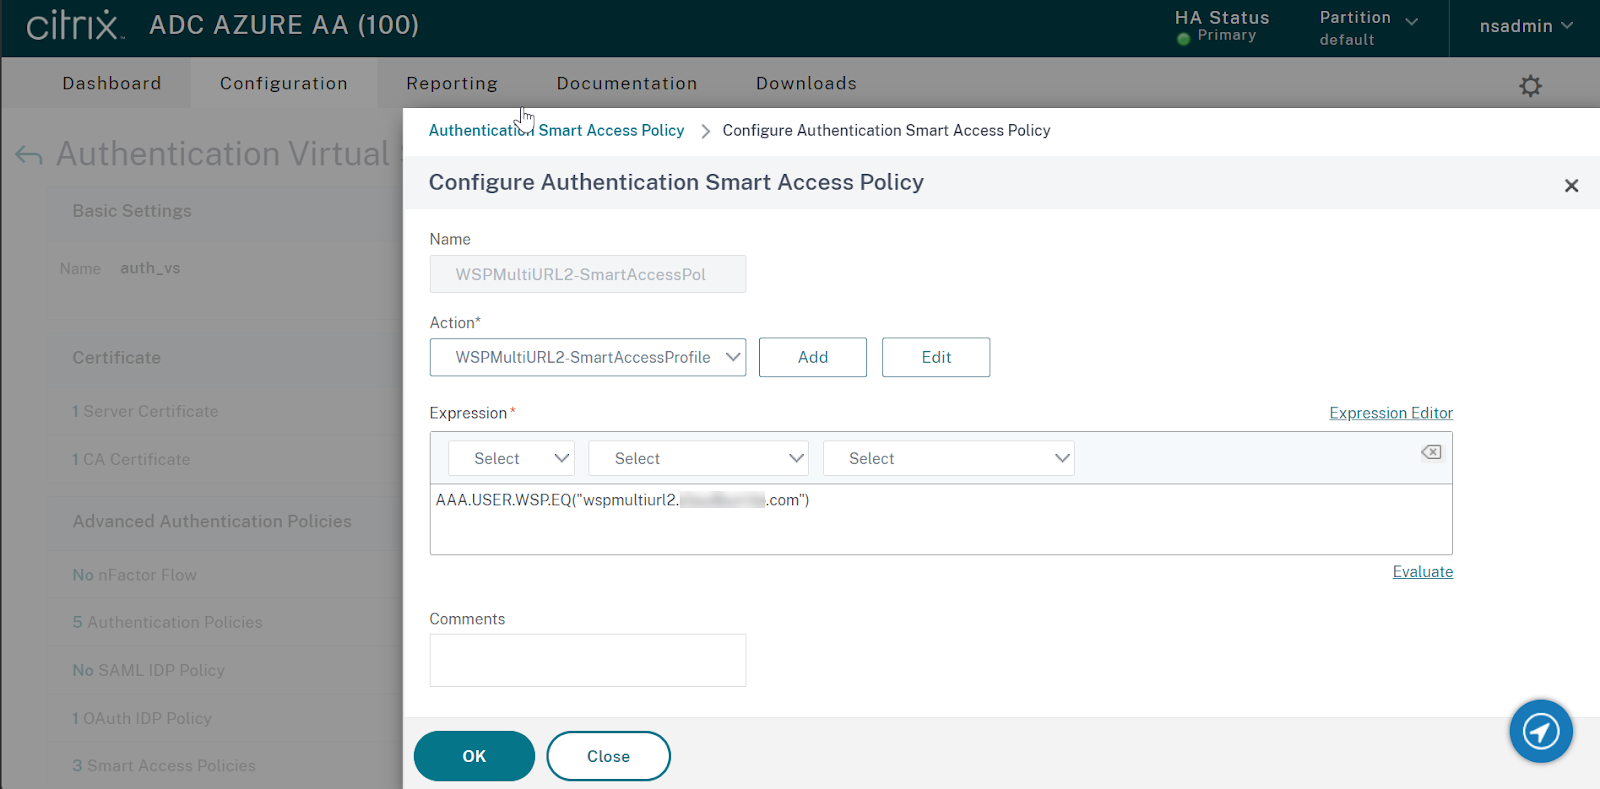
Step 3: Once you have configured authentication policies based on your URLs, you need to bind them to your authentication virtual server. For more information, see Authentication policies.
Email Discovery to add store URLs to Citrix Workspace app
Email discovery adds all the store URLs configured in the list of service URLs as stores. If you want to add two or more stores through email discovery, configure each store URL as a service URL. It ensures that the URLs are added as stores during the email discovery process. You can use either of the following methods to add stores:
-
Global App Configuration service UI: For more info, see Configure settings for cloud store
-
Global App Configuration API: You can use the preceding portal to make an API call to POST /aca/discovery/app/workspace/domain using your registered domain For more info, see Global App Configuration service API.
If <user@yourdomain.com> is entered in the Citrix Workspace app, the Email Discovery service adds all stores listed in service URLs. You can use a UPN, or an email address when it contains the correct domain suffix mydomain.com.
Known limitations
The following are some limitations that impact the multiple URL feature.
Citrix Virtual Apps and Desktops™
- Resource filtering using store URL for Citrix Virtual Apps and Desktops (on-premises aggregation) isn’t supported.
Citrix Workspace app
To add multiple URLs from the same Citrix Cloud tenant to Citrix Workspace app requires the following versions:
- Citrix Workspace app for Windows version 2302 or later
- Citrix Workspace app for iOS version 2303 or later
- Citrix Workspace app for Android version 2303 or later
- Citrix Workspace app for Linux version 2303 or later
- Citrix Workspace app for Mac version 2305
- Citrix Workspace app for iOS version 2303
- Older versions of Citrix Workspace app display a store domain selector menu. In this case, the end user must select the same URL they entered when adding the store. Selecting a different URL requires the user to sign in again.
Global App Configuration Service
- If the Global App Configuration service settings are configured for multiple store URLs, then only one store URL can be added to Citrix Workspace app at a time. Adding a second URL to Citrix Workspace app fails. For example, If GACS settings are configured for both
<https://wspmultiurlmain.yourdomain.com:443>and<https://wspmultiurl2.yourdomain.com:443>, then the user can add only one URL to Citrix Workspace app. - Account addition fails if more than one GACS configured URL is found during the Global App Configuration service discovery. For example, consider a case where a user enters
<user@yourdomain.com>in Citrix Workspace app. The domain-based discovery finds two results and GACS settings are configured for both of them. The response returned is:<https://wspmultiurlmain.yourdomain.com:443>and<https://wspmultiurl2.yourdomain.com:443>. In this case, account addition fails with Citrix Workspace app as it supports adding only one account with GACS settings configuration.
{
  "items": [
 {
   "domain": {
     "name": "yourdomain.com"
   },
   "app": {
     "workspace": {
       "serviceURLs": [
         {
           "url": "https://wspmultiurlmain.yourdomain.com:443"
         },
         {
           "url": "https://wspmultiurl2.yourdomain.com:443"
         },
         {
           "url": "https://wspmultiurl3.yourdomain.com:443"
         }
       ]
     }
   }
 }
  ],
  "nextToken": "None",
  "count": 1
}

<!--NeedCopy-->
In this article
- Overview
- Store name
- Enable or disable cloud URL
- View URLs
- Add store (Cloud) URLs
- Modify store (Cloud) URL
- Configure store URLs using PowerShell
- Configure authentication methods
- Configure themes and logos
- Resource filtering using Secure Private Access
- Send custom announcements
- Resource Filtering resources from DaaS
- Configure Adaptive Authentication policies
- Email Discovery to add store URLs to Citrix Workspace app
- Known limitations