-
-
Share a running application
-
-
-
This content has been machine translated dynamically.
Dieser Inhalt ist eine maschinelle Übersetzung, die dynamisch erstellt wurde. (Haftungsausschluss)
Cet article a été traduit automatiquement de manière dynamique. (Clause de non responsabilité)
Este artículo lo ha traducido una máquina de forma dinámica. (Aviso legal)
此内容已经过机器动态翻译。 放弃
このコンテンツは動的に機械翻訳されています。免責事項
이 콘텐츠는 동적으로 기계 번역되었습니다. 책임 부인
Este texto foi traduzido automaticamente. (Aviso legal)
Questo contenuto è stato tradotto dinamicamente con traduzione automatica.(Esclusione di responsabilità))
This article has been machine translated.
Dieser Artikel wurde maschinell übersetzt. (Haftungsausschluss)
Ce article a été traduit automatiquement. (Clause de non responsabilité)
Este artículo ha sido traducido automáticamente. (Aviso legal)
この記事は機械翻訳されています.免責事項
이 기사는 기계 번역되었습니다.책임 부인
Este artigo foi traduzido automaticamente.(Aviso legal)
这篇文章已经过机器翻译.放弃
Questo articolo è stato tradotto automaticamente.(Esclusione di responsabilità))
Translation failed!
Share a running application
A Workspace App lets you access an application or process through HTTP or HTTPS running on a port of your Workspace. You can have multiple Workspace Apps attached to a single workspace, each accessing an application running on a different port. Common use cases include testing web applications, webhooks and callbacks, and exposing the web interfaces of development tooling.
Create a Workspace App
Workspace apps can be created in different ways.
-
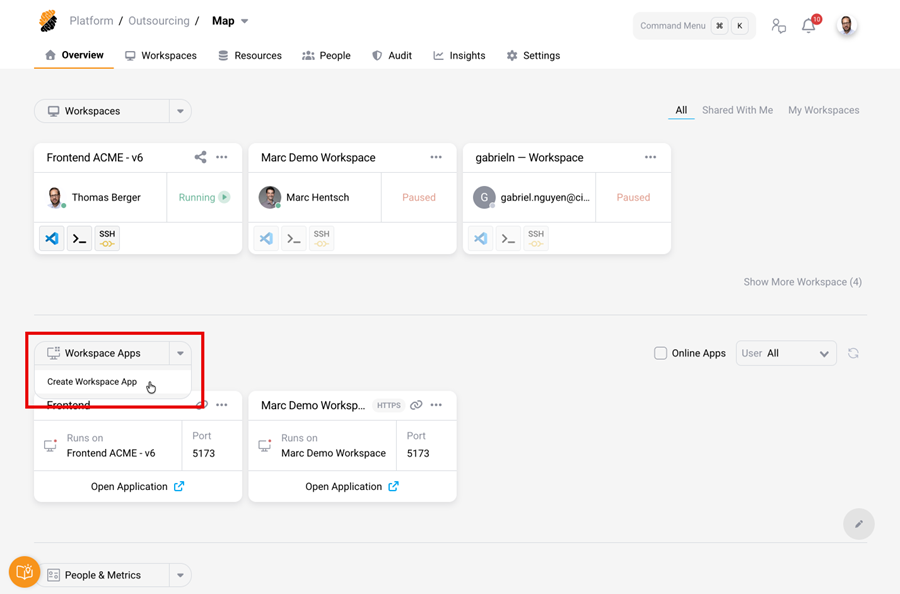
From the Project Overview page, select the Create Workspace App button from the Workspace Apps drop-down menu and follow the onscreen instructions.
-
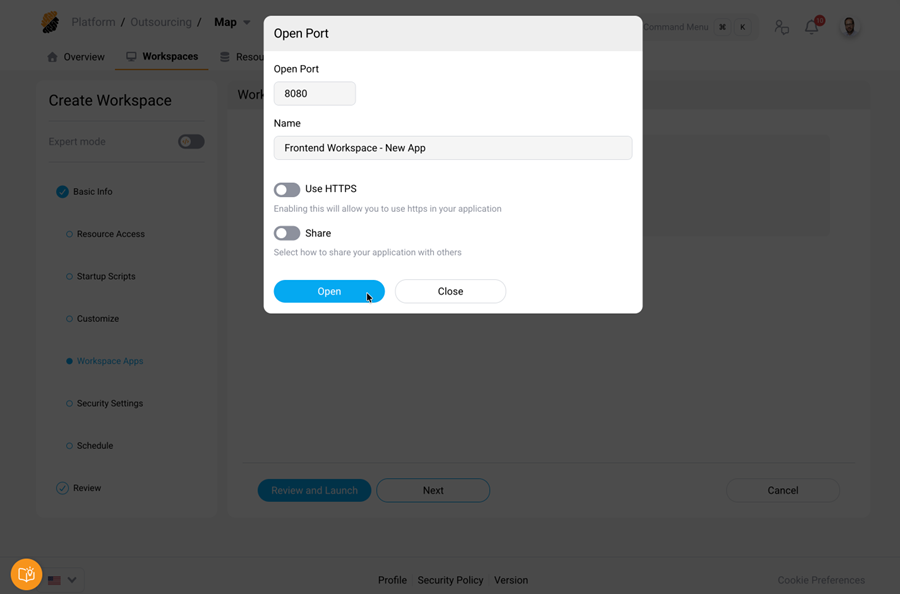
When creating or editing a workspace or workspace template, select the Workspace Apps menu in the wizard and follow the onscreen instructions. When adding a workspace app to a template, all child workspaces inherit this setting automatically.
-
Click the “…“ icon on a workspace and select Edit Ports.
In either case, you need to enter the following information:
- Port — The port where the app or process is running in your workspace.
- Name — A display name for the workspace app. Citrix SecurSpaces™ uses this name to reference the app.
- Override Host Header — Enable this option when your application rejects requests because of a Host header mismatch. See Override Host Header for details.
- Use HTTPS — Enable this option only if your application serves its own TLS certificates. For most scenarios, leave this off. Regardless of this setting, the platform is always exposed over HTTPS, so the browser connection appears as HTTPS. The toggle controls only whether the platform calls the app within the workspace using HTTP or HTTPS.
- Share — Control who can access the application. See Share a Workspace App for options.
Tip
When you create a workspace app for a Node.js project, make sure the port number matches the one opened in the localhost of the workspace.
Override Host Header
When a workspace app runs behind the SecurSpaces proxy service, some applications (such as Jupyter Notebook or pgAdmin) may block requests because of a mismatch between the Host header and the Origin header. By default, the proxy forwards localhost as the Host header, while the Origin header contains the workspace app’s public URL. Applications that do not check X-Forwarded-Host interpret this as a cross-origin request and reject it.
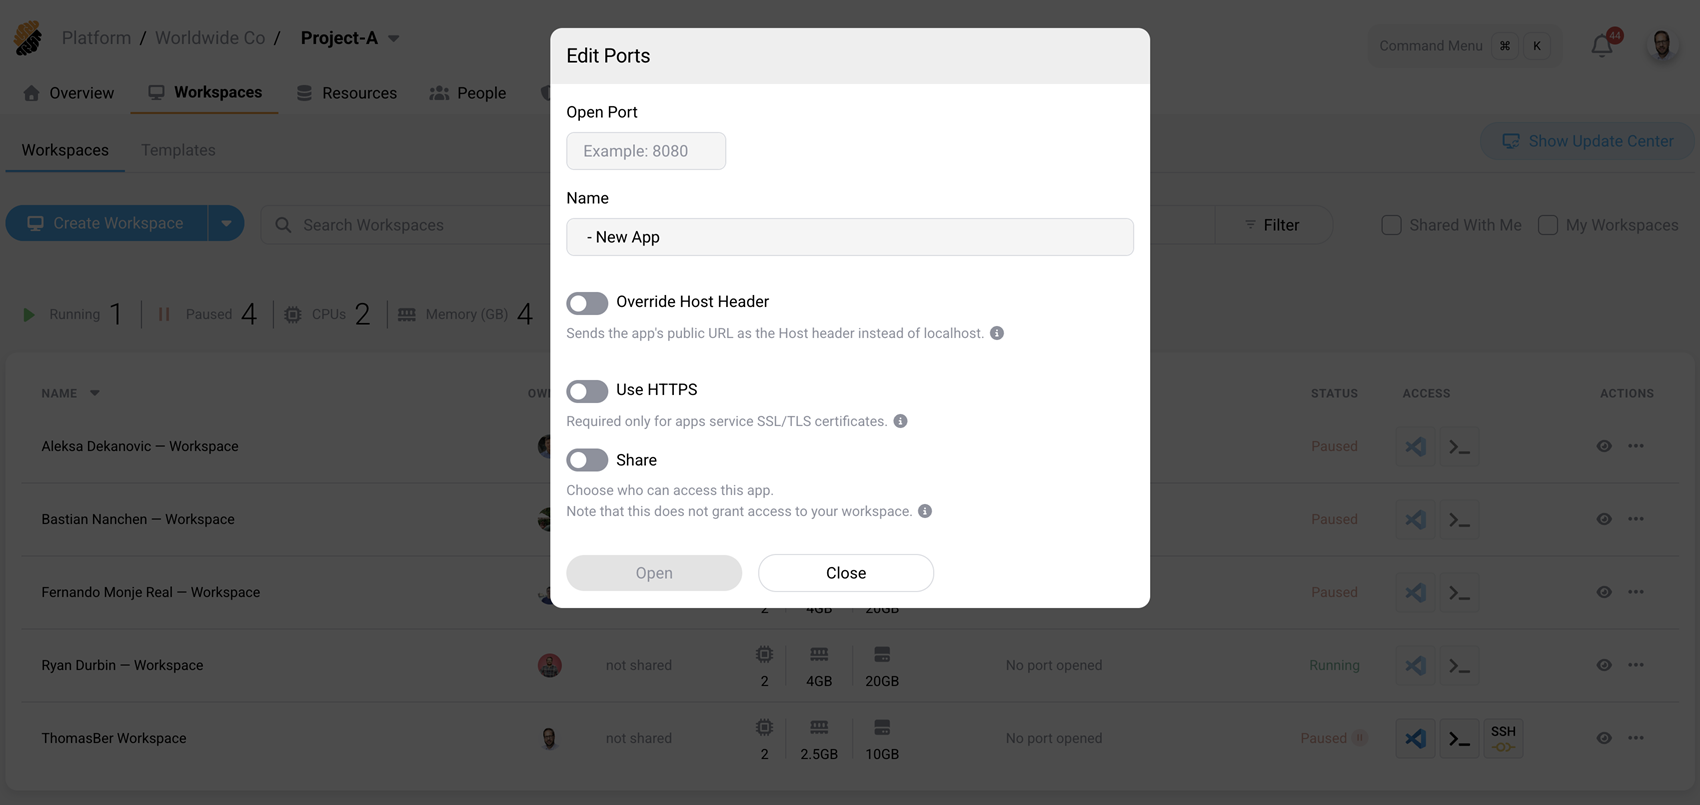
Enable Override Host Header to have the proxy send the workspace app’s public URL in the Host header instead of localhost. This aligns the Host, Origin, and X-Forwarded-Host headers so that the application works without per-tool proxy configuration.
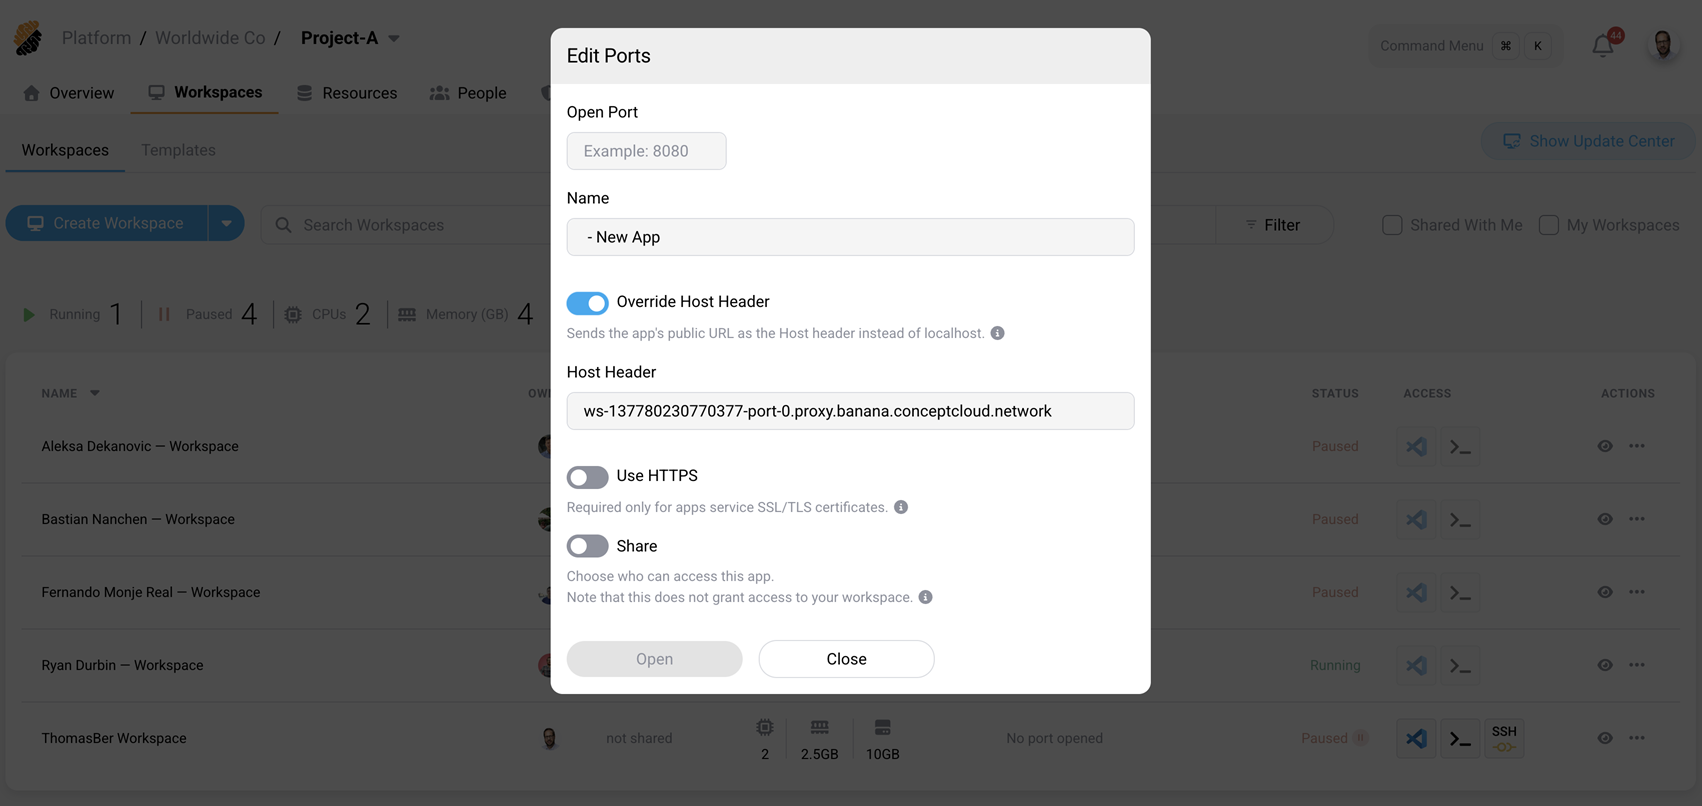
When enabled, a Host Header field appears, pre-filled with the workspace app’s fully qualified domain name (FQDN). You can accept the default or enter a custom value.
Important
Leave Override Host Header disabled for local development workflows where the server expects
localhostas the Host header. Enabling it in those cases can break the application.
Share a Workspace App
You can share a workspace app when creating it or by editing an existing one.
To update the properties of a workspace app, either:
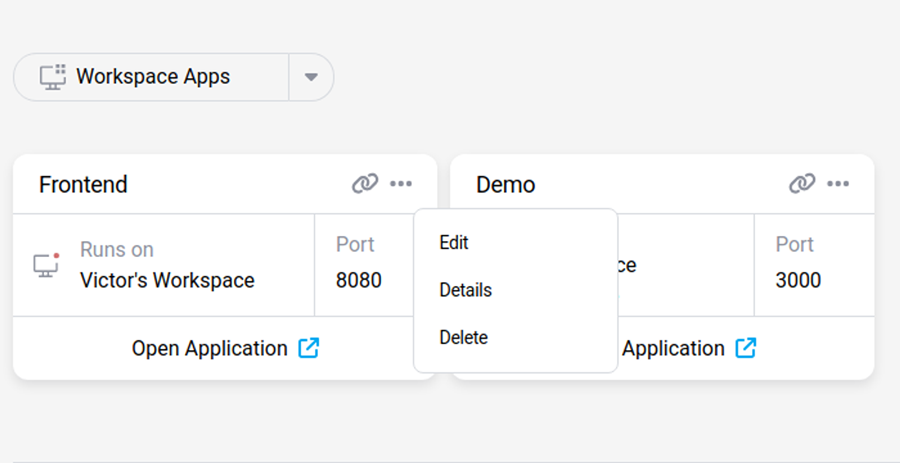
- On the Project Overview page, click the “…“ icon on the workspace app and select Edit.
- Click the “…“ icon on the workspace that hosts the app and select Edit Ports.
There are three sharing options:
- Public — Everyone with the link who can connect to the SecurSpaces environment over the network can access the workspace app.
- Project Sharing — Only members of the SecurSpaces project can access the workspace app.
- Share With Project members — Only the selected members of the SecurSpaces project can access the workspace app.
Granting access to a workspace app does not provide access to the workspace that runs the app. To share a workspace with another user, use the Share Workspace functionality.
Note
The Public sharing option is governed by a platform-level policy. A platform administrator must enable Allow Creation of Public Workspace Apps in Workspace Apps Settings for public sharing to take effect. The two names refer to the same capability: Public is the sharing mode you select on an individual app, while Allow Creation of Public Workspace Apps is the platform policy that permits it. If the policy is disabled, a workspace app set to Public still requires viewers to authenticate to the platform.
Access a Workspace App Using an API Key
You can access a running workspace app programmatically with an API key instead of authenticating interactively in a browser. This is useful for scripts, CI pipelines, webhooks, and other automated callers.
This method works only when a platform administrator enables Allow Access to Workspace Apps Using API Keys in Workspace Apps Settings. When the policy is disabled, the platform ignores API keys and the request falls back to standard authentication.
To authenticate a request, include your API key in the Strong-Network-Authorization header:
Strong-Network-Authorization: <API_KEY>
<!--NeedCopy-->
The API key grants access only when its scope matches the workspace app and the user who created the key is allowed to access the app — that is, the user owns the workspace, the app is shared with the project, or the app is shared directly with that user.
For example, to call a workspace app running on port 8010:
curl -v \
  -H "Strong-Network-Authorization: <API_KEY>" \
  https://<workspace-app-public-url>/your/app/path
<!--NeedCopy-->
Delete a Workspace App
You can delete a workspace app from the Overview page by pressing the “…“ icon and selecting Delete. You can also delete a workspace app by clicking the “…“ icon on a workspace and selecting Edit Ports.
Share
Share
This Preview product documentation is Citrix Confidential.
You agree to hold this documentation confidential pursuant to the terms of your Citrix Beta/Tech Preview Agreement.
The development, release and timing of any features or functionality described in the Preview documentation remains at our sole discretion and are subject to change without notice or consultation.
The documentation is for informational purposes only and is not a commitment, promise or legal obligation to deliver any material, code or functionality and should not be relied upon in making Citrix product purchase decisions.
If you do not agree, select I DO NOT AGREE to exit.