Install Session Recording servers from within the cloud
You can connect existing Session Recording servers to the cloud. You can also install Session Recording servers directly from within the cloud.
This feature obliterates the need to download the Citrix Virtual Apps and Desktops installer or the SessionRecordingAdministrationx64.msi file. It also checks domain joining to prevent issues that might keep Session Recording servers from functioning after being connected.
This article walks you through the process of installing a Session Recording server from within the cloud and provides guidance for post-installation actions.
Note:
Since July 2023, Microsoft has renamed Azure Active Directory (Azure AD) to Microsoft Entra ID. In this document, any reference to Azure Active Directory, Azure AD, or AAD now refers to Microsoft Entra ID.
Installation steps
To install a Session Recording server from within the cloud, connect a machine to the Session Recording service and then install the Session Recording server on it from within the cloud. To do so:
-
Prepare a machine.
-
Allow the outbound ports based on the version of your cloud client.
- If you are using version 7.40.13020.11 or later of the cloud client, allow the outbound port 443 only.
- If you are using a cloud client earlier than version 7.40.13020.11, allow the outbound ports 80, 443, 8088, and 9090–9094.
-
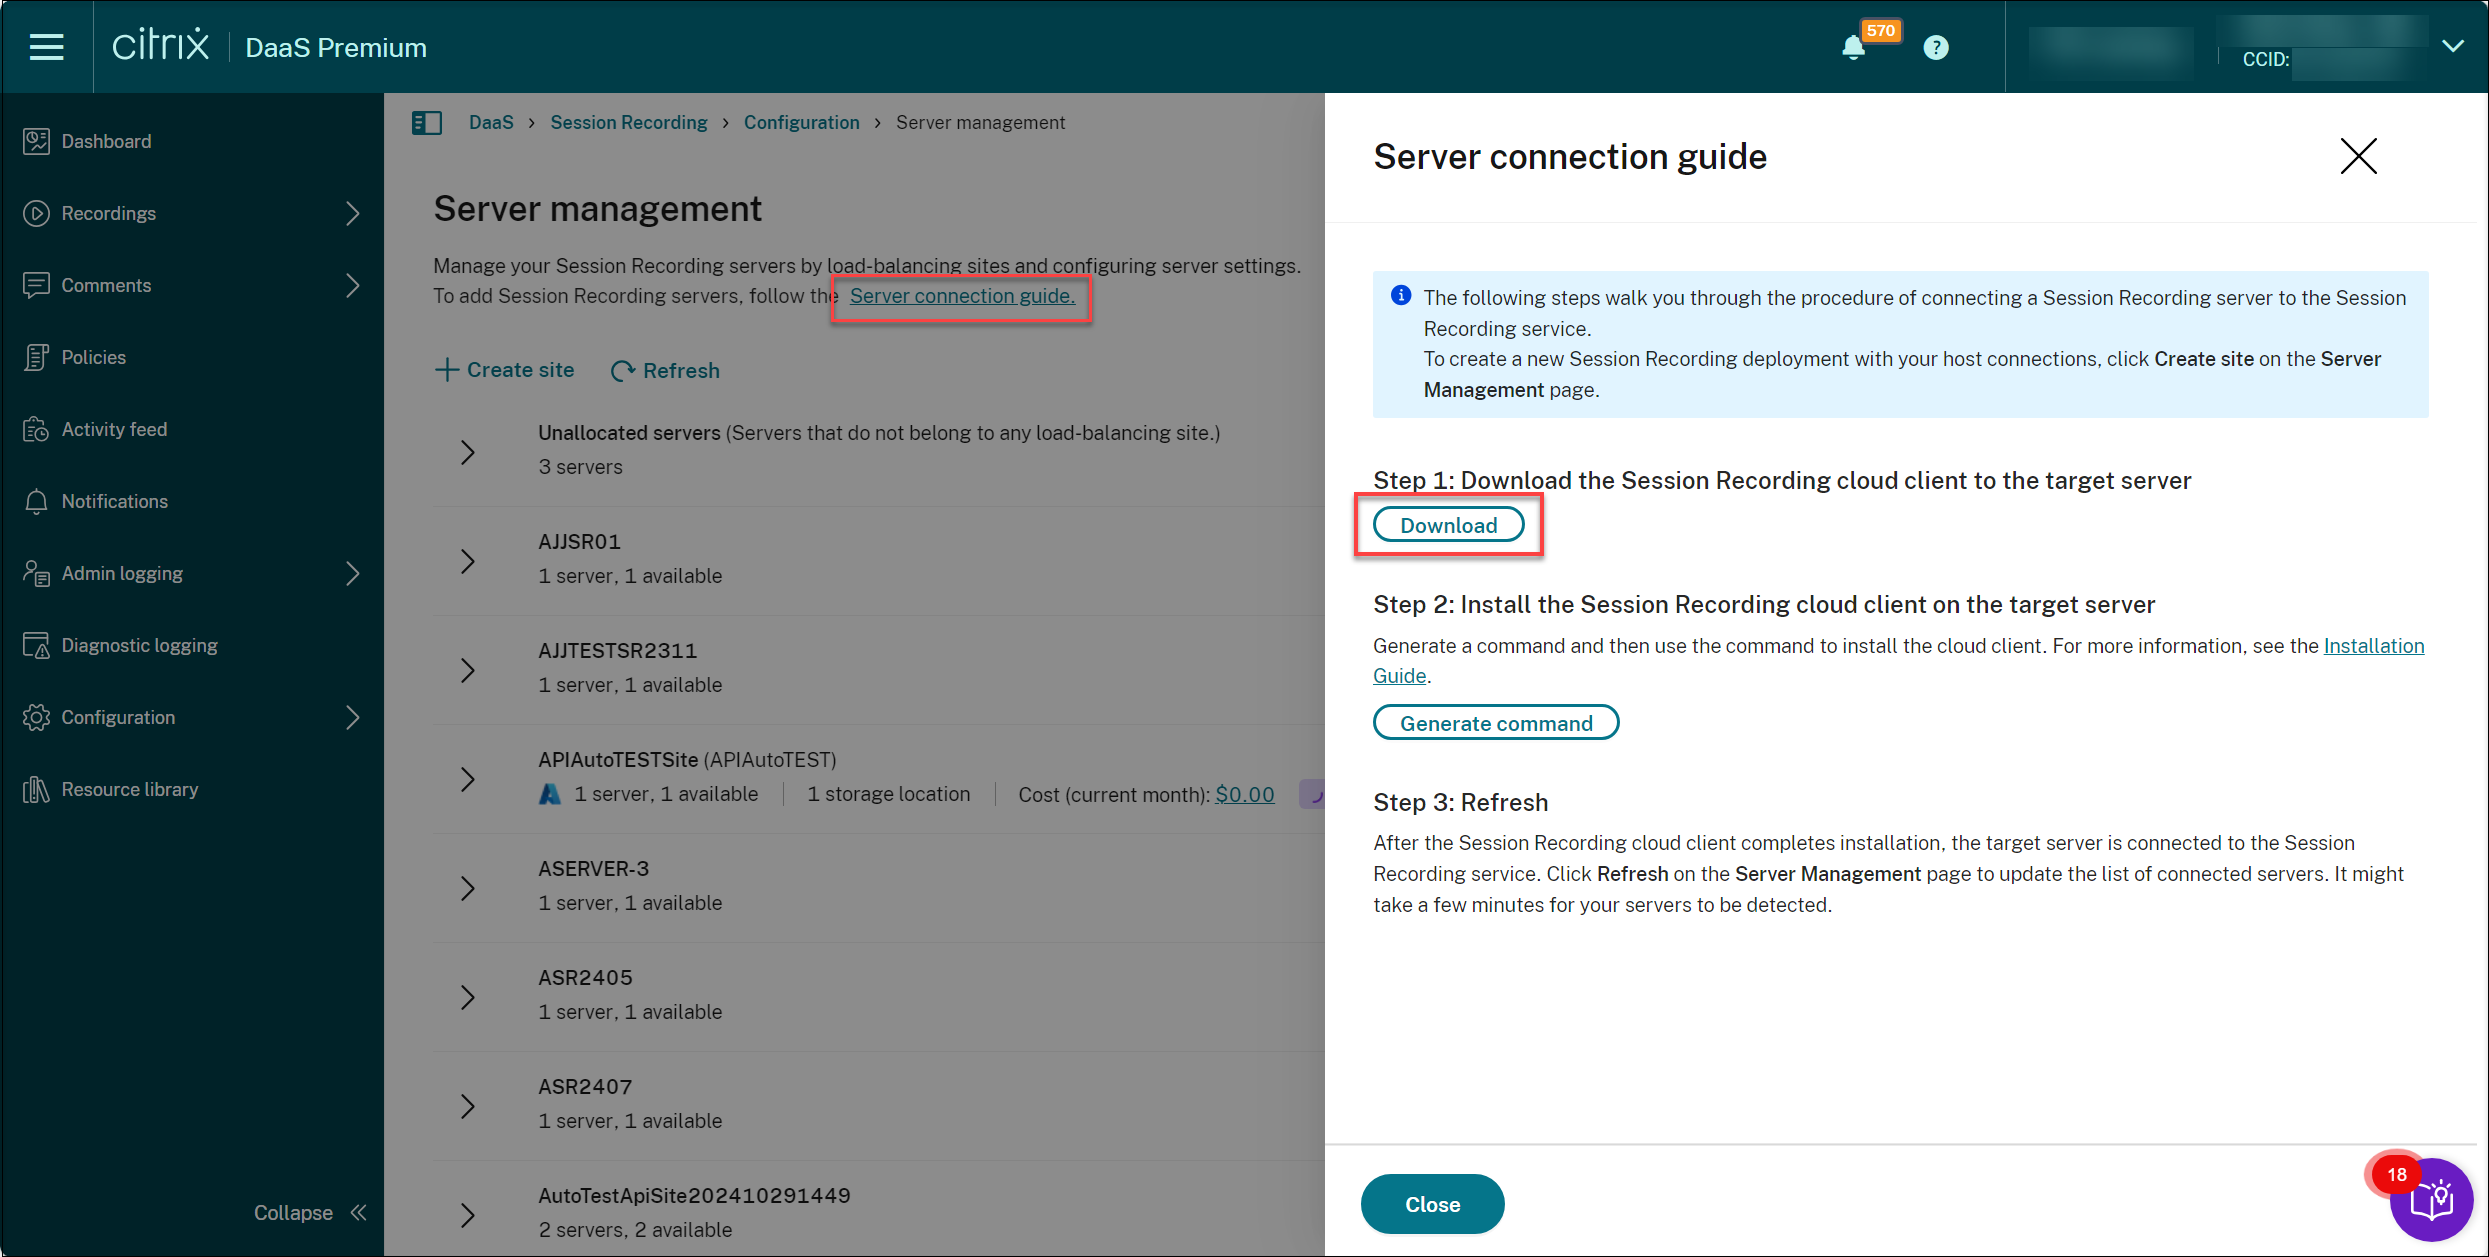
Download and install the Session Recording cloud client on the machine.
Note:
A daemon maintaining the cloud client’s running state is available for versions 7.38.10030.16 and later of the cloud client. The daemon automatically fixes the cloud client when it runs abnormally.
- Sign in to Citrix Cloud.
- In the upper left menu, select My Services > DaaS.
- In the DaaS tile, scroll down in the left navigation pane and select Session Recording. You can hover over and pin the Session Recording menu to the top PINNED section of the navigation pane for quick access. You can reorder pinned menus by dragging them to the desired places.
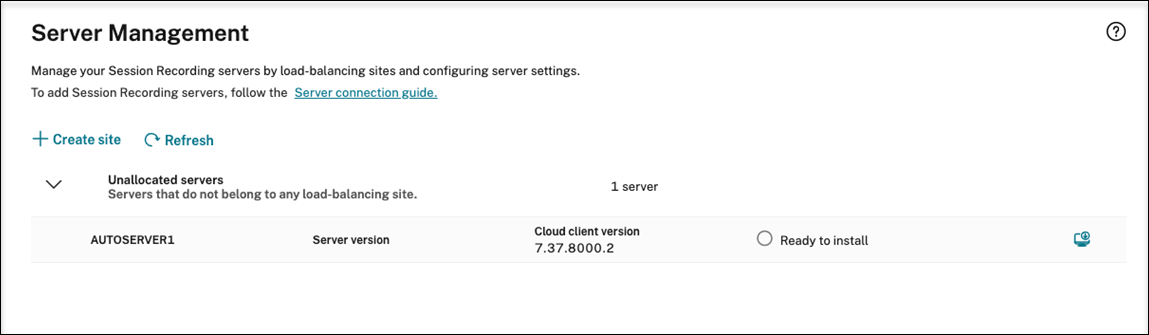
- In the Session Recording service view, select Configuration > Server Management from the left navigation.
-
Click Download on the Server connection guide page.
Tip:
- The Generate command button for cloud client installation is unavailable for the administrators that are added through Azure AD groups.
- You can also access the Download and Generate command buttons by clicking Continue configuration on the Session Recording service welcome page:
-
Install the cloud client on the machine. To do that, run a command as an administrator from the location of the cloud client .msi file that you downloaded earlier.
You can enter a command manually or generate a command by clicking Generate command on the Server connection guide page.
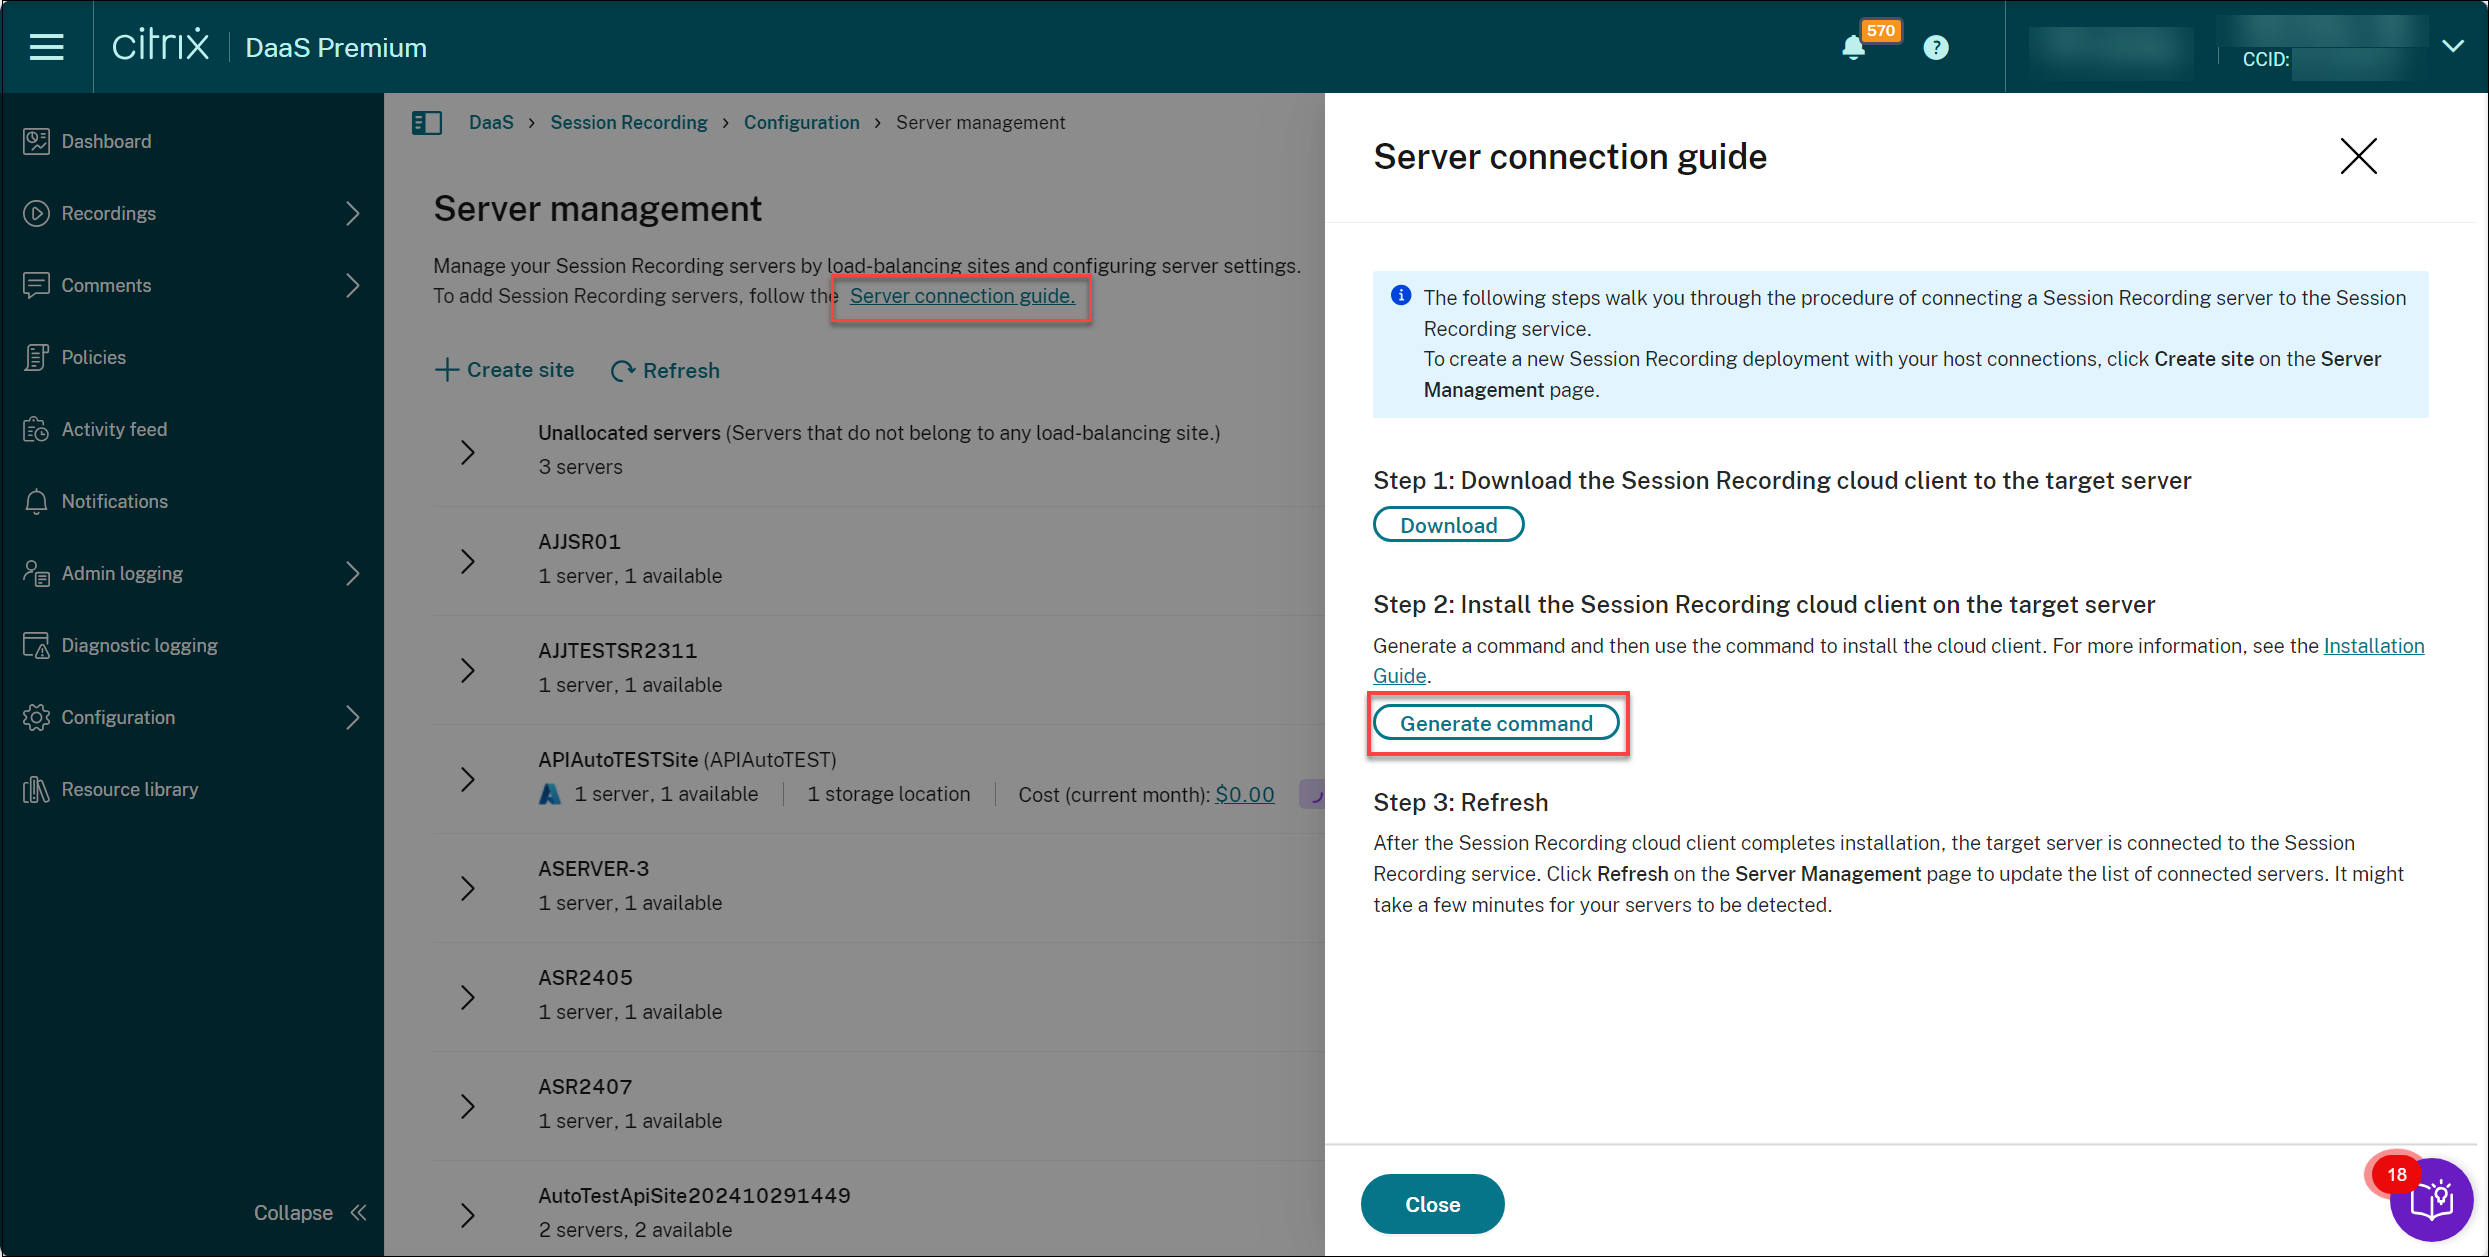
Answer questions and provide information where necessary on the Generate command page. After that, click the Generate command button.
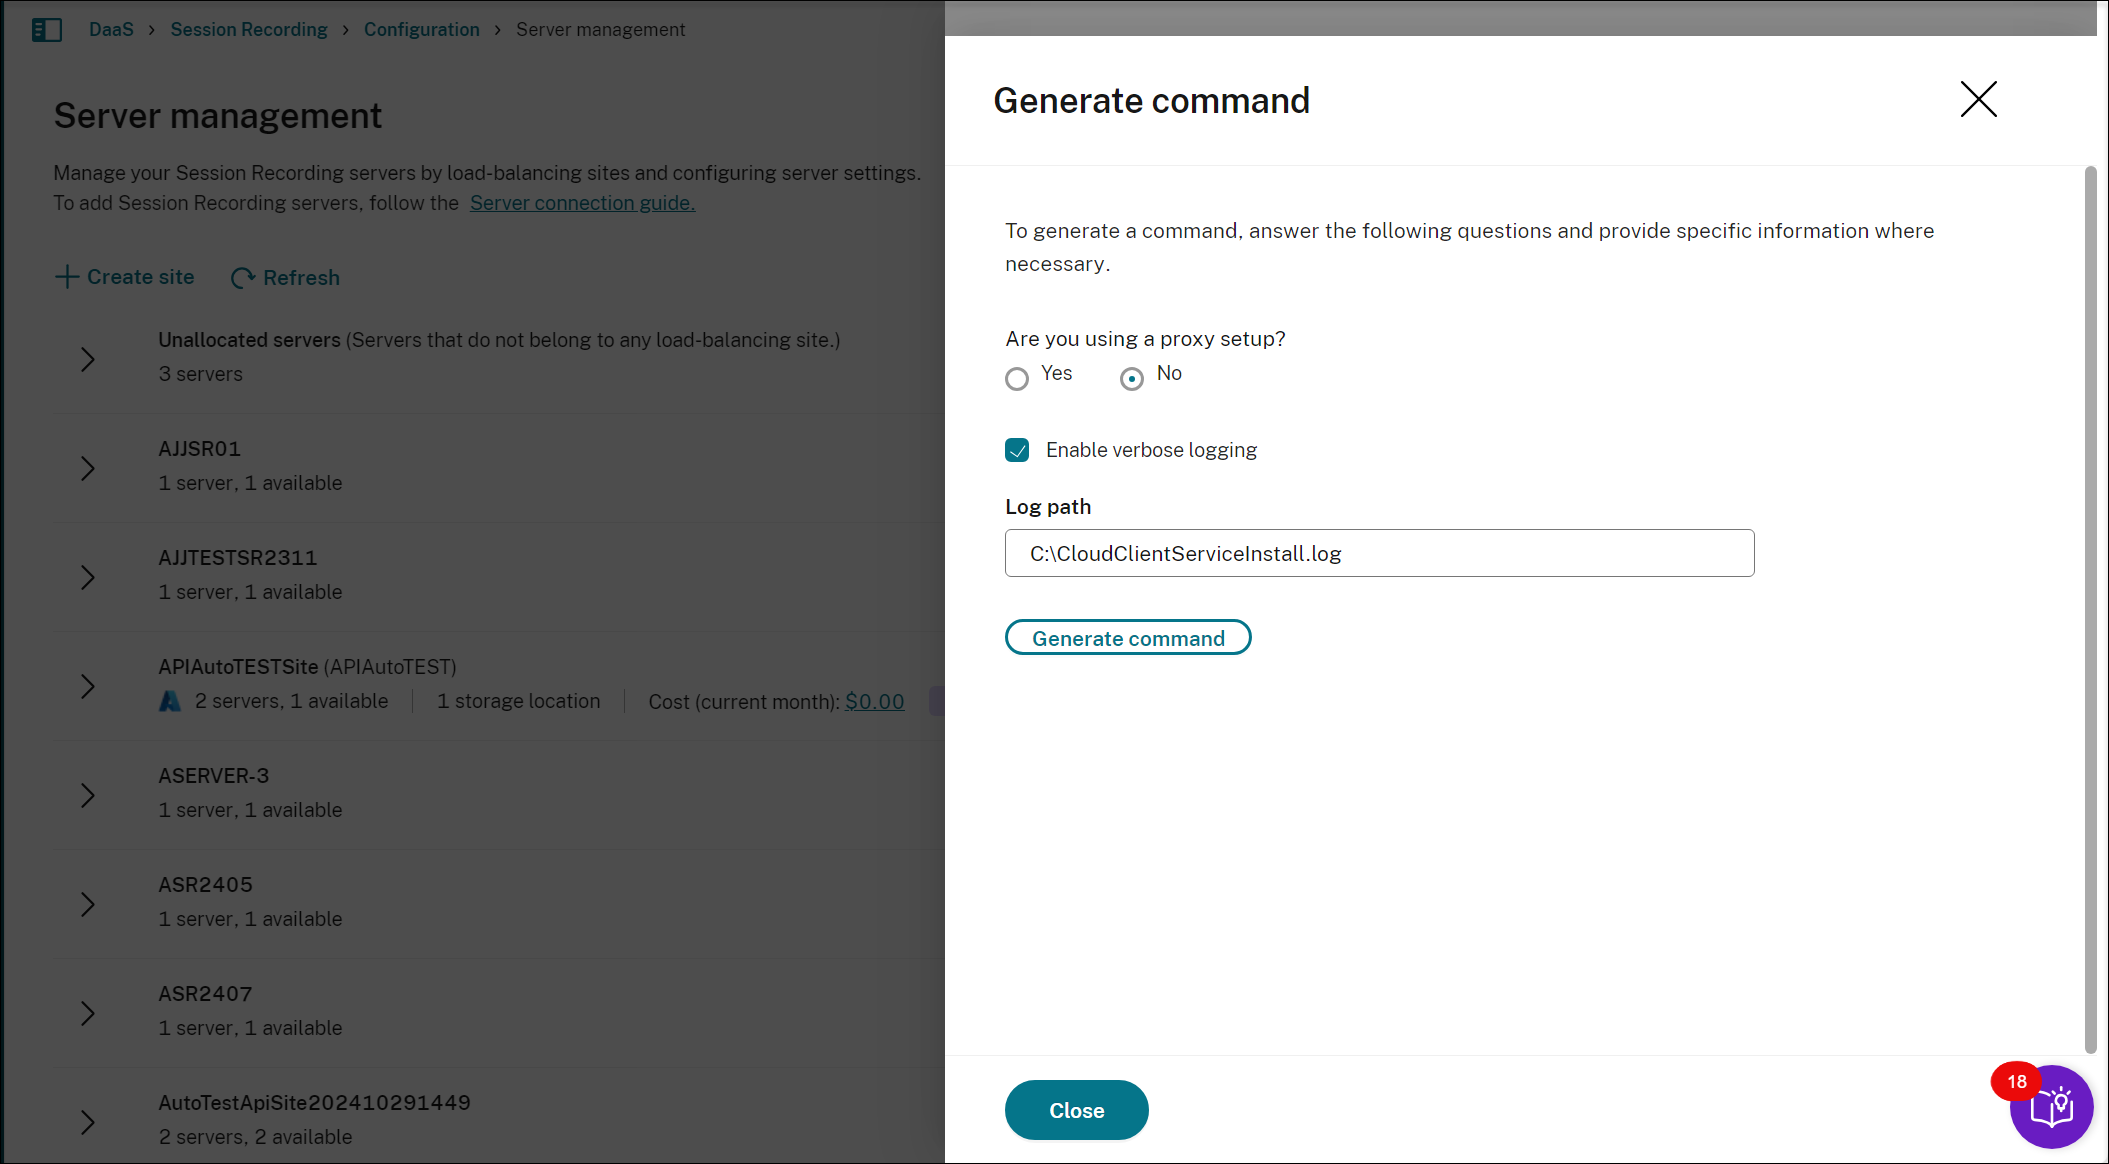
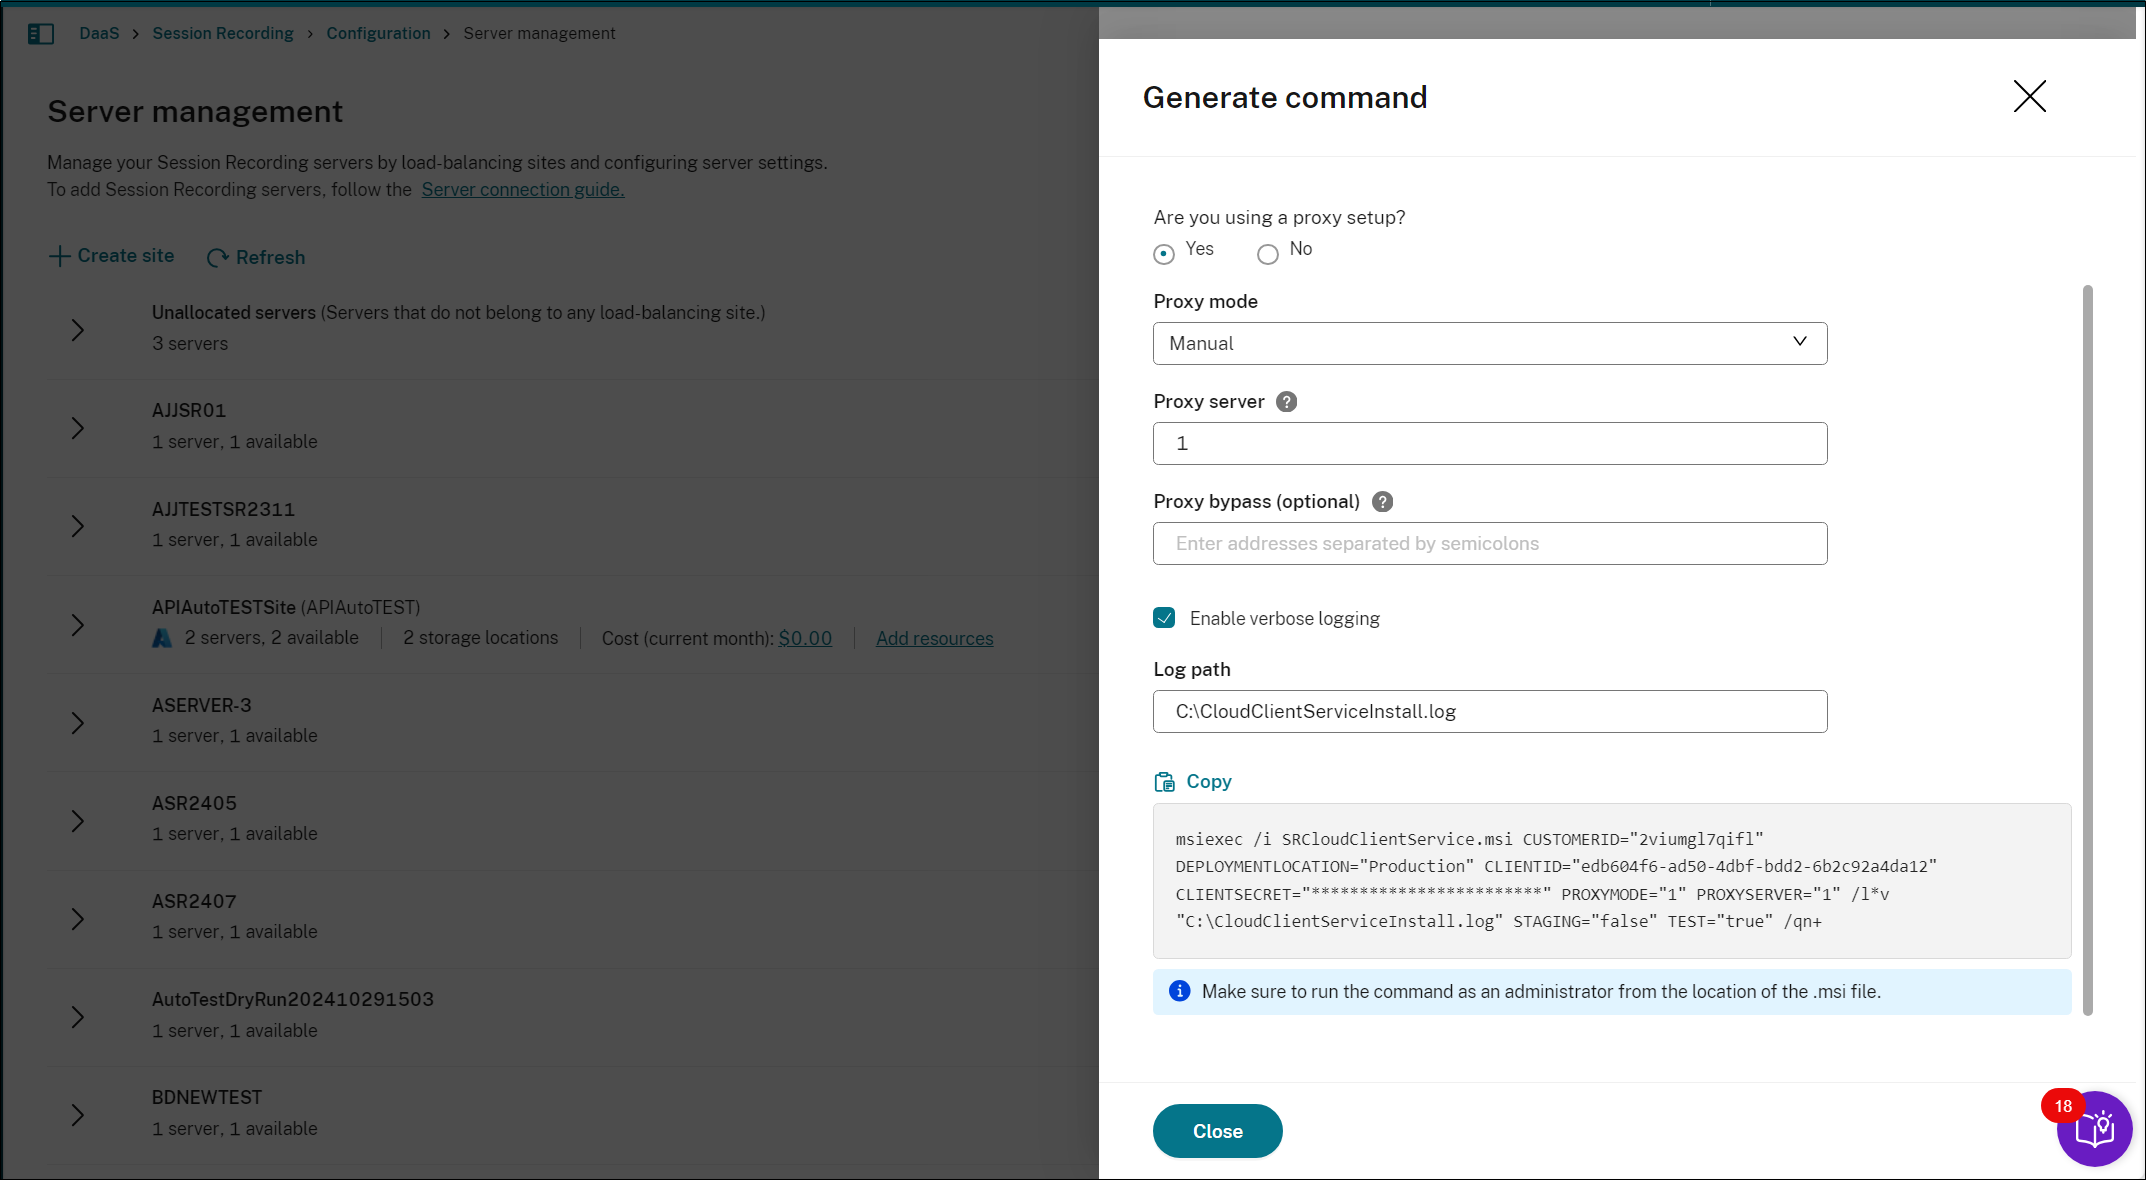
If you modify the answers or provide different information after clicking the Generate command button, the generated command automatically updates accordingly. The Generate command button is available again after you sign out and sign back in to Citrix Cloud.
-
Verify that the status of the machine shows Ready to install, and then click the installation icon.
-
Follow the wizard to install the Session Recording server component on the machine.
-
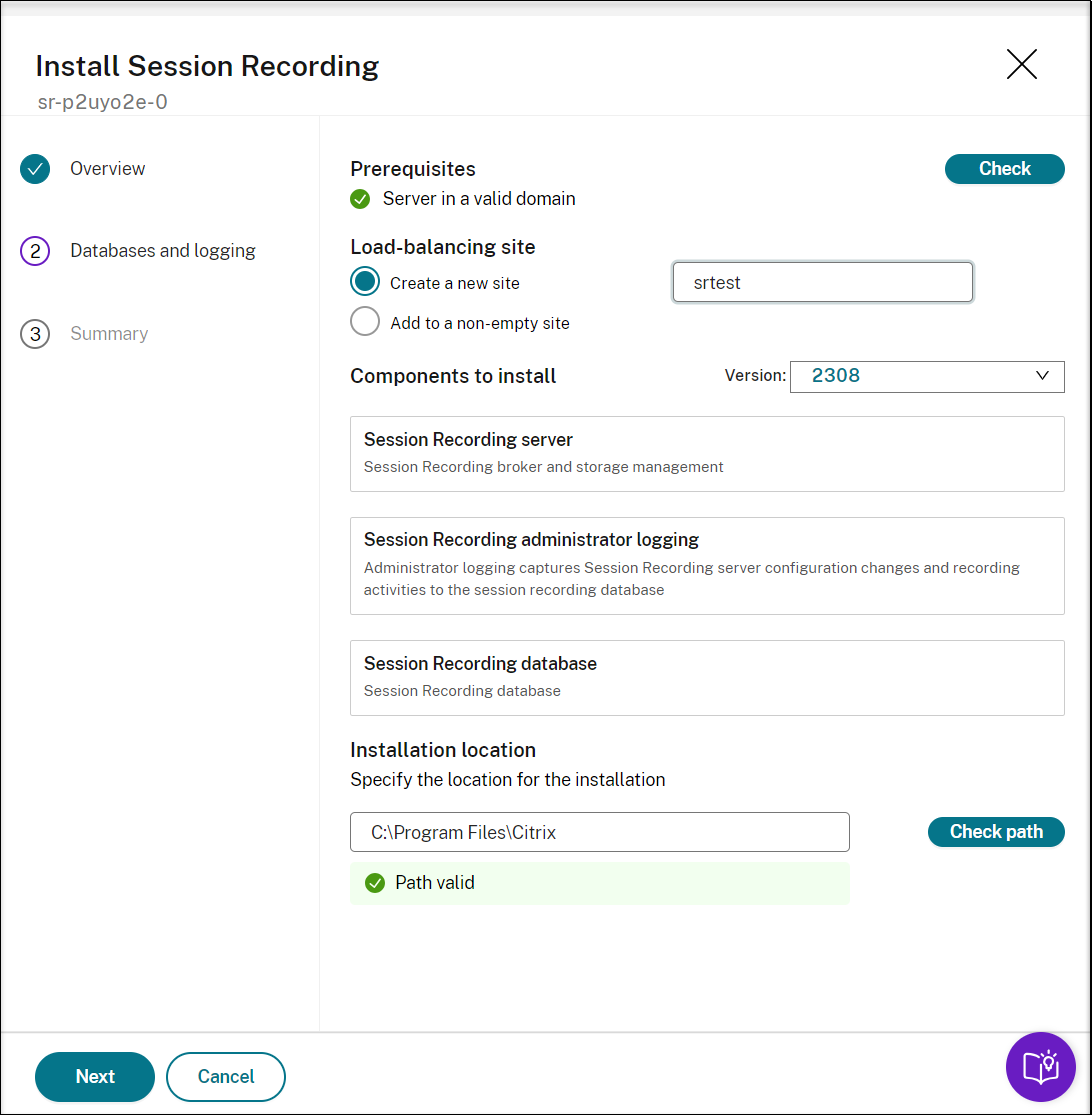
On the Overview page, complete the following steps:
-
Run a check to verify that the machine is in a valid domain.
The prerequisite check is to prevent issues that might keep Session Recording servers from functioning after being connected.
-
Create a site for the machine or add the machine to an existing non-empty site.
- Choose a server version to install.
- Specify an installation path and verify that the path is valid.
- Click Next to proceed to the Databases page.
-
-
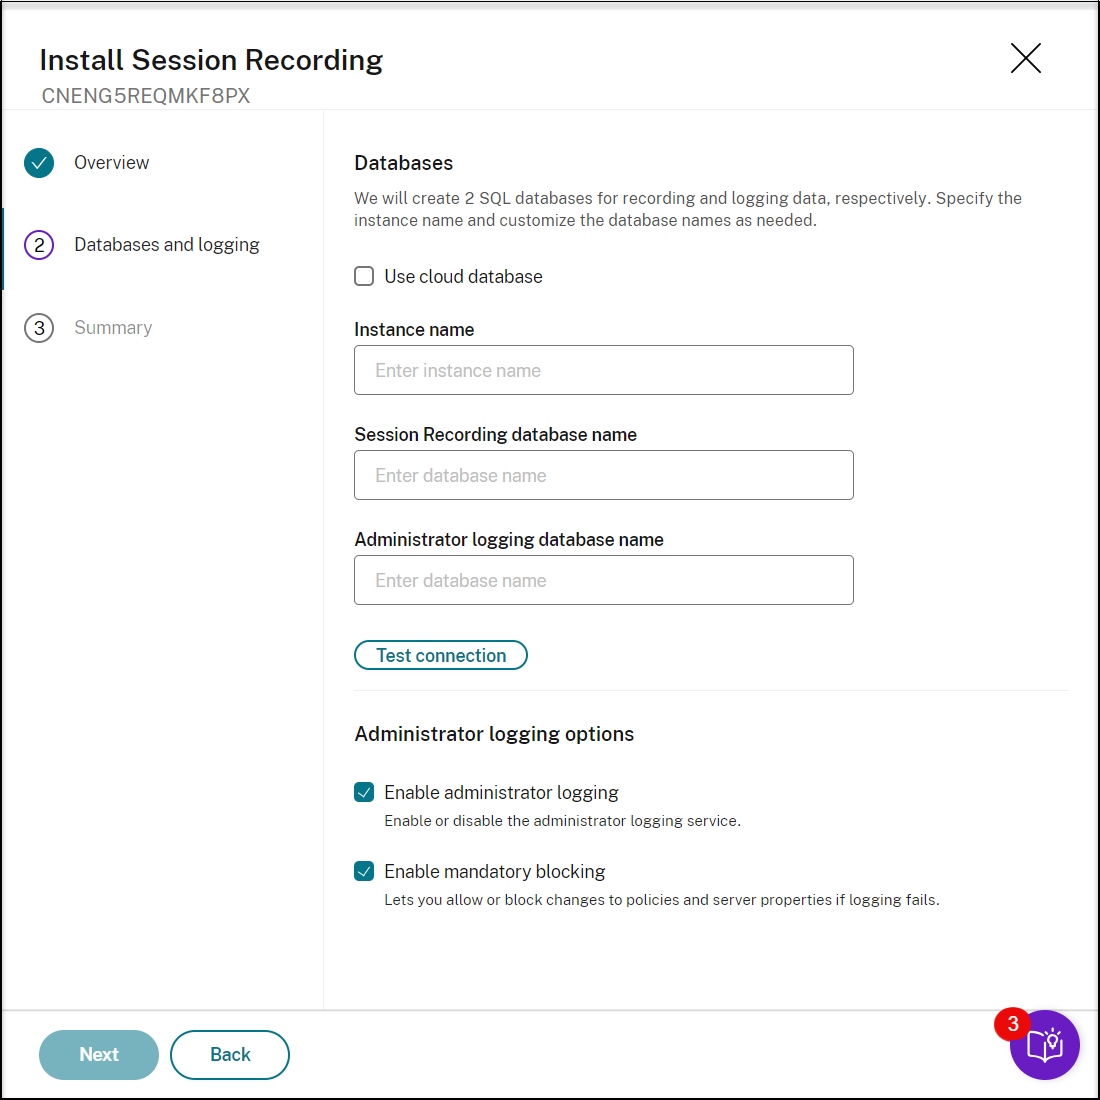
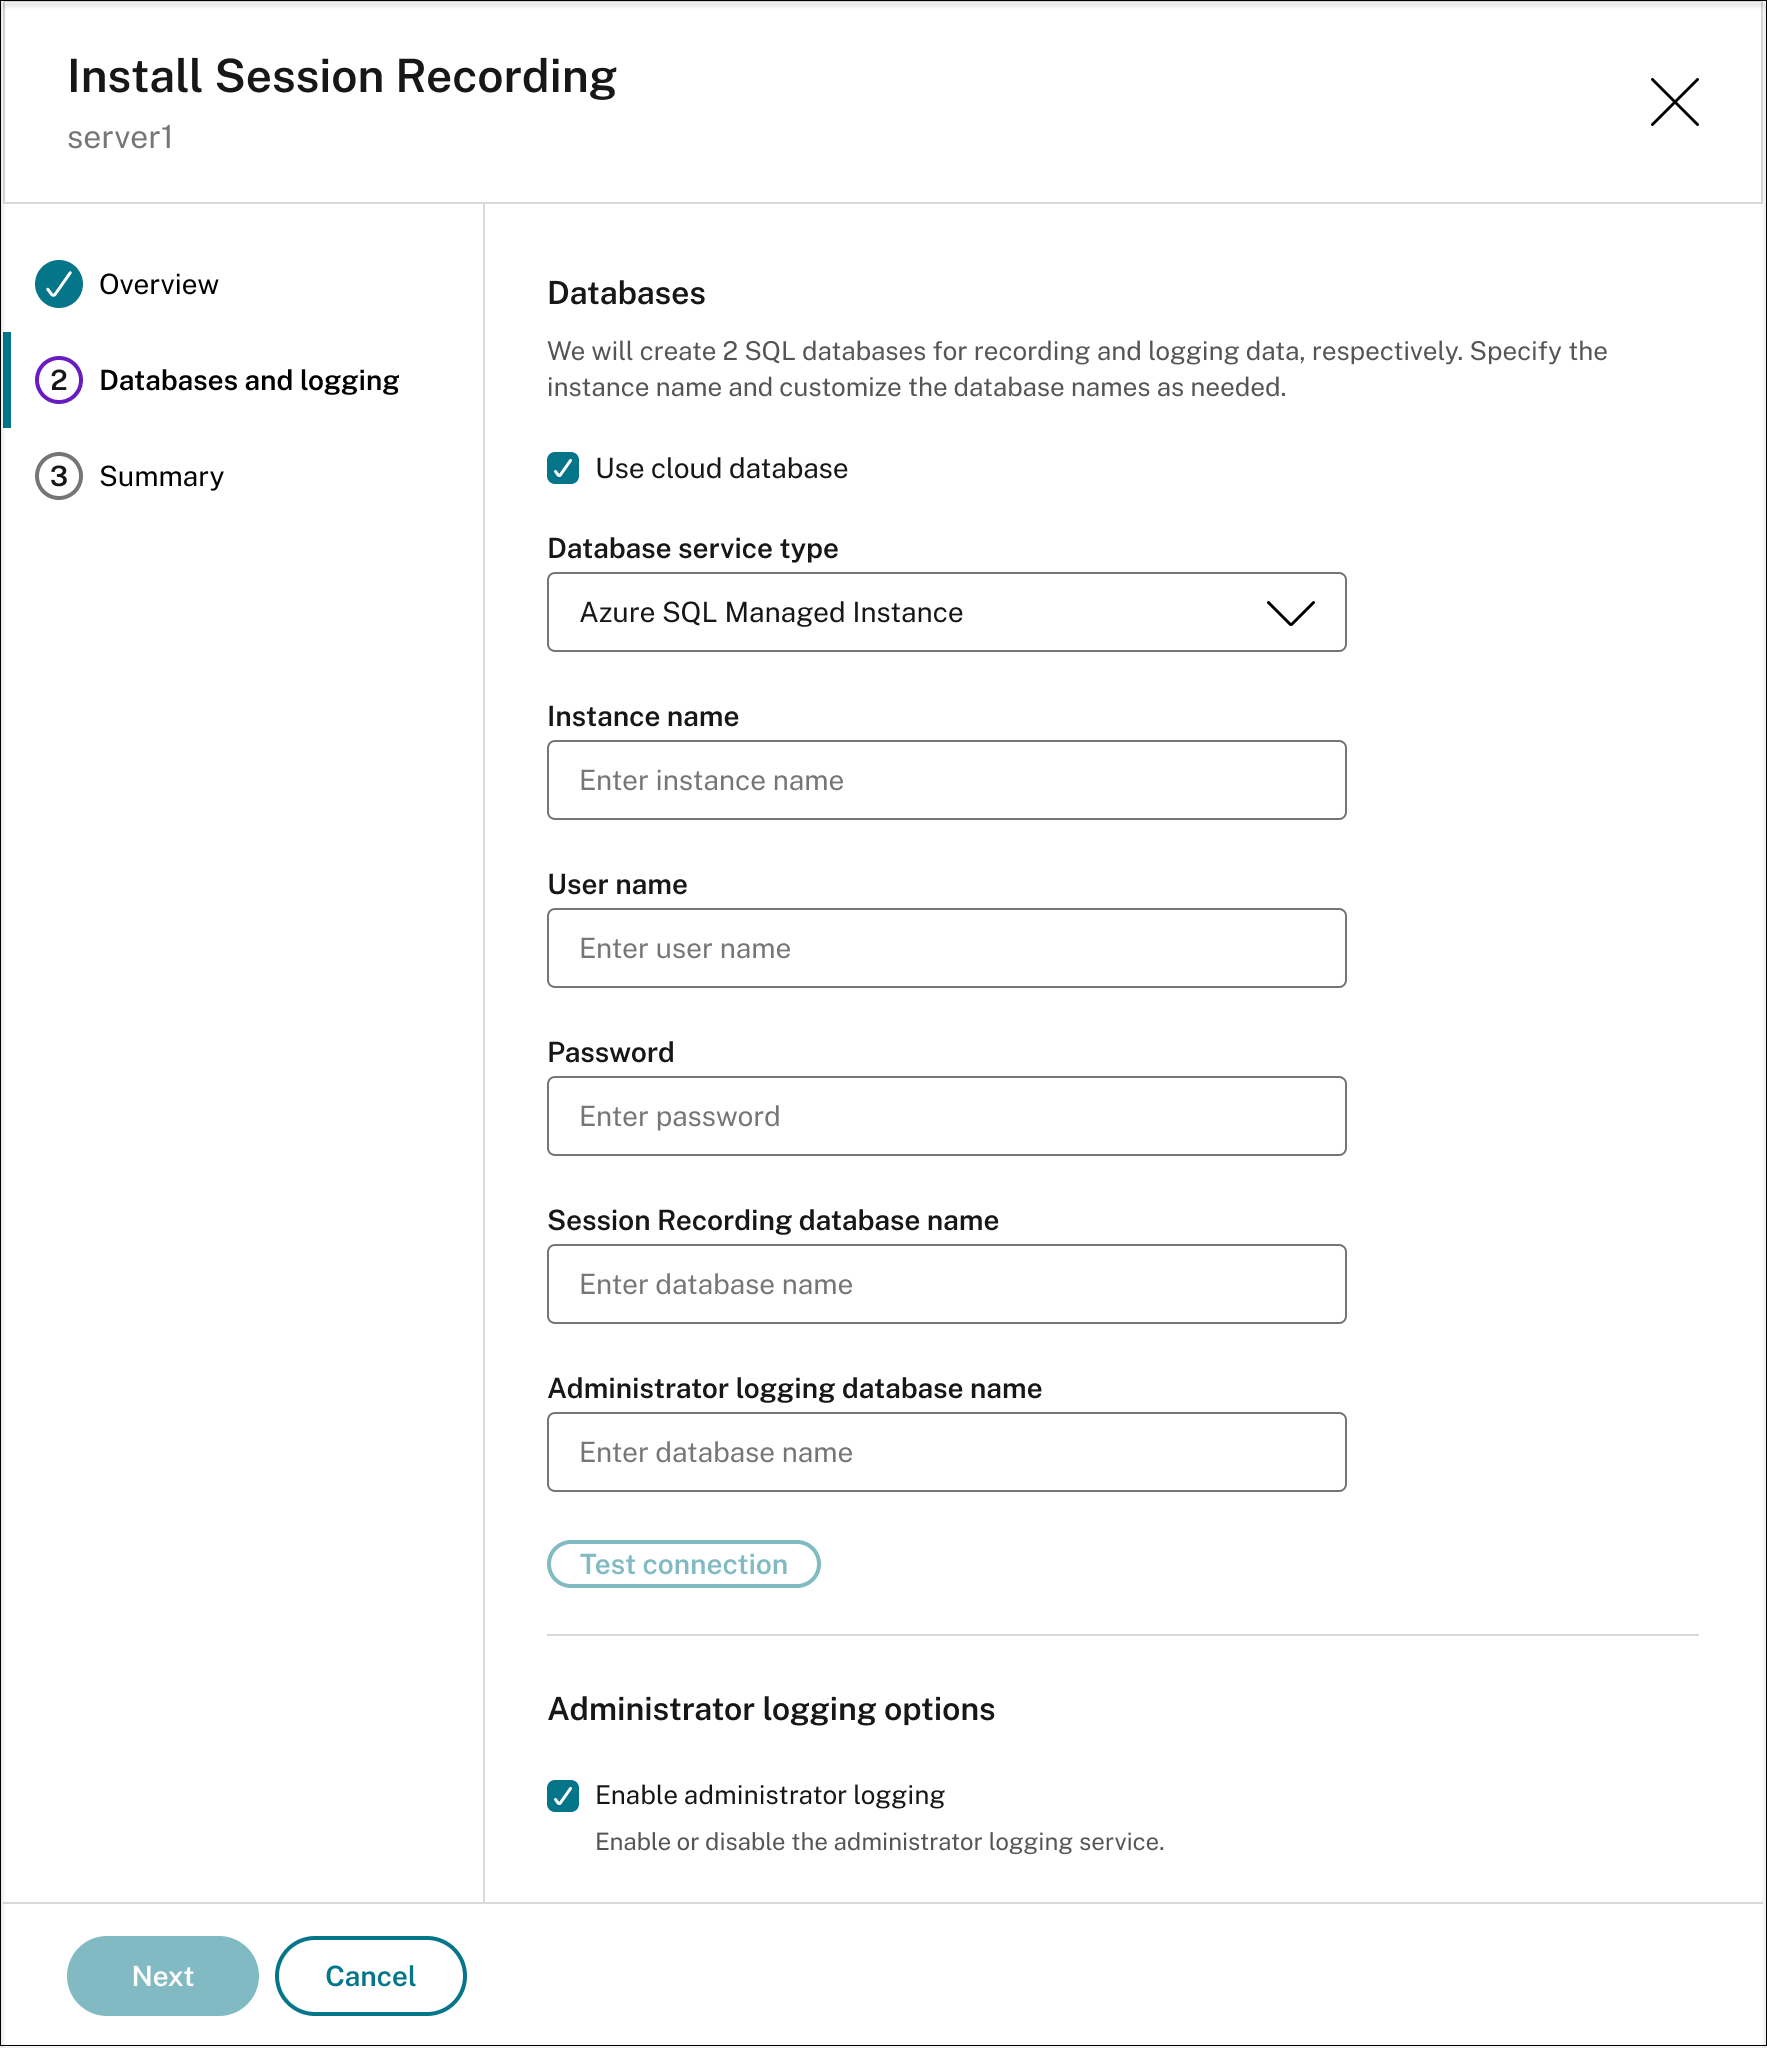
On the Databases page, choose whether to use a cloud database, fill the fields accordingly, and then click Test connection to test the connectivity to the Session Recording database and the administrator logging database.
Tip:
- If you allocated the machine to an existing non-empty site earlier, the fields on the Databases page are automatically filled.
- You can deploy the Session Recording database on the following cloud SQL database services:
- Azure SQL Database
- Azure SQL Managed Instance
- SQL Server on Azure Virtual Machines (VMs)
- AWS RDS
-
Google Cloud SQL Server
-
Instance name: If the database instance isn’t a named instance, you can use only the computer name of the SQL Server. If you have named the instance during the instance setup, use computer-name\instance-name as the database instance name. To determine the server instance name that you are using, run select @@servername on the SQL Server. The return value is the exact database instance name. If your SQL server is configured to be listening on a custom port other than the default port 1433, set the custom listener port by appending a comma to the instance name. For example, type DXSBC-SRD-1,2433 in the Instance name text box, where 2433, following the comma, denotes the custom listener port.
-
Session Recording database name: Type a custom database name. If the Session Recording server and the database instance are installed on different machines, grant the sysadmin role permission on the database to the machine where the Session Recording server is installed. If both the Session Recording server and the database instance are installed on the same machine, grant the sysadmin role permission on the database to the machine where the Session Recording server is installed and to the NT AUTHORITY\NETWORK SERVICE and NT AUTHORITY\SYSTEM accounts. Click Test connection to test the connectivity to the SQL Server instance and the validity of the database name.
-
Administrator logging database name: The administrator logging database name must be different from the Session Recording database name. After typing the administrator logging database name, click Test connection to test the connectivity to the administrator logging database.
-
Enable administration logging: By default, the administration logging feature is enabled. You can disable it by clearing the check box.
-
Enable mandatory blocking: By default, mandatory blocking is enabled. The normal features might be blocked if logging fails. You can disable mandatory blocking by clearing the check box.
Session Recording now supports different types of sql authentication, please refer to the following table for details:
Supported Sql Authentication Method Supported SQL Server Type SQL Server Authentication
- On-Premises SQL Server
- Azure SQL Database
- Azure SQL Managed Instance
- SQL Server on Azure VMs
- AWS RDS
- Google Cloud SQL Server
Microsoft Entra ID Password Authentication with Cloud Managed Entra id account
- Azure SQL Database
- Azure SQL Managed Instance
Microsoft Entra ID Service Principal Authentication with Cloud Managed Entra id account Azure SQL Managed Instance Note:
Need to install OLE DB Driver and ODBC Driver on the same machine as the cloud client.
-
On the Summary page, verify your settings and click Install.

-
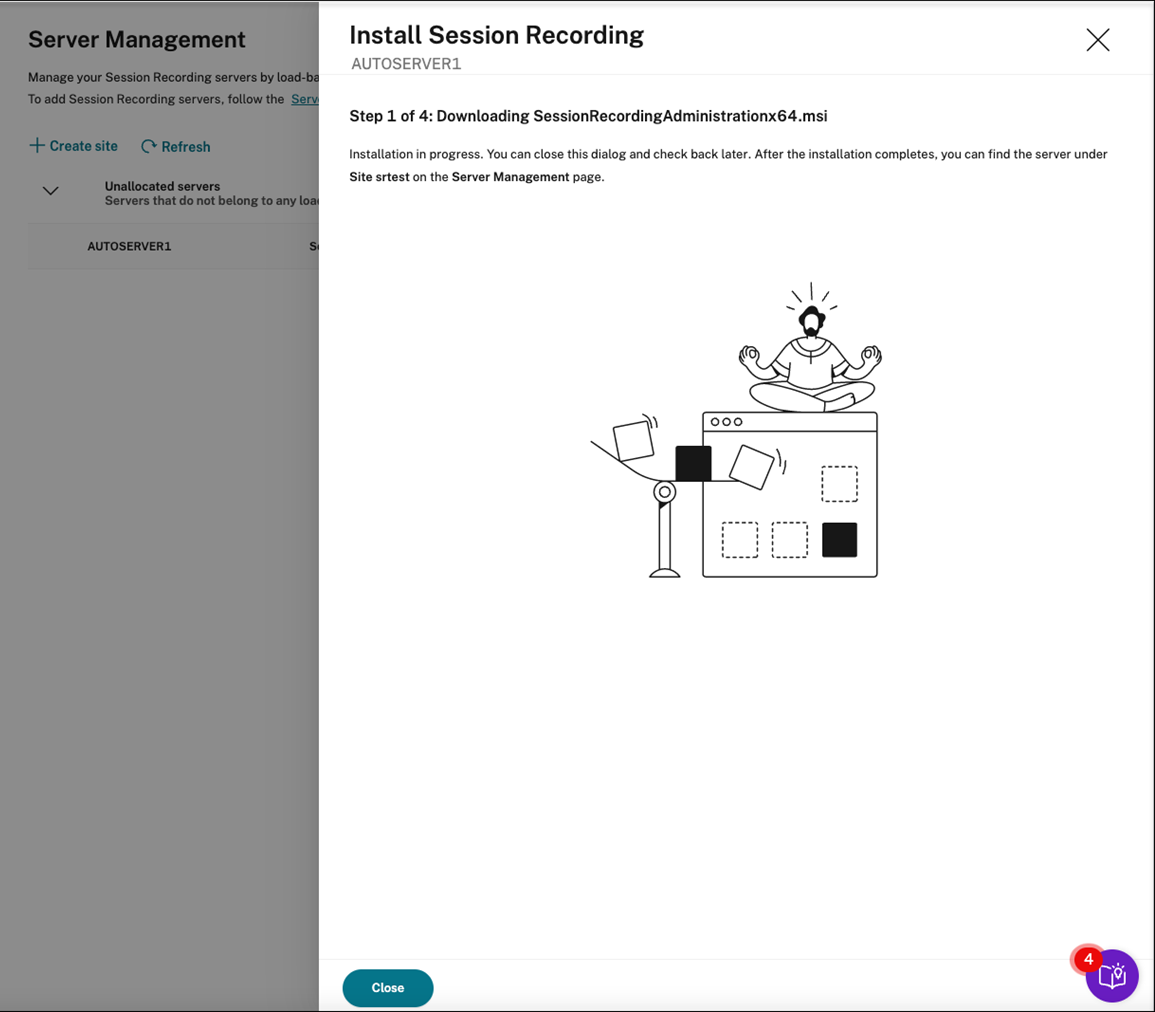
Check the installation progress by clicking the icon next to Installation in progress.
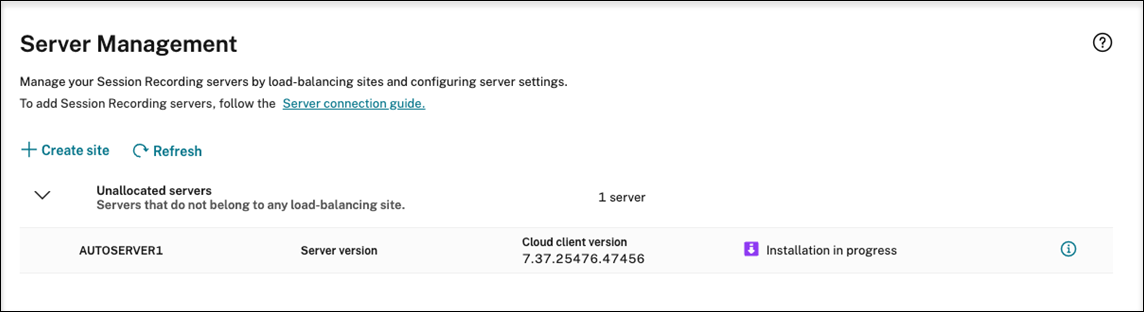
For example, the installation has progressed to the first step.
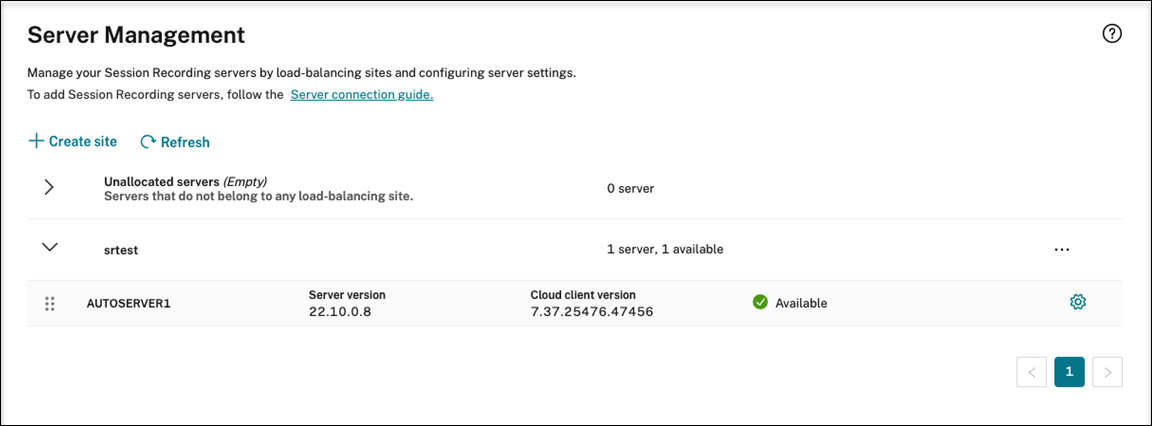
After installation completes successfully, the machine becomes a Session Recording server that is connected to the Session Recording service. You can find the server under the site that you created or specified. Refresh the Server Management page to view all connected servers.
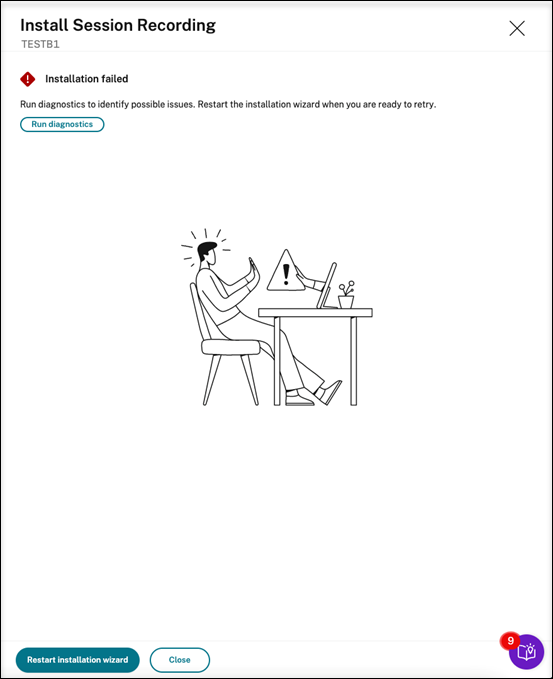
If the installation fails, click the icon next to Installation failed and run diagnostics to identify possible issues. Fix the issues if any, restart the machine, and then restart the installation wizard.
-
Post-installation actions
After installing a Session Recording server from within the cloud, perform the following operations:
- Connect the newly installed Session Recording server to the target Session Recording agent. Go to the target VDA or VDI machine and open Session Recording Agent Properties. Type the computer name of the machine where you installed the Session Recording server. Type the protocol and port information for the connection to the Session Recording server.
- Configure server settings, policies, and playback permissions based on your needs.
- Launch sessions to verify that sessions are recording.
- View administrator logging data.
- Go to the Session Recording management dashboard to gain insights into your deployment. For fresh installations, data is not immediately available on the dashboard.