Configure server groups
For redundancy and scalability, you should deploy 2 or more identical StoreFront servers in a server group, behind a load balancer. StoreFront synchronizes configuration and favorites data between the servers.
To manage a multiple-server deployment, use only one server at a time to make changes to the configuration of the server group. Ensure that the Citrix StoreFront management console is not running on any of the other servers in the deployment. Once you have completed your changes, propagate local changes to the other servers in the server group to ensure a consistent configuration across the deployment.
View server group
In the StoreFront management console, in the tree view on the left hand side, select Server Group. This shows the number of servers in the server group, the base URL, the list of servers and their synchronization status.
Add a server to a server group
Before you install StoreFront on a server that you’re adding to the group, ensure the following:
- The server you’re adding must have the same version of StoreFront as other servers in the group.
- The server you’re adding is co-located with the other servers in the group. Ensure low latency and a reliable connection between the servers.
- The server you’re adding is running the same operating system version with the same locale settings as the other servers in the group. StoreFront server groups containing mixtures of operating system versions and locales aren’t supported.
- IIS is configured with the same website configuration, such as physical path and site IDs, as the other servers in the group.
Note:
For recommendation on server group size, see StoreFront Server groups.
If the StoreFront server you are adding previously belonged to a server group and has been removed, before it can be added again, to the same or a different server group, you must reset the StoreFront server to a factory default state. See Reset a server to factory defaults
Important:
When you add a new server to a server group, StoreFront service accounts are added as members of the local administrators group on the new server. These services require local administrator permissions to join and synchronize with the server group. If you use Group Policy to prevent addition of new members to the local administrator group or if you restrict the permissions of the local administrator group on your servers, StoreFront cannot join a server group.
-
Log on to a server in the StoreFront deployment that you wish to join and open the Citrix StoreFront management console. Select the Server Group node in the left pane of the console and, in the Actions pane, select Add Server. Make a note of the authorization code that is displayed.
-
Connect to the new server. In the StoreFront management console, select Join existing server group.
-
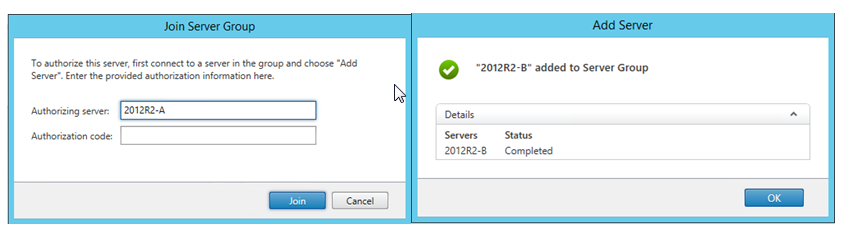
In the Join Server Group dialog box, specify the name of the existing server in the Authorizing server box. Enter the authorization code obtained from that server and select Join.
Once joined to the group, the configuration of the new server is updated to match the configuration of the existing server. All the other servers in the group are updated with details of the new server.
-
Add the server to the load balancer.
To manage a multiple server deployment, use only one server at a time to make changes to the configuration of the server group. Ensure that the Citrix StoreFront management console is not running on any of the other servers in the deployment. Any configuration changes you make must be propagated to the other servers in the group to ensure a consistent configuration across the deployment.
Remove servers from a server group
- Remove the server from the load balancer.
- Log in to one of the servers in the server group other than the one you wish to remove.
- Open the StoreFront management console.
- In the tree view Select Server Group
- Select Remove Server.
- Choose the server you wish to remove.
Before a removed StoreFront server can be added again, to the same or to a different server group, you must reset it to a factory default state. See Reset a server to factory defaults
Propagate local changes to a server group
Once you have made configuration changes to one server, you must propagate those changes to all the other servers in the server group. Propagation of configuration information is initiated manually so that you retain control over when and if the servers in the group are updated with configuration changes. While running this propagation, you cannot make any further changes until all the servers in the group have been updated.
To propagate changes, select Propagate changes from the actions pane.
Important:
Any changes made on other servers in the group are discarded during propagation. If you update the configuration of a server, propagate the changes to the other servers in the group to avoid losing those changes if you later propagate changes from different server in the deployment.
The information propagated between servers in the group includes the following:
- Contents of all
web.configfiles, which contain the StoreFront configuration. - Contents of
C:\Program Files\Citrix\Receiver StoreFront\Receiver Clients, such asC:\Program Files\Citrix\Receiver StoreFront\Receiver Clients\Windows\CitrixWorkspaceAppWeb.exeandC:\Program Files\Citrix\Receiver StoreFront\Receiver Clients\MAC\CitrixWorkspaceAppWeb.dmg. - For each store website, e.g.
c:\inetpub\wwwroot\Citrix\StoreWeb, the contents of thecontrib,customandcustomwebfolders. These folders are use to hold website customizations. - Contents of the Citrix Delivery Services certificate store, except any manually imported Certificate Revocation Lists (CRLs). (For details on distributing local CRLs, see Certificate Revocation List (CRL) checking.
Note:
Subscription data is synchronized with the other servers independently of the Propagate Changes mechanism. It happens automatically without needing initiate the Propagate Changes task.