Certificates and authentication
Several components play a role in authentication during XenMobile® operations:
-
XenMobile Server: The XenMobile Server is where you define enrollment security and the enrollment experience. Options for onboarding users include:
- Whether to make the enrollment open for all or by invitation only.
- Whether to require two-factor authentication or three-factor authentication. Through client properties in XenMobile, you can enable Citrix PIN authentication and configure the complexity and expiration time of the PIN.
- Citrix ADC: Citrix ADC provides termination for micro VPN SSL sessions. Citrix ADC also provides network in-transit security, and lets you define the authentication experience used each time a user accesses an app.
-
Secure Hub: Secure Hub and XenMobile Server work together in enrollment operations. Secure Hub is the entity on a device that talks to the Citrix ADC: When a session expires, Secure Hub gets an authentication ticket from Citrix ADC and passes the ticket to the MDX apps. Citrix recommends certificate pinning, which prevents man-in-the-middle attacks. For more information, see this section in the Secure Hub article: Certificate pinning.
Secure Hub also facilitates the MDX security container: Secure Hub pushes policies, creates a session with the Citrix ADC when an app times out, and defines the MDX timeout and authentication experience. Secure Hub is also responsible for jailbreak detection, geolocation checks, and any policies you apply.
- MDX policies: MDX policies create the data vault on the device. MDX policies direct micro VPN connections back to the Citrix ADC, enforce offline mode restrictions, and enforce client policies, such as time-outs.
For more information about configuring authentication, including an overview of single-factor and two-factor authentication methods, see the Deployment Handbook article, Authentication.
You use certificates in XenMobile to create secure connections and authenticate users. The remainder of this article discusses certificates. For other configuration details, see the following articles:
- Domain or domain plus security token authentication
- Client certificate or certificate plus domain authentication
- PKI entities
- Credential providers
- APNs certificates
- SAML for single sign-on with Citrix Files
- Microsoft Azure Active Directory server settings
- To send a certificate to devices to authenticate to the Wi-Fi server: Wi-Fi device policy
- To push a unique certificate not used for authentication, such as an internal root certificate authority (CA) certificate, or a specific policy: Credentials device policy
Certificates
XenMobile generates a self-signed Secure Sockets Layer (SSL) certificate during installation to secure the communication flows to the server. You must replace the SSL certificate with a trusted SSL certificate from a well-known CA.
XenMobile also uses its own Public Key Infrastructure (PKI) service or obtains certificates from the CA for client certificates. All Citrix products support wildcard and Subject Alternative Name (SAN) certificates. For most deployments, you only need two wildcard or SAN certificates.
Client certificate authentication provides an extra layer of security for mobile apps and lets users seamlessly access HDX™ Apps. When client certificate authentication is configured, users type their Citrix PIN for single sign-on (SSO) access to XenMobile-enabled apps. Citrix PIN also simplifies the user authentication experience. Citrix PIN is used to secure a client certificate or save Active Directory credentials locally on the device.
To enroll and manage iOS devices with XenMobile, set up and create an Apple Push Notification Service (APNs) certificate from Apple. For steps, see APNs certificates.
The following table shows the certificate format and type for each XenMobile component:
| XenMobile component | Certificate format | Required certificate type |
|---|---|---|
| Citrix Gateway | PEM (BASE64), PFX (PKCS #12) | SSL, Root (Citrix Gateway converts PFX to PEM automatically.) |
| XenMobile Server | .p12 (.pfx on Windows-based computers) | SSL, SAML, APNs (XenMobile also generates a full PKI during the installation process.) Important: XenMobile Server doesn’t support certificates with a .pem extension. To use a .pem certificate, split the .pem file into a certificate and key and import each into the XenMobile Server. |
| StoreFront™ | PFX (PKCS #12) | SSL, Root |
XenMobile supports SSL listener certificates and client certificates with bit lengths of 4096, 2048, and 1024. 1024-bit certificates are easily compromised.
For Citrix Gateway and the XenMobile Server, Citrix recommends obtaining server certificates from a public CA, such as Verisign, DigiCert, or Thawte. You can create a Certificate Signing Request (CSR) from the Citrix Gateway or the XenMobile configuration utility. After you create the CSR, you submit it to the CA for signing. When the CA returns the signed certificate, you can install the certificate on Citrix Gateway or XenMobile.
Important: Requirements for trusted certificates in iOS, iPadOS, and macOS
Apple has new requirements for TLS server certificates. Verify that all certificates follow the new Apple requirements. See the Apple publication, https://support.apple.com/en-us/HT210176.
Apple is reducing the maximum allowed lifetime of TLS server certificates. This change affects only server certificates issued after September 2020. See the Apple publication, https://support.apple.com/en-us/HT211025.
Uploading certificates in XenMobile
Each certificate you upload has an entry in the Certificates table, including a summary of its contents. When you configure PKI integration components that require a certificate, you choose a server certificate that satisfies the context-dependent criteria. For example, you might want to configure XenMobile to integrate with your Microsoft certification authority (CA). The connection to the Microsoft CA must be authenticated by using a client certificate.
This section provides general procedures for uploading certificates. For details about creating, uploading, and configuring client certificates, see Client certificate or certificate plus domain authentication.
Private key requirements
XenMobile may or may not possess the private key for a given certificate. Likewise, XenMobile may or may not require a private key for uploaded certificates.
Uploading certificates
You have two options for uploading certificates:
- Upload the certificates to the console individually.
- Perform a bulk upload of certificates to iOS devices with the REST API.
When uploading certificates to the console, you have two main options:
- Click to import a keystore. Then, you identify the entry in the keystore repository you want to install, unless you are uploading a PKCS #12 format.
- Click to import a certificate.
You can upload the CA certificate (without the private key) that the CA uses to sign requests. You can also upload an SSL client certificate (with the private key) for client authentication.
When configuring the Microsoft CA entity, you specify the CA certificate. You select the CA certificate from a list of all server certificates that are CA certificates. Likewise, when configuring client authentication, you can select from a list of all the server certificates for which XenMobile has the private key.
To import a keystore
By design, keystores, which are repositories of security certificates, can contain multiple entries. When loading from a keystore, therefore, you are prompted to specify the entry alias that identifies the entry you want to load. If you do not specify an alias, the first entry from the store is loaded. Because PKCS #12 files usually contain only one entry, the alias field does not appear when you select PKCS #12 as the keystore type.
-
In the XenMobile console, click the gear icon in the upper-right corner of the console. The Settings page appears.
-
Click Certificates. The Certificates page appears.
-
Click Import. The Import dialog box appears.
-
Configure these settings:
- Import: In the list, click Keystore. The Import dialog box changes to reflect available keystore options.
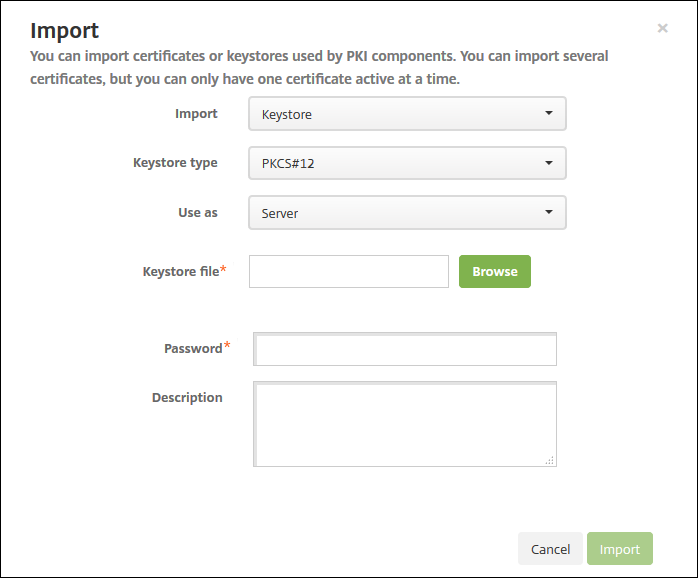
- Keystore type: In the list, click PKCS #12.
-
Use as: In the list, click how you plan to use the certificate. The available options are:
- Server. Server certificates are certificates used functionally by the XenMobile Server that are uploaded to the XenMobile web console. They include CA certificates, RA certificates, and certificates for client authentication with other components of your infrastructure. In addition, you can use server certificates as storage for certificates you want to deploy to devices. This use especially applies to CAs used to establish trust on the device.
- SAML. Security Assertion Markup Language (SAML) certification allows you to provide SSO access to servers, websites, and apps.
- APNs. APNs certificates from Apple enable mobile device management via the Apple Push Network.
- SSL Listener. The Secure Sockets Layer (SSL) Listener notifies XenMobile of SSL cryptographic activity.
- Keystore file: Browse to find the keystore you want to import of the file type .p12 (or .pfx on Windows-based computers).
- Password: Type the password assigned to the certificate.
- Description: Optionally, type a description for the keystore to help you distinguish it from your other keystores.
-
Click Import. The keystore is added to the Certificates table.
To import a certificate
When importing a certificate, either from a file or a keystore entry, XenMobile attempts to construct a certificate chain from the input. XenMobile imports all certificates in that chain to create a server certificate entry for each. This operation only works if the certificates in the file or keystore entry do form a chain. For example, if each subsequent certificate in the chain is the issuer of the previous certificate.
You can add an optional description for the imported certificate. The description only attaches to the first certificate in the chain. You can update the description of the remaining certificates later.
-
In the XenMobile console, click the gear icon in the upper-right corner of the console and then click Certificates.
-
On the Certificates page, click Import. The Import dialog box appears.
-
In the Import dialog box, in Import, if it is not already selected, click Certificate.
-
The Import dialog box changes to reflect available certificate options. In Use as, select how you plan to use the keystore. The available options are:
- Server. Server certificates are certificates used functionally by the XenMobile Server that are uploaded to the XenMobile web console. They include CA certificates, RA certificates, and certificates for client authentication with other components of your infrastructure. In addition, you can use server certificates as storage for certificates you want to deploy to devices. This option especially applies to CAs used to establish trust on the device.
- SAML. Security Assertion Markup Language (SAML) certification allows you to provide single sign-on (SSO) access to servers, websites, and apps.
- SSL Listener. The Secure Sockets Layer (SSL) Listener notifies XenMobile of SSL cryptographic activity.
-
Browse to find the keystore you want to import of the file type .p12 (or .pfx on Windows-based computers).
-
Browse to find an optional private key file for the certificate. The private key is used for encryption and decryption along with the certificate.
-
Type a description for the certificate, optionally, to help you identify it from your other certificates.
-
Click Import. The certificate is added to the Certificates table.
Upload certificates to iOS devices in bulk with the REST API
If uploading certificates one at a time isn’t practical, you can bulk upload them to iOS devices with the REST API. This method supports certificates in the .p12 format. For more information about the REST API, see REST APIs.
-
Rename each of the certificate files in the format
device_identity_value.p12. Thedevice_identity_valuecan be the IMEI, Serial Number, or MEID of each device.As an example, you choose to use serial numbers as your identification method. One device has a serial number
A12BC3D4EFGH, so name the certificate file you expect to install on that deviceA12BC3D4EFGH.p12. -
Create a text file to store the passwords for the .p12 certificates. In that file, type the device identifier and password for each device on a new line. Use the format
device_identity_value=password. See the following:A12BC3D4EFGH.p12=password1! A12BC3D4EFIJ.p12=password2@ A12BC3D4EFKL.p12=password3# <!--NeedCopy--> - Pack all the certificates and the text file that you created into a .zip file.
- Launch your REST API client, log in to XenMobile, and get an authentication token.
-
Import your certificates, ensuring you put the following in the message body:
{
    "alias": "",
    "useAs": "device",
    "uploadType": "keystore",
    "keystoreType": "PKCS12",
    "identityType":"SERIAL_NUMBER",        # identity type can be "SERIAL_NUMBER","IMEI","MEID"
    "credentialFileName":"credential.txt"   # The credential file name in .zip
}
<!--NeedCopy-->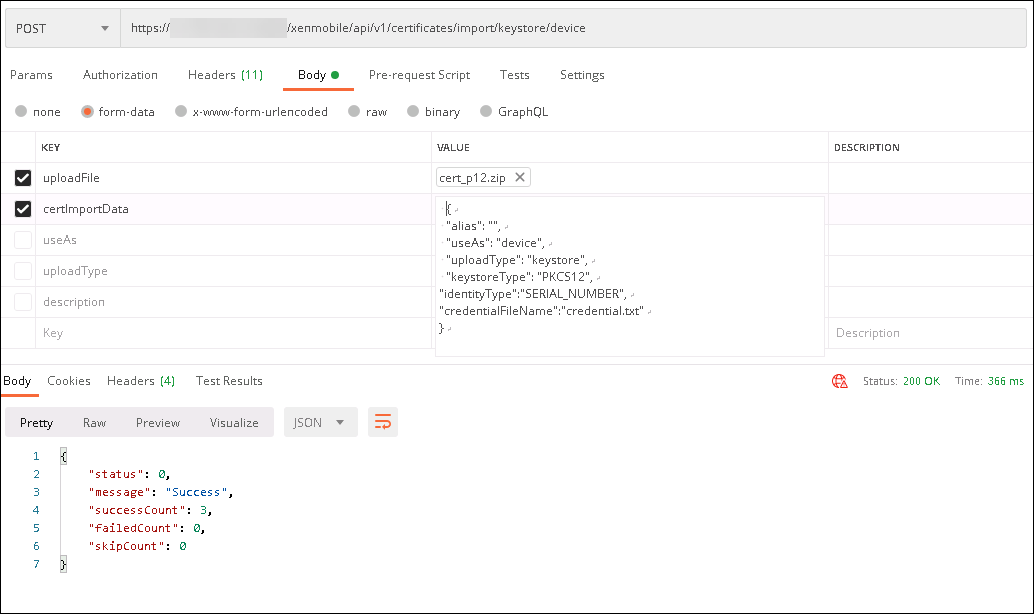
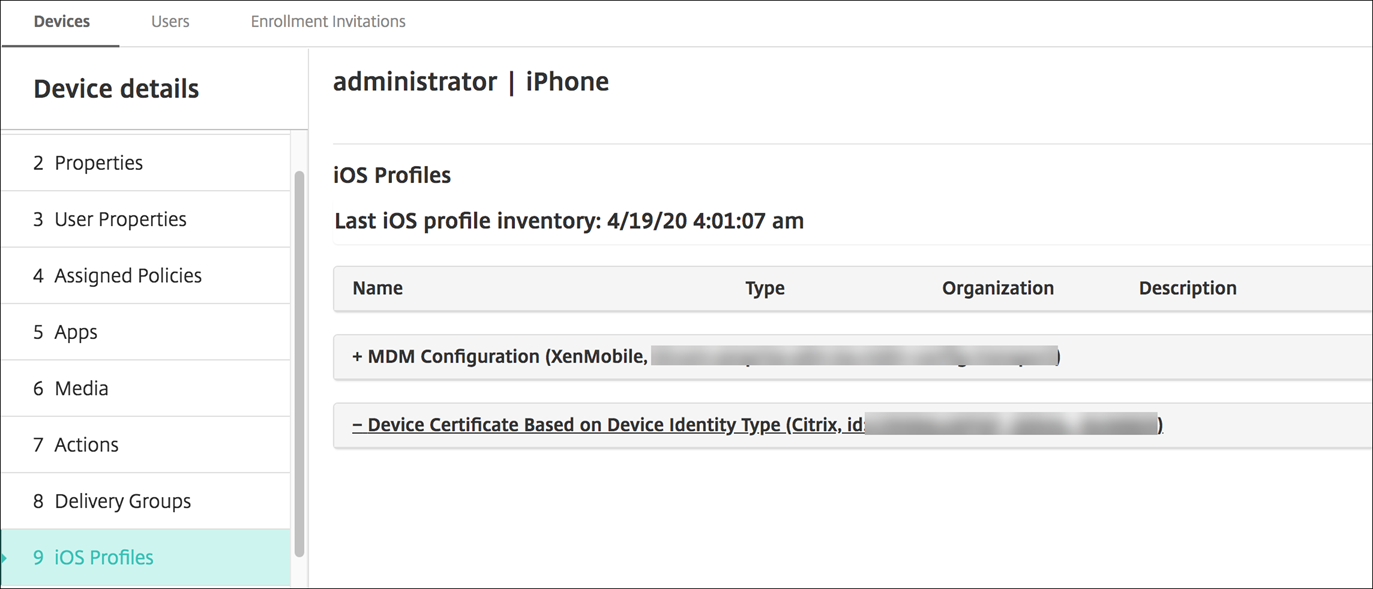
- Create a VPN policy with the credential type Always on IKEv2 and the device authentication method Device Certificate Based on Device Identity. Select the Device identity type you used in your certificate file names. See VPN device policy.
-
Enroll an iOS device and wait for the VPN policy to deploy. Confirm the certificate installation by checking the MDM configuration on the device. You can also check the device details in the XenMobile console.

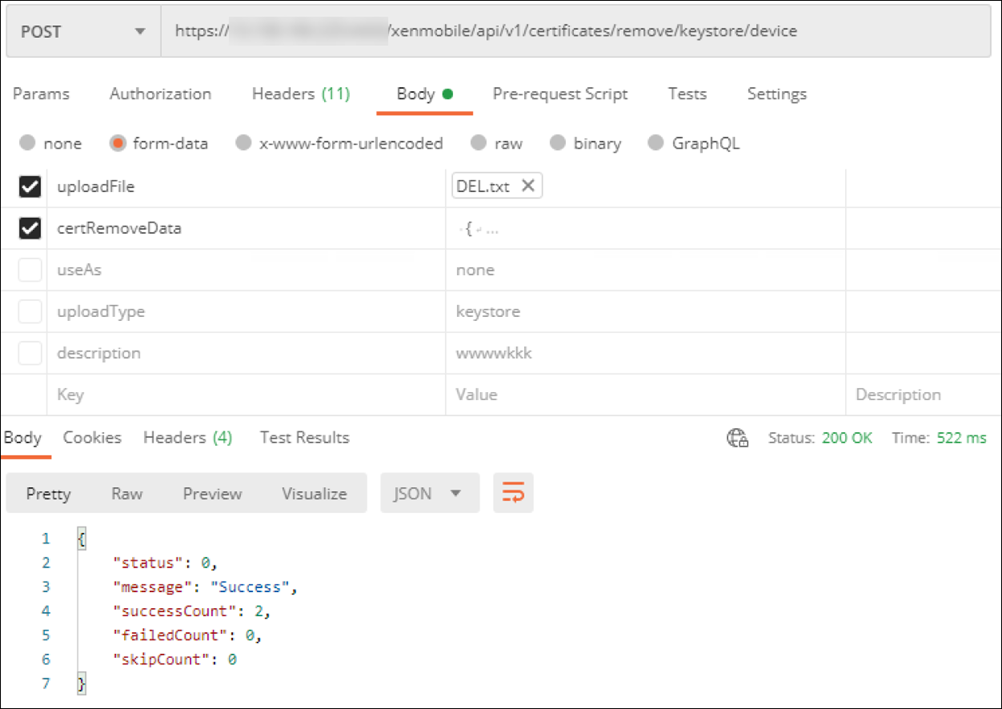
You can also delete certificates in bulk by creating a text file with the device_identity_value listed for each certificate to delete. In the REST API, call the delete API and use the following request, replacing device_identity_value with the appropriate identifier:
```
{
    "identityType"="device_identity_value"
}
<!--NeedCopy--> ```
Updating a certificate
XenMobile only allows one certificate per public key to exist in the system at a time. If you attempt to import a certificate for the same key pair as an already imported certificate: You can either replace the existing entry or delete the entry.
To most effectively update your certificates in the XenMobile console, do the following. Click the gear icon on the upper-right corner of the console to open the Settings page and then click Certificates. In the Import dialog box, import the new certificate.
When you update a server certificate, components that were using the previous certificate automatically switch to using the new certificate. Likewise, if you have deployed the server certificate on devices, the certificate automatically updates on the next deployment.
Renewing a certificate
XenMobile Server uses the following certificate authorities internally for PKI: Root CA, device CA, and server CA. Those CAs are classified as a logical group and provided a group name. When a new XenMobile Server instance is provisioned, the three CAs are generated and given the group name “default”.
You can renew the CAs for supported iOS, macOS, and Android devices by using the XenMobile Server console or the public REST API. For enrolled Windows devices, users must re-enroll their devices to receive a new device CA.
The following APIs are available for renewing or regenerating the internal PKI CAs in XenMobile Server and renewing the device certificates issued by these certificate authorities.
- Create group certificate authorities (CAs).
- Activate new CAs and deactivate old CAs.
- Renew the device certificate on a configured list of devices. Already enrolled devices continue to work without disruption. A device certificate is issued when a device connects back to the server.
- Return a list of devices still using the old CA.
- Delete the old CA after all devices have the new CA.
For information, see the following sections in the Public API for REST Services PDF:
- Section 3.16.58, Renew Device Certificate
- Section 3.23, Internal PKI CA Groups
The Manage Devices console includes the security action Certificate Renewal used to renew the enrollment certificate on a device.
Prerequisites
- By default, this certificate refresh feature is disabled. To activate the certificate refresh features, set the value for the server property refresh.internal.ca to True.
Important:
If your Citrix ADC is set up for SSL Offload, when you generate a new certificate, ensure that you update your load balancer with the new cacert.perm. For more information on Citrix Gateway setup, see To use SSL Offload mode for NetScaler VIPs.
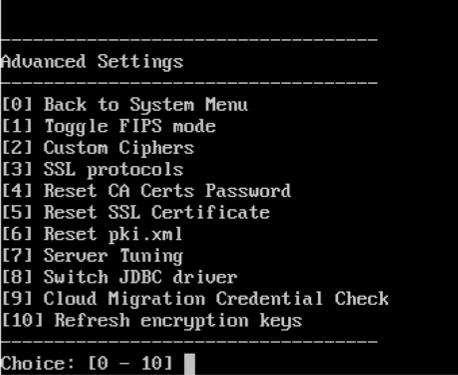
CLI option to reset the server CA certificate password for cluster nodes
After you generate a server CA certificate on one XenMobile Server node, use the XenMobile CLI to reset the certificate password on other cluster nodes. From the CLI main menu, choose System > Advanced Settings > Reset CA certs password. If you reset the password when there is no new CA certificate, XenMobile doesn’t reset the password.
XenMobile Certificate Administration
We recommend that you list the certificates you use in your XenMobile deployment, especially on their expiration dates and associated passwords. This section intends to help you make certificate administration in XenMobile easier.
Your environment may include some or all of the following certificates:
- XenMobile Server
- SSL Certificate for MDM FQDN
- SAML Certificate (For Citrix Files)
- Root and Intermediate CA Certificates for the preceding certificates and any other internal resources (StoreFront/Proxy, and so on)
- APN Certificate for iOS Device Management
- Internal APNs Certificate for XenMobile Server Secure Hub Notifications
- PKI User Certificate for connectivity to PKI
- MDX Toolkit
- Apple Developer Certificate
- Apple Provisioning Profile (per application)
- Apple APNs Certificate (for use with Citrix Secure Mail™)
- Android Keystore File
The MAM SDK doesn’t wrap apps, so it doesn’t require a certificate.
- Citrix ADC
- SSL Certificate for MDM FQDN
- SSL Certificate for Gateway FQDN
- SSL Certificate for ShareFile SZC FQDN
- SSL Certificate for Exchange Load Balancing (offload configuration)
- SSL Certificate for StoreFront Load Balancing
- Root & Intermediate CA Certificates for the preceding certificates
XenMobile Certificate Expiration Policy
If you allow a certificate to expire, the certificate becomes invalid. You can no longer run secure transactions on your environment and you cannot access XenMobile resources.
Note:
The Certification Authority (CA) prompts you to renew your SSL certificate before the expiration date.
APNs certificate for Citrix Secure Mail
Apple Push Notification Service (APNs) certificates expire every year. Be sure to create an APNs SSL certificate and update it in the Citrix portal before the certificate expires. If the certificate expires, users face inconsistency with Secure Mail push notifications. Also, you can no longer send push notifications for your apps.
APNs certificate for iOS device management
To enroll and manage iOS devices with XenMobile, set up and create an APNs certificate from Apple. If the certificate expires, users cannot enroll in XenMobile and you cannot manage their iOS devices. For details, see APNs certificates.
You can view the APNs certificate status and expiration date by logging on to the Apple Push Certificates Portal. Be sure to log on as the same user who created the certificate.
You also receive an email notification from Apple 30 and 10 days before the expiration date. The notification includes the following information:
The following Apple Push Notification Service certificate, created for Apple ID CustomerID will expire on Date. Revoking or allowing this certificate to expire will require existing devices to be re-enrolled with a new push certificate.

Please contact your vendor to generate a new request (a signed CSR), then visit https://identity.apple.com/pushcert to renew your Apple Push Notification Service certificate.

Thank You,

Apple Push Notification Service
<!--NeedCopy-->
MDX Toolkit (iOS distribution certificate)
An app that runs on a physical iOS device (other than apps in the Apple App Store) have these signing requirements:
- Sign the app with a provisioning profile.
- Sign the app with a corresponding distribution certificate.
To verify that you have a valid iOS distribution certificate, do the following:
- From the Apple Enterprise Developer portal, create an explicit App ID for each app you plan to wrap with the MDX Toolkit. An example of an acceptable App ID is:
com.CompanyName.ProductName. - From the Apple Enterprise Developer portal, go to Provisioning Profiles > Distribution and create an in-house provisioning profile. Repeat this step for each App ID created in the previous step.
- Download all provisioning profiles. For details, see Wrapping iOS Mobile Apps.
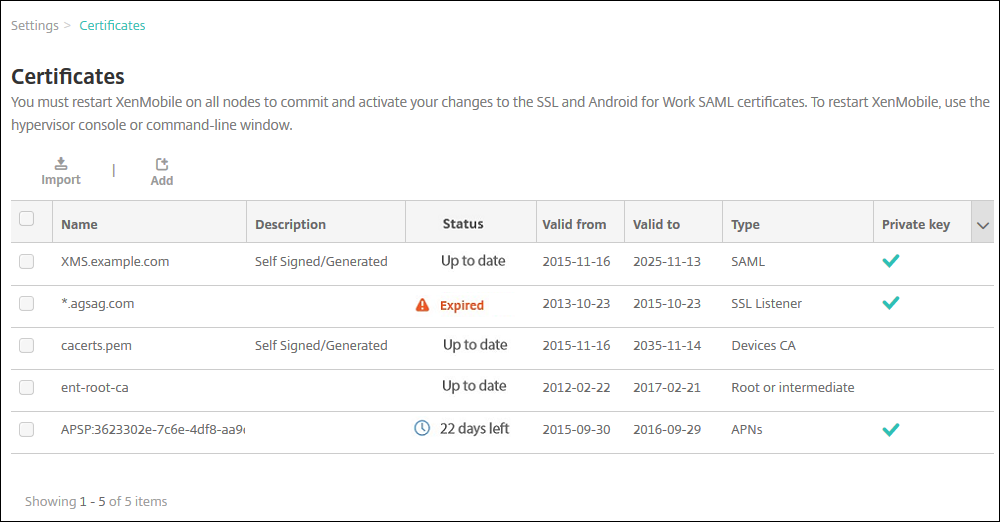
To confirm that all XenMobile Server certificates are valid, do the following:
- In the XenMobile console, click Settings > Certificates.
- Check that all certificates including APNs, SSL Listener, Root, and Intermediate certificates are valid.
Android keystore
The keystore is a file that contains certificates used to sign your Android app. When your key validity period expires, users can no longer seamlessly upgrade to new versions of your app.
Citrix ADC
For details on how to handle certificate expiration for Citrix ADC, see How to handle certificate expiry on NetScaler in the Citrix Support Knowledge Center.
An expired Citrix ADC certificate prevents users from enrolling and accessing the Store. The expired certificate also prevents users from connecting to Exchange Server when using Secure Mail. In addition, users cannot enumerate and open HDX apps (depending on which certificate expired).
The Expiry Monitor and Command Center can help you to track your Citrix ADC certificates. The Center notifies you when the certificate expires. These tools assist to monitor the following Citrix ADC certificates:
- SSL Certificate for MDM FQDN
- SSL Certificate for Gateway FQDN
- SSL Certificate for ShareFile SZC FQDN
- SSL Certificate for Exchange Load Balancing (offload configuration)
- SSL Certificate for StoreFront Load Balancing
- Root and Intermediate CA Certificates for the preceding certificates