This content has been machine translated dynamically.
Dieser Inhalt ist eine maschinelle Übersetzung, die dynamisch erstellt wurde. (Haftungsausschluss)
Cet article a été traduit automatiquement de manière dynamique. (Clause de non responsabilité)
Este artículo lo ha traducido una máquina de forma dinámica. (Aviso legal)
此内容已经过机器动态翻译。 放弃
このコンテンツは動的に機械翻訳されています。免責事項
이 콘텐츠는 동적으로 기계 번역되었습니다. 책임 부인
Este texto foi traduzido automaticamente. (Aviso legal)
Questo contenuto è stato tradotto dinamicamente con traduzione automatica.(Esclusione di responsabilità))
This article has been machine translated.
Dieser Artikel wurde maschinell übersetzt. (Haftungsausschluss)
Ce article a été traduit automatiquement. (Clause de non responsabilité)
Este artículo ha sido traducido automáticamente. (Aviso legal)
この記事は機械翻訳されています.免責事項
이 기사는 기계 번역되었습니다.책임 부인
Este artigo foi traduzido automaticamente.(Aviso legal)
这篇文章已经过机器翻译.放弃
Questo articolo è stato tradotto automaticamente.(Esclusione di responsabilità))
Translation failed!
Configure SQL Server
For connections to SQL Server from an on-premises XenMobile® Server, you can use any of the following drivers:
- The default driver
- jTDS
- Microsoft Java Database Connectivity (JDBC) driver
The jTDS driver is the default driver when you:
- Install XenMobile Server on-premises.
- Upgrade from a XenMobile Server that’s configured to use the jTDS driver.
For both drivers, XenMobile supports SQL Server authentication or Windows authentication. For those combinations of authentication and driver, SSL can be on or off.
When you use Windows authentication with the Microsoft JDBC driver, the driver uses integrated authentication with Kerberos. XenMobile contacts Kerberos to get the Kerberos Key Distribution Center (KDC) details. If the required details aren’t available, the XenMobile CLI prompts for the IP address of the Active Directory server.
To switch from the jTDS driver to the JDBC driver, SSH to all your XenMobile Server nodes and use the XenMobile CLI for configuration. The steps vary according to your current jTDS driver configuration, as follows.
Switch to Microsoft JDBC (SQL Server authentication)
To complete these steps, you need the SQL Server user name and password.
-
SSH to all XenMobile Server nodes.
-
In the XenMobile CLI main menu, type 2 to select the System Menu.
-
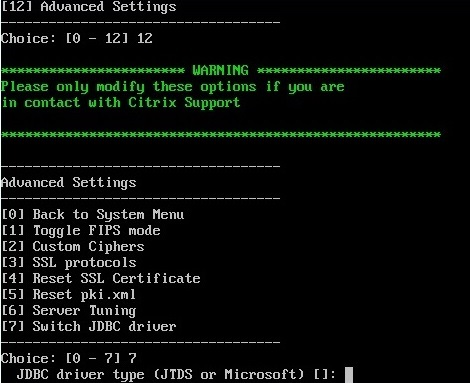
Type 12 to select Advanced Settings.
-
Type 7 to select Switch JDBC driver, and then type m for Microsoft.
-
When prompted, type y to choose SQL authentication and then type the SQL Server user name and password.
-
Repeat the steps for each XenMobile Server node.
-
Restart each XenMobile Server node.
Switch to Microsoft JDBC (SSL is off; Windows authentication)
To complete these steps, you need the Active Directory user name and password, the Kerberos KDC realm, and the KDC user name.
-
SSH to all XenMobile Server nodes.
-
In the XenMobile CLI main menu, type 2 to select the System Menu.
-
Type 12 to select Advanced Settings.
-
Type 7 to select Switch JDBC driver, and then type m.
-
When prompted whether to use SQL Server authentication, type n.
-
When prompted, type the Active Directory user name and password configured for the SQL server.
-
If XenMobile doesn’t auto-discover the Kerberos KDC realm, it prompts for the KDC details, including the SQL server FQDN.
-
When prompted whether to use SSL, type n. XenMobile saves the configuration. If XenMobile can’t save the configuration because of errors, it shows an error message and the details that you entered.
-
Repeat the steps for each XenMobile Server node.
-
Restart each XenMobile Server node.
To change the XenMobile database password
Follow this guidance to change the XenMobile database password, such as when Citrix Support directs you to make a password change.
If your SQL server uses Windows authentication, make database password changes in the Windows Active Directory. Then, refresh the database administrator account on the database server to synchronize the password change. You can then change the password in XenMobile, as follows.
Important:
- Plan a scheduled maintenance window for changing the database password in XenMobile. A password change must occur during system downtime.
When you change the password, make sure that all XenMobile nodes are connected to the network. After you change the password, restart XenMobile.
If you don’t restart XenMobile after a password change, XenMobile goes into recovery mode. In that case, revert to the old password in the SQL server, restart XenMobile, and change the password again.
-
Verify that all XenMobile Server nodes are running. For a clustered environment, bring up all nodes.
-
Block the incoming device traffic to XenMobile at the Citrix ADC load balancer by disabling the virtual server.
-
To change the database password in an SQL server: Log in to the XenMobile CLI, navigate to Configuration > Database, and enter the changed password when prompted:
Server []: <ipAddress> Port [1433]: 1433 Username [sa]: <userName> Password: <****> <!--NeedCopy--> -
Choose Y to restart the server.
-
Repeat steps 3 and 4 for all the other nodes in the cluster.
-
Unblock the incoming device traffic by enabling the virtual server at the Citrix ADC load balancer.
Share
Share
This Preview product documentation is Citrix Confidential.
You agree to hold this documentation confidential pursuant to the terms of your Citrix Beta/Tech Preview Agreement.
The development, release and timing of any features or functionality described in the Preview documentation remains at our sole discretion and are subject to change without notice or consultation.
The documentation is for informational purposes only and is not a commitment, promise or legal obligation to deliver any material, code or functionality and should not be relied upon in making Citrix product purchase decisions.
If you do not agree, select I DO NOT AGREE to exit.