Wi-Fi device policy
You create new or edit existing Wi-Fi device policies in XenMobile® by using the Configure > Device Policies page. Wi-Fi policies let you manage how users connect their devices to Wi-Fi networks by defining the following items:
- Network names and types
- Authentication and security policies
- Proxy server use
- Other WiFi-related details
To add or configure this policy, go to Configure > Device Policies. For more information, see Device policies.
Prerequisites
Before you create a policy, be sure that you complete these steps:
- Create any delivery groups that you plan to use.
- Know the network name and type.
- Know any authentication or security types that you plan to use.
- Know any proxy server information that you might need.
- Install any necessary CA certificates.
- Have any necessary shared keys.
- Create the PKI entity for certificate-based authentication.
- Configure credential providers.
For more information, see Authentication and its subarticles.
iOS settings
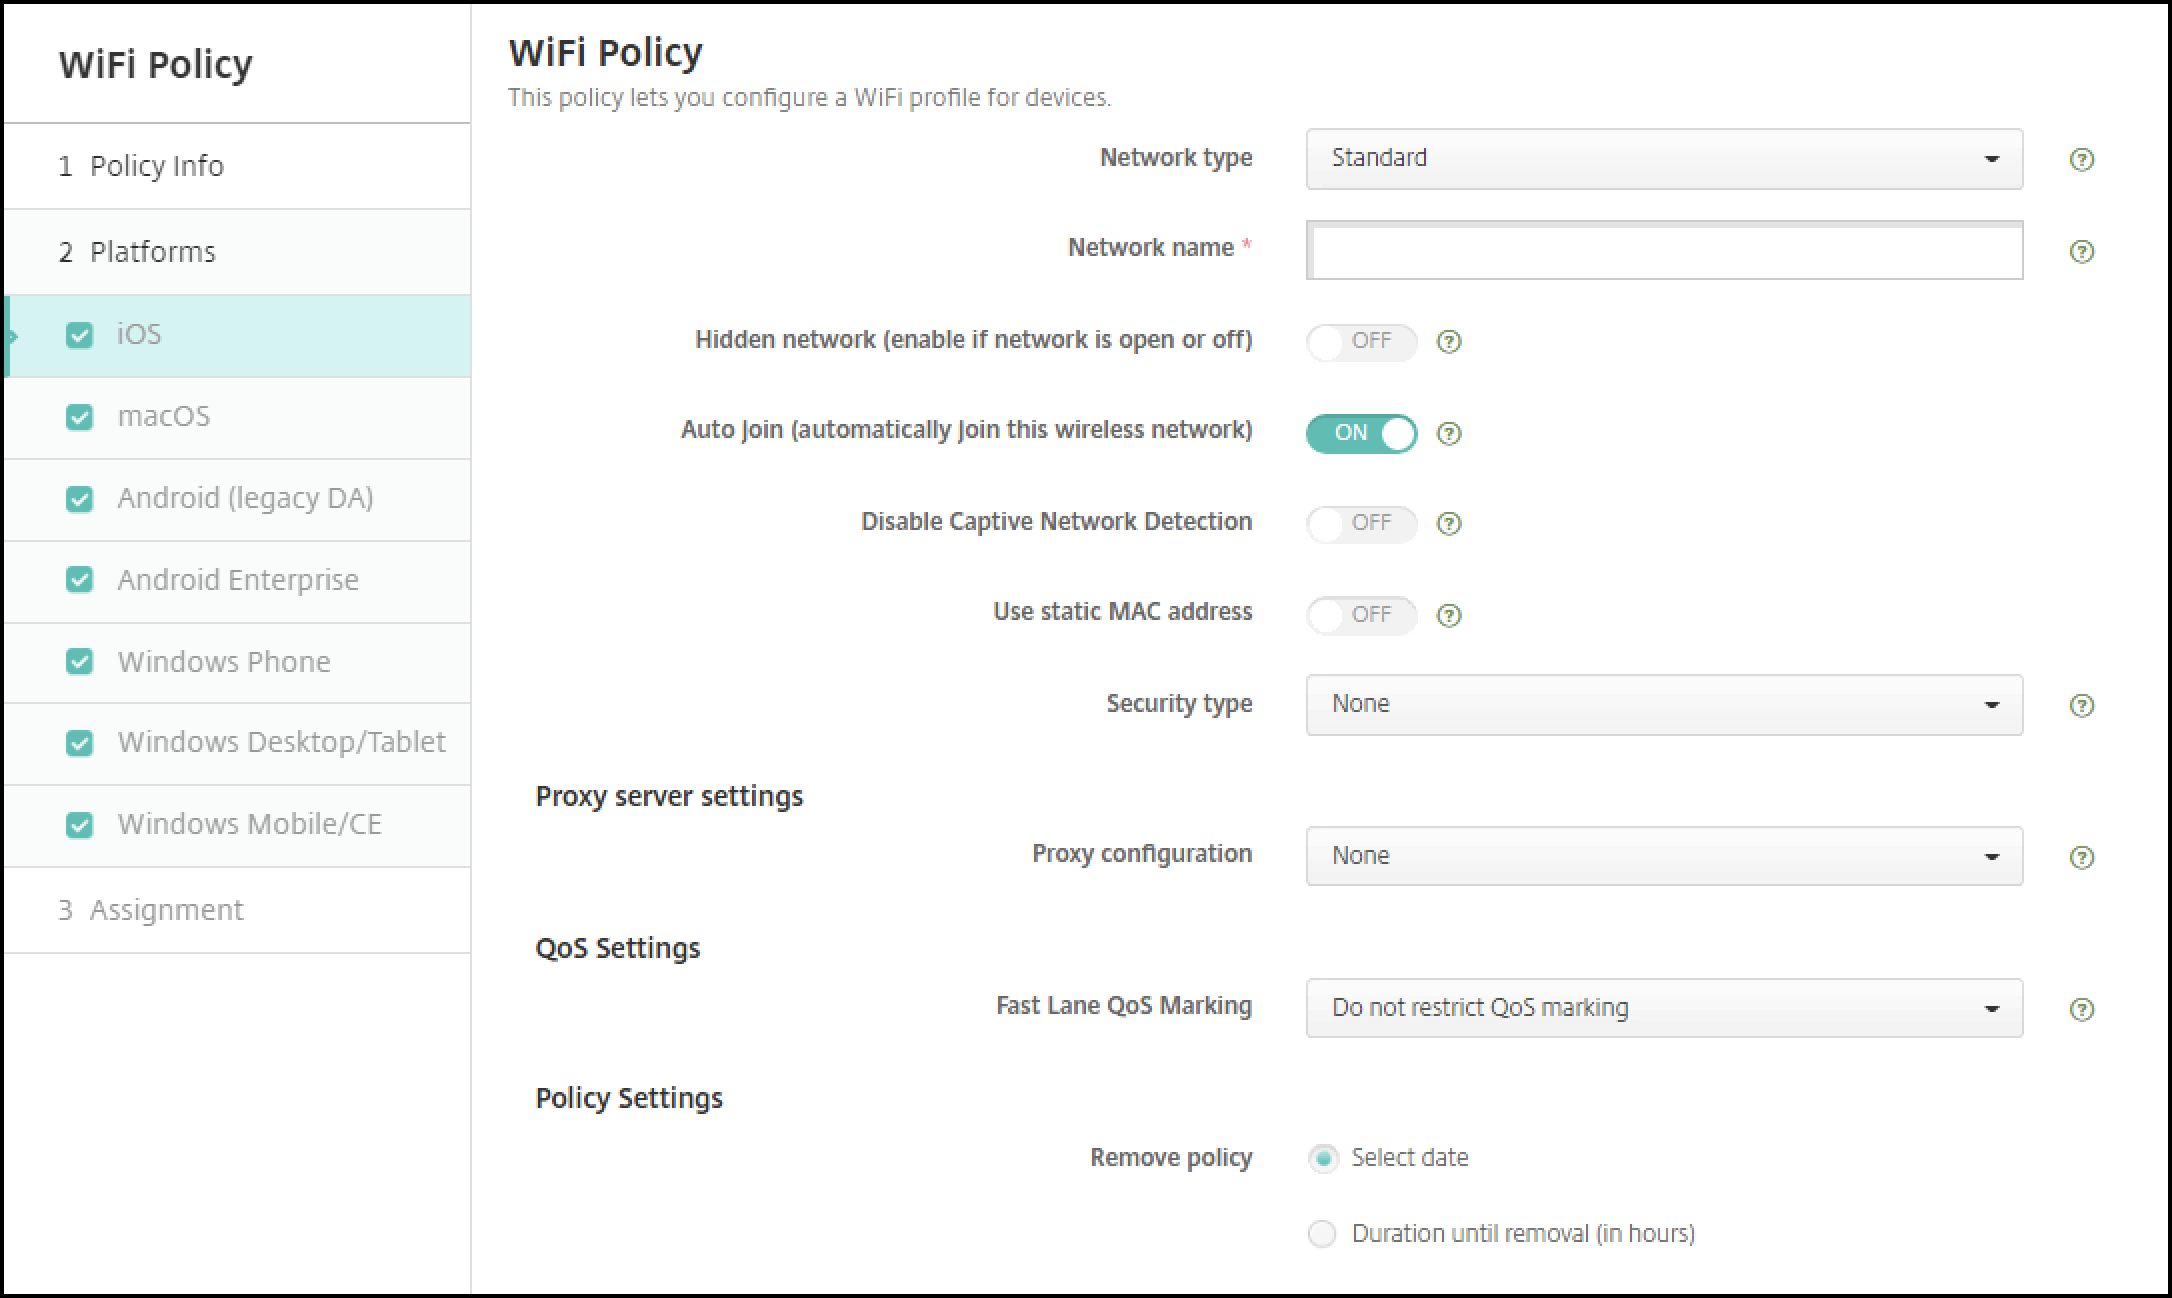
- Network type: In the list, choose Standard, Legacy Hotspot, or Hotspot 2.0 to set the network type you plan to use.
- Network Name: Type the SSID that is seen in the list of available networks for the device. Does not apply to Hotspot 2.0.
- Hidden network (enable if network is open or off): Choose whether the network is hidden.
- Auto Join (automatically join this wireless network): Choose whether the network is joined automatically. If an iOS device is already connected to another network, it won’t join this network. The user must disconnect from the previous network before the device automatically connects. The default is On.
- Use static MAC address: MAC addresses are unique identifiers that a device transmits within a network. To increase privacy, iOS and iPadOS devices can use a different MAC address each time they connect to a network. If On, the device always uses the same MAC address when connecting to this network. If Off, the device uses a different MAC address every time it connects to this network. The default is Off.
-
Security type: In the list, choose the security type you plan to use. Does not apply to Hotspot 2.0.
- None - Requires no further configuration.
- WEP
- WPA/WPA2 Personal
- Any (Personal)
- WEP Enterprise
- WPA/WPA2 Enterprise: Use of WPA-2 Enterprise requires that you configure the Simple Certificate Enrollment Protocol (SCEP). XenMobile can then send the certificate to the devices to authenticate to the Wi-Fi server. To configure SCEP, go to the Distribution page of Settings > Credential Providers. For more information, see Credential providers.
- Any (Enterprise)
The following sections list the options that you configure for each of the preceding connection types.
WPA, WPA Personal, Any (Personal) settings for iOS
Password: Type an optional password. If you leave this field blank, users might be prompted for their passwords when they log on.
WEP Enterprise, WPA Enterprise, WPA2 Enterprise, Any (Enterprise) settings for iOS
When you choose any of these settings, their settings are listed after Proxy server settings.
- Protocols, accepted EAP types: Enable the EAP types that you want to support and then configure the associated settings. The default is Off for each of the available EAP types.
- Inner authentication (TTLS): Required only when you enable TTLS. In the list, choose the inner authentication method to use. Options are: PAP, CHAP, MSCHAP, or MSCHAPv2. The default is MSCHAPv2.
-
Protocols, EAP-FAST: Choose whether to use protected access credentials (PACs).
- If you choose Use PAC, choose whether to use a provisioning PAC.
- If you choose Provisioning PAC, choose whether to allow an anonymous TLS handshake between the end-user client and XenMobile.
- Provisioning PAC anonymously
- If you choose Provisioning PAC, choose whether to allow an anonymous TLS handshake between the end-user client and XenMobile.
- If you choose Use PAC, choose whether to use a provisioning PAC.
-
Authentication:
- User name: Type a user name.
- Per-connection password: Choose whether to require a password each time that users log on.
- Password: Type an optional password. If you leave this field blank, users might be prompted for their passwords when they log on.
- Identity credential (Keystore or PKI credential): In the list, choose the type of identity credential. The default is None.
- Outer identity: Required only when you enable PEAP, TTLS, or EAP-FAST. Type the externally visible user name. You can increase security by typing a generic term such as “anonymous” so that the user name isn’t visible.
- Require a TLS certificate: Choose whether to require a TLS certificate.
-
Trust
-
Trusted certificates: To add a trusted certificate, click Add and, for each certificate you want to add, do the following:
- Application: In the list, choose the application you want to add.
- Click Save to save the certificate or click Cancel.
-
Trusted server certificate names: To add trusted server certificate common names, click Add and, for each name you want to add, do the following:
- Certificate: Type the name of the server certificate. You can use wildcards to specify the name, such as wpa.*.example.com.
- Click Save to save the certificate name or click Cancel.
-
Trusted certificates: To add a trusted certificate, click Add and, for each certificate you want to add, do the following:
- Allow trust exceptions: Choose whether the certificate trust dialog appears on users devices when a certificate is untrusted. The default is On.
-
Proxy server settings
- Proxy configuration: In the list, choose None, Manual, or Automatic to set how the VPN connection routes through a proxy server and then configure any additional options. The default is None, which requires no further configuration.
- If you choose Manual, configure these settings:
- Hostname/IP address: Type the host name or IP address of the proxy server.
- Port: Type the proxy server port number.
- User name: Type an optional user name to authenticate to the proxy server.
- Password: Type an optional password to authenticate to the proxy server.
- If you choose Automatic, configure these settings:
- Server URL: Type the URL of the PAC file that defines the proxy configuration.
- Allow direct connection if PAC is unreachable: Choose whether to allow users to connect directly to the destination if the PAC file is unreachable. The default is On. This option is available only on iOS 7.0 and later.
-
Policy settings
-
Remove policy: Choose a method for scheduling policy removal. Available options are Select date and Duration until removal (in hours)
- Select date: Click the calendar to select the specific date for removal.
- Duration until removal (in hours): Type a number, in hours, until policy removal occurs. Only available for iOS 6.0 and later.
-
Remove policy: Choose a method for scheduling policy removal. Available options are Select date and Duration until removal (in hours)
macOS settings
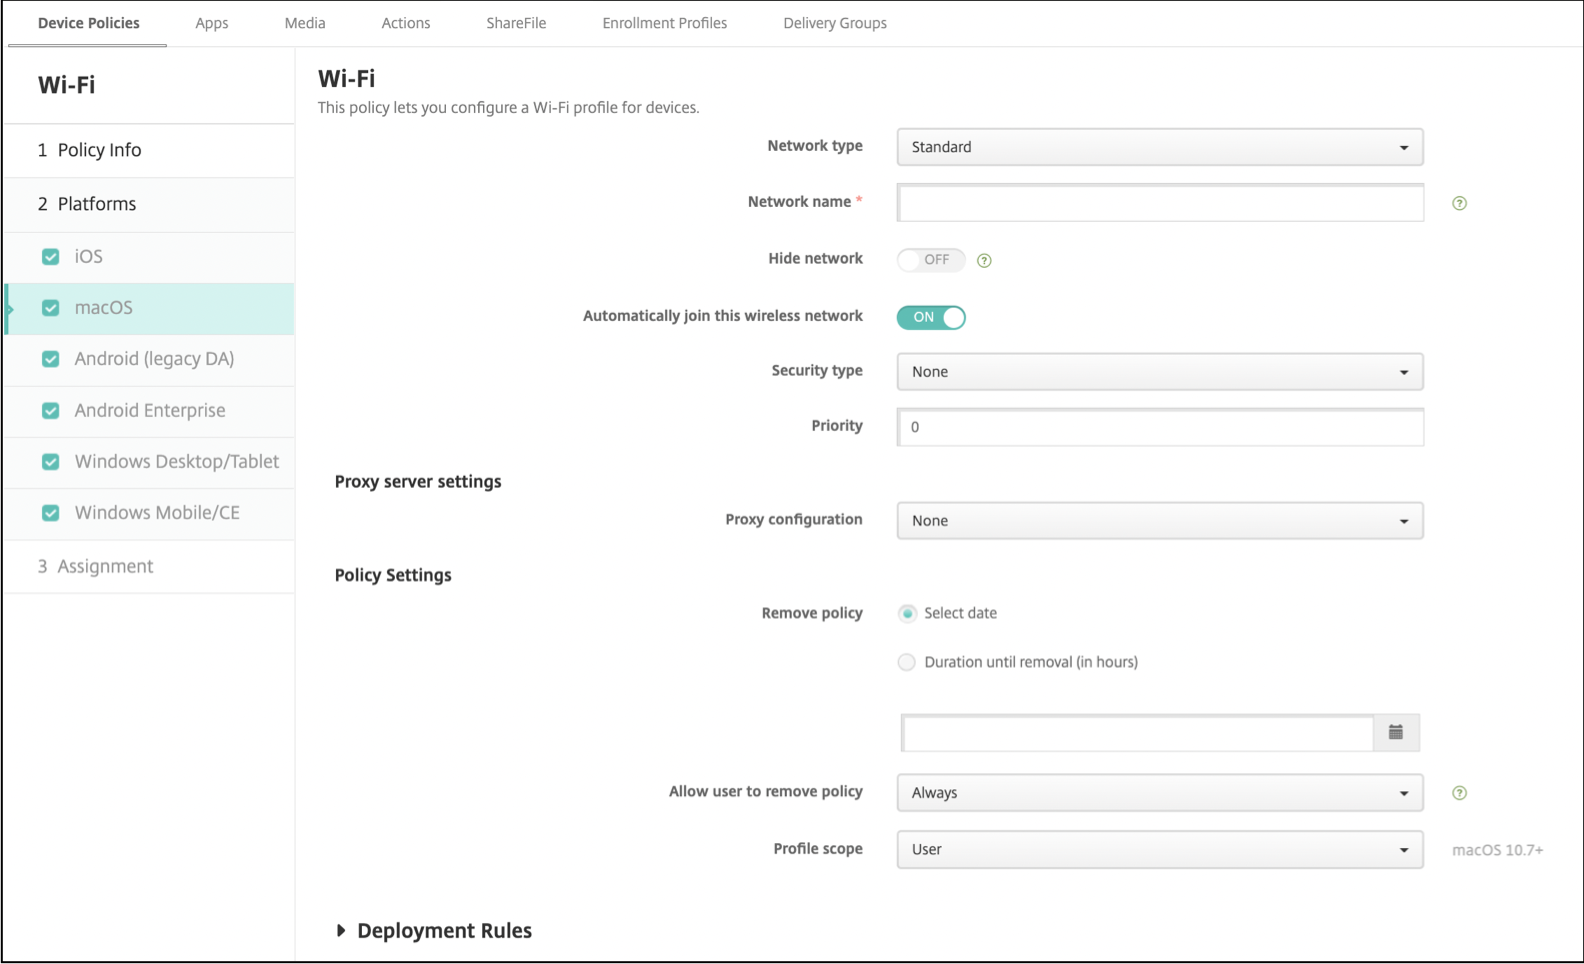
- Network type: In the list, choose Standard, Legacy Hotspot, or Hotspot 2.0 to set the network type you plan to use.
- Network Name: Type the SSID that is seen in the list of available networks for the device. Does not apply to Hotspot 2.0.
- Hide network: Choose whether you want to hide the network.
- Automatically join this wireless network: Choose whether the network is joined automatically. If a device is already connected to another network, it won’t join this network. The user must disconnect from the previous network before the device automatically connects. The default is On.
-
Security type: In the list, choose the security type you plan to use. Does not apply to Hotspot 2.0.
- None - Requires no further configuration.
- WEP
- WPA/WPA2 Personal
- Any (Personal)
- WEP Enterprise
- WPA/WPA2 Enterprise
- Any (Enterprise)
- Priority: If you have multiple networks, type a number in the Priority field to set the priority of the network connection. The device chooses the network with the lowest number.
The following sections list the options that you configure for each of the preceding connection types.
WPA, WPA Personal, WPA 2 Personal, Any (Personal) settings for macOS
- Password: Type an optional password. If you leave this field blank, users might be prompted for their passwords when they log on.
WEP Enterprise, WPA Enterprise, WPA2 Enterprise, Any (Enterprise) settings for macOS
When you choose any of these settings, their settings are listed after Proxy server settings.
- Protocols, accepted EAP types: Enable the EAP types that you want to support and then configure the associated settings. The default is Off for each of the available EAP types.
- Inner authentication (TTLS): Required only when you enable TTLS. In the list, choose the inner authentication method to use. Options are: PAP, CHAP, MSCHAP, or MSCHAPv2. The default is MSCHAPv2.
-
Protocols, EAP-FAST: Choose whether to use protected access credentials (PACs).
- If you select Use PAC, choose whether to use a provisioning PAC.
- If you choose Provisioning PAC, choose whether to allow an anonymous TLS handshake between the end-user client and XenMobile.
- Provisioning PAC anonymously
- If you choose Provisioning PAC, choose whether to allow an anonymous TLS handshake between the end-user client and XenMobile.
- If you select Use PAC, choose whether to use a provisioning PAC.
-
Authentication:
- User name: Type a user name.
- Per-connection password: Choose whether to require a password each time users log on.
- Password: Type an optional password. If you leave this field blank, users might be prompted for their passwords when they log on.
- Identity credential (Keystore or PKI credential): In the list, choose the type of identity credential. The default is None.
- Outer identity: Required only when you enable PEAP, TTLS, or EAP-FAST. Type the externally visible user name. You can increase security by typing a generic term like “anonymous” so that the user name isn’t visible.
- Require a TLS certificate: Choose whether to require a TLS certificate.
-
Trust
-
Trusted certificates: To add a trusted certificate, click Add and, for each certificate you want to add, do the following:
- Application: In the list, choose the application you want to add.
- Click Save to save the certificate or click Cancel.
-
Trusted server certificate names: To add trusted server certificate common names, click Add and, for each name you want to add, do the following:
- Certificate: Type the name of the server certificate that you want to add. You can use wildcards to specify the name, such as wpa.*.example.com.
- Click Save to save the certificate name or click Cancel.
-
Trusted certificates: To add a trusted certificate, click Add and, for each certificate you want to add, do the following:
- Allow trust exceptions: Choose whether the certificate trust dialog appears on user devices when a certificate is untrusted. The default is On.
- Use as a Login Window configuration: Choose whether to use the same credentials entered at the login window to authenticate the user.
-
Proxy server settings
- Proxy configuration: In the list, choose None, Manual, or Automatic to set how the VPN connection routes through a proxy server and then configure any additional options. The default is None, which requires no further configuration.
- If you choose Manual, configure these settings:
- Hostname/IP address: Type the host name or IP address of the proxy server.
- Port: Type the proxy server port number.
- User name: Type an optional user name to authenticate to the proxy server.
- Password: Type an optional password to authenticate to the proxy server.
- If you choose Automatic, configure these settings:
- Server URL: Type the URL of the PAC file that defines the proxy configuration.
- Allow direct connection if PAC is unreachable: Choose whether to allow users to connect directly to the destination if the PAC file is unreachable. The default is On. This option is available only on iOS 7.0 and later.
Android settings
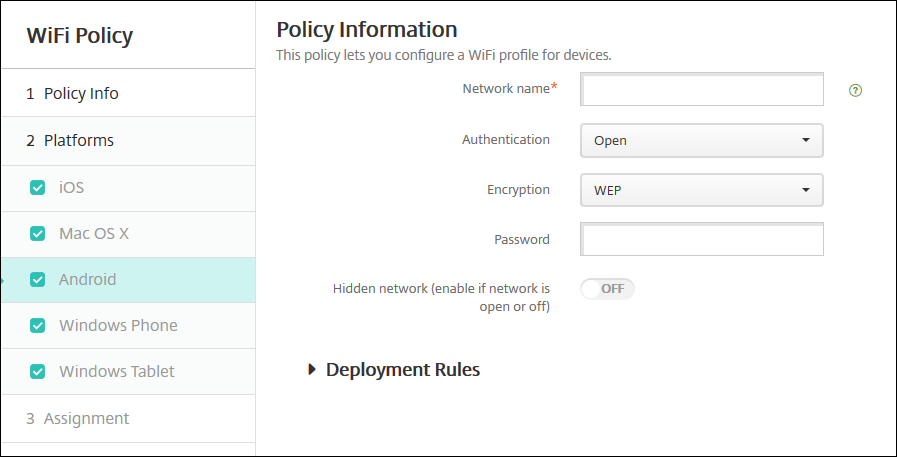
- Network name: Type the SSID that is in the list of available networks on the user device.
-
Authentication: In the list, choose the type of security to use with the Wi-Fi connection.
- Open
- Shared
- WPA
- WPA-PSK
- WPA2
- WPA2-PSK
- 802.1x EAP
The following sections list the options that you configure for each of the preceding connection types.
Open, Shared settings for Android
- Encryption: In the list, choose either Disabled or WEP. The default is WEP.
- Password: Type an optional password.
WPA, WPA-PSK, WPA2, WPA2-PSK settings for Android
- Encryption: In the list, choose either TKIP or AES. The default is TKIP.
- Password: Type an optional password.
802.1x settings for Android
- EAP Type: In the list, choose PEAP, TLS, or TTLS. The default is PEAP.
- Password: Type an optional password.
- Authentication phase 2: In the list, choose None, PAP, MSCHAP, MSCHAPPv2, or GTC. The default is PAP.
- Identity: Type the optional user name and domain.
- Anonymous: Type the optional, externally visible user name. You can increase security by typing a generic term like “anonymous” so that the user name isn’t visible.
- CA certificate: In the list, choose the certificate to use.
- Identity credential: In the list, choose the identity credential to use. The default is None.
- Hidden network (Enable if network is open or off): Choose whether the network is hidden.
Android Enterprise settings
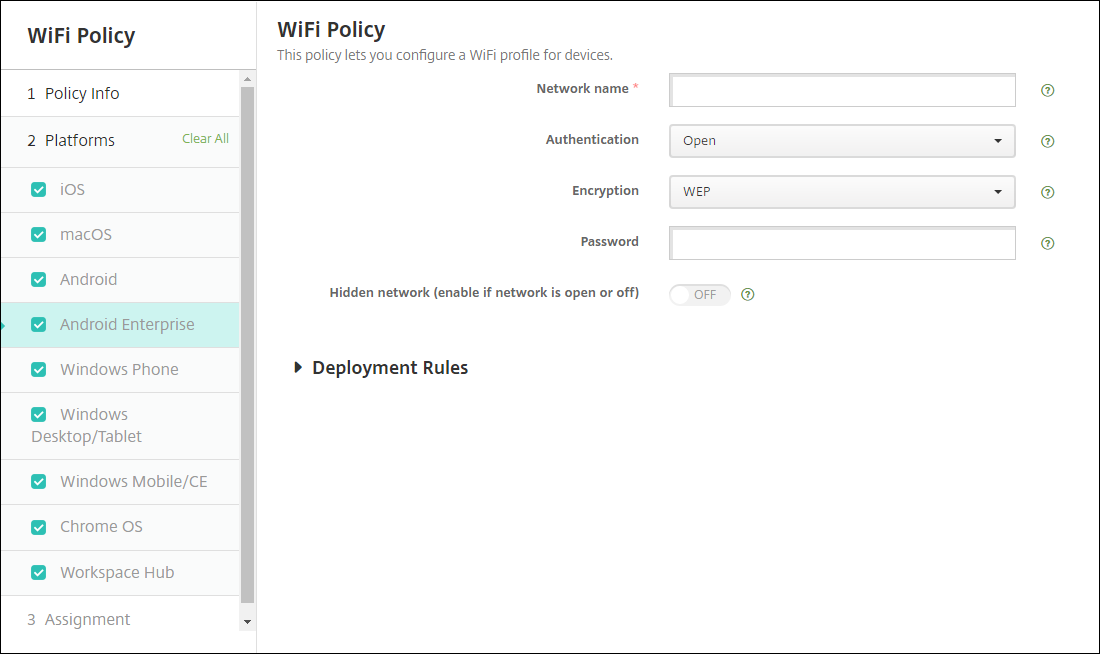
- Network name: Type the SSID that is in the list of available networks on the user device.
-
Authentication: In the list, choose the type of security to use with the Wi-Fi connection.
- Open
- Shared
- WPA
- WPA-PSK
- WPA2
- WPA2-PSK
- 802.1x EAP
The following sections list the options that you configure for each of the preceding connection types.
Open, Shared settings for Android Enterprise
- Encryption: In the list, choose either Disabled or WEP. The default is WEP.
- Password: Type an optional password.
WPA, WPA-PSK, WPA2, WPA2-PSK settings for Android Enterprise
- Encryption: In the list, choose either TKIP or AES. The default is TKIP.
- Password: Type an optional password.
802.1x settings for Android Enterprise
- EAP Type: In the list, choose PEAP, TLS, or TTLS. The default is PEAP.
- Password: Type an optional password.
- Authentication phase 2: In the list, choose None, PAP, MSCHAP, MSCHAPPv2, or GTC. The default is PAP.
- Identity: Type the optional user name and domain.
- Anonymous: Type the optional, externally visible user name. You can increase security by typing a generic term like “anonymous” so that the user name isn’t visible.
- CA certificate: In the list, choose the certificate to use.
-
Domain: Type the required domain name. For more information, see Domain.
Note:
When you configure the Wi-Fi policy on devices running on Android 13 or later, the CA certificate and Domain fields must be mandatorily updated. If they aren’t updated, then the configuration fails.
- Identity credential: In the list, choose the identity credential to use. The default is None.
- Hidden network (Enable if network is open or off): Choose whether the network is hidden.
Windows 10 and Windows 11 settings

-
Authentication: Click the type of security in the drop-down list that you want to use with the Wi-Fi connection.
- Open
- WPA Personal
- WPA-2 Personal
- WPA Enterprise
- WPA-2 Enterprise: Use of WPA-2 Enterprise requires that you configure SCEP. SCEP configuration enables XenMobile to send the certificate to devices to authenticate to the Wi-Fi server. To configure SCEP, go to Distribution page of Settings > Credential Providers. For more information, see Credential providers.
The following sections list the options that you configure for each of the preceding connection types.
Open settings for Windows 10 and Windows 11
- Hidden network (Enable if network is open or off): Choose whether the network is hidden.
- Connect automatically: Choose whether to connect to the network automatically.
WPA Personal, WPA-2 Personal settings for Windows 10 and Windows 11
- Encryption: In the list, choose either AES or TKIP to set the type of encryption. The default is AES.
- Hidden network (Enable if network is open or off): Choose whether the network is hidden.
- Connect automatically: Choose whether to connect to the network automatically.
WPA-2 Enterprise settings for Windows 10 and Windows 11
- Encryption: In the list, choose either AES or TKIP to set the type of encryption. The default is AES.
- EAP Type: in the list, choose either PEAP-MSCHAPv2 or TLS to set the EAP type. The default is PEAP-MSCHAPv2.
- Connect if hidden: Choose whether the network is hidden.
- Connect automatically: Choose whether to connect to the network automatically.
- Push certificate via SCEP: Choose whether to push the certificate to user devices by using the Simple Certificate Enrollment Protocol (SCEP).
- Credential provider for SCEP: In the list, choose the SCEP credential provider. The default is None.