-
-
XenMobile AutoDiscovery Service
-
This content has been machine translated dynamically.
Dieser Inhalt ist eine maschinelle Übersetzung, die dynamisch erstellt wurde. (Haftungsausschluss)
Cet article a été traduit automatiquement de manière dynamique. (Clause de non responsabilité)
Este artículo lo ha traducido una máquina de forma dinámica. (Aviso legal)
此内容已经过机器动态翻译。 放弃
このコンテンツは動的に機械翻訳されています。免責事項
이 콘텐츠는 동적으로 기계 번역되었습니다. 책임 부인
Este texto foi traduzido automaticamente. (Aviso legal)
Questo contenuto è stato tradotto dinamicamente con traduzione automatica.(Esclusione di responsabilità))
This article has been machine translated.
Dieser Artikel wurde maschinell übersetzt. (Haftungsausschluss)
Ce article a été traduit automatiquement. (Clause de non responsabilité)
Este artículo ha sido traducido automáticamente. (Aviso legal)
この記事は機械翻訳されています.免責事項
이 기사는 기계 번역되었습니다.책임 부인
Este artigo foi traduzido automaticamente.(Aviso legal)
这篇文章已经过机器翻译.放弃
Questo articolo è stato tradotto automaticamente.(Esclusione di responsabilità))
Translation failed!
XenMobile® AutoDiscovery Service
The AutoDiscovery service simplifies the enrollment process for users through email-based URL discovery. The AutoDiscovery service also provides features such as enrollment verification, certificate pinning, and other benefits for Citrix Workspace™ customers. The service, hosted in Citrix Cloud™, is an important part of many XenMobile deployments.
With the AutoDiscovery service, users:
- Can use their corporate network credentials to enroll their devices.
- Don’t need to enter details about the XenMobile Server address.
- Enter their user name in user principal name (UPN) format. For example,
user@mycompany.com.
We recommend that you use the AutoDiscovery service for high-security environments. The AutoDiscovery service supports public key certificate pinning, which prevents man-in-the-middle attacks. Certificate pinning makes sure that the certificate signed by your enterprise is used when Citrix clients communicate with XenMobile. To configure certificate pinning for your XenMobile sites, contact Citrix Support. For information about certificate pinning, see Certificate pinning.
To access the AutoDiscovery service, navigate to https://adsui.cloud.com (commercial) or https://adsui.cem.cloud.us (government).
Prerequisites
- The new AutoDiscovery service in Citrix Cloud requires the latest version of Secure Hub:
- For iOS, Secure Hub version 21.6.0 or later
-
For Android, Secure Hub version 21.8.5 or later
Devices running on earlier versions of Secure Hub might experience interruptions in service.
-
To access the new AutoDiscovery service, you must have a Citrix Cloud administrator account with full access. The AutoDiscovery service doesn’t support administrator accounts with custom access. If you don’t have an account, see Sign-up for Citrix Cloud.
Citrix migrated all existing AutoDiscovery records to Citrix Cloud without a disruption in service. The migrated records don’t automatically appear in the new console. You must reclaim domains in the new AutoDiscovery service to prove ownership. For more information, see CTX312339.
- Before starting using the AutoDiscovery service for your Endpoint Management deployments, verify and claim your domain. You can claim up to 10 domains. The claim associates the verified domain with the AutoDiscovery service. To claim more than 10 domains, open an SRE ticket or contact Citrix Technical Support.
- Use the MAM Port setting instead of Citrix Gateway FQDN to direct MAM traffic to your data center. If you enter a fully qualified domain name along with the port of your Citrix Gateway, the client device uses the configuration from the MAM Port setting.
- If an ad blocker prevents the site from opening, make sure that you disable the ad blocker for the entire website.
Claim a domain
-
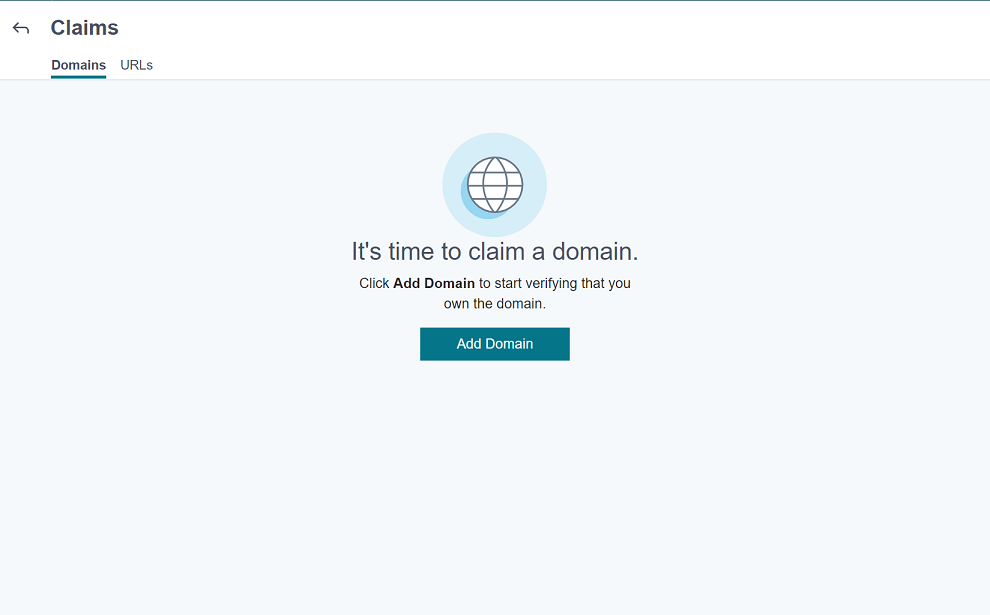
On the Claims > Domains tab, click Add Domain.
-
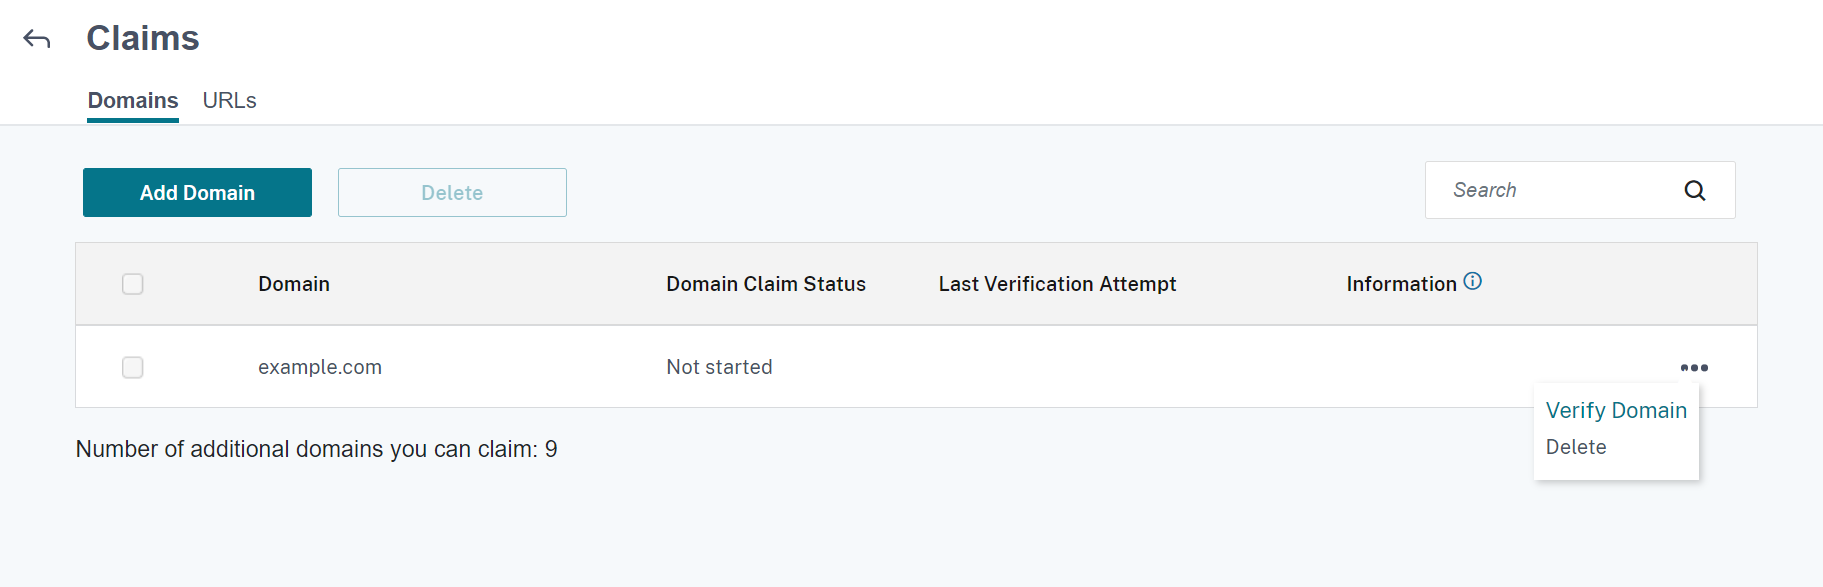
In the dialog box that appears, enter the domain name of your XenMobile environment and then click Confirm. Your domain appears in Claims > Domains.

-
On the domain you added, click the ellipsis menu and select Verify Domain to start the verification process. The Verify your domain page appears.
-
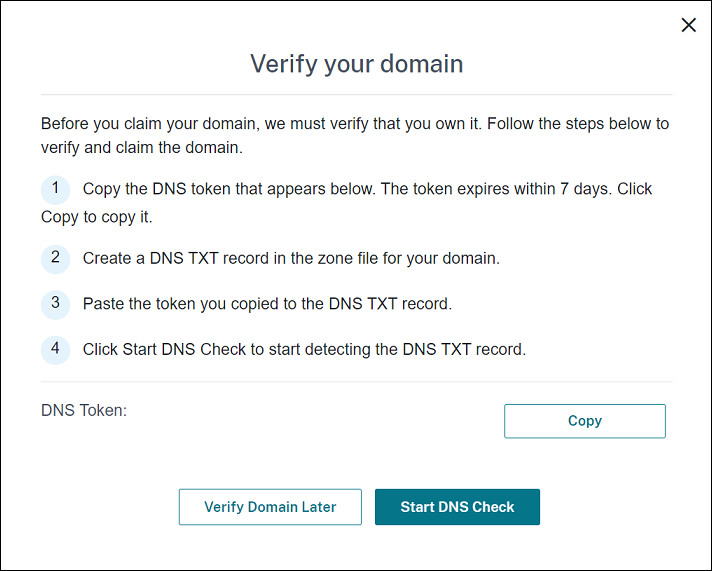
On the Verify your domain page, follow the instructions to verify that you own the domain.
-
Click Copy to copy the DNS token to the clipboard.
-
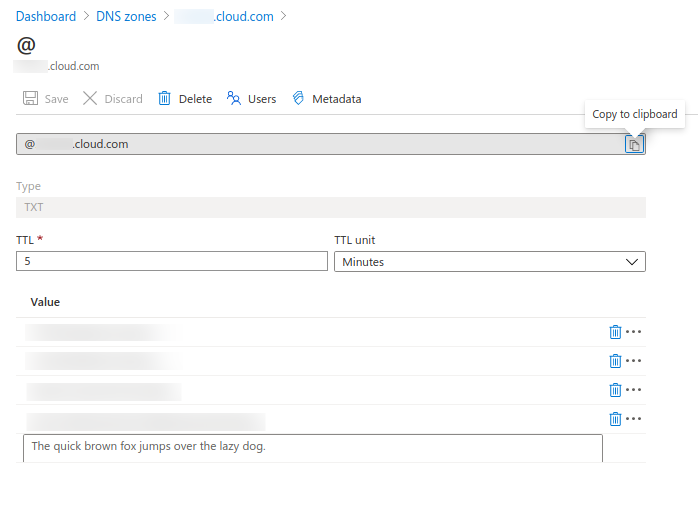
Create a DNS TXT record in the zone file for your domain. To do so, go to your domain hosting provider portal and add the DNS token you copied.
The following screenshot shows a domain hosting provider portal. Your portal might look different.
-
In Citrix Cloud, on the Verify your domain page, click Start DNS Check to start detecting your DNS TXT record. If you want to verify the domain later, click Verify Domain Later.
The verification process generally takes about an hour. However, it can take up to two days to return a response. It is OK for you to log out and log in again during the status check.
After the configuration completes, the status of your domain changes from Pending to Verified.
-
-
After you claim your domain, provide information about the AutoDiscovery service. Click the ellipsis menu on the domain that you added and then click Add Endpoint Management Info. The AutoDiscovery Service Information page appears.
-
Enter the following information and then click Save.
-
Endpoint Management Server FQDN: Enter the fully qualified domain name of the XenMobile Server. For example:
example.xm.cloud.com. This setting is used for MDM and MAM control traffic. -
Citrix Gateway FQDN: Enter the fully qualified domain name of Citrix Gateway, in the form FQDN or FQDN:port. For example:
example.com. This setting is used to direct MAM traffic to your data center. For MDM-only deployments, leave this field blank.Note:
Citrix recommends that you use the MAM Port setting instead of Citrix Gateway FQDN to control MAM traffic. If you enter a fully qualified domain name along with the port of your Citrix Gateway, the client device uses the configuration from the MAM Port setting.
-
Instance Name: Enter the instance name of the XenMobile Server that you configured earlier. If you are not sure about your instance name, leave the default value zdm.
-
MDM Port: Enter the port used for MDM control traffic and MDM enrollment. For cloud-based services, the default is 443.
-
MAM Port: Enter the port used for MAM control traffic, MAM enrollment, iOS enrollment, and app enumeration. For cloud-based services, the default is 8443.
-
Request AutoDiscovery for Windows devices
If you plan to enroll Windows devices, do the following:
-
Contact Citrix Support and create a support request to enable Windows AutoDiscovery.
-
Get a publicly signed, non-wildcard SSL certificate for
enterpriseenrollment.mycompany.com. Themycompany.comportion is the domain that has the accounts that users use to enroll. Attach the SSL certificate in .pfx format and its password to the support request created in the previous step.To use more than one domain to enroll Windows devices, you can also use a multi-domain certificate with the following structure:
- A SubjectDN with a CN that specifies the primary domain it serves (for example, enterpriseenrollment.mycompany1.com).
- The appropriate SANs for the remaining domains (for example, enterpriseenrollment.mycompany2.com, enterpriseenrollment.mycompany3.com, and so on).
-
Create a canonical name (CNAME) record in your DNS and map the address of your SSL certificate (enterpriseenrollment.mycompany.com) to autodisc.xm.cloud.com.
When a Windows device user enrolls using a UPN, the Citrix enrollment server:
- Provides the details of your XenMobile Server.
- Instructs the device to request a valid certificate from XenMobile.
At this point, you can enroll all supported devices. Go to the next section to prepare to deliver resources to devices.
Share
Share
In this article
This Preview product documentation is Citrix Confidential.
You agree to hold this documentation confidential pursuant to the terms of your Citrix Beta/Tech Preview Agreement.
The development, release and timing of any features or functionality described in the Preview documentation remains at our sole discretion and are subject to change without notice or consultation.
The documentation is for informational purposes only and is not a commitment, promise or legal obligation to deliver any material, code or functionality and should not be relied upon in making Citrix product purchase decisions.
If you do not agree, select I DO NOT AGREE to exit.