What’s new in XenMobile Server 10.13
XenMobile Server 10.13 (PDF Download)
Continued support for the Classic policies deprecated from Citrix ADC
Citrix recently announced the deprecation of some Classic policy-based features starting with Citrix ADC 12.0 build 56.20. The Citrix ADC deprecation notices have no impact to existing XenMobile Server integrations with Citrix Gateway. XenMobile Server continues to support the Classic policies and no action is needed.
Deprecation announcements
For advanced notice of the Citrix XenMobile features that are being phased out, see Deprecation.
Before upgrading endpoints to iOS 14.5
Citrix recommends that before upgrading any endpoint to iOS 14.5, you do the following actions to mitigate app crashes:
- Upgrade Citrix Secure Mail and Secure Web to 21.2.X or higher. See Upgrade MDX or enterprise apps.
- If you use the MDX Toolkit, wrap all third-party iOS applications with MDX Toolkit 21.3.X or higher. Check the MDX Toolkit download page for the latest version.
Before you upgrade an on-premises Citrix ADC
Upgrading an on-premises Citrix ADC to certain versions can result in a single sign-on error. Single sign-on to Citrix Files or the ShareFile domain URL in a browser with the Company Employee Sign in option results in an error. The user is unable to sign in.
To work around this issue: If you haven’t already run the following command from the ADC CLI on Citrix Gateway, run it to enable global SSO:
`set vpn parameter SSO ON`
`bind vpn vs <vsName> -portalTheme X1`
For more information, see:
After you complete the workaround, users can authenticate to Citrix Files or the ShareFile domain URL using SSO in a browser with the Company Employee Sign in option. [CXM-88400]
Before you upgrade to XenMobile 10.13 (on-premises)
Some systems requirements changed. For information, see System requirements and compatibility and XenMobile compatibility.
-
If the virtual machine running the XenMobile® Server to be upgraded has less than 8 GB of RAM, we recommend increasing the RAM to at least 8 GB.
-
Update your Citrix License Server to 11.16 or later before updating to the latest version of XenMobile Server 10.13.
The latest version of XenMobile requires Citrix License Server 11.16 (minimum version).
Note:
The Customer Success Services date (previously, Subscription Advantage date) in XenMobile 10.13 is September 29, 2020. The Customer Success Services date on your Citrix license must be later than this date.
You can view the date next to the license in the License Server. If you connect the latest version of XenMobile to an older License Server environment, the connectivity check fails and you can’t configure the License Server.
To renew the date on your license, download the latest license file from the Citrix Portal and upload the file to the Licensing Server. See Customer Success Services.
-
For a clustered environment: iOS policy and app deployments to devices running iOS 11 and later have the following requirements. If Citrix Gateway is configured for SSL persistence, you must open port 80 on all XenMobile Server nodes.
-
Recommendation: Before you install a XenMobile update, use the functionality in your VM to take a snapshot of your system. Also, back up your system configuration database. If you experience issues during an upgrade, complete backups enable you to recover.
To upgrade
With this release, XenMobile supports VMware ESXi 7.0. Make sure that you upgrade to 10.13 before installing or upgrading ESXi 7.0.
You can directly upgrade to XenMobile 10.13 from XenMobile 10.12.x or 10.11.x. To do the upgrade, download the latest binary available: Go to https://www.citrix.com/downloads. Navigate to Citrix Endpoint Management (XenMobile) > XenMobile Server > Product Software > XenMobile Server 10. On the tile for the XenMobile Server software for your hypervisor, click Download File.
To upload the upgrade, use the Release Management page in the XenMobile console. See To upgrade using the Release Management page.
After you upgrade
If functionality involving outgoing connections stop working, and you haven’t changed your connection configuration, check the XenMobile Server log for errors such as the following: “Unable to connect to the VPP Server: Host name ‘192.0.2.0’ does not match the certificate subject provided by the peer”.
- The certificate validation error means you must disable host name verification on the XenMobile Server.
- By default, host name verification is enabled on outgoing connections except for the Microsoft PKI server.
- If host name verification breaks your deployment, change the server property
disable.hostname.verificationtotrue. The default value of this property isfalse.
Platform support updates
-
iOS 14: XenMobile Server and Citrix Mobile productivity apps are compatible with iOS 14, but don’t currently support any new iOS 14 features. Use the MDX Toolkit 20.8.5 or later or prepare the apps using the MAM SDK.
-
Android 11: XenMobile Server supports Android 11. For information about how the deprecation of Google Device Administration APIs impacts devices running Android 10+, see Migrate from device administration to Android Enterprise. Also see this Citrix blog.
Configure multiple device and app management modes in a single environment
You can now configure a single XenMobile site to support multiple enrollment configurations. The role of enrollment profiles expanded to include enrollment settings for device and app management.
Enrollment profiles support multiple use cases and device migration paths within a single XenMobile console. Use cases include:
- Mobile Device Management (MDM only)
- MDM+Mobile Application Management (MAM)
- MAM only
- Corporate-owned enrollments
- BYOD enrollment (the ability to opt out of MDM enrollment)
- Migration of Android device administrator enrollments to Android Enterprise enrollments (fully managed, work profile, dedicated device)
Enrollment profiles replace the now deprecated server property, xms.server.mode. This change does not impact your existing delivery groups and enrolled devices.
If you don’t need to enroll dedicated devices, you can disable this feature by setting the server property enable.multimode.xms to false. See Server properties.
The following table shows the automated migration path from the existing server property mode to the new enrollment profile feature:
| Existing server property | New management mode |
|---|---|
| ENT mode (iOS) | Apple device enrollment with Citrix MAM |
| ENT mode (Android) | Legacy device administrator with Citrix MAM |
| ENT mode (Android Enterprise) | Work profile on fully managed (previously COPE), with Citrix MAM |
| MAM mode (iOS and Android) | Citrix MAM |
| MDM mode (iOS) | Apple device enrollment |
| MDM mode (Android) | Legacy device administrator |
| MDM mode (Android Enterprise) | Work profile on fully managed |
When you create a delivery group, you can attach an enrollment profile to the group. If you don’t attach an enrollment profile, XenMobile attaches the Global enrollment profile.
Enrollment profiles provide the following device management features:
-
Easier migration from Android device administrator (DA) mode to Android Enterprise. For Android Enterprise devices, settings include a device owner mode such as: Fully managed, work profile on fully managed, or dedicated. See Android Enterprise.
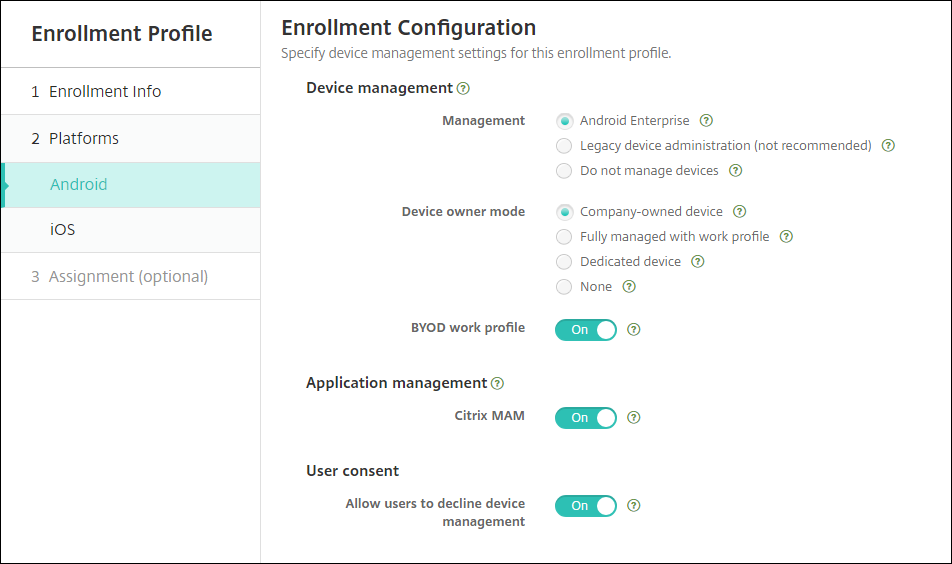
For this upgrade, your current XenMobile configuration for server mode and Settings > Android Enterprise map to the new enrollment profile settings as follows.
Current configuration Management setting Device owner mode setting Citrix MAM setting MDM. Managed Google Play (Android Enterprise) Android Enterprise Work profile on fully managed Off MDM; G Suite (legacy DA) Legacy DA not applicable Off MAM Do not manage devices not applicable On MDM+MAM. Managed Google Play (Android Enterprise) Android Enterprise* Work profile on fully managed On MDM+MAM; G Suite (legacy DA) Legacy DA* not applicable On * If enrollment is required, Allow users to decline device management is Off.
After the upgrade, your current enrollment profiles reflect those mappings. Consider whether you want to create other enrollment profiles to handle any new use cases as you transition away from legacy DA.
-
Easier iOS management. For iOS devices, settings include a choice between enrolling devices as managed or unmanaged.
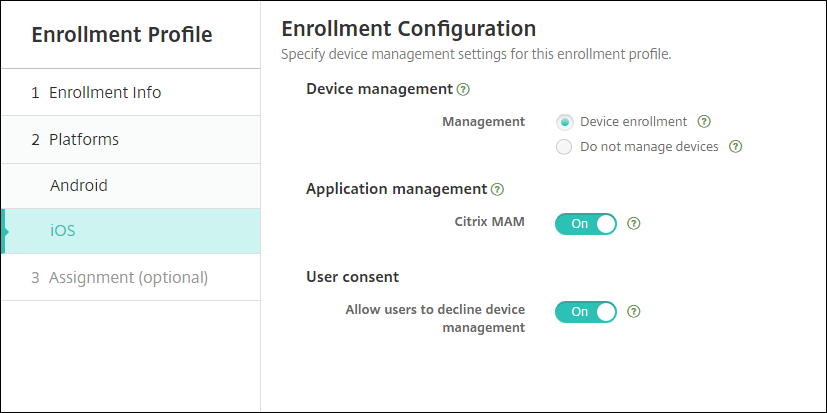
For this upgrade, your prior configurations map to the new enrollment profile settings as follows.
Server mode Management setting Citrix MAM setting MDM Device enrollment Off MAM Do not manage devices On MDM+MAM Device enrollment On If enrollment is required, Allow users to decline device management is Off.
The following limitations exist for enhanced enrollment profiles:
- The enhanced enrollment profile feature isn’t available for one-time PIN or two-factor authentication enrollment invitations.
See Enrollment profiles.
Support for the latest HTTP/2-based APNs provider API
Apple support for the Apple Push Notification service legacy binary protocol ends from March 31, 2021. Apple recommends that you use the HTTP/2-based APNs provider API instead. XenMobile Server now supports the HTTP/2-based API. For more information, see the news update, “Apple Push Notification Service Update” in https://developer.apple.com/. For help with checking connectivity to APNs, see Connectivity checks.
The following versions of XenMobile Server enable support for the HTTP/2-based API by default:
- XenMobile Server 10.13
- XenMobile Server 10.12 Rolling Patch 5 and above
If you use the following versions of XenMobile Server, you must add the server property apple.apns.http2 to enable the support:
- XenMobile Server 10.12 Rolling Patches 2–4 and above
- XenMobile Server 10.11 Rolling Patch 5 and above
We no longer support XenMobile Server 10.11 and recommend that you upgrade to the latest version.
Use a device-certificate based IPsec VPN with many iOS devices
Instead of configuring a VPN device policy and a Credentials device policy for each iOS device that requires a device-certificate based IPsec VPN, automate the process.
- Configure an iOS VPN device policy with the connection type Always on IKEv2.
- Select Device certificate based on device identity as the device authentication method.
- Select the Device identity type to use.
- Bulk import your device certificates using the REST API.
For more information about configuring the VPN device policy, see VPN device policy. For information about importing certificates in bulk, see Upload certificates in bulk using the REST API.
Auto updates for Apple Volume Purchase apps
When you add a Volume Purchase account (Settings > iOS Settings), you can now enable auto updates for all iOS apps. See the App Auto Update setting in Apple Volume Purchase.
Password requirements for a local user account
When you add or edit a local user account in the XenMobile console, make sure that you follow the latest password requirements.
For more information, see To add a local user account.
-
Password requirements: When you add or edit a local user account in the XenMobile Server console, follow the latest password requirements. See To add a local user account.
-
Local user account locking: If a user reaches the maximum number of consecutive invalid login attempts, the local user account locks for 30 minutes. The system denies all further authentication attempts until the lockout period expires. To unlock the account in the XenMobile Server console, go to Manage > Users, select the user account, and click Unlock Local User. See To unlock a local user account.
Device policies
New device policies and device policy settings have been added for Android Enterprise devices.
Hide the tray bar icon on Android Enterprise devices
You can now select whether the tray bar icon is hidden or visible for Android Enterprise devices. See XenMobile options device policy.
More certificate management features for Android Enterprise devices in work profile mode or fully managed mode
In addition to installing certificate authorities in the managed keystore, you can now manage the following features:
- Configure the certificates used by specific managed apps. The Credentials device policy for Android Enterprise now includes the setting Apps to use the certificates. You can specify the apps to use the user certificates issued by the credential provider selected in this policy. Apps are silently granted access to certificates during run time. To use the certificates for all apps, leave the apps list blank. See Credentials device policy.
- Silently remove certificates from the managed keystore or uninstall all non-system CA certificates. See Credentials device policy.
- Prevent users from modifying credentials stored in the managed keystore. The Restrictions device policy for Android Enterprise now includes the setting Allow user to configure user credentials. By default, that setting is On. See Restrictions device policy.
Easier use of the certificate alias in Managed configurations
Use the new Certificate alias setting in the Credentials device policy with the Managed configuration device policy. Doing so allows apps to authenticate on the VPN without user action. Instead of finding the credential alias in the app logs, you create the credential alias. Create the alias by typing it in the Certificate alias field of the Managed configurations device policy. Then you type the same certificate alias in the Certificate alias setting in the Credentials device policy. See Managed configurations policy and Credentials device policy.
Control the “Use one lock” setting on Android Enterprise devices
The new Enable unified passcode setting in the Passcode device policy lets you control whether a device requires a separate passcode for the device and the work profile. Before this setting, users controlled this behavior with the Use one lock setting on the device. When Enable unified passcode is On, users can use the same passcode for the device as the work profile. If Enable unified passcode is Off users can’t use the same passcode for the device as the work profile. The default is Off. The Enable unified lock setting is available for Android Enterprise devices running Android 9.0 or later. See Passcode device policy.
Show the apps and shortcuts on Android Enterprise devices that are not in compliance
The Passcode device policy for Android Enterprise has a new setting Show apps and shortcuts while passcode is not in compliance. Enable the setting to cause the apps and shortcuts to remain visible when the device passcode is no longer compliant. Citrix recommends you create an automated action to mark the device as out of compliance when the passcode is not in compliance. See Passcode device policy.
Disable the ability to print on the Android Enterprise work profile devices or fully managed devices
In the Restrictions device policy, the Don’t allow printing setting lets you specify whether users can print to any printer accessible from the Android Enterprise device. See Android Enterprise settings.
Allow apps on dedicated devices by adding their package name in the Kiosk policy
You can now enter the package name that you want to allow on the Android Enterprise platform. See Android Enterprise settings.
Manage keyguard features for Android Enterprise work profile and fully managed devices
The Android keyguard manages the device and work challenge lock screens. Use the Keyguard Management device policy to control:
- Keyguard management on work profile devices. You can specify the features available to users before they unlock the device keyguard and the work challenge keyguard. For example, by default users can use fingerprint unlock and view unredacted notifications on the lock screen. You can also use the keyguard management policy to disable all biometric authentication for devices running Android 9.0 and later.
- Keyguard management on fully managed and dedicated devices. You can specify the features available, such as trust agents and secure camera, before they unlock the keyguard screen. Or, you can choose to disable all keyguard features.
See Keyguard Management device policy.
Publish enterprise apps for Android Enterprise in the XenMobile console
You no longer need to register for a Google Play developer account when you add an Android Enterprise private app. The XenMobile console opens a managed Google Play store UI for you to upload and publish the APK file. For more information, see Add an enterprise app.
Publish web apps for Android Enterprise in the XenMobile console
You no longer need to go to managed Google Play or the Google Developer portal to publish Android Enterprise web apps for XenMobile. When you click Upload in Configure > Apps > Web link, a managed Google Play store UI opens for you to upload and save the file. The app approval and publishing can take about 10 minutes. For more information, see Add a Web link.
Upload certificates to iOS devices in bulk with the XenMobile Server REST API
If uploading certificates one at a time isn’t practical, use the XenMobile Server REST API to upload the certificates to iOS devices in bulk.
- Configure an iOS VPN device policy with the connection type Always on IKEv2.
- Select Device Certificate Based on Device Identity as the device authentication method.
- Select the Device identity type to use.
- Bulk import your device certificates with the REST API.
For information about configuring the VPN device policy, see VPN device policy. For information about importing certificates in bulk, see Upload certificates to iOS devices in bulk with the REST API.
Refresh encryption keys
The Refresh encryption keys option is added in the Advanced Settings of the XenMobile CLI. You can use this option to refresh the encryption keys one node at a time. See System options.
ESXi 7.0 support
With this release, XenMobile supports VMware ESXi 7.0. Make sure that you upgrade to 10.13 before installing or upgrading ESXi 7.0.
New server properties
The following server properties are now available:
- Allow hostnames for iOS App Store links: To add public app store apps for iOS using the public APIs rather than the console, configure a list of allowed host names if you want.
- Local user account lockout limit: Configure the number of sign-in attempts a local user has before their account is locked.
- Local user account lockout time: Configure how long a local user is locked out after too many failed sign-in attempts.
- Maximum size of file upload restriction enabled: Enable restricting the maximum file size for uploaded files.
- Maximum size of file upload allowed: Set the maximum file size for uploaded files.
For more detailed information about these properties, see Server properties.
Self-service disk cleanup
A new command-line interface option called Disk Usage is available in the Troubleshooting Menu. This option allows you to see a list of core dump files and support bundle files. After viewing the list you can choose to delete all of those files through the command-line. For more information about the command-line interface tools, see Command-line interface options.
In this article
- Continued support for the Classic policies deprecated from Citrix ADC
- Deprecation announcements
- Before upgrading endpoints to iOS 14.5
- Before you upgrade an on-premises Citrix ADC
- Before you upgrade to XenMobile 10.13 (on-premises)
- To upgrade
- After you upgrade
- Platform support updates
- Configure multiple device and app management modes in a single environment
- Support for the latest HTTP/2-based APNs provider API
- Use a device-certificate based IPsec VPN with many iOS devices
- Auto updates for Apple Volume Purchase apps
- Password requirements for a local user account
- Device policies
- Publish enterprise apps for Android Enterprise in the XenMobile console
- Publish web apps for Android Enterprise in the XenMobile console
- Upload certificates to iOS devices in bulk with the XenMobile Server REST API
- Refresh encryption keys
- ESXi 7.0 support
- New server properties
- Self-service disk cleanup