Configure multiple Workspace URLs
Overview
You can now create multiple Workspace URLs (subdomains of cloud.com) and use these URLs as policy inputs. For example, you might want different branding, authentication methods, and resources for different divisions within your organization. With the multiple Workspace URLs feature, you can now have a separate branding, authentication methods, and resources for each of your URLs.
Note:
You can create a maximum of 10 URLs for your Workspace.
Each store is accessible by a unique URL and can differ in the following aspects:
- Different branding of the UI (post login)
- Different sets of apps and desktops
- Different authentication configuration
Select unique Workspace URLs
The workspace URL that you select must be unique. Citrix Cloud rejects Workspace URLs that are already in use by other customers. It’s recommended to use a naming convention that contains a string that is unique to your organization.
Note:
Avoid using generic URLs such as
workspace.cloud.comormystore.cloud.com.
For example, you can create URLs using the following format:
YourOrgsales.cloud.comYourOrgengineering.cloud.comYourOrgmarketing.cloud.com
Add multiple Workspace URLs
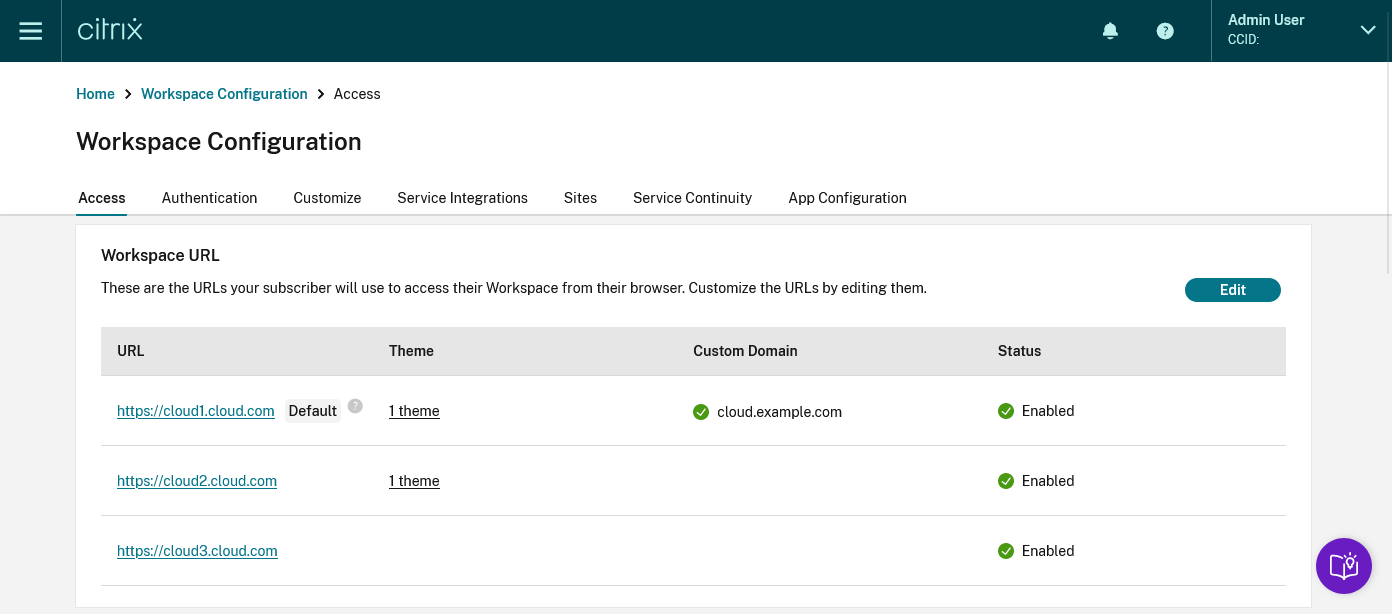
You can add multiple URLs from the Citrix Cloud console as follows.
- Go to Citrix Cloud and sign in with your credentials.
-
Navigate to Workspace Configuration > Access. Under Workspace URL, you can find a list of existing URLs.
-
To add URL, click Edit > Add Workspace URL.
-
Enter the subdomain.
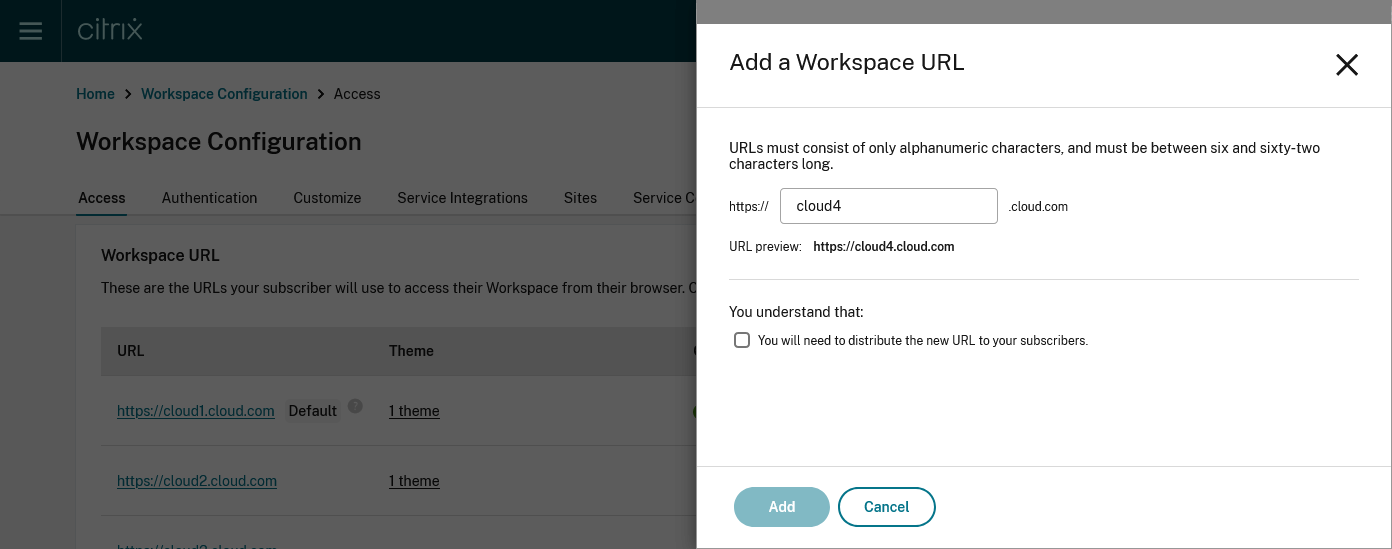
- Click Add to save the URL. You must select the checkbox as an acknowledgment that you must provide the new URLs to your end users post configuration.
Add multiple URLs using PowerShell
You can also use the PowerShell script to add multiple Workspace URLs. You need a client ID and Secret. For more information, see Citrix Cloud API.
- Download a copy of the Store configuration PowerShell module, and unzip it.
- Unpack the .zip to your current user’s desktop and place it inside a folder called StoreConfig.
Sample script to configure multiple workspace URLs
Use the following script to ensure that the connection to configure Workspace is made using TLS version 1.2:
[System.Net.ServicePointManager]::SecurityProtocol = [System.Net.SecurityProtocolType]::Tls12;
<!--NeedCopy-->
View the PowerShell help for each cmdlet using these commands (optional)
The PowerShell cmdlet Get-Help gives detailed instructions for the Get and Set-WorkspaceCustomConfiguration cmdlets.
Get-Help Get-WorkspaceCustomConfiguration -detailed
Get-Help Set-WorkspaceCustomConfiguration -detailed
<!--NeedCopy-->
Loading the PowerShell module
$ModulePath = "$env:UserProfile\desktop\StoreConfig\Citrix.Workspace.StoreConfigs.psm1")

if (Test-Path -Path $ModulePath)
{
    Write-Host "Importing StoreConfig PowerShell Module..." -ForegroundColor "Green"
    Import-Module -Name $ModulePath -verbose
}
else
{
    throw "StoreConfig PowerShell Module not found."
}

[string]$APIClientID = "<insert ClientID>"
[string]$APIClientSecret = "<insert ClientSecret>"
<!--NeedCopy-->
Existing Workspace URL
Set a variable to the value of existing URL for the workspace.
$WSPURL = "wspmultiurlmain.cloud.com"
<!--NeedCopy-->
Specify new URLs
Specify the new URLs that you want to create in a list, including any existing URLs.
$WorkspaceHosts = @($WSPURL,"wspmultiurl2.cloud.com","wspmultiurl3.cloud.com")
<!--NeedCopy-->
Performing the URL update
Run the cmdlet Set-WorkspaceCustomConfigurations with the $WorkspaceHosts list as the argument to the -WorkspaceHosts parameter to update the URL list for the workspace. Give the existing URL as the argument to the -WorkspaceUrl parameter.
Set-WorkspaceCustomConfigurations -WorkspaceUrl $WSPURL `
                                  -WorkspaceHosts $WorkspaceHosts `
                                  -ClientId $APIClientID `
                                  -ClientSecret $APIClientSecret `
                                  -Verbose

<!--NeedCopy-->
Check the Store configuration for your customer
Get-WorkspaceCustomConfigurations -WorkspaceUrl $WSPURL `
                                  -ClientId APIClientID `
                                  -ClientSecret $APIClientSecret `
                                  -Verbose
<!--NeedCopy-->

Configure themes and logos based on Workspace URLs
With the multiple URL feature, you can create and assign separate Appearance themes and logos for each of the URLs. It enables you to vary the theme and logo that is visible to end users, based on the Workspace URL.
To create themes and logos based on URLs: Sign in to the Citrix Cloud Console portal.
- Navigate to Workspace Configuration > Customize > Appearance.
- Select Add theme or modify an existing theme using the edit option.
- On the AfterSign-in Appearance tab, upload the logo and select the theme colors.
- On the Theme Details tab, enter the required Workspace URL in the Assign access domain field.
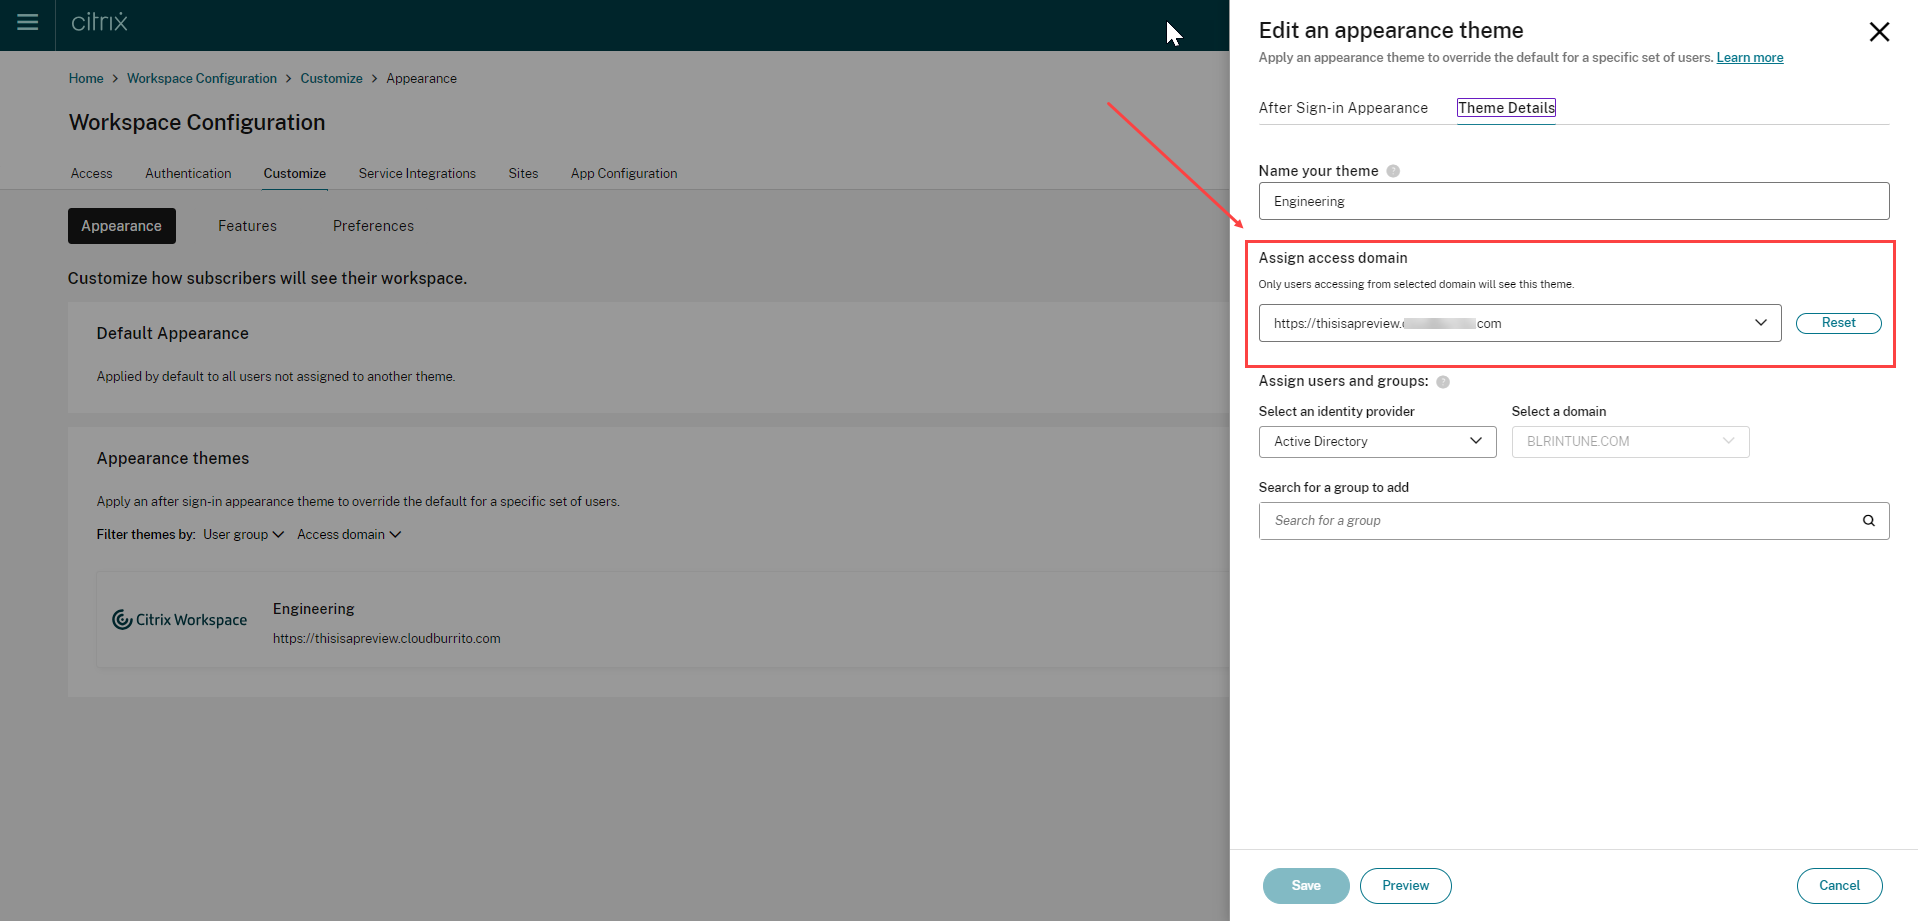
- Save your theme configuration. For more information on creating a theme, see Create multiple custom themes.
Application of themes
Themes can be configured and applied for the following use cases:
- Apply theme to a specific URL: The configured theme applies to any end user using te particular Workspace URL. The user group membership isn’t considered as a factor in these cases.
- Apply the theme to one or more user groups: The theme applies to end users who belong to any of the selected user groups. In this case, the theme is applied regardless of the URL used.
- Apply theme to a specific URL and one or more user groups: The theme applies to an end user if they belong to any of the selected user groups and are using the particular URL.
The theme prioritization mechanism is the same as before. For more information, see Prioritize custom themes
In case no theme has been configured, the default theme is applied. It’s also applied in the following scenarios:
- When viewing any pre-login messages or UI
- When viewing the sign-in screen, unless a third-party provider is used which has its own sign-in page
- After sign-in, if no appearance theme is configured for the URL
Filter resources based on Workspace URLs
With the new multiple Workspace URL feature, you can filter and deliver resources based on the Workspace URL that the end users are using. There are two methods to filter resources based on Workspace URLs:
Resource filtering using Secure Private Access
While configuring Citrix DaaS with Secure Private Access, you can control the end user’s access to resources. You can implement this by configuring Access policies based on Workspace URLs. Access Policies can be configured for delivery groups using the Workspace URL filter.
For more information, see Citrix Secure Private Access
Resource Filtering using DaaS admin console (Studio)
You can now configure Access Policies for delivery groups based on Workspace URLs. You can control end users’ access to resources based on the Workspace URL that they’re using. To configure an Access Policy for delivery groups based on Workspace URLs, you need to apply the following SmartAccess filters. The filter values are also sent as SmartAccess tags to the DaaS service. It is applicable in both the scenarios:
- while listing apps and desktops published by DaaS
- while launching an app or desktop
| Filter | Value | Description |
|---|---|---|
| Citrix.Workspace.UsingDomain | example.cloud.com | Allows filtering of delivery group resources by Workspace URL. The value is the fully qualified domain name of the Workspace URL. |
| Citrix-Via-Workspace | True | Indicates that the end user is using the Workspace service, rather than an on-premises StoreFront deployment. |
Note:
The SmartAccess tags are sent automatically. DaaS treats requests from Workspace as being not through Citrix Gateway. If you are not using Network Location or Device Posture, you need to add filter criteria for these filters to the Non-Citrix Gateway Connections rule.

This allows filtering of apps and desktops within a delivery group, based on the following criteria:
- the workspace URL that is being used by the end users
- whether users have signed into Workspace or StoreFront
For more information on configuring an access policy for a delivery group, see Manage delivery groups.
Note:
Enabling the adaptive access (Network Location or Device Posture) features causes DaaS to treat requests via Workspace as via Gateway. If either feature is switched on, the multiple URL filter criteria need to be added to the Citrix Gateway Connections rule instead. These features cause other SmartAccess tags to be sent. For more information, see Adaptive Access based on user’s network location and Device Posture.
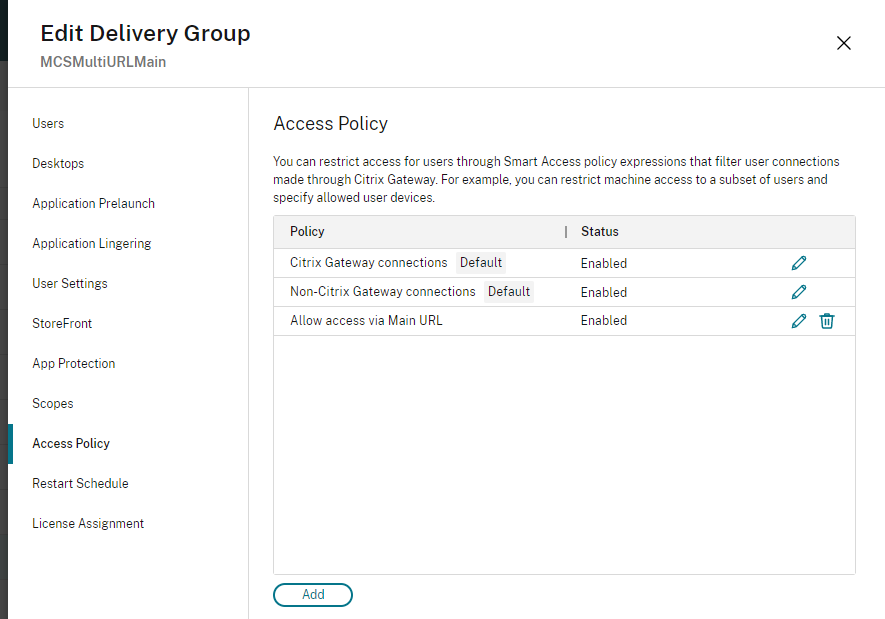
Create an access policy rule for multiple URL workflows
- To create an access policy rule, go to Edit Delivery Group > Access Policy, and click Add. Access policies can only be changed once a delivery group has been created.
- Add a descriptive policy name.
- Select one of the following criteria for your filters:
- Match any: The access policy allows access if any of the given filter criteria matches the incoming request.
- Match all: The access policy allows access only if all of the given filter criteria match the incoming request.
- Add values for the
**Citrix.Workspace.UsingDomain**and**Citrix-Via-Workspace**filters.
For example, in the following scenario the use of Match any filter means that this rule allows access from either a user using
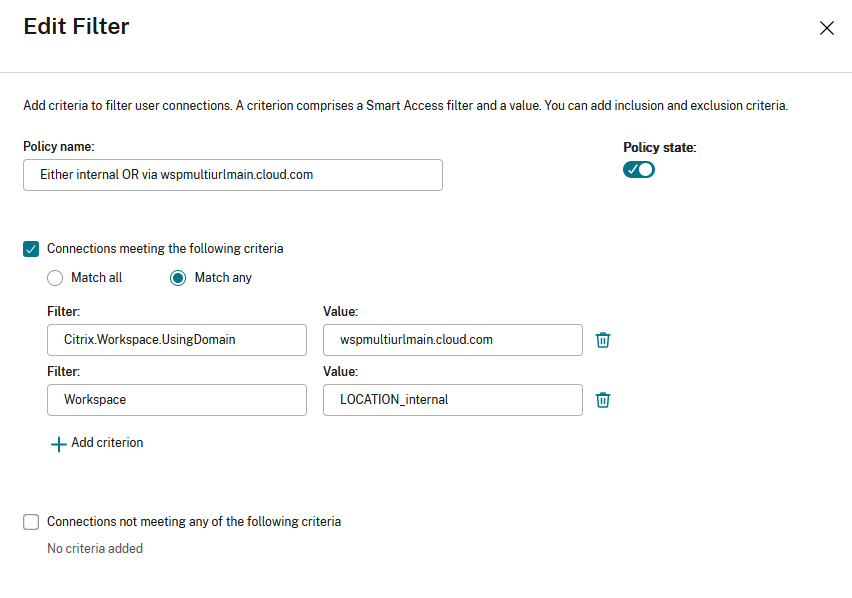
Changing the filter to Match all would mean that the rule only allows access to a user using <wspmultiurlmain.cloud.com> from an internal network.
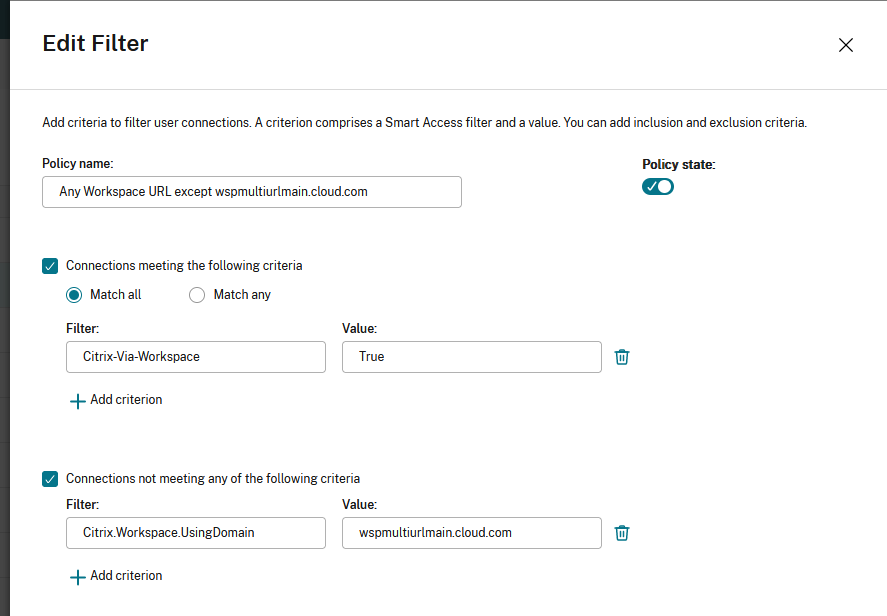
Once you confirm the changes, the new policy appears on the Access Policy page. For more information, see Manage Delivery Groups
Configure nFactor authentication flows based on Workspace URLs
You can associate authentication policies with a Workspace URL using the Adaptive Authentication service. This enables you to configure different authentication policies for the end users based on the Workspace URL they’re using. You can create a policy or edit an existing one to associate it with a Workspace URL. Use one of the following methods:
Configure multiple authentication policies using the UI
The Adaptive Authentication service lets you create policies that authenticate your end users based on the Workspace URL that they’re using.
Step 1: Configure a series of authentication actions and policies that you want to use for the Workspace URLs. The policy configuration depends on the type of authentication and the authentication factors that you want to use. Any supported nFactor authentication flow can be used.
For more information, see Adaptive Authentication
For example, consider the following scenario where:
- The first URL
<https://wspmultiurlmain.cloud.com>must be mapped to LDAP authentication and OTP. - The second URL
<https://wspmultiurl2.cloud.com>must be mapped to LDAP authentication. - The third URL
<https://wspmultiurl3.cloud.com>must have End User Cert authentication
Policy syntax
Check for a particular Workspace URL using exact string matching.
AAA.USER.WSP.EQ("wspmultiurlmain.cloud.com")

<!--NeedCopy-->
Check whether a particular string is contained within a Workspace URL, using substring matching.
AAA.USER.WSP.CONTAINS("wspmultiurlmain")
<!--NeedCopy-->
Step 2: Configure an authentication policy and add your Workspace URL as the expression. The authentication policy is then valid for the Workspace URL that you entered in the Expression text field.
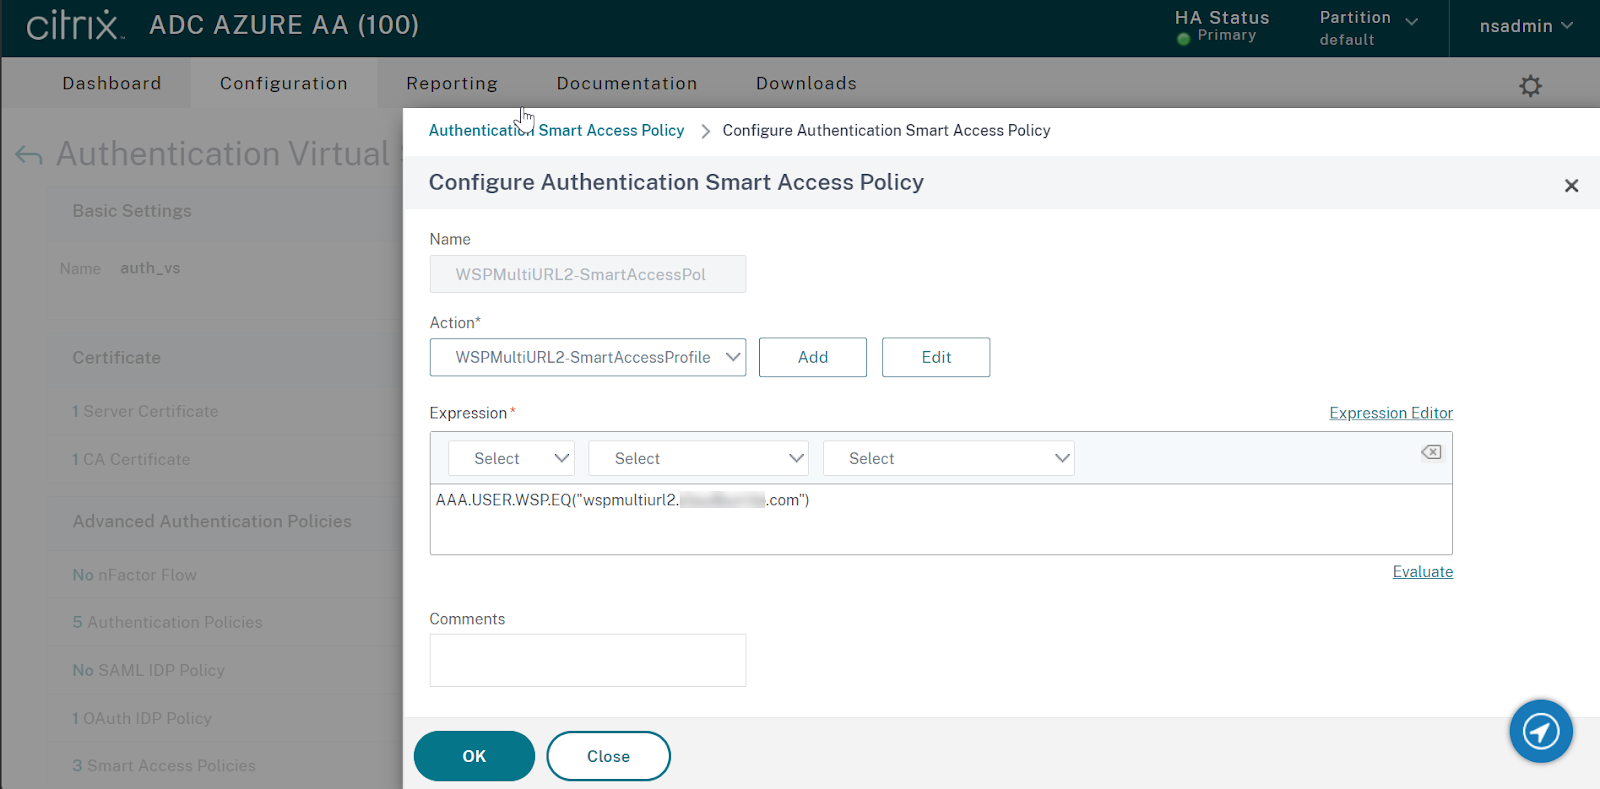
Step 3: Once you have configured authentication policies based on your URLs, you need to bind them to your authentication virtual server. For more information, see Authentication policies.
Send SmartAccess tags to DaaS based on Workspace URL
DaaS delivery groups support SmartAccess tags based on the Workspace URL used. The tags can be a fixed set as explained in Configure Workspace to filter DaaS resources based on Workspace URL or you can use the Citrix.Workspace.UsingDomain filter or any other SmartAccess tag you want to use to influence DaaS resource enumeration behavior. The AAA admin can define multiple conditions that control when SmartAccess tags are sent to DaaS delivery groups.
-
Configure a SmartAccess tag profile with a tag string that you want to send to DaaS.
-
Configure a SmartAccess tag policy expression and link the policy to the action you created earlier.
-
Now bind the authentication policies to your AAA virtual server.
Configure multiple authentication policies using the Command Line Interface
Send a SmartAccess tag based on the Workspace URL used
Create the SmartAccess Tag profiles
add authentication smartAccessProfile WSPMultiURLMain-SmartAccessProfile -tags "WSPMultiURLMain"

add authentication smartAccessProfile WSPMultiURL2-SmartAccessProfile -tags "WSPMultiURL2"

add authentication smartAccessProfile WSPMultiURL3-SmartAccessProfile -tags "WSPMultiURL3"

<!--NeedCopy-->
Create the Smart Access Tag policies
add authentication smartAccessPolicy WSPMultiURLMain-SmartAccessPol -rule "AAA.USER.WSP.EQ(\"wspmultiurlmain.cloud.com\")" -action WSPMultiURLMain-SmartAccessProfile

add authentication smartAccessPolicy WSPMultiURL2-SmartAccessPol -rule "AAA.USER.WSP.EQ(\"wspmultiurl2.cloud.com\")" -action WSPMultiURL2-SmartAccessProfile

add authentication smartAccessPolicy WSPMultiURL3-SmartAccessPol -rule "AAA.USER.WSP.EQ(\"wspmultiurl3.cloud.com\")" -action WSPMultiURL3-SmartAccessProfile
<!--NeedCopy-->
Show Smart Access Profiles and Policies
show authentication smartAccessProfile
show authentication smartAccessPolicy
<!--NeedCopy-->
Bind the Policies to the Adaptive Authentication virtual server called “auth_vs”
bind authentication vserver auth_vs -policy WSPMultiURLMain-SmartAccessPol -priority 10

bind authentication vserver auth_vs -policy WSPMultiURL2-SmartAccessPol -priority 20

bind authentication vserver auth_vs -policy WSPMultiURL3-SmartAccessPol -priority 30

<!--NeedCopy-->
Email Discovery to add Workspace URLs to Citrix Workspace app
Email discovery adds all the Workspace URLs configured in the list of service URLs as stores. If you want to add two or more stores through email discovery, configure each Workspace URL as a service URL. It ensures that the URLs are added as stores during the email discovery process. You can use either of the following methods to add stores:
-
Global App Configuration service UI: For more info, see Configure settings for cloud store
-
Global App Configuration API: You can use the preceding portal to make an API call to POST /aca/discovery/app/workspace/domain using your registered domain For more info, see Global App Configuration service API.
If <user@yourdomain.com> is entered in the Citrix Workspace app, the Email Discovery service adds all stores listed in service URLs. You can use a UPN, or an email address when it contains the correct domain suffix mydomain.com.
Known limitations
The following are some limitations that impact the multiple URL feature.
Workspace Platform
- You can’t disable individual URLs. If you disable a Workspace URL within the Citrix Cloud admin console, it disables all the configured URLs.
Citrix Virtual Apps and Desktops
- Resource filtering using Workspace URL for Citrix Virtual Apps and Desktops (on-premises aggregation) isn’t supported.
Custom Workspace Domain
The workspace is limited to a single custom domain. It’s always linked to the Workspace URL marked as Default in the admin console.
Citrix Workspace app
To add multiple URLs from the same customer as stores, users must be on the following versions of the Citrix Workspace app clients:
- Citrix Workspace app for Windows version 2302 or later
- Citrix Workspace app for iOS version 2303 or later
- Citrix Workspace app for Android version 2303 or later
- Citrix Workspace app for Linux version 2303 or later
- Citrix Workspace app for Mac version 2305
- Citrix Workspace app for iOS version 2303
- Older versions of Citrix Workspace app display a Workspace domain selector menu. In this case, the end user must select the same URL they entered when adding the store. Selecting a different URL requires the user to sign in again.
Global App Configuration Service
- If the Global App Configuration service settings are configured for multiple Workspace URLs, then only one Workspace URL can be added to Citrix Workspace app at a time. Adding a second URL to Citrix Workspace app fails. For example, If GACS settings are configured for both
<https://wspmultiurlmain.yourdomain.com:443>and<https://wspmultiurl2.yourdomain.com:443>, then the user can add only one URL to Citrix Workspace app. - Account addition fails if more than one GACS configured URL is found during the Global App Configuration service discovery. For example, consider a case where a user enters
<user@yourdomain.com>in Citrix Workspace app. The domain-based discovery finds two results and GACS settings are configured for both of them. The response returned is:<https://wspmultiurlmain.yourdomain.com:443>and<https://wspmultiurl2.yourdomain.com:443>. In this case, account addition fails with Citrix Workspace app as it supports adding only one account with GACS settings configuration.
{
  "items": [
 {
   "domain": {
     "name": "yourdomain.com"
   },
   "app": {
     "workspace": {
       "serviceURLs": [
         {
           "url": "https://wspmultiurlmain.yourdomain.com:443"
         },
         {
           "url": "https://wspmultiurl2.yourdomain.com:443"
         },
         {
           "url": "https://wspmultiurl3.yourdomain.com:443"
         }
       ]
     }
   }
 }
  ],
  "nextToken": "None",
  "count": 1
}

<!--NeedCopy-->
In this article
- Overview
- Select unique Workspace URLs
- Add multiple Workspace URLs
- Add multiple URLs using PowerShell
- Configure themes and logos based on Workspace URLs
- Filter resources based on Workspace URLs
- Resource filtering using Secure Private Access
- Resource Filtering using DaaS admin console (Studio)
- Configure nFactor authentication flows based on Workspace URLs
- Configure multiple authentication policies using the UI
- Send SmartAccess tags to DaaS based on Workspace URL
- Email Discovery to add Workspace URLs to Citrix Workspace app
- Known limitations