Manage delivery groups
Introduction
This article describes procedures for managing delivery groups from the management console. In addition to changing the settings specified when creating the group, you can configure other settings that are not available when you create a delivery group.
The procedures are organized according to the categories: general, users, machines, and sessions. Some tasks span more than one category. For example, “Prevent users from connecting to machines” is described in the machines category, but it also affects users. So, if you can’t find a task in one category, check a related category.
Other articles also contain related information:
- Applications contain information about managing applications in delivery groups.
- Managing delivery groups requires the Delivery Group Administrator built-in role permissions. For details, see Delegated administration.
General
- View group details
- Change preferred properties
- Change the delivery type
- Change StoreFront™ addresses
- Change the functional level
- Manage Remote PC Access delivery groups
- Change the license for a delivery group
- Organize delivery groups using folders
- Manage app protection
- Change suspend capability for a delivery group
View group details
- Use the search function to locate a specific delivery group. Refer to Search for instances for instructions.
- From the search results, select a group as necessary.
- Refer to the following table for descriptions of the group columns.
- Click a tab in the bottom details pane for more information about this group.
| Column | Description |
|---|---|
| Delivery Group | The group name and the session type. Session types include Single-session OS and Multi-session OS. |
| Delivering | The type of resources delivered from this group. Possible values include Applications, Desktops, and Applications and Desktops. “Static machine assignment” appears if the delivery group consists of dedicated machines. |
| Session in Use | The number of machines that are set up and the number of machines that are in a Disconnected state. |
| Allocated Count | The number of machines in the catalog assigned to a delivery group. |
| Folder | The location of the group within the Delivery Groups tree. It displays the name of the folder that the group is in (including the trailing backslash), or - if the group is at the root level. |
Change preferred properties
Preferred properties control how users access and launch resources from a delivery group. To change preferred properties for a delivery group, follow these steps:
- From Studio, select Delivery Groups in the left pane.
- Select a group and then select Edit in the action bar.
- On the Preferences page, change any of the settings in the following table.
- Select Apply to apply any changes you made and keep the window open. Or, select OK to apply changes and close the window.
| Setting | Description |
|---|---|
| Description | The text that end users see. |
| Enable Delivery Group | Whether the delivery group is enabled. |
| Time zone
|
The time zone in which the machines of this delivery group reside. This setting automatically shows the time zone set in Settings > Date and Time for a newly created delivery group. You can choose a different time zone for the delivery group if needed. The drop-down menu lists the time zones supported by the site.
Note: Changing the time zone on a delivery group might reboot the machines in that delivery group. To avoid this, ensure to change the time zone settings outside of production hours. |
| Enable Secure ICA® | Secures communications to and from machines in the delivery group using SecureICA, which encrypts the ICA protocol. The default level is 128-bit. The level can be changed using the SDK. Citrix® recommends using more encryption methods such as TLS encryption when traversing public networks. Also, SecureICA does not check data integrity. |
Change the delivery type of a delivery group
The delivery type indicates what the group can deliver: applications, desktops, or both.
Before changing an applications type to the Desktops type, delete all applications from the group.
- From Studio, select Delivery Groups in the left pane.
- Select a group and then select Edit in the action bar.
- On the Delivery Type page, select the delivery type you want.
- Select Apply to apply any changes you made and keep the window open. Or, select OK to apply changes and close the window.
Change StoreFront addresses
- From Studio, select Delivery Groups in the left pane.
- Select a group and then select Edit in the action bar.
- On the StoreFront page, indicate whether you will specify a StoreFront server address later (Manually) or select Add new to specify the StoreFront servers you want to be used (Automatically).
- Select Apply to apply any changes you made and keep the window open. Or, select OK to apply changes and close the window.
You can also specify StoreFront server addresses from the Settings tab within the Delivery Groups node.
Change the functional level
Change the functional level for the delivery group after you upgrade the VDAs on its machines and the machine catalogs containing the machines used in the delivery group.
Before you start:
- If you use Citrix Provisioning™ (formerly Provisioning Services), upgrade the VDA version in the Citrix Provisioning console.
- Start the machines containing the upgraded VDA so that they can register with Citrix DaaS. This process tells the console about what must change in the delivery group.
- If you must continue to use earlier VDA versions, newer product features might not be available. For more information, see the upgrade documentation.
To change the functional level for a delivery group:
- From Studio, select Delivery Groups in the left pane.
- Select a group and then select Change Functional Level in the action bar. The Change Functional Level action appears only if upgraded VDAs are detected.
The display indicates you which, if any, machines cannot be changed to the functional level and why. You can then cancel the change action, resolve the machine issues, and then perform the change action again.
After the change completes, you can revert the machines to their previous states. Select the delivery group and then select Undo Functional Level Change in the action bar.
Manage Remote PC Access delivery groups
If a machine in a Remote PC Access machine catalog is not assigned to a user, the machine is temporarily assigned to a delivery group associated with that catalog. This temporary assignment enables the machine to be assigned to a user later.
The delivery group-to-machine catalog association has a priority value. Priority determines which delivery group that machine is assigned to when it registers with the system or when a user needs a machine assignment: the lower the value, the higher the priority. If a Remote PC Access machine catalog has multiple delivery group assignments, the software selects the match with the highest priority. Use the PowerShell SDK to set this priority value.
When first created, Remote PC Access machine catalogs are associated with a delivery group. This association means that machine accounts or Organizational Units added to the catalog later can be added to the delivery group. This association can be switched off or on.
To add or remove a Remote PC Access machine catalog association with a delivery group:
- From Studio, select Delivery Groups in the left pane.
- Select a Remote PC Access group.
- In the Details section, select the Machine Catalogs tab and then select a Remote PC Access catalog.
- To add or restore an association, select Add Desktops. To remove an association, select Remove Association.
Change the license for a delivery group
To change the license entitlement for a delivery group, follow these steps:
-
Select Delivery Groups in the navigation pane.
-
Select a group and then click Edit in the action bar.
-
On the License Assignment page, select the license you want the group to use.
-
Click Apply to apply any changes you made and to keep the window open. Or, click Save to apply changes and to close the window.
For more information about delivery group-level entitlements, see Multi-type licensing.
Organize delivery groups using folders
Create folders to organize delivery groups for easy access.
Tip:
You can set your preferred default view (folder or list view) for the Delivery Groups node by clicking the Folder icon on the top right of the action bar.
Required roles
By default, you need to have the following built-in role to create and manage delivery group folders: Cloud Administrator, Full Administrator, or Delivery Group Administrator. If necessary, you can customize roles for creating and managing delivery group folders. For more information, see Required permissions.
Create a delivery group folder
Before you start, plan how to organize your delivery groups. Consider the following:
- You can nest folders up to five levels (excluding the default node folder).
- A folder can contain delivery groups and subfolders.
-
All nodes in Studio (such as Machine Catalogs, Delivery Groups, Applications, and Application Groups) share the same folder tree in the back end. To avoid name conflicts when renaming or moving folders, use unique names for first-level folders across different nodes.
If you create a folder using the
New-BrokerAdminFolderSDK cmdlet and want it to appear under the Delivery Groups node, you must add theContainsDeliveryGroupsmetadata using theSet-BrokerAdminFolderMetadatacmdlet.Example:
 Set-BrokerAdminFolderMetadata -AdminFolderId {adminFolderUid} -Name ContainsDeliveryGroups -Value true
 <!--NeedCopy-->
To create a delivery group folder, follow these steps:
- From Studio, select Delivery Groups in the left pane.
- In the folder hierarchy, select a folder and then select Create Folder in the Action bar.
- Enter a name for the new folder, and then click Done.
Tip:
If you create a folder in an unintended location, you can drag it to the correct location.
Move a delivery group
You can move a delivery group between folders. Detailed steps are as follows:
-
From Studio, select Delivery Groups in the left pane.
-
View groups by folder. You can also turn on View all above the folder hierarchy to view all groups at a time.
-
Right-click a group and then select Move Delivery Group.
-
Select the folder to which you want to move the group, and then click Done.
Tip:
You can drag a group to a folder.
Manage delivery group folders
You can delete, rename, and move delivery group folders.
You can delete a folder only if it and its subfolders don’t contain delivery groups.
To manage a folder, follow these steps:
-
From Studio, select Delivery Groups in the left pane.
-
In the folder hierarchy, select a folder, and then select an action in the Action bar as needed:
- To rename the folder, select Rename Folder.
- To delete the folder, select Delete Folder.
- To move the folder, select Move Folder.
-
Follow the onscreen instructions to complete the remaining steps.
Required permissions
The following table lists the permissions required to perform actions on delivery group folders.
| Action | Required permissions |
|---|---|
| Create delivery group folders | Create Delivery Group Folder |
| Delete delivery group folders | Remove Delivery Group Folder |
| Move delivery group folders | Move Delivery Group Folder |
| Rename delivery group folders | Edit Delivery Group Folder |
| Move delivery groups to folders | Edit Delivery Group Folder and Edit Delivery Group Properties |
Manage app protection
The following information is supplemental to the App protection article in the Citrix Virtual Apps and Desktops documentation. To use app protection in a Citrix DaaS deployment, follow the general guidance in that article, minding the following details.
-
From Studio, select Delivery Groups in the left pane.
-
Select a group and then select Edit in the action bar.
-
On the App Protection page, you can see the following options:
Options Description Do not apply Select this option to not apply the setting. Apply to this delivery group Select Anti-keylogging and/or Anti key capturing options. Hover over each of these settings to read the details in the tool tip. Apply contextually
To apply this setting, configure the access policy in the Access Policy settings page. - Click Access Policy in the left pane and click Add.
- On the Add Policy page, do the following
- i. Enter a Policy name and configure the settings as required.
- ii. In the Filter and Value fields, enter the details and click Done. The new policy is listed in the App Protection page. Enable the required settings for this policy.
- iii. Click Save.
- i. Enter a Policy name and configure the settings as required.
- Click Access Policy in the left pane and click Add.
-
On the Delivery Group page, select the Delivery Group and click the Details tab at the bottom. The new App Protection settings applied are displayed.
-
You must have a valid Citrix Cloud™ subscription and valid app protection entitlements. To purchase the app protection feature, you can contact your Citrix sales representative.
-
App protection requires XML trust. To enable XML trust, go to Settings > Site settings > Enable XML trust.
-
Regarding anti-screen-capturing:
- On Windows and macOS, only the window of the protected content is blank. App protection is active when a protected window is not minimized.
- On Linux, the entire capture is blank. App protection is active whether a protected window is minimized or not.
Change suspend capability for a delivery group
Make the suspend capability required or optional for a delivery group:
-
Required: The delivery group can only include those VMs that are suspend capable.
-
Optional: The delivery group can include VMs that are or aren’t suspend capable.
Before you begin
You can only change the suspend-capability of a delivery group to Required if all the VMs present in the delivery group are suspend-capable.
To change the suspend-capability of a delivery group:
- From Studio, go to Delivery Groups in the left pane.
- Select a group, and then click Change Suspend Capability in the action bar.
Users
Note:
The option Leave user management to Citrix Cloud has been removed. To manage user assignments for existing delivery groups set to Leave user management to Citrix Cloud, see Manage user assignments for Citrix Cloud Library-managed delivery groups.
This topic covers the following sections:
- Add or remove users
- Manage user assignments for Citrix Cloud Library-managed delivery groups
- Restrict user access to desktops and apps in a delivery group
- Restrict user access to resources in a delivery group
- Restrict user access to resources across all delivery groups
- Configure user scope for an access policy
Add or remove users in a delivery group
For detailed information about users, see Users.
- From Studio, select Delivery Groups in the left pane.
- Select a group and then select Edit Delivery Group in the action bar.
-
On the Users page:
- To add users, select Add, and then specify the users you want to add.
- To remove users, select one or more users and then select Remove.
- Select or clear the check box to allow access by unauthenticated users.
- Select Apply to apply any changes you made and keep the window open. Or, select OK to apply changes and close the window.
Manage user assignments for Citrix Cloud Library-managed delivery groups
For Citrix Cloud Library-managed delivery groups, you can manage their user assignments using Full Configuration. Detailed steps are as follows:
- From Studio, select Delivery Groups in the left pane.
- Select a Citrix Cloud Library-managed delivery group, and then select Edit in the action bar.
-
To restrict the use of a desktop to certain users, follow these steps:
- On the Desktops or Desktop Assignment Rules page, select the desktop and click Edit. The Edit Desktop page appears with the Restrict desktop use option selected.
- Click Add, select users as needed, and then click Done.
- Click OK.
- To restrict the use of applications in this group to certain users, click Application Assignment Rule, and follow the similar steps described in step 3 to add users.
Restrict access to desktops and apps in a delivery group
You can manage user access to resources in a delivery group by performing the following tasks:
Restrict desktop access to specific users
Users who meet both of the following conditions can access desktops in a delivery group:
-
Have access to resources (apps and desktops) in this delivery group.
By default, access is determined by the deployment’s user access list, which is not configured through Studio. You can add or remove users from the default user scope. See Add or remove users in a delivery group.
-
Have access to desktops in this group.
For more information, see Desktops (or Desktop Assignment Rules) page.
To restrict access to a desktop to specific users, see Desktops (or Desktop Assignment Rules) page.
Restrict application access to specific users
Users who meet all of the following conditions can access applications in a delivery group:
-
Have access to resources (apps and desktops) in this delivery group.
By default, access is determined by the deployment’s user access list, which is not configured through Studio. You can add or remove users from the default user scope. See Add or remove users in a delivery group.
-
Have access to applications in this group.
By default, the application entitlement policy rule includes everyone. See the PowerShell SDK
BrokerAppEntitlementPolicyRulecmdlets for details. If needed, you can restrict user access to applications in a delivery group using the steps described below. -
Have access to application groups that include this application.
To restrict application access to specific users at the delivery group level, follow these steps:
- In Studio, select Delivery Groups in the left pane.
- Select a delivery group, and then select Edit in the action bar.
-
To restrict application access, follow these steps:
-
In the left pane, click the Application Assignment Rule.
-
To allow specific users to access applications, select Restrict application use, and then click Add in the Allow list area and specify users or user groups to include.
-
To block specific users from accessing applications, click Add in the Block list area and specify the users or user groups to exclude.
-
Note:
- If you select Restrict application use but leave both the Allow and Block lists empty, no users can use applications in this group.
- If you select Restrict application use and leave the Allow list empty, all users except users in the Block list can use the applications.
Restrict access to resources in a delivery group
Any changes you make to restrict access to resources in a delivery group supersede previous settings, regardless of the method you use. You can:
-
Restrict access for administrators using delegated administration scopes: You can create and assign a scope that permits administrators to access all applications and another scope that provides access to only certain applications. For details, see Delegated administration.
-
Restrict access for users through smart access policy expressions: You can configure access policy rules to control user access to a specific delivery group. Examples include:
- Restrict access to a subset of users and specify allowed user devices.
- Restrict access to users connected through cloud stores (instead of on-premises stores).
- Restrict access to users connected through a specific store URL.
This section guides you through how to restrict user access to delivery groups through access policy rules:
- About access policy rules
- Add access policy rules
- Manage access policy rules using Studio
- Add and refine policy rules using PowerShell
About access policy rules
You can configure multiple access policy rules for a delivery group. Apps and desktops in a delivery group appear in a user’s StoreFront or Workspace when the user’s connection matches any access policy rule you defined for the delivery group, irrespective of order.
Each rule can be individually enabled or disabled. A disabled rule is ignored when the access policy is evaluated.
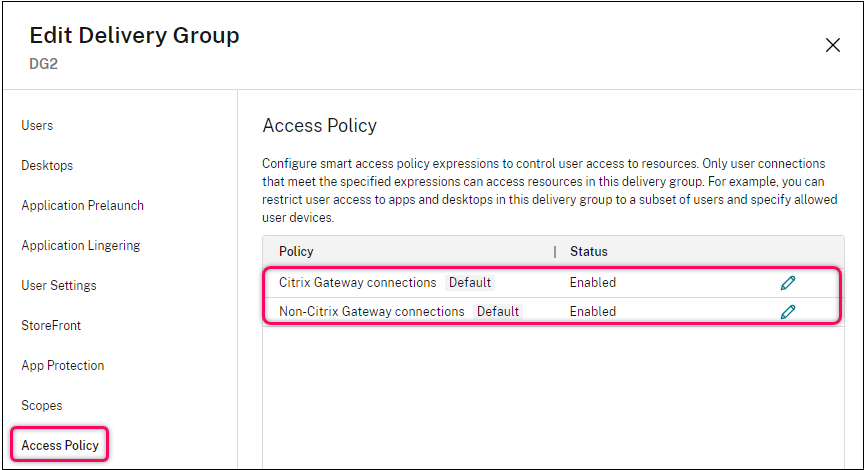
In Studio, the Access Policy list includes the following default SmartAccess policy rules. You can add more as necessary.
- Citrix Gateway connections. This policy allows only user connections made through Citrix Gateway can access resources within the delivery group. User connections made through Workspace when either the Device Posture or Network Location features are enabled, are also considered connections through Citrix Gateway.
- Non-Citrix Gateway connections. This policy allows only user connections made not through Citrix Gateway can access resources within the delivery group.
Note:
- To prevent the default rules from overriding a newly configured one, you must either disable the default rules or refine them to exclude the filters used in the new policy.
- The default policies can’t be deleted but they can be disabled. To disable a policy, click the Edit icon and then change the Policy state to Disabled.
- The policy list also shows rules added using PowerShell commands. Those policies can be deleted but can’t be edited in Studio.
Add access policy rules using Studio
An access policy rule comprises a set of filters. For more information about filters, see this article. When adding an access policy rule, you add multiple condition filters to the rule as needed.
To add a policy for a delivery group using Studio, follow these steps:
- From Studio, select Delivery Groups in the left pane.
- Select a group and then click Edit in the action bar.
-
On the Access Policy page, click Add. The Add Policy page appears.
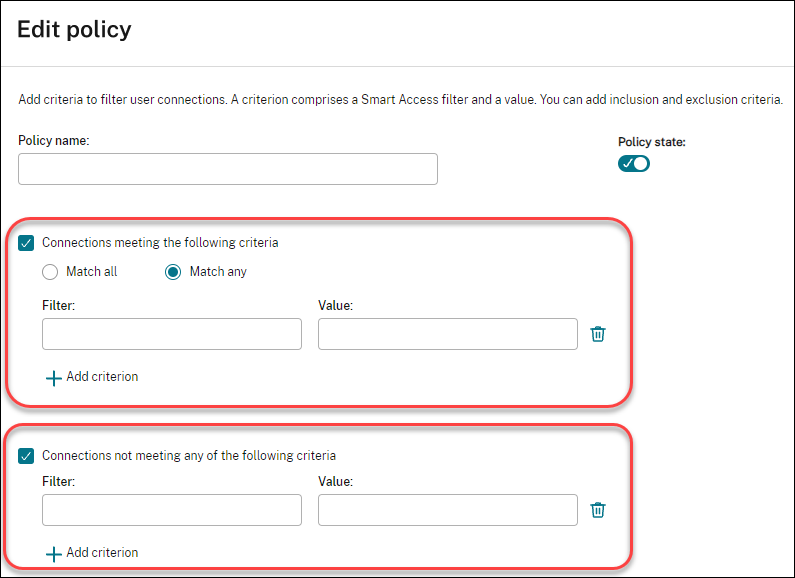
-
In the Policy name field, type a descriptive name for the policy. The name must be unique in your deployment.
-
To define the criteria for allowed user connections, follow these steps:
- Select Connections meeting the following criteria.
- Click Add criterion.
- In the Filter field, type the name of the filter that you want to use. In the Value field, type a desired value for the filter. For example, to allow only users connected through Workspace (instead of StoreFront) to access resources in this delivery group, type
Citrix-Via-Workspacefor Filter andTruefor Value. - To add more criteria, repeat steps b-c.
-
Select the relationship among the criteria:
- Match any. Allows access only when the incoming user connection meets any of the configured filter criteria.
- Match all. Allows access only when the incoming user connection meets all of the configured filter criteria.
-
To define the criteria for prohibited user connections, follow these steps:
- Select Connections not meeting any of the following criteria.
- Click Add criterion.
- In the Filter field, type the name of the filter that you want to use. In the Value field, type a desired value for the filter. For example, to prohibit users connected through the
example.cloud.comstore URL from accessing resources in this delivery group. TypeCitrix.Workspace.UsingDomainfor Filter andexample.cloud.comfor Value. -
To add more criteria, repeat steps b-c.
Note:
User connections meeting any of the configured criteria are prohibited from resources in this delivery group.
-
Click Done.
The new policy appears in the policy list.
-
Review and refine the default policy rules to avoid unintentional overlaps with connections covered by this new policy. To refine the existing policies, use the following ways:
- Disable the default policy rules.
- Configure the default policy rules to exclude the SmartAccess filters that you added to the inclusion criteria of the new policy. For more information, see Manage policy rules using Studio and Add and manage access policy rules using PowerShell.
Important:
As explained in About access policy rules, when a user’s connection matches one or more policy rules in a delivery group, the user gains access to its resources. Therefore, after creating a rule, you must carefully review and refine the existing rules to avoid any unintentional overlaps with connections covered by the new rule.
Manage access policy rules using Studio
You can use the inclusion and exclusion criteria to refine the default policies. For example, to restrict access to a subset of those connections, follow these steps:
- Edit a default policy.
- Select Connections meeting any of the following criteria.
- Add, edit, or remove the SmartAccess policy expressions for the allowed user access scenarios.
For more information, see the Citrix Gateway documentation.
Add and manage access policy rules using PowerShell
You can use the following PowerShell cmdlets to add and manage access policy rules for delivery groups:
- New-BrokerAccessPolicyRule
- Get-BrokerAccessPolicyRule
- Set-BrokerAccessPolicyRule
- Rename-BrokerAccessPolicyRule
- Remove-BrokerAccessPolicyRule
For more information, see the relative articles in the Citrix Developer Documentation.
Restrict user access to resources across all delivery groups
You can configure resource filtering rules to control user access to applications and desktops across all delivery groups. These rules let you specify the resource type, apply tag-based restrictions, and enforce access conditions based on factors such as network location and store connection context.
Required permission
To perform this task, you must be an administrator role with the Manage resource filter permission.
Add a resource filtering rule
To add a resource filtering rule, complete the following steps:
- Go to Delivery Groups > Settings.
- Select Manage in the Resource filter tile.
- In the Manage resource filter rules dialog box, click Add.
- Enter a Name and Description for the rule.
- Select the resource type that the rule applies to:
- Applications
- Desktops
- Both
-
Select the tag that identifies the resources that the rule applies to.
Note:
If you select Both as the resource type, selecting a tag is required.
-
Configure the Smart Access filter to define the conditions under which the resources are filtered.
- Click Add to save the rule.
Configure user scope for an access policy
By default, all access policies in a delivery group apply to the same set of users. You can configure an access policy to apply to specific users using Studio, PowerShell, or the Rest API.
To apply an access policy to specified users using Studio, follow these steps:
- From Studio, select Delivery Groups in the left pane.
- Select a group and then select Edit Delivery Group in the action bar.
- On the Users page, select Use contextual access.
- Select the access policy that you want to configure, and click User access scope. The User access scope page appears.
-
To define which authenticated users this policy applies to:
- To apply this policy to any authenticated users, select Allow any authenticated users to use resources.
- To apply this policy to specific users, keep Restrict use of resources selected. Then, use the allow list and block list to add or remove users for this policy.
- To apply this access policy to users who don’t provide credentials, select Grant access to unauthenticated (anonymous) users; no credentials are required.
Machines
- Manage user assignments for machines
- Enable Local Host Cache for single-session pooled VDAs
- Update a machine
- Add, change, or remove a tag restriction for a desktop
- Remove a machine
- Prevent users from connecting to a machine (maintenance mode)
- Shut down and restart machines
- Create and manage restart schedules for machines
- Enable a one-time restart schedule
- Manage Autoscale™
In addition to the features described in this article, see Autoscale for information about proactively power managing machines.
Manage user assignments for machines
Note:
This task is available only for MCS-provisioned single-session static machines.
Manage user assignments for machines in a delivery group. When desktop assignment rules are configured for the delivery group, machines are randomly assigned to users upon initial desktop launch and remain assigned to the users unless their user assignments are modified. If you want to manually assign an unassigned machine to specific users or change the existing user assignment for a machine, follow the steps described in this task to make changes. Using these steps, you can also modify names displayed in the Citrix Workspace App for machines assigned to users.
Detailed steps are as follows:
- From Studio, select Delivery Groups from the left pane.
- Select a group, and then select Edit in the action bar.
-
In the left pane, select Machine Allocation. The following details for each machine in the group appear:
- Machine name: Shows the name of a machine.
- Display name: Shows the machine’s display name in Citrix Workspace App.
- Users: Shows users assigned to this machine. If desktop assignment rules are configured, machines are randomly assigned to users upon their initial desktop launch and remain assigned to them unless their user assignments are modified.
-
Locate a machine, and then assign users to it or change its user assignment:
- Click Browser to browser to users.
- In the Users column, enter a semicolon-separated list of user names.
- Click Import from CSV file to import the setting details using a CSV file.
- Click Change to update the machine’s desktop icon from an
.icoor an.exefile. The specified icon overrides the default icon set only at the machine level.
-
(Optional) If the machine is assigned to users, modify its display name as needed.
Note:
The Display name field is enabled only when the machine is assigned to users:
- If the machine is assigned to a user based on a desktop assignment rule, this field shows the display name configured in that rule.
- If the machine is manually assigned to users and the field is left blank, the delivery group’s published name (if specified) is used as the machine’s display name. The delivery group’s name is used if the published name is unspecified. You can specify published names for delivery groups only through PowerShell.
- Select Apply to apply changes and keep the window open. Or, select OK to apply changes and close the window.
Enable Local Host Cache for single-session pooled VDAs
By default, power-managed, single-session, pooled machines can be used for only one session when in Local Host Cache mode. You can override the default behavior on a per-delivery group basis. Detailed steps are as follows:
- From Studio, select Delivery Groups in the left pane.
- Select a group as needed, then select Edit in the action bar.
- On the Local Host Cache page, select Use machines for subsequent sessions.
- Select Apply to apply any changes you made and keep the window open. Or, select OK to apply changes and close the window.
Alternatively, you can override the default behavior using PowerShell commands. For more information, see Enable using PowerShell.
Important:
Enabling access to power-managed single-session pooled machines can cause data and changes from previous user sessions being present in subsequent sessions.
Update a machine in a delivery group
- From Studio, select Delivery Groups in the left pane.
- Select a group and then select View Machines in the action bar.
- Select a machine and then select Update Machines in the action bar.
To choose a different image, select Image and then select a snapshot.
To apply changes and notify machine users, select Rollout notification to end-users. Then specify:
- When to update the image: now or on the next restart
- The restart distribution time (the total time to begin updating all machines in the group)
- Whether users are notified of the restart
- The message users will receive
Add, change, or remove a tag restriction for a desktop
Adding, changing, and removing tag restrictions can have unanticipated effects on which desktops are considered for launch. Review the considerations and cautions in Tags.
- From Studio, select Delivery Groups in the left pane.
- Select a group and then select Edit in the Actions bar.
- On the Desktops page, select the desktop and select Edit.
- To add a tag restriction, select Restrict launches to machines with the tag and then select the tag.
-
To change or remove a tag restriction, either:
- Select a different tag.
- Remove the tag restriction by clearing Restrict launches to machines with this tag.
- Select Apply to apply any changes you made and keep the window open. Or, select OK to apply changes and close the window.
Remove a machine from a delivery group
Removing a machine deletes it from a delivery group. It does not delete it from the machine catalog that the delivery group uses. Therefore, that machine is available for assignment to another delivery group.
Machines must be shut down before they can be removed. To temporarily stop users from connecting to a machine while you are removing it, put the machine into maintenance mode before shutting it down.
Machines might contain personal data, so use caution before allocating the machine to another user. Consider reimaging the machine.
- From Studio, select Delivery Groups in the left pane.
- Select a group and then select View Machines in the action bar.
- Ensure that the machine is shut down.
- Select the machine and then select Remove from Delivery Group in the action bar.
You can also remove a machine from a delivery group through the connection the machine uses.
Prevent users from connecting to a machine (maintenance mode) in a delivery group
When you need to temporarily stop new connections to machines, you can turn on maintenance mode for one or all machines in a delivery group. You might do this before applying patches or using management tools.
- When a multi-session OS machine is in maintenance mode, users can connect to existing sessions, but cannot start new sessions.
- When a single-session OS machine (or a PC using Remote PC Access) is in maintenance mode, users cannot connect or reconnect. Current connections remain connected until they disconnect or log off.
To turn maintenance mode on or off:
- From Studio, select Delivery Groups in the left pane.
- Select a group.
-
To turn on maintenance mode for all machines in the delivery group, select Turn On Maintenance Mode in the action bar.
To turn on maintenance mode for one machine, select View Machines in the action bar. Select a machine, and then select Turn On Maintenance Mode in the action bar.
- To turn maintenance mode off for one or all machines in a delivery group, follow the previous instructions, but select Turn Off Maintenance Mode in the action bar.
Windows Remote Desktop Connection (RDC) settings also affect whether a multi-session OS machine is in maintenance mode. Maintenance mode is on when any of the following occur:
- Maintenance mode is set to on, as described earlier.
- RDC is set to Don’t allow connections to this computer.
- RDC is not set to Don’t allow connections to this computer and the Remote Host Configuration User Logon Mode setting is either Allow reconnections, but prevent new logons or Allow reconnections, but prevent new logons until the server is restarted.
You can also turn maintenance mode on or off for:
- A connection, which affects the machines using that connection.
- A machine catalog, which affects the machines in that catalog.
Shut down and restart machines in a delivery group
This procedure is not supported for Remote PC Access machines.
- From Studio, select Delivery Groups in the left pane.
- Select a group and then select View Machines in the action bar.
-
Select the machine and then select one of the following actions in the action bar:
Note:
- The following actions apply only to machines that are power managed.
- Some options might not be available, depending on the machine state.
- Force shut down: Forcibly powers off the machine and refreshes the list of machines.
- Restart: Requests the operating system to shut down and then start the machine again. If the operating system cannot comply, the machine remains in its current state.
- Force restart: Forcibly shuts down the operating system and then restarts the machine.
- Suspend: Pauses the machine without shutting it down, and refreshes the list of machines.
- Shut down: Requests the operating system to shut down.
For non-force actions, if the machine does not shut down within 10 minutes, it is powered off. If Windows attempts to install updates during the shutdown, there is a risk that the machine will be powered off before the updates finish.
Create and manage restart schedules for machines in a delivery group
Note:
- When a restart schedule is applied to a delivery group with Autoscale enabled, its machines are just powered off and left for Autoscale to power them on.
- When restart schedules are applied to random single-session machines, those machines are powered off rather than restarted, to save costs. We recommend that you use Autoscale to power on machines.
- Changing the time zone on a delivery group might reboot the machines in that delivery group. To avoid this, ensure to change the time zone settings outside of production hours.
A restart schedule specifies when machines in a delivery group are periodically restarted. You can create one or more schedules for a delivery group. A schedule can affect either:
- All the machines in the group.
- One or more (but not all) machines in the group. The machines are identified by a tag that you apply to the machine. This is called a tag restriction, because the tag restricts an action to only items (in this case, machines) that have the tag.
For example, let’s say all of your machines are in one delivery group. You want every machine restarted once every week, and you want the machines used by the accounting team restarted daily. To accomplish this, set up one schedule for all machines, and another schedule for only the machines in accounting.
A schedule includes the day and time that the restart begins, and the duration. The duration is either “start all affected machines at the same time” or an interval it will likely take to restart all affected machines.
You can enable or disable a schedule. Disabling a schedule can be helpful when testing, during special intervals, or when preparing schedules before you need them.
You cannot use schedules for automated power-on or shutdown from the management console, only to restart.
Schedule overlap
Multiple schedules can overlap. In the example above, both schedules affect the accounting machines. Those machines might be restarted twice on Sunday. The scheduling code is designed to avoid restarting the same machine more often than intended, but it cannot be guaranteed.
- If the schedules coincide precisely in start and duration times, it is more likely that the machines will be restarted only once.
- The more the schedules differ in start and duration times, it’s more likely that multiple restarts will occur.
- The number of machines affected by a schedule also affects the chance of an overlap. In the example, the weekly schedule that affects all machines might initiate restarts faster than the daily schedule for accounting machines, depending on the duration specified for each.
For an in-depth look at restart schedules, see Reboot schedule internals.
View restart schedules
- From Studio, select Delivery Groups in the left pane.
- Select a group and then select Edit in the action bar.
- Select the Restart Schedule page.
The Restart Schedule page contains the following information for each configured schedule:
- Schedule name.
- Tag restriction used, if any.
- How often the machine restarts occur.
- Whether machine users receive a notification.
- Whether the schedule is enabled. Disabling a schedule can be helpful when testing, during special intervals, or when preparing schedules before you need them.
Add (apply) tags
When you configure a restart schedule that uses a tag restriction, ensure that the tag has been added (applied) to the machines that the schedule affects. In the example above, each of the machines used by the accounting team has a tag applied. For details, see Tags.
Although you can apply more than one tag to a machine, a restart schedule can specify only one tag.
- From Studio, select Delivery Groups in the left pane.
- Select the group containing the machines to be controlled by the schedule.
- Select View Machines and then select the machines you want to add a tag to.
- Select Manage Tags in the action bar.
- If the tag exists, enable the check box next to the tag name. If the tag does not exist, select Create and then specify the name for the tag. After the tag is created, enable the check box next to the newly created tag name.
- Select Save in the Manage Tags dialog.
Create a restart schedule
Note:
Restart schedules can be applied to all power managed and non-power managed multi-session machines.
- From Studio, select Delivery Groups in the left pane.
- Select a group and then select Edit in the action bar.
- On the Restart Schedule page, select Add.
-
On the Add Restart Schedule page:
- To enable the schedule, select Yes. To disable the schedule, select No.
- Type a schedule name and description.
- For Restrict to tag, apply a tag restriction.
- For Include machines in maintenance mode, choose whether to include machines that are in maintenance mode in this schedule. To use PowerShell instead, see Scheduled restarts for machines in maintenance mode.
- For Restart frequency, select how often the restart occurs: daily, weekly, monthly, or once. If you select Weekly or Monthly, you can specify one or more specific days.
- For Repeats every, specify how often you want the schedule to run.
- For Start date, specify a start date for the first occurrence of the schedule.
- For Begin restart at, specify, in 24-hour clock format, the time of day to begin the restart.
- For Restart duration:
- To forcibly restart machines with unresponsive sessions, select Forced restart, then select one of the following options:
- Restart all machines at once
- Restart all machines within a time period, and specify the time by Hour or Minute.
-
To wait for all sessions to drain before restarting, select Graceful restart.
Upon starting a restart schedule that is configured to use graceful restart:
- All idle machines belonging to the delivery group are restarted immediately
- Each machine belonging to the delivery with one or more active sessions are restarted when all sessions are logged off.
Note:
Graceful restart schedules can only restart power managed machines.
- To forcibly restart machines with unresponsive sessions, select Forced restart, then select one of the following options:
- In Send notification to users, determine whether to display a notification message on the applicable machines before a restart begins. By default, no message appears.
- If you choose to display a message 15 minutes before the restart begins, you can choose to repeat the message every five minutes after the initial message. By default, the message does not repeat.
-
Enter the notification title and text. There is no default text.
If you want the message to include a countdown to restart, include the variable %m%. Unless you chose to restart all machines at the same time, the message appears on each machine at the appropriate time before the restart.
- Click Done to apply the changes and to close the Add Restart Schedule window.
- Click Apply to apply the changes you made and keep the Edit Delivery Group window open. Or, click Save to apply changes and to close the window.
Immediately run a restart schedule
A restart schedule specifies when machines in a delivery group restart regularly. You can also run a restart schedule immediately to restart the machines in that schedule.
To run a restart schedule immediately, follow these steps:
- From Studio, select Delivery Groups in the left pane.
- Select the applicable delivery group and then select Edit in the action bar
- On the Restart Schedule page, select a schedule that you want to run and then select Run schedule now.
Note:
- You cannot run a schedule immediately if it is configured with the Restart all machines after draining sessions setting.
- You can apply Run schedule now only to one schedule at a time.
- After you edit a schedule, Run schedule now becomes unavailable. Select Apply to make it available.
Edit, remove, enable, or disable a restart schedule
- From Studio, select Delivery Groups in the left pane.
- Select a group and then select Edit in the action bar.
- On the Restart Schedule page, select the check box for a schedule.
- To edit a schedule, select Edit. Update the schedule configuration, using the guidance in Create a restart schedule.
- To enable or disable a schedule, select Edit. Select or clear the Enable restart schedule check box.
- To remove a schedule, select Remove. Confirm the removal. Removing a schedule does not affect any tags applied to machines in the affected machines.
Scheduled restarts delayed due to database outage
Note:
This feature is available only in PowerShell.
If a site database outage occurs before a scheduled restart begins for machines (VDAs) in a delivery group, the restarts begin when the outage ends. This action can have unintended results.
For example, let’s say you’ve scheduled a delivery group’s restarts to occur during off-production hours (beginning at 3 am). A site database outage occurs one hour before a scheduled restart begins (2 am). The outage lasts six hours (until 8 am). The restart schedule begins when the connection between the Delivery Controller™ and the site database is restored. The VDA restarts now begin five hours after their original schedule. This action might result in VDAs restarting during production hours.
To help avoid this situation, you can use the MaxOvertimeStartMins parameter for the New-BrokerRebootScheduleV2 and Set-BrokerRebootScheduleV2 cmdlets. The value specifies the maximum number of minutes beyond the scheduled start time that a restart schedule can begin.
-
If the database connection is restored within that time (scheduled time +
MaxOvertimeStartMins), the VDA restarts begin. -
If the database connection is not restored within that time, the VDA restarts do not begin.
-
If this parameter is omitted or has a zero value, the scheduled restart begins when the connection to the database is restored, regardless of the outage duration.
For more information, see the cmdlet help. This feature is available only in PowerShell.
Scheduled restarts for machines in maintenance mode
To indicate whether a restart schedule affects machines that are in maintenance mode, use the IgnoreMaintenanceMode option with the BrokerRebootScheduleV2 cmdlets.
For example, the following cmdlet creates a schedule that restarts both machines that are and machines that are not in maintenance mode.
New-BrokerRebootSchedulev2 rebootSchedule1 -DesktopGroupName <myDesktopGroup> -IgnoreMaintenanceMode $true
The following cmdlet modifies an existing restart schedule.
Set-BrokerRebootSchedulev2 rebootSchedule1 -IgnoreMaintenanceMode $true
For more information, see the cmdlet help.
Enable a one-time restart schedule
If you want to enable one-time restart schedule using PowerShell, use the following BrokerCatalogRebootSchedule PowerShell commands to create, modify, and delete a restart schedule:
Get-BrokerCatalogRebootScheduleNew-BrokerCatalogRebootScheduleSet-BrokerCatalogRebootScheduleRemove-BrokerCatalogRebootScheduleRename-BrokerCatalogRebootSchedule
Limitations:
- A catalog reboot schedule associated with a catalog that is without a configured timezone is created but does not start.
- When a catalog reboot schedule is created, then the reboot schedule runs only on the catalog VMs belonging to a delivery group.
Example:
-
To create a restart schedule of the VMs in the catalog named BankTellers to begin on Feb 3, 2022, between 2 AM and 4 AM.
New-BrokerCatalogRebootSchedule -Name BankTellers -CatalogName BankTellers -StartDate "2022-02-03" -StartTime "02:00" -Enabled $true -RebootDuration 120 <!--NeedCopy--> -
To create a restart schedule of the VMs in the catalog having UID 17 to begin on Feb 3, 2022, between 1 AM and 5 AM. Ten minutes before the restart, each VM is set to display a message box with the title: WARNING: Reboot pending, and the message: Save your work, in every user session.
New-BrokerCatalogRebootSchedule -Name 'Update reboot' -CatalogUid 17 -StartDate "2022-02-03" -StartTime "01:00" -Enabled $true -RebootDuration 240 -WarningTitle "WARNING: Reboot pending" -WarningMessage "Save your work" -WarningDuration 10 <!--NeedCopy--> -
To rename the catalog restart the schedule named Old Name to New Name.
Rename-BrokerCatalogRebootSchedule -Name "Old Name" -NewName "New Name" <!--NeedCopy--> -
To display all catalog restart schedules with UID 1, and then rename the catalog reboot schedule with the UID 1 to New Name.
Get-BrokerCatalogRebootSchedule -Uid 1 | Rename-BrokerCatalogRebootSchedule -NewName "New Name" -PassThru <!--NeedCopy--> -
To set the catalog restart schedule named Accounting to display a message with the title WARNING: Reboot pending, and the message, Save your work, ten minutes before the restart of each VM. The message appears in every user session on that VM.
Set-BrokerCatalogRebootSchedule -Name Accounting -WarningMessage "Save your work" -WarningDuration 10 -WarningTitle "WARNING: Reboot pending" <!--NeedCopy--> -
To display all restart schedules that are disabled, and then enable all disabled restart schedules.
Get-BrokerCatalogRebootSchedule -Enabled $false | Set-BrokerCatalogRebootSchedule -Enabled $true <!--NeedCopy--> -
To set the catalog restart schedule with UID 17 to display the message: Rebooting in %m% minutes in fifteen, ten, and five minutes before the restart of each VM.
Set-BrokerCatalogRebootSchedule 17 -WarningMessage "Rebooting in %m% minutes." -WarningDuration 15 -WarningRepeatInterval 5 <!--NeedCopy--> -
To configure the time zone for the catalog named MyCatalog.
 Set-BrokerCatalog -Name "MyCatalog" -TimeZone <TimeZone>
 <!--NeedCopy-->
Manage Autoscale
By default, Autoscale is disabled for delivery groups. To manage Autoscale for a delivery group (if applicable), follow these steps:
- From Studio, select Delivery Groups in the left pane.
- Select a group and then select Manage Autoscale in the action bar. The Manage Autoscale window appears.
- Configure settings as needed. For information about Autoscale settings, see Autoscale.
- Select Apply to apply any changes you made and to keep the window open. Or, select Save to apply changes and to close the window.
Sessions
- Log off or disconnect a session, or send a message to users
- Configure session prelaunch and session linger
- Configure session roaming
- Control session reconnection when disconnected from machine in maintenance mode
Log off or disconnect a session, or send a message to delivery group users
- From Studio, select Delivery Groups in the left pane.
- Select a group and then select View Machines in the action bar.
- To log a user off a session, select the session or desktop and then select Log off in the action bar. The session closes and the machine becomes available to other users, unless it is allocated to a specific user.
- To disconnect a session, select the session or desktop and then select Disconnect in the action bar. Applications continue to run and the machine remains allocated to that user. The user can reconnect to the same machine.
- To send a message to users, select the session, machine, or user and then select Send message in the action bar. Enter the message.
Configure session prelaunch and session linger in a delivery group
These features are supported only on multi-session OS machines.
The session prelaunch and session linger features help specified users access applications quickly, by:
- Starting sessions before they are requested (session prelaunch)
- Keeping application sessions active after a user closes all applications (session linger)
By default, session prelaunch and session linger are not used. A session starts (launches) when a user starts an application, and remains active until the last open application in the session closes.
Considerations:
- The delivery group must support applications, and the machines must be running a VDA for multi-session OS, minimum version 7.6.
- These features are supported only when using Citrix Workspace app for Windows, and also require more Citrix Workspace app configuration. For instructions, search for session prelaunch in the product documentation for your Citrix Workspace app for Windows version.
- Citrix Workspace app for HTML5 is not supported.
- When using session prelaunch, if a user’s machine is put into suspend or hibernate mode, prelaunch does not work (regardless of session prelaunch settings). Users can lock their machines/sessions. However, if a user logs off from Citrix Workspace app, the session is ended and prelaunch no longer applies.
- When using session prelaunch, physical client machines cannot use the suspend or hibernate power management functions. Client machine users can lock their sessions but should not log off.
- Prelaunched and lingering sessions consume a concurrent license, but only when connected. If using a user/device license, the license lasts 90 days. Unused prelaunched and lingering sessions disconnect after 15 minutes by default. This value can be configured in PowerShell (
New/Set-BrokerSessionPreLaunchcmdlet). - Careful planning and monitoring of your users’ activity patterns are essential to tailoring these features to complement each other. Optimal configuration balances the benefits of earlier application availability for users against the cost of keeping licenses in use and resources allocated.
- You can also configure session prelaunch for a scheduled time of day in Citrix Workspace app.
How long unused prelaunched and lingering sessions remain active
There are several ways to specify how long an unused session remains active if the user does not start an application: a configured timeout and server load thresholds. You can configure all of them. The event that occurs first causes the unused session to end.
-
Timeout: A configured timeout specifies the number of minutes, hours, or days an unused prelaunched or lingering session remains active. If you configure too short a timeout, prelaunched sessions end before they provide the user benefit of quicker application access. If you configure too long a timeout, incoming user connections might be denied because the server doesn’t have enough resources.
You can enable this timeout from the SDK only (
New/Set-BrokerSessionPreLaunchcmdlet), not from the management console. If you disable the timeout, it does not appear in the console display for that delivery group or in the Edit Delivery Group pages. -
Thresholds: Automatically ending prelaunched and lingering sessions based on server load ensures that sessions remain open as long as possible, assuming that server resources are available. Unused prelaunched and lingering sessions do not cause denied connections because they are ended automatically when resources are needed for new user sessions.
You can configure two thresholds: the average percentage load of all servers in the delivery group, and the maximum percentage load of a single server in the group. When a threshold is exceeded, the sessions that have been in the prelaunch or lingering state for the longest time are ended. Sessions are ended one-by-one at minute intervals until the load falls below the threshold. While the threshold is exceeded, no new prelaunch sessions are started.
Servers with VDAs that have not registered with a Controller and servers in maintenance mode are considered fully loaded. An unplanned outage causes prelaunch and lingering sessions to end automatically to free capacity.
To enable session prelaunch
- From Studio, select Delivery Groups in the left pane.
- Select a group and then select Edit in the action bar.
-
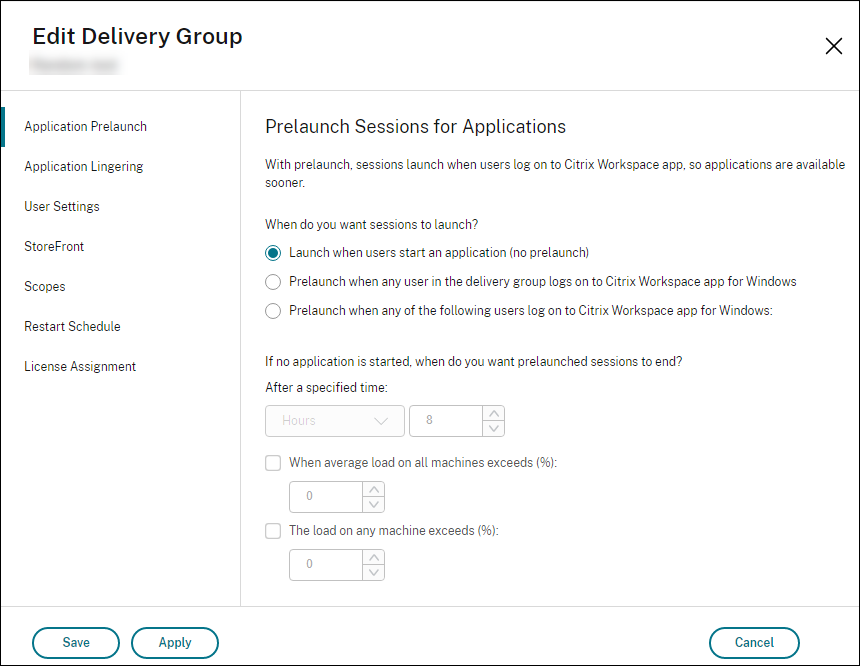
On the Application Prelaunch page, enable session prelaunch by choosing when sessions launch:
- When a user starts an application. This is the default setting. Session prelaunch is disabled.
- When any user in the delivery group logs on to Citrix Workspace app for Windows.
- When anyone in a list of users and user groups logs on to Citrix Workspace app for Windows. Be sure to also specify users or user groups if you choose this option.
-
A prelaunched session is replaced with a regular session when the user starts an application. If the user does not start an application (the prelaunched session is unused), the following settings affect how long that session remains active.
- When a specified time interval elapses. You can change the time interval (1–99 days, 1–2376 hours, or 1–142,560 minutes).
- When the average load on all machines in the delivery group exceeds a specified percentage (1–99%).
- When the load on any machine in the delivery group exceeds a specified percentage (1–99%).
Recap: A prelaunched session remains active until one of the following events occurs: a user starts an application, the specified time elapses, or a specified load threshold is exceeded.
To enable session linger
- From Studio, select Delivery Groups in the left pane.
- Select a group and then select Edit in the action bar.
-
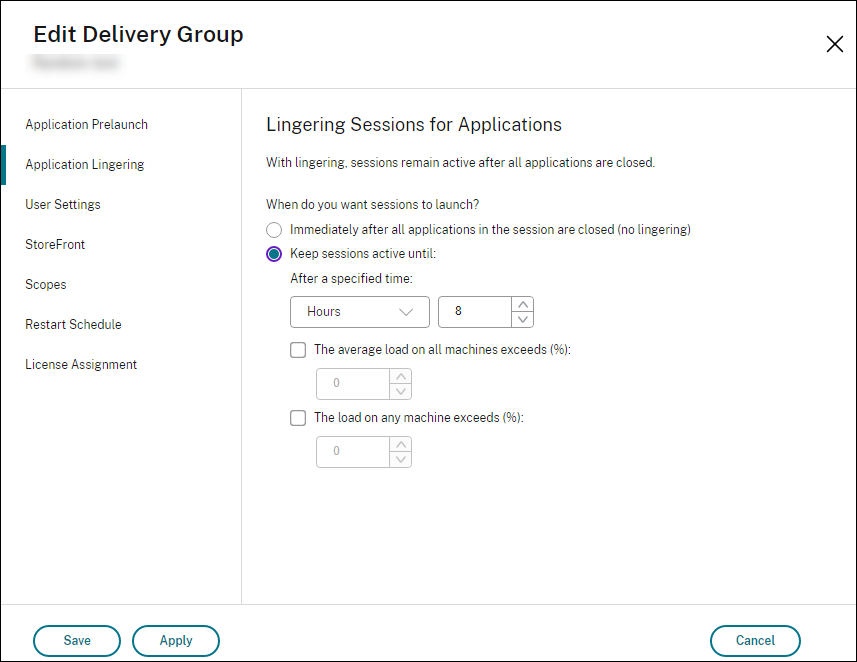
On the Application Lingering page, enable session linger by selecting Keep sessions active until.
-
Several settings affect how long a lingering session remains active if the user does not start another application.
- When a specified time interval elapses. You can change the time interval: 1–99 days, 1–2376 hours, or 1–142,560 minutes.
- When the average load on all machines in the delivery group exceeds a specified percentage: 1–99%.
- When the load on any machine in the delivery group exceeds a specified percentage: 1–99%.
Recap: A lingering session remains active until one of the following events occurs: a user starts an application, the specified time elapses, or a specified load threshold is exceeded.
Configure session roaming
By default, session roaming is enabled for delivery groups. Sessions roam between client devices with the user. When the user launches a session and then moves to another device, the same session is used and applications are simultaneously available on both devices. You can view the applications on multiple devices. The applications follow, regardless of the device or whether current sessions exist. Often, printers and other resources assigned to the application also follow. Alternatively, you can also use PowerShell. For more information, see Session roaming.
Configure session roaming for applications
To configure session roaming for applications, follow these steps:
-
From Studio, select Delivery Groups in the left pane.
-
Select a group and then select Edit Delivery Group in the action bar.
-
On the Users page, enable session roaming by selecting the Sessions roam with users as they move between devices check box.
- When enabled, if a user launches an application session and then moves to another device, the same session is used and available on both devices. When disabled, the session no longer roams between devices.
-
Select OK to apply changes and close the window.
Configure session roaming for desktops
To configure session roaming for a desktop, follow these steps:
-
From Studio, select Delivery Groups in the left pane.
-
Select a group and then select Edit Delivery Group in the action bar.
-
On the Desktops page, select the desktop and select Edit.
-
Enable session roaming by selecting the Session roaming check box.
- When enabled, if the user launches the desktop and then moves to another device, the same session is used, and applications are available on both devices. When disabled, the session no longer roams between devices.
-
Select OK to apply changes and close the window.
Control session reconnection when disconnected from machine in maintenance mode
Note:
This feature is available only in PowerShell.
You can control whether sessions that are disconnected on machines in maintenance mode are allowed to reconnect to machines in the delivery group.
Before late May 2021, reconnection was not allowed for single-session pooled desktop sessions that had disconnected from machines in maintenance mode. Now, you can configure a delivery group to allow or prohibit reconnections (regardless of session type) after disconnection from a machine in maintenance mode.
When creating or editing a delivery group (New-BrokerDesktopGroup, Set-BrokerDesktopGroup), use the -AllowReconnectInMaintenanceMode <boolean> parameter to allow or prohibit reconnections for machines that were disconnected from a machine in maintenance mode.
- When set to true, sessions can reconnect to machines in the group.
- When set to false, sessions cannot reconnect to machines in the group.
Default values:
- Single-session: Disabled
- Multi-session: Enabled
Applications
View applications in a delivery group and add more if needed.
- From Studio, select Delivery Groups in the left pane.
- Select a group. If this group contains applications, View Applications appears in the action bar.
- Select View Applications. You are directed to the Applications node where all applications available in this group appear.
- To add more applications to this group, go to the Delivery Groups node, select the group, and select Add Applications in the action bar.
Troubleshoot
-
VDAs that are not registered with a Delivery Controller are not considered when launching brokered sessions. This results in underutilization of otherwise available resources. There are various reasons a VDA might not be registered, many of which an administrator can troubleshoot. The details display provides troubleshooting information in the catalog creation wizard, and after you add a catalog to a delivery group.
After you create a delivery group, the details pane for a delivery group indicates the number of machines that are expected to be registered but are not. For example, one or more machines are powered on and not in maintenance mode, but are not currently registered with a Controller. When viewing a “not registered, but should be” machine, review the Troubleshoot tab in the details pane for possible causes and recommended corrective actions.
For messages about functional level, see VDA versions and functional levels.
For information about VDA registration troubleshooting, seeCTX136668.
- In the display for a delivery group, the Installed VDA version in the details pane might differ from the actual version installed on the machines. The machine’s Windows Programs and Features display shows the actual VDA version.
- For machines with Power State Unknown status, see CTX131267 for guidance.