Entra ID single sign-on to VDAs (preview)
You can enable single sign-on to Entra joined VDAs, so that after users have authenticated to the store using Entra ID, they do not need to re-enter credentials when they launch a virtual app or desktop.
IMPORTANT:
Entra ID SSO to VDAs is currently in preview. This feature is provided without support and is not yet recommended for use in production environments.
Prerequisites
- You have Entra ID joined resources hosted by Citrix DaaS™ or Citrix Virtual Apps and Desktops™ 2603 or higher.
- Users authenticate to their store using Entra ID. This can be using Citrix Gateway with OIDC, Citrix Gateway with SAML, or SAML direct to StoreFront.
- The UI experience is set to Modern.
- You have completed all configuration described at Microsoft Entra single sign-on - DaaS or Microsoft Entra single sign-on - Citrix Virtual Apps and Desktops. Otherwise, single sign-on will fail and users may experience launch delays or errors.
- If the store uses Citrix Gateway for authentication and publishes resources from any Citrix DaaS sites then configure your NetScaler ADC to allow unauthenticated calls to the ticket redemption endpoint. This is not required if all sites are Citrix Virtual Apps and Desktops, or if authenticating directly to StoreFront without a gateway.
Known issues
If the user authenticates using SAML and is logged in to multiple Entra ID accounts, when the user launches a VDA, the web browser or Citrix Workspace app may prompt the user to select which account to use, or Single sign-on may fail. This issue does not occur if the user authenticates using OIDC based authentication.
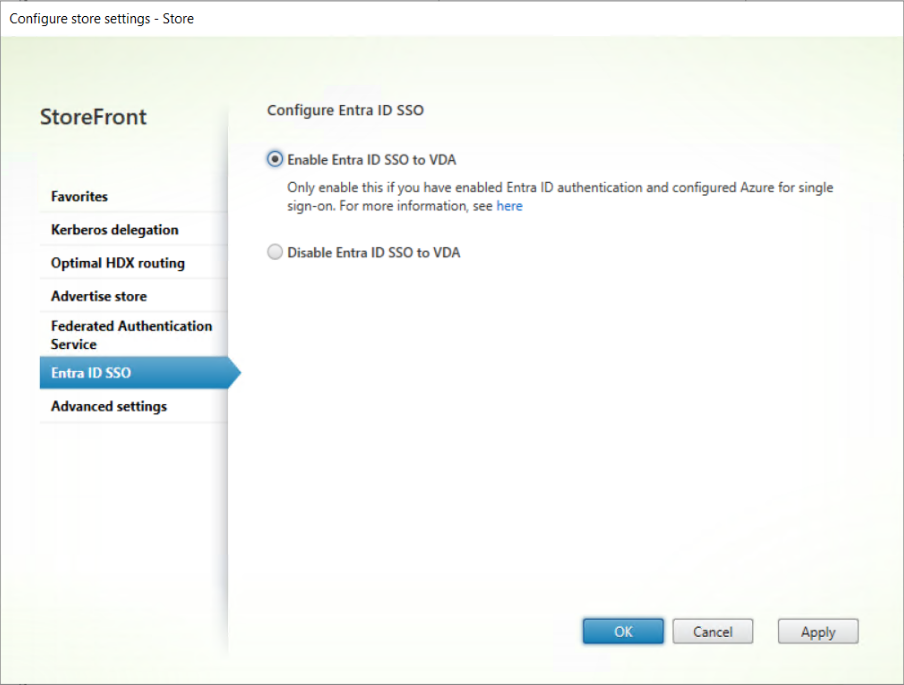
Configure using management console
To configure Entra ID SSO:
-
Open the Store settings window for the store you wish to configure.
-
In the Action pane, select Configure Store Settings.
-
On the Configure Store Settings page, select the Entra SSO tab.
-
Enable or disable Entra SSO.
-
Select OK to save your changes.
This setting only affects machines in delivery groups configured to use log on type of Entra or hybrid. For delivery groups with log on type Active Directory, you may wish to also enable Federated Authentication Service.
Configuration using PowerShell
To configure single sign-on using PowerShell, call the Set-STFStoreLaunchOptions cmdlet with parameter -EntraIdSsoEnabled.
Configure NetScaler ADC to allow unauthenticated access to ticket redemption endpoint
Citrix DaaS uses a Citrix managed Azure client to handle the SSO via a Citrix Entra ID web page. To improve security, StoreFront creates a ticket linked to the client. The Citrix Entra ID web page calls back to StoreFront to validate that ticket. As the Citrix Entra ID web page is hosted under a different domain than StoreFront, it does not have access to the authentication context. Therefore if users authenticate to their store via a Citrix Gateway, then you must configure your NetScaler ADC to bypass the Citrix Gateway for calls to /Citrix/<StoreWeb>/Tickets/RedeemStoreTicket.
Note:
Citrix Virtual Apps and Desktops requires that you create your own client in Azure rather than using the Citrix managed client. Hence the ticket is not required and the following configuration is not necessary.
The following diagram shows how you can use a content switcher to bypass authentication for the ticket redemption URL.

Calls to /Citrix/<StoreWeb>/Tickets/RedeemStoreTicket are directed to a load balancer which forwards the requests to StoreFront, bypassing the gateway. Note that the load balancer is required as the content switcher cannot be configured to direct traffic directly to a URL and requires a virtual server as a target. The load balancer does not perform any load balancing and merely forwards traffic to StoreFront. If you already have a suitable StoreFront load balancer on the same machine then you can use this instead.
All other calls are directed to the gateway’s VPN virtual server.
Create load balancer to pass through from content switcher to StoreFront
If you already have a load balancer virtual server fronting your StoreFront server group and running on the same machine as the gateway then you can skip this step and configure the content switch to send traffic directly to that virtual server. Otherwise you must create a load balancer to pass through traffic to the StoreFront server(s). This is because content switcher actions must reference a virtual server.
The steps are slightly different depending on whether StoreFront is configured for HTTPS (recommended) or HTTP.
StoreFront is configured for HTTPS
Create a service stf_srv representing StoreFront using its IP address and bind it to an SSL load balancer with no persistence.
add service stf_srv <StoreFront Ip Address> SSL 443
add lb vserver lb_vs SSL <lb_vs Ip Address> 443 -persistenceType NONE -cltTimeout 180
bind lb vserver lb_vs stf_srv
<!--NeedCopy-->
StoreFront is configured for HTTP
Create a service stf_srv representing StoreFront using its FQDN and bind it to an HTTP load balancer with no persistence.
add server storefront1 <storefront fqdn>
add service stf_srv storefront1 HTTP 80
add lb vserver lb_vs HTTP 0.0.0.0 0 -persistenceType NONE -cltTimeout 180
bind lb vserver lb_vs stf_srv
<!--NeedCopy-->
Create SSL content switching virtual server
Create an SSL content switching virtual server to handle client requests. This content switching virtual server listens for HTTPS traffic on port 443 and routes requests to either the gateway VPN virtual server or pass through to StoreFront via the load balancer.
By default content switching is disabled so you must enable it if you have not previously done so.
enable feature CS
add cs vserver cs_vs SSL <cs_vs Ip Address> 443 -cltTimeout 180 -persistenceType NONE
bind ssl vserver cs_vs -certkeyName <Certificate Name>
<!--NeedCopy-->
Create content switching policy for ticket redemption
Create a content switching policy for load balancing based on a URL containing a StoreFront ticket redemption path.
This policy matches requests when the URL contains /Citrix/<StoreWeb>/Tickets/RedeemStoreTicket and routes them to the load balancer without going through the VPN Virtual Server.
Replace <StoreWeb> with the name of the StoreFront website from the StoreFront virtual server web policy. You can either use the load balancer lb_vs created in the earlier step, or an existing load balancer virtual server fronting your StoreFront servers.
add cs action cs_lb_vs -targetLBVserver lb_vs
add cs policy cs_lb_vs_pol -rule "HTTP.REQ.URL.CONTAINS(\"/Citrix/<StoreWeb>/Tickets/RedeemStoreTicket\")" -action cs_lb_vs
bind cs vserver cs_vs -policyName cs_lb_vs_pol -priority 100
<!--NeedCopy-->
Create content switching policy for all other traffic
Create a catch-all content switching policy to send all other StoreFront traffic via the VPN virtual server for authentication.
add cs action cs_vpn_vs -targetVserver <VPN vServer>
add cs policy cs_vpn_pol -rule TRUE -action cs_vpn_vs
bind cs vserver cs_vs -policyName cs_vpn_pol -priority 110
<!--NeedCopy-->