
High availability deployments
You can configure high availability for Citrix SecurAccess™ ZTNA in just a few straightforward steps.
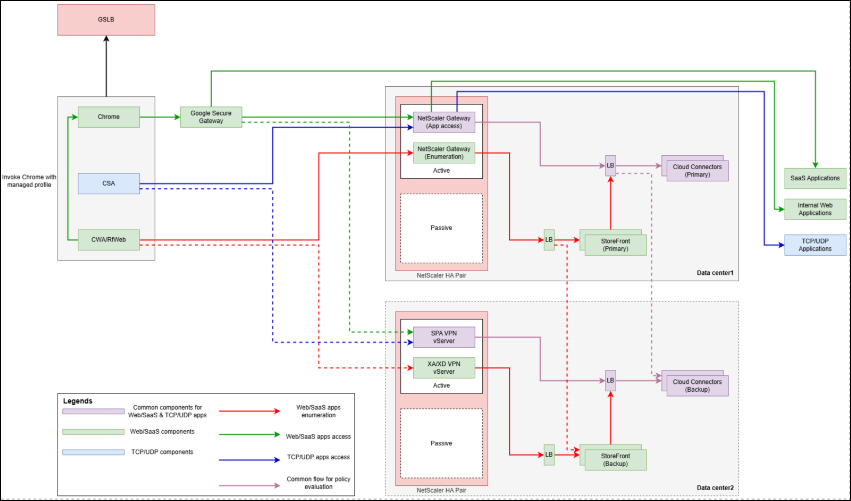
High availability within the data center
The following sections provide more information about high availability within the data center.
NetScaler
For high availability, it is recommended to Create NetScaler high-availability Pair. This is an active-passive NetScaler pair.
If the active NetScaler is down, the passive NetScaler is automatically promoted as active, and all user traffic is routed to the new active NetScaler. Users are not required to re-authenticate as the sessions are also synchronized across the NetScaler high availability pair.
For more details on NetScaler HA pair, see High Availability.
Cloud Connectors (Citrix SecurAccess ZTNA servers)
Configure a NetScaler load balancer for Citrix SecurAccess ZTNA with service group configuration.
-
Create a new service group on NetScaler: Navigate to Configuration > Traffic Management > Load Balancing > Service Groups.
-
Click Add.
-
Enter a Name for the service group, for example,
primary_spa_servers. -
Depending upon the type of load balancer (SSL or SSL_BRIDGE), choose the appropriate Protocol for the service group.
-
Leave other fields with default values and click OK to save the service group.
-
Click No Service Group Member to add Cloud Connectors from the current data center.
-
Use the IP Based option and add the current data center’s Cloud Connectors IP address and Port. By default, Citrix SecurAccess ZTNA uses port 8443. Other fields can be retained with default values.
-
Repeat this step if additional Cloud Connectors must be added.
-
Click Create to create the load balancer service.
-
Click OK to add the service to the service group.Note:Optionally you can add an HTTP Monitor for the Citrix SecurAccess ZTNA service. The following URL path can be used to do so.
/secureAccess/healthIt returns 200 OK if Citrix SecurAccess ZTNA is up and running. -
Click Done.
-
Now create a load balancer. Navigate to Configuration > Traffic Management > Load Balancing > Virtual Servers.
-
Click Add.
-
Enter a load balancer name.
-
Choose the appropriate Protocol, for example, SSL or SSL_BRIDGE.
-
Set IP Address Type as IP Address and Port as
443.Note:The protocol must be SSL or SSL_BRIDGE. HTTP type is not supported for Citrix SecurAccess ZTNA load balancer. The port must be 443. Custom HTTPS ports are not supported. -
Click OK.
-
Click No Load Balancing Virtual Server ServiceGroup Binding.
-
Click to select the service group created earlier, then click Select.
-
Set Order value as 10. Click Bind, then Continue.
-
If using SSL type Protocol, click No Server Certificate to bind the appropriate server certificate. For SSL_BRIDGE type load balancer, no server certificate is required in the load balancer, but the server certificate must be configured in the Cloud Connector for Citrix SecurAccess ZTNA service. For details, see Configure TLS/SSL certificates for the Citrix SecurAccess ZTNA service on Cloud Connector.
This concludes the load balancer configuration with the service group for Citrix SecurAccess ZTNA.
All the Citrix SecurAccess ZTNA servers in the load balancer are active. If one Citrix SecurAccess ZTNA server goes down, users are not impacted as the other Citrix SecurAccess ZTNA servers continue to serve the traffic. The Citrix SecurAccess ZTNA servers are stateless, so there is no persistency requirement.
StoreFront servers
StoreFront servers also behave the same as Citrix SecurAccess ZTNA servers during failover within the same data center.