Configure a custom domain
You can allow users to access their store using a custom domain instead or as well as the cloud.com domain. You must own the domain and each domain can only be used to access a single store.
Each cloud.com URL can have a linked custom URL.
Prerequisites
-
You can either choose a newly registered domain, or one that you already own. The domain must be in subdomain format (your.company.com). Citrix doesn’t support using just a root domain (company.com).
-
It recommended that you use a dedicated domain. This helps you change the domain easily, if necessary.
- Custom domains cannot contain any Citrix trademarks. Find the full list, see Cloud Software Group Trademark Guidelines.
- The domain you choose must be configured in the public DNS. Any CNAME record names and values included in your domain configuration must be resolvable by Citrix. Private DNS configurations are not supported.
Configuring your custom domain
Once a custom domain is set, you can’t change the URL or certificate type. You can only delete it. Ensure that the domain you choose isn’t already configured in DNS. Remove any existing CNAME records before attempting to configure your custom domain.
Note:
When adding the custom URL and configuring SAML, Citrix Cloud™ requires 24 hours for provisioning.
Adding a custom domain
-
Sign in to Citrix Cloud.
-
From the Citrix Cloud menu, select StoreFront Cloud and then select Access.
-
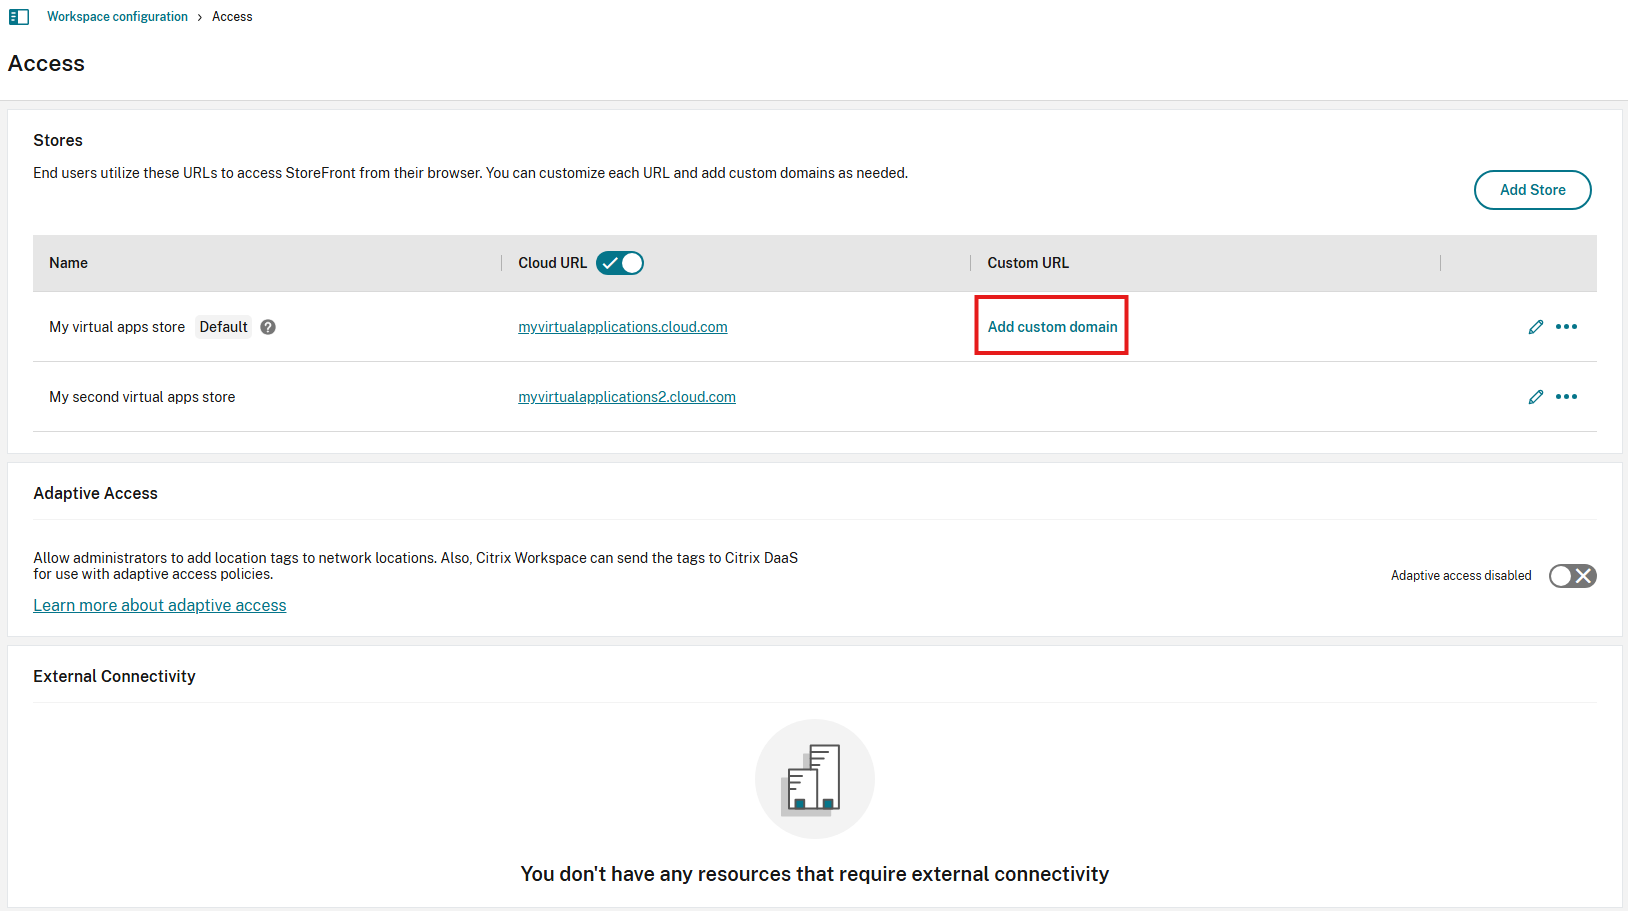
On the Access tab, in the Stores table select Add custom domain for the cloud URL you want to add a custom URL for (the first custom URL you create must be associated with your primary cloud URL).
-
Read the information that appears on the Overview page, and select Next.
-
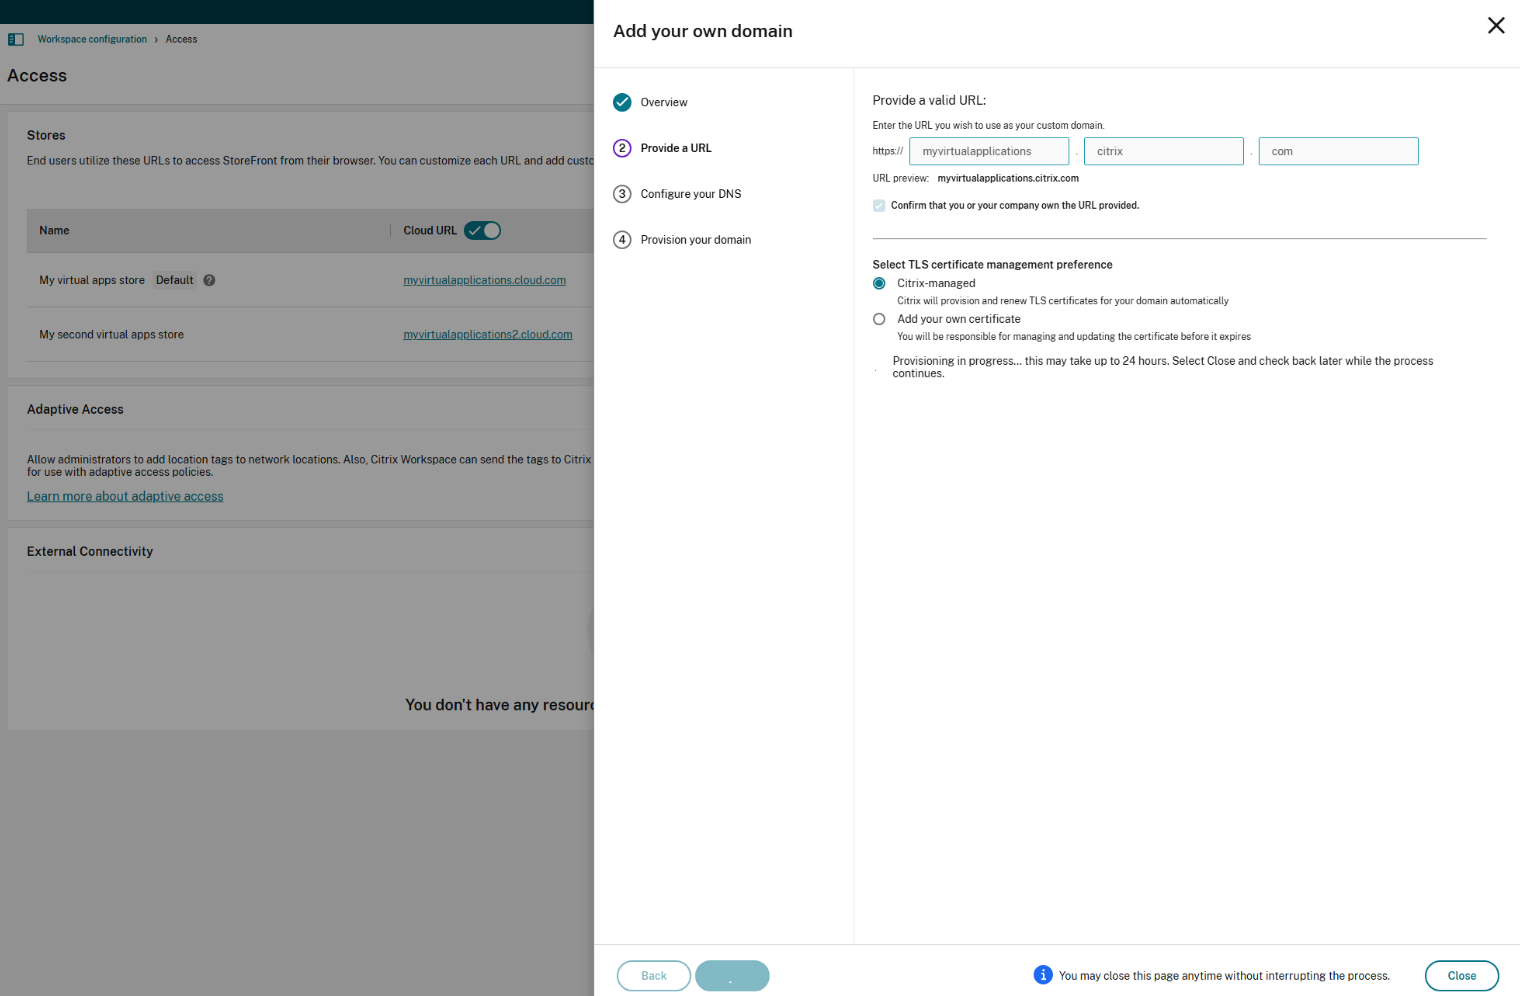
Enter your chosen domain in the Provide a URL page. Confirm that you own the specified domain by selecting Confirm that you or your company own the URL provided, and choose your TLS certificate management preference. It is recommended selecting managed, as the certificate renewals are handled for you. For more information, see Providing a renewed certificate. Click Next.
If any warnings appear on this page, correct the highlighted issue to proceed.
If you have chosen to provide your own certificate, there’s an extra step to complete in the instructions.
Provisioning of your chosen domain takes some time. You can wait with the page open or close it while provisioning is in progress.
-
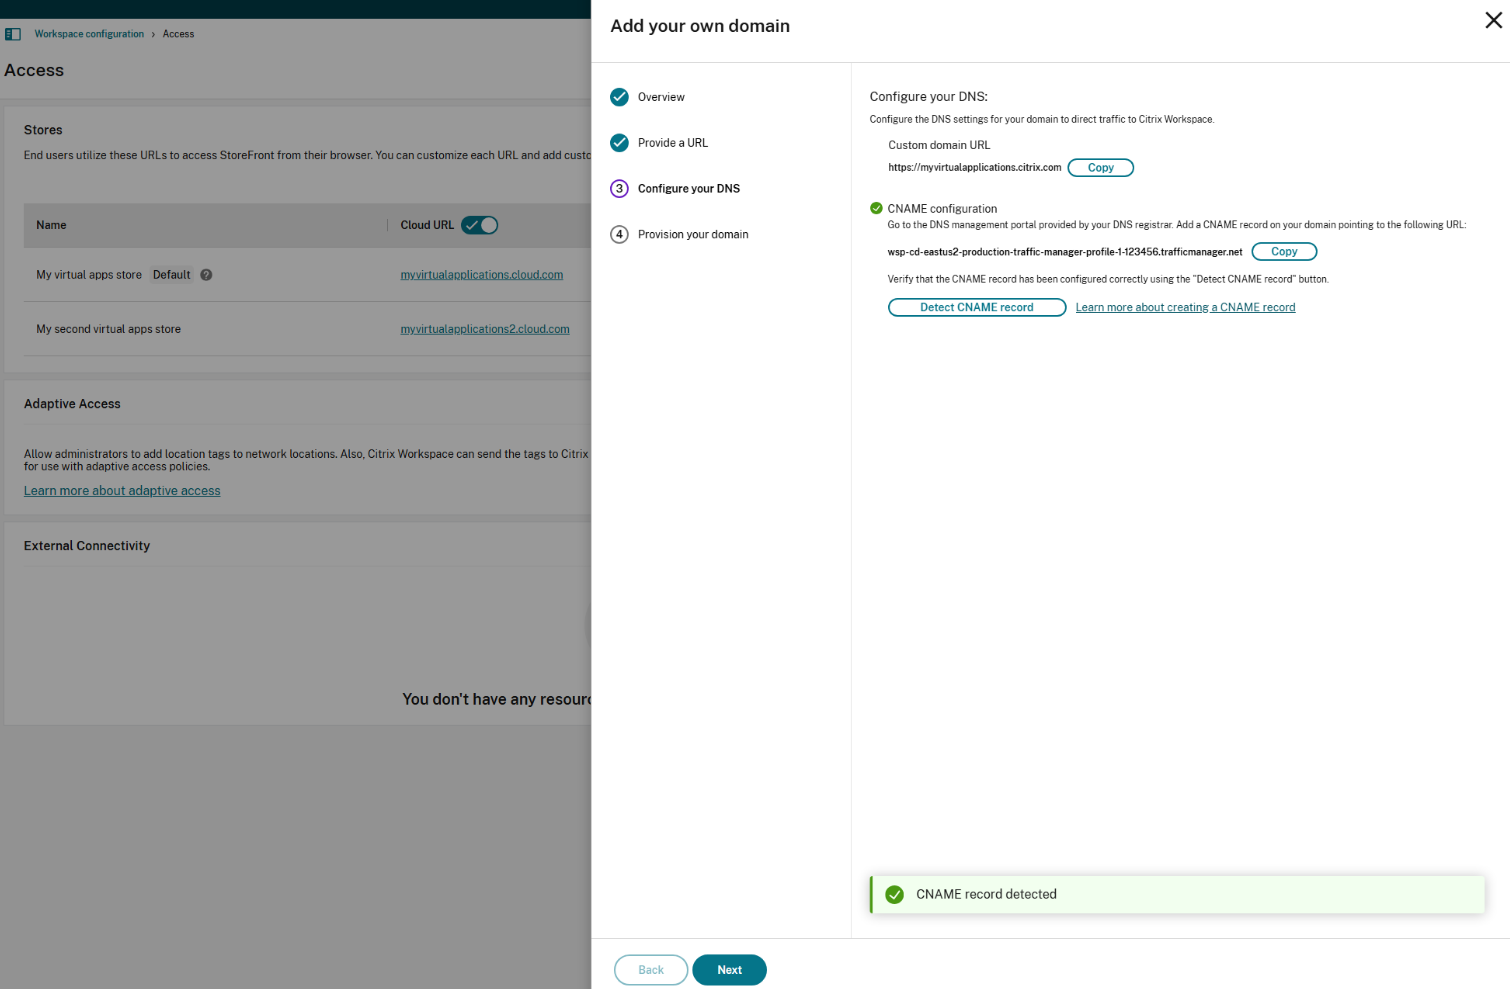
If you have the Provide a URL page open while provisioning completes, the Configure your DNS page opens automatically. If you have closed the page, select the Continue button for your custom domain from the Access tab.
-
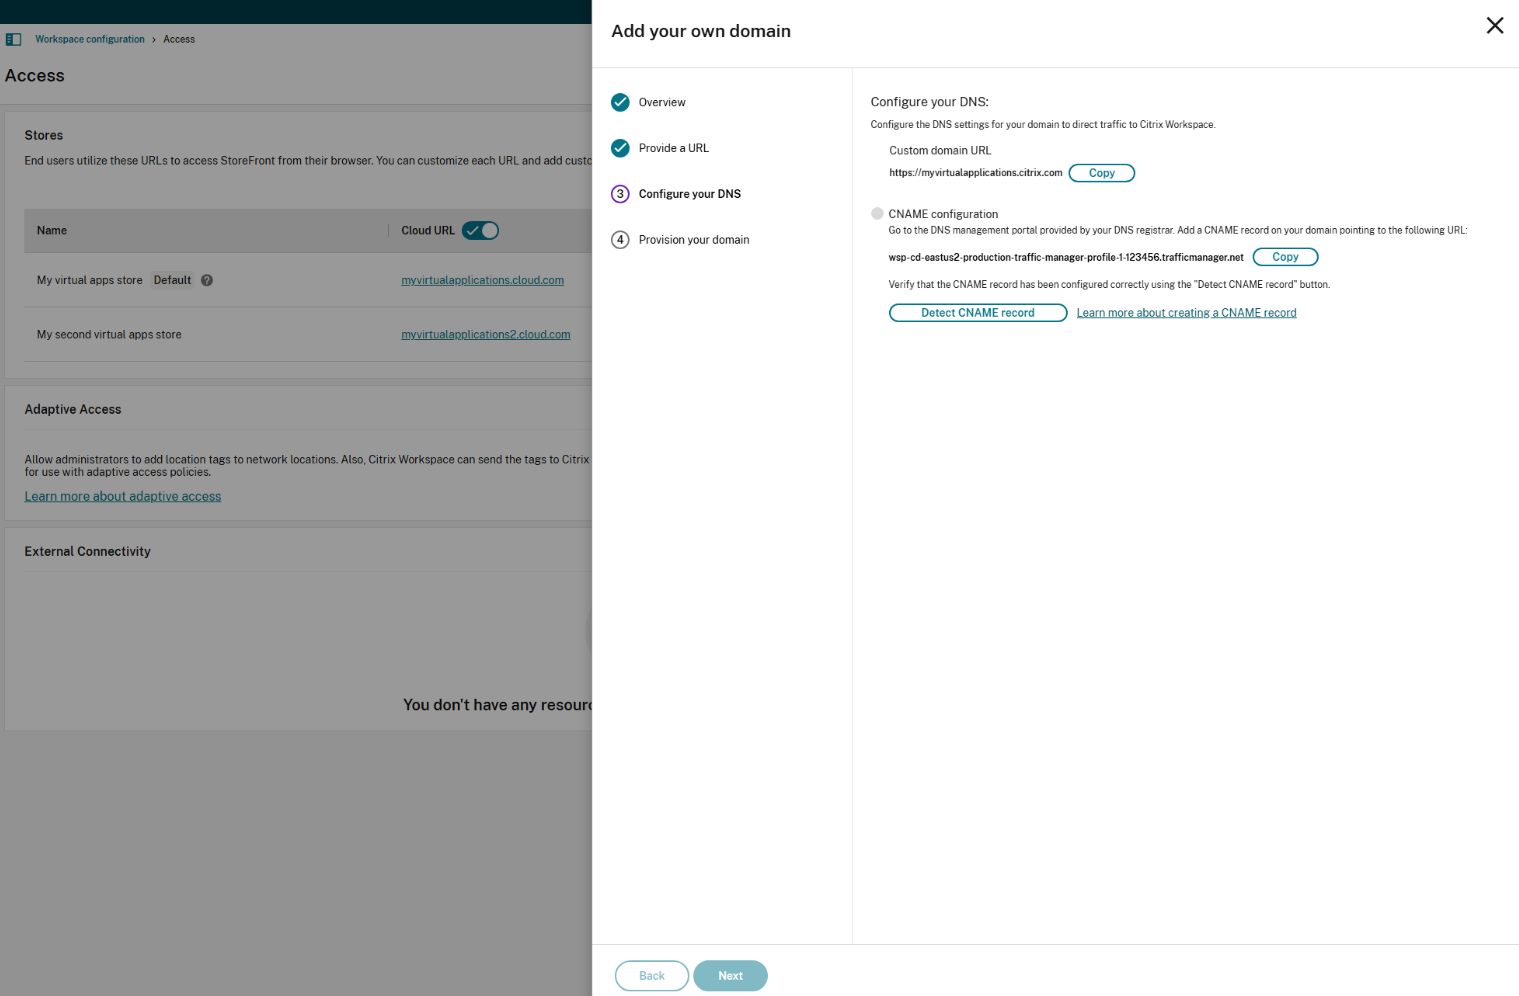
Perform this step in the management portal provided by your DNS registrar. Add a CNAME record for your chosen custom domain that points to the Azure Traffic Manager assigned to you.
Copy the address of the traffic manager from the Configure your DNS page. The address in the example is as follows:
wsp-cd-eastus2-production-traffic-manager-profile-1-123456.trafficmanager.net
If you have any Certificate Authority Authorization (CAA) records configured in your DNS, add one that allows Let’s Encrypt to generate certificates for your domain. Let’s Encrypt is the Certificate Authority (CA) that Citrix uses to generate a certificate for your custom domain. The value for the CAA record must be as follows: 0 issue “letsencrypt.org”
-
Once you configure the CNAME record with your DNS provider, select Detect CNAME record to verify that your DNS configuration is correct. If the CNAME record has been configured correctly, a green tick appears next to the CNAME configuration section.
If any warnings appear on this page, correct the highlighted issue to continue.
If you have any CAA records configured with your DNS provider a separate CAA configuration appears. Select Detect CAA record to verify that your DNS configuration is correct. If your CAA record configuration is correct, a green tick appears next to the CAA configuration section.
When your DNS configuration is verified, click Next.
-
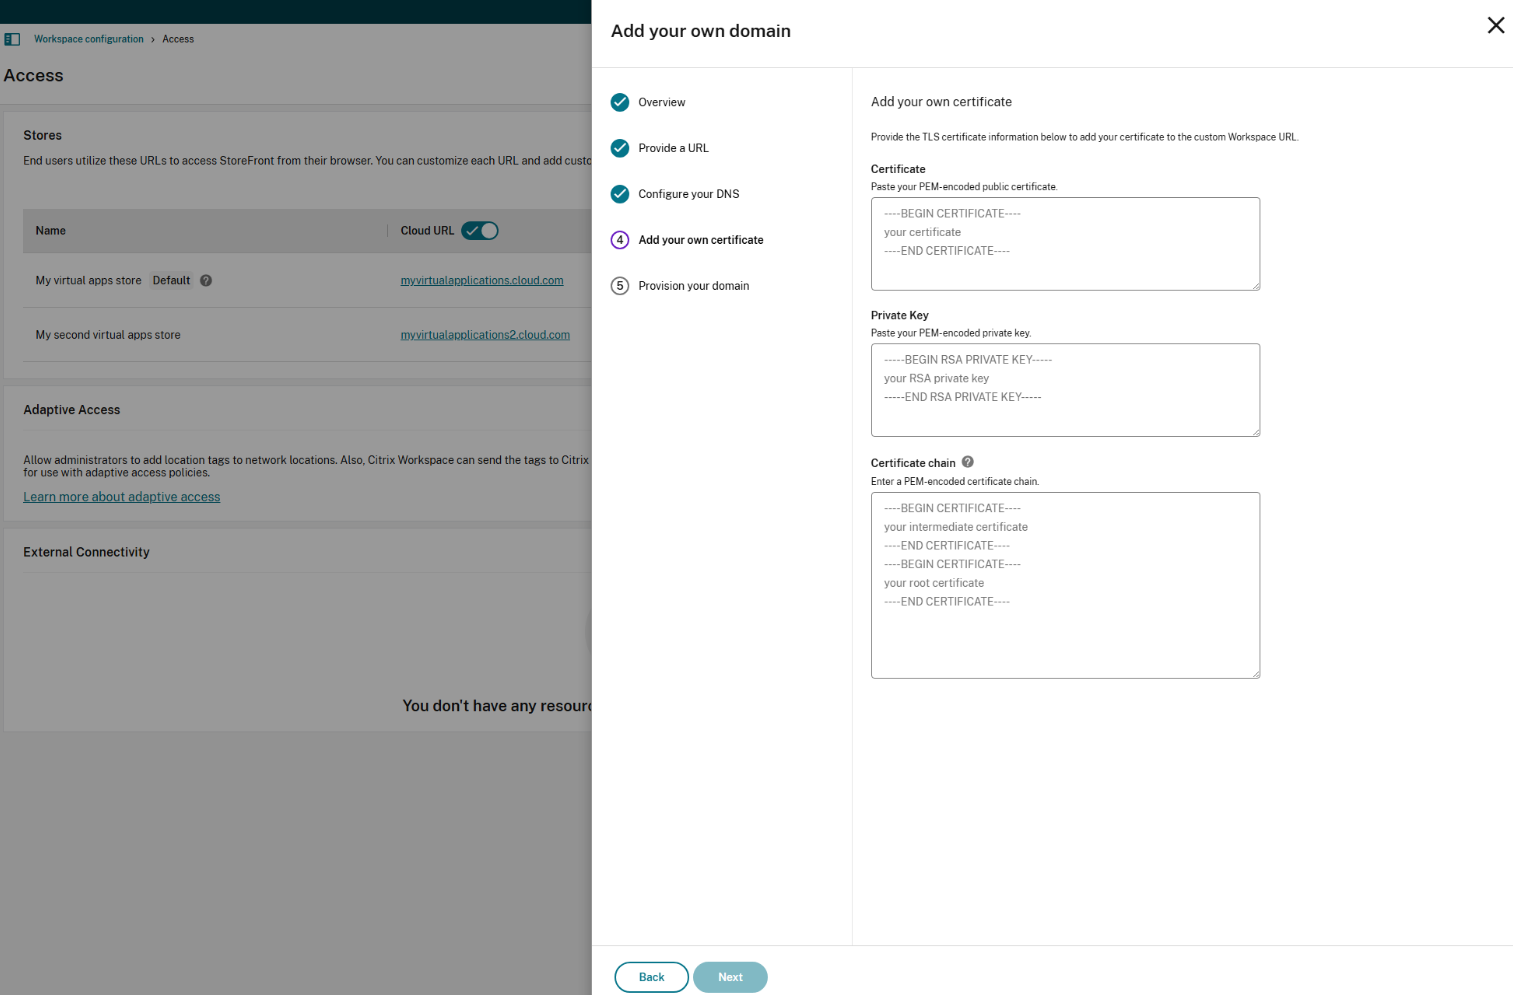
This is an optional step. If you chose to add your own certificate, complete the required information on the Add your own certificate page.
Note:
Password protected certificates are not supported.
If any warnings appear on this page, correct the highlighted issue to proceed. Ensure that the certificate fulfills the following conditions.
- It must be PEM encoded.
- It must remain valid for at least the next 30 days.
- It must be used exclusively for the custom store URL. Wildcard certificates are not acceptable.
- The common name of the certificate must match the custom domain.
- SANs on the certificate must be for the custom domain. Additional SANs are not allowed.
- The duration for which the certificate is valid must not exceed 10 years.
Note:
It is recommended that you use a certificate using a secure cryptographic hash function (SHA-256 or higher). You are responsible for renewing the certificate. If your certificate has expired or is about to expire, see the Providing a renewed certificate section.
-
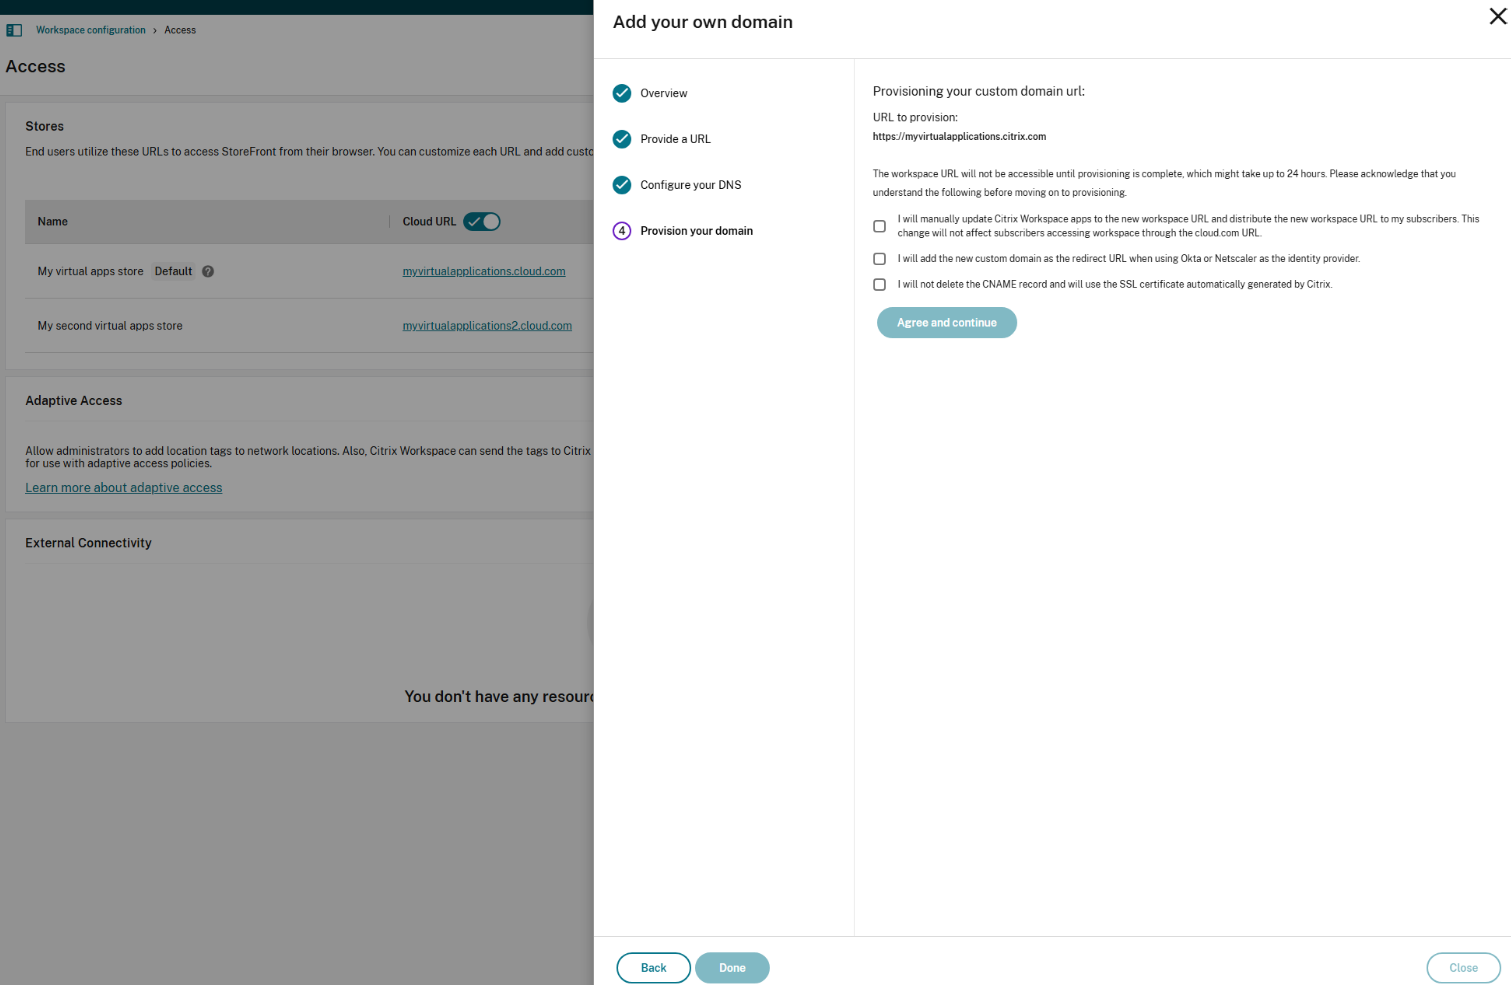
Read the information that appears on the Provision your domain page and acknowledge the given instructions. When you’re ready to continue, select Agree and continue.
This final provisioning step can take some time to complete. You can wait with the page open while the operation completes, or you can close the page.
Deleting a custom domain
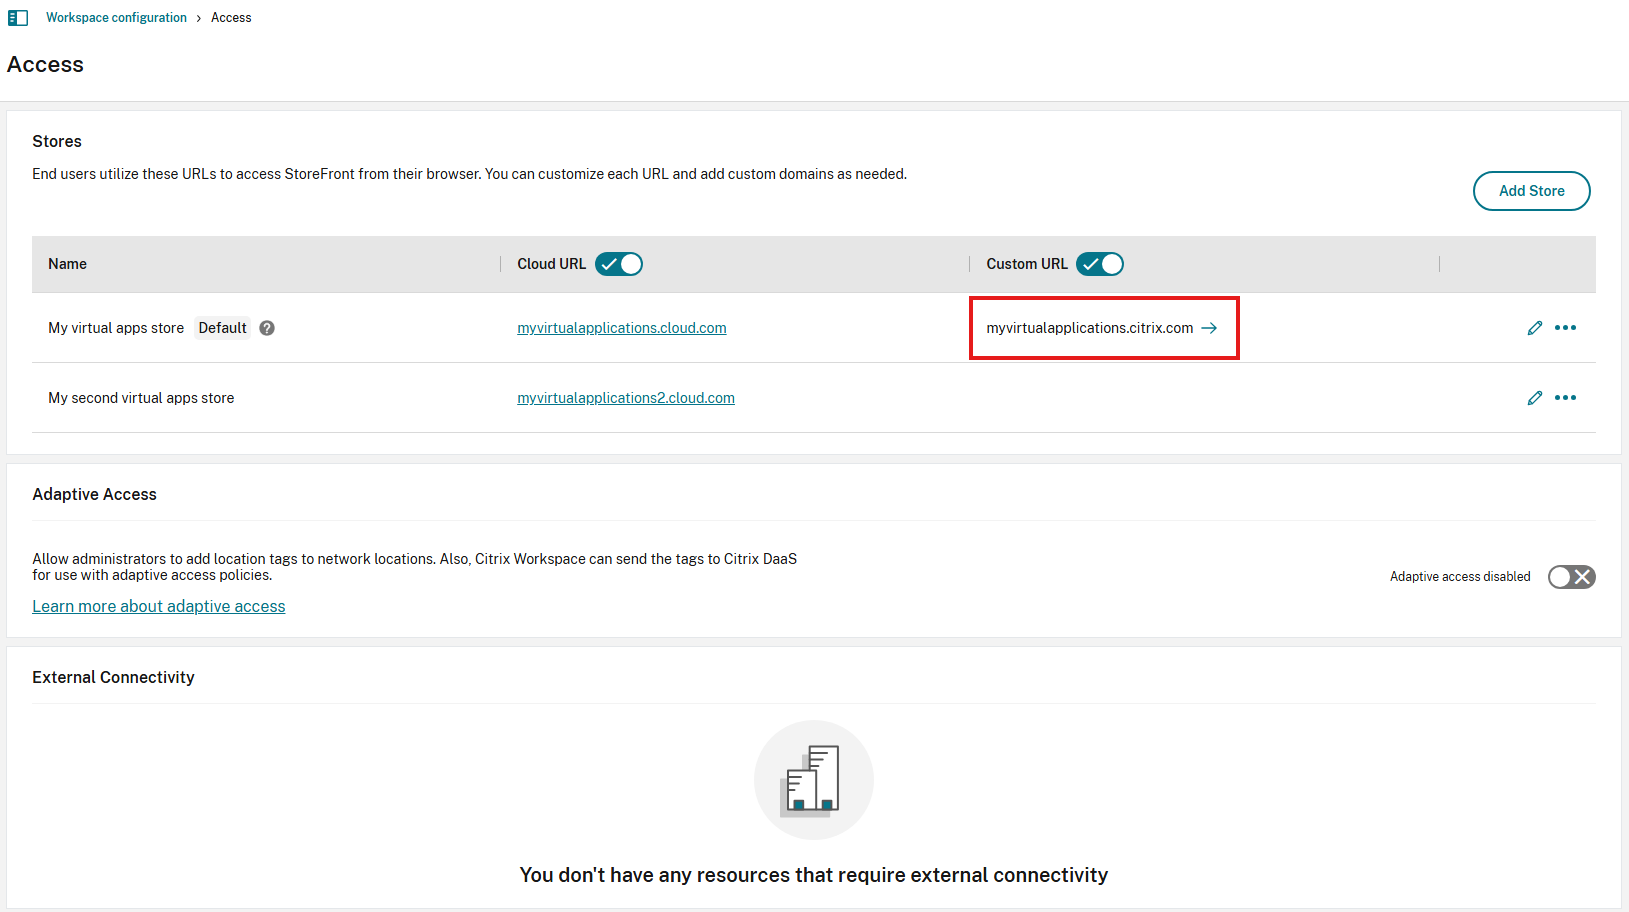
After deleting the custom URL, end users can only access the store using the cloud.com URL.
When you delete a custom domain, ensure that the CNAME record is removed from your DNS provider.
To delete a custom domain,
-
Sign in to Citrix Cloud.
-
From the Citrix Cloud menu, select StoreFront Cloud > Access.
-
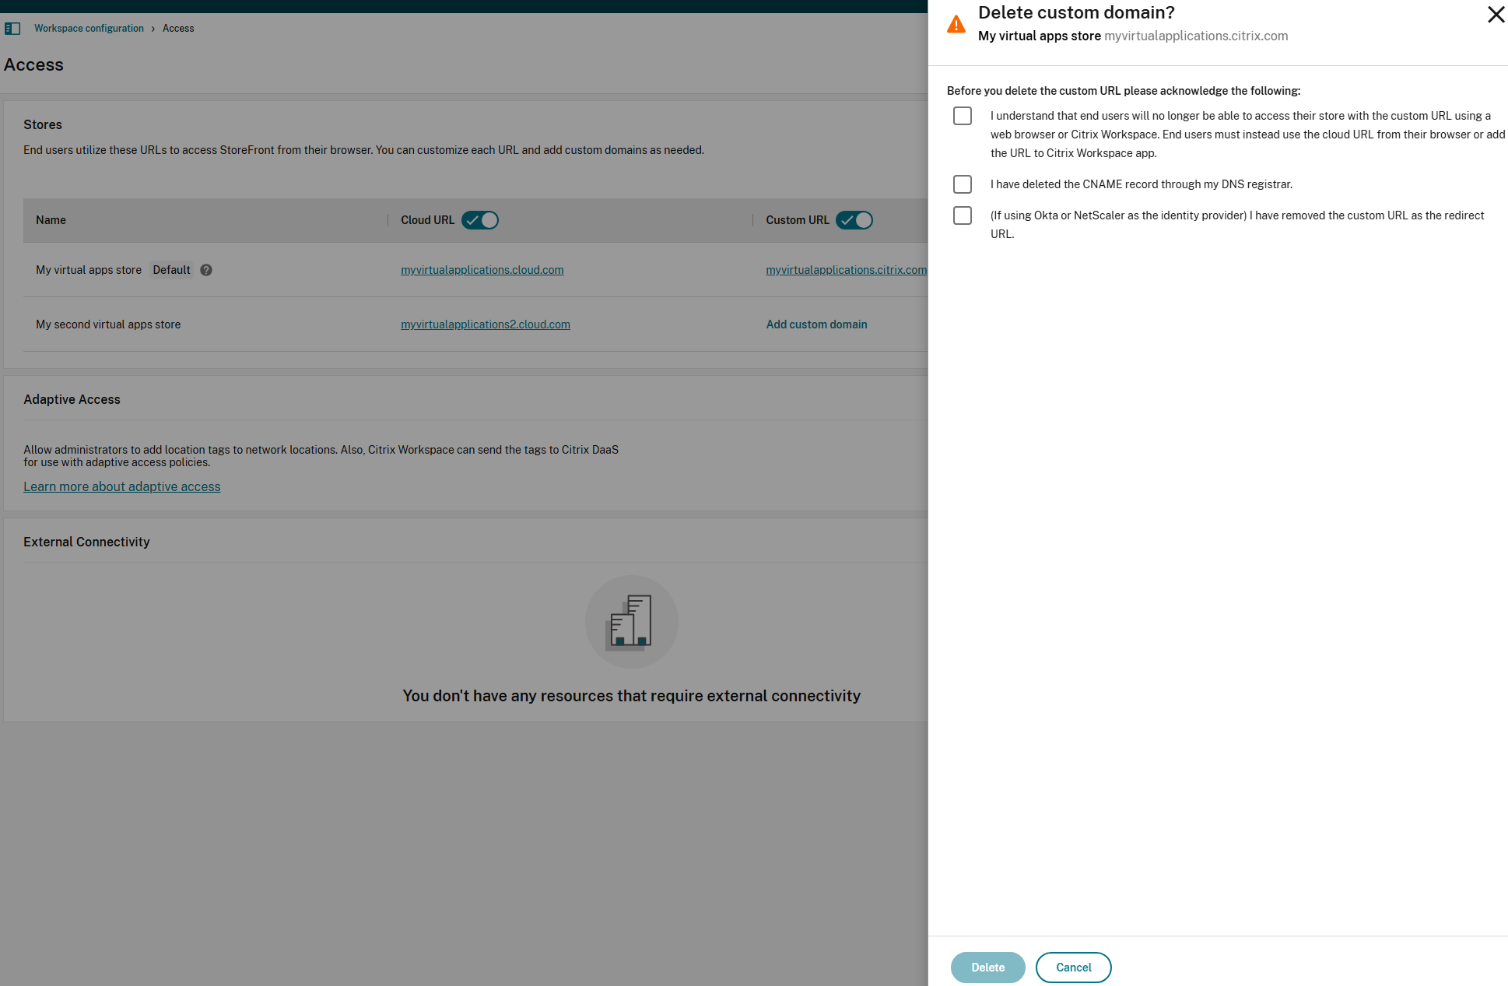
Expand the context menu (…) for the custom domain on the Access tab, and select Delete custom domain.

-
Read the information that appears on the Delete custom domain page and acknowledge the given instructions. When you’re ready to continue, select Delete.
Deleting a custom domain takes some time to complete. You can wait with the page open while the operation completes, or you can close the page.
If you have onboarded multiple custom domains, you cannot delete the custom domain associated with the default cloud URL until all other custom domains have been deleted.
Providing a renewed certificate
-
Sign in to Citrix Cloud.
-
From the Citrix Cloud menu, select StoreFront Cloud > Access.
-
When your certificate is about to expire in 30 days or less, your custom domain displays a warning.
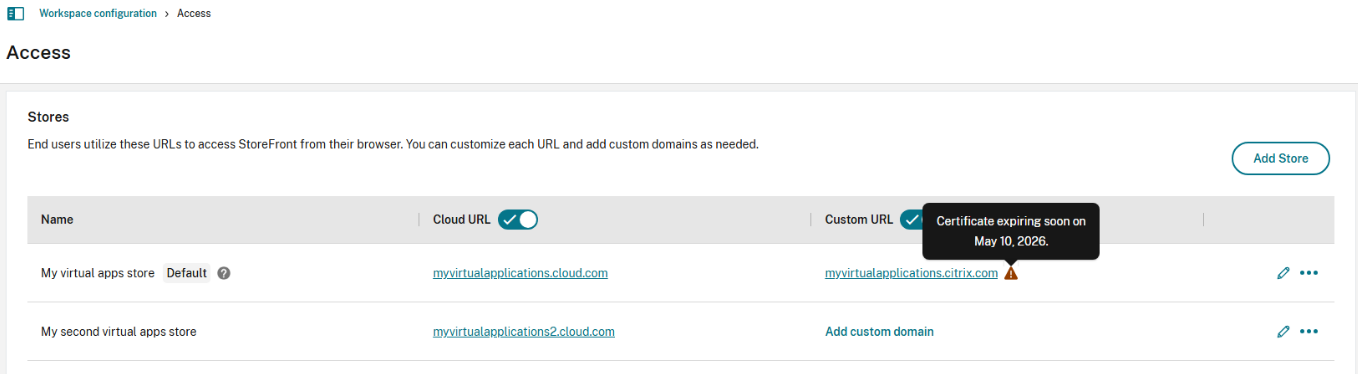
-
Click the warning to open the update certificate wizard.
-
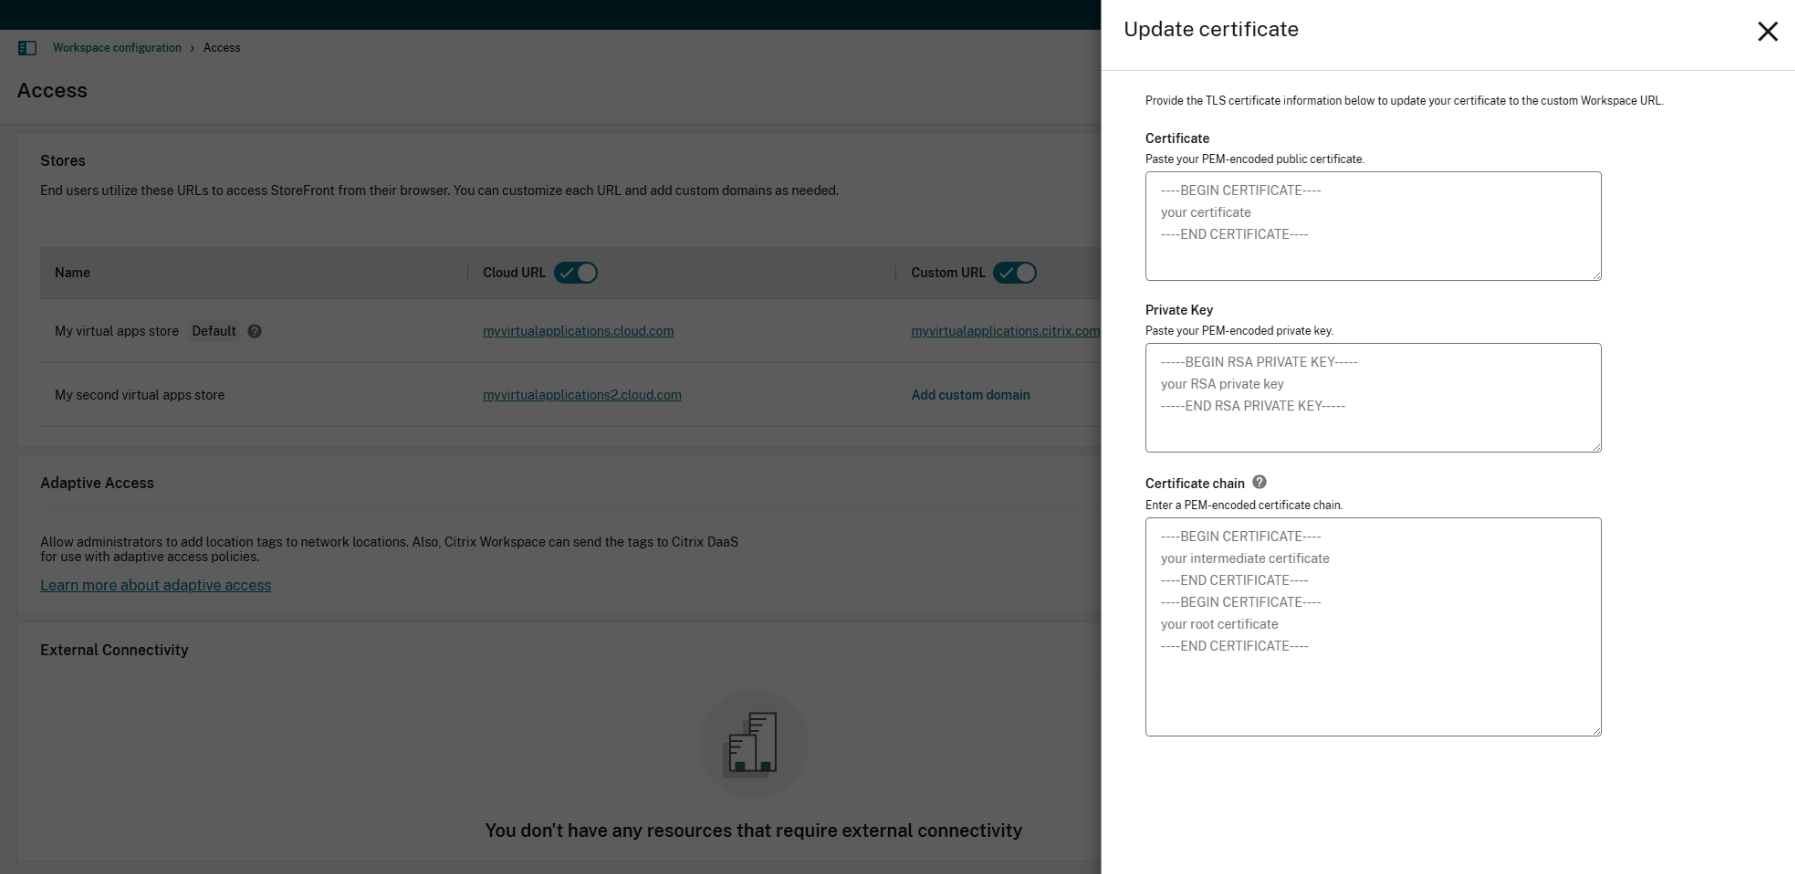
Enter the required information on the Update certificate page, and Save.
If any warnings appear on this page, correct the highlighted issue to proceed.
The certificate must meet the same requirements as when the custom domain was created. For more information, see Adding a custom domain.
Configuring your identity provider
Configuring Okta
Perform the following steps if you are using Okta as the identity provider for store access.
-
Sign in to the administrator portal for your Okta instance. This instance contains the application that is used by Citrix Cloud.
-
Expand Applications then select Applications in the menu.
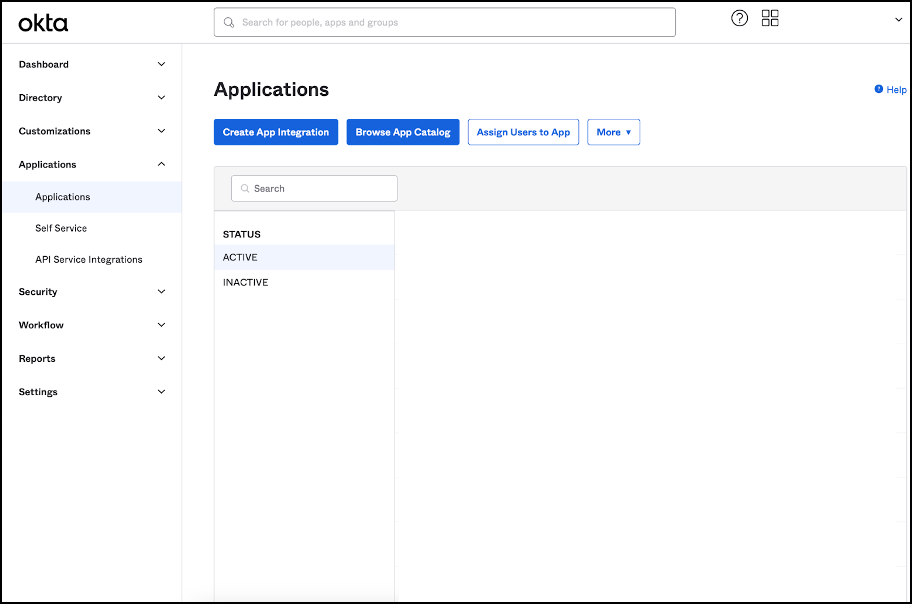
- Open the application linked to Citrix Cloud.
-
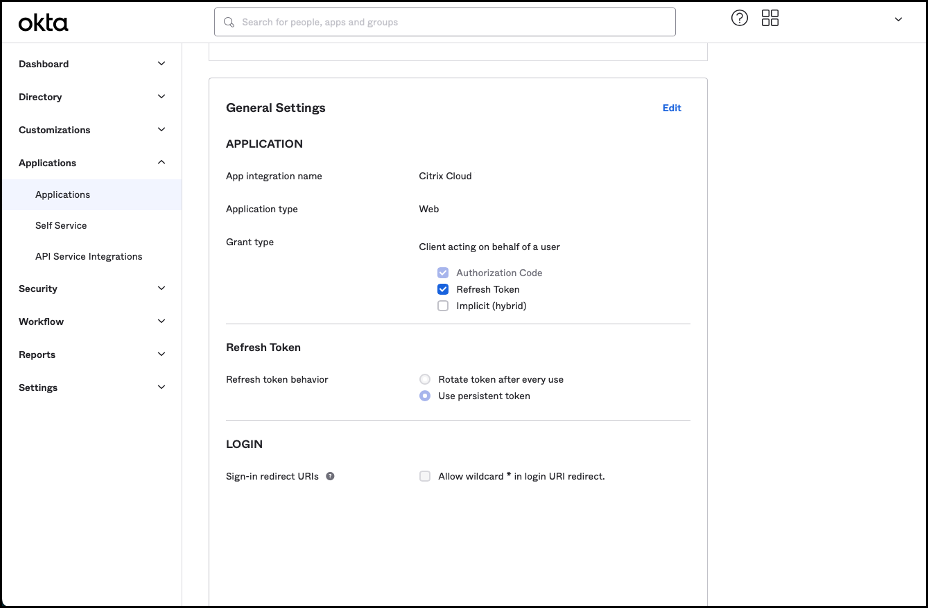
Select Edit in the General Settings section.
-
In the LOGIN section of General Settings, add a value for Sign-in redirect URIs. Add the new value without replacing any existing values. The new value must be of the following format:
<https://your.company.com/core/login-okta> -
In the same section add another value for Sign-out redirect URIs. Add the new value without replacing any existing values. The new value must be in the following format:
<https://your.company.com>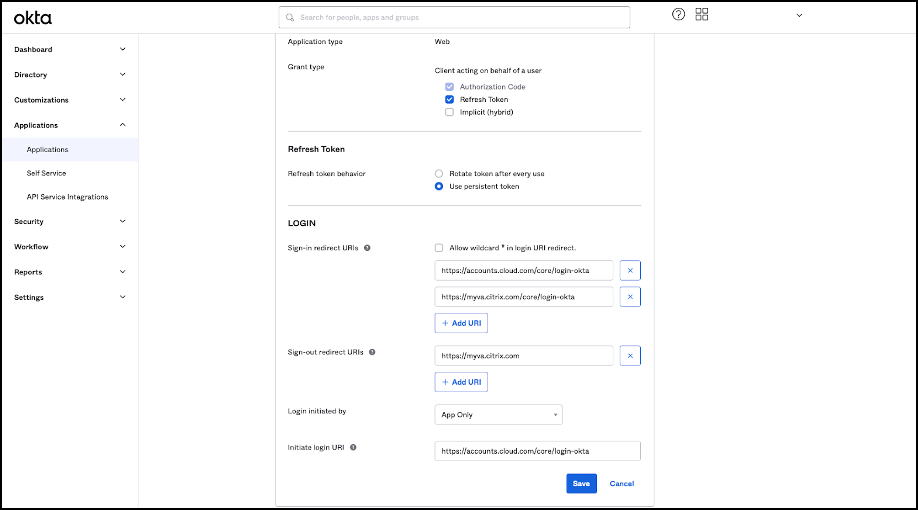
- Click Save to store the new configuration.
Note:
To configure SAML with your custom domain, follow the procedure mentioned in SAML configuration.
Configuring OAuth Policies and Profiles
Important
The existing OAuth policy and profile that links Citrix Cloud and Citrix Gateway or your Adaptive Authentication HA pair together, must be updated only if the OAuth credentials are lost. Altering this policy risks breaking the link between Citrix Cloud and stores and affects your ability to log in to stores.
Configuring Citrix Gateway
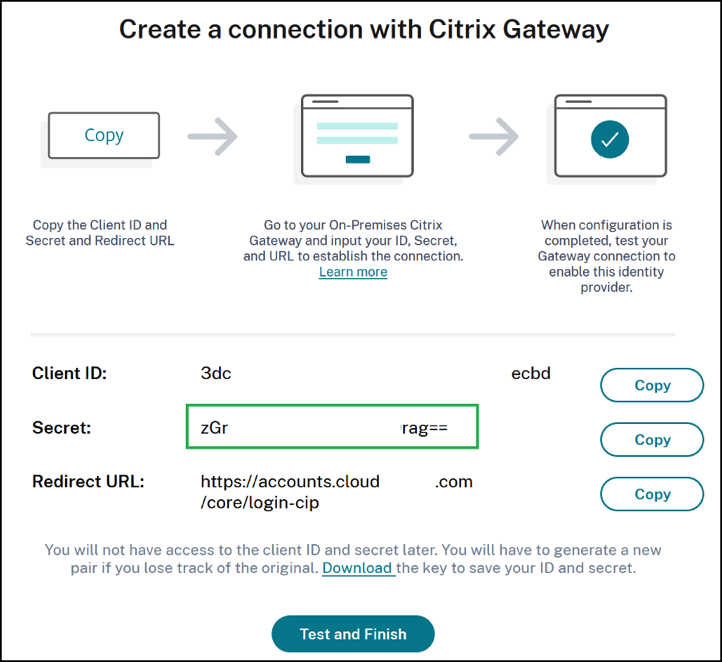
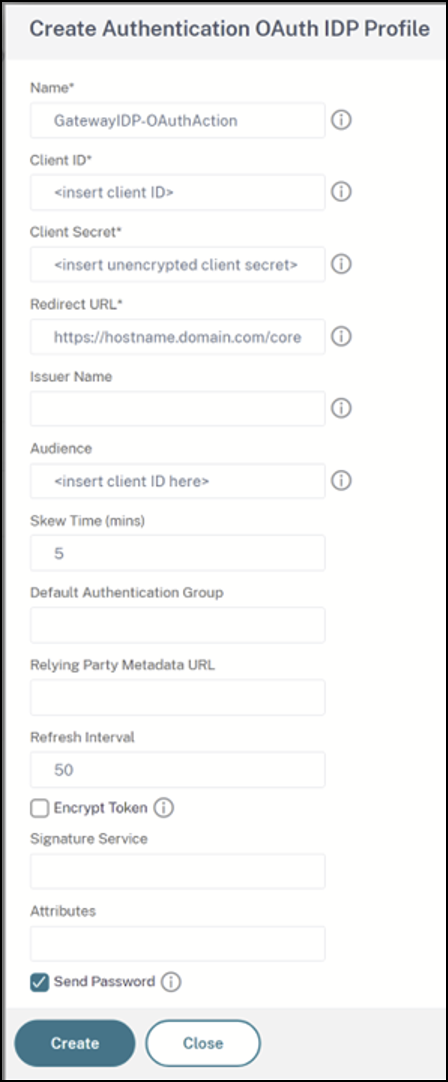
The Citrix Cloud admin has the access to the unencrypted client secret. These credentials are provided by Citrix Cloud during the Citrix Gateway linking process within Identity and Access Management > Authentication. The OAuth profile and policy is created by the Citrix admin. It is created manually on Citrix Gateway during the connection process.
You need the client ID and unencrypted client secret that were provided during the Citrix Gateway connection process. These credentials are provided by Citrix Cloud and have been saved securely. The unencrypted secret is needed to use both the Citrix ADC interface or the command-line interface (CLI) to create a OAuth policy and profile.
Here’s an example of the UI when the client ID and secret are provided to the Citrix Admin.
Note:
The admin cannot obtain a copy of the unencrypted secret after the Citrix Gateway has been connected. They must save the credentials during the connection process.
Using Citrix Cloud
Perform these steps to add another OAuth profile and policy using the Citrix Gateway interface:
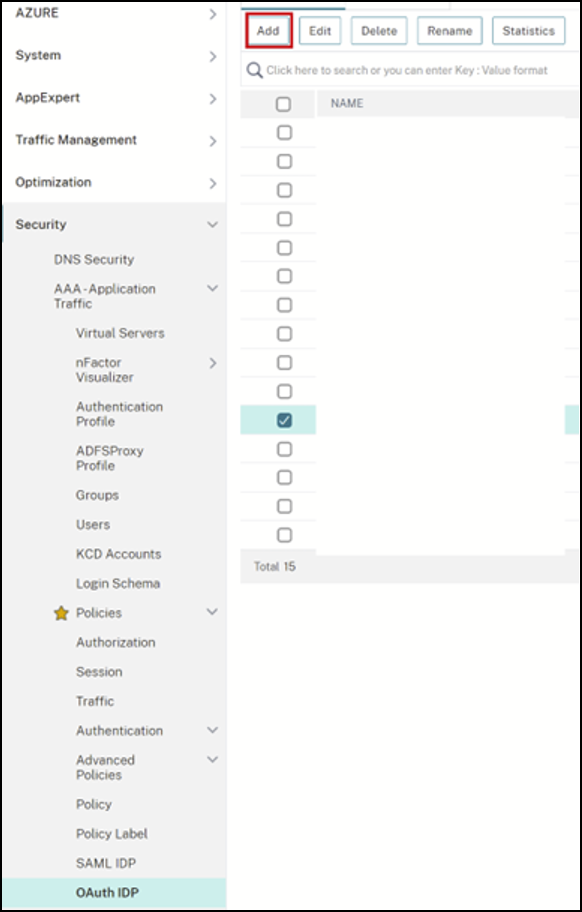
-
From the menu select Security > AAA - Application Traffic > OAuth IDP. Select the existing OAuth policy and click Add.
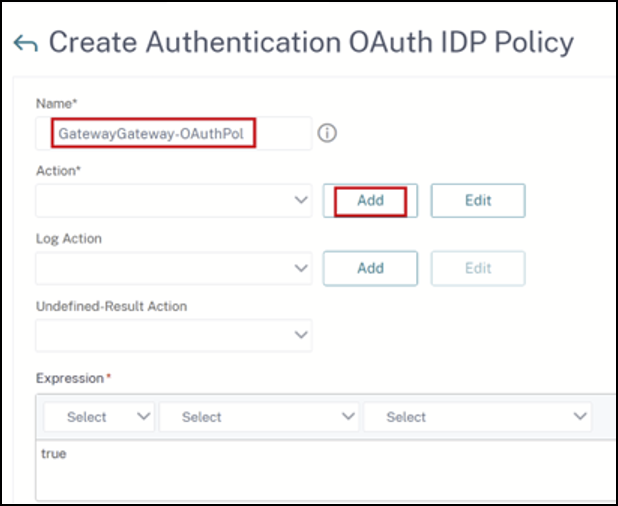
-
When prompted, modify the name of the new OAuth policy to be different from the existing policy selected the previous step. Citrix suggests adding a custom-URL to its name.
- On the Citrix Gateway GUI, create your existing OAuth Profile
-
On the same GUI menu click Add.
-
On the Citrix Gateway GUI, bind the new OAuth Policy to your existing authentication, authorization, and auditing virtual server.
-
Navigate to Security > Virtual Servers > Edit.

Using the command-line interface (CLI)
Important
If you don’t have a copy of the OAuth credentials saved securely, you need to disconnect and reconnect your Citrix Gateway. Update your existing OAuth profile with new OAuth credentials provided by Citrix Cloud Identity and Access Management. This procedure is not recommended and must be used only if the old credentials are unrecoverable.
-
Use an SSH tool such as PuTTY to connect to your Citrix Gateway instance.
-
Create the OAuthProfile and OAuthPolicy. Add authentication OAuthIDPProfile.
"CustomDomain-OAuthProfile" -clientID "<clientID>" -clientSecret "<unencrypted client secret>" -redirectURL "https://hostname.domain.com/core/login-cip" -audience "<clientID>" -sendPassword ONadd authentication OAuthIDPPolicy "CustomDomain-OAuthPol" -rule true -action "CustomDomain-OAuthProfile" -
Bind the OAuthPolicy to the correct authentication, authorization, and auditing virtual server with a lower priority than the existing policy. This instance assumes that the existing policy has a priority of 10, so 20 is used for the new policy. Bind authentication virtual server.
"CitrixGatewayAAAvServer" -policy "CustomDomain-OAuthPol" -priority 20
Configuring Adaptive Authentication
Important
The encrypted secret and encryption parameters for the OAuth profile are different on the Adaptive Authentication primary vs secondary HA gateways. Make sure you obtain the encrypted secret from the primary HA gateway and also run these commands on the primary HA gateway.
The Citrix Cloud admin doesn’t have access to the unencrypted client secret. The OAuth policy and profile is created by the Citrix Adaptive auth service during the provisioning phase. It is necessary to use the encrypted secret and CLI commands obtained from the ns.conf file to create OAuth profiles. This cannot be performed using the Citrix ADC UI. Bind the new Custom URL OAuthPolicy to your existing authentication, authorization, and auditing virtual server using a higher priority number than the existing policy that is bound to your existing authentication, authorization, and auditing virtual server. The lower priority numbers are evaluated first. Set the existing policy to be priority 10 and the new policy to be priority 20 to ensure they are evaluated in the correct order.
-
Connect to your Adaptive Authentication primary node using an SSH tool like PuTTY.
show ha node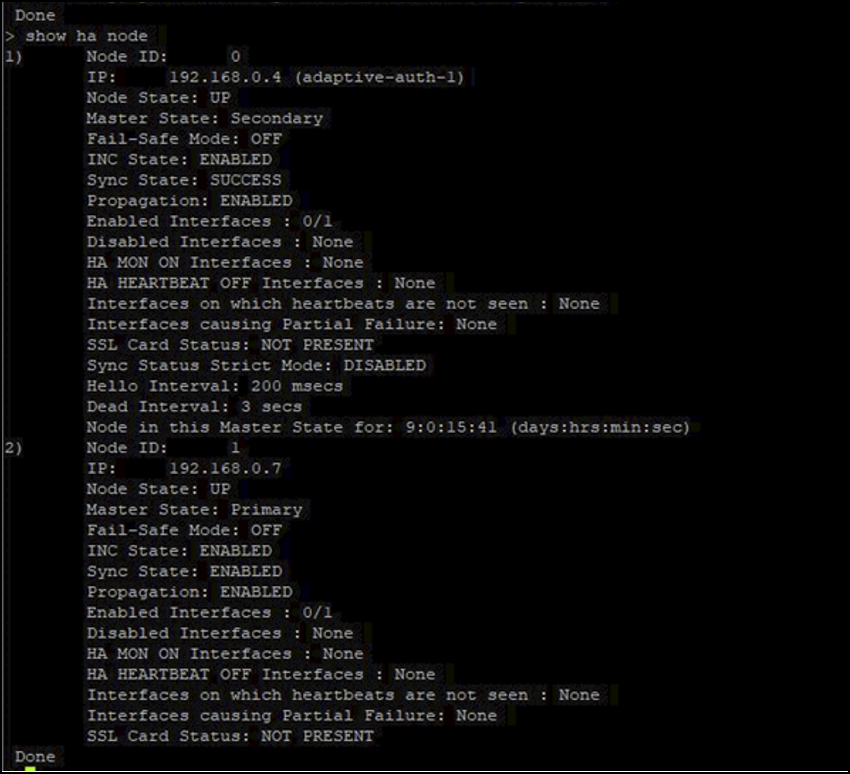
-
Locate the line within the running configuration of the primary HA gateway containing your existing OAuth Profile.
sh runn | grep oauth -
Copy the output from the Citrix ADC CLI including all encryption parameters.

-
Modify the line that you copied from the previous step. Use it to construct a new CLI command that allows you to create an OAuth profile using the encrypted version of the client ID. All encryption parameters must be included.
- Update the name of the OAuth profile to CustomDomain-OAuthProfile
- Update the -redirectURL to https://hostname.domain.com/core/login-cip
Following example covers both updates.
add authentication OAuthIDPProfile "CustomDomain-OAuthProfile" -clientID b1656835-20d1-4f6b-addd-1a531fd253f6 -clientSecret <long encrypted client Secret> -encrypted -encryptmethod ENCMTHD_3 -kek -suffix 2023_04_19_09_12_25 -redirectURL "https://hostname.domain.com/core/login-cip" -audience b1656835-20d1-4f6b-addd-1a531fd253f6 -sendPassword ONadd authentication OAuthIDPPolicy "CustomDomain-OAuthPol" -rule true -action "CustomDomain-OAuthProfile" -
Bind the OAuthPolicy to the correct authentication, authorization, and auditing virtual server with a lower priority than the existing policy. The authentication, authorization, and auditing virtual server name for all Adaptive Authentication deployments is the name auth_vs. This instance assumes that the existing policy has a priority of 10, so 20 is used for the new policy.
bind authentication vserver "auth_vs" -policy "CustomDomain-OAuthPol" -priority 20
Known limitations
Some known limitations of the custom domain solution are as follows:
- The first custom domain you create must be linked to the default cloud URL. Custom domains can then be added to other cloud URLs added through the multi-URL feature after a custom domain has been created for the default cloud URL.
- If you have onboarded multiple custom domains, you cannot delete the custom domain associated with the default cloud URL until all other custom domains have been deleted.
- This feature is not supported on Citrix Workspace app for Windows version 2305 and 2307. Update to the latest supported version.
- Logging on using a custom domain with Google authentication isn’t supported.