Sign in to stores with SAML using Multiple Custom URLs
The architecture to support SAML with a store Custom URL has been simplified and updated to support multiple custom domains using just one SAML application configured inside your SAML IdP. Changes have been made within Citrix Cloud’s authentication platform and within the store custom URL service to support up to 10 custom URLs with SAML and Conditional Authentication. Historically, it was necessary to configure one SAML application with cloud.com SAML endpoints, and another with SAML endpoints containing your Custom URLs. It is no longer necessary to create and maintain multiple different SAML applications to support all SAML use cases.
Advantages of the New Architecture to Support Multiple Custom URLs.
Create just 1x SAML application containing Citrix Cloud SAML endpoints matching your Citrix Cloud region such as saml.cloud.com (US, EU and APS), saml.citrixcloud.jp (Japan) or saml.cloud.us (GOV).
Example SAML Application Endpoints:
- Entity ID
https://saml.cloud.comorhttps://saml.cloud.com/<guid> - Assertion Consumer Service (SSO):
https://saml.cloud.com/saml/acs - Logout (SLO):
https://saml.cloud.com/saml/logout/callback
Supported SAML Logon Use Cases:
-
Logon to store using either of your Store URLs with a single SAML application
store.cloud.comORstore.mycustomer.com - Logon to Citrix Cloud using SAML for admin access also uses the same generic SAML application.
- A single SAML application inside your IdP can now support up to 10 store custom URLs without the need to create and maintain multiple different SAML applications. Citrix Cloud no longer needs additional SAML applications with custom URL SAML endpoints to support all SAML use cases.
FAQ
What is the multi custom URL feature in stores?
Historically, Citrix Cloud only supported a single custom URL linked to the first Store cloud.com URL. Now a custom URL can be configured for each of your Store cloud.com URLs up to a maximum of 10. These form pairs of URLs where each custom URL is a CNAME in DNS for its corresponding cloud.com URL.
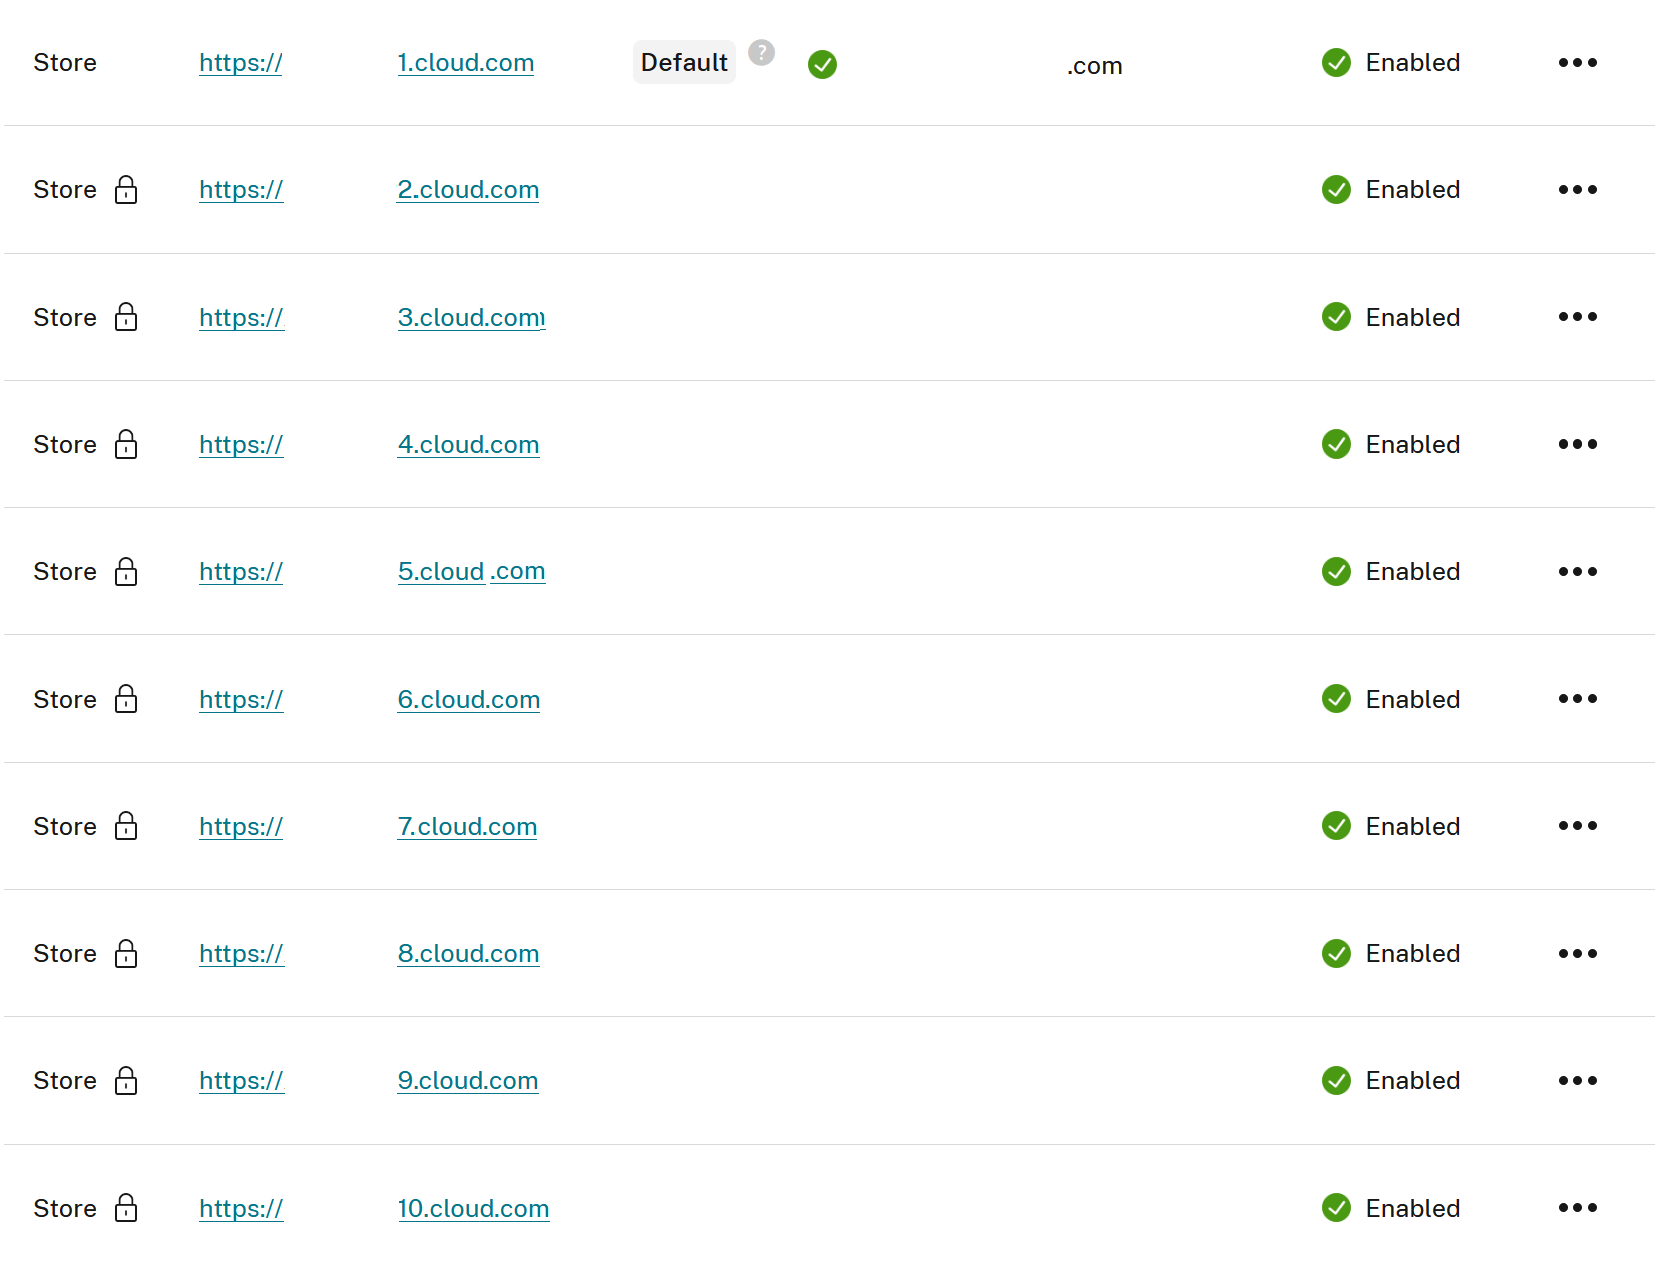
Before the release of multi custom URL, only 1 custom URL associated with the primary cloud.com store URL was supported within StoreFront Cloud > Access.
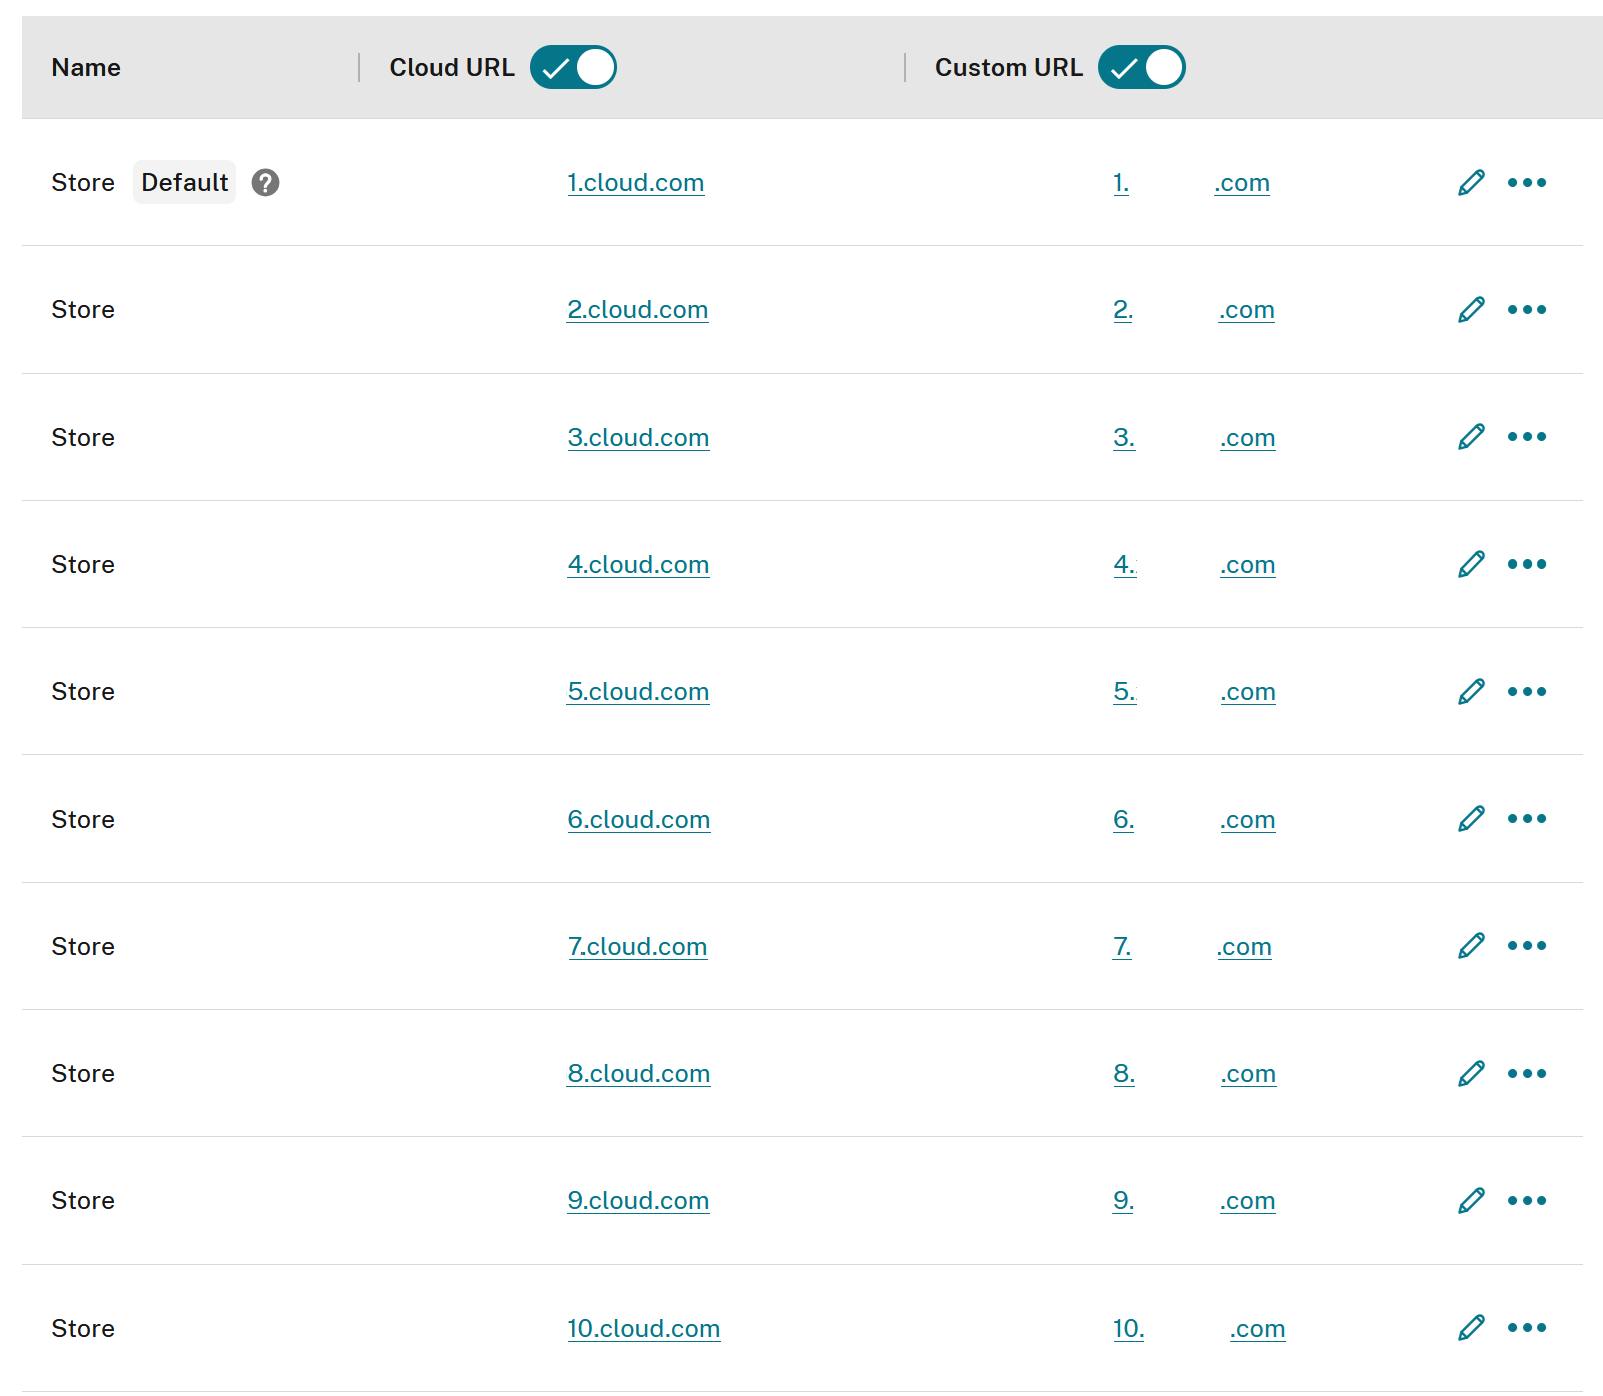
StoreFront Cloud > Access after release of multi custom URL. 1 – 10 custom URLs are now supported.
How do I decide if I need to migrate my custom URL or not?
This is dictated by the combination of authentication features you wish to use in Citrix Cloud and store, the logon scenarios you currently have and your current SAML solution. Use the table below for guidance.
| SAML Logon Scenario | Unmigrated Custom URL | Migrated Custom URLs |
|---|---|---|
| Logon to store with 1x SAML App with custom URL endpoints | Supported (1 Custom URL) | Not Supported (1–10 Custom URLs) |
| Logon to store with 2x SAML Apps | Supported (1 Custom URL) | Supported (1–10 Custom URLs) |
Citrix Cloud admin logon with SAML 1x App with cloud.com URL endpoints
|
Supported | Supported |
| Citrix Cloud admin logon with 2x SAML Apps | Supported | Supported |
| Citrix Cloud admin logon with SAML 1x App with custom URL endpoints | Unsupported | Unsupported |
| Conditional Authentication Policy using store URL and SAML | Supported
|
Supported
|
end users enter a cloud.com URL into the browser or Citrix Workspace app |
||
| Conditional Authentication Policy using store URL and SAML | Unsupported (1 Custom URL)
|
Supported (1–10 URLs)
|
| end users enter a custom URL into the browser or Citrix Workspace app |
Why did the SAML and Custom URL architecture need to change to support multiple custom URLs?
Scalability. The introduction of multi custom URLs within Citrix Cloud means that the legacy architecture requiring a SAML app per custom URL does not scale and is impractical for both Citrix Cloud and IdP administrators.
Legacy SAML custom URL requirements:
- 1 x
cloud.comSAML application for Citrix Cloud admin logon using SAML. - 1 x SAML application per custom URL.
IdP Configuration Complexity. It was necessary for each SAML application to be configured identically apart from their SAML endpoints leading to additional work within your SAML IdP. This increased deployment and configuration complexity. The new multi custom domain architecture eliminates the need to do this and only one SAML application is needed inside your IdP to support 1 – 10 custom URLs.
Ongoing IdP Maintenance Tasks. Configuring and maintaining multiple SAML applications and having to perform ongoing yearly certificate rotation tasks on multiple SAML applications is labour intensive and undesirable for both Citrix Cloud and IdP administrators. This problem only increases for administrators as more custom domains are added and more SAML applications are required. The new architecture eliminates this maintenance problem as only one SAML application is needed for all SAML and Custom URL use cases.
Why is Citrix asking me to migrate from my current custom URL SAML solution to the new simpler solution?
The use of both the Multi Custom URL feature and the use of Conditional Authentication with custom URLs, requires legacy 1x and 2x SAML application configurations to be updated and migrated. This document contains instructions on how to perform migrations for customers using either of the legacy 1x or 2x SAML application solutions.
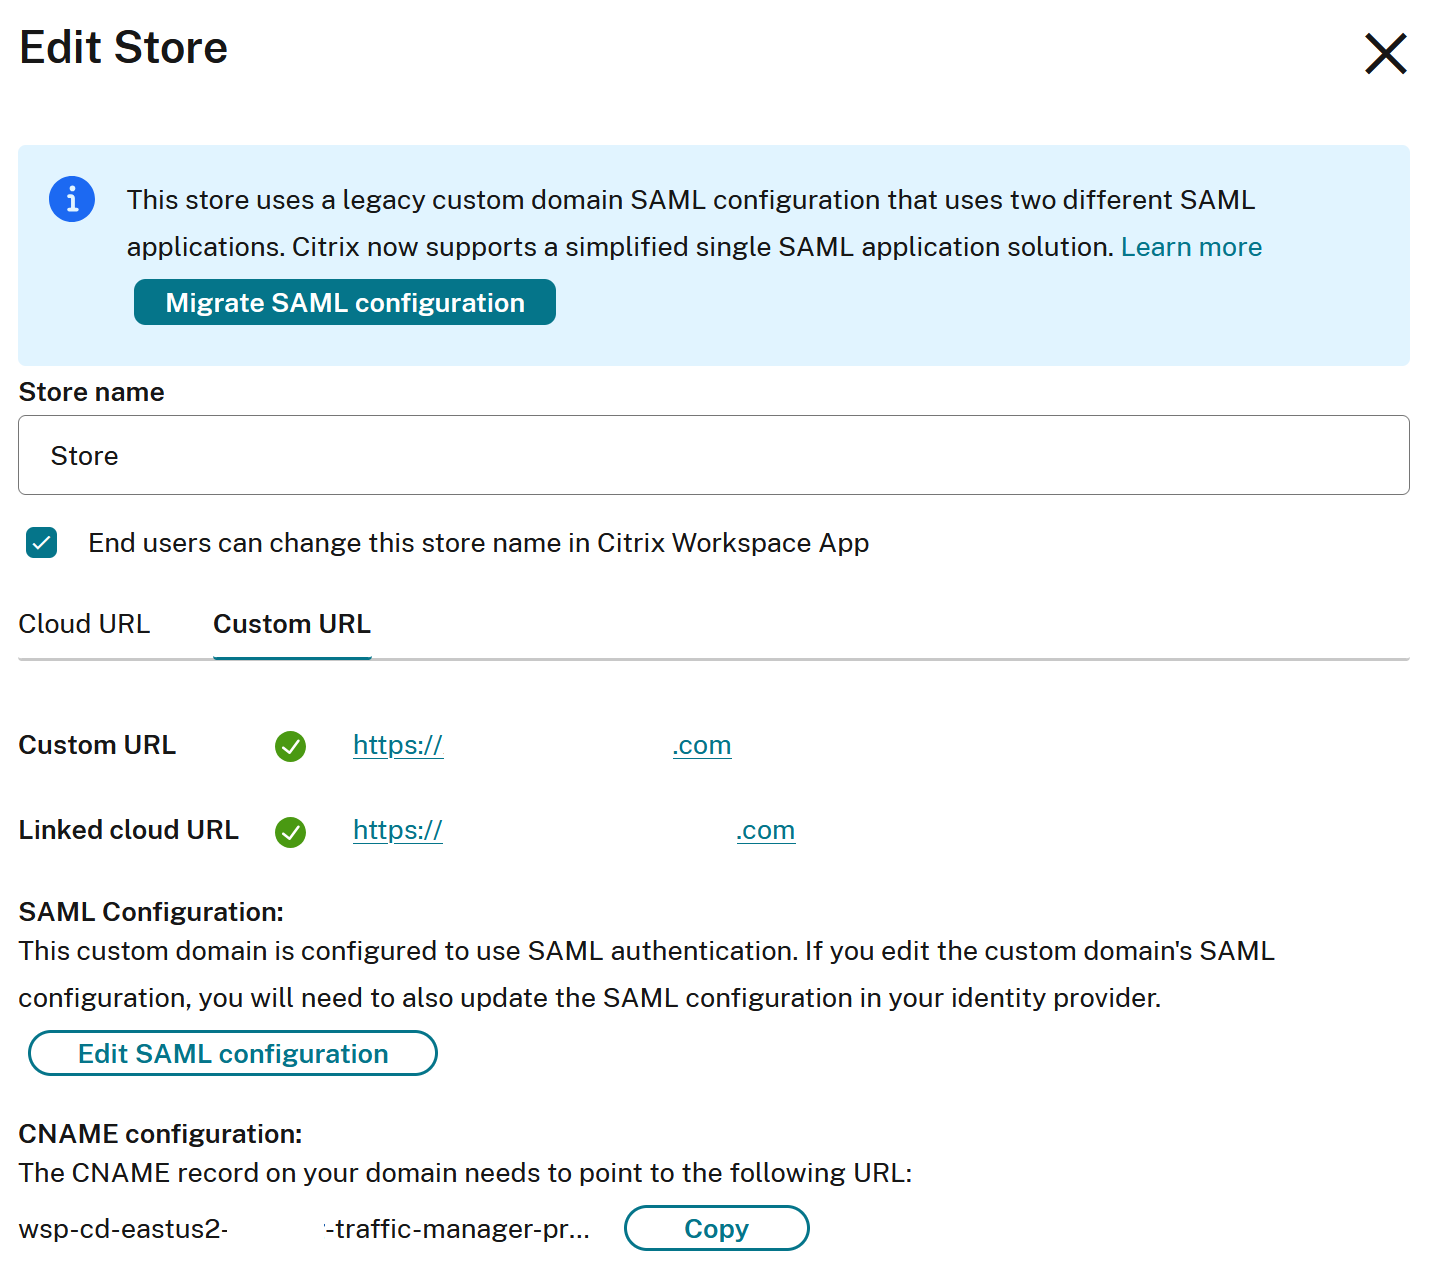
This warning inside StoreFront Cloud > Access indicates you have one or more custom URLs in need of migration.

This warning will only appear if you have enabled either SAML or Conditional Authentication within StoreFront Cloud > Authentication.
Is the SAML IdP configuration the same to support all my new custom URLs up to a maximum of 10?
Yes. Configure your SAML application identically if your intent to use just one, or more than one custom URL to access store.
Is Conditional Authentication now supported with multiple SAML apps and multiple custom domains?
Yes. This is a common scenario that many large enterprises will wish to use. It has always been possible to create Conditional Authentication policies that resolve to different SAML applications using any of your 1-10 cloud.com URLs. Now each of your cloud.com URLs can have its own custom URL (pairs of URLs).
For detailed instructions on switching between different IdPs based on store URL used by your end users, refer to this article Conditional Authentication article.
Will my legacy unmigrated SAML connections continue to function if I don’t wish to use multiple custom URLs or to use Conditional Authentication with a custom URL and SAML?
Yes. Backwards compatibility with existing legacy 1x and 2x SAML app solutions will be maintained, and existing SAML application solutions will continue to function and be supported. You will NOT be able to use custom URLs with SAML or with Conditional Authentication if any of your custom URLs remain in an unmigrated state.
If I onboard new custom URLs after the release of the multi custom URL feature do I need to perform any migrations on these new URLs?
No. All newly onboarded custom domains after the multi custom URL feature has been released will support the new architecture and do not need to be migrated. Migration only applies to custom URL configurations that were created before the release of the multi custom URL feature. This is typically for the first and only custom URL you have configured within your Citrix Cloud tenant which existed before support for multiple custom URLs was introduced.
Migrating Legacy Custom URLs and SAML Configurations
It is required you read the entire Legacy Custom URL SAML Configurations section so you understand your current custom URL and SAML configuration and whether you are currently operating with a 1x or 2x SAML application solution before taking any migration actions. Migration actions should be conducted in a planned maintenance window and testing conducted after migration to ensure SAML logons have not been impacted before you remove any obsolete SAML applications from your IdP.
Important:
If your legacy SAML configuration in both Citrix Cloud and your SAML IdP does not exactly match either of the 1x or 2x SAML app solutions described in the Legacy Custom URL SAML Configurations section in this document, you are in an unsupported state.
What do I have to do to migrate from my current 2x SAML application Custom URL solution to the new simpler solution?
-
Citrix Cloud administrators must coordinate with IdP administrators to make the necessary changes within both Citrix Cloud’s custom URL service and within your SAML IdP.
-
Within your SAML IdP verify the existence and configuration of both the primary and secondary SAML applications. This is different for every SAML IdP such as EntraID, Okta, Duo, PingFederate ect.
-
Do not change the existing primary SAML application Citrix Cloud SAML endpoints. This is the SAML application that appears inside Identity and Access Management > Authentication and will be used for all SAML logon use cases after migration of the custom URL.
Primary Application Example from Citrix Cloud Commercial US, EU and APS
- Entity ID:
https://saml.cloud.comorhttps://saml.cloud.com/<guid> - Assertion Consumer Service (SSO):
https://saml.cloud.com/saml/acs - Logout (SLO):
https://saml.cloud.com/saml/logout/callback
- Entity ID:
-
Identify this obsolete secondary SAML application. This SAML application’s configuration is specified inside the StoreFront Cloud > Access menu.
Secondary Application Example
- Entity ID:
https://saml.cloud.comorhttps://saml.cloud.com/<guid> - Assertion Consumer Service (SSO):
https://workspaces.mycompany.com/saml/acs - Logout (SLO):
https://workspaces.mycompany.com/saml/logout/callback
- Entity ID:
-
Navigate to StoreFront Cloud > Access and click on the warning icon to open the migration UI.

-
Click the Migrate SAML Configuration button shown below.
-
Accept the warning and perform the migration from within this UI.

-
Click Migrate.
Important:
The migration updates legacy backend data within the store Custom URL service. This is an irreversible operation on the store custom URL service record and cannot be reverted once performed.
-
The warning icon shown in step 4 next to your custom URL should disappear once migration has been successful. This indicates the backend data within the store Custom URL service has been updated.
Verify all your SAML logon use cases are still successful after migration.
- Test the SAML logon to store using any
cloud.comURLs. This uses the Primary SAML Application. - Test the SAML logon to store using all your custom URLs. This previously used the Secondary SAML Application BEFORE migration but now uses the unchanged Primary SAML Application.
- Test the SAML logon to Citrix Cloud using your admin sign in URL using any AD admin users and groups that were configured before migration. This uses the Primary SAML Application.
- Test the SAML logon to store using any
-
Verify the backend store Custom URL service data was successfully updated.
For example using FireFox Developer Tools.
Open developer tools on your browser by pressing F12 on your keyboard and then navigate to StoreFront Cloud > Access from any other page in the Citrix Cloud UI with developer tools already running. This will capture all REST API calls made by the Citrix Cloud console to return a list of Custom URLs.
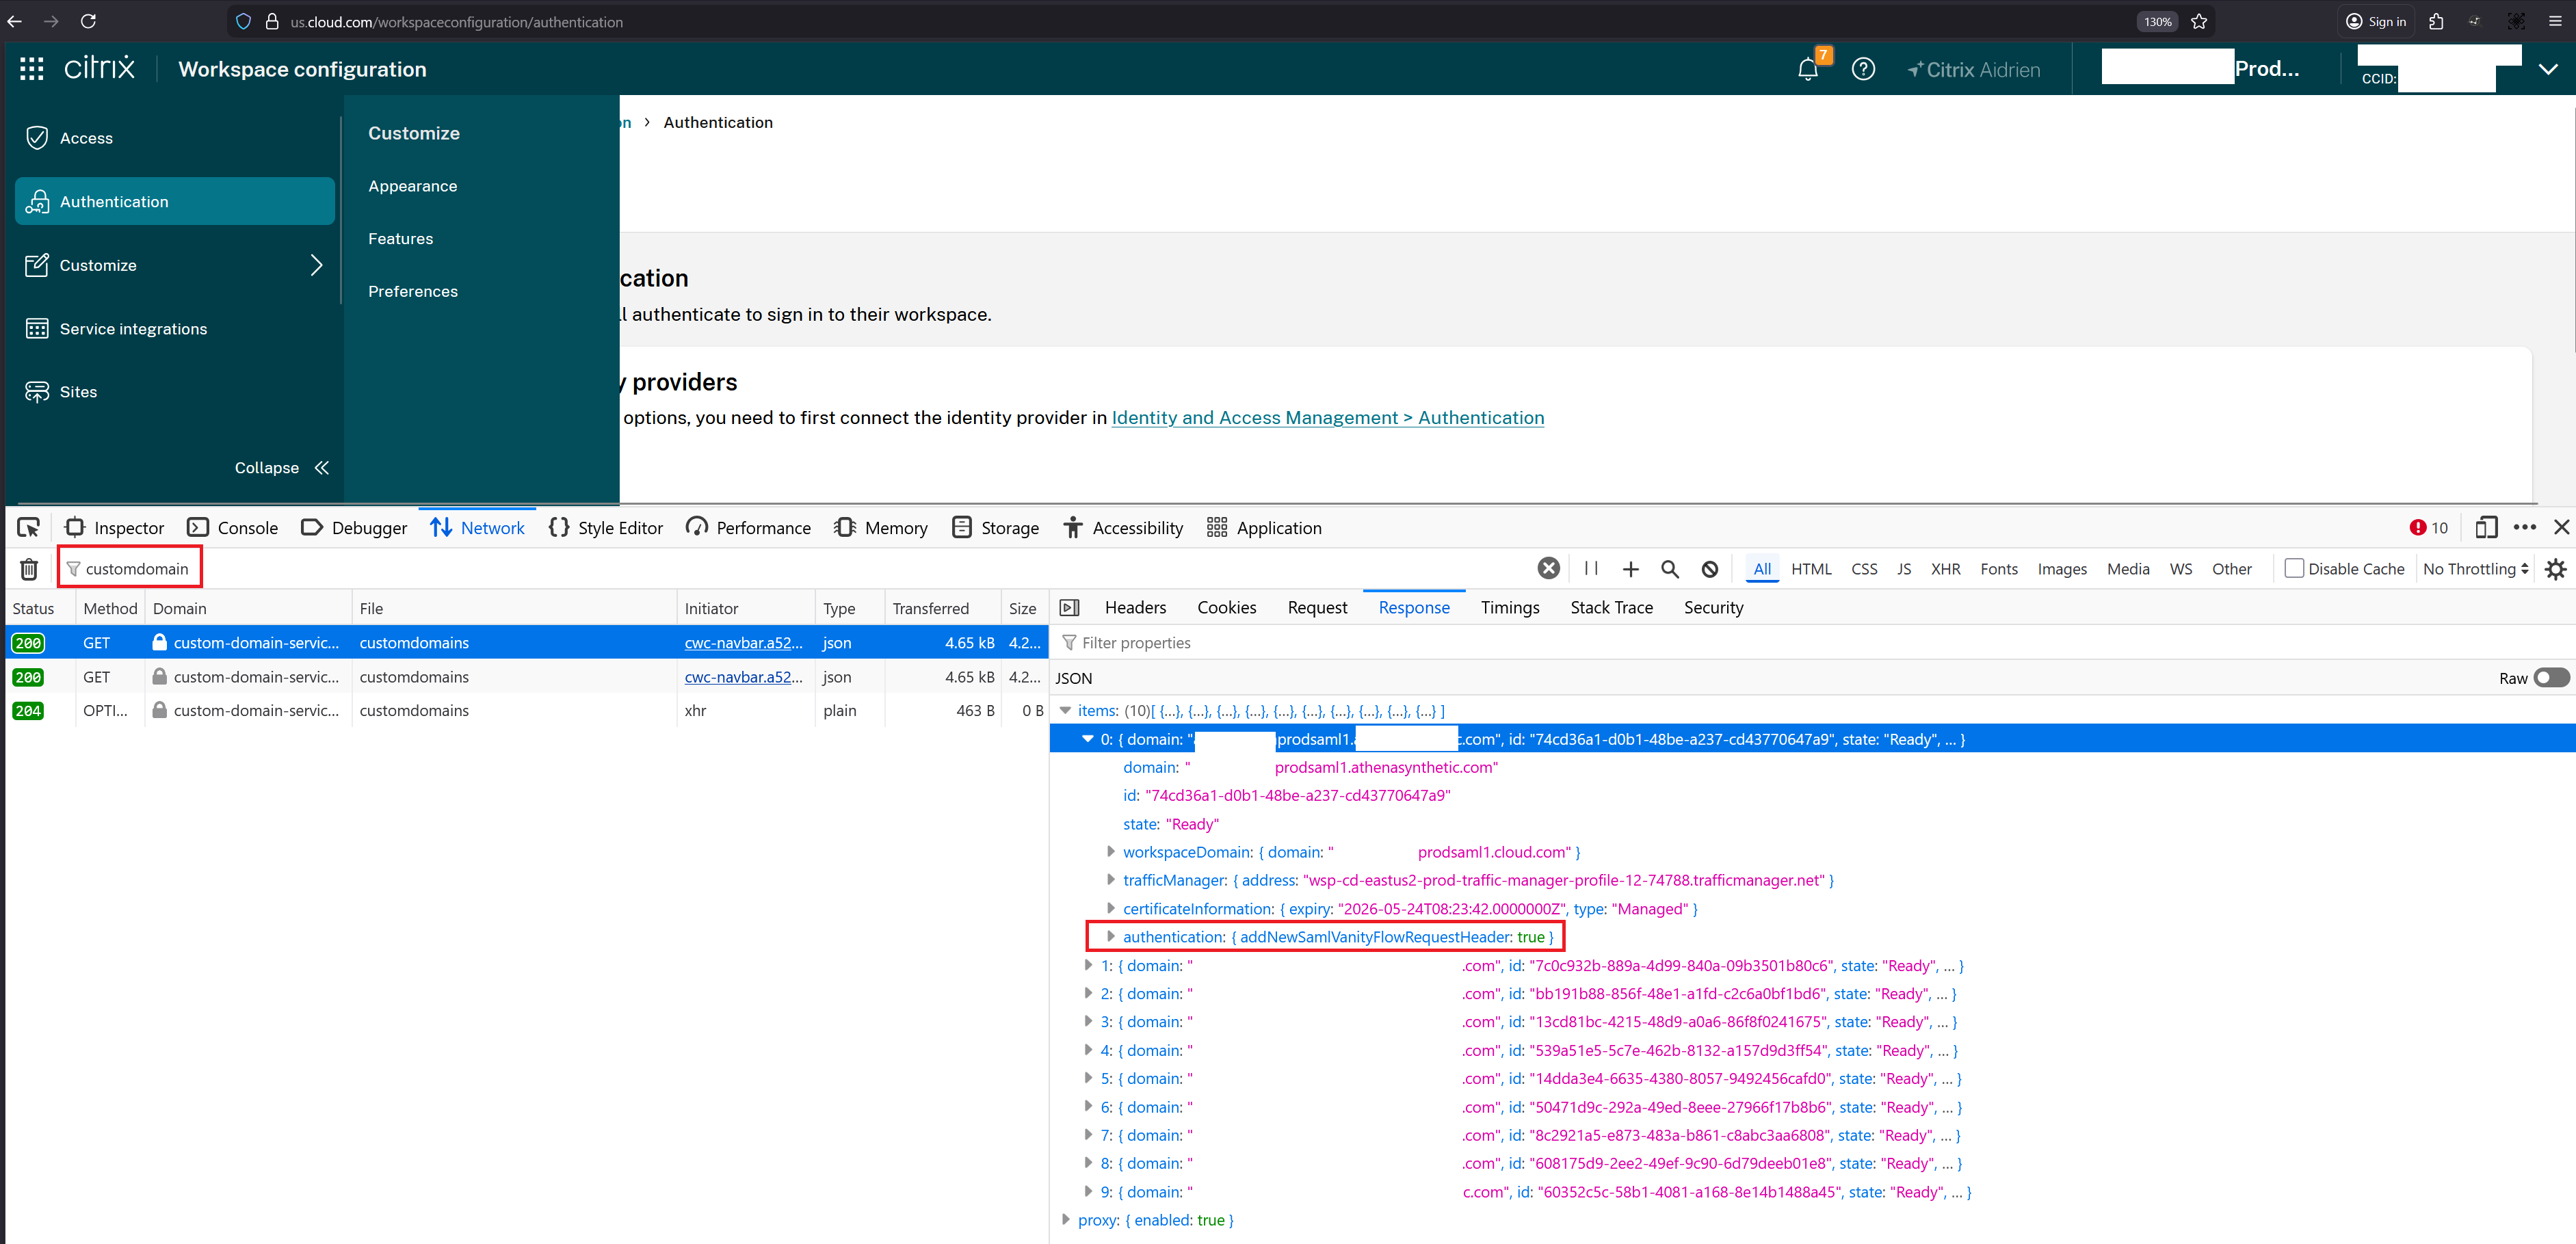
Enter
customdomaininto the network search dialogue to filter for the correct REST API calls.Locate this REST API call:
GET https://custom-domain-service.us.wsp.cloud.com/services/custom-domain-service/customers/<CCID>/stores/<storeID>/customdomainsMigrated custom URL objects will contain this additional data.
"addNewSamlVanityFlowRequestHeader":trueExample Custom URL Object:
"items": [ { "domain": "stores.mycompany.com", "id": "74cd36a1-d0b1-48be-a237-cd43770647a9", "state": "Ready", "workspaceDomain": { "domain": "stores.cloud.com" }, "trafficManager": { "address": "wsp-cd-eastus2-prod-traffic-manager-profile-12-74788.trafficmanager.net" }, "certificateInformation": { "expiry": "2026-05-24T08:23:42.0000000Z", "type": "Managed" }, "authentication": { "addNewSamlVanityFlowRequestHeader": true } } ] <!--NeedCopy--> -
Delete the secondary application from within your SAML IdP that uses custom URL SAML endpoints. The secondary SAML application is no longer used during the SAML logon flow.
Important:
Only delete the secondary SAML application once you have proven the migration has been successful and all the required SAML logon scenarios have been tested.
What do I have to do to migrate from my current 1x SAML application Custom URL solution to the new simpler solution?
-
Citrix Cloud administrators must coordinate with IdP administrators to make the necessary changes within both Citrix Cloud’s custom URL service and within your SAML IdP.
-
Within your SAML IdP verify the existence and configuration of a custom URL SAML application. You should only have one SAML application configured inside your SAML IdP. This is different for every SAML IdP such as EntraID, Okta, Duo, PingFederate ect…
Your existing primary SAML application’s Citrix Cloud SAML endpoints should look like this example.
Primary Application Example
- Entity ID:
https://saml.cloud.comorhttps://saml.cloud.com/<guid> - Assertion Consumer Service (SSO):
https://workspaces.mycompany.com/saml/acs - Logout (SLO):
https://workspaces.mycompany.com/saml/logout/callback
- Entity ID:
-
Raise a support case and contact Citrix Support and Engineering to schedule assistance with migrating your custom domain. Citrix engineering will migrate your custom URL on your behalf after a review of your SAML configuration.
-
Step 3 must be completed before you can safely make changes to your SAML application. Update your existing primary SAML application’s Citrix Cloud SAML endpoints to look like this example.
Important:
Do NOT update or alter the existing EntityID SAML endpoint on your primary SAML application. There is no need to change this. Only the ACS and logout SAML endpoints need to be updated.
Primary Application Example
- Entity ID:
https://saml.cloud.comorhttps://saml.cloud.com/<guid>(Do not change) - Assertion Consumer Service (SSO):
https://saml.cloud.com/saml/acs(Update) - Logout (SLO):
https://saml.cloud.com/saml/logout/callback(Update)
- Entity ID:
-
Navigate to StoreFront Cloud > Access and click on the warning icon to open the migration UI.
-
The warning icon shown in step 4 next to your custom URL should disappear once Citrix support and engineering have completed the migration. This indicates the backend data within the store Custom URL service has been successfully updated.
-
Test the SAML logon to store using all your custom URLs (previously used the Secondary SAML Application before migration).
- Test the SAML logon to store using any
cloud.comURLs (continues to use the Primary SAML Application). - Test the SAML logon to store using all your custom URLs (previously used the Secondary SAML Application before migration).
- Test the SAML logon to store using any
Legacy Custom URL SAML Configurations
To determine whether you have deployed either a 1x or 2x SAML application solution in your Citrix Cloud environment, identify which combination of SAML sign-in scenarios you currently use and examine your current SAML applications inside your SAML IdP.
The following sign-in scenarios share the same SAML application (SAML App 1) by default:
- SAML authentication where the store sign-in URL for your region (
cloud.com,citrixcloud.jp,cloud.us) is configured in your SAML provider as the SP Entity ID. - SAML authentication for Citrix Cloud using your unique sign-in URL (for example,
https://citrix.cloud.com/go/mycompany). In this scenario, administrators are authenticated to Citrix Cloud using SAML, based on their Active Directory (AD) group membership.
Adding SAML authentication for users through a custom domain (for example, https://workspaces.mycompany.com) that you configure in Citrix® StoreFront Cloud requires a second SAML application (SAML App 2).
Note:
Adding a custom URL and configuring SAML will take up to 24 hours for provisioning in Citrix Cloud.
The following table lists the supported combinations of SAML sign-in scenarios and the required SAML apps.
| Sign in to store with store URL | Sign in to store with custom domain URL | Sign in to Citrix Cloud using SAML sign-in URL | SAML App 1 required? | SAML App 2 required? |
|---|---|---|---|---|
| Yes | No | No | Yes - Use cloud.com SAML endpoints | No |
| No | Yes | No | Yes - Use custom domain SAML endpoints | No |
| No | No | Yes | Yes - Use cloud.com SAML endpoints | No |
| Yes | No | Yes | Yes - Use cloud.com SAML endpoints | No |
| No | No | Yes | Yes - Use the cloud.com SAML endpoints | Yes - Use custom domain SAML endpoints |
| Yes | Yes | Yes | Yes - Use cloud.com SAML endpoints | Yes - Use custom domain SAML endpoints |
1x SAML Application Configuration (Legacy SAML Config)
- In Citrix Cloud, you configured a custom URL inside StoreFront Cloud > Access.
-
In your SAML provider’s management console, you configured 1x SAML application using the store custom URL as the SP endpoints.
Example Legacy Custom URL SAML Application Endpoints
- Entity ID:
https://saml.cloud.comorhttps://saml.cloud.com/<guid> - Assertion Consumer Service (SSO):
https://workspaces.mycompany.com/saml/acs - Logout (SLO):
https://workspaces.mycompany.com/saml/logout/callback
The following example illustrates the Custom URL SAML endpoint configuration for Entra ID:

The following example illustrates the Custom URL SAML endpoint configuration for Okta, where Audience Restriction contains the Entity ID value:
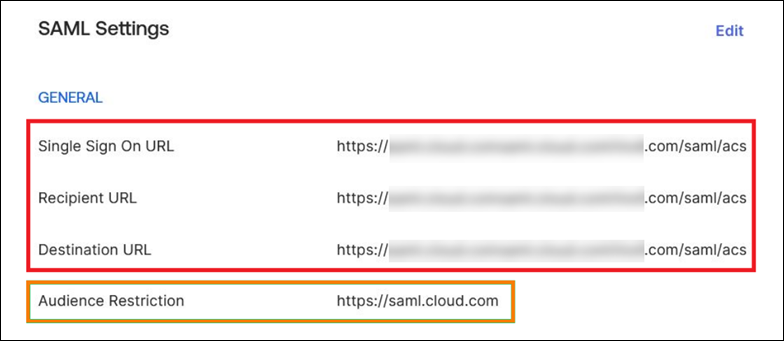
- Entity ID:
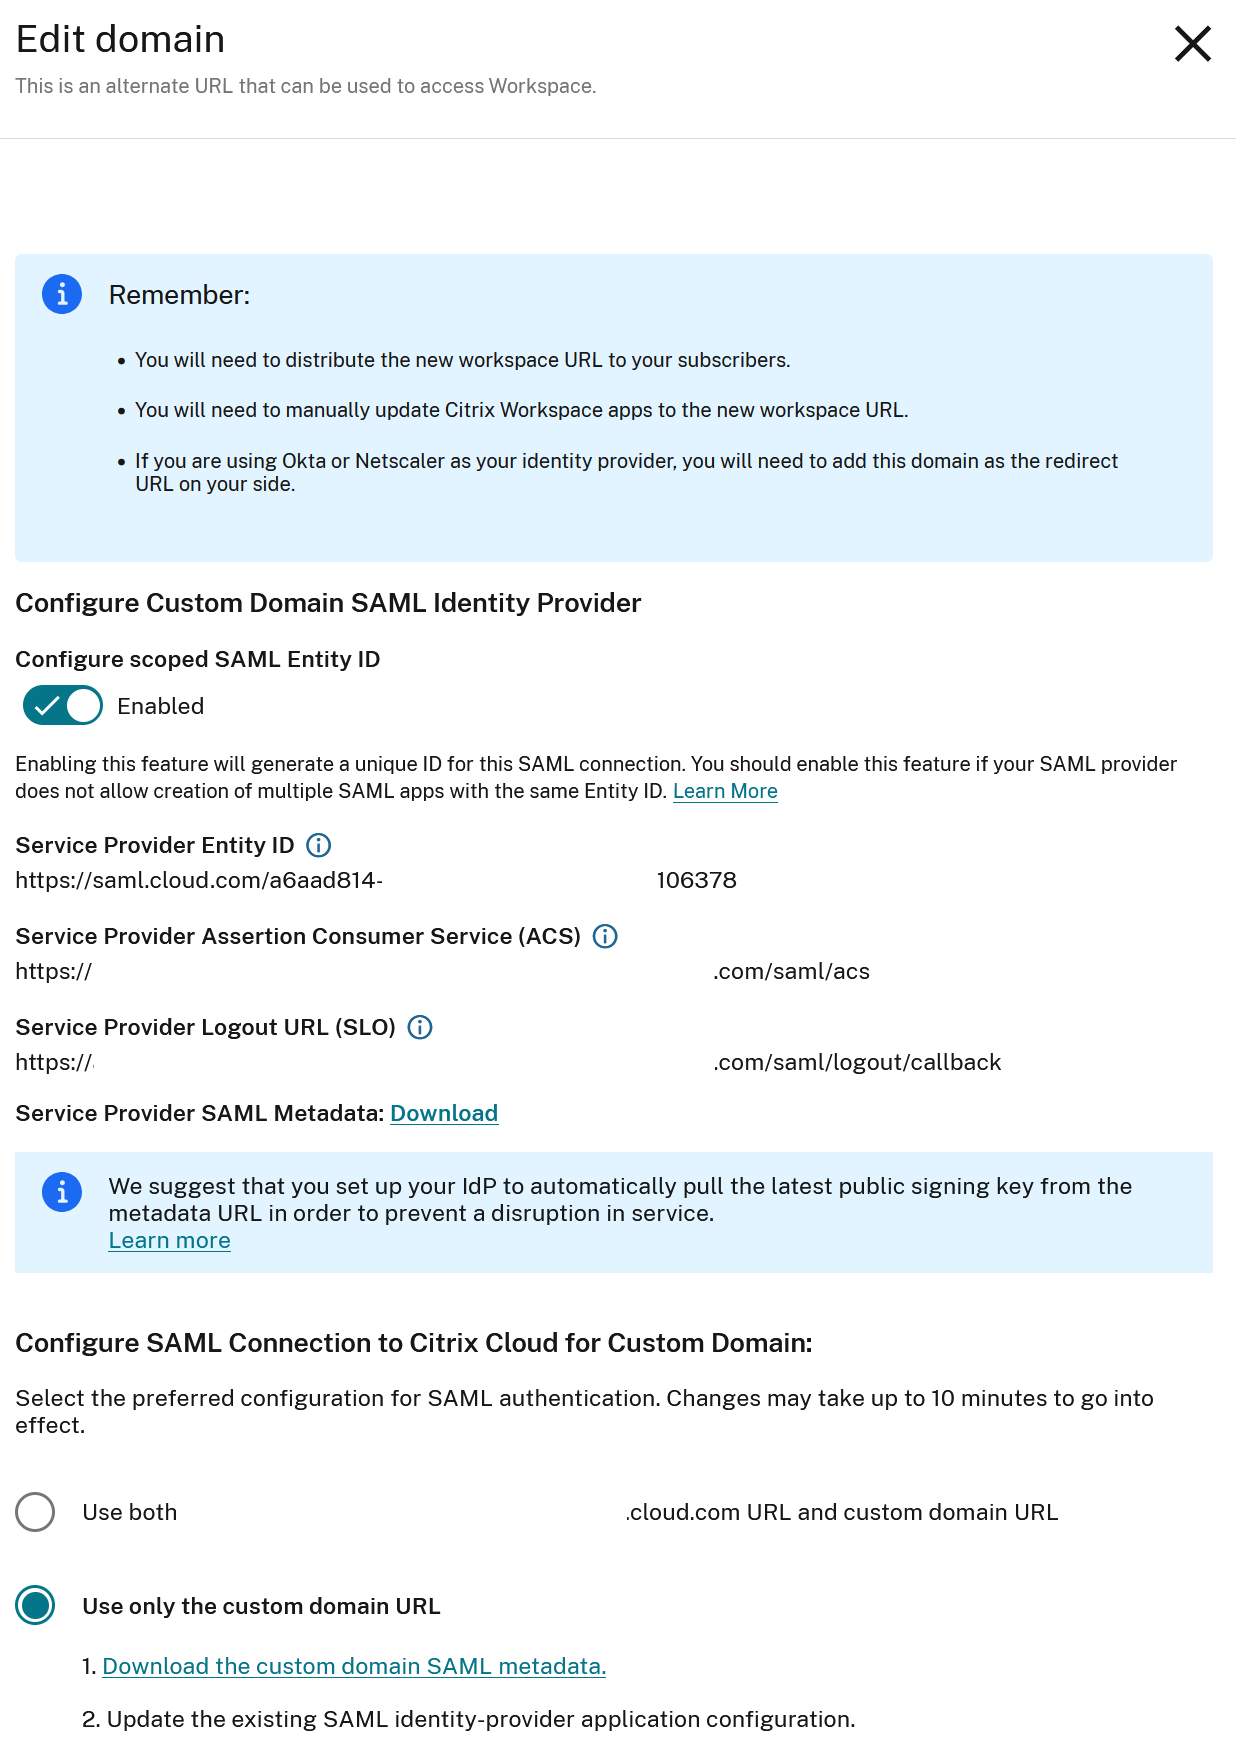
-
You selected Use only the custom domain within StoreFront Cloud > Access > Edit.
2 x SAML Application Configuration (Legacy SAML Config)
-
In Citrix Cloud you configured a custom domain inside StoreFront Cloud > Access.
-
Within your SAML provider’s management console, you configured 2x SAML applications.
-
Within the primary SAML application, you configured the following cloud.com SP endpoints:
- Entity ID:
https://saml.cloud.comorhttps://saml.cloud.com/<guid> - Assertion Consumer Service (SSO):
https://saml.cloud.com/saml/acs - Logout (SLO):
https://saml.cloud.com/saml/logout/callback
The following example shows this endpoint configuration in the Okta management console:
The following example shows this Service Provider endpoint configuration in the Entra ID management console:
- Entity ID:
- Within the secondary SAML application, you configured the following store custom domain SP endpoints.
- Entity ID:
https://saml.cloud.com - Assertion Consumer Service (SSO):
https://workspaces.mycompany.com/saml/acs - Logout (SLO):
https://workspaces.mycompany.com/saml/logout/callbackThe following example shows this Service Provider endpoint configuration in the Okta console.
- The following example shows this Service Provider endpoint configuration in the Entra ID console.
- Entity ID:
-
You selected Use both
customer.cloud.comURL and Custom URL within StoreFront Cloud > Access > Edit.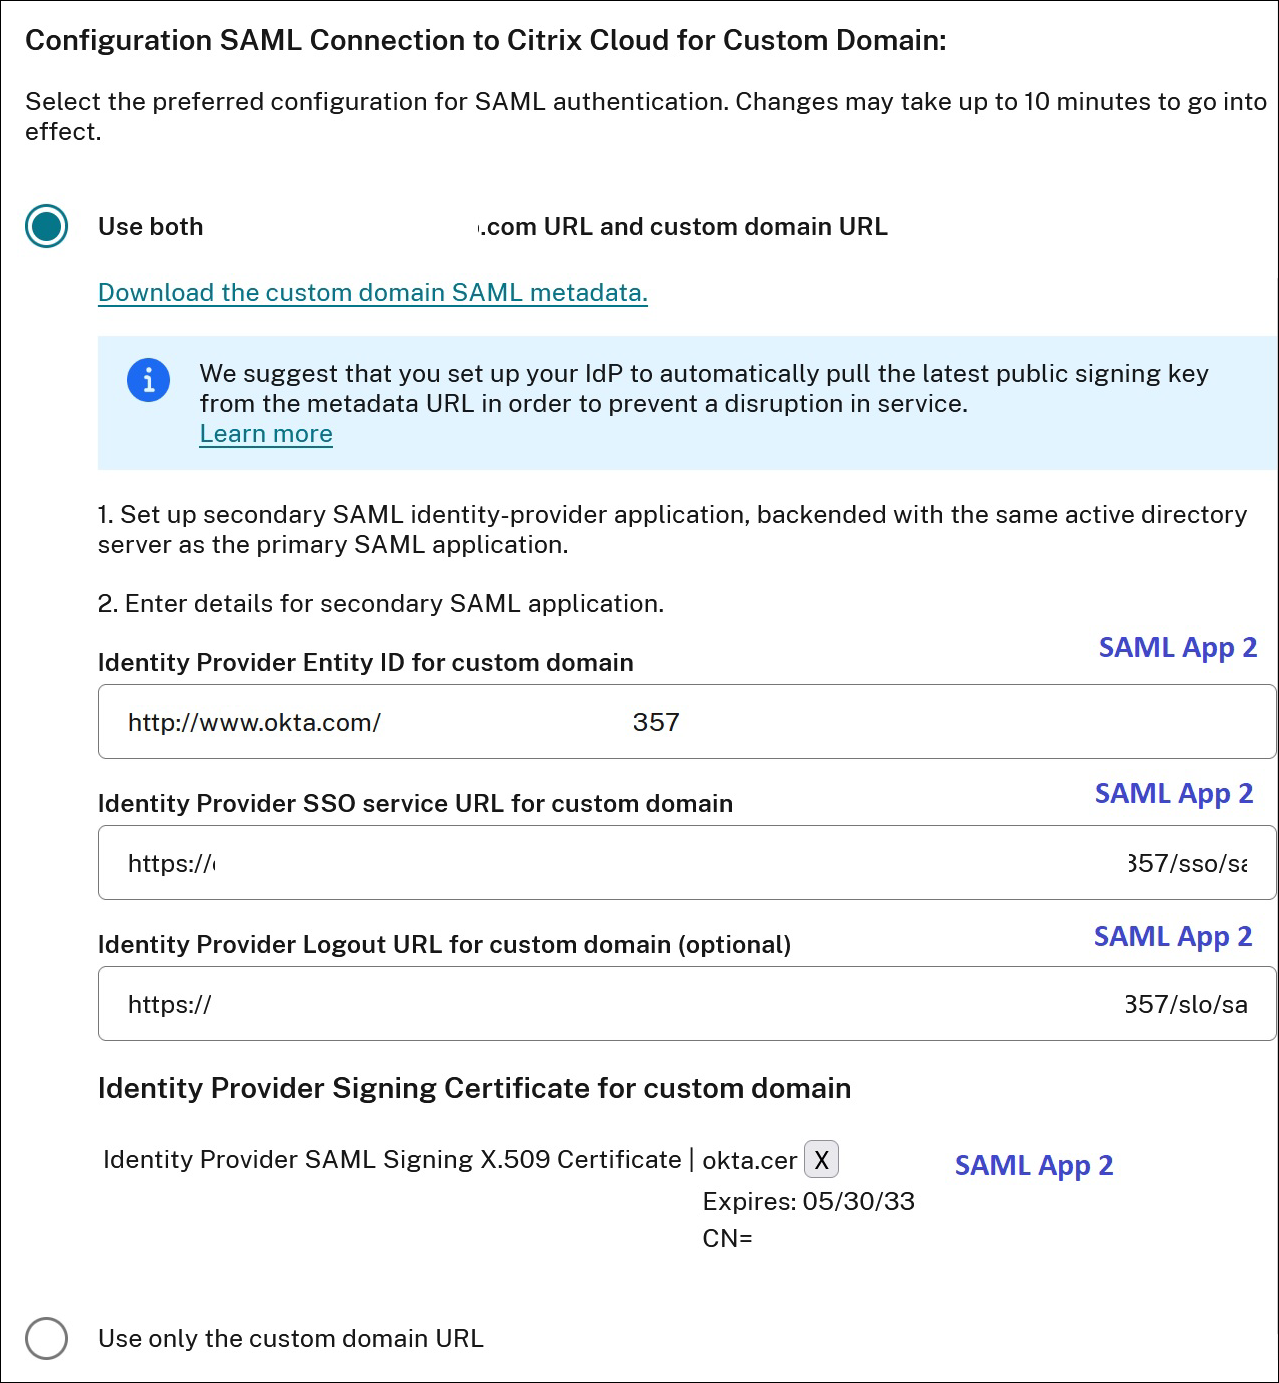
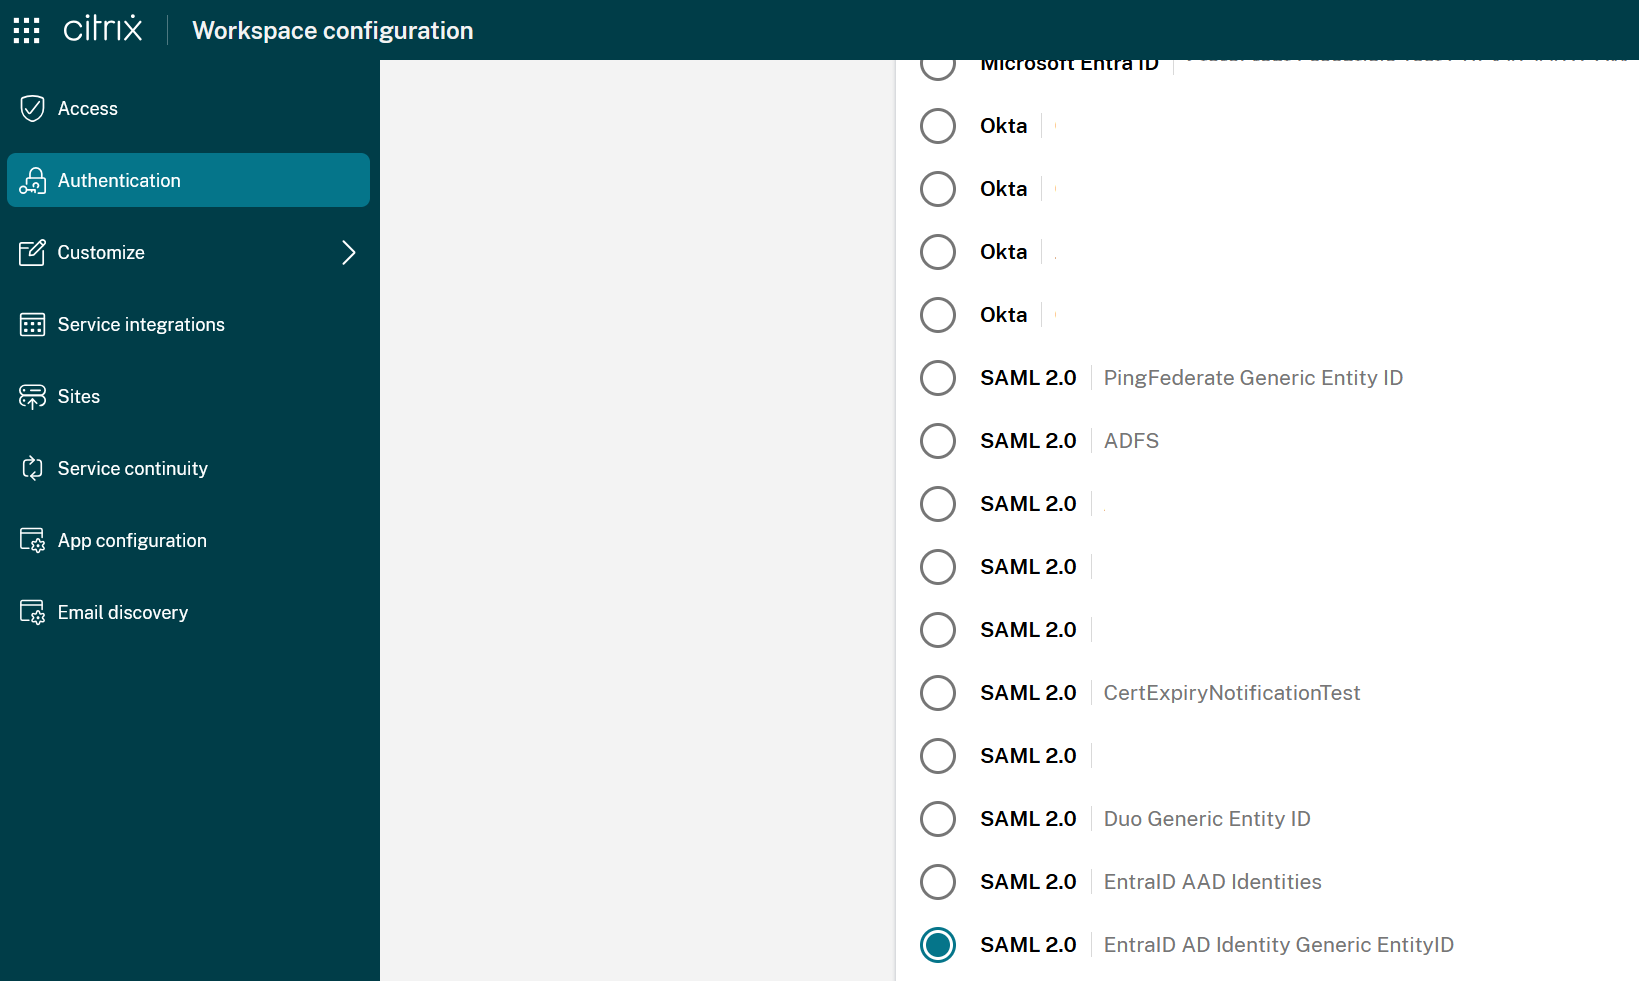
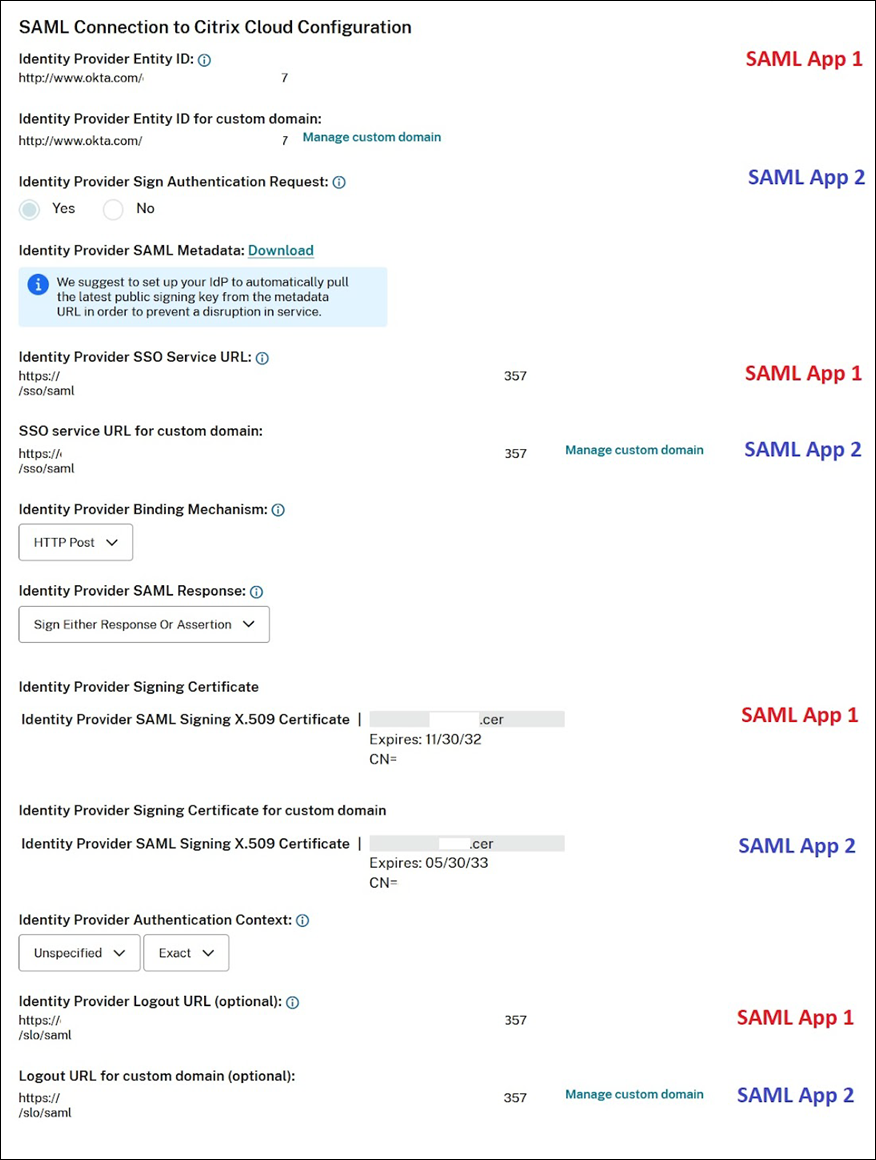
- Within Identity and Access Management > Authentication select Select SAML Provider > View from the ellipsis menu. The SAML Configuration page should display pairs of SAML endpoints configured for Entity ID, SSO URL, and Logout URL.
In this article
- FAQ
- Migrating Legacy Custom URLs and SAML Configurations
- What do I have to do to migrate from my current 1x SAML application Custom URL solution to the new simpler solution?
- Legacy Custom URL SAML Configurations
- 1x SAML Application Configuration (Legacy SAML Config)
- 2 x SAML Application Configuration (Legacy SAML Config)