Connect SAML as an identity provider to Citrix Cloud™
Citrix Cloud supports using SAML (Security Assertion Markup Language) as an identity provider to authenticate Citrix Cloud administrators and end users signing in to their stores. You can use the SAML 2.0 provider of your choice with your on-premises Active Directory (AD).
About this article
This article describes the required steps for configuring a connection between Citrix Cloud and your SAML provider. Some of these steps describe actions that you perform in your SAML provider’s administration console. The specific commands you use to perform these actions might vary from the commands described in the article, depending on your chosen SAML provider. These SAML provider commands are provided as examples only. Refer to your SAML provider’s documentation for more information about the corresponding commands for your SAML provider.
Citrix SAML Logon Use Cases
- Login to stores for end users.
- Login to stores using a store custom domain for end users.
- Login to Citrix Cloud for admin users.
Choosing the right SAML flow for your use case
-
AD backed identities imported into your SAML provider. These identities contain on-premise user attributes such as objectSIDs and objectGUIDs. These do not require AD shadow accounts as AD accounts corresponding to these imported users already exist in Active Directory.
-
Native Identities, which exist only within the SAML provider directory such as Entra ID or Okta Users. These have no corresponding identity inside AD and require AD shadow accounts if AD domain joined VDAs and DaaS catalogs are to be used. These users do not have embedded objectSIDs.
-
Entra ID Guest/B2B users, which are invited into Entra ID from other Entra ID tenants or using guest email addresses. These have no corresponding identity inside AD and require AD shadow accounts if AD domain joined VDAs and DaaS catalogs are to be used. These users may not have embedded objectSIDs. Some users may have incorrect objectSIDs in the wrong Active Directory.
Supported SAML providers
SAML providers that support the official SAML 2.0 specification are supported for use with Citrix Cloud.
Citrix has tested the following SAML providers for authenticating Citrix Cloud administrators and for authenticating Citrix® StoreFront Cloud end users using Single Sign-on (SSO) and Single Logout (SLO). SAML providers that don’t appear in this list are also supported.
- Microsoft ADFS
- Microsoft Entra ID
- Duo
- Okta
- PingFederate
When testing these providers, Citrix used the following settings to configure the SAML connection in the Citrix Cloud console:
| In this field in Citrix Cloud | Enter this value |
|---|---|
| Entity ID | https://entityid.com |
| Sign Authentication Request | Yes |
| SSO Service URL | https://yoursamlprovider/sso/saml2 |
| SSO Binding Mechanism | HTTP Post |
| SAML Response | Sign Either Response Or Assertion |
| Authentication Context | Unspecified, Exact |
| Logout URL | https://yoursamlprovider/slo/saml2 |
| Sign Logout Request | Yes |
| SLO Binding Mechanism | HTTP Post |
For more information about these settings, see Add SAML provider metadata to Citrix Cloud in this article.
Support for scoped Entity IDs
This article describes how to configure SAML authentication using a single SAML application and Citrix Cloud’s default generic Entity ID.
If your SAML authentication requirements include the need for multiple SAML applications within a single SAML provider, refer to Configure a SAML application with a scoped Entity ID in Citrix Cloud.
Administrator authentication with SAML 2.0
Citrix Cloud supports using SAML 2.0 to authenticate individual administrators and members of administrator groups in AD. For more information about adding administrator groups to Citrix Cloud, see Manage administrator groups.
Using an existing SAML connection for administrator authentication
If you already have a SAML 2.0 connection in Citrix Cloud and want to use it to authenticate administrators, you must first disconnect SAML 2.0 in Identity and Access Management and then reconfigure the connection. If you’re using your SAML connection to authenticate StoreFront Cloud end users, you must also disable the SAML authentication method in StoreFront Cloud. After reconfiguring the SAML connection, you can add individual administrators or administrator groups to Citrix Cloud.
If you attempt to add individual administrators or administrator groups without first disconnecting and reconnecting SAML 2.0, the Active Directory identity option described in Add an administrator group to Citrix Cloud doesn’t appear.
Task overview for setting up a new SAML connection
To set up a new SAML 2.0 connection in Citrix Cloud, you perform the following tasks:
- In Identity and Access Management, connect your on-premises AD to Citrix Cloud as described in Connect Active Directory to Citrix Cloud.
- Integrate your SAML provider with your on-premises AD as described in SAML integration with Active Directory in this article.
- Configure the sign-in URL that administrators can use to sign in to Citrix Cloud.
- In Identity and Access Management, configure SAML authentication in Citrix Cloud. This task involves configuring your SAML provider with the SAML metadata from Citrix Cloud and then configuring Citrix Cloud with the metadata from your SAML provider to create the SAML connection.
Task overview for using an existing SAML connection for Citrix Cloud administrators
If you already have a SAML 2.0 connection in Citrix Cloud and want to use it for administrator authentication, perform the following tasks:
- If applicable, disable SAML 2.0 store authentication: In StoreFront Cloud > Authentication, select a different authentication method and then select Confirm when prompted.
- Disconnect your existing SAML 2.0 connection: In Identity and Access Management > Authentication, locate the SAML connection. From the ellipsis menu at the far right, select Disconnect. Select Yes, disconnect to confirm the action.
- Reconnect SAML 2.0 and configure the connection: From the ellipsis menu for SAML 2.0, select Connect.
- When prompted, enter a unique identifier for the sign-in URL that administrators will use to sign in.
- Configure the SAML connection as described in Configure the SAML provider metadata in this article.
After configuring your SAML connection, you can add your AD administrator groups to Citrix Cloud as described in Manage administrator groups. You can also reenable SAML for end users as described in this article.
Create and map custom SAML attributes
If you already have custom attributes for the SID, UPN, OID, email, and displayName attributes configured in your SAML provider, you don’t have to perform this task. Proceed to Create a SAML connector application and use your existing custom SAML attributes in Step 5.
Note:
The steps in this section describe actions that you perform in your SAML provider’s administration console. The specific commands you use to perform these actions might vary from the commands described in this section, depending on your chosen SAML provider. The SAML provider commands in this section are provided as examples only. Refer to your SAML provider’s documentation for more information about the corresponding commands for your SAML provider.
- Sign in to the administration console of your SAML provider and select the option for creating custom user attributes. For example, depending on your SAML provider’s console, you might select Users > Custom User Fields > New User Field.
-
Add attributes for the following AD properties. Name the attributes using the default values shown.
AD Property Required or optional Default value userPrincipalName Required if not adding an attribute for SID (recommended). cip_upnobjectSID Required if not adding an attribute for UPN. cip_sidobjectGUID Optional for authentication cip_oidmail Optional for authentication cip_emaildisplayName Required by the store UI displayNamegivenName Required by the store UI firstNamesn Required by the store UI lastNameAD Forest Optional for authentication cip_forestAD Domain Optional for authentication cip_domain - Select the AD that you connected with Citrix Cloud. For example, depending on your SAML provider’s console, you might select Users > Directories.
- Select the option for adding directory attributes. For example, depending on your SAML provider’s console, you might select Directory Attributes.
- Select the option for adding attributes and map the following AD attributes to the custom user attributes you created in Step 2:
- If you added the attribute for SID in Step 2 (for example,
cip_sid), select objectSid and map to the attribute that you created. - If you added the attribute for UPN in Step 2 (for example,
cip_upn), select userPrincipalName and map to the attribute that you created. - If you added the attribute for ObjectGUID in Step 2 (for example,
cip_oid), select ObjectGUID and map to the attribute that you created. - If you added the attribute for Mail in Step 2 (for example,
cip_email), select mail and map to the attribute that you created. - If you added the attribute for Display Name in Step 2 (for example,
displayName), select displayName and map to the attribute that you created.
- If you added the attribute for SID in Step 2 (for example,
Configure the administrator sign-in URL
- Sign in to Citrix Cloud at https://citrix.cloud.com.
- From the Citrix Cloud menu, select Identity and Access Management.
- Locate SAML 2.0 and select Connect from the ellipsis menu.
- When prompted, enter a short, URL-friendly identifier for your company and select Save and continue. The Configure SAML page appears.
- Proceed to the next section to configure the SAML connection to Citrix Cloud.
Configure the SAML provider metadata
In this task, you create a connector application using SAML metadata from Citrix Cloud. After you configure the SAML application, you use the SAML metadata from your connector application to configure the SAML connection to Citrix Cloud.
Note:
Some steps in this section describe actions that you perform in your SAML provider’s administration console. The specific commands you use to perform these actions might vary from the commands described in this section, depending on your chosen SAML provider. The SAML provider commands in this section are provided as examples only. Refer to your SAML provider’s documentation for more information about the corresponding commands for your SAML provider.
Create a SAML connector application
- From your SAML provider’s administration console, add an application for an identity provider with attributes and sign response. For example, depending on your provider’s console, you might select Applications > Applications > Add App and then select SAML Test Connector (IdP w/ attr w/ sign response).
- If applicable, enter a display name and save the app.
- From the Configure SAML screen in Citrix Cloud, in SAML Metadata, select Download. The metadata XML file appears in another browser tab.
Note:
If needed, you can also download this file from
https://saml.cloud.com/saml/metadata.xml. This endpoint might be more friendly to some identity providers when importing and monitoring the SAML provider metadata. - Enter the following details for the connector application:
- In the Audience field, enter
https://saml.cloud.com. - In the Recipient field, enter
https://saml.cloud.com/saml/acs. - In the field for ACS URL validator, enter
https://saml.cloud.com/saml/acs. - In the field for ACS URL, enter
https://saml.cloud.com/saml/acs.
- In the Audience field, enter
-
Add your custom SAML attributes as parameter values in the application:
Create this field Assign this custom attribute cip_sid The custom attribute you created for SID. Example: cip_sid cip_upn The custom attribute you created for UPN. Example: cip_upn cip_oid The custom attribute you created for ObjectGUID. Example: cip_oid cip_email The custom attribute you created for Mail. Example: cip_email displayName The custom attribute you created for Display Name. Example: displayName - Add your end users as users to allow them to access the application.
Add SAML provider metadata to Citrix Cloud
-
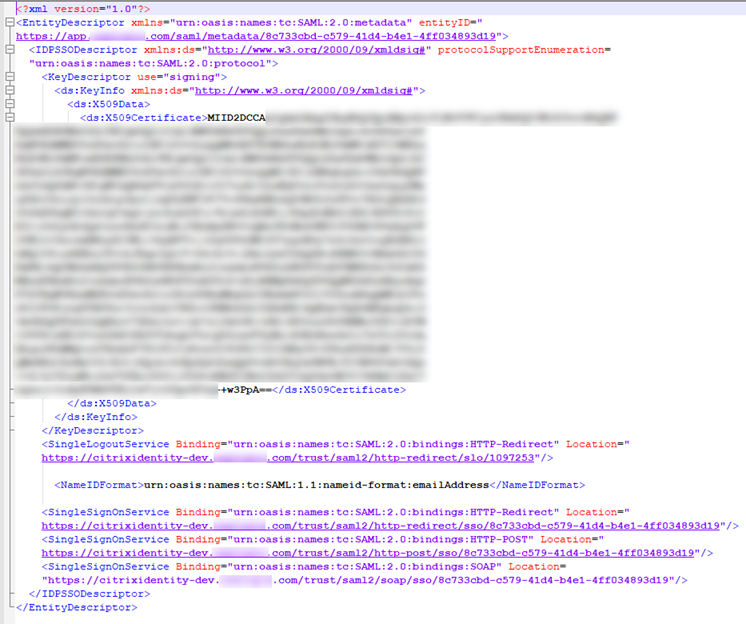
Acquire the SAML metadata from your SAML provider. The following image is an example of what this file might look like:
- In the Configure SAML screen in Citrix Cloud, enter the following values from your SAML provider’s metadata file:
-
In Identity Provider Entity ID, enter the entityID value from the EntityDescriptor element in the metadata.

- In Sign Authentication Request, select Yes to allow Citrix Cloud to sign authentication requests, certifying they came from Citrix Cloud and not a malicious actor. Select No if you prefer to add the Citrix ACS URL to an allow list that your SAML provider uses for posting SAML responses safely.
-
In SSO Service URL, enter the URL for the binding mechanism you want to use. You can use either HTTP-POST or HTTP-Redirect binding. In the metadata file, locate the SingleSignOnService elements with Binding values of either HTTP-POST or HTTP-Redirect.

- In Binding Mechanism, select the mechanism that matches the binding for the SSO Service URL you chose from the metadata file. By default, HTTP Post is selected.
- In SAML Response, select the signing method your SAML provider uses for the SAML Response and SAML Assertion. By default, Sign Either Response or Assertion is selected. Citrix Cloud rejects any responses that aren’t signed as specified in this field.
-
- In your SAML provider’s administration console, perform the following actions:
- Select SHA-256 for the SAML signing algorithm.
- Download the X.509 certificate as a Base64-encoded PEM, CRT, or CER file.
- On the Configure SAML page in Citrix Cloud, in X.509 Certificate, select Upload File and select the certificate file you downloaded in the previous step.
- Select Continue to complete the upload.
- In Authentication Context, select the context you want to use and how strictly you want Citrix Cloud to enforce this context. Select Minimum to request authentication at the selected context without enforcing authentication at that context. Select Exact to request authentication at the selected context and enforce authentication only at that context. If your SAML provider doesn’t support authentication contexts or you choose not to use them, select Unspecified and Minimum. By default, Unspecified and Exact are selected.
- For Logout URL (optional), decide whether or not you want users signing out of their store or Citrix Cloud to also sign out of all web applications that they previously signed in to through the SAML provider.
- If you want users to stay signed in to their web applications after signing out of their store or Citrix Cloud, leave the Logout URL field blank.
-
If you want users to sign out of all web applications after signing out of their store or Citrix Cloud, enter the SingleLogout (SLO) endpoint from your SAML provider. If you’re using Microsoft ADFS or Microsoft Entra ID as your SAML provider, the SLO endpoint is the same as the single sign-on (SSO) endpoint.
-
Verify that the following default attribute values in Citrix Cloud match the corresponding attribute values configured in your SAML provider. For Citrix Cloud to find these attributes within the SAML assertion, the values entered here must match those in your SAML provider. If you didn’t configure a certain attribute in your SAML provider, you can use the default value in Citrix Cloud or leave the field blank, unless noted otherwise.
-
Attribute name for User Display Name: Default value is
displayName. -
Attribute name for User Given Name: Default value is
firstName. -
Attribute name for User Family Name: Default value is
lastName. -
Attribute name for Security Identifier (SID): You must enter this attribute name from your SAML provider if you didn’t create an attribute for UPN. The default value is
cip_sid. -
Attribute name for User Principal Name (UPN): You must enter this attribute name from your SAML provider if you didn’t create an attribute for SID. The default value is
cip_upn. -
Attribute name for Email: Default value is
cip_email. -
Attribute name for AD Object Identifier (OID): Default value is
cip_oid. -
Attribute name for AD Forest: Default value is
cip_forest. -
Attribute name for AD Domain: Default value is
cip_domain.
-
Attribute name for User Display Name: Default value is
- Select Test and Finish to verify you configured the connection successfully.
Add administrators to Citrix Cloud from AD
For instructions for adding and managing AD groups in Citrix Cloud, see Manage administrator groups.
Enable SAML authentication for stores
- From the Citrix Cloud menu, select StoreFront Cloud.
- Select the Authentication tab
- Select SAML 2.0.
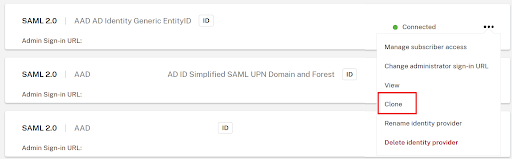
Cloning an Existing SAML Connection within Identity and Access Management
Important:
Cloning SAML connections does not clone the existing Scoped Entity ID. You may need to update your SAML application configuration if you add a Scoped Entity ID or generate a new one during the cloning process.
To clone an existing SAML connection follow the steps below:
-
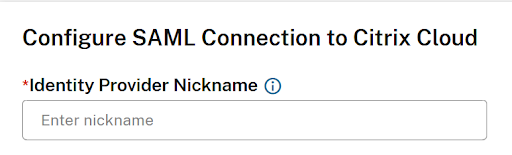
Select the 3 dots to the right of an existing SAML connection and select Clone from the list of actions.
-
Enter a new and unique GO URL for the new SAML connection. This can be changed later if needed.
-
Enter a new unique nickname for the new SAML connection.
-
Update any settings within the connection such as enable scoped entity ID, signing needs to be enabled, add a missing logout URL, or update the SAML provider cert which has recently expired….
-
Click “Test and finish” to save the new SAML connection.
-
Switch store to use the new SAML connection within StoreFront Cloud -> Authentication.
-
Update your SAML application configuration with a new scoped entity ID (not always necessary)

In this article
- About this article
- Citrix SAML Logon Use Cases
- Choosing the right SAML flow for your use case
- Supported SAML providers
- Support for scoped Entity IDs
- Administrator authentication with SAML 2.0
- Task overview for setting up a new SAML connection
- Task overview for using an existing SAML connection for Citrix Cloud administrators
- Create and map custom SAML attributes
- Configure the administrator sign-in URL
- Configure the SAML provider metadata
- Add administrators to Citrix Cloud from AD
- Enable SAML authentication for stores
- Cloning an Existing SAML Connection within Identity and Access Management