Deployment Guide: Deploying Citrix Secure Developer Spaces™ in Amazon Elastic Kubernetes Service
The Citrix Secure Developer Spaces™ platform provides a secure and productive cloud development environment that can be deployed on public, private clouds, and self-hosted servers. It also works in full air-gapped modes, such as high-security settings. The primary purpose of Citrix Secure Developer Spaces platform is to provide secure, cloud development environments (CDEs) that boost developer productivity while ensuring enterprise-level security. It allows organizations to streamline the provisioning and management of coding environments, improving efficiency and collaboration among internal and external teams. By centralizing development resources and integrating automated security features, the platform reduces the risk of data leaks and intellectual property theft, enabling safe remote work and supporting DevSecOps practices. Specifically, typical usage scenarios encompass IT efficiency, developer productivity, and governance of the development process. This deployment guide provides the steps to deploy the Secure Developer Spaces using Amazon Elastic Kubernetes Service (EKS) and MongoDB Atlas. The CDEs can be accessed through cloud or local integrated development environments (IDEs), offering a secure and isolated environment for developers.
This guide helps the user perform the following tasks:
- Preparing for the installation
- Installing and configuring the Secure Developer Spaces platform
- Accessing and upgrading the Secure Developer Spaces workspace
- Onboarding end users
For more information, see the Secure Developer Spaces website.
Architecture Diagram
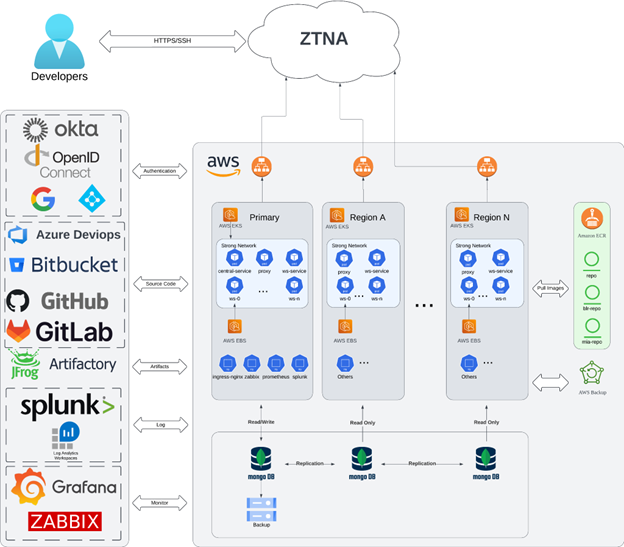
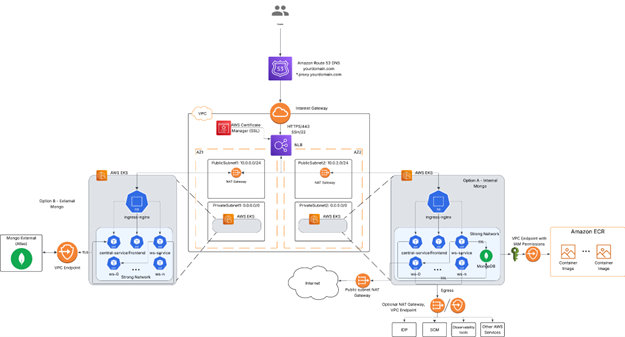
The architectural diagram of a CDE has the following components:
- One Kubernetes cluster with auto-scaling node and storage Container Storage Interface(CSI) driver capacity to host the Secure Developer Spaces platform and workspace
- A container registry
- MongoDB database
- Code repositories, for example, GitHub, GitLab or Bitbucket
- Optional: Additional Kubernetes clusters set up in different regions to ensure global access with optimized network latency
- Optional: An identity provider (SAML), such as Okta
- Optional: Observability
- Optional: Private access using Citrix® workspace
The key components of Secure Developer Spaces - the Cloud Development Environment (CDE) Platform include Kubernetes clusters, a container registry, and a MongoDB database. You can leverage resources from any cloud service provider or use your hardware in a data center, or even hybrid.
The following hardware specifications are required for Amazon Elastic Kubernetes Service (EKS) deployment:
- Amazon Elastic Kubernetes Service (EKS) for platform and regions
- Service node pool with two m5.2xlarge instances (8vCPU, 32GB RAM)
- Workspace node pool with m5.4xlarge instances (16vCPU, 64GB RAM) with auto-scaling
- Amazon Elastic Container Registry (ECR)
- Standard tier Cross-region replication for multi-region deployments
- MongoDB Atlas cluster
- M10 (2 GB RAM, 8 GB Storage) with auto-scaling
- Read-only nodes for regions
If you are not using AWS, you can choose from the following alternatives:
- Kubernetes Cluster:
- Azure Kubernetes Service
- Google Kubernetes Engine
- Container Registry
- Azure Container Registry
- Google Container Registry
Prerequisites
The Secure Developer Spaces CDE platform deployment has the following prerequisites:
- An AWS account with appropriate permissions for cloud infrastructure
- A MongoDB Atlas subscription for database management
- Two domain names:
- Regular, such as sample.com
- A wildcard subdomain for proxy support, such as *.proxy.example.com
- SSL certificates for secure communications
- An identity provider (SAML), such as Okta, for identity and access management
Preparing for the Installation
You can prepare for the installation by setting up the prerequisites listed in the previous section. In addition, you must perform the procedures given in this section.
Creating a Managed Kubernetes Service
Amazon Elastic Kubernetes Service (EKS) is a managed Kubernetes service that you can use to deploy and manage containerized applications. Before starting, download and install the following tools:
Procedure
-
Configure the AWS CLI with your credentials
aws configure
<!--NeedCopy-->
Enter your AWS Access Key ID, Secret Access Key, default region, and output format when prompted.
-
Create an EKS cluster using eksctl
eksctl create cluster \ --name $MY_EKS_CLUSTER_NAME \ --region $AWS_REGION \ --nodegroup-name standard-nodes \ --node-type m5.2xlarge \ --nodes 2 \ --nodes-min 2 \ --nodes-max 4 \ --managed <!--NeedCopy--> -
Add a node group for workspaces with auto-scaling:
eksctl create nodegroup \ --cluster $MY_EKS_CLUSTER_NAME \ --region $AWS_REGION \ --name workspace-nodes \ --node-type m5.4xlarge \ --nodes 2 \ --nodes-min 2 \ --nodes-max 10 \ --managed <!--NeedCopy--> -
To verify the connection to your cluster and get a list of cluster nodes, run the following command:
kubectl get nodes
<!--NeedCopy-->
Creating an Amazon Elastic Container Registry
Amazon Elastic Container Registry (ECR) is a fully managed container registry that makes it easy to store, manage, and deploy container images. Secure Developer Spaces fetches service images and workspace images that you uploaded from Amazon ECR.
-
Create an ECR repository
aws ecr create-repository \ --repository-name strong-network \ --image-scanning-configuration scanOnPush=true <!--NeedCopy--> -
Create additional repositories for workspace images:
aws ecr create-repository \
 --repository-name ws-images \
 --image-scanning-configuration scanOnPush=true
<!--NeedCopy-->
This command generates the details of the service principal, including the appId, displayName, password, and tenant.
-
To authenticate Docker to your ECR registry, use the following command:
aws ecr get-login-password --region $AWS_REGION | docker login --username AWS --password-stdin $AWS_ACCOUNT_ID.dkr.ecr.$AWS_REGION.amazonaws.com <!--NeedCopy--> -
Set up cross-region replication if needed (for multi-region deployments):
aws ecr put-replication-configuration \ --replication-configuration '{"rules":[{"destinations":[{"region":"us-west-2","registryId":"$AWS_ACCOUNT_ID"}]}]}'
 <!--NeedCopy-->
Creating a MongoDB Service
This procedure guides you through creating a MongoDB database and configuring it for use with your Kubernetes cluster.
-
Open the database page and click Create.
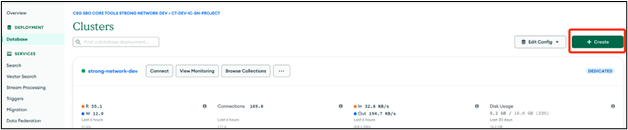
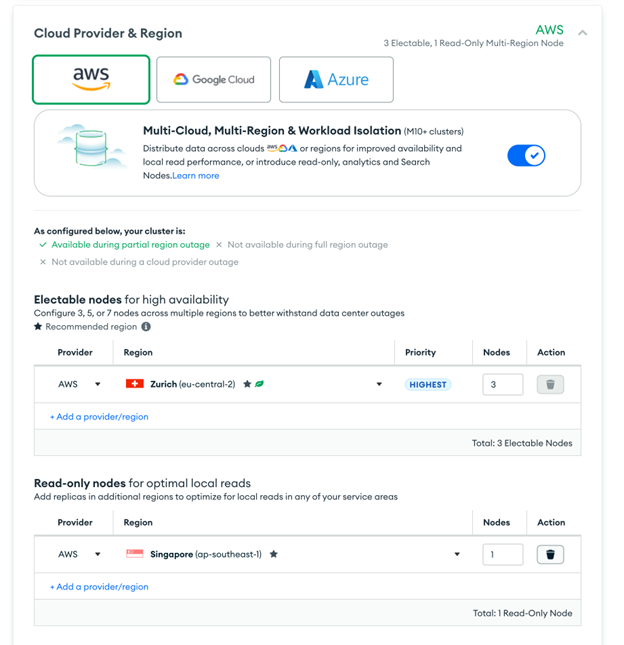
- Configure your settings and click Create Deployment.
- Select AWS as the cloud provider
- Choose the same region EKS cluster
- Select M10 tier with auto-scaling
-
Go to the Database Access page and add a user.

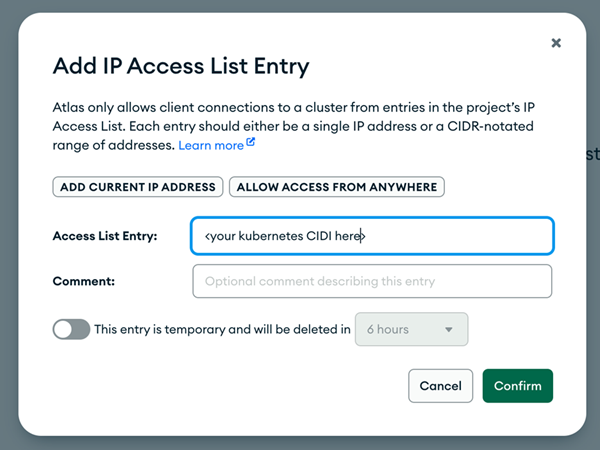
- Go to the Network Access page and add your EKS cluster IP ranges.
- Add the CIDR blocks for your EKS cluster VPC
- Alternatively, use peering between your VPC and MongoDB Atlas for enhanced security

Downloading Container Images and Helm Chart
This procedure guides you in downloading container images and the Helm chart necessary for deploying the Secure Developer Spaces platform.
To download container images and Helm chart, run the Docker container from Docker Hub:
docker run -it --rm -v ${PWD}:/strong-network/shared strongnetwork/strong_installer:${VERSION}
<!--NeedCopy-->
Creating Config
If you are installing Secure Developer Spaces for the first time, you must create the config.yml file for deployment.
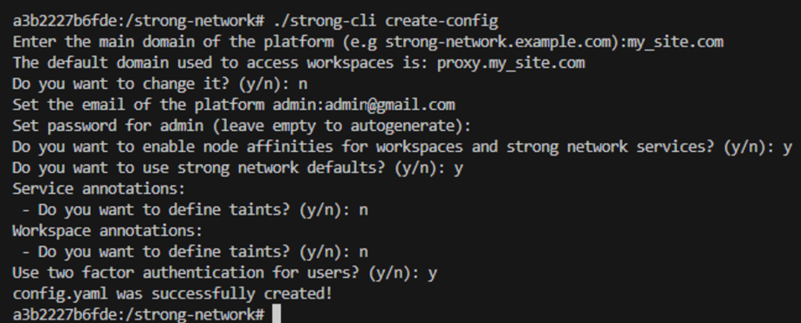
1.Run the following command:
./strong-cli create-config
<!--NeedCopy-->
2.Set up the platform by responding to the prompts based on your preferences and requirements.
The following example shows a generated config.yml file:
ninja:
image_tag: "latest"
docker_registry: "<aws-account-id>.dkr.ecr.<region>.amazonaws.com"
workspace_registry: "<aws-account-id>.dkr.ecr.<region>.amazonaws.com/ws-images/"
user_admin_email: "" # Default admin@strong-network.com
user_admin_password: "" # command: openssl rand -base64 16 | tr '/+' '_-' | tr
-d '='
secret_key_repos_b64: "" # 16bytes base64 encoded; command: openssl rand
-base64 16
proxy_host_name: "" # example: proxy.example.com
host_name: "" # example: example.com
ssl_certificate_secret: "" # secret for ssl certs; created using: kubectl
create -n release-name secret tls helloworld-credential --key=private.key
--cert=public.crt
externalMongodb:
hostName: "" # MongoDB Atlas host name
auth:
username: "" # set MongoDB Atlas user
password: "" # set MongoDB Atlas password
<!--NeedCopy-->
Where:
- image_tag: The Docker image tag of services.
- docker_registry: The URL of the Docker registry where services are hosted.
- workspace_registry: The URL of the Docker registry where workspace images are hosted.
- user_admin_email: The email of the administrator.
- user_admin_password: The password for the administrator of the platform.
- secret_key_repos_b64: The secret to encrypt the private keys to access the repositories.
- host_name: The URL of deployment (for example, company.strong-network.com).
- proxy_host_name: The proxy URL used to access the workspace application.
- ssl_certificate_secret: The Kubernetes TLS secret that contains a private key and a chain of SSL certificates.
Fetching Helm Chart and Container Images
This section outlines the steps to fetch the Helm chart and container images required for deploying the Secure Developer Spaces platform.
-
Go to the /strong-network directory and run the following strong-cli Binary command:
./strong-cli install \
    --source-region eu \
    --domain your-domain.com \
    --dst-reg-url <aws-account-id>.dkr.ecr.<region>.amazonaws.com \
    --aws-access-key-id <aws-access-key-id> \
    --aws-secret-access-key <aws-secret-access-key>
  <!--NeedCopy-->
Where:
- –source-region: It is the closest region to you (us, eu, asia). If this flag is not provided, the program auto-detects the best region.
- –domain: The host domain. If this flag is not provided, the domain is extracted from the ./shared/config.yml file.
- –src-reg-key-file: The path to the Service Account Key file of the Secure Developer Spaces registry. If this flag is not provided, the program tries to auto-authenticate to the source registry.
- –dst-reg-url: Your destination registry URL to which you want to push images.
Based on the destination registry URL, you must provide the following inputs for AWS:
- –aws-access-key-id: Your AWS access key ID.
- –aws-secret-access-key: Your AWS secret access key.
The CLI downloads the Helm chart and starts pushing images to your registry.
Preinstalling NGINX Ingress Controller
Ensure you have a pre-installed NGINX Ingress controller on the Kubernetes cluster. If not, then go to the installation guide and see the installation per Cloud Provider. If the Cloud Provider is not on the list, perform the following steps.
-
Run the following helm commands:
helm repo add ingress-nginx https://kubernetes.github.io/ingress-nginx
helm repo update
helm install --namespace nginx --create-namespace ingress-nginx ingress-nginx/ingress-nginx \
  --set controller.service.type=LoadBalancer \
  --set controller.service.annotations."service\.beta\.kubernetes\.io/aws-load-balancer-type"="nlb"
<!--NeedCopy-->
It is best practice to set up this NGINX configuration to optimize the platform’s performance in customer deployments.
-
A default ConfigMap exists in the ingress-nginx namespace, usually named ingress-nginx-controller.
kubectl edit configmap ingress-nginx-controller <!--NeedCopy--> -
Add keep-alive-requests: 10000 to the ConfigMap as shown in the following command:
```bash apiVersion: v1 data: allow-snippet-annotations: “false” enable-brotli: “true” keep-alive: 120s keep-alive-requests: “10000” use-gzip: “true” use-http2: “true” kind: ConfigMap
Uploading the SSL Secret
The SSL secret is used in the Secure Developer Spaces ingress configuration. Perform the following step to upload your SSL secret.
-
Run the kubectl create secret command to upload your SSL secret. See the command in the following example:
kubectl create secret tls my-ssl-secret --cert=path/to/tls.crt --key=path/to/tls.key
Installing the Secure Developer Spaces Platform
After you have followed the prerequisite procedures, you can install the Secure Developer Spaces platform.
-
Configure and run the .yml file using Helm. Replace the values in the following example with the actual values:
helm upgrade --install my_release ninjahchart-${SN_VERSION}.tgz -f config.yml -
Once the deployment is complete, inspect the running services with the kubectl get all command to generate an output similar to the following example:
> kubectl get pods pod/release-central-service-7794bf97db 1/1 Running 0 3h24m pod/release-central-service-55f74bb5d 1/1 Running 0 3h24m pod/release-mongodb-869ddfb7c-7q58h 1/1 Running 0 3h24m pod/release-coordinator-7f9c4c95bd5fd 1/1 Running 0 3h24m pod/release-proxy-569859ddb9-748jj 1/1 Running 0 3h24m pod/release-frontend-7b4b8b97d4-67d2k 1/1 Running 0 3h24m pod/release-workspace-api-74cb48675c-9x4v8 1/1 Running 0 3h24m - To log into the platform, enter the URL of your deployment in the Chrome browser.
- Use the admin credentials that you set in the Helm values.
You can configure the platform to connect to the service providers, such as GitHub, GitLab, GSuite, and Microsoft Teams.
Configuring the Secure Developer Spaces Platform
After installing the Secure Developer Spaces platform, you must configure it for use. This section covers the configuration procedures.
Configuring Okta as SAML Identity Provider
- In the Okta Admin menu, navigate to Applications > Application.
- Click Create App Integration.
- In the modal for the sign-in method, select SAML 2.0.
- Enter the application name. Click Configure SAML and enter the following values in the dialog.
- Single Sign-On URL: Enter the URL, for example http(s)://yourdomain/saml/acs
- Audience URI: Enter the URI, for example: http(s)://yourdomain/saml/metadata
-
Attribute Statements:
- email: (Mandatory)
- firstName: (Optional) If not set, the email is used as the username.
- lastName: (Optional) If not set, the email is used as the username.

- Click Continue and Finish. The app is successfully created in Okta.
-
To configure the Secure Developer Spaces platform to trust Okta, log in to the platform as the administrator and go to http(s)://yourdomain/platform/system_configuration/saml_sp or click System Configuration > SAML Service Provider Configuration.
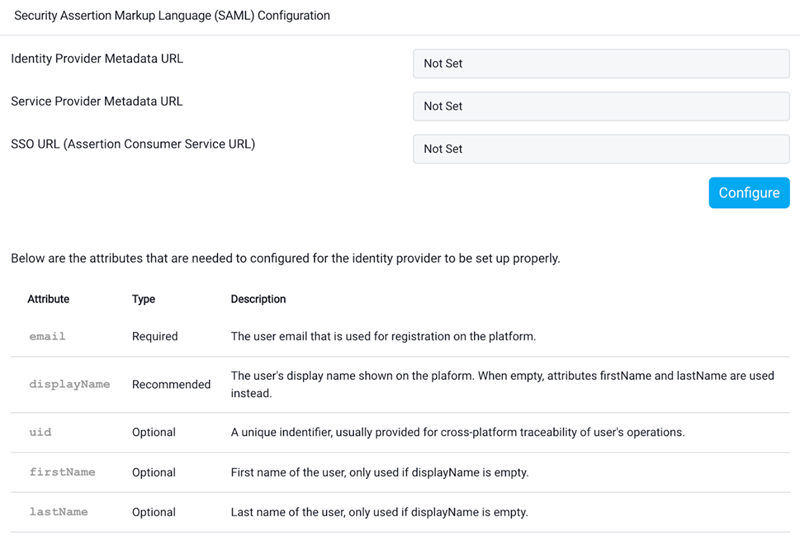
- Click Configure and upload the metadata of the SAML Identity Provider (Okta in this case) or enter a metadata URL.
The SAML configuration is now complete and ready to use.
Configuring the Code Repository
To configure the code repository, you must set up the Secure Developer Spaces platform and then configure the code repository instance of your choice. Below are the guides for configuring Github, Gitlab, and Bitbucket.
Github configuration
- Go to https://github.com/settings/developers
- Click on Register new application and you will be presented with a screen to set:
- Application Name: At your discretion.
- Homepage URL: The main route of the domain where the platform is running.
- Authorization Callback URL: The URL should have a structure similar to https://example.com/oauth/apps/callback, where “example.com” should be replaced with the proper domain name (same as the Homepage URL).
- When this process is done, click on the green button Register application.
- You will be redirected to a new application page where you can see the Client ID and generate the Secret that needs to be set in the platform configuration.
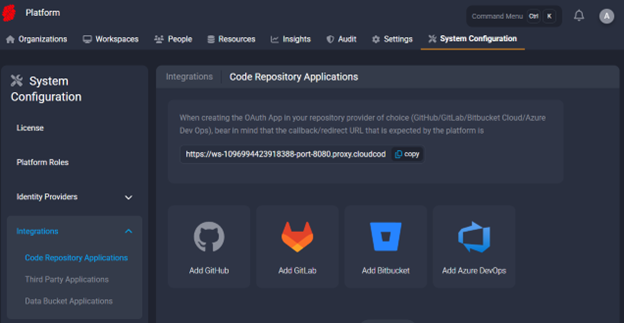
- Go to the Secure Developer Spaces platform settings and open the Code Repository Applications menu (
/platform/system_configuration/integrations/repos) - Click Add GitHub icon
- Enter the details from step 4 in the form and click Create at the bottom of the screen
Gitlab configuration
- Go to https://gitlab.com/-/user_settings/applications
- Click on New application and set the following fields:
- Name: The name you want to give to the application. It will be public.
- Redirect URI: The URL should have a structure similar to https://example.com/oauth/apps/callback, where “example.com” should be replaced with the proper domain name.
- Confidential: This should already be selected by default; leave it as it is.
- Scopes: Add the api and write_repository scopes. These are needed to automatically deploy deployment keys.
- After clicking the Save application button, you will be presented with the Client ID (called Application ID) and Secret, which you need to enter in the platform configuration.
- Go to the Secure Developer Spaces platform settings and open the Code Repository Applications menu (
/platform/system_configuration/integrations/repos) - Click Add GitLab icon
- Enter the details from step 3 in the form and click Create at the bottom of the screen
Bitbucket Configuration
- Go to the Secure Developer Spaces platform settings.
- Open the Code Repository Applications menu.
- Click Add Bitbucket. Select the checkbox for Bitbucket Server or Data Center (self-hosted).
- Set the following fields:
- Bitbucket App Name: Users see it when using this Code Repository Provider.
- Custom Domain: Enter the URL where the Bitbucket instance is hosted. If none is given, HTTPS is chosen by default.
- Enforce Users to Connect: If selected, users must connect to Bitbucket before opening their workspaces. This can prevent misconfiguration/permission issues on the user side.
- Click the Create button to complete the configuration on the Secure Developer Spaces platform.
- Save the Bitbucket Server Public Key for later use. This can also be found in the edit menu after clicking the Create button.
Configuring the Bitbucket Instance
- Go to Administration > Applications > Application Links and click Create link.
- Enter the following information in the fields: a. Application Type: External application b. Direction: Incoming
- Click Continue.
- Set a unique name.
- Redirect URL: Set to https://example.com/oauth/v1/apps/callback, where example.com should be replaced with the proper domain name.
-
Application Permissions: Set
Account: Write,Repositories: Admin. - Click Save.
- Enter strong_network for both the Client ID and Client Secret.
SSH Access Configuration
The platform optionally allows users to connect to their workspaces using SSH. Developers can securely access the remote file system of the workspace and leverage remote IDE features in applications, such as Visual Studio Code and JetBrains Gateway. This section covers the following procedures:
- Configure the NGINX Load Balancer: Forward TCP requests on port 22 to allow SSH access.
- Enable SSH Access in the Admin Platform Configuration: Adjust settings on the admin platform configuration page to enable the SSH feature.
- Utilize SSH Access: Show developers how to use the SSH feature to connect to their workspaces.
Configuring the NGINX Load Balancer
To create ConfigMap, switch to the namespace of the NGINX controller. By default, it is Nginx.
-
Run the following command:
kubectl create configmap ssh-mapping -
To edit the data field of the ConfigMap to include a mapping from the SSH port (default 22) to your release’s workspace API, run the following commands:
kubectl edit configmap ssh-mapping apiVersion: v1 data: "22": default/release-workspace-api:2222 kind: ConfigMap -
To edit the DeploymentApp of the NGINX Ingress Controller, run the following command:
kubectl edit deployments.apps ingress-nginx-controller -
Add the following line to the Arguments of the controller (under the Args header):
spec: --tcp-services-configmap=$(POD_NAMESPACE)/ssh-mapping -
To expose Port 22 in the Service of the NGINX Ingress Controller, run the following commands:
kubectl edit svc -n=nginx nginx-ingress-controller
name: ssh
  port: 22
  protocol: TCP
  targetPort: 22
TCP requests to port 22 in the load balancer are set to automatically be redirected to port 22 on the Secure Developer Spaces workspace service.
Enabling SSH Access on the Platform
- Log in to the Secure Developer Spaces platform. You must have an administrator or security officer role.
- Go to Platform Overview > Settings > Workspace Settings.
- Scroll down to the Connect Via SSH section.
- Click the toggle button to enable the feature.
Note: Ensure that the port for SSH connection matches the port exposed in the NGINX load balancer.

Creating Your First Secure Developer Spaces Workspace
To create your first Secure Developer Spaces workspace, you must create an organization and a project administrator.
Creating an Organization
- Click Add New Organization.
- Enter the following information:
- Organization Name: Name of the organization
- Owner: Any user with the right permissions to own an organization
Creating a Project Admin
- Click Add New Project.
- Enter the following information:
- Project Name: Name of the project
- Owner: Any existing user on the platform or a new user you want to onboard
Installing the Secure Developer Spaces Region
The following topics cover the procedures required to install the Secure Developer Spaces region.
Creating MongoDB Read-Only Nodes
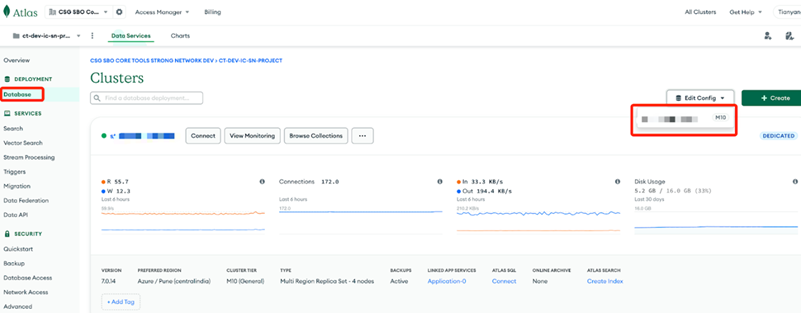
-
Navigate to the Database page and edit the database config as shown in the following image:
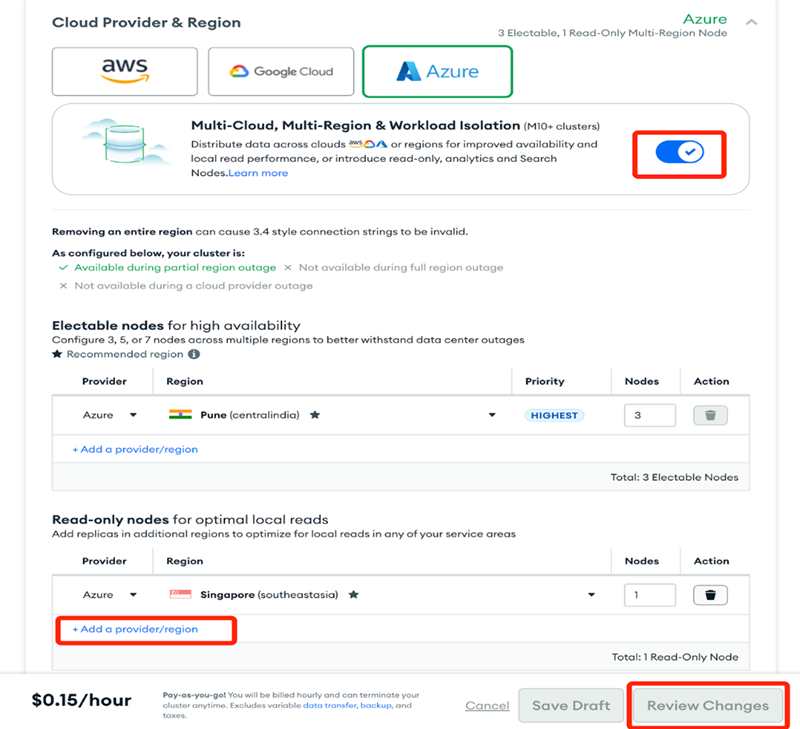
-
Enable Multi-Region and add a read-only node of the region you want to create. Then, save the change.
Creating the Kubernetes Cluster in the New Region
Perform the steps in the Creating a Managed Kubernetes Service topic, but specify the new region.
    eksctl create cluster \
     --name $MY_EKS_CLUSTER_NAME \
     --region $NEW_AWS_REGION \
     --nodegroup-name standard-nodes \
     --node-type m5.2xlarge \
     --nodes 2 \
     --nodes-min 2 \
     --nodes-max 4 \
     --managed
Configure NGINX Ingress Controller. For more information, see Preinstalling NGINX Ingress Controller.
Preparing the Helm Chart and Container Images
The regional instance uses the same set of service container images as the primary region.
- Use the same installer to pull the images. For more information, see Fetching Helm Charts and Container Images.
- Obtain the regional chart from Secure Developer Spaces support.
Creating the Helm Chart Values
To create the Helm chart values, you need a config.yml file. Here is an example of the config.yml file:
    regional:
      secretKeyReposB64: "" # Set the value same as primary region
      jwtSecret: "" # Set the value same as primary region
      regionalDomain: ""
      centralHostname: "" # primary region proxy URL
      centralService: "" # primary region URL
      externalMongodb: # The same as primary region
        hostname: ""
        auth:
          username: ""
          password: ""
Deploying the Secure Developer Spaces Region
Configure and run the following .yml file using Helm.
helm upgrade --install my_release regionchart-${SN_VERSION}.tgz -f config.yml
Upgrading the Secure Developer Spaces Platform
This section provides instructions for upgrading the Secure Developer Spaces platform to the latest version.
Pulling the New Helm Chart and Container Images
- To pull the new Helm chart and container images, perform the steps in the Preparing the Helm Chart and Container Images topic.
-
To upgrade with Helm, run the following command.
helm upgrade my_release ninjahchart-${SN_VERSION}.tgz
Note:
The service restarts during the upgrade, resetting active connections and affecting users.
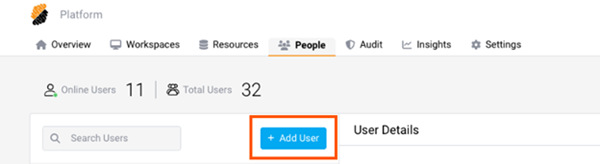
Onboarding End Users
The Secure Developer Spaces agent ensures seamless access control to source code across all working environments. Once end users are added to the workspace and assigned to project teams, they can use the environments for cloud-native and legacy Windows, Linux, and Mac development.
Creating a Workspace
In this section, you create and configure a workspace for cloud-native development using the Secure Developer Spaces platform.
-
Click Create Workspace.
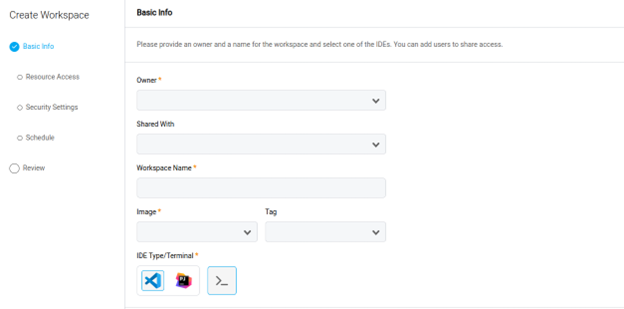
- Select and enter the following information:
- Basic Info: Name
- Embedded Cloud IDE
- User Sharing Options
- Docker Image
- Image Version
- Resource Allocation (requires Workspaces::Manage Project permission)
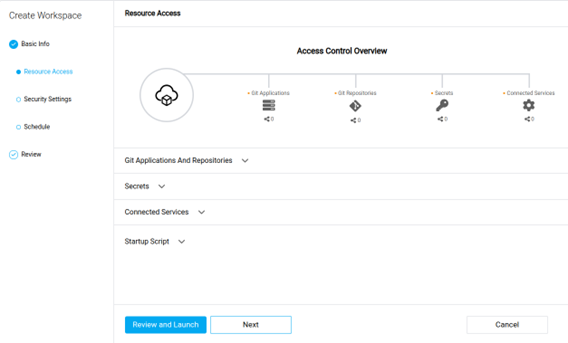
-
Attach various project resources to your workspace. Resources must have been previously added to the project, and you might need to update access rights. You can add the following resources:
- Git Applications and Repositories: Connect the entire Git applications available from your platform or single repositories that have been previously imported to the project’s or organization’s resources. Specify a default folder location within your workspace where the Git files are cloned.
- Secrets: Import secrets to the workspace as files or environment variables. Choose from existing secrets or create one.
- Connected HTTP and SSH Services: Connect services as environment variables in the workspace. Supported and available services are part of the project’s and organization’s resources and depend on the platform’s configuration.
- Startup Script: Set up a startup script to be run automatically at the workspace’s boot time. This allows you to customize the software available in the container.
- Review your Workspace configuration and open it. Your workspace is automatically deployed. You can edit its configuration from the Overview or Workspaces pages.
Accessing Your Workspace Through SSH
This topic explains how to access your workspace through SSH, allowing you to edit code directly using a local command-line editor. You must generate an SSH key pair for this process.
-
To generate an SSH Key Pair on UNIX and UNIX-like systems, run the following command in your terminal:
ssh-keygen - The terminal suggests a default path and file name (for example, /home/user_name/.ssh/id_rsa). To accept the default path and file name, press Enter. To specify a different path and file name, enter those details and press Enter.
- Option: Enter a passphrase. It is best practice to set a passphrase for additional security against unauthorized use of your private key.
-
If you set a passphrase, you are prompted to enter it again for confirmation. If you did not set a passphrase, press Enter.
The generated SSH public and private keys are saved in the specified path. The public key file name is automatically created by appending .pub to the private key file name. For example, if the private key file is named id_rsa, the public key file is id_rsa.pub.
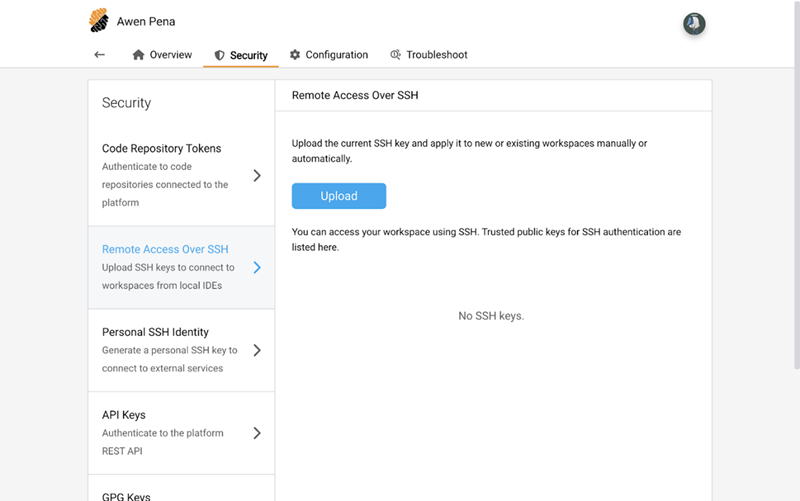
-
Upload your public key to the SSH Keys section in your profile.
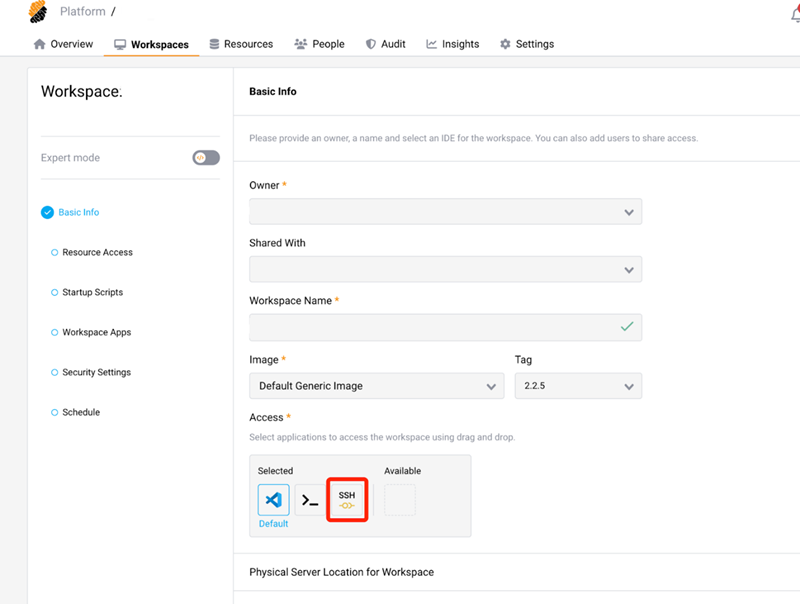
-
To enable the SSH connection to your workspace, drag the SSH access.
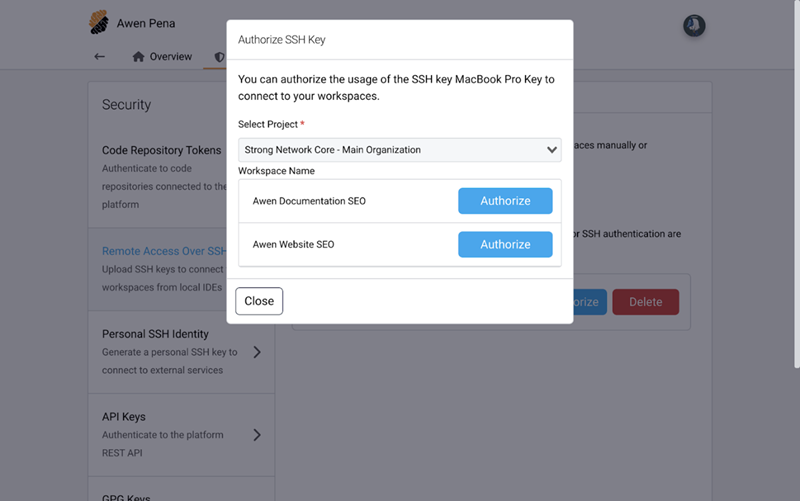
-
Authorize the workspace using your SSH key.
-
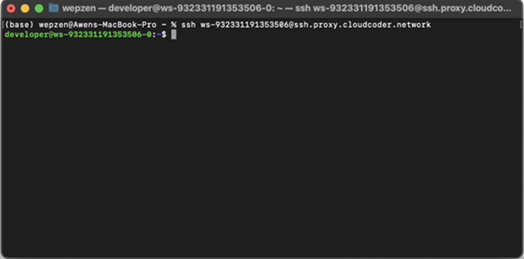
To connect to your workspace using a shell, navigate to the Running Actions List of your workspace
-
Select the Connect With SSH option. This action displays the SSH command required to establish an SSH connection to your workspace.
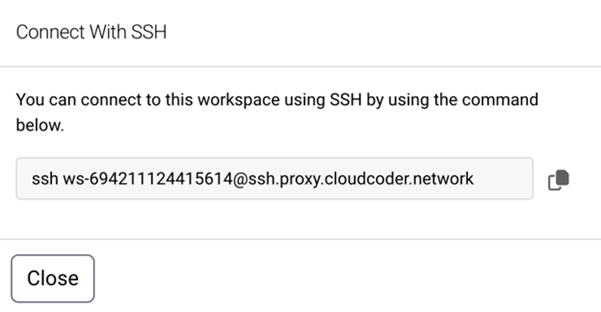
-
Enter this command in your terminal.
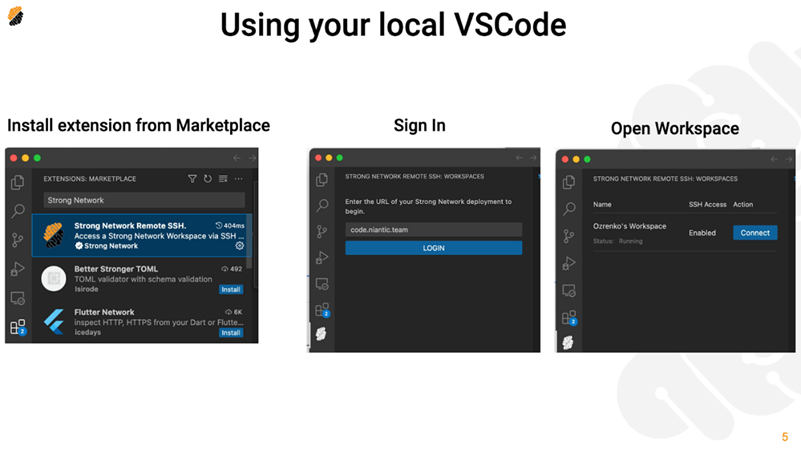
Connecting to Your Workspace Through SSH Using Visual Studio Code
- Install the Secure Developer Spaces Remote SSH extension from the marketplace.
- Sign in using the < Secure Developer Spaces URL >.
-
Open the assigned workspace to begin working in a secure environment.
Working from Windows/Linux/Mac VDA
Secure Developer Spaces supports proxy mode, using which you can install Strong Agents on existing Windows VDA, Linux VDA, and Mac VDA. In this mode, all source code access traffic is routed through the Strong Agent, which uses existing source credentials or keys. This eliminates the need for engineers to create personal SSH keys to access source code.
Note:
The following procedure applies to Windows, Linux, and the Citrix VDA for macOS.
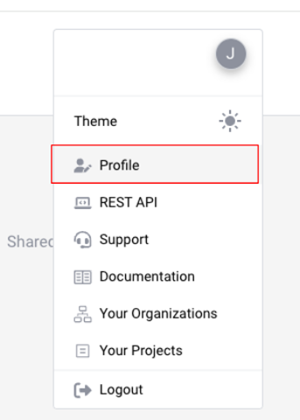
Setting up the Profile
-
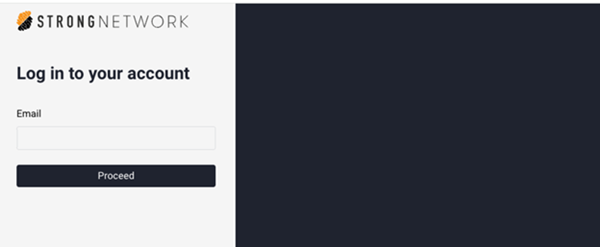
If you have not used the cloud-native environment, activate your SDS account with your company’s SDS instance URL.
-
Contact your project admin to add you to a project.
-
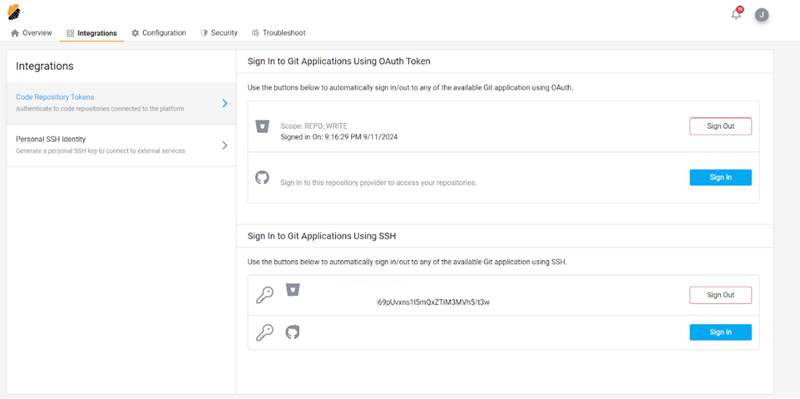
Configure your profile to set up the source code access permission.
Installing the Agent
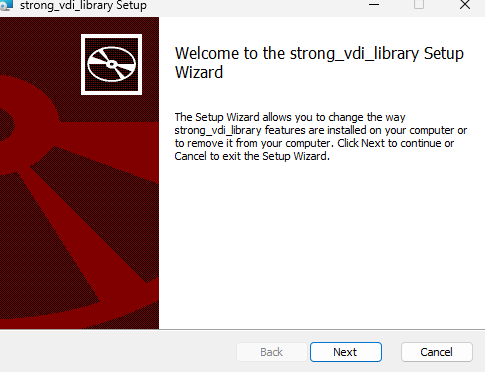
-
Install the Strong agent and run the Strong VDI library after installation.

Setting up the Configuration
-
Run the binary and enter the Secure Developer Spaces workspace URL.
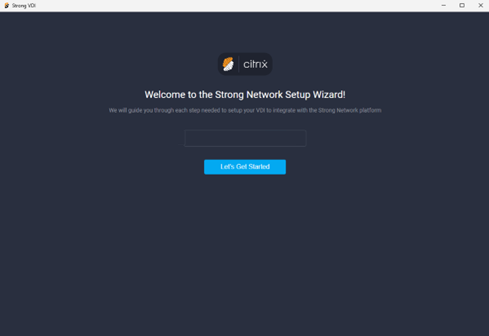
-
Click Let’s Get Started and log into your account.

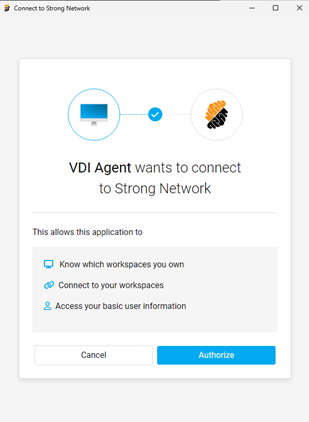
-
Authorize the connection to Secure Developer Spaces.
-
Configure the environment and complete the setup
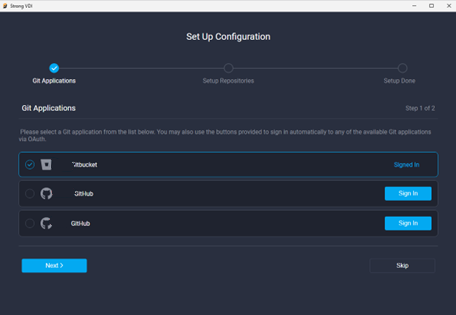
You can now use any terminal to clone your source code and use a local IDE, such as Visual Studio or Xcode, to perform your daily tasks. Secure Developer Spaces securely and centrally manages credentials in the backend. ```
In this article
- Architecture Diagram
- Prerequisites
- Preparing for the Installation
- Creating a Managed Kubernetes Service
- Creating a MongoDB Service
- Downloading Container Images and Helm Chart
- Creating Config
- Installing the Secure Developer Spaces Platform
- Configuring the Secure Developer Spaces Platform
- Configuring the Code Repository
- SSH Access Configuration
- Creating Your First Secure Developer Spaces Workspace
- Installing the Secure Developer Spaces Region
- Upgrading the Secure Developer Spaces Platform
- Onboarding End Users