What’s new in XenMobile Server 10.12
XenMobile Server 10.12 (PDF Download)
Deprecation announcements
For advanced notice of the Citrix XenMobile features that are being phased out, see Deprecation.
Prepare your Android devices for upcoming changes
These previously announced deprecations impact your Android and Android Enterprise devices:
- Device administration (DA) enrollments for Android 10:
- July 31, 2020: Citrix® deprecates new enrollments for the legacy Android device administration mode.
- November 1, 2020: Google deprecates the legacy device administration API. Android 10 devices running in the legacy device administration mode will no longer work.
- MDX encryption:
- August 1, 2020: Citrix starts enforcing migration from MDX encryption to platform encryption for Citrix mobile productivity and third-party MDX apps.
- September 1, 2020: MDX encryption reaches end of life.
For devices enrolled in legacy DA
- If you don’t use MDX encryption, no action is required.
- If you use MDX encryption, migrate Android devices to Android Enterprise before July 31, 2020. Devices running Android 10 must enroll or re-enroll using Android Enterprise. This requirement includes Android devices in MAM-only mode. See Migrate from device administration to Android Enterprise.
For devices already enrolled in Android Enterprise from July 31
- If you published the apps using the Android Enterprise platform, encryption is already handled through Android Enterprise. No action is required.
- If you published the apps using the legacy Android platform, republish the apps using Android Enterprise before July 31, 2020.
Before you upgrade to XenMobile 10.12 (on-premises)
Some systems requirements changed. For information, see System requirements and compatibility and XenMobile compatibility.
-
Update your Citrix License Server to 11.16 or later before updating to the latest version of XenMobile Server 10.12.
The latest version of XenMobile requires Citrix License Server 11.16 (minimum version).
Note:
If you want to use your own license for the Preview, know that the Customer Success Services date (previously, Subscription Advantage date) in XenMobile 10.12 is January 20, 2020. The Customer Success Services date on your Citrix license must be later than this date.
You can view the date next to the license in the License Server. If you connect the latest version of XenMobile® to an older License Server environment, the connectivity check fails and you can’t configure the License Server.
To renew the date on your license, download the latest license file from the Citrix Portal and upload the file to the Licensing Server. For more information, see Customer Success Services.
-
For a clustered environment: iOS policy and app deployments to devices running iOS 11 and later have the following requirements. If Citrix Gateway is configured for SSL persistence, you must open port 80 on all XenMobile Server nodes.
-
If the virtual machine running the XenMobile Server to be upgraded has less than 4 GB of RAM, increase the RAM to at least 4 GB. Keep in mind that the recommended minimum RAM is 8 GB for production environments.
-
Recommendation: Before you install a XenMobile update, use the functionality in your VM to take a snapshot of your system. Also, back up your system configuration database. If you experience issues during an upgrade, complete backups enable you to recover.
To upgrade
You can directly upgrade to XenMobile 10.12 from XenMobile 10.11.x or 10.10.x. To do the upgrade, download the latest binary available: Go to https://www.citrix.com/downloads. Navigate to Citrix Endpoint Management (XenMobile) > XenMobile Server > Product Software > XenMobile Server 10. On the tile for the XenMobile Server software for your hypervisor, click Download File.
To upload the upgrade, use the Release Management page in the XenMobile console. For more information, see To upgrade using the Release Management page.
After you upgrade
After you upgrade to XenMobile 10.12 (on-premises):
If functionality involving outgoing connections stop working, and you haven’t changed your connection configuration, check the XenMobile Server log for errors such as the following: “Unable to connect to the VPP Server: Host name ‘192.0.2.0’ does not match the certificate subject provided by the peer”.
The certificate validation error indicates that you need to disable host name verification on the XenMobile Server. By default, host name verification is enabled on outgoing connections except for the Microsoft PKI server. If host name verification breaks your deployment, change the server property disable.hostname.verification to true. The default value of this property is false.
Additional support for iOS 13
XenMobile Server supports devices upgraded to iOS 13. The upgrade impacts your users as follows:
-
During enrollment, a few new iOS Setup Assistant Option screens appear. Apple added a new iOS Setup Assistant Option screen to iOS 13. The new options are included in the Settings > Apple Device Enrollment Program (DEP) page in this version. You can configure XenMobile Server to skip those screens. Those pages appear to users on iOS 13 devices.
-
Some Restrictions device policy settings that were available on supervised or unsupervised devices for previous versions of iOS are available only on supervised devices for iOS 13+. The current XenMobile Server console tool tips don’t yet indicate that these settings are for supervised devices for iOS 13+ only.
- Allow hardware controls:
- FaceTime
- Installing apps
- Allow apps:
- iTunes Store
- Safari
- Safari > Autofill
- Network - Allow iCloud actions:
- iCloud documents & data
- Supervised only settings - Allow:
- Game Center > Add friends
- Game Center > Multiplayer gaming
- Media content - Allow:
- Explicit music, podcasts, and iTunes U material
- Allow hardware controls:
These restrictions apply as follows:
- If an iOS 12 (or lower) device is already enrolled in XenMobile Server and then upgrades to iOS 13, the preceding restrictions apply to unsupervised and supervised devices.
- If an unsupervised iOS 13+ device enrolls in XenMobile Server, the preceding restrictions apply only to supervised devices.
- If a supervised iOS 13+ device enrolls in XenMobile Server, the preceding restrictions apply only to supervised devices.
Apple Volume Purchase Program migration to Apple Business Manager (ABM) and Apple School Manager (ASM)
Companies and institutions using the Apple Volume Purchase Program (VPP) need to migrate to Apps and Books in the Apple Business Manager or Apple School Manager before December 1, 2019.
Before migrating VPP accounts in XenMobile, see this Apple support article.
If your organization or school only uses the Volume Purchase Program (VPP), you can enroll in ABM/ASM and then invite existing VPP Purchasers to your new ABM/ASM account. For ASM, navigate to https://school.apple.com. For ABM, navigate to https://business.apple.com.
To update your VPP account on XenMobile:
-
In the XenMobile console, click the gear icon in the upper-right corner. The Settings page appears.
-
Click iOS Settings. The Volume Purchase Program configuration page appears.
-
Make sure that your ABM or ASM account has the same app config as your previous VPP account.
-
In the ABM or ASM portal, download an updated token.
-
In the XenMobile console, do the following:
-
Edit the existing Volume Purchase account with the updated token info for that location.
-
Edit your ABM or ASM credentials. Don’t change the suffix.
-
Click Save twice.
-
For more information, see:
Support for Android Enterprise COPE devices
XenMobile Server supports Android Enterprise fully managed devices with work profiles, formerly known as COPE (corporate-owned personally enabled) devices. These devices are a type of Android Enterprise fully managed devices that also have a work profile. You can apply separate policy settings to the device and the work profile. For this release:
- You can apply separate settings to the device and the work profile using these device policies: Credentials, Passcode, and Restrictions.
- You can apply the location mode setting of the Location device policy to the COPE device itself but not to the work profile of the COPE device. Other settings in the Location device policy aren’t available for COPE devices.
- You can apply the Lock security action separately to the device or the work profile.
Device policies
For Android Enterprise fully managed devices with work profiles (COPE devices), some device policies can apply separate settings to the entire device and the work profile. In the XenMobile Server console, some device policies allow you to apply the separate settings. You can use other device policies to apply settings only to the entire device or only to the work profile of fully managed devices with work profiles.
Security actions
For Android Enterprise fully managed devices with work profiles (COPE devices), you can apply:
- The Lock security action separately to the device or the work profile.
- All other security actions to the device.
Enrollment profiles control enrollment options for Android devices
Enrollment profiles now control how Android devices are enrolled if Android Enterprise is enabled for your XenMobile deployment. Enrollment profiles determine whether Android devices are enrolled in the default Android Enterprise mode (fully managed or work profile) or in legacy (device administrator) mode.
By default, the Global enrollment profile enrolls new and factory reset Android Enterprise devices as fully managed devices and enrolls BYOD Android Enterprise devices as work profile devices. For more information, see Android Enterprise.
Preparing legacy Android devices for Android Enterprise as default enrollment
Google is deprecating the device administrator mode of device management and encouraging customers to manage all Android devices in device owner mode or profile owner mode. (See Device admin deprecation in the Google Android Enterprise developer guides.) To support this change, Android Enterprise is now the default enrollment option for Android devices.
This change means that if Android Enterprise is enabled for your XenMobile deployment, all newly enrolled or re-enrolled Android devices are enrolled as Android Enterprise devices.
To prepare for this change, XenMobile now allows you to create enrollment profiles that control how Android devices are enrolled.
Your organization might not be ready to begin managing legacy Android devices in device owner mode or profile owner mode. In that case, you can continue to manage them in device administrator mode. Create an enrollment profile for legacy devices and re-enroll all enrolled legacy devices.
To create an enrollment profile for legacy devices:
-
In the XenMobile console, go to Configure > Enrollment Profiles.
-
To add an enrollment profile, click Add. In the Enrollment Info page, type a name for the enrollment profile.
-
Click Next or select Android Enterprise under Platforms. The Enrollment Configuration page appears.
-
Set Management to Legacy (device administration). Click Next or Select Assignment (options). The Delivery Group Assignment screen appears.
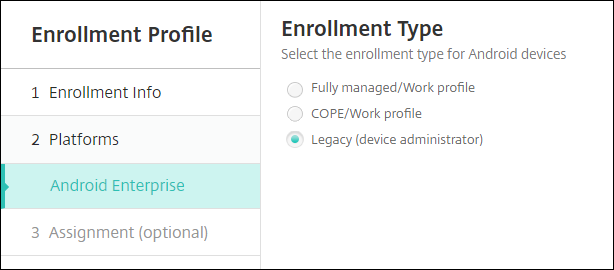
-
Choose the delivery group or delivery groups that have the administrators who enroll the dedicated devices. Then click Save.
To continue managing a legacy device in device administrator mode, enroll or re-enroll them using this profile. You enroll device administrator devices similar to work profile devices, by having users download the Secure Hub and providing an enrollment server URL.
For more information about Endpoint Management support for the transition to Android Enterprise, see the blog, Android Enterprise as default for Citrix Endpoint Management service.
Simplified app management for Android Enterprise
You no longer must go to managed Google Play or the Google Developer portal to approve or publish apps for the XenMobile Server. As a result, app approval and publishing take about 10 minutes rather than hours.
Approve Android Enterprise apps for the Public App Store in the XenMobile Server console. You can now approve managed Google Play store apps without leaving the XenMobile Server console. After you enter an app name in the search field, the managed Google Play store UI opens with the instructions for you to approve and save the app. Your app then populates in the results allowing you to configure its details. See Add a public app store app.
Add MDX apps for Android Enterprise. The XenMobile Server console now supports Android Enterprise as a platform for MDX app deployment. See Add an MDX app.
Approve MDX apps for Android Enterprise in the XenMobile Server console. You can now approve managed Google Play store apps for Android Enterprise without leaving the XenMobile Server console. After you upload an MDX file, the managed Google Play store UI opens with the instructions for you to approve and save the app. See Add an MDX app.
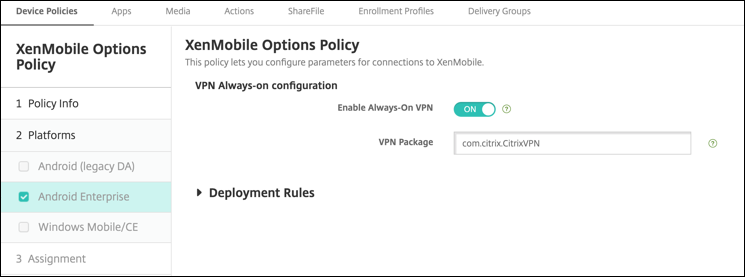
Support for Always-On VPN for Android Enterprise
The XenMobile Server options device policy now lets you enable Always-On VPN for Android Enterprise.
When you configure VPN profiles for Android Enterprise, in the Default VPN profile, type the name of the VPN profile. XenMobile uses this profile when users tap the connect switch in the user interface of the Citrix SSO app instead of tapping a specific profile. If this field is left empty, the main profile is used for the connection. If only one profile is configured, it is marked as the default profile. For an always-on VPN, this field must be set to the name of the VPN profile to be used for establishing an always-on VPN.
Configure the product track for your Android Enterprise apps
When adding a public store app or an MDX app for Android Enterprise, configure the product track you want to push to user devices. For example, if you have a track designed for testing, you can select and assign it to a specific delivery group. To learn more about rolling out your release, see the Google Play Help Center. For information on configuring the product track, see Add an MDX app or Add a public app store app.
Force a passcode reset for macOS users
When a macOS device receives a configuration profile with a passcode policy, users must provide a passcode that meets the policy settings. You can now force a passcode reset the next time that a user authenticates. In the Passcode device policy for macOS (10.13 and later), enable the new setting Force passcode reset. For more information about the policy, see Passcode device policy.
In this article
- Deprecation announcements
- Prepare your Android devices for upcoming changes
- Before you upgrade to XenMobile 10.12 (on-premises)
- To upgrade
- After you upgrade
- Additional support for iOS 13
- Apple Volume Purchase Program migration to Apple Business Manager (ABM) and Apple School Manager (ASM)
- Enrollment profiles control enrollment options for Android devices
- Simplified app management for Android Enterprise
- Support for Always-On VPN for Android Enterprise
- Configure the product track for your Android Enterprise apps
- Force a passcode reset for macOS users