Deploy resources
Device configuration and management typically involve creating resources (policies, apps, and media) and actions in the Citrix Endpoint Management console and then packaging them using delivery groups. Delivery groups define categories of users so you can deploy specified policies, apps, media, and actions to their devices. Using the Citrix Endpoint Management console, you can:
- Add, manage, and deploy delivery groups.
-
Change the order in which Citrix Endpoint Management pushes resources and actions in a delivery group to devices. This order is called the deployment order.
You can specify deployment order in the Citrix Endpoint Management console. However, when a user is in multiple delivery groups that have duplicate or conflicting policies, Citrix Endpoint Management determines deployment order. See Calculation steps.
About delivery groups
Inclusion in a delivery group is typically based on user characteristics, such as company, country, department, office address, and title. Delivery groups give you greater control over who gets which resources and when they get them. You can deploy a delivery group to all users or to a defined group of users.
Installing and configuring Citrix Endpoint Management creates the default delivery group, AllUsers. This group has all local and Active Directory users. You can’t delete the AllUsers group, but you can disable it when you don’t want to push resources to all users. For details, see Enable and disable the AllUsers delivery group.
When you deploy a resource to a delivery group, you send a push notification to all users in the delivery group. For Apple devices, use the Apple Push Notification service (APNs) to send notifications. For more information see APNs certificates). For Android devices, use Firebase Cloud Messaging (FCM). For more information, see Firebase Cloud Messaging. For Windows devices, use the Windows Push Notification Service (WNS).
About deploying resources
When you work on pushing resources to devices, consider:
- Deployment order: Deployment order is the sequence in which Citrix Endpoint Management pushes resources (policies, apps, and media) and actions to a device. The deployment order applies to devices in a delivery group with an enrollment profile configured for device management (MDM) or for a combination of application management (MAM) and MDM.
-
Deployment rules: Citrix Endpoint Management uses deployment rules that you specify for user and device properties to filter policies, apps, media, actions, and delivery groups. For example, a deployment rule might specify to push the deployment package when a domain name matches a particular value.
Within a delivery group, you can specify a subset of users and devices that receive the resources based on their user and device properties. User and device property filtering within a delivery group takes precedence over deployment rules set on the resource.
- Deployment schedule: Citrix Endpoint Management uses the deployment schedule that you specify for policies, apps, media, and actions to control deployment of those items. You can specify that a deployment occurs now, on a set date and time, or when deployment conditions are met. You specify the schedule when you create the rule. See Configure deployment rules.
Before adding delivery groups, consider how deployment order, rules, and schedule relate to your deployment goals.
Deployment order
Deployment order is the sequence in which Citrix Endpoint Management pushes resources to devices. Deployment order is important when there are prerequisites for resources and dependencies between resources. Resources include policies, apps, actions, and delivery groups.
For example, if you’re pushing out a Wi-Fi policy that has certificate-based authentication, you must push the certification policy out before the Wi-Fi policy. Else, errors occur. Conversely, for some policies (such as Terms and Conditions, software inventory, and actions), deployment order doesn’t matter.
When you add a delivery group, you can specify the order in which resources are deployed to devices. However, Citrix Endpoint Management always identifies each situation in which a user is in multiple delivery groups that have duplicate or conflicting policies. In these cases, Citrix Endpoint Management calculates a deployment order both for the objects that it delivers to a device and for the actions it performs.
When determining deployment order, Citrix Endpoint Management applies filters and control criteria, such as deployment rules and deployment schedule, to resources. The following table shows which of these criteria you can apply to each type of resource.
| Resource | Device platform | Deployment rules | Deployment schedule | User/groups |
|---|---|---|---|---|
| Device policy | Y | Y | Y | - |
| App | Y | Y | Y | - |
| Media | Y | Y | Y | - |
| Action | - | Y | Y | - |
| Delivery group | - | Y | - | Y |
Calculation steps
When Citrix Endpoint Management needs to calculate deployment order, it does these steps.
Note:
The device platform doesn’t affect the calculation steps.
-
Determine all the delivery groups for a specific user, based on the filters of users, groups, and deployment rules.
-
Create an ordered list of all resources (policies, apps, media, and actions) in the selected delivery groups. The list is based on the filters of device platform, deployment rules, and deployment schedule. The ordering algorithm is as follows:
-
Place resources from delivery groups that have an admin-defined deployment order ahead of resources from delivery groups without one. For details, see Example of calculation with user-defined order.
-
As a tie-breaker among delivery groups, order resources from delivery groups in reverse alphabetical order by delivery group name. For example, Citrix Endpoint Management places resources from delivery group B ahead of resources from delivery group A.
-
While sorting, if an admin-defined deployment order is specified for the resources of a delivery group, maintain that order. Otherwise, sort the resources within that delivery group alphabetically by resource name.
-
If the same resource appears more than once, remove the duplicate resource. Deliver only the first of these resources.
-
Resources associated with an admin-defined order deploy before resources without an admin-defined order.
Example of calculation with admin-defined order
Suppose that you have two delivery groups:
- Delivery group Account Managers 1: With unspecified order for resources. Has the policies Network and Passcode.
- Delivery group Account Managers 2: With specified order for resources. Has the policies Connection scheduling, Restrictions, Passcode, and Network, in order.
If the calculation algorithm ordered deployment groups only by name, Citrix Endpoint Management might deploy in this order, starting with the delivery group Account Managers 1: Network, Passcode, Connection scheduling, and Restrictions. Citrix Endpoint Management might ignore Passcode and Network, both duplicates, from the Account Managers 2 delivery group.
However, the Account Managers 2 group has an admin-specified deployment order. So the calculation algorithm places resources from the Account Managers 2 delivery group higher in the list than the resources from the Account Managers 1 delivery group. As a result, Citrix Endpoint Management deploys the policies in this order: Connection scheduling, Restrictions, Passcode, and Network. Citrix Endpoint Management ignores the policies Network and Passcode from the Account Managers 1 delivery group, because they’re duplicates. The algorithm respects the order specified by the Citrix Endpoint Management administrator.
Configure deployment rules
Configure deployment rules to deliver resources when specific conditions are met. You can configure base or advanced deployment rules.
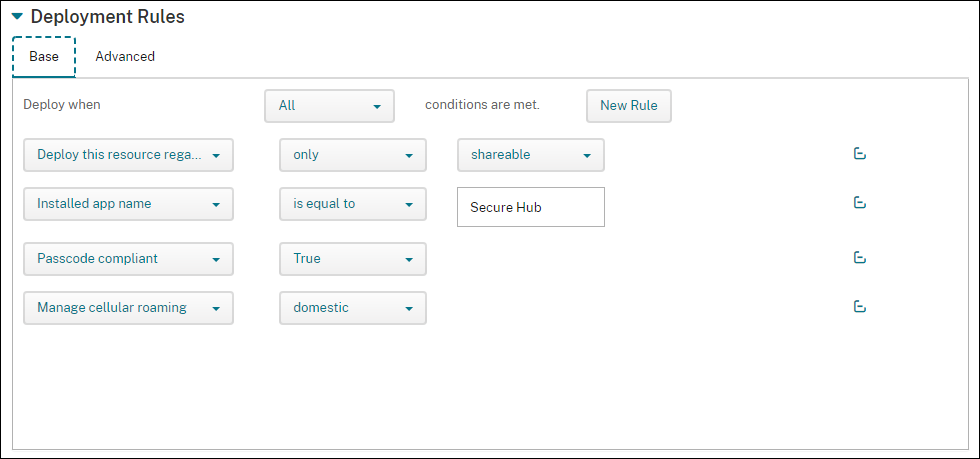
When adding a deployment rule using the base editor, first select when to deploy the resource.
- All: Deliver the resource when the user or device meets all the conditions you configure.
- Any: Deliver the resource when the user or device meets at least one of the conditions you configure.
Click New Rule to choose a rule from a list of available rules to add. The available rules vary based on the resource being deployed and the platform for which you configure the resource. Within each rule are conditions.
You can specify to deploy the resource:
- Only when the selected property exists or except when the selected property exists.
- When the property matches the text you type exactly, the property has the text you type, or the property doesn’t match the text you type.
- When the device or user is compliant with the property you select or isn’t compliant with the property you select.
- When the device or user properties match a condition you select from a predefined list.
Use the advanced editor to create more complex deployment rules. You can choose from more rules and you can combine different Boolean logic operators when creating an advanced rule.

Work with delivery groups
You can work with delivery groups in the following ways:
- Add a delivery group
- Deploy to delivery groups
- Delete a delivery group
- Edit a delivery group
- Enable and disable the AllUsers delivery group.
Add a delivery group
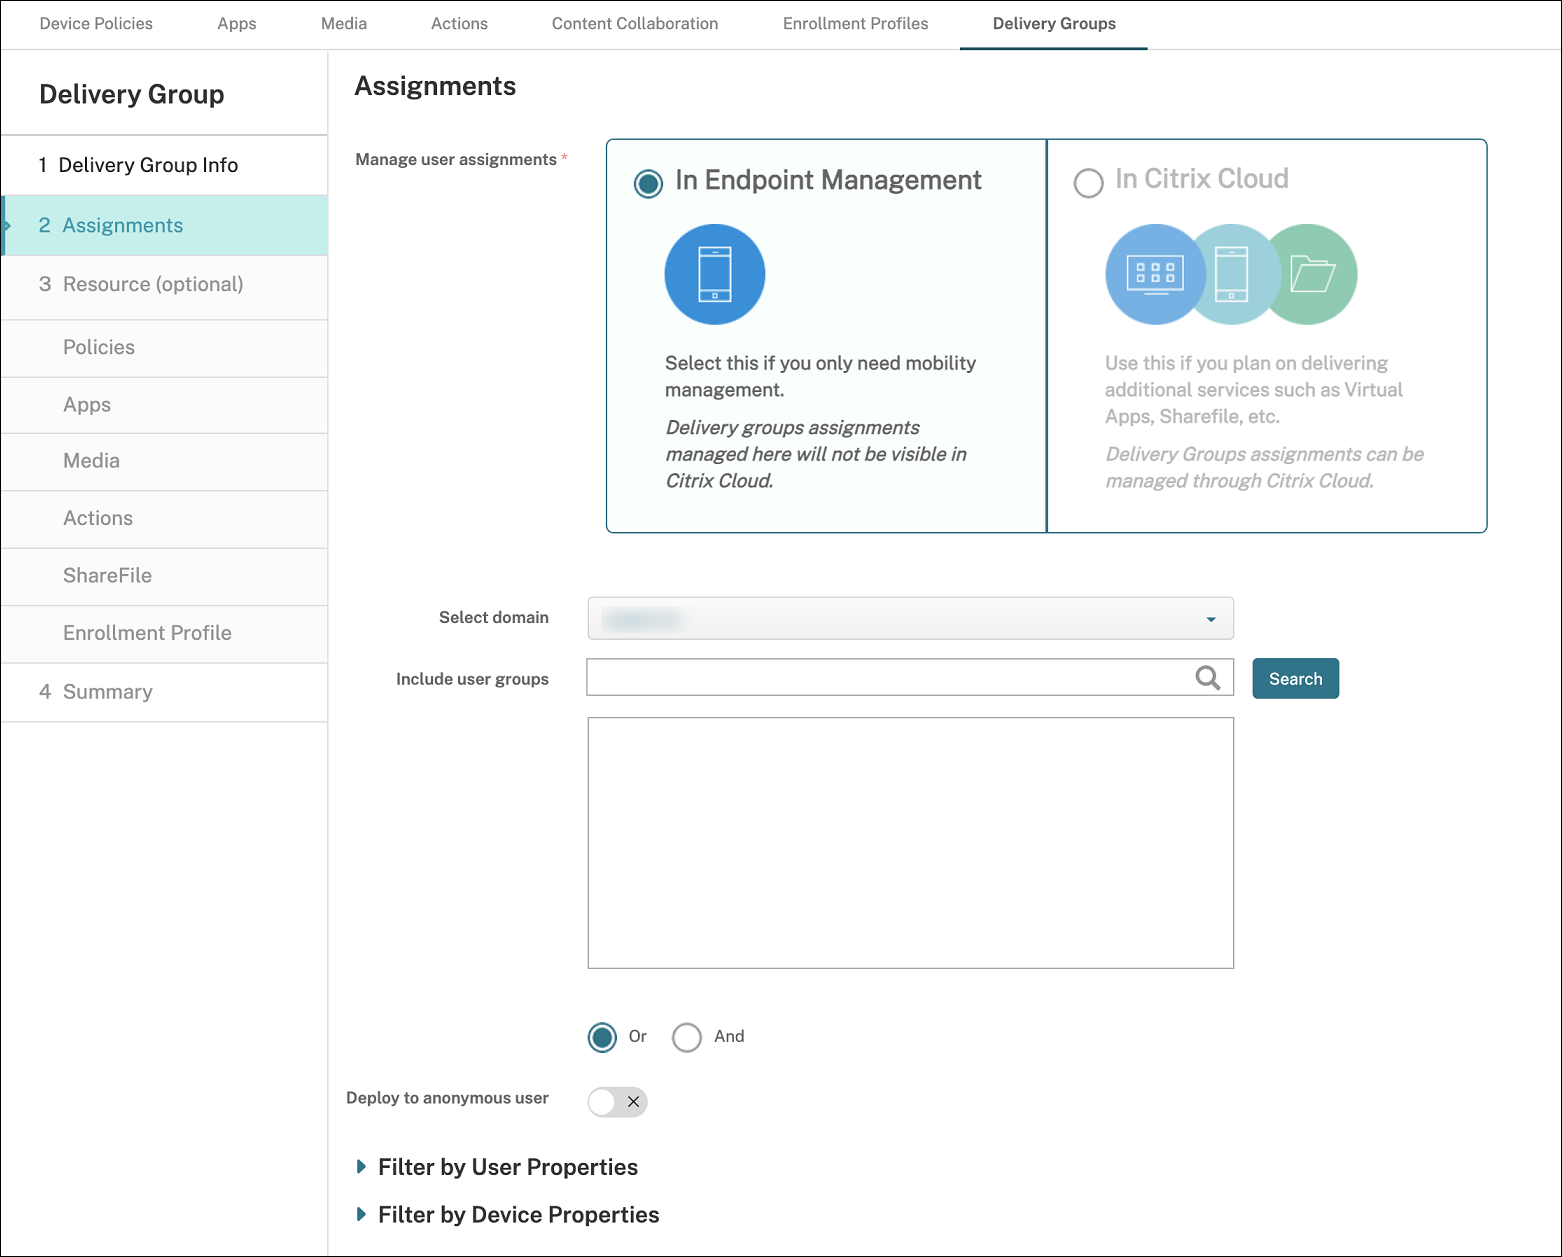
When you create a delivery group, you specify whether the user assignments are managed in Citrix Endpoint Management or in Citrix Cloud. You can’t change this specification after you create the delivery group.
If you plan to use the delivery group to deliver other Citrix Cloud services, specify to manage the user assignments in Citrix Cloud. Other Citrix Cloud services include Citrix Virtual Apps and Desktops, ShareFile, or Secure Browser Service. You can add Active Directory users only to delivery groups managed in Citrix Cloud.
If you need only mobility management for a delivery group of users and apps, set Manage user assignments to In Citrix Endpoint Management. You can’t see delivery groups with users managed in Citrix Endpoint Management in Citrix Cloud. So you can’t use delivery groups managed in Citrix Endpoint Management to deliver other services.
Note:
We recommend adding delivery groups before creating device policies and enrollment profiles. For information on creating them, see Device policies and Enrollment profiles.
-
In the Citrix Endpoint Management console, click Configure > Delivery Groups.
-
From the Delivery Groups page, click Add.
-
In the Delivery Group Information page, type a name and description for the delivery group and then click Next.
-
On the Assignments page, specify how to manage the delivery group assignments.
-
Manage user assignments:
- In Citrix Endpoint Management: Select this option if you plan to create a delivery group for users and apps that need only mobility management. You can’t see delivery groups whose user assignments are managed in Citrix Endpoint Management in Citrix Cloud and you can’t use them to deliver other services.
- In Citrix Cloud: Select this option if you plan to use the delivery group to deliver other services. Those services might include Citrix Virtual Apps and Desktops or ShareFile.
-
Manage user assignments:
-
Add users to the delivery group.
Important:
You can’t change the Manage user assignments setting after creating the delivery group.
- Select domain: From the list, select the domain from which to choose users.
-
Include user groups: Do one of the following:
- In the list of user groups, click the groups you want to add. The selected groups appear in the Selected user groups list.
- Click Search to see a list of all user groups in the selected domain. You can also type a full or partial group name in the search box and then click Search to narrow your search.
To remove a user group from the Selected user groups list, do one of the following:
- In the Selected user groups list, click the X next to each group you want to remove.
- Click Search to see a list of all user groups in the selected domain. Or, type a full or partial group name before you click Search to narrow your search. Clear the checkbox of each group that you want to remove.
- Or/And: Select whether users are in any group (Or) or whether they must be in all groups (And) for the resource to be deployed to them.
- Deploy to anonymous user: Select whether to deploy to unauthenticated users in the delivery group. Unauthenticated users are users that you can’t authenticate but you allowed their devices to connect to Citrix Endpoint Management anyway.
- Expand Filter by User Properties or Filter by Device Properties to specify how the delivery group manages resources.
- If you choose Filter by Device Properties, expand the device platform to configure the deployment rules:
- Device Properties - Android (see Create a rule to deploy resources to Android devices)
- Device Properties - iOS
- Device Properties - Windows Desktop/Tablet only
- The Base tab appears by default. Under the Base tab, specify when to deploy the policy. You can choose to deploy the policy when All conditions are met or when Any conditions are met. The default option is set as All.
- Click New Rule to define the conditions.
- In the lists, choose the conditions. For example, select Device ownership and BYOD.
- Click New Rule for each condition that you want to add.
- Click the Advanced tab to combine the rules with Boolean options. The conditions you chose on the Base tab appear.
- Click AND, OR, or NOT, and then click New Rule.
-
In the lists, choose the conditions to add to the rule and then click the plus sign (+) on the right side.
At any time, you can click to select a condition and then click Edit to change the condition or Delete to remove the condition.
- If you choose Filter by Device Properties, expand the device platform to configure the deployment rules:
- Click Next to go to the Policies page. You optionally add policies, apps, media, or actions for the delivery group here. For details, see:
- When you’re satisfied with your delivery group, click Summary to see a summary of the configuration.
- Click Save. The new delivery group appears on the Delivery Groups page.
Add policies to a delivery group
- From the Resources (optional) list, click Policies.
-
For each policy you want to add, do the following:
- Scroll through the list of available policies to find the policy you want to add. Or, type a full or partial policy name in the search box, and then click Search.
- Drag the policy that you want to add into the box on the right.
To remove a policy from the box, click the X next to the policy name.
- Click Next to go to the Apps page.
Add apps to a delivery group
-
For each app you want to add, do the following:
- Scroll through the list of available apps to find the app you want to add. Or, type a full or partial app name in the search box, and then click Search.
- Drag the app into either the Required Apps box or the Optional Apps box.
For apps marked as required, users can promptly receive updates in situations such as when:
- You upload a new app and mark that it is required.
- You mark an existing app required.
- A user deletes a required app.
- A Citrix Secure Hub update is available.
For information about forced deployment of required apps, including how to enable the feature, see About required and optional apps.
To remove an app from the box, click the X next to the app name.
-
Click Next to go to the Media page.
Add media to a delivery group
-
For each book you want to add, do the following:
- Scroll through the list of available books to find the book you want to add. Or, type a full or partial book name in the search box, and then click Search.
- Drag the book that you want to add into the Required Books box.
For books marked as required, users promptly receive updates in situations such as when:
- You upload a new book and mark that it is required.
- You mark an existing book required.
- A user deletes a required book.
- A Citrix Secure Hub update is available.
To remove a book from the box, click the X next to the book name.
-
Click Next to go to the Actions page.
Add actions to a delivery group
-
For each action you want to add, do the following:
- Scroll through the list of available actions to find the action you want to add. Or, type a full or partial action name in the search box, and then click Search.
- Drag the action that you want to add into the box on the right.
To remove an action from the box, click the X next to the action name.
-
Click Next to go to the ShareFile page.
Apply the ShareFile configuration
The ShareFile page differs depending on whether you configured Citrix Endpoint Management (Configure > ShareFile) for Enterprise accounts or for storage zone connectors.
-
If you configured Enterprise accounts for use with Citrix Endpoint Management, set Enable ShareFile to On. This setting provides the delivery group single sign-on access to ShareFile content and data.
-
If you configured storage zone connectors for use with Citrix Endpoint Management, drag the storage zone connectors to include in the delivery group to the box on the right.
Review configured options and change deployment order
On the Summary page, you can review the options you’ve configured for the delivery group and change the deployment order of resources. The Summary page shows your resources by category. The Summary page doesn’t show the deployment order.
Note:
Click Back to return to previous pages change the configuration.
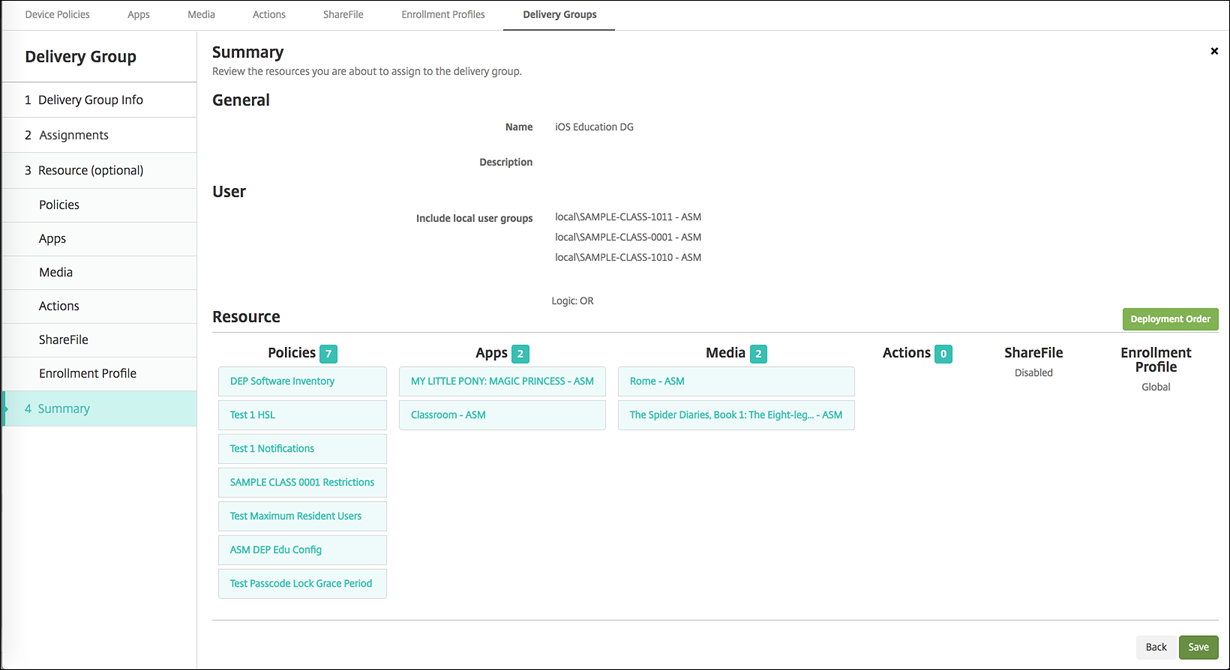
To view or change the deployment order:
-
Click Deployment Order.
-
In the Deployment Order dialog box, drag a resource to the place in the order where you want to deploy it. The resources deploy in top-to-bottom order.
-
Click Save to save the deployment order.
When you have finished configuring the delivery group, on the Summary page, click Save.
Create a rule to deploy resources to Android Enterprise
You can manage the deployment of a delivery group to Android Enterprise devices by using the Android device property rules. If you enroll multiple devices to the same user, you can create advanced filters for Android Enterprise based on device enrollment mode or the device application package ID.
To deploy a delivery group to Android Enterprise devices by using device enrollment mode:
- Create a delivery group.
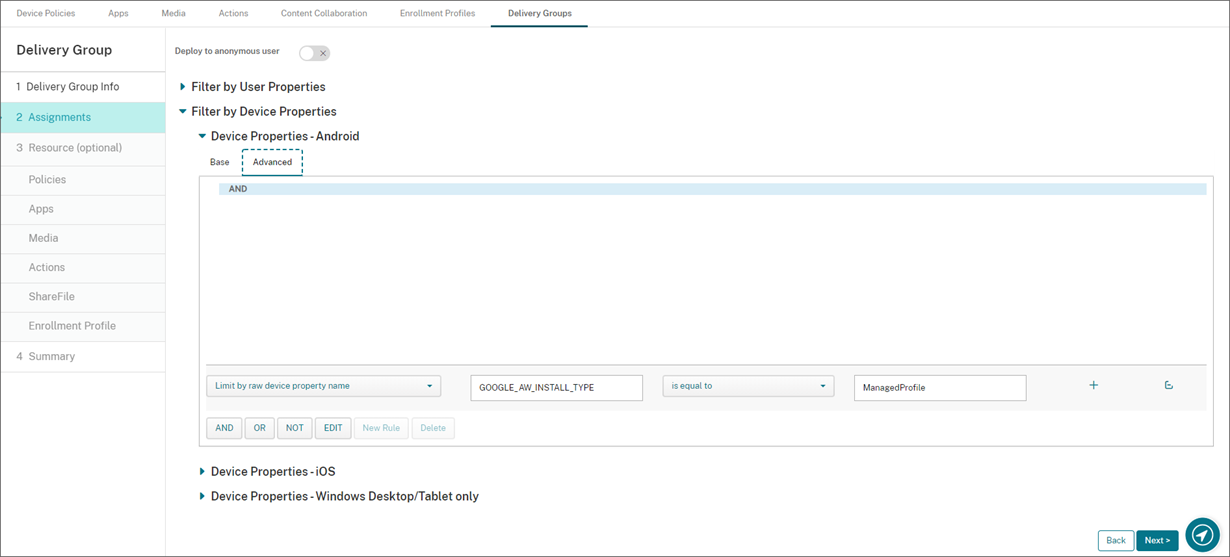
- On the Assignments page, expand Filter by Device Properties.
- In Device Properties – Android, open the Advanced tab and click New rule.
- In the list, choose the condition to add to the rule:
- For new Android Enterprise devices, choose Limit by raw device property name and type GOOGLE_AW_INSTALL_TYPE in the first value field. Then you must set the condition to equal one of the enrollment modes.
- For existing Android Enterprise devices, choose Limit by known device property name and select Android Enterprise install type in the first value field. Then you must set the condition to equal one of the enrollment modes.
- In the second field, type an enrollment mode for your Android Enterprise devices:
- DeviceAdministrator: Specifies company-owned devices intended only for work use (also known as device owner mode)
- ManagedProfile: Specifies BYOD—personal devices enrolled with work Profile Management (also known as profile-owner mode)
- CorporateOwnedSingleUse: Specifies dedicated devices (formerly known as corporate-owned, single-use devices)
- CorporateOwnedPersonallyEnabled: Specifies fully managed devices with a work profile (formerly known as corporate-owned, personally enabled devices)
-
Finish configuring the delivery group as described Add a delivery group.
For more information, see Device deployment scenarios and profiles.
To deploy a delivery group to Android Enterprise devices by using the device application package ID:
- In Device Properties – Android, open the Advanced tab and click New rule.
- In the list, choose Installed app name and enter the application package ID.
Edit a delivery group
You can’t change the name of an existing delivery group. To update other settings, go to Configure > Delivery Groups, select the group you want to edit, and then click Edit.
Enable and disable the AllUsers delivery group
AllUsers is the only delivery group that you can enable or disable. You cannot delete AllUsers as you can other delivery groups.
From the Delivery Groups page, choose the AllUsers delivery group by selecting the checkbox next to AllUsers or by clicking in the line containing AllUsers. Then do one of the following:
- Click Disable to disable the AllUsers delivery group. This command is available only if the AllUsers group is enabled (the default). Disabled appears under the Disabled heading in the delivery group table.
- Click Enable to enable the AllUsers delivery group. This command is available only if the AllUsers group is disabled. Disabled no longer appears under the Disabled heading in the delivery group table.
Deploy to delivery groups
Deploying to a delivery group means to send a push notification to all users with Apple, Android, and Windows tablet devices.
For users with other platform devices, if those devices are already connected to Citrix Endpoint Management, they receive the resources immediately. Otherwise, based on their scheduling policy, they receive the resources the next time that they connect.
For updated apps to appear in the Updated Available list in the app store on Android devices, first deploy an App Inventory policy to the user devices.
-
On the Delivery Groups page, do one of the following:
- To deploy to more than one delivery group at a time, select the checkboxes next to the groups you want to deploy.
- To deploy to a single delivery group, either select the checkbox next to its name or click the line containing its name.
-
Click Deploy.
Depending on how you select a single delivery group, the Deploy command appears over or to the right of the delivery group.
Verify that the groups you want to deploy apps, policies, and actions to are listed. Then click Deploy. The apps, policies, and actions are deployed to the selected groups based on device platform and scheduling policy.
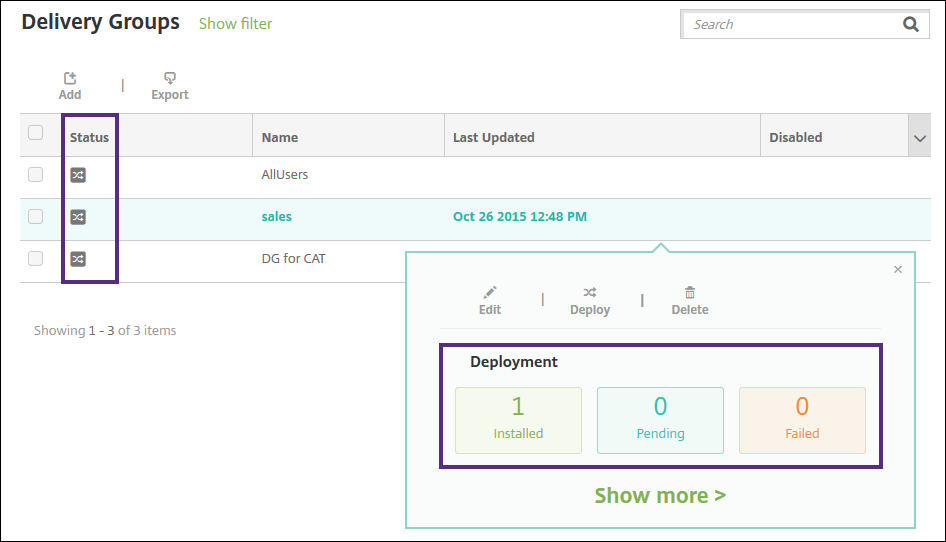
You can check deployment status on the Delivery Groups page in one of these ways:
- Look at the deployment icon under the Status heading for the delivery group, which indicates any deployment failure.
- Click the line that has the delivery group to display an overlay that shows Installed, Pending, and Failed deployments.
Clone a delivery group
Clone a delivery group when you want to create a delivery group that is similar to an existing one. Use the clone as the starting point for your new delivery group. Then make your changes to the clone, such as adding enrollment profiles or new sets of AD users.
- In the Citrix Endpoint Management console, click Configure and then select the Delivery Groups tab.
- From the list of delivery groups, select the one you want to use as the basis for the new group.
- Select Clone.
- In the Clone a Delivery Group dialog box, enter the name of the new group and, optionally, a description.
- Select Clone.
Delete delivery groups
You can’t delete the AllUsers delivery group, but you can disable it when you don’t want to push resources to all users. See Enable and disable the AllUsers delivery group.
Important:
You cannot undo a delete.
-
On the Delivery Groups page, do one of the following:
- To delete more than one delivery group at a time, select the checkboxes next to the groups you want to delete.
- To delete a single delivery group, either select the checkbox next to its name or click the line containing its name.
-
Click Delete.
Depending on how you select a single delivery group, the Delete command appears over or to the right of the delivery group.
-
In the Delete dialog box, click Delete.
Export the Delivery Groups table
-
Click Export above the Delivery Groups table. Citrix Endpoint Management extracts the information in the Delivery Groups table and converts it to a .csv file.
-
Open or save the .csv file by following the usual steps for your browser.