Manage certificates in the Secure Private Access console
The Secure Private Access certificate store provides a centralized location for admins to efficiently manage both Certificate Authority (CA) and Secure Sockets Layer (SSL) certificates. This dedicated store simplifies certificate management by enabling administrators to seamlessly add new certificates, modify existing ones, and remove those that are no longer required.
Previously, Secure Private Access certificates were stored in the NetScaler® Console’s certificate store. With the dedicated Secure Private Access certificate store, certificates managed within the NetScaler Console are no longer automatically synchronized or accessible for use within Secure Private Access. Administrators must directly upload the necessary certificates into the Secure Private Access console.
The certificates used in Secure Private Access are organized into two tabs within the Certificates page.
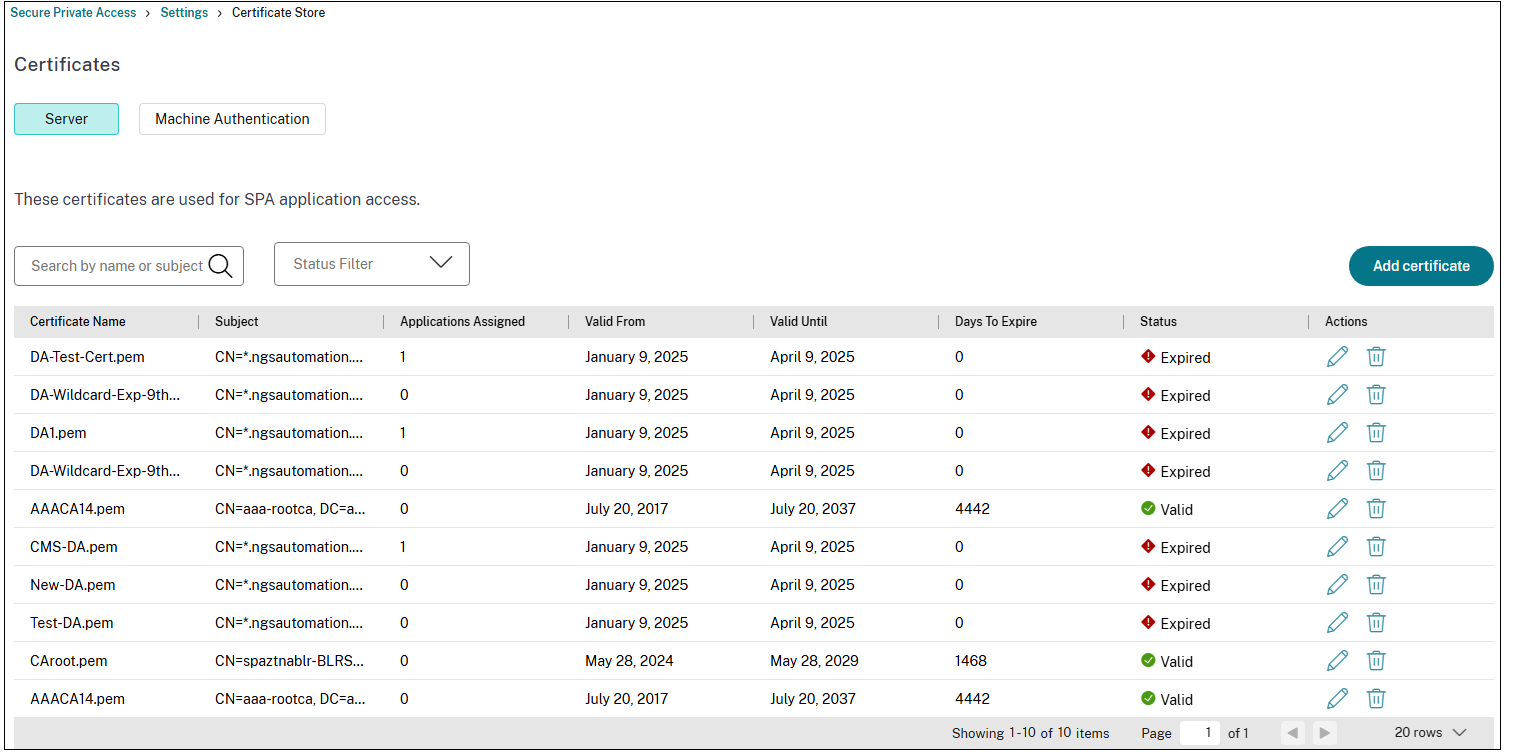
- Server - Contains the list of certificates, primarily SSL server certificates related to the direct access (agentless access) operations.
-
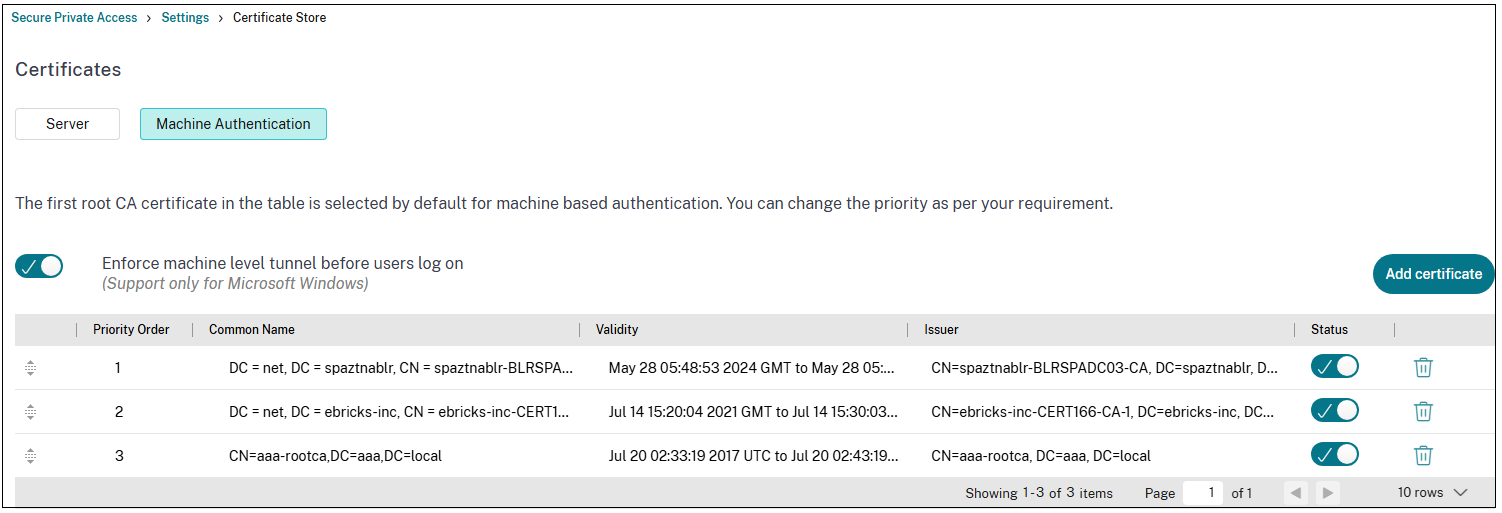
Machine authentication - Contains the list of certificates related to managing machine tunnels initiated from the Citrix Secure Access™ client. These certificates are used when an administrator logs into the Citrix Secure Access client.
Machine authentication certificates are essential for the Always On feature, utilizing Device Certificates issued by trusted Certificate Authorities (CAs). These CA certificates are securely uploaded and managed within the Machine authentication tab (Settings > Certificate Store), ensuring seamless and robust device authentication for the Always On functionality.
Manage machine authentication certificates
Add a certificate
Steps to add a machine authentication certificate.
-
Navigate to Settings > Certificate Store.
Note:
We recommend that you use the Machine Based Authentication option found under Settings > Certificate Store instead of Settings > Machine Based Authentication. The option Settings > Machine Based Authentication is scheduled for removal in the upcoming service release.
- Click the Machine authentication tab and then click Add certificate.
- In Name, enter a name for the certificate.
-
In Certificate file, browse to your local drive and upload the certificate file.
- Certificates for both root CA and intermediate CA are supported.
- The certificates to be uploaded must be in the PEM format and include the whole chain. The certificate must be generated starting from the intermediate certificate all the way to the root CA.
- Click Save.
The certificate is added to the list of available certificates in the Machine authentication tab.
Disable a certificate
You can disable the certificate that is no longer used by sliding the toggle switch OFF in the Status column.
Delete a certificate
- Click the delete icon to delete a certificate.
Set priority for the certificate
If multiple certificates are used for the same machine, you can change the priority of the certificates by using the up-down drag icon in the Priority Order column.
Manage SSL certificates
Add a certificate
Steps to add an SSL certificate.
- Navigate to Settings > Certificate Store.
- Click the Server tab.
- Enter a name for the certificate.
-
In Certificate file, browse to your local drive and upload the certificate file.
- Certificates for both root CA and intermediate CA are supported.
- The certificates to be uploaded must be in the PEM format and include the whole chain. The certificate must be generated starting from the intermediate certificate all the way to the root CA.
- Password (Optional) - Applicable for PFX certificates. If you have an encrypted RSA private key, type the RSA passphrase that was used to encrypt the private key.
- Click Save.
Note:
- The certificate is added to the list of available certificates under the Server tab.
- The Applications assigned column displays the number of applications for which a certificate is assigned.
Search for a certificate
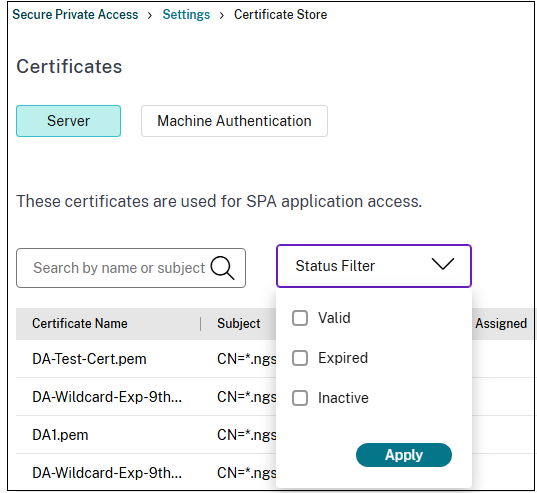
You can search for an SSL certificate by the certificate name or the subject. You can also search for certificates based on the status of the certificate.
Modify a certificate
Steps to modify an SSL certificate.
- Click the edit icon next to the certificate.
-
In Certificate file, browse to your local drive and upload the modified certificate file.
Ensure that the updated certificate is for the same domain or the wildcard domain. Otherwise, the upload fails.
- Click Save.
Delete a certificate
Click the delete icon to delete a certificate.
External notification
When a certificate within a customer’s account is nearing its expiration date, within the 30-day window leading up to its expiry, an email notification is automatically sent to the specific customer administrators.