Open ID Connect with Citrix Workspace
You can configure Single Sign On (SSO) for Chrome Enterprise Premium (CEP) using Citrix Workspace as an OpenID Connect (OIDC) authentication provider. OIDC integration with Citrix Workspace provides the following benefits:
-
Device Posture service integration: By integrating the Device Posture service with Google Chrome Enterprise Premium, you can extend device compliance checks to Chrome browser-based access scenarios. This integration enables organizations to enforce device posture policies when users access applications through their managed Google Chrome profiles. To use the Device Posture service for this integration, we recommend configuring periodic device posture scans.
Note:
This integration does not work when the Device Posture service is configured in multi-workspace URL mode.
For more information about the Device Posture service, see Device Posture overview.
-
Unified sign-on experience: While you can configure SSO for Chrome against most common identity providers, including but not limited to Active Directory (AD) and Microsoft Entra (formerly Azure AD), you can opt for a unified sign-on experience for both Citrix Workspace and CEP.
Overview
OIDC enables SSO using Citrix Workspace as an OIDC authentication provider. The components involved in OIDC are illustrated in the following diagram:

Google Chrome, when creating a managed profile, always tries to authenticate against the Google Directory. With OIDC, Google directory becomes essentially a relying party (RP) against Citrix Workspace, which is an OIDC Connect Provider. In turn Citrix Workspace enables the following:
- Device Posture capabilities
- A common and unified sign-in experience for Chrome, Citrix Workspace Access (CWA), and Workspace portal.
Prerequisites
Before configuring the OIDC authentication with Citrix Workspace, ensure that the following prerequisites are met:
- You have administrative access to the Google Admin console.
- You have configured and performed directory synchronization. For details, see Synchronize user directory configured in Citrix Workspace with the Google Cloud user directory.
-
User identity provider (IdP) is set up and configured in Citrix Cloud Identity and Access Management. The following identity providers are supported:
- Active Directory (AD) - Standard on-premises Active Directory integration
- Active Directory with Token - AD integration with token-based authentication
- Microsoft Entra ID - Cloud-based identity service (formerly Azure AD)
- Okta
- SAML 2.0
For more information about Citrix Cloud Identity and Access Management, see Identity and access management.
- You have configured how subscribers authenticate to their workspace by selecting one of the previously mentioned Identity Providers. For instructions on how to Configure Citrix Workspace Authentication, see Configure Authentication.
- You have already completed the initial setup and onboarding of Secure Private Access. For details, see Secure Private Access onboarding and set up.
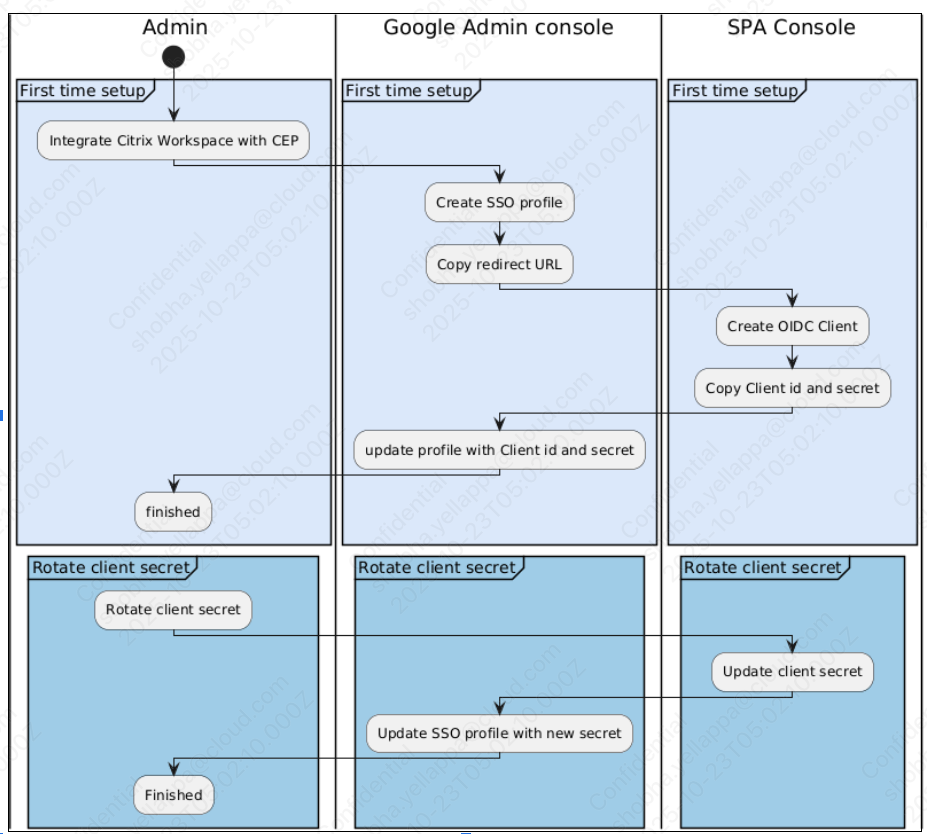
OIDC integration overview
To enable Google Chrome managed profile login to integrate with your configured Citrix Identity Provider, a Google OIDC SSO profile must be associated with a Citrix OIDC client. To do so, perform the following steps:
- In the Google Admin console, create a new SSO profile by entering a profile name. You can leave the other fields blank for now. For details about creating a new SSO profile and redirect URL, see Create a Google OIDC SSO profile.
-
After the SSO profile is created, copy the redirect URL generated for this profile.
-
In the Secure Private Access console, create the Citrix OIDC client and paste the redirect URL (from the Google SSO profile) in the Redirect URL field. For details on creating a Citrix OIDC client, see Create a Citrix OIDC client.
- Once the OIDC client is created, note the client ID, client secret, and issuer URL displayed in the Secure Private Access console.
- Return to the Google Admin console and update the SSO profile with the client ID, client secret, and issuer URL from the Secure Private Access console.
- In Manage SSO profile assignments, select the Google SSO profile you configured to complete the integration.
Note:
Post creation of the OIDC client, you can rotate the client secret in the Secure Private Access console and update the SSO profile in the Google Admin console.
The following diagram illustrates the OIDC integration workflow:
Create a Google OIDC SSO profile
Perform the following steps in the Google Admin console.
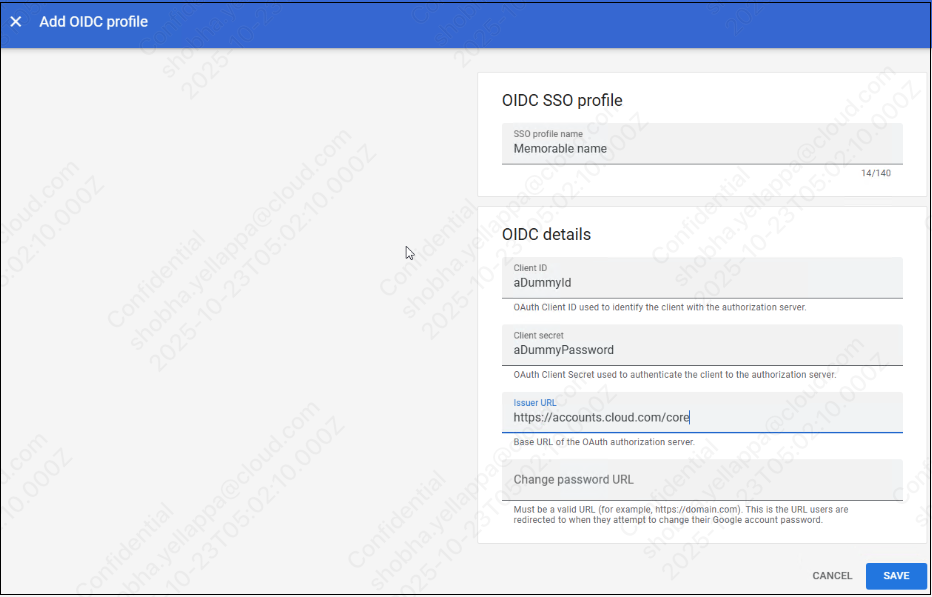
- Go to Security > Authentication > SSO with third party IdP and then select Add OIDC Profile.
- Provide a name for the profile.
- Assign a dummy value for client ID and client secret or leave these empty. These fields are updated later.
- In Issuer URL, enter
https://accounts.cloud.com/core. - Click Save.
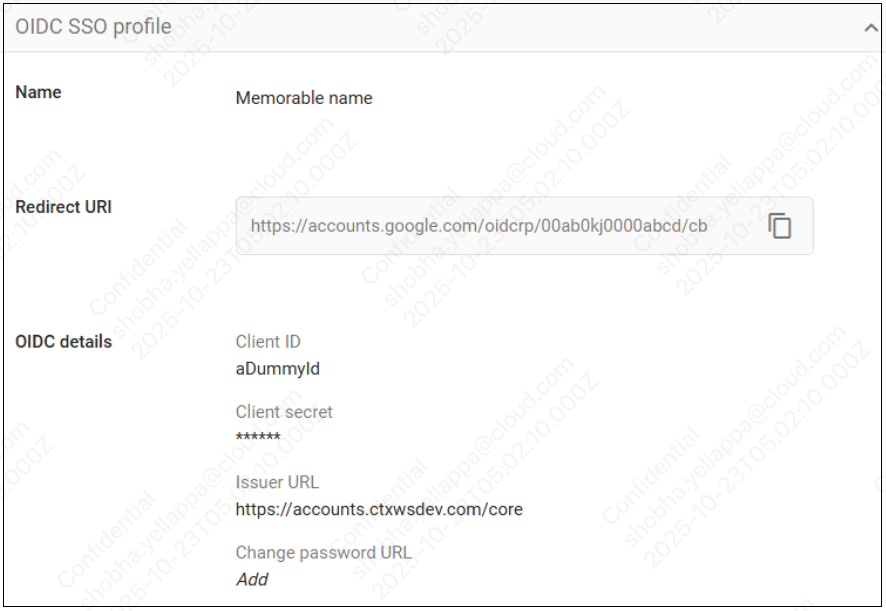
After creating the profile, click it to obtain the redirect URI, which is needed for creating the OIDC client.
Create a Citrix OIDC client
Perform the following steps in the Secure Private Access admin console:
-
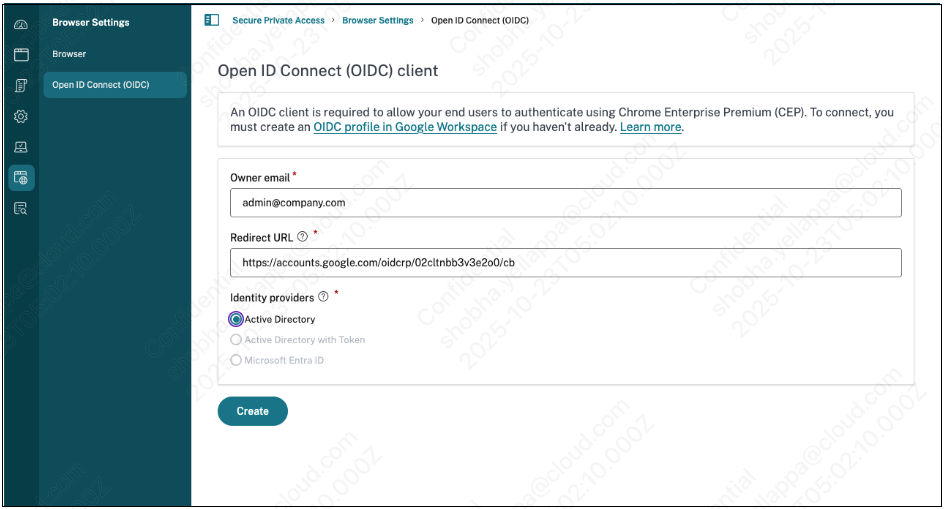
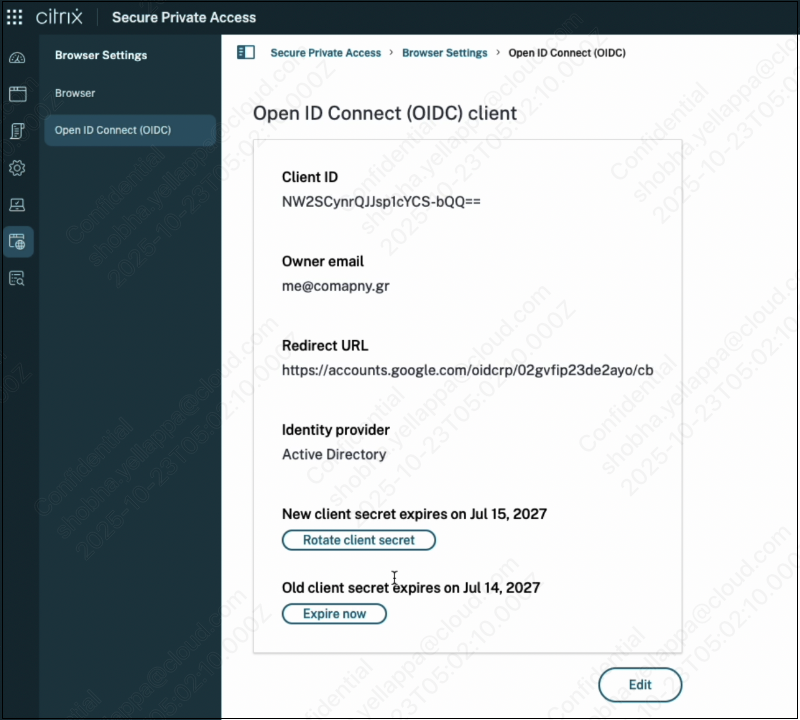
In the navigation pane, click Browser Settings > Open ID Connect (OIDC).
Note:
The Open ID Connect (OIDC) option in the Browser settings menu is available only after the onboarding process is completed.
- In Owner email, enter the user’s email ID address. This email ID address is required for sending alerts when the OIDC client secret expires.
- In Redirect URL, enter the redirect URI that was generated in the Google Admin console when you created the Google OIDC SSO profile. The identity provider responds to user authentication requests using this URL.
- Select the identity provider that is configured in your environment.
-
Click Create.
After successfully creating an OIDC client, a pop-up window displays the client ID, client secret, and issuer URL. You must copy these details to your Google Admin console configuration. You can retrieve the credentials by one of the following methods:
- Copying the values directly from the pop-up window
- Downloading the details as a CSV file for secure storage
Important:
The client secret is only visible during this initial setup step. You must retrieve the client secret before closing the pop-up window or proceeding to the next step. Once the window is closed, the client secret cannot be viewed again and you must rotate the secret to obtain a new one.
- Click Close.
OIDC SSO profile assignment
Once the OIDC client is created and the Google OIDC SSO profile is updated with the Client ID and Secret, the OIDC SSO profile must be assigned to the users and groups for SSO to take effect.
- In the Google Admin console, go to Security > Authentication > SSO with 3rd party IdP.
- In Manage SSO profile assignments, click Manage.
- From the left navigation pane, select the root organizational unit (OU) and your SSO profile to enable SSO for all users of your organization. Alternatively, you may assign the SSO profile to specific groups or OUs.
Update Citrix OIDC client
The Citrix OIDC client secret has a default lifetime of two years. You can maintain OIDC security, or respond to a potential security incident, by rotating the client secret. Client secret rotation is a critical security measure that must be performed when an existing secret is nearing its expiration or as part of proactive security maintenance. Each time you rotate a client secret, a new secret is generated. The old secret remains valid until its original expiration date, to ensure a smooth transition without an SSO authentication outage. Ensure to update your Google Admin console configuration with the new client secret as soon as possible after every rotation.
Perform the following steps to rotate the client secrets
- In the admin console, click Settings > Open ID Connect (OIDC) client page.
- Click Rotate client secret to generate a new secret. A confirmation message appears.
-
Enable the toggle switch to agree to the confirmation message, then click Rotate.
Note:
- The old client secret remains valid until its expiration. This allows you to update Google Workspace without any authentication outage.
- If for security purposes you want to expire immediately, click Expire now.
- The Client ID remains unchanged during this process.
- Click Close.
- Update the new secret in your Google Workspace configuration immediately.
Important:
- You must update the new client secret in your Google OIDC SSO profile configuration prior to the previous secret’s expiration to maintain uninterrupted OIDC authentication. Failure to update the secret in such a timely manner disrupts authentication and may cause access issues for users and services.
- Regular rotation of client secrets is recommended to mitigate unauthorized access risks and maintain authentication system integrity.
- Once you have updated the secret of the Google OIDC SSO profile, it’s recommended that you expire the old secret.
Delete an OIDC client
A client secret cannot be rotated after it has expired. If the client secret expires before being rotated, it becomes invalid. In this case, you must delete the existing client and create a new one.
Perform the following steps in the Secure Private Admin console.
- Click Edit in the Open ID Connect (OIDC) client page.
-
Click Delete client.
A confirmation message appears.
- Slide the toggle to ON and then click Delete client.