Configuring the farm
Run the Configuration Wizard on a Provisioning Server when creating a farm, adding new Provisioning Servers to an existing farm, or reconfiguring an existing Provisioning Server.
If all Provisioning Servers in the farm share configuration settings such as site and store information, consider Running the Configuration Wizard Silently.
Configuration wizard settings
Before running the Configuration Wizard, be prepared to make the following selections (described in detail below):
- Network Topology
- Identify the Farm
- Identify the Database
- Identify the Site
- License Server Settings
- Select Network Cards for the Stream Service
- Configure Bootstrap Server
Note
If errors occur during processing, the log is written to a ConfigWizard.log file, which is at C: \ProgramData\Citrix\Provisioning Services.
Starting the Configuration Wizard
The Configuration Wizard starts automatically after Provisioning Services software is installed. The wizard can also be started by selecting Start > All Programs > Citrix > Provisioning Services \ > Provisioning Services Configuration Wizard.
Tip
The Configuration Wizard was modified at release 7.12 to include support for Linux Streaming. Refer to the installation article for information about the Linux streaming component.
Network topology
Complete the network configuration steps that follow.
-
Select the network service to provide IP addresses
Note: Use existing network services if possible. If existing network services cannot be used, choose to install the network services that are made available during the installation process.
To provide IP addresses to target devices, select from the following network service options:
- If the DHCP service is on this server, select the radio button next to one of the following network services to use, then click Next:
- Microsoft DHCP
- Provisioning Services BOOTP service
- Other BOOTP or DHCP service
- If the DHCP service is not on this server, select the radio button next to The service is running on another computer, then click Next.
- If the DHCP service is on this server, select the radio button next to one of the following network services to use, then click Next:
-
Select the network service to provide PXE boot information
Each target device needs to download a boot file from a TFTP server.
Select the network service to provide target devices with PXE boot information:
- If you choose to use this Provisioning Server to deliver PXE boot information, select The service that runs on this computer, then select from either of the following options, then click Next:
- Microsoft DHCP (options 66 and 67)
- Provisioning Services PXE Service
- If Provisioning Services will not deliver PXE boot information, select The information is provided by a service on another device option, then click Next.
- If you choose to use this Provisioning Server to deliver PXE boot information, select The service that runs on this computer, then select from either of the following options, then click Next:
Identify the farm
- Select from the following farm options:
-
Farm is already configured
Select this option to reconfigure an existing farm, then continue on to the “Configure user account settings” procedure. This option only appears if a farm exists.
-
Create farm
- On the Farm Configuration dialog, select the Create Farm radio button to create a farm, then click Next.
- Use the Browse button to browse for existing SQL databases and instances in the network, or type the database server name and instance. Optionally, enter a TCP port number to use to communicate with this database server. Note: The combination of the database name and farm name should not exceed 54 characters, otherwise the farm name may display truncated in the Existing Farms screen.
- To enable database mirroring, enable the Specify database mirror failover partner option, then type or use the Browse button to identify the failover database server and instance names. Optionally, enter a TCP port number to use to communicate with this server.
- Click Next to continue on to select the database location.
-
Join existing farm
- On the Farm Configuration dialog, select the Join Existing Farm radio button to add this Provisioning Server to an existing farm, then click Next.
- Use the Browse button to browse for the appropriate SQL database and instance within the network.
- Select the farm name that displays by default, or scroll to select the farm to join. Note: More than one farm can exist on a single server. This configuration is common in test implementations.
- To enable database mirroring, enable the Specify database mirror failover partner option, then type or use the Browse button to identify the failover database server and instance names. Optionally, enter a TCP port number to use to communicate with this server.
- Click Next.
- Select from the following site options, then click Next:
- Existing Site: Select the site from the drop-down menu to join an existing site.
- New Site: Create a site by typing the name of the new site and a collection.
Continue on to configure the user account settings.
-
Identify the database
Only one database exists within a farm. To identify the database:
-
If the database server location and instance have not yet been selected, complete the following procedure:
- On the Database Server dialog, click Browse to open the SQL Servers dialog.
- From the list of SQL Servers, select the name of the server where this database exists and the instance to use (to use the default instance, SQLEXPRESS, leave the instance name blank). In a test environment, this may be a staged database. Note: When rerunning the Configuration Wizard to add more Provisioning Servers database entries, the Server Name and Instance Name text boxes are already populated. By default, SQL Server Express installs as an instance named ‘SQLEXPRESS’.
- Click Next. If this is a new farm, continue on to the “Defining a Farm” procedure.
-
To change the database to a new database:
- On the old database server, perform a backup of the database to a file.
- On the new database server, restore the database from the backup file.
- Run the Configuration Wizard on each Provisioning Server.
- Select Join existing farm on the Farm Configuration dialog.
- Enter the new database server and instance on the Database Server dialog.
- Select the restored database on the Existing Farm dialog.
- Select the site that the Server was previously a member of on the Site dialog.
- Click Next until the Configuration Wizard finishes.
-
Define a farm. Select the security group to use:
- Use Active Directory groups for security Note: When selecting the Active Directory group to act as the Farm Administrator from the drop-down list, choices include any group the current user belongs to. This list includes Built-in groups, which are local to the current machine. Avoid using these groups as administrators, except for test environments. Also, be aware that some group names may be misleading and appear to be Domain groups, but are local Domain groups. For example: ForestA.local/Builtin/Administrators.
- Use Windows groups for security
-
Click Next.
Continue on to select the license server.
Create a store for a new farm
A new store can be created and assigned to the Provisioning Server being configured:
Note: The Configuration Wizard only allows a server to create or join an existing store if it is new to the database. If a server exists in the database and it rejoins a farm, the Configuration Wizard may prompt the user to join a store or create a store, but the selection is ignored.
- On the New Store page, name the new Store.
- Browse or enter the default path (for example: C:\PVSStore) to use to access this store, then click Next. If an invalid path is selected, an error message appears. Reenter a valid path, then continue. The default write cache location for the store is located under the store path for example: C:\PVSStore\WriteCache.
Identify the site
When joining an existing farm, identify the site where this Provisioning Server is to be a member, by either creating a site or selecting an existing site within the farm. When a site is created, a default target device collection is automatically created for that site
Select the license server
- Enter the name (or IP address) and port number of the license server (default is 27000). The Provisioning Server must be able to communicate with the license server to get the appropriate product licenses.
- Optionally, select the check box Validate license server version and communication to verify that the license server is able to communicate with this server and that the appropriate version of the license server is being used. If the server is not able to communicate with the license server, or the wrong version of the license server is being used, an error message displays and does not allow you to proceed.
- Click Next to continue on to configure user account settings.
Configure user account settings
The Stream and Soap services run under a user account. To provide database access privileges to this user account, Data reader and Data writer database roles are configured automatically using the Configuration wizard.
- On the User Account dialog, select the user account that the Stream and Soap services run under:
- Network service account (minimum privilege local account that authenticates on the network as computers domain machine account).
- Specified user account (required when using a Windows Share; workgroup or domain user account). Type the user name, domain, and password information in the appropriate text boxes.
- Click Next, then continue on to selection network cards for the Stream Service.
Creating self-signed certificates for Linux streaming
When configuring Provisioning Services for streaming Linux Desktops, the Linux target devices must be linked to the PVS Soap server via an SSL connection. The CA certificate must be present on both the PVS server and the target device.
Using the PVS Configuration Wizard, you can choose to add the proper certificate from the PVSSoap container, specifically for Linux Desktops.
Creating self-signed certificates with PoSH
To create a certificate:
- Use the following PowerShell command (as an administrator) to create a self-signed certificate that will be placed into the PVSSoap container:
#New-SelfSignedCertificate –Type SSLServerAuthentication –Container PVSSoap –Subject “CN=PVS-01.fqdn” –CertStoreLocation “Cert:\LocalMachine\My” –KeyExportPolicy Exportable
<!--NeedCopy-->
Important
This command requires PowerShell 5.0 or later. Windows Server 2012 comes with PowerShell 4.0 which does not accept the command described in this section.

-
Import the generated certificate into the local machine’s Trusted Root Certificate Authority store from the Personal store.
-
Run the PVS Configuration Wizard. At the Soap SSL Configuration prompt, choose the newly generated certificate by highlighting in blue, and continue through the wizard:
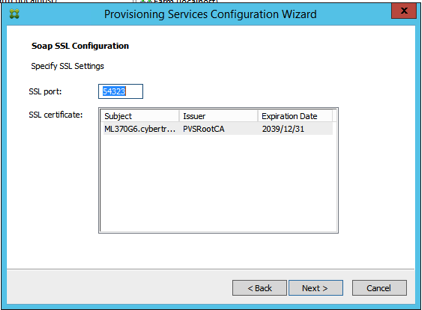
Tip
When the Soap SSL Configuration page first loads the certificate is highlighted (in gray) which gives the appearance that it is selected. Ensure that the certificate is selected. It should turn blue to indicate that it has been selected.
Select network cards for the Stream Service
- Select the check box next to each of the network cards that the Stream Service can use.
- Enter the base port number that is used for network communications in the First communications port: text box. Note: A minimum of 20 ports are required within the range. All Provisioning Servers within a farm must use the same port assignments.
- Select the Soap Server port (default is 54321) to use for Console access, then click Next.
Continue on to select the bootstrap server.
Configure the bootstrap server
- Select the bootstrap server. To use the TFTP service on this Provisioning Server:
- Select the Use the TFTP Service option, then enter or browse for the boot file. The default location is: C:\Documents and Settings\All Users\ProgramData\Citrix\Provisioning Services\Tftpboot
If a previous version of Provisioning Services was installed on this server, and the default location is:
C:\Program Files\Citrix\Provisioning Services\TftpBoot
you must run the Configuration Wizard to change the default location to:
C:\Documents and Settings\All Users\ProgramData or ApplicationData\Citrix\Provisioning Services\Tftpboot
If the default is not changed, the bootstrap file cannot be configured from the Console and target devices fail to boot. The message ‘Missing TFTP’ appears.
- Click Next.
- Select Provisioning Servers to use for the boot process:
-
Use the Add button to add more Provisioning Servers to the list, the Edit button to edit existing information, or Remove to remove the Provisioning Server from the list. Use the Move up or Move down buttons to change the Provisioning Server boot preference order. The maximum length for the server name is 15 characters. Do not enter the FQDN for the server name. In an HA implementation, at least two Provisioning Servers must be selected as boot servers.
-
Optionally, highlight the IP address of the Provisioning Server that target devices boot from, then click Advanced. The Advanced Stream Servers Boot List appears.
-
The following table describes advanced settings that you can choose from. After making your selections, click OK to exit the dialog, then click Next to continue.
| Field | Description |
|---|---|
| Verbose Mode | Select the Verbose Mode option if you want to monitor the boot process on the target device (optional) or view system messages. |
| Interrupt Safe Mode | Select Interrupt Safe Mode if you are having trouble with your target device failing early in the boot process. This enables debugging of target device drivers that exhibit timing or boot behavior problems. |
| Advanced Memory Support | This setting enables the bootstrap to work with newer Windows OS versions and is enabled by default. Only disable this setting on Windows Server OS 32 bit versions that do not support PAE, or if your target device is hanging or behaving erratically in early boot phase. |
| Network Recovery Method | Restore Network Connections— Selecting this option results in the target device attempting indefinitely to restore its connection to the Provisioning Server. Note: Because the Seconds field does not apply, it becomes inactive when the Restore Network Connections option is selected. Reboot to Hard Drive— (a hard drive must exist on the target device) Selecting this option instructs the target device to perform a hardware reset to force a reboot after failing to re-establish communications for a defined number of seconds. The user determines the number of seconds to wait before rebooting. Assuming the network connection cannot be established, PXE fails and the system will reboot to the local hard drive. The default number of seconds is 50, to be compatible with HA configurations. |
| Logon Polling Timeout | Enter the time in milliseconds between retries when polling for Provisioning Servers. Each Provisioning Server is sent a login request packet in sequence. The first Provisioning Server that responds is used. In non-HA configurations, this time-out simply defines how often to retry the single available Provisioning Server with the initial login request. This time-out defines how quickly the round-robin routine switches from one Provisioning Server to the next in trying to find an active Provisioning Server. The valid range is from 1,000 milliseconds to 60,000 milliseconds. |
| Login General Timeout | Enter the time-out in milliseconds for all login associated packets, except the initial login polling time-out. This time-out is longer than the polling time-out, because the Provisioning Server needs time to contact all associated servers, some of which may be down and will require retries and time-outs from the Provisioning Server to the other Provisioning Servers to determine if they are indeed online or not. The valid range is from 1,000 milliseconds to 60,000 milliseconds. |
Verify that all configuration settings are correct, then click Finish.
Bootstrap configurations can be reconfigured by selecting the Configure Bootstrap option from the Provisioning Services Action menu in the Console.
In this article
- Configuration wizard settings
- Starting the Configuration Wizard
- Network topology
- Identify the farm
- Identify the database
- Create a store for a new farm
- Identify the site
- Select the license server
- Configure user account settings
- Select network cards for the Stream Service
- Configure the bootstrap server