Power manage Azure VMs
For information on required permissions, see Required Azure permissions.
Azure on-demand provisioning
With Azure on-demand provisioning, VMs are created only when Citrix DaaS™ initiates a power-on action, after the provisioning completes.
When you use MCS to create machine catalogs in the Azure Resource Manager, the Azure on-demand provisioning feature:
- Reduces your storage costs
- Provides faster catalog creation
When you create an MCS catalog, the Azure portal displays the network security groups, network interfaces, base images, and identity disks in the resource groups.
The Azure portal does not show a VM until Citrix DaaS initiates a power-on action for it. Then, the VM’s status in Studio changes to On. There are two types of machines with the following differences:
- For a pooled machine, the operating system disk and write-back cache exist only when the VM exists. When you shut down a pooled machine in the console, the VM is not visible in the Azure portal. There’s a significant storage cost saving if you routinely shut down machines (for example, outside of working hours).
- For a dedicated machine, the operating system disk is created the first time the VM is powered on. The VM in the Azure portal remains in storage until the machine identity is deleted. When you shut down a dedicated machine in the console, the VM is still visible in the Azure portal.
Note:
Support for Azure catalogs created before the on-demand provisioning feature (“legacy” catalogs) is deprecated. Therefore, recreate the Azure legacy catalog VMs. The catalogs are then provisioned as on-demand that saves storage cost.
Preserving a provisioned virtual machine when power cycling
Choose whether to preserve a provisioned virtual machine when power cycling. Use the PowerShell parameter New-ProvScheme CustomProperties. This parameter supports an extra property, PersistVm, used to determine if a provisioned virtual machine persists when power cycled. Set the PersistVm property to true to persist a virtual machine when powered off, or set the property to false to ensure that the virtual machine is not preserved when powered off.
Note:
The
PersistVmproperty only applies to a provisioning scheme with the propertiesCleanOnBootandUseWriteBackCacheenabled. If thePersistVmproperty is not specified for non-persistent virtual machines, they’re deleted from the Azure environment when powered off.
In the following example, the New-ProvScheme CustomProperties parameter sets the PersistVmproperty to true:
<CustomProperties xmlns="http://schemas.citrix.com/2014/xd/machinecreation" xmlns:xsi="http://www.w3.org/2001/XMLSchema-instance">
<Property xsi:type="StringProperty" Name="UseManagedDisks" Value="true" />
<Property xsi:type="StringProperty" Name="StorageType" Value="Standard_LRS" />
<Property xsi:type="StringProperty" Name="PersistWBC" Value="false" />
<Property xsi:type="StringProperty" Name="PersistOsDisk" Value="true" />
<Property xsi:type="StringProperty" Name="PersistVm" Value="true" />
<Property xsi:type="StringProperty" Name="ResourceGroups" Value="demo-resourcegroup" />
<Property xsi:type="StringProperty" Name="LicenseType" Value="Windows_Client" />
</CustomProperties>
<!--NeedCopy-->
In the following example, the New-ProvScheme CustomProperties parameter preserves the write-back cache by setting PersistVM to true:
 New-ProvScheme
 -AzureAdJoinType "None"
 -CleanOnBoot
 -CustomProperties "<CustomProperties xmlns=`"http://schemas.citrix.com/2014/xd/machinecreation`" xmlns:xsi=`"http://www.w3.org/2001/XMLSchema-instance`"><Property xsi:type=`"StringProperty`" Name=`"UseManagedDisks`" Value=`"true`" /><Property xsi:type=`"StringProperty`" Name=`"StorageType`" Value=`"Standard_LRS`" /><Property xsi:type=`"StringProperty`" Name=`"PersistWBC`" Value=`"false`" /><Property xsi:type=`"StringProperty`" Name=`"PersistOsDisk`" Value=`"true`" /><Property xsi:type=`"StringProperty`" Name=`"PersistVm`" Value=`"true`" /><Property xsi:type=`"StringProperty`" Name=`"ResourceGroups`" Value=`"demo-resourcegroup`" /><Property xsi:type=`"StringProperty`" Name=`"LicenseType`" Value=`"Windows_Client`" /></CustomProperties>"
 -HostingUnitName "demo"
 -IdentityPoolName "NonPersistent-MCSIO-PersistVM"
 -MasterImageVM "XDHyp:\HostingUnits\demo\image.folder\scale-test.resourcegroup\demo-snapshot.snapshot"
 -NetworkMapping @ {"0"="XDHyp:\HostingUnits\demo\\virtualprivatecloud.folder\East US.region\virtualprivatecloud.folder\ji-test.resourcegroup\jitest-vnet.virtualprivatecloud\default.network"}
-ProvisioningSchemeName "NonPersistent-MCSIO-PersistVM"
 -ServiceOffering "XDHyp:\HostingUnits\demo\serviceoffering.folder\Standard_B2ms.serviceoffering" -UseWriteBackCache
 -WriteBackCacheDiskSize 127
 -WriteBackCacheMemorySize 256
 <!--NeedCopy-->
Tip:
The
PersistVmproperty determines whether to preserve a provisioned virtual machine. ThePersistOsdiskproperty determines whether to persist the OS disk. To preserve a provisioned virtual machine, preserve the OS disk first. You cannot delete the OS disk without first deleting the virtual machine. You can use thePersistOsdiskproperty without using specifying thePersistVmparameter.
Customize power on behavior at storage type change failure
At power on, the storage type of a managed disk can fail to change to the desired type due to a failure on Azure. In these scenarios, the VM would remain off with a failure message sent to you. However, you can either choose to power on the VM even when storage cannot be restored to its configured type or choose to keep the VM powered off.
-
If you configure the custom property
FailSafeStorageTypeas true (default setting) or do not specify it inNew-ProvSchemeorSet-ProvSchemecommands:- On power on, the VM powers on with the incorrect storage type.
- On shutdown, the VM remains off with the incorrect storage type.
-
If you configure the custom property
FailSafeStorageTypeas false inNew-ProvSchemeorSet-ProvSchemecommands:- On power on, the VM remains off with the incorrect storage type.
- On shutdown, the VM remains off with the incorrect storage type.
To create a machine catalog to include FailSafeStorageType custom property:
- Open a PowerShell window.
- Run
asnp citrix*to load the Citrix-specific PowerShell modules. - Create an identity pool if not already created.
-
Add the custom property in
New-ProvScheme. For example:New-ProvScheme -HostingUnitName "Azure-Resources-1" -IdentityPoolName "name" -InitialBatchSizeHint 1 -MasterImageVM "XDHyp:\HostingUnits\Azure-Resources-1\image.folder\abc.resourcegroup\def.snapshot" -NetworkMapping @{"0"="XDHyp:\HostingUnits\Azure-Resources-1\ght.folder\abc.resourcegroup\abc-vnet.virtualprivatecloud\default.network"} -ProvisioningSchemeName "name" -ServiceOffering "XDHyp:\HostingUnits\Azure-Resources-1\serviceoffering.folder\Standard_DS2_v2.serviceoffering" -CustomProperties "<CustomProperties xmlns=`"http://schemas.citrix.com/2014/xd/machinecreation`" xmlns:xsi=`"http://www.w3.org/2001/XMLSchema-instance`"> <Property xsi:type=`"StringProperty`" Name=`"StorageType`" Value=`"Premium_LRS`" /> <Property xsi:type=`"StringProperty`" Name=`"StorageTypeAtShutdown`" Value=`"Standard_LRS`" /> <Property xsi:type=`"StringProperty`" Name=`"FailSafeStorageType`" Value=`"true`" /> </CustomProperties>" <!--NeedCopy--> - Create the machine catalog.
To update an existing machine catalog so to include FailSafeStorageType custom property. This update does not affect existing VMs.
- Update the custom property in
Set-ProvSchemecommand. For example:
   Set-ProvScheme -ProvisioningSchemeName <String> -CustomProperties "
   <CustomProperties xmlns=`"http://schemas.citrix.com/2014/xd/machinecreation`" xmlns:xsi=`"http://www.w3.org/2001/XMLSchema-instance`">
   <Property xsi:type=`"StringProperty`" Name=`"StorageType`" Value=`"Premium_LRS`" />
   <Property xsi:type=`"StringProperty`" Name=`"IdentityDiskStorageType`" Value=`"Premium_LRS`" />
   <Property xsi:type=`"StringProperty`" Name=`"FailSafeStorageType`" Value=`"false`" />
   </CustomProperties>"
   <!--NeedCopy-->
To apply the change done in Set-ProvScheme to the existing VMs, run the Request-ProvVMUpdate command.
-
Run the Request-ProvVMUpdate command. For example:
Request-ProvVMUpdate -ProvisioningSchemeName <String> -VMName <List-Of-Vm-Names> <!--NeedCopy--> -
Restart the VMs.
Create hibernation-capable VMs
In Azure environments, you can create an MCS machine catalog that supports hibernation. Using this feature, you can suspend a VM, and then reconnect to the previous state of the VM when a user signs in again.
The hibernation capability applies to the following:
- Single-session OS
- Persistent and non-persistent VMs
- Static and random (pooled) VDI desktops
You can resume to the same session after you hibernate a VM, irrespective of whether the VDI desktop is static or random.
In this section, see the following:
- Prerequisites
- Limitations
- Create and manage a hibernation-capable machine catalog
- Create a machine catalog for existing hibernation-capable VMs
- Check the hibernation property
- Power management of VMs (Manual and Automated)
Prerequisites to use hibernation
To use hibernation, make sure to complete the following tasks:
- Install the Azure VM Agent on the master image for both Windows and Linux. The page file of the Windows image can be on the temporary disk. MCS sets the page file location to the C: drive in the base disk when hibernation is enabled on the machine catalog.
- MCS automatically sets the hibernation property for the generated resources. You do not need to configure properties of the master resources to support hibernation.
- Use a VM size in your subscription that supports hibernation.
-
Create a hibernation-capable machine profile (VM or template spec) so that VMs inherit the hibernation-capability. To create the VM, see Getting started with hibernation.
Note:
As per Microsoft, you can deploy hibernation enabled VMs from an OS disk. This feature is supported for certain regions currently and will be available for all the regions soon. For more information, see Deploy hibernation enabled VMs from an OS disk.
To create the template spec, do the following:
- Open the Azure Portal. Choose a VM whose configuration you want to use in the template. Select Export template in the left pane.
- Clear the Include parameters checkbox. Copy the context and save it as a JSON file, for example,
VMExportTemplate.json. - Ensure that the parameter
hibernationEnabledistrueon the template. If the parameter is nottrue, check the VM configuration that you used. You can specify a supported VM size in the template file. However, you can also specify the machine size while creating the catalog. - Add the template for the network interface resource to the JSON file
VMExportTemplate.json. As a result, you have an ARM template file having two resources. - Select Azure Portal > Template specs > Import template > Choose local template file to import this template file as an ARM template spec.
- After the ARM Template specification is created, you can use it as a machine profile.
Note:
It might take a few minutes to sync to Citrix Studio.
For more information, see the Microsoft document Prerequisites to use hibernation.
Limitations
- Only single-session OS machine catalogs (persistent and non-persistent) are supported.
- Ephemeral OS disks and MCS I/O features do not support Azure hibernation.
- Hibernation might fail during the Automatic Windows updates.
- Trusted Launch is a prerequisite for hibernation when Hyper-V is enabled.
For more information, see the Microsoft document.
Create and manage a hibernation-capable machine catalog
To create hibernation-capable VMs, you can create and manage a hibernation-capable machine catalog using:
Create a catalog using Studio
- Sign in to Citrix Cloud.
- In the DaaS tile, click Manage to open Studio.
- In the left pane, select Machine Catalogs.
- Select Create Machine Catalog. The catalog creation wizard opens.
- On the Machine Type page, select the Single-session OS machine type for this catalog.
-
On the Machine Management page, select the settings as follows:
- Select Machines that are power managed (for example, virtual machines or blade PCs).
- Select Citrix Machine Creation Services™ (MCS).
- Select a resource location from the Resources drop-down list.
- On the Desktop Experience page, select the random or static desktop experience as needed.
-
On the Image page, select a master image. Select the checkbox Use a machine profile and select a machine profile that supports hibernation. Click the tooltip to know if a machine profile supports hibernation.
Note:
If you select an Azure-managed master image, only images in the same region as the selected resource location are displayed.
- On the Storage and License Types page, select the storage and license to use for this catalog.
-
On the Virtual Machines page, select the count of VMs, VM size, and availability zone.
Note:
The machine sizes that support hibernation are only shown for your selection.
- On the NICs page, add the NICs you want the VMs to use.
- On the Disk Settings page, select the storage type and size of the write-back cache disk.
- On the Resource Group page, select the resource group to provision VMs.
- On the Machine Identities page, select Create new Active Directory accounts. Then, specify an account naming scheme.
- On the Domain Credentials page, click Enter credentials. Enter your domain credentials to perform account creation in the target Active Directory domain.
- On the Summary page, enter a name for the machine catalog, and then click Finish.
When the MCS machine catalog creation is complete, locate the catalog in the catalog list, and then click the Template Properties tab. The value of the parameter Hibernation must be Supported.
If you want to edit a machine catalog, consider the following restrictions:
- If the current machine catalog supports hibernation, you can’t:
- Change the VM size to a hibernate-incapable one.
- Change the machine profile to a hibernate-incapable one.
- If the current machine catalog does not support hibernation, you can’t:
- currently, change the machine profile to a hibernate-capable one using Studio.
Create a machine catalog for managing existing hibernation-capable VMs
If you already have hibernation-capable VMs and want to suspend and resume them, create a machine catalog to import those VMs for power management.
Note:
You can create a machine catalog containing both hibernation-capable and incapable VMs. However, if you want hibernation-related functionality, you must create the machine catalog with only hibernation-capable VMs.
To create a catalog for existing hibernation-capable VMs using Studio, follow the on-screen instructions to complete the steps and pay attention to the following key settings:
- On the Machine Management page, select Machines that are power managed, and then select Other service or technology as the way of deploying machines.
- On the Virtual Machines page, add or import only the hibernation-capable VMs.
Create a machine catalog using PowerShell commands
After you meet all the requirements to use hibernation, you can create a hibernation-capable machine catalog using the New-ProvScheme command. For information on how to create a catalog using the Remote PowerShell SDK, see Manage Citrix DaaS using Remote PowerShell SDKs.
While creating the catalog, you can check whether a VM size and machine profile supports hibernation or not using the following PowerShell commands:
-
For the VM size, run the following command and check whether the property
supportsHibernationis True. For example,Get-ChildItem -LiteralPath @("XDHyp:\HostingUnits\ <VirtualNetwork> \serviceoffering.folder") | select Name, AdditionalData | ConvertTo-Json <!--NeedCopy--> -
For the machine profile, run the following command and check whether the property
supportsHibernationis True. For example,Get-ChildItem -LiteralPath @("XDHyp:\HostingUnits\ <VirtualNetwork> \machineprofile.folder\abc.resourcegroup")|select Name, AdditionalData|ConvertTo-Json <!--NeedCopy-->
If you want to edit a machine catalog, consider the following restrictions:
- If the current machine catalog supports hibernation, you can’t:
- Change the VM size to a hibernate-incapable one
- Change the machine profile to a hibernate-incapable one
- If the current machine catalog does not support hibernation, you can’t:
- currently, change the machine profile to a hibernate-capable one using Studio.
For information on how to modify VM size and machine profile of a catalog using the Remote PowerShell SDK, see https://developer-docs.citrix.com/projects/citrix-virtual-apps-desktops-sdk/en/latest/MachineCreation/Set-ProvScheme/.
Check hibernation property
You can check the hibernation property of a machine catalog, VM, and a broker machine using the PowerShell commands:
-
To check the hibernation property of a provisioning scheme, run the following PowerShell commands. The
HibernationEnabledparameter must beTrue.(Get-ProvScheme -provisioningSchemeName <YourSchemeName>).VMMetadata -join "" | ConvertFrom-Json | Select HibernationEnabled <!--NeedCopy--> -
To check the hibernation property of a provisioning VM, run the following PowerShell commands. The
SupportsHibernationparameter must beTrue.(Get-ProvVM -VMName <YourVMName>).CustomVmData | ConvertFrom-Json | Select SupportsHibernation <!--NeedCopy--> -
To check the hibernation capacity of a broker machine, run the following PowerShell commands. The Suspend and Resume power actions indicate hibernation capability.
 (Get-BrokerMachine -MachineName <YourMachineName>).SupportedPowerActions
 <!--NeedCopy-->
Power management of hibernation-capable VMs
You can perform the following power management operations on the hibernation-capable VMs:
- Suspend VM from the running state
- Resume VM from the suspended state
- Force shut down VM from a suspended state
- Force restart the VM from the suspended state
See the following for more information:
Suspend
You can suspend a VM using one of the following ways:
- Manually using Studio
- Automatically using the timeout policy: For more information, see Miscellaneous settings.
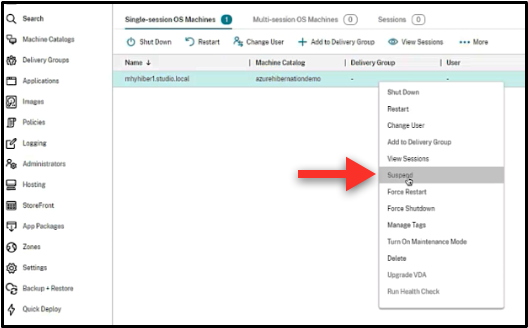
To manually suspend a VM:
-
Right-click the VM, and select Suspend. Click Yes to confirm the action. The Power State changes from Suspending to Suspended.
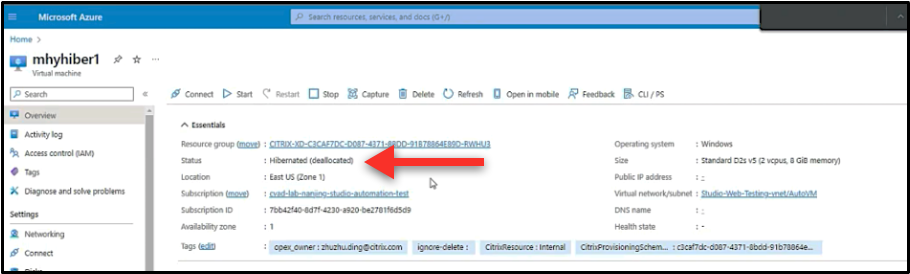
You can check the status of the VM in the Azure portal.
Resume
To resume a hibernated VM, use one of the following ways:
-
Manually:
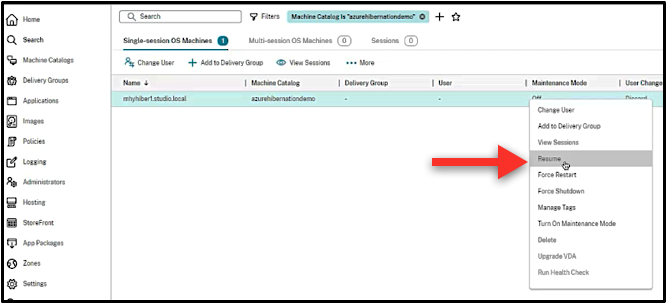
-
Administrators can resume the VM using Studio.
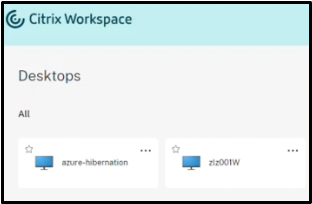
-
When end users launch the desktop, it automatically resumes.
-
-
Automatically:
-
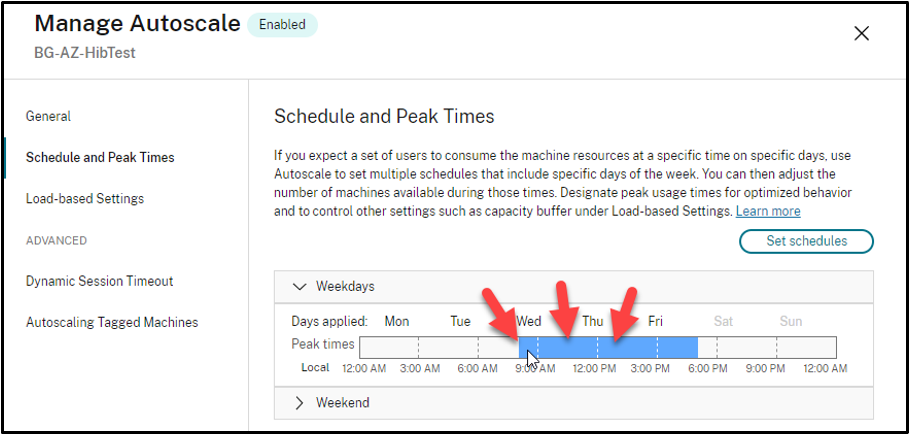
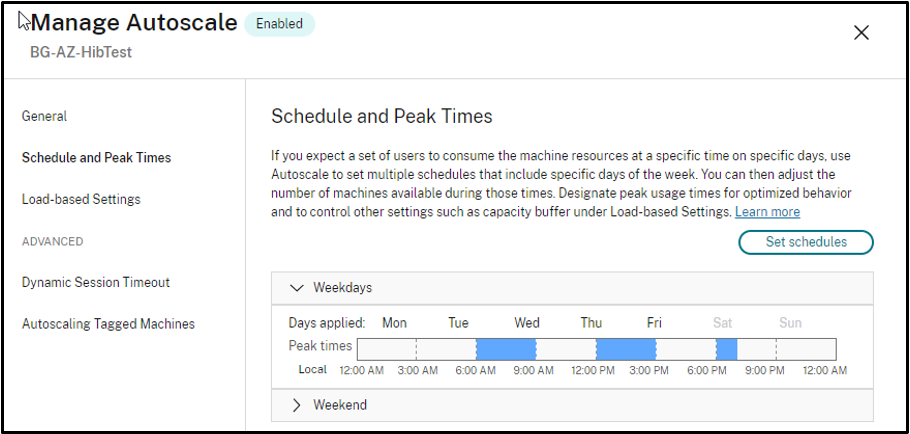
Autoscale™ can automatically power on the hibernated machines if you configure the peak times correctly. You can set the peak times in 30-minutes intervals by clicking the time-schedule. Each blue frame represents a timeslot marked as peak time. The peak times can have consecutive and non-consecutive time slots.
-
Consecutive time slots
-
Non-consecutive time slots
-
-
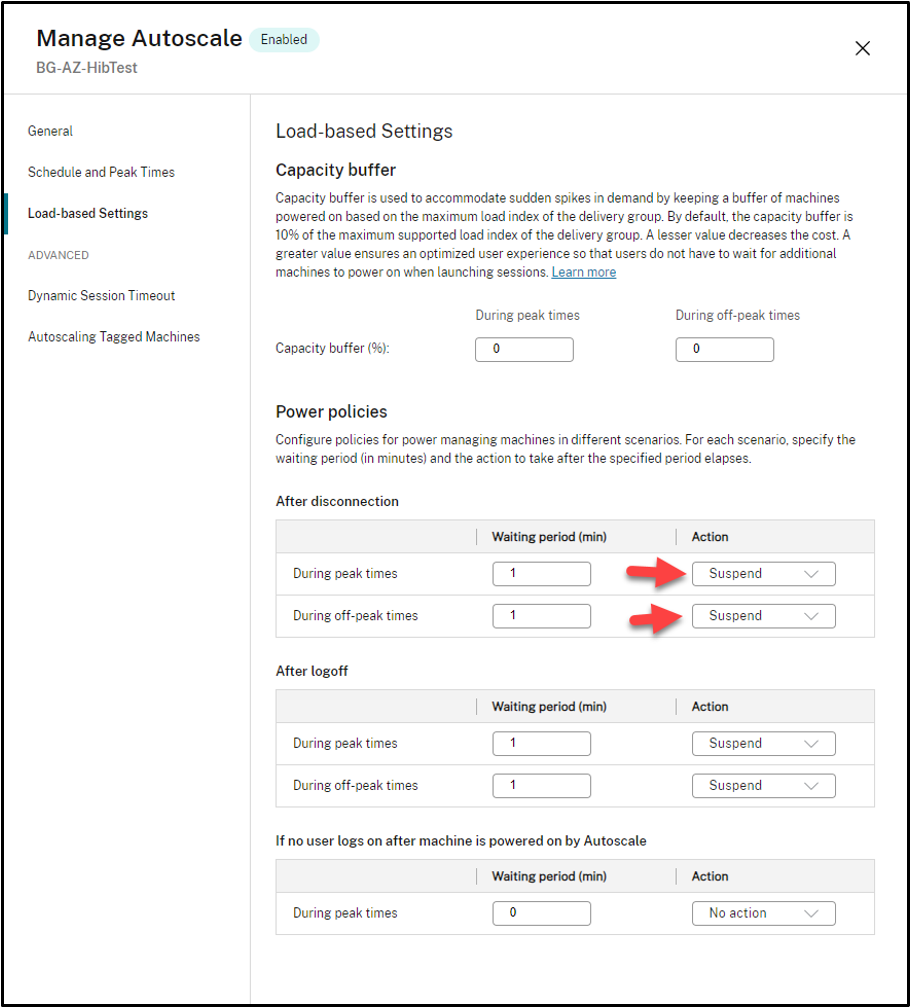
Note:
In Manage Autoscale > Load-based Settings, if the Action is configured as Suspend, then make sure that all VMs within that delivery group have hibernation capability. Otherwise, VMs that can’t hibernate continues to run.
Get warnings messages for hibernation failure
You can get warning messages using a PowerShell command Get-ProvOperationEvent in case of hibernation failure of MCS-provisioned and existing hibernation-capable VMs. For information about the Powershell command, see the SDK documentation Get-ProvOperationEvent.
To do this:
- Open a PowerShell window.
- Run
asnp citrix*to load Citrix-specific PowerShell modules. -
Run
Get-ProvOperationEventto get the warning message in case of hibernation failure.Get-ProvOperationEvent -filter { OperationName -eq "Suspend" } <!--NeedCopy-->Output:
EventAdditionalData : Error code = OperationNotAllowed and Error message = The Hibernate-Deallocate Operation cannot be performed on a VM that has extension 'AzureHibernateExtension' in failed state. For more information, see https://aka.ms/hibernate-resume/errors. Error details from the extension : Enabling
                  hibernate failed. Response from the powercfg command. Exit Code: 1. Error message:
                  Hibernation failed with the following error: The request is not supported.

                  The following items are preventing hibernation on this system.
                    The current Device Guard configuration has disabled hibernation.
                    An internal system component has disabled hibernation.
                            Hypervisor
                  Status: 409
                  ErrorCode: OperationNotAllowed

                  Content:
                  {
                    "error": {
                      "code": "OperationNotAllowed",
                      "message": "The Hibernate-Deallocate Operation cannot be performed on a VM that has extension 'AzureHibernateExtension' in failed state. For more information, see https://aka.ms/hibernate-resume/errors. Error details from the extension : Enabling hibernate failed. Response from the
                  powercfg command. Exit Code: 1. Error message:\nHibernation failed with the following error: The request is not supported.\r\r\n\r\nThe following items are preventing hibernation on this system.\r\n\tThe current Device Guard configuration has disabled hibernation.\r\n\tAn internal system
                  component has disabled hibernation.\r\n\t\tHypervisor"
                    }
                  }
EventCategory       : Warning
EventDateTime       : 1/11/2024 4:18:31 AM
EventId             : 0
EventMessage        : Failed to suspend machine my-resource-group/my-vm.
EventSeverity       : Important
EventSource         : AzureRmPlugin
EventState          : New
LinkedObjectType    : ProvisioningScheme
LinkedObjectUid     : 589cb600-6e65-479f-9d47-9715c4732366
OperationName       : Suspend
OperationTargetName : my-resource-group/my-vm
OperationTargetType : VirtualMachine
OperationType       : PowerManagement
Recommendation      :
<!--NeedCopy-->
Troubleshooting hibernation issues
You get the following error message if you try to enable both hibernation and trusted launch VM features, however, configuration of the guest OS is not correct.
| Error code | Error message |
|---|---|
| OperationNotAllowed | The Hibernate-Deallocate Operation cannot be performed on a VM that has extension ‘AzureHibernateExtension’ in failed state. For more information, see https://aka.ms/hibernate-resume/errors/. Error details from the extension : Enabling hibernate failed. Response from the powercfg command. Exit Code: 1. Error message: Hibernation failed with the following error: The request is not supported. The following items are preventing hibernation on this system. The current Device Guard configuration has disabled hibernation. An internal system component has disabled hibernation. |
To resolve the issue, ensure that virtualization is enabled within the guest VM. For example, confirm that Hyper-V is enabled in a Windows environment.
For more information on warning messages, see the Microsoft document Troubleshooting VM hibernation.
Note:
Error messages related to failure in resuming a VM will be available in a future release.
More information
For more information on Citrix Azure hibernation, see the Citrix Tech Zone article.