Citrix DaaS™ Quick Deploy for Amazon WorkSpaces Core Bundles
Introduction
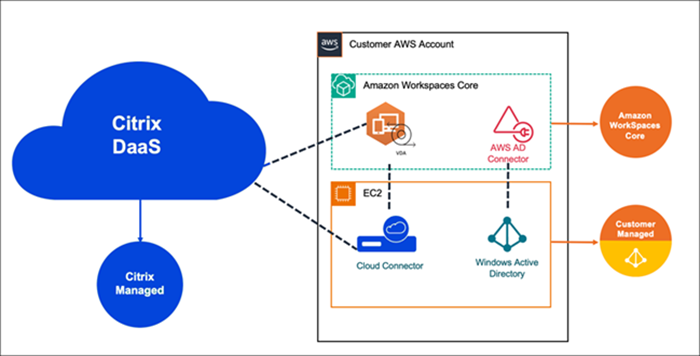
This article describes how to prepare and create a deployment with Citrix® for Amazon WorkSpaces Core. Amazon WorkSpaces Core resides in Amazon Web Services (AWS).
The following is the representation of the AWS implementation and its management with Citrix DaaS:
Prepare and create a deployment
The deployment checklist in the Quick Deploy interface contains links to procedures 1-6.
- Before you start, complete the prerequisites in Citrix Cloud and AWS.
- Create a resource location in Citrix Cloud. (This procedure is also included as a prerequisite.)
- Connect your AWS account. This procedure enables permissions so that the Citrix DaaS can connect to AWS.
- Create a directory connection. This procedure configures a connection that allows access to your organization’s Active Directory.
- Import an image. This procedure enables you to create a desktop experience for your users.
- Create a deployment. This procedure specifies the machines to be deployed and the users who can access them through their store.
Before you start
Make sure you’ve completed the following tasks before you begin preparing and creating your deployment.
There is one exception: Creating a resource location in Citrix Cloud is listed as a prerequisite. It is also the first procedure in the deployment checklist. So, if you create the resource location as part of the prerequisites, skip that procedure in the checklist sequence. Similarly, complete that procedure in the checklist if you didn’t do it earlier.
Prerequisites to complete in Citrix Cloud
- Create a Citrix Cloud account and subscribe to the Citrix DaaS.
- Create a Citrix Cloud resource location. (This procedure is also linked in the Quick Deploy interface.)
Prerequisites to complete in AWS
- Create an AWS user account. The account must have:
- Role permissions for the Citrix API client.
- Permissions for programmatic access. For more information, see AWS account programmatic access permissions.
- Create the workspaces_DefaultRole role. For more information, see Create the workspaces_DefaultRole Role.
- In your Active Directory:
- Use the AD Connector option to store and manage information. For more details, see AD Connector.
- Create an OU where VMs are created. That OU must have a Citrix policy for communication with the Cloud Connectors and Citrix Cloud. See the Reference section for details.
- Set up a group policy for the Citrix Cloud Connector™ configuration:
- Download the latest Group Policy Management Console provided by Citrix (CitrixGroupPolicyManagement_64.msi) from the Citrix download site.
- Install the MSI (that machine must have the Visual Studio 2015 runtime installed). Then create a Citrix policy that contains the Controllers policy setting. That setting specifies the Cloud Connector addresses.
- Create or use an existing NAT gateway. For more information, see NAT gateway.
- Create or use one or more existing security groups that allow the Citrix Cloud Connectors to communicate with the deployed VMs. For more information, see Control traffic to your AWS resources using security groups
-
To use Windows 10 or Windows 11 desktop images with dedicated tenancy, set up BYOL for your account. You can complete this step after connecting your account. For more information, see Set up BYOL for your account.
Note:
Windows 10 N and Windows 11 N versions are not supported for BYOL.
- If you plan to use BYOL, ensure you have sufficient Windows 10 or Windows 11 licenses. For more information, see Bring Your Own Windows desktop licenses.
- Using Citrix DaaS for Amazon WorkSpaces Core automatically enables the Bring Your Own Protocol (BYOP) feature in Amazon WorkSpaces Core.
General preparation
Review each procedure before you start. Benefit: This will help the processes to be completed easily.
Create a resource location
You create a resource location in Citrix Cloud.
- A resource location contains two or more Cloud Connectors that communicate with Citrix Cloud. The servers on which you install the Cloud Connectors must be in an EC2 VPC, domain-joined, and have Internet connectivity. The Cloud Connectors must be in the same VPC as the directory you plan to use.
- For more information on Cloud Connectors, see Citrix Cloud Connector and how to provision them.
- The resource location can also contain your Active Directory servers. For more information, see Connect Active Directory to Citrix Cloud.
Connect your AWS account
This procedure enables permissions for the Citrix DaaS to connect to AWS.
To connect your AWS account, follow these steps:
- In the DaaS tile, click Manage to open Studio.
-
In the left pane, select Quick Deploy > Amazon WorkSpaces Core > Accounts, then click Connect account.
-
In the Authenticate account page, complete these steps:
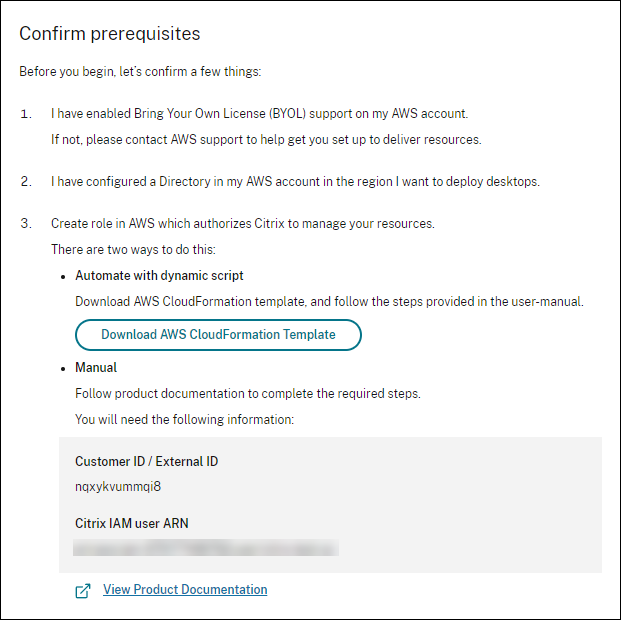
- Expand the Prerequisites panel to review the setup requirements.
- In the Prerequisites panel, download the AWS CloudFormation template from the Connect account wizard and save it locally. You will upload this template later when you create the AssumeRole stack in AWS.
-
In the Role ID field, enter the Amazon Resource Name (ARN) of the role that authorizes Citrix to manage your resources.
Tip:
- The Role ID can be found in the AWS management console by navigating to IAM > Roles.
- If you are using the
CloudFormationscript, then navigate to CloudFormation and click the corresponding stack that was used to create the role. Navigate to the Resources tab and click the resource with LogicalIDCitrixAssumeRole.
- Enter a friendly name for the account in the Name field.
- Click Next. The Pick region page opens.
Note:
- You cannot connect two accounts in the same region for the same AWS account.
- To create an AssumeRole, see Create AssumeRole for Amazon WorkSpaces Core integration.
- On the Pick region page, select the region where you want to deploy your desktops and click Next. The Summary page opens.
- On the Summary page, review the information you provided. Click Connect. The connection process might take several hours to complete.
Note:
After you connect your account, you can configure BYOL at any time. For more information, see Set up BYOL for your account.
Create AssumeRole for Amazon WorkSpaces Core integration
To create AssumeRole for Amazon WorkSpaces Core, follow these steps:
- In your browser window, open the Amazon Web Services website and sign in.
- In the Search field, type cloudformation and press Enter.
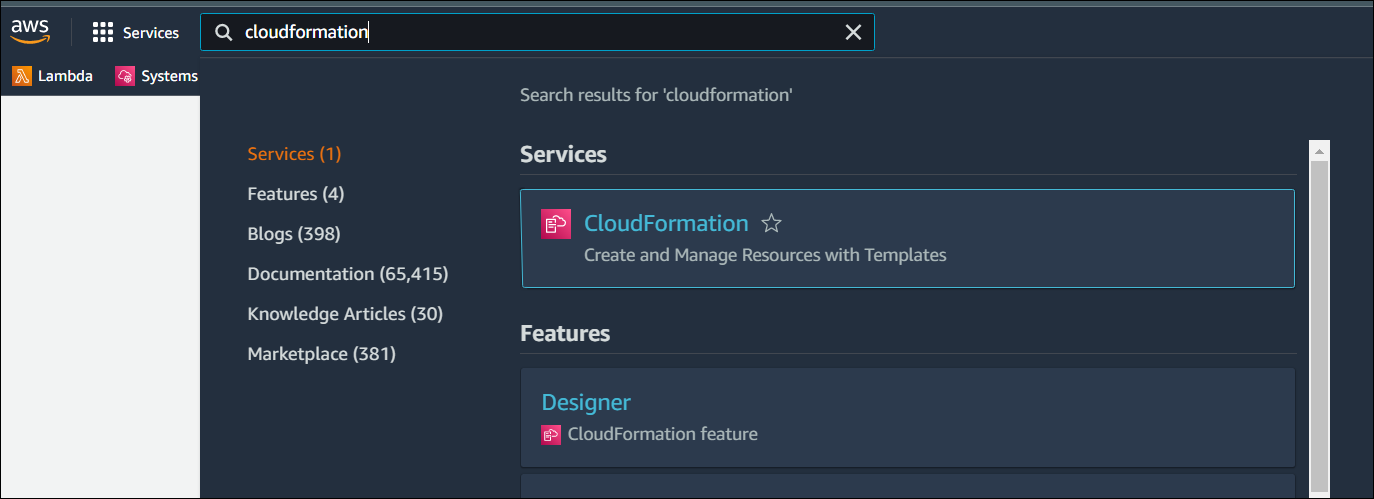
- Under Services select CloudFormation. The Stacks window opens.
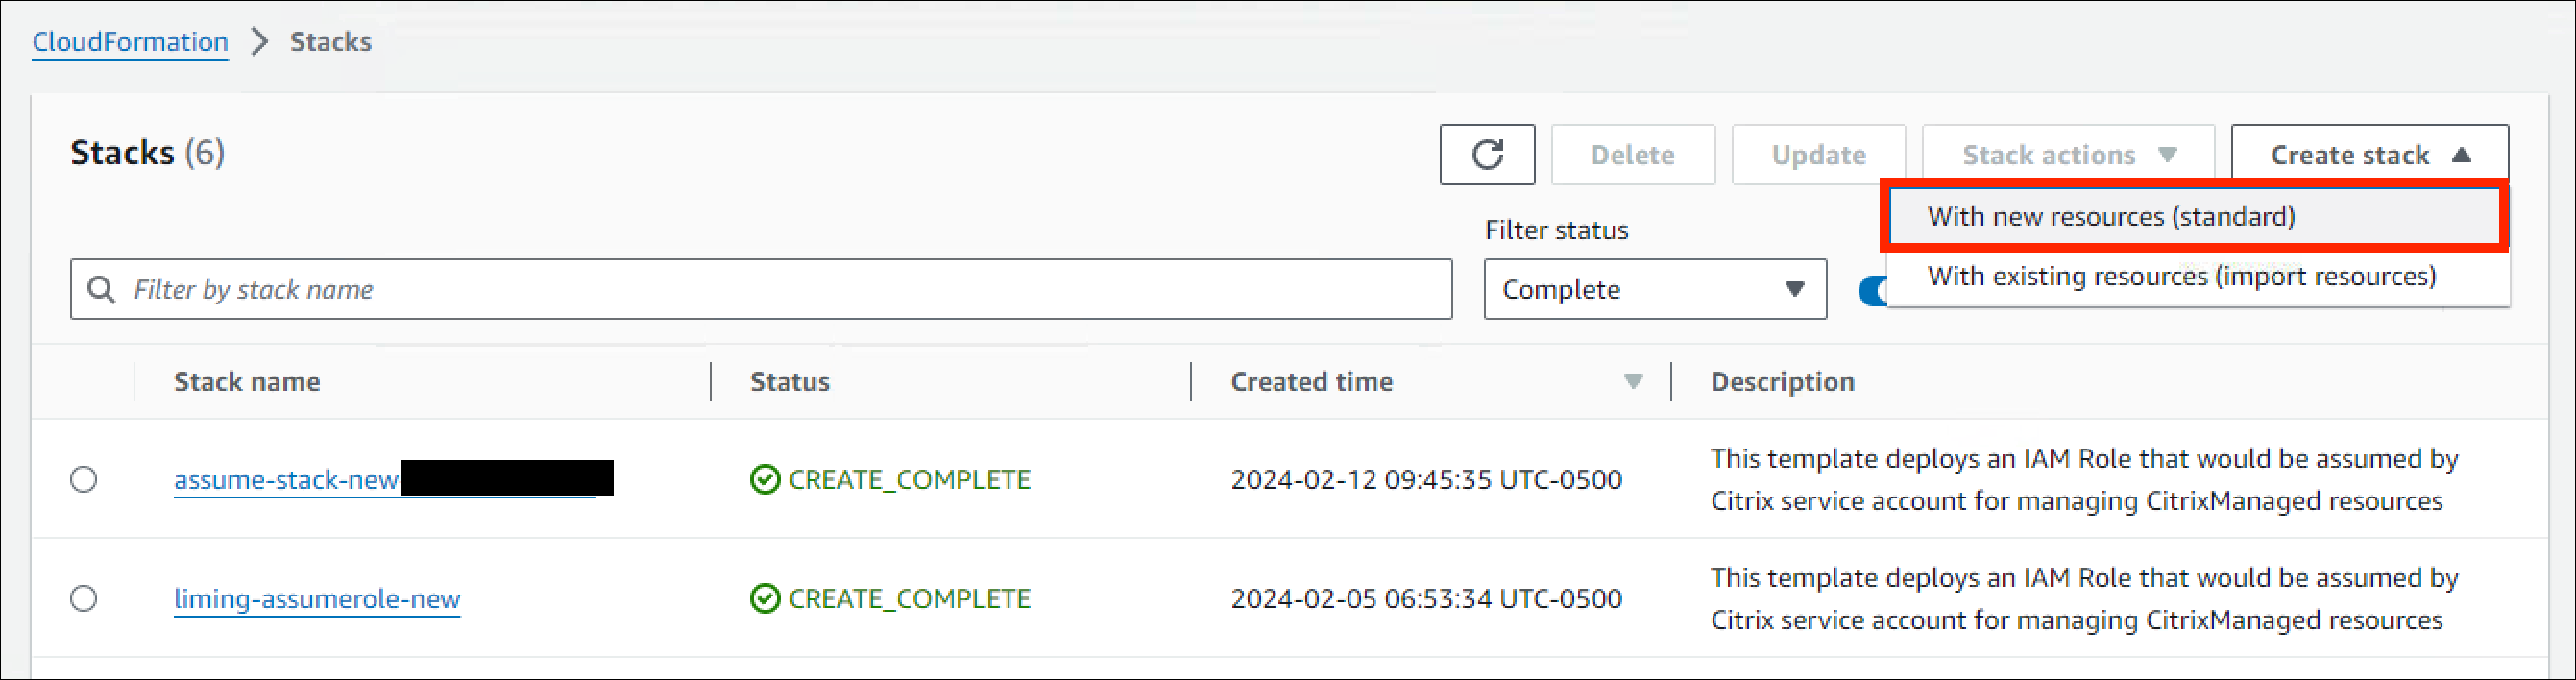
- Click Create stack > With new resources (standard) at the top right corner. The Create stack window opens.
- Under Prerequisite – Prepare template, select Template is ready.
- Under Specify template, click Upload a template file > Choose file and click Next. The Specify stack details pane opens.
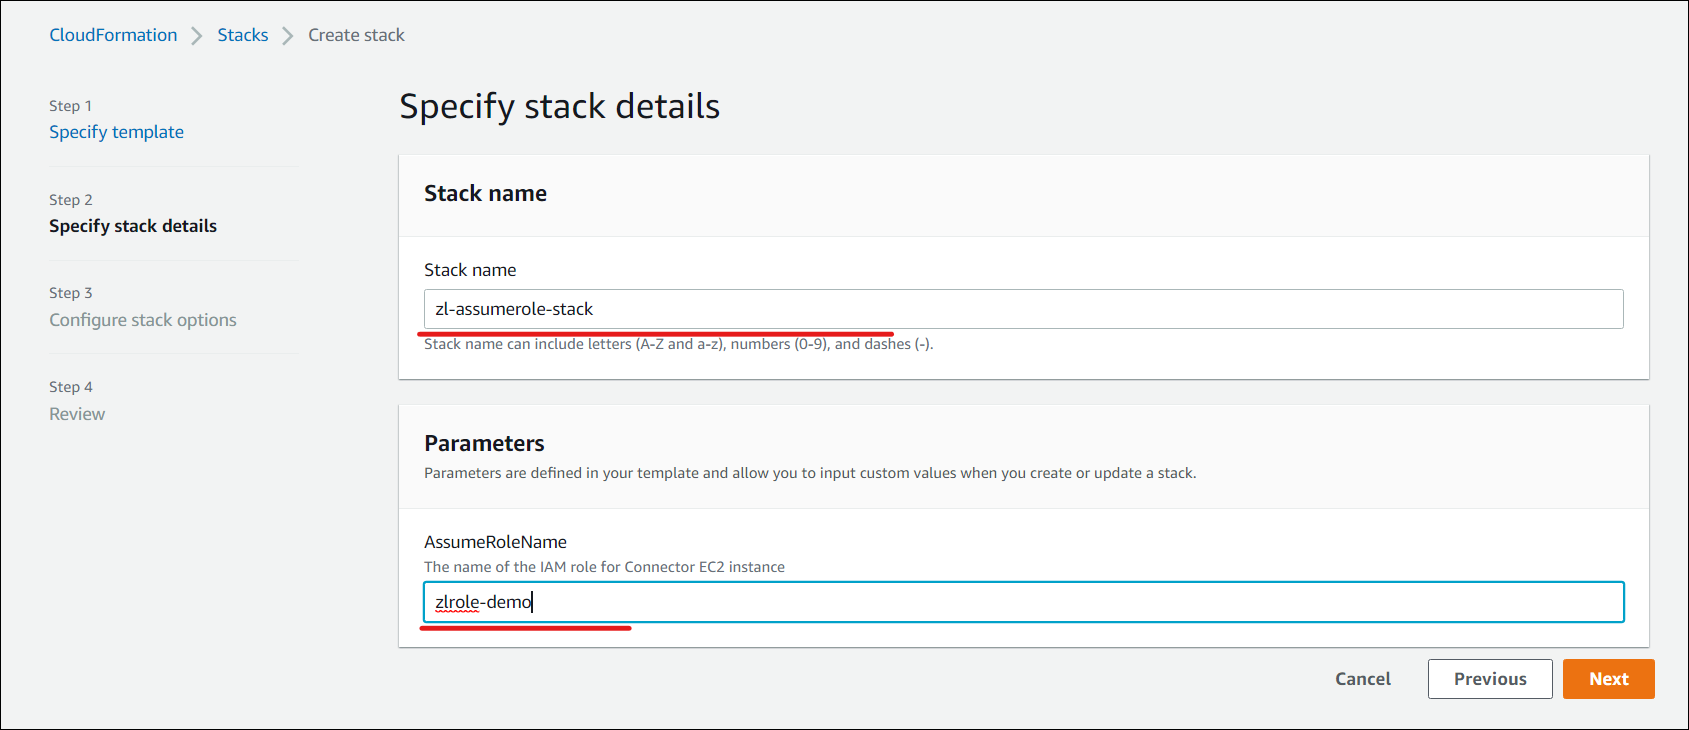
-
In the Specify stack details pane, provide a Stack name and AssumeRoleName and click Next. The Configure stack options pane opens.
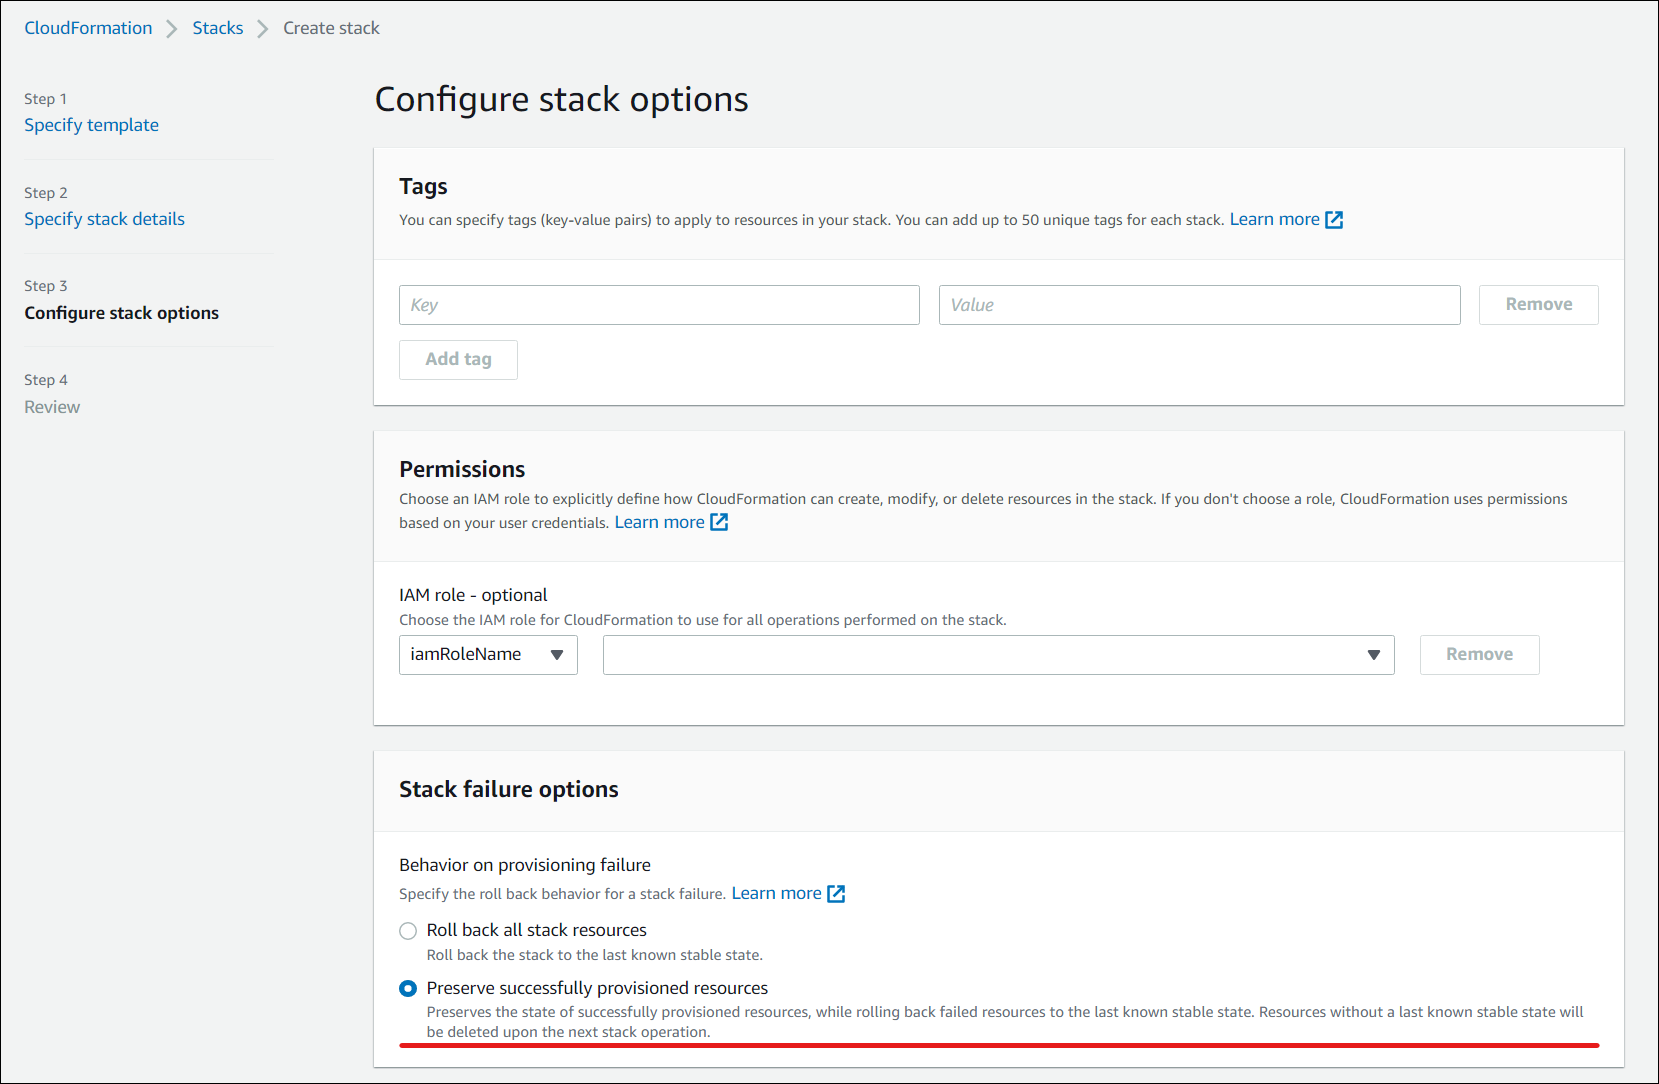
-
In the Configure stack options pane, select the Preserve successfully provisioned resources option. This option preserves the state of successfully provisioned resources. Resources without a last known stable state are deleted upon the next stack operation.
-
In the Capabilities pop-up window, select the I acknowledge that AWS CloudFormation might create IAM resources with custom names checkbox and click Create stack.

- The Events tab shows the status of the Stack created.
-
In the Resources tab, select the Physical ID corresponding to the AssumeRole created.

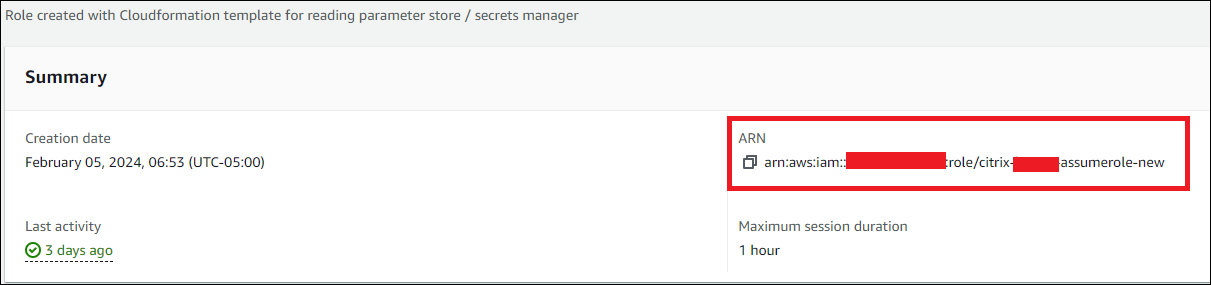
-
The Summary pane shows the Amazon Resource Name (ARN) generated.
Note:
Stack creation might fail because workspaces_DefaultRole has already been created. This does not affect the AssumeRole creation.
- Resume the procedure from step 3 in Connect your AWS account.
(Optional) Set up BYOL for your account
Bring Your Own License (BYOL) lets you import and use Windows 10 or Windows 11 desktop images for your Citrix DaaS for Amazon WorkSpaces Core deployment. BYOL enables dedicated tenancy for directory connections and access to EC2-based machine images.
Important:
Enabling BYOL is a permanent change for your AWS account and can only be reversed by removing all resources and contacting AWS support.
You can set up BYOL for an authenticated AWS account from the Accounts list or from the account detail panel.
Prerequisites:
- The AWS account is in the Authenticated state.
- BYOL has not yet been configured for the account.
- BYOL is enabled in the AWS WorkSpaces Console for your account. To enable it, contact your AWS account manager, sales representative, or the AWS Support Center. For more information, see Enable BYOL for your account using the Amazon WorkSpaces console.
To set up BYOL for your account, follow these steps:
- In Web Studio, go to Quick Deploy > Amazon WorkSpaces Core > Accounts.
- Select the AWS account for which you want to set up BYOL.
-
Click Set up BYOL. The Set up BYOL wizard opens.
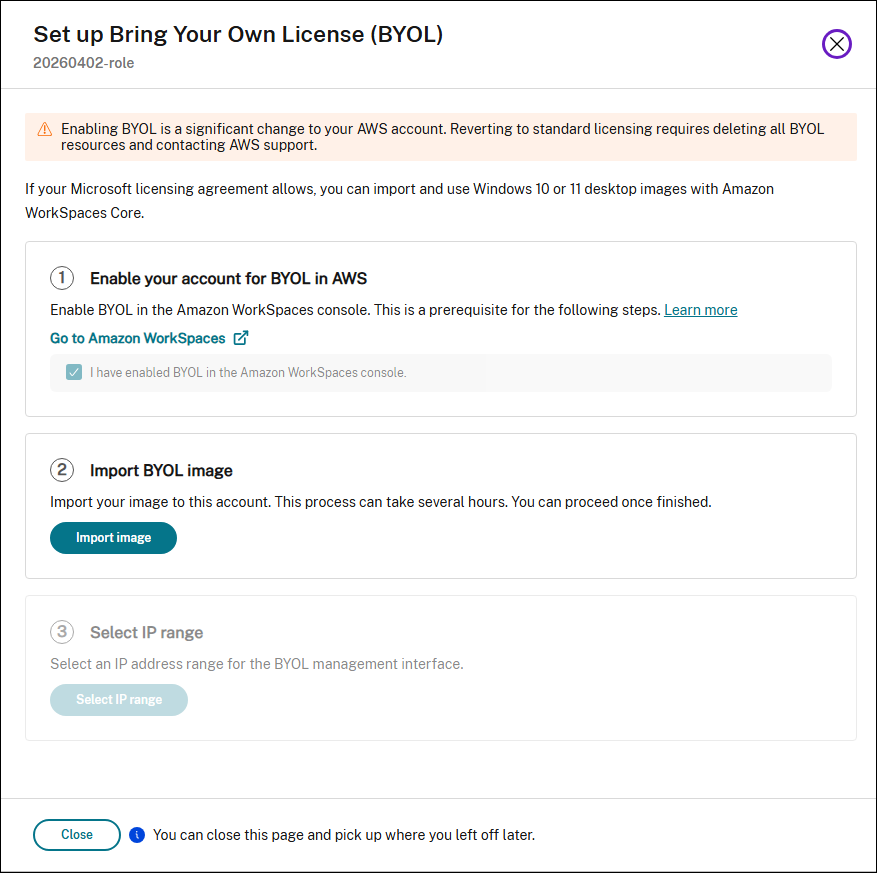
- On the Enable your account for BYOL in AWS step:
- Click Go to Amazon WorkSpaces to open the AWS WorkSpaces Console and enable BYOL for your account.
- After enabling BYOL in AWS, select the Confirm I’ve enabled BYOL checkbox.
- Click Next.
-
On the Import BYOL image step, click Import image to import a Windows 10 or Windows 11 desktop image into your account.
Note:
Importing an image might take several hours. You can close this page and return later to check the import status.
After BYOL setup is complete, the account detail panel shows the BYOL status, IP range, and available images.
Create a directory connection
Note:
Deregister your AWS Directory at the beginning of this step. After you create a Directory Connection with Citrix DaaS, the selected directory gets registered to create Amazon WorkSpaces with Citrix DaaS.
This procedure creates a connection that allows access to your organization’s Active Directory.
Prerequisites:
- A resource location containing two Cloud Connectors.
- A security group.
- An OU in your Active Directory.
For prerequisite details, see Before you start.
You can start this procedure from one of two places:
- A link on the Get Started checklist.
- From Studio, select Studio > Quick Deploy > Amazon WorkSpaces Core > Directory connections. Then click Create Directory Connection.
Follow the Create directory connection sequence:
- Connect directory: Select the account from the drop-down menu. Select either Dedicated or Shared for the tenancy.
-
Resource location: Select the account and directory. (The selected account must have at least one directory.)
- Select two subnets in which the desktop machines will be deployed. The subnets must be in appropriate availability zones.
- Specify a friendly name for this connection.
- When you’re done, click Next.
-
Virtual machine settings: The settings you select apply to all VMs that use this directory connection.
- The OU selected must match the OU targeted by the Citrix Group Policy.
- Select a security group.
- Indicate whether you want to give administrator privileges to each user assigned to VMs.
Import an image
This procedure enables you to create a desktop experience for your users. You can now import two types of images:
- EC2 Image - To import this image, the prerequisite is to install Citrix Virtual Delivery Agent and all its drivers. The image must also be prepared for BYOL. A BYOL script is available at: BYOLChecker.zip.
- Workspace Image - To import this image, the prerequisite is to install Citrix Virtual Delivery Agent and all its drivers.
To import the image, follow the steps:
- In Web Studio > Quick Deploy > Amazon WorkSpaces Core, click Images.
- In My Images, click Import Image.
- Prerequisites: Provides the prerequisites details for EC2 image and Workspace image. Click Next: Choose image.
-
Choose image
- Provide a friendly name for the image.
- Select an account.
- From the Image drop-down list, you can select EC2 or WSI type of images.
- If you select EC2, then choose the application to install from the Application drop-down menu and click Next: Summary. EC2 type images support only single-sessions.
- If you select WSI, then ensure that the session support and ingestion process align with the image setup. Although a mismatch does not overwrite the image’s settings, but might cause deployment failure due to incompatibility. Select session support as single or multi-session.
- Provide a description and click Next: Summary.
- Click Next. The Summary page opens.
-
In the Summary page review the information you provided and click Import Image.
Note:
Importing an image might take several hours.
- Select any image and click View Detail. The details page shows the options selected while creating the images, such as Account, Session support, Tenancy, Applications, and others.
Note:
When you create a deployment, in the Image and performance page:
- If the Directory connection selected has a dedicated tenancy, then the images listed are only single-sessions. In the Desktops page you can choose to create desktops with or without assigning users.
- If the Directory connection selected has a shared tenancy, then the images listed are both single and multi-sessions. If you select an image with multi session, then in the Desktops page, only Create desktops without assigning users option is enabled.
Requirements for Dedicated Tenancy Images
- The images must be either Windows 10 Pro or Windows 11 Pro.
- Run the BYOLChecker script during the image preparation.
- The image can only be set in single-session support.
- When creating an AMI image in EC2, the snapshot must be unencrypted.
- The default ingestion protocol during image import is regular. However, customers can opt for the graphical G4DN ingestion protocol, which installs additional drivers and requires higher-tier machines.
- During image import, customers can add an office application to be installed. This will limit workspace creation to preassigned users deployment.
- The images require the directory connection to be set as dedicated.
- You can create preassigned single-session deployments or decoupled (pooled) single-session deployments.
Requirements for Default or Shared Tenancy Images
- Select the Windows Server BYOP bundle to create a workspace.
- The workspace must be unencrypted, and only the Always On mode is supported.
- Connect to the workspace from the connector using the private IP address via RDP and log in with the same user credentials the workspace is assigned to. The image cannot be saved if there are multiple user profiles on the machine.
- Install VDA and run the image checker application.
- VDA can be configured as either single-session or multi-session.
- Restart the workspace and save it as an image.
- After the image is saved, it can be imported into the Citrix environment.
- The default ingestion protocol during image import is regular. However, if the base bundle was G4DN-based, you can opt for the graphical G4DN ingestion protocol.
- The images require the directory connection to be set as shared.
- If you set up and saved the image as a single-session, you can create preassigned single-session deployments or decoupled (pooled) single-session deployments.
- If you set up and saved the image as a multi-session, you can only create decoupled (pooled) multi-session deployments.
OS, Directory Type, and Session Support Compatibility
| Image | Session Support | AWS Directory Tenancy | Deployment Type | Persistence |
|---|---|---|---|---|
| Windows Desktop 11 Pro | Single-Session | Dedicated | Dedicated or Pooled | Persistent |
| Windows Desktop 10 Pro | Single-Session | Dedicated | Dedicated or Pooled | Persistent |
| Windows Server 2022 | Multi-Session | Shared | Pooled | Persistent |
| Windows Server 2022 | Single-Session | Shared | Dedicated or Pooled | Persistent |
| Windows Server 2019 | Multi-Session | Shared | Pooled | Persistent |
| Windows Server 2019 | Single-Session | Shared | Dedicated or Pooled | Persistent |
Note:
All instances are persistent and using the pools feature, the instances are assigned on the first use basis. The instances remain provisioned without an assigned user. When a user logs in for the first time, that instance is assigned to the user for all future logins.
Integrate Microsoft Office 2019 Image when importing an image
To integrate Microsoft Office 2019 image while importing an image:
- In Web Studio > Quick Deploy > Amazon WorkSpaces Core, click Images.
- In My Images, click Import Image.
- In Import Image > Prerequisites, click Next: Choose Image.
- In Import Image > Choose image:
- Select an account from the Account dropdown.
- Select an AMI from the AMI dropdown.
- Enter the name of the image in the Name field.
- Select the Include Microsoft Office 2019 Professional Plus in the image.
- Enter a description in the Description field.
- In Import Image > Choose image, click Next: Summary.
- In Choose Image > Summary, ensure that Selected appears for Microsoft Office 2019.
- In My Images, click Import Image. The status of the recently deployed image displays importing until the import operation completes.
- In My Images, select the recently deployed image and click View Detail.
- In the Detail panel, the Microsoft Office 2019 field displays Included.
Note:
Only the following versions of the OS are compatible:
- Windows 10 Version 21H2 (December 2021 Update)
- Windows 10 Version 22H2 (November 2022 Update)
- Windows 10 Enterprise LTSC 2019 (1809) (1809)
- Windows 10 Enterprise LTSC 2021 (21H2) (21H2)
- Windows 11 Version 22H2 (October 2022 release)
Create a custom image from an existing WorkSpaces instance
To create a custom image for a user:
- In Web Studio > Quick Deploy > Amazon WorkSpaces Core, select Deployments.
- Select the deployment containing machines you want to manage and click View detail.
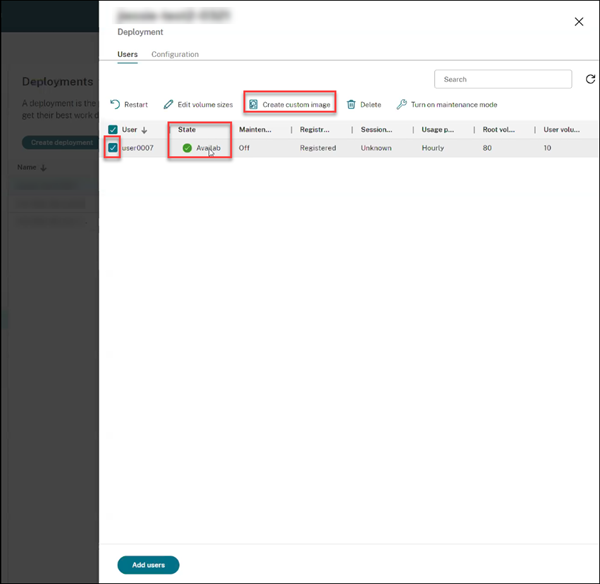
-
In the Deployment pane, under the Users tab, select the User whose workspace state is available and click Create custom image.
Note:
You can create a custom image only for the deployment whose workspace state is available.
-
In the Create custom image pane:
- Verify the Image properties, OS and Account information of the selected user.
- Note the warning message that indicates the time the desktop deployment will be in maintenance mode during the process.
- Fill the mandatory fields like Image name and Description. The Image name field suggests the allowed characters for image names.
- Click Create. The Images node window opens.
- Click the Refresh button. The newly created custom image is listed with the Status as Pending.
- Select the custom image and click View Detail. The Image window opens with details like Status, Account, ID, OS, and Description.
- Click Deployments in the left navigation. The Status of the new deployment shows as Updating.
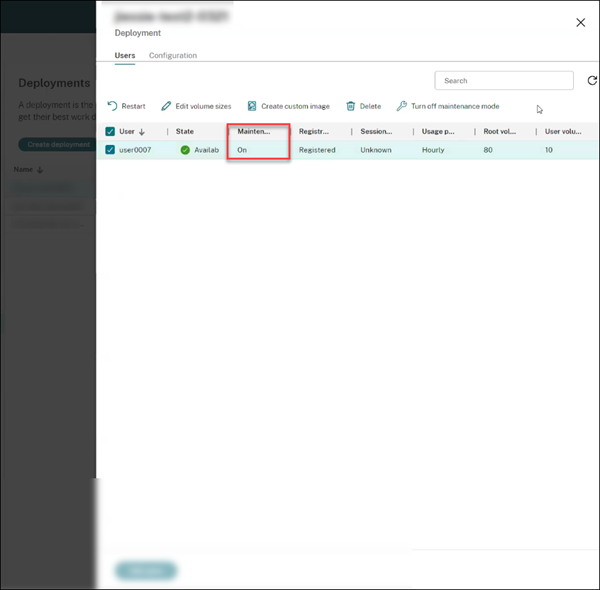
-
Select the new deployment and click View detail.
- In the Deployment pane, the Maintenance tab shows as On.
As a best practice:
- Use a separate Virtual Private Cloud (VPC) that is not connected to your production environment.
- For Windows WorkSpaces, avoid configuring any Group Policy Objects (GPOs) before creating the image. For more information, see Best practices.
- Use a dedicated AD Connector for image creation.
- Use a dedicated OU in the Active Directory for image creation. For more information, see Best practices for successful BYOL image creation for Amazon WorkSpaces.
Create a deployment
A deployment is a group of desktops that users can access from their store. This procedure specifies the characteristics of the virtual machines to be deployed as desktops, and which AD users can use them.
Note:
The computer name is set by Amazon when the workspace is created and is used as an identifier to ensure accurate workspace data. You cannot modify the computer name using Citrix DaaS for Amazon Workspaces Core.
Prerequisites
Complete all the steps listed in Prepare and create a deployment.
- In Web Studio > Quick Deploy > Amazon WorkSpaces Core > Deployments, click Create deployment.
- In the Image and performance page,
- if you select a dedicated tenancy, as the Directory connection, then the image drop down lists the images that have Dedicated tenancy. Images with Dedicated tenancy support only single-sessions.
- if you select a shared tenancy as the Directory connection, then the Image drop down lists the images that have Default tenancy. Images with Shared tenancy support both single and multi-sessions.
- Select the Performance and Root volume sizes. Click Next: Encryption.
-
Encryption: In the Select encryption key preference section:
- The Use AWS managed KMS key option is selected by default. This encrypts both root and user volume and is managed by AWS.
- If you select the Use customer managed key option, ensure to first create the key in AWS Key Management. Once created, enter the key into the Key Alias field and click Next: Desktops.
Note:
Encryption keys can be found in the Key Management Service (KMS) console under AWS managed keys or Customer managed keys.
-
Desktops:
- A new option to select Create desktops without assigning users, is added. If you select this option, it is recommended to configure the user profile location to be stored on the D: drive or at an external location. By default, the user profile is stored on the C: drive. The user data and settings on the C: drive are lost if you rebuild the WorkSpace. Specify the number of desktops you want to add to the deployment. The Desktop assignment type for this option is Random pool unassigned. Click Next: Summary.
Note:
The Create desktops without assigning users option is not available for images with AWS provided applications. Therefore, you must assign users while creating desktops.
- If you select the existing Assign users while creating desktops option, search and select the users who will be allowed to access the desktops. If you want to customize the volume sizes for a user, select Edit user and root volume sizes, and then specify the sizes. The Desktop assignment type for this option is Static preassigned. Click Next: Summary.
- Summary: Review the information you provided and provide a Deployment name. Click Create deployment. The Deployment page shows the new Desktops column with the assigned desktop details.
- Re-sync: Click Re-sync for a deployment that is in Pending state or if the number of machines listed in a deployment does not match with the number of machines listed in AWS.
- Select a deployment and click View detail. The deployment details page shows three tabs:
- Desktops: Select a desktop and the settings to modify is displayed.
- Applications: This tab allows you to add new applications and to delete the existing applications. For more information about adding applications to an existing deployment, see Step 6. Applications.
- Users: This tab is available only for unassigned deployments to assign users or groups to launch the desktop. Click Add. Update the required settings and click Find now. You can select more than one user from the table and click Ok > Done. You can add more users and also delete an existing user by selecting appropriate options.
- Configuration: This tab shows the assignment type of the selected desktop. If it is an unassigned desktop, then the Desktop assignment type is Random pool unassigned.
Integrate Microsoft 365 Windows apps
To integrate Microsoft 365 Apps, see Microsoft 365 Apps for enterprise now available on Amazon WorkSpaces services and Microsoft 365 Bring Your Own License (BYOL).
Manage machines in a deployment
In addition to the machine management features described in Manage machine catalogs, for some actions, you can select machines to manage from a deployment.
To manage machines in a deployment:
- In Web Studio > Quick Deploy > Amazon WorkSpaces Core, select Deployments.
- In the Deployments pane, select the deployment containing machines you want to manage.
- Click View details.
- In the Deployment details pane, select the machine you want to manage.
- From the actions displayed, select the action you want to perform on the machine:
- Click Edit volume size to change the volume size of the machine.
- Click Delete to delete the machine from the deployment and AWS. If a machine is in a delivery group, it can be deleted only if it is maintenance mode.
- Click Turn maintenance mode on/off to turn maintenance mode on (if it is off) or off (if it is on) for the machine.
Add applications to a deployment
To add applications to an existing deployment:
- In Web Studio > Quick Deploy > Amazon WorkSpaces Core, select Deployments.
- In the Deployments pane, select the deployment to which you want to add the applications.
- Click Add applications. The Add Application pane opens.
- Click the Add menu and select one of the following sources to add the applications:
- From Start menu
- Manually
- Application packages
- Existing
- Application group
For more information about adding applications to an existing deployment, see Step 6. Applications.
Use persistent desktops with a non-persistent user profile
Workspace Environment Management™ can be used to configure Profile Management settings to enable persistent desktops with non-persistent user profiles. This provides you with a customizable desktop experience while maintaining easy management and centralized storage of user profiles, creating a flexible and scalable solution for virtual desktop environments. Do the following to configure the setting:
- From the WEM console, navigate to Configuration Set > Policies and Profiles > Citrix Profile Management Settings.
- Select Enable Profile Management Configuration and navigate to Profile Handling tab.
- Select Delete locally cached profiles on logoff.
Reference
AWS account programmatic access permissions
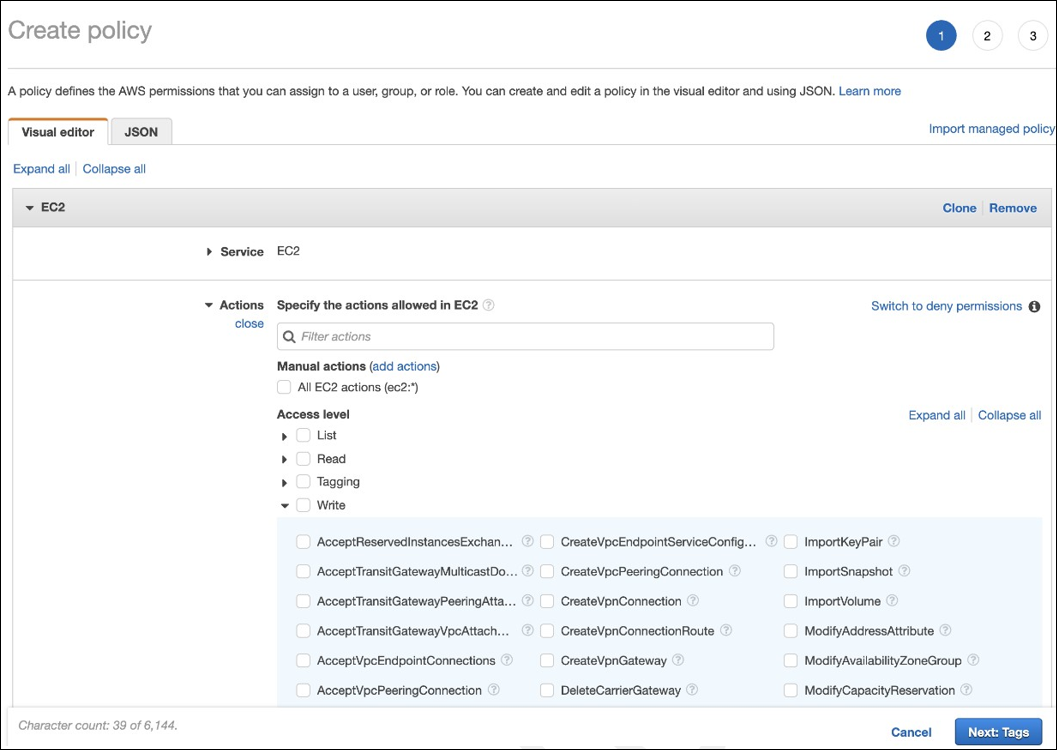
The AWS user account must have certain programmatic access permissions to make API calls to the AWS resource layer. Programmatic access creates an access key ID and a secret access key. You can create a policy containing these permissions in the IAM console. As shown in the following graphics, you can use the visual editor (adding the permissions one by one) or the JSON (adding the snippet below). For more information, see Creating an IAM user in your AWS account.
-
On the Visual editor tab, add the permissions one-by-one.
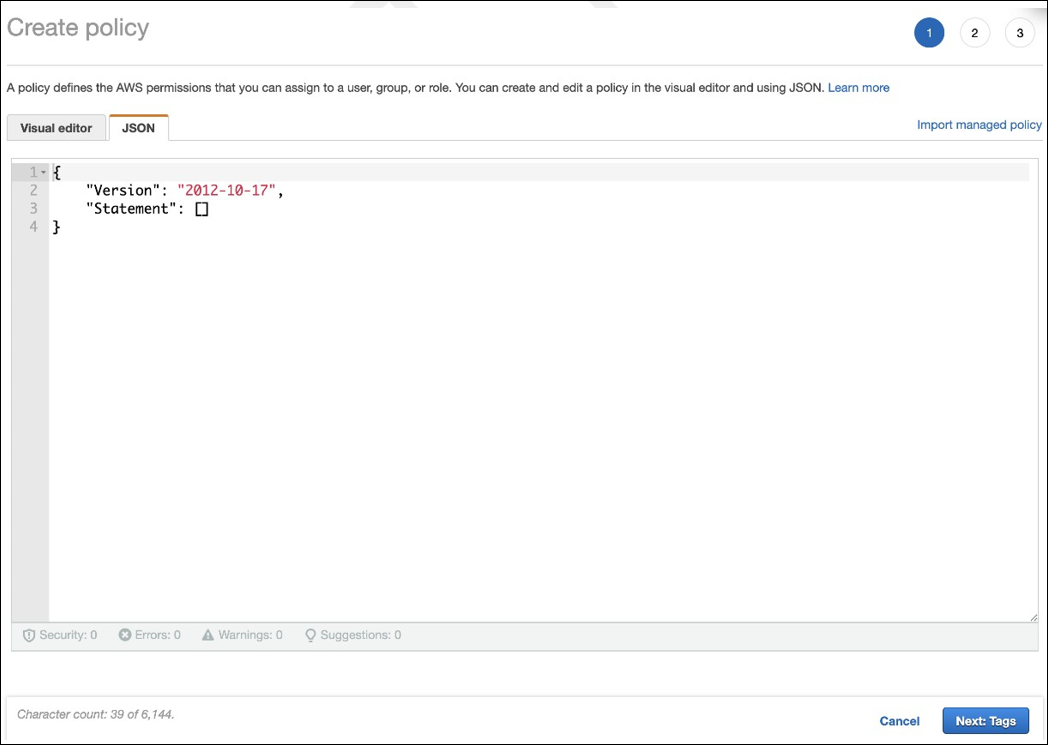
-
On the JSON tab, add the snippet shown after the following graphic.
Required permissions
{
    "Version": "2012-10-17",
    "Statement": [
        {
            "Sid": "VisualEditor0",
            "Effect": "Allow",
            "Action": [
                    "workdocs:DeregisterDirectory",
                    "workdocs:RegisterDirectory",
                    "workdocs:AddUserToGroup",
                    "ec2:ImportInstance",
                    "ec2:DescribeImages",
                    "ec2:DescribeImageAttribute"
                    "ec2:CreateKeyPair",
                    "ec2:DescribeKeyPairs",
                    "ec2:ModifyImageAttribute",
                    "ec2:DescribeVpcs",
                    "ec2:DescribeSubnets",
                    "ec2:RunInstances",
                    "ec2:DescribeSecurityGroups",
                    "ec2:CreateTags",
                    "ec2:DescribeRouteTables",
                    "ec2:DescribeInternetGateways",
                    "ec2:CreateSecurityGroup",
                    "ec2:DescribeInstanceTypes",
                    "servicequotas:ListServices",
                    "servicequotas:GetRequestedServiceQuotaChange",
                    "servicequotas:ListTagsForResource",
                    "servicequotas:GetServiceQuota",
                    "servicequotas:GetAssociationForServiceQuotaTemplate",
                    "servicequotas:ListAWSDefaultServiceQuotas",
                    "servicequotas:ListServiceQuotas",
                    "servicequotas:GetAWSDefaultServiceQuota",
                    "servicequotas:GetServiceQuotaIncreaseRequestFromTemplate",
                    "servicequotas:ListServiceQuotaIncreaseRequestsInTemplate",
                    "servicequotas:ListRequestedServiceQuotaChangeHistory",
                    "servicequotas:ListRequestedServiceQuotaChangeHistoryByQuota",
                    "sts:DecodeAuthorizationMessage",
                    "ds:*",
                    "workspaces:*",
                    "iam:GetRole",
                    "iam:GetContextKeysForPrincipalPolicy",
                    "iam:SimulatePrincipalPolicy"

                ],
                "Resource": "*"
            }
        ]
}
<!--NeedCopy-->
In this article
- Introduction
- Prepare and create a deployment
- Before you start
- Create a resource location
- Connect your AWS account
- Create a directory connection
- Import an image
- Create a deployment
- Integrate Microsoft 365 Windows apps
- Manage machines in a deployment
- Add applications to a deployment
- Use persistent desktops with a non-persistent user profile
- Reference