Create a Nutanix catalog
Create machine catalogs describes the wizards that create a machine catalog. The following information covers details specific to Nutanix virtualization environments.
Note:
Before creating a Nutanix catalog, you need to finish creating a connection to Nutanix. See Connection to Nutanix.
Create a machine catalog using Nutanix machine template version
When creating an MCS-provisioned machine catalog with a Citrix-managed Nutanix AHV Prism Central host connection, the base image is created from a Nutanix VM template version. A key advantage is that Nutanix Prism Central allows a VM template to be used across multiple clusters. As a result, Citrix administrators can use a single Nutanix VM template version as the master VM for multiple MCS machine catalogs, even if those catalogs are on different Nutanix clusters.
Before creating the catalog, create a master VM, and convert it to a VM template version in Nutanix Prism Central. See Nutanix documentation for the steps.
You can create a catalog using:
- Studio. You can also create a catalog using existing VMs. See Create a machine catalog using existing machines (power managed)
- PowerShell commands
Limitations
- Attaching multiple NICs to the same subnet is not supported.
- Due to Nutanix limitation, each MCS provisioned machine catalog can only be assigned with NICs in a single type of network among Overlay networks, VLAN Basic Subnets, and VLAN Subnets.
- In some scenarios, updating MCS master image for a non-persistent machine catalog might cause potential issues. See Secure Boot and vTPM in Nutanix Prism Central.
- When creating a machine catalog on Nutanix, cluster name containing a period (.) is not supported.
- When selecting a Nutanix VM template as the master image, the template name or template version name must not contain any characters like # or &.
Create a machine catalog using Studio
In the Machine Catalog Setup wizard:
- On the Machine Type page, select Multi-session OS, Single-session OS, or Remote PC Access.
-
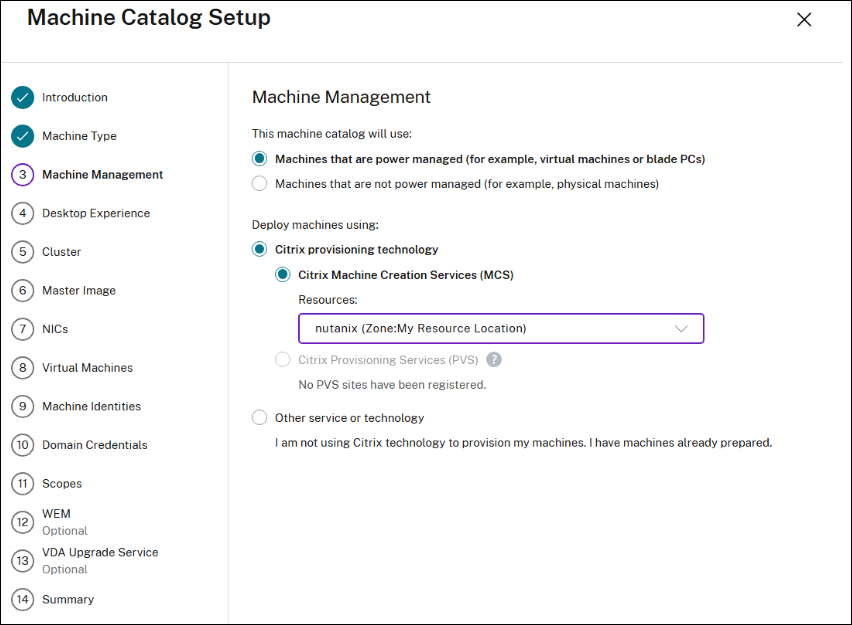
On the Machine Management page, select Machines that are power managed and Citrix Machine Creation Services™ as the deployment method. Select the Resources.
- On the Desktop Experience page, select one of the two options.
-
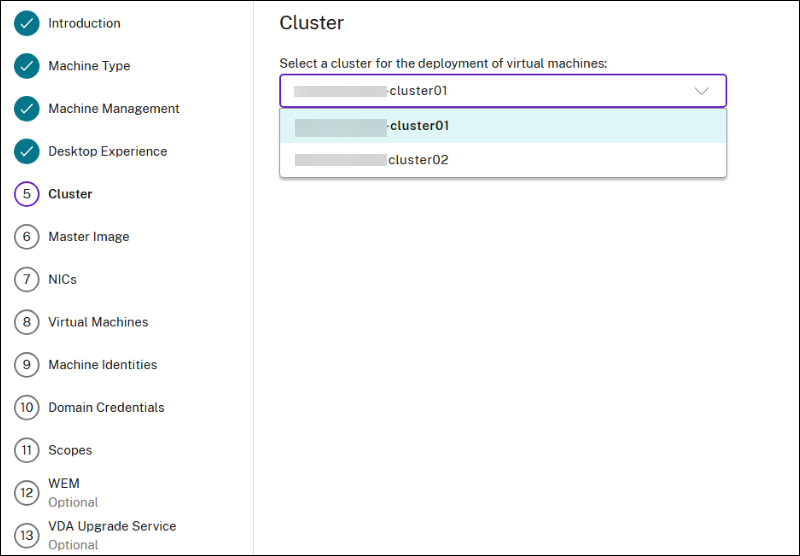
On the Cluster page, select a cluster for the deployment of the VMs.
-
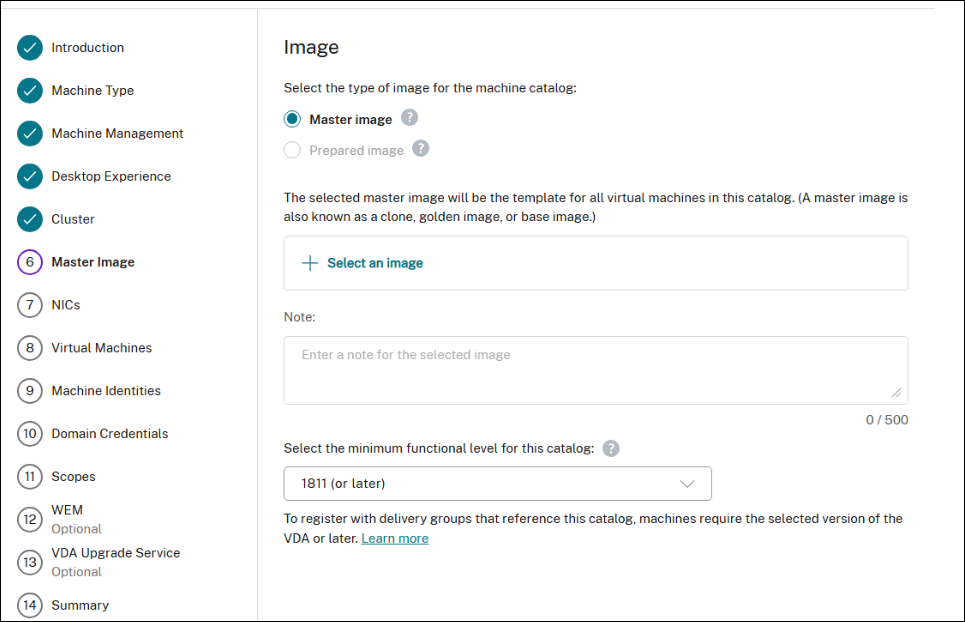
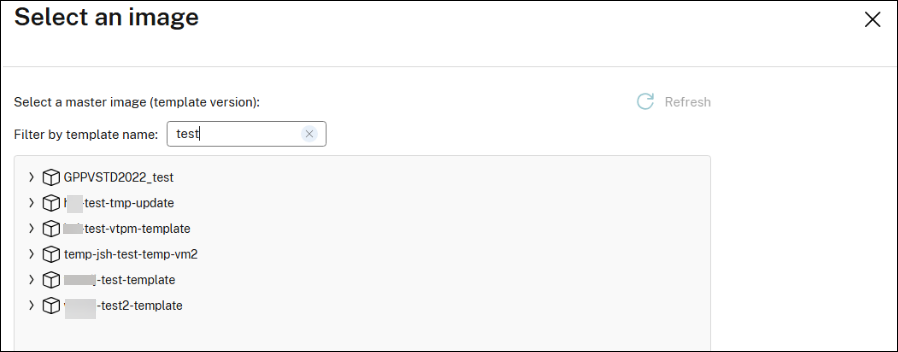
On the Master Image page, click Master Image and select a master image (template version). You can filter machine templates by name. The master image’s template version defaults as the machine profile for new catalogs. However, you can change the template version for the machine profile.
Note:
You can use a single Nutanix VM template version as the master VM for multiple MCS machine catalogs, even if those catalogs are on different Nutanix clusters.
Filter machine templates by name:
See description of a template:

-
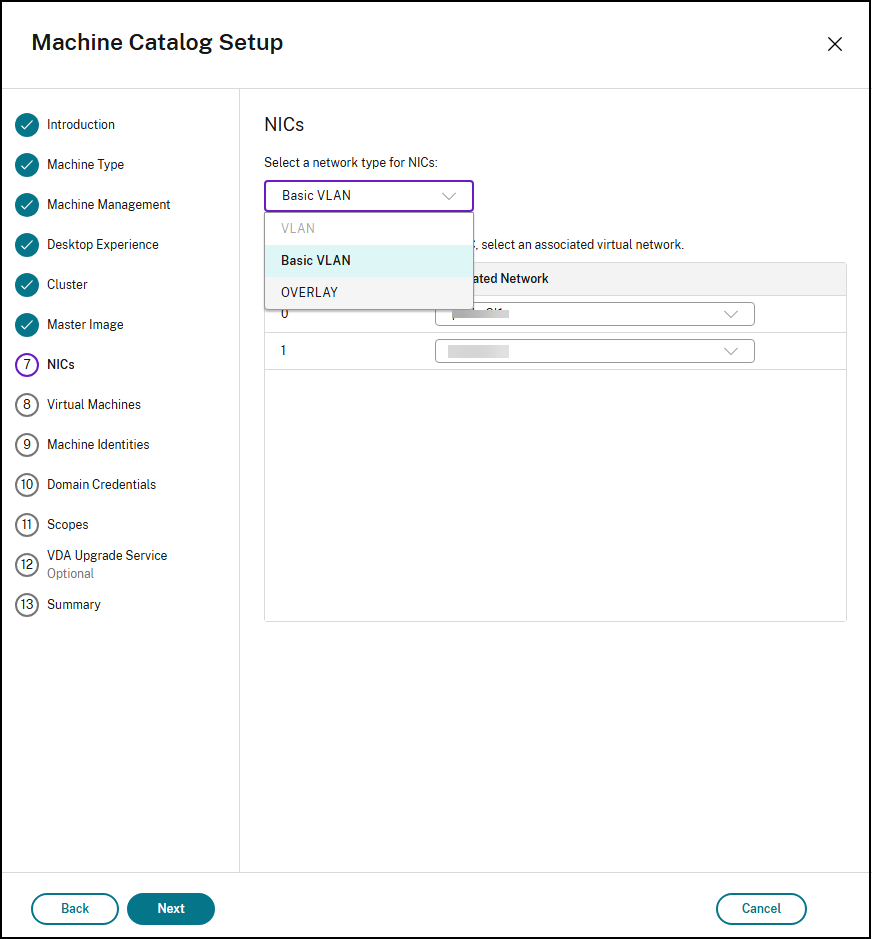
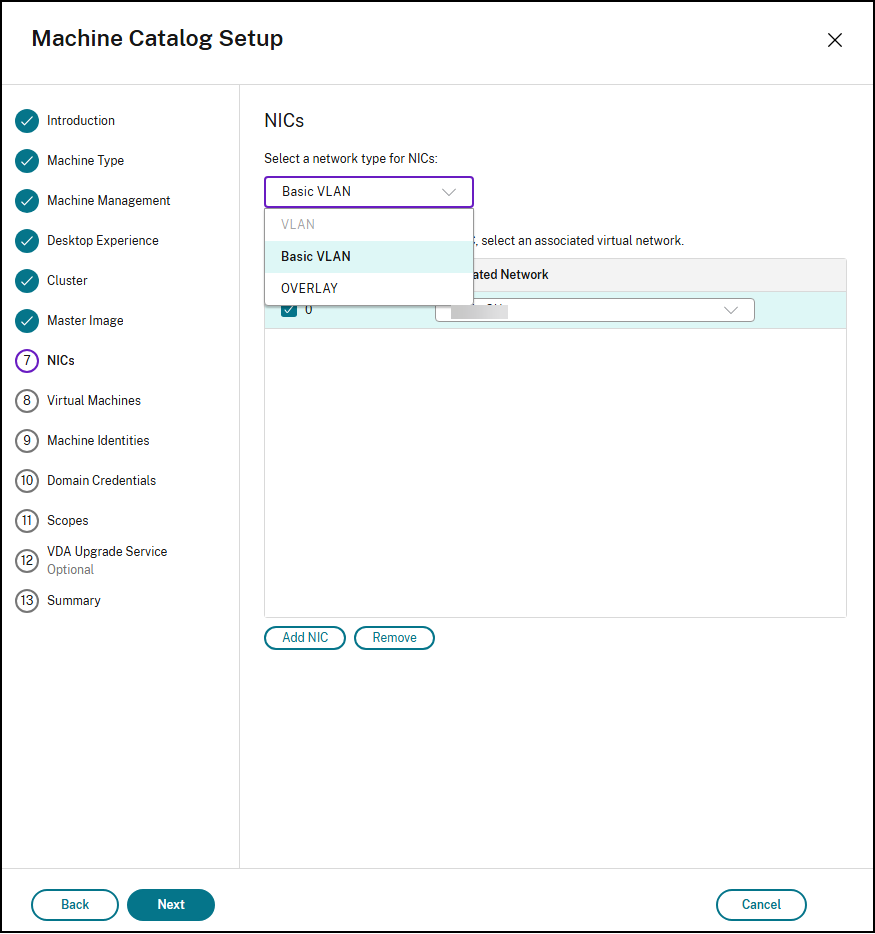
On the NICs page:
- Select a NIC type from the drop-down to filter associated networks. The network types of NICs available are: VLAN (Advanced VLAN), Basic VLAN, and OVERLAY.
-
If you create a catalog with a machine profile, then the NIC number is consistent with the NIC number of the machine profile and can’t be changed. Select an associated virtual network for each NIC.
-
If you create a catalog without a machine profile, click Add NIC to increase NIC count or click Remove to delete selected NICs. Select one or more NICs and then select an associated virtual network for each NIC.
- On the Virtual Machines page, indicate the number of virtual machines you want to create and configure your machines for Total memory (MB) on each machine, Virtual CPUs, and Cores per CPU. These values are automatically populated from the machine profile.
- On the Summary page, check the details of the machine catalog. Enter a name and description for the machine catalog. Click Finish.
Export the machine profile
You can export the machine profile used by the machine catalog to a JSON file.
- Select the machine catalog and navigate to the Templates Properties tab.
- Under Machine Profile details, click Export next to the Last version.
Create a machine catalog using PowerShell commands
- Open the PowerShell window.
- Run
asnp citrix*. -
Create an identity pool if not already created. For example:
New-AcctIdentityPool -Domain "<string>" -IdentityPoolName "<string>" -IdentityType "ActiveDirectory" -NamingScheme "DemoVM-##" -NamingSchemeType "Numeric" -ZoneUid "GUID" -Scope @() <!--NeedCopy--> -
Create a provisioning scheme.
For example: Without a machine profile
New-ProvScheme -CustomProperties "<CustomProperties xmlns=`"http://schemas.citrix.com/2014/xd/machinecreation`" xmlns:xsi=`"http://www.w3.org/2001/XMLSchema-instance`"><Property xsi:type=`"StringProperty`" Name=`"ClusterId`" Value=`"00062c63-1fb0-58c9-4fc8-5c2573352378`" /><Property xsi:type=`"StringProperty`" Name=`"CPUCores`" Value=`"1`" /></CustomProperties>" -HostingUnitName "<Hosting unit name>" -IdentityPoolName "<string>" -InitialBatchSizeHint 1  -MasterImageVM "XDHyp:\HostingUnits\<Hosting Unit Name>\Templates.folder\<template name>.template\<template version name>.templateversion" -NetworkMapping @{"5"="XDHyp:\HostingUnits\<Hosting unit name>\Clusters.folder\<Cluster Name>.cluster\<Network name>.network"} -ProvisioningSchemeName "<Catalog name>" -ProvisioningSchemeType "MCS" -RunAsynchronously -Scope @() -VMCpuCount 2 -VMMemoryMB 10240
<!--NeedCopy-->
For example: With a machine profile
Use a machine profile to capture hardware properties from a template version and apply them to provisioned VMs. If you don’t specify machine profile, hardware properties are captured from the master image template version.
Note:
- The OS Disk, vTPM, and Secure Boot properties are always captured from the master image, even when a machine profile is used.
- Since OS Disk is not read from the machine profile, you can create a diskless VM and convert it to a template version that can be used for the machine profile.
- As the complete JSON spec of the machine profile template version is stored, you can create the VMs even if you delete the template version from the Prism Central.
Properties captured from the machine profile are:
Property Property Name in API (GetTemplateVersionById) Comments/References CPU numSockets RAM memorySizeBytes Core numCoresPerSocket Categories categories Category Management GPU gpus GPUs Summary View Threads Per Core numThreadsPerCore aCLI-VM Numa Nodes numNumaNodes Enable VCPU Hard Pinning isVcpuHardPinningEnabled Enable CPU Passthrough isCpuPassthroughEnabled Enable Memory Overcommit isMemoryOvercommitEnabled Creating a VM through Prism Central (AHV) Enable GPU Console Access isGpuConsoleEnabled Enable CPU Hot Plug isCpuHotplugEnabled Enable SCSI Controller isScsiControllerEnabled Timezone hardwareClockTimezone Creating a VM through Prism Central (AHV) Enable AHV branding isBrandingEnabled Enable VGA Console isVgaConsoleEnabled VM isAgentVm Creating a VM through Prism Central (AHV) Note:
Using the same master image template version, you can create different catalogs with various machine profiles, each featuring a distinct set of properties mentioned above. For example, you might assign different Categories that can be linked to Nutanix Policies, adjust CPU/Memory, modify Memory Overcommit settings, or add and remove multiple GPUs.
The command-line parameters, such as
VMCpuCount,VMMemoryMB, andCPUCoresin theCustomProperties, can be provided and takes precedence over the values for these parameters from the machine profile template version. If not provided, these are read from the given machine profile.$customProperties = @" <CustomProperties xmlns="http://schemas.citrix.com/2014/xd/machinecreation" xmlns:xsi="http://www.w3.org/2001/XMLSchema-instance"> <StringProperty Name="ClusterId" Value="00062c63-1fb0-58c9-4fc8-5c2573352378" /> <StringProperty Name="CPUCores" Value="2" /> </CustomProperties> "@ New-ProvScheme -HostingUnitName "<Hosting unit name>" ` -IdentityPoolName "<string>" ` -InitialBatchSizeHint 1 ` -MasterImageVM "XDHyp:\HostingUnits\<Hosting Unit Name>\Templates.folder\<template name>.template\<template version name>.templateversion" ` -MachineProfile "XDHyp:\HostingUnits\<Hosting Unit Name>\Templates.folder\<template name for machine profile>.template\<template version name>.templateversion" ` -NetworkMapping @{"0"="XDHyp:\HostingUnits\<Hosting unit name>\Clusters.folder\<Cluster Name>.cluster\<Network name>.network"} ` -ProvisioningSchemeName "<Catalog name>" ` -ProvisioningSchemeType "MCS" ` -CustomProperties $customProperties ` -RunAsynchronously ` -VMCpuCount 2 ` -Scope @() <!--NeedCopy--> -
Register a provisioning scheme as a broker catalog. For example:
New-BrokerCatalog -AllocationType "Random" -IsRemotePC $False  -MinimumFunctionalLevel "L7_20" -Name "<Catalog Name>" -PersistUserChanges "Discard" -ProvisioningType "MCS"    -SessionSupport "MultiSession" -ZoneUid "GUID"  -ProvisioningSchemeId fe7df345-244e-4xxxx-xxxxxxxxx `  -Scope @()
<!--NeedCopy-->
Create a machine catalog with existing machines (power managed)
You can create a machine catalog with existing machines (power managed) using:
Create a machine catalog with existing machines (power managed) using Studio
In the Machine Catalog Setup wizard:
- On the Operating System page, select Multi-session OS or Single-session OS.
-
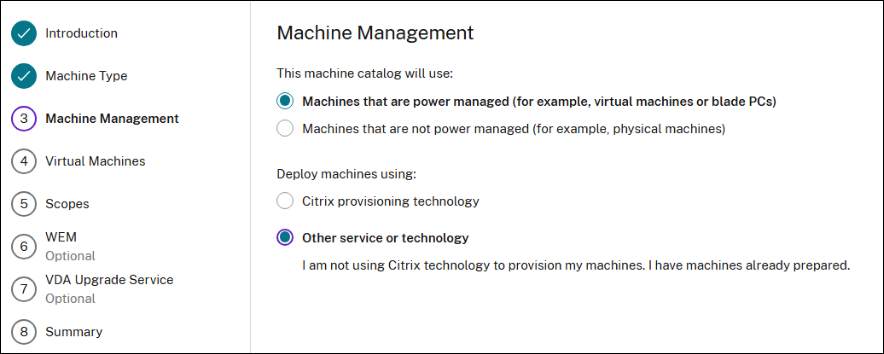
On the Machine Management page, select Machines that are power managed and Other service or technology.
-
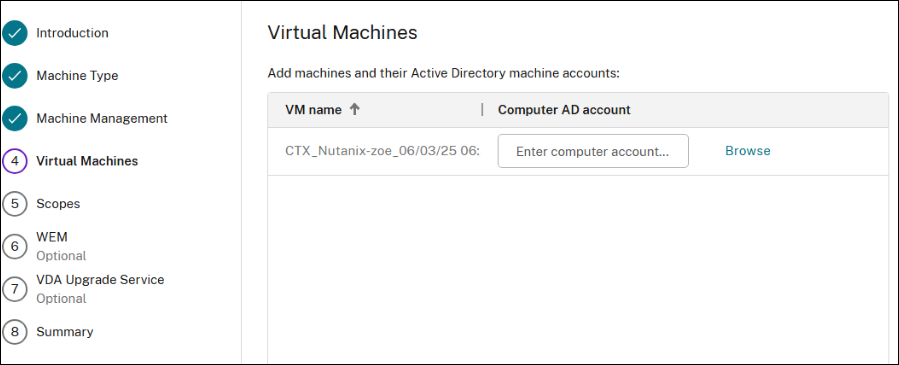
On the Virtual Machines page, add machines and their Active Directory machine accounts. You can do one of the following:
- Click Import from CSV file to bulk add machines. For information about using CSV files to add machines, see Use CSV files to bulk add machines to a catalog.
-
Click Add Machines to add machines manually. The Select VMs window appears. Expand the Nutanix AHV Prism Central connection that you created earlier and select the VMs you want to add. Then add the associated machine account names.
- The Scopes and Summary pages do not contain information specific to Nutanix AHV Prism Central.
Create a machine catalog with existing machines (power managed) using PowerShell
- Open the PowerShell window.
- Run
asnp citrix*. -
Create a catalog to have power-managed VMs that are assigned to the user. For example:
New-BrokerCatalog -AllocationType "Permanent" -IsRemotePC $False -MachinesArePhysical $False -Name "<Catalog Name>" -PersistUserChanges "OnLocal" -ProvisioningType "Manual" -Scope @() -SessionSupport "SingleSession" -ZoneUid "fb202053-8c35-4db2-a299-a8d9538ec6be" <!--NeedCopy--> -
Add VMs to the catalog. For example:
New-BrokerMachine  -CatalogUid 6 -HostedMachineId "d859caf3-4bf0-447b-b012-8af0594c7d88" -HypervisorConnectionUid 1 -IsReserved $False  -MachineName "S-1-5-21-1334627847-1250330507-3910179295-100245"
<!--NeedCopy-->
Create a machine catalog using a Nutanix snapshot
This section describes how to create an MCS provisioned machine catalog with Nutanix Acropolis (Prism Element) host connection. Before creating the catalog, create master images and snapshots in Nutanix. For more information, see the Nutanix documentation.
In the Machine Catalog Setup wizard:
-
The Container or Cluster and Container page is unique to Nutanix.
-
If you deploy machines by using Nutanix AHV XI as the resources, on the Container page, select a container where the VMs’ identity disks will be placed.
-
If you deploy machines by using Nutanix AHV PC as the resources, you see the Cluster and Container page. Select which cluster to use for the deployment of VMs and then a container.
-
-
On the Image page, select the image snapshot. Use the Acropolis console to rename your snapshots if needed. If you rename snapshots, restart the catalog creation wizard to see a refreshed list.
-
On the Virtual Machines page, indicate the number of virtual CPUs and the number of cores per vCPU.
- On the NICs page, select the NIC type to filter associated networks. This option is available only for Nutanix AHV PC connections.
- The Machine Identities, Domain Credentials, Scopes, and Summary pages do not contain Nutanix-specific information.
Limitations
When creating an MCS catalog with Nutanix host connection (specifically, Nutanix AHV plug-in 2.7.1 and Nutanix AHV plug-in 2.5.1), the hard disk size of provisioned VMs are incorrectly displayed on Studio.
- Nutanix AHV plug-in 2.7.1: The size displayed is smaller (1 GB) than the real storage size.
- Nutanix AHV plug-in 2.5.1: The size displayed is smaller (32 GB) than the real storage size.
However, this works as designed if the master image VM is a snapshot in VM.
Where to go next
- If this is the first catalog created, you are guided to create a delivery group.
- To review the entire configuration process, see Plan and build a deployment.
- To manage catalogs, see Manage machine catalogs and Manage a Nutanix catalog.