Use DaaS get-started guide
DaaS get-started guide streamlines and simplifies the DaaS deployment process for both new and experienced administrators. Using the guide, you can quickly set up your DaaS deployments by answering a series of questions.

This article walks you through the processes of setting up five typical DaaS deployment scenarios.
Benefits
Benefits of using this guide include:
-
Easy to get started. This guide connects essential deployment steps through a questionnaire-led, step-by-step workflow. If you’re a new administrator, you can quickly set up your deployment while learning concepts and terminology through contextual help.
-
Simplify complex configurations. This guide provides pre-configured settings wherever necessary and provides access to Studio for advanced configurations. If you’re an experienced administrator, you can use the guide as a starting point for complex configurations.
Supported deployment scenarios
This guide provides quick deployments for these scenarios:
| What to deliver? | Machines already exist? | Machine type | Remark |
|---|---|---|---|
| Virtual apps and desktops | No | Virtual machines (Provisioned by DaaS) | Power managed |
| Virtual apps and desktops | Yes | Virtual machines or blade PCs | Power managed |
| Virtual apps and desktops | Yes | Physical or virtual machines | Not power managed |
| Office PCs | Yes | Physical machines | Power managed |
| Office PCs | Yes | Physical machines | Not power managed |
See the following sections for detailed instructions:
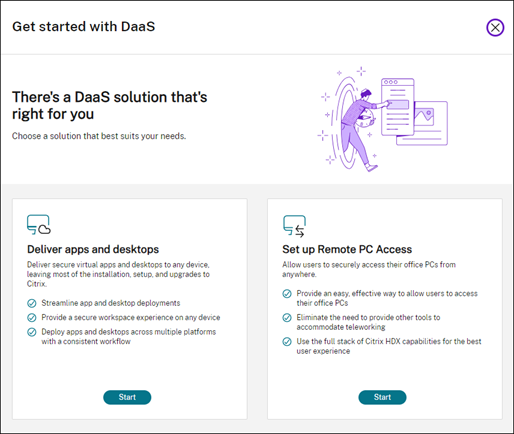
- Deliver apps and desktops from scratch (power managed)
- Deliver apps and desktops using existing machines (power managed)
- Deliver apps and desktops using existing machines (not power-managed)
- Deliver office PCs (power managed)
- Deliver office PCs (not power-managed)
Terminology
The following are DaaS-specific terms:
-
Resource location. Contains the resources required to deliver apps and desktops to users.
-
Host connection. Connects DaaS to a host (hypervisor or cloud service) in a resource location. Creating host connections is required when you want to create and manage machines on hosts or to power manage existing machines.
-
Master image. Serves as a template for replicating virtual machines on your host. It includes the operating system, applications, Virtual Delivery Agent (VDA), and other software.
-
Machine catalog. Collection of identical machines. They can be virtual or physical depending on your needs. You can create a machine catalog to create identically configured machines on a host or import machines into DaaS for management.
-
Delivery group. Contains machines from machine catalogs. Also, it specifies which users can use those machines and which applications and desktops are available to those users.
-
Machine Profile. Specifies the properties of virtual machines. VMs in a catalog can inherit properties from a machine profile.
Access the guide
- Go to the DaaS > Home page.
- Locate Get started with DaaS.
-
Click Get Started to initiate your deployment process.
Note:
You can exit the process at any time by clicking Close and the guide saves your settings automatically. To continue your configuration, click Continue. To start fresh, click Start over.
Deliver apps and desktops from scratch (power managed)
This section guides you through the deployment process of creating VMs and delivering apps and desktops using them.
Prerequisites
Before you start, you need:
-
Connectivity from Citrix Cloud™ to the target identity provider
For more information, see the corresponding section in Identity providers.
- Role: Full Administrator or Cloud Administrator
-
Required permissions on the target hypervisor or cloud service.
For more information, see the corresponding sections in the Create and manage connections.
- Administrator credentials for VM account creation
Preparation
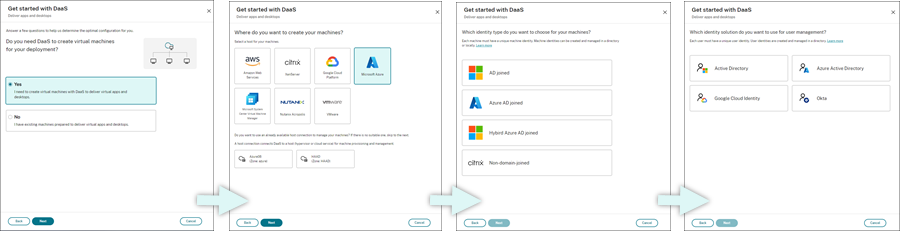
Answer the onscreen questions to complete the following infrastructure-level settings. See the following table for details.
| # | Setting | Description |
|---|---|---|
| 1 | Specify whether VM creation is needed | Select Yes. |
| 2 | Select the host type | Select a host type for your deployment. |
| Options: AWS, XenServer (formerly Citrix Hypervisor™), Google Cloud Platform, Microsoft Azure, Microsoft System Center Virtual Machine Manager, Nutanix Acropolis, and VMware | ||
| 3 | Select the machine identity type | Select an identity type for machine management. |
| Options: AD joined, Microsoft Entra joined, Microsoft Entra hybrid joined, and Non-domain-joined | ||
| 4 | Select the user identity type | Select an identity type for user management. |
| Options: Active Directory, Microsoft Entra ID, Google Cloud Identity, and Okta |
Deployment steps
After you complete the infrastructure-level settings, steps specific to this deployment scenario appear as follows.
Follow the onscreen instructions to complete the settings.
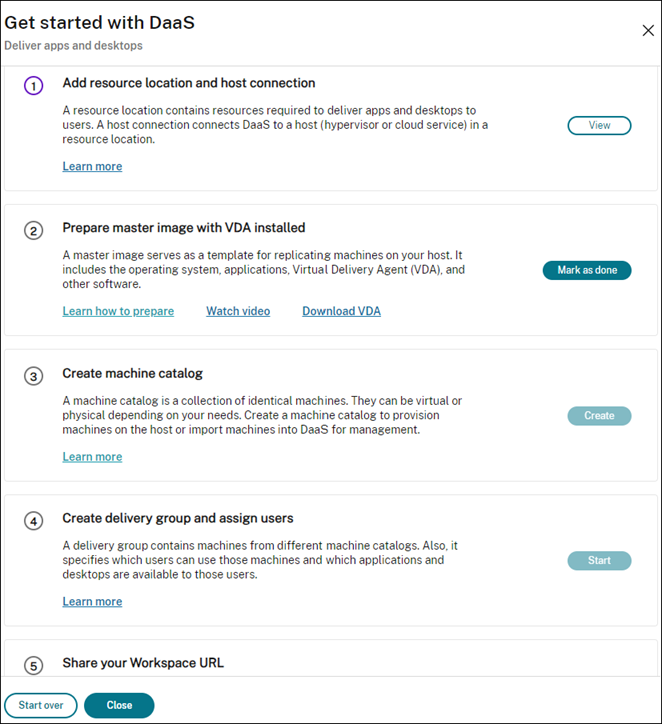
Step 1: Add a resource location and host connections
Set up your resource location by installing Cloud Connectors and configure connections to hypervisors or cloud services in the location.
- Name the resource location.
- Download and install Cloud Connectors on at least two Windows Server machines.
-
Detect installed Cloud Connectors.
-
Add and configure host connections for the resource location. Detailed settings of a connection include:
- Connection details, such as the connection address, user name, and password.
- Storage resources
- Network resources
Note:
DaaS creates and manages VMs on hosts through those connections. You must specify connections when you create machine catalogs.
Step 2: Prepare master images for your machines
Prepare master images on VMs in your resource location. For more information, see Prepare a master image on the hypervisor or cloud service.
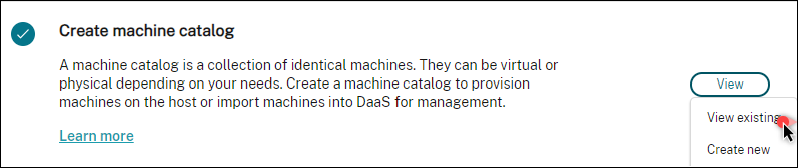
Step 3: Create machine catalogs
Create a machine catalog to create a group of identically configured machines on a host. Detailed steps are as follows:
-
Name the catalog.
-
Select the machine type.
Options: Multi-session, Single-session static (personal desktops), and Single-session random (pooled desktops).
-
Select a host connection.
Options originate from all host connections that you’ve configured for your resource locations in Step 1.
- Select a master image.
-
Select a machine profile.
Note:
Machine profile support is currently available for Azure, GCP, and AWS cloud services, and the use of machine profile is optional for GCP.
- Set how many machines you want to create.
-
Set the machine identities.
By default, the machine identity type that you selected in the preparation phase is shown. Provide the required identity settings for the VMs, such as domain, OU, and naming scheme.
- Enter the administrator credentials required for machine creation.
-
Click Create.
Tip:
The Create button is available only after you provide all required settings.
To view the catalog creation progress, select View > View existing.
Step 4: Create delivery groups and assign users
Tip:
Before creating delivery groups, view the existing catalogs to ensure that at least one catalog has been created successfully. Otherwise, you’re prevented from creating delivery groups.
Creating a delivery group includes the following subtasks:
- Add VMs to the group
- Assign users to the group
- Specify which apps and desktops you want to make available to assigned users
- Name the group.
- Add machines to the group by selecting a machine catalog and specifying how many VMs are available for the group.
- Specify available applications and desktops for this group:
- To add applications from a running machine in the selected catalog, click Add new > From start menu.
- To add applications deployed on network shares, click Add new > Manually, and then provide the required settings, such as path, working directory, and more.
- (Visible only with multi-session OS machines) For desktop delivery, keep Enable desktop delivery selected.
- Add users who can access apps and desktops in this group.
Step 5: Share the store URL with your users
Go to StoreFront Cloud > Access, and then share the store URL with your users.
Deliver apps and desktops using existing machines (power managed)
This section guides you through the deployment process of delivering apps and desktops using existing machines (power managed).
Prerequisites
Before you start, you need:
-
Connectivity from Citrix Cloud to the target identity provider
For more information, see the corresponding section in Identity providers.
-
Role: Full Administrator or Cloud Administrator
Preparation
Answer the onscreen questions to complete the following infrastructure-level settings.
| # | Setting | Description |
|---|---|---|
| 1 | Specify whether VM creation is needed | Select No. |
| 2 | Select whether power management is required | Select Machines that are power managed (for example, virtual machines or blade PCs). |
| 3 | Select the host platform | Select the host platform where your existing machines reside. |
| Options: AWS, Citrix®, Google Cloud Platform, Microsoft Azure, Microsoft System Center Virtual Machine Manager, Nutanix Acropolis, and VMware | ||
| 4 | Select the user identity type | Select an identity type for user management. |
| Options: Active Directory, Microsoft Entra ID, Google Cloud Identity, and Okta |
Deployment steps
After you complete the infrastructure-level settings, steps specific to this deployment scenario appear. Follow the onscreen instructions to complete the settings.
Step 1: Add a resource location and host connections
Set up your resource location by installing Cloud Connectors and configure connections to hypervisors or cloud services in your location.
- Name the resource location.
- Download and install Cloud Connectors on at least two Windows Server machines.
- Detect installed Cloud Connectors.
- Add and configure host connections for the resource location. Examples of connection settings include the connection address, user name, and password.
Note:
DaaS power manages machines in resource locations through connections. You need to specify a connection when importing your machines to a catalog.
Step 2: Create machine catalogs
Create a machine catalog and import your machines to it.
- Name the catalog
-
Select the machine type.
Options: Multi-session, Single-session static (personal desktops), and Single-session random (pooled desktops).
- Select a resource location.
- Import machines to the catalog. Machines are organized by host connection. Choose a host connection to import associated machines.
- Click Create.
Step 3: Create delivery groups and assign users
To create a delivery group, you must:
- Add VMs to the group
- Assign users to the group
- Specify which apps and desktops you want to make available to assigned users
- Name the group.
- Select a machine catalog as needed, and then specify how many machines are available for the delivery group.
- Specify available applications and desktops for this group:
- To add applications from a running machine in the selected catalog, click Add new > From start menu.
- To add applications deployed on network shares, click Add new > Manually, and then provide the required settings, such as path, working directory, and more.
- (Visible only with multi-session OS machines) For desktop delivery, keep Enable desktop delivery selected.
- Add users to the group.
Step 4: Share the store URL with your users
Go to Citrix® StoreFront Cloud > Access, and then share the store URL with your users.
Deliver apps and desktops using existing machines (not power-managed)
This section guides you through the deployment process of delivering apps and desktops using existing machines (not power-managed).
Prerequisites
Before you start, you need:
-
Connectivity from Citrix Cloud to the target identity provider
For more information, see the corresponding section in Identity providers
-
Role: Full Administrator or Cloud Administrator
Preparation
Answer the onscreen questions to complete the following infrastructure-level settings.
| # | Setting | Description |
|---|---|---|
| 1 | Specify whether VM creation is needed | Select No. |
| 2 | Select whether power management is required | Select Machines that are not power managed (for example, physical machines). |
| 3 | Select the user identity type | Select an identity type for user management. |
| Options: Active Directory, Microsoft Entra ID, Google Cloud Identity, and Okta |
Deployment steps
After you complete the infrastructure-level settings, steps specific to this deployment scenario appear. Follow the onscreen instructions to complete the settings.
Step 1: Add a resource location
Set up your resource location by installing Cloud Connectors.
- Name the resource location.
- Download and install Cloud Connectors on at least two Windows Server machines.
- Detect installed Cloud Connectors.
Note:
Creating host connections is required only when you want to power manage machines.
Step 2: Create a machine catalog
Create a machine catalog and import your machines to it.
- Name the catalog
-
Select the machine type.
Options: Multi-session, Single-session static (personal desktops), and Single-session random (pooled desktops).
- Select a resource location.
-
Import machines to the catalog.
To ease machine search, use partial computer names and directory selection.
- Click Create.
Step 3: Create delivery groups and assign users
To create a delivery group, you must:
- Add VMs to the group
- Assign users to the group
- Specify which apps and desktops you want to make available to assigned users
- Name the group.
- Select a machine catalog as needed, and then specify how many machines are available for the delivery group.
- Specify available applications and desktops for this group:
- To add applications from a running machine in the selected catalog, click Add new > From start menu.
- To add applications deployed on network shares, click Add new > Manually, and then provide the required settings, such as path, working directory, and more.
- (Visible only with multi-session OS machines) For desktop delivery, keep Enable desktop delivery selected.
- Add users to the group.
Step 4: Share the store URL with your users
Go to Citrix® StoreFront Cloud > Access, and then share the store URL with your users.
Deliver office PCs (power managed)
This section guides you through the deployment process of delivering office PCs (power managed).
Prerequisites
Before you begin, you need:
- Machine names of the PCs.
-
Citrix Virtual Delivery Agent (VDA) is installed on each PC. (This step can be done after catalog creation.)
For more information, see Download VDA.
Preparation
Answer the onscreen questions to complete the following infrastructure-level settings.
| # | Step | Description |
|---|---|---|
| 1 | Select the machine allocation type. | Select how the machines are assigned. |
| Options: Static auto-assigned, Static preassigned, and Random pool unassigned | ||
| 2 | Determine whether to allow users to power on machines | Select I want remote users to power on machines by themselves. |
| 3 | Select the user identity type | Select an identity type for user management. |
| Options: Active Directory, Microsoft Entra ID, Google Cloud Identity, and Okta |
Deployment steps
After you complete the infrastructure-level settings, steps specific to this deployment scenario appear. Follow the onscreen instructions to complete the settings.
Step 1: Add a resource location and host connections
Set up your resource location by installing Cloud Connectors and add a connection of the Remote PC Wake on LAN type.
- Name the resource location.
- Download and install Cloud Connectors on at least two Windows Server machines.
- Detect installed Cloud Connectors.
- Click Add new to add a connection:
- Select a resource location (zone).
- Select Remote PC Wake on LAN for Connection type.
- Enter a name for the connection.
Note:
DaaS power manages machines through the configured connections. You must configure connections of the Remote PC Wake on LAN type when creating Remote PC Access catalogs for power-managed machines.
Step 2: Create a Remote PC Access catalog
Create a machine catalog and import your office PCs to it.
- Name the catalog
- Select a resource location.
- Select a machine allocation type. By default, the type that you selected in the preparation phase is shown.
- Select the Wake on LAN connection. Options are the connections of the Remote PC Wake on LAN type that you configured for the selected location.
- Import your machines.
- Click Create.
Step 3: Create delivery groups and assign users
Create a delivery group to group machines that you want to deliver and specify who can access them.
- Name the group.
- Select a machine catalog as needed. Only the Remote PC Access catalogs appear.
- Assign users to the group.
Step 4: Share the store URL with your users
Go to Citrix® StoreFront Cloud > Access, and then share the store URL with your users.
Deliver office PCs (not power-managed)
This section guides you through the deployment process of delivering office PCs (not power-managed).
Prerequisites
Before you begin, you need:
- Machine names of the PCs.
-
Citrix Virtual Delivery Agent (VDA) is installed on each PC. (This step can be done after catalog creation.)
For more information, see Download VDA.
Preparation
Answer the onscreen questions to complete the following infrastructure-level settings.
| # | Setting | Description |
|---|---|---|
| 1 | Select the machine allocation type. | Select how the machines are assigned. |
| Options: Static auto-assigned, static preassigned, and random pool unassigned | ||
| 2 | Determine whether to allow users to power on machines | Keep I want remote users to power on machines by themselves cleared. |
| 3 | Select the user identity type | Select an identity type for user management. |
| Options: Active Directory, Microsoft Entra ID, Google Cloud Identity, and Okta |
Deployment steps
After you complete the infrastructure-level settings, steps specific to this deployment scenario appear. Follow the onscreen instructions to complete the settings.
Step 1: Add a resource location
Set up your resource location by installing Cloud Connectors.
- Name the resource location.
- Download and install Cloud Connectors on at least two Windows Server machines.
- Detect installed Cloud Connectors.
Note:
Creating host connections is required only when you want to power manage machines.
Step 2: Create a Remote PC Access catalog
Create a catalog and import your office PCs to it.
- Name the catalog
- Select a resource location.
- Select an allocation type. By default, the type that you selected in the preparation phase is shown.
- Import your machines.
- Click Create.
Step 3: Create delivery groups and assign users
Create a delivery group for machines that you want to deliver and specify who can access them.
- Name the group.
- Select a machine catalog as needed. Only the Remote PC Access catalogs appear.
- Assign users for the group.
Step 4: Share the store URL with your users
Go to Citrix® StoreFront Cloud > Access, and then share the store URL with your users.
In this article
- Benefits
- Supported deployment scenarios
- Terminology
- Access the guide
- Deliver apps and desktops from scratch (power managed)
- Deliver apps and desktops using existing machines (power managed)
- Deliver apps and desktops using existing machines (not power-managed)
- Deliver office PCs (power managed)
- Deliver office PCs (not power-managed)