-
-
WebSocket communication between VDA and Delivery Controller™
-
-
-
-
-
-
Machines and sessions (Search > Default view)
-
This content has been machine translated dynamically.
Dieser Inhalt ist eine maschinelle Übersetzung, die dynamisch erstellt wurde. (Haftungsausschluss)
Cet article a été traduit automatiquement de manière dynamique. (Clause de non responsabilité)
Este artículo lo ha traducido una máquina de forma dinámica. (Aviso legal)
此内容已经过机器动态翻译。 放弃
このコンテンツは動的に機械翻訳されています。免責事項
이 콘텐츠는 동적으로 기계 번역되었습니다. 책임 부인
Este texto foi traduzido automaticamente. (Aviso legal)
Questo contenuto è stato tradotto dinamicamente con traduzione automatica.(Esclusione di responsabilità))
This article has been machine translated.
Dieser Artikel wurde maschinell übersetzt. (Haftungsausschluss)
Ce article a été traduit automatiquement. (Clause de non responsabilité)
Este artículo ha sido traducido automáticamente. (Aviso legal)
この記事は機械翻訳されています.免責事項
이 기사는 기계 번역되었습니다.책임 부인
Este artigo foi traduzido automaticamente.(Aviso legal)
这篇文章已经过机器翻译.放弃
Questo articolo è stato tradotto automaticamente.(Esclusione di responsabilità))
Translation failed!
Monitor and manage machines and sessions in Search > Default view
This article guides you through how to monitor and manage machines and sessions using Default view within the Search node. It contains the following topics:
- Learn about Default view
- Search for machines and sessions
- Customize cloumns to display
- Manage machines and sessions
- Export machine or session data to CSV files
Learn about the default view
The defaut view within the Search node provides a central place for monitoring and managing machines and user sessions.
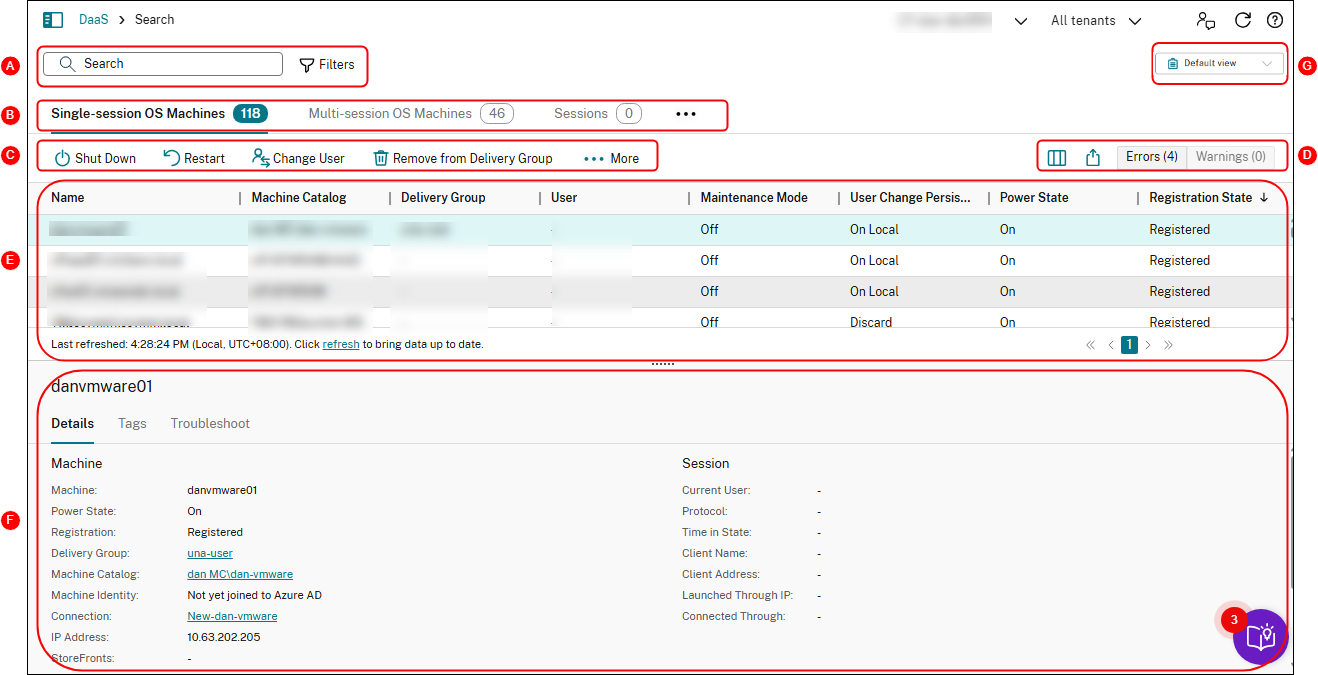
| Callout | Area | Description |
|---|---|---|
| A | Search bar | Provides a quick search and a filter-based search that allows you to define complex search criteria. For more information, see Search for instances. |
| B | Type tabs | Displays tabs to list machines by type or list all sessions. Instance counts appear in the tab names. |
| C | Instance-level actions | Displays actions that you can perform on the selected instances (machines or sessions). For more information, see Machine actions and Session actions. |
| D
|
List-level actions
|
Displays actions that you can perform on the current list:
|
| E | Main view | Displays the instances and their properties. You can customize the main view by selecting the Column to display icon. For more information about available columns, see Machine columns and Session columns. |
| F
|
Details pane
|
Displays the following details:
|
| G | Switch to Hardware view | Click to switch from Default view to Hardware view. |
Search for instances
Use the search function to locate specific machines and sessions:
- Search using filters
- Save the current filter set for a quick search
- Pin a filter field in the search bar
- Search using the quick search box
- Tips to enhance a search
Search using filters
For example, to locate all single-session OS machines that are static and assigned to users, follow these steps:
-
On the Single-session OS machines tab, click the Filters icon. The Filters panel appears.
-
Add the necessary filter criteria.
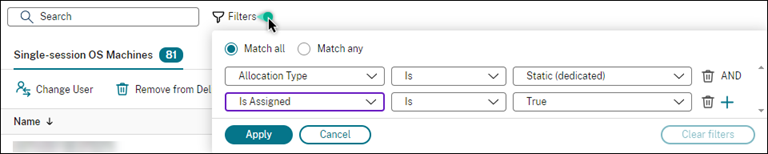
-
Select Match all (AND operator) if you want the search to return results that match all filter criteria. Select Match any (OR operator) if you want the search to return results that match any of the filter criteria.
-
Click Apply.
The filtered list displays all single-session OS machines that are static and assigned to users.

Save the current filter set for a quick search
For example, to save the filter set for single-session OS machines that are static and assigned to users for future use, follow these steps:
- After you conduct a filter-based search, click the Star icon in the search bar, as shown in the preceding figure.
- On the page that appears, enter a name for this filter set (for example, Static & assigned machines).
-
Click Save.
The saved filter set appears in the search history list when you click the search box.
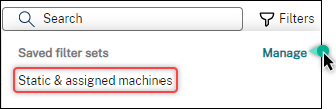
Note:
Filter sets are saved on a per user account basis. To manage saved filter sets, select Manage.
Pin a filter field in the search bar
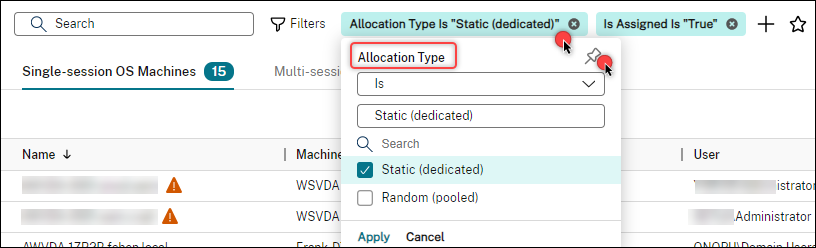
Pin frequently used filter fields in the search bar for easy access. For example, after conducting a filter-based search, you want to pin Allocate Type in the search bar. Follow these steps:
-
Click the filter setting in the search bar.
-
In the panel that appears, click the Pin icon to pin the filter field (Allocation Type for this example) in the search bar.
Search using the quick search box
The quick search box provides a convenient way to search for instances based on name-related properties or saved filter sets. Detailed steps are as follows:
-
Click the search box. Your recent searches and saved filter sets appear in the drop-down list. You can click a previous search or filter set for a quick search.
-
To start a new search, enter a complete or partial name from the following options:
- Machine name or DNS name
- Machine catalog name
- Delivery group name
- Session user name
- Session client name
- Friendly name of the VM hosting the session, as used by its hypervisor
- Hosting server name
Tips to enhance a search
Consider the following tips when using the Search feature:
-
On the Search node, select any column to sort items.
-
To show more characteristics to include in the display where you can search and sort, select Columns to Display or click any column and select Columns to Display. In the Columns to Display window, select the checkbox next to the items you want to display and select Save to exit.
Note:
Columns that degrade performance are marked with the Degrades performance label.
-
To locate a user device connected to a machine, use Client (IP) and Is, and enter the device IP address.
-
To locate active sessions, use Session State, Is, and Connected.
-
To list all machines in a delivery group, select Delivery Groups in the left pane. Select the group, and then select View Machines from the action bar or the context menu.
-
To quickly narrow down MCS-provisioned machines by specific properties, use the Search bar available in Hardware view.
Keep the following considerations in mind when performing sorting operations:
-
As long as the number of items does not exceed 5,000, you can click any column to sort the items in it. When the number exceeds 5,000, you can sort only by name or by current user (depending on which tab you are on). To enable sorting, use filters to reduce the number of items to 5,000 or fewer.
-
When the number of items is greater than 500 but no more than 5,000:
- We cache all data locally to improve sort performance. On the Single-session OS Machines and Multi-session OS Machines tabs, we cache the data the first time you click a column (any column except the Name column) to sort. On the Sessions tab, we cache the data the first time you click a column (any column except the Current User column) to sort. As a result, the sort takes longer to complete. For faster performance, sort by name or current user, or use filters to reduce the number of items.
- The following message under the table indicates that the data is cached: Last refreshed:
<the time when you refreshed the table>. In that case, sort operations are based on items that were loaded previously. Those items might not be up to date. To bring them up to date, click the refresh icon.
Customize columns to display
Create a personalized main view to display the properties and statuses crucial for your daily operations. Detailed steps are as follows:
- In the Search node, select the Multi-session OS Machines, Single-session OS Machines, or Sessions tab as necessary.
-
Click the Columns to display icon in the action bar and select the columns.
For more information about the available columns and their descriptions, see Machine columns and Session columns.
When choosing columns, you can see columns marked with the Degrades performance label. Selecting those columns might degrade the performance of the console. Keep these considerations in mind:
-
After you complete your customization, the table refreshes to display the columns you select. Their presence might result in delays when you refresh the table.
-
After you refresh the browser or sign out of the console and then sign in, a message appears asking whether to preserve those columns. If you choose to preserve them, you’re restricted to refreshing the table more than once a minute for optimal console performance. For more frequent refreshes, remove any columns that degrade performance.
Manage machines and sessions
Use actions in the Search node to troubleshoot machines and session issues or process user requests.
Good to know
You can manage machines at different levels:
-
At the individual machine level. Use the Search node to locate target machines and perform actions.
-
At the machine catalog level, such as changing master images for a catalog, deleting machines from a catalog, and adding machines to a catalog. For more information, see Manage machine catalogs.
-
At the delivery group level, such as turning on or off maintenance mode for machines in a group. For more information, see Manage delivery groups.
In addition to the individual session level, You can also manage sessions at the delivery group level, such as configuring session prelaunch and linger for a delivery group. For more information, see Manage Delivery Groups.
Perform actions on machines or sessions
To manage machines or sessions at the individual instance level, follow these steps:
- In the Search node, select the Multi-session OS Machines, Single-session OS Machines, or Sessions tab.
- Select one or more instances as necessary.
-
From the action bar or right-click menu, select an action based on the issues that you encounter with those instances or user requests.
For more information about the available actions and their descriptions, see Machine actions and Session actions.
Note:
If you select two or more instances, only actions that apply to all of them are available.
Export machine or session data to CSV files
Export the list of instances (machines or sessions) displayed on a tab (up to 30,000 items) to a CSV file. Detailed steps are as follows:
-
In the Search node, select the Multi-session OS Machines, Single-session OS Machines, or Sessions tab as necessary.
-
Click the Export icon in the upper right corner.
-
In the dialog box that appears, click Continue.
The export might take several minutes to complete. You can find the file in the default download folder of your browser.
Note:
On each tab of the Search node, you cannot perform another export while an export is in progress.
Share
Share
This Preview product documentation is Citrix Confidential.
You agree to hold this documentation confidential pursuant to the terms of your Citrix Beta/Tech Preview Agreement.
The development, release and timing of any features or functionality described in the Preview documentation remains at our sole discretion and are subject to change without notice or consultation.
The documentation is for informational purposes only and is not a commitment, promise or legal obligation to deliver any material, code or functionality and should not be relied upon in making Citrix product purchase decisions.
If you do not agree, select I DO NOT AGREE to exit.