Android Enterprise
Android Enterprise is a set of tools and services provided by Google as an enterprise management solution for Android devices. With Android Enterprise:
- You use Citrix Endpoint Management to manage company-owned and bring your own device (BYOD) Android devices.
- You can manage the entire device or a separate profile on the device. The separate profile isolates business accounts, apps, and data from personal accounts, apps, and data.
- You can also manage devices dedicated to a single use, such as inventory management. For an overview from Google of what Android Enterprise can do, see Android Enterprise Management.
Resources:
-
For a list of terms and definitions related to Android Enterprise, see the Google Android Enterprise developers guide article, Android Enterprise terminology. Google updates these terms frequently.
-
For a list of Android operating systems supported for Citrix Endpoint Management, see Supported device operating systems.
-
For information about the outbound connections to consider when setting up network environments for Android Enterprise, see the Google support article, Android Enterprise Network Requirements.
-
For information about deploying Android Enterprise, see Deploy resources).
Getting started with Android Enterprise
Important:
Device administration mode is no longer supported. If your users have devices in device administration mode, see Migrate from device administration to Android Enterprise. After your devices are migrated to Android Enterprise, use the following steps to set up Android Enterprise devices.
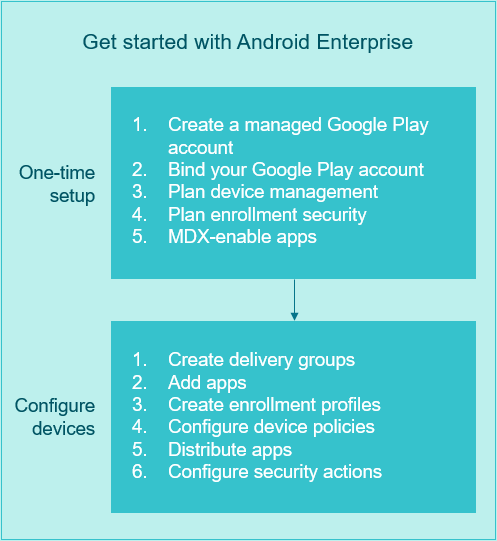
One-time setup
-
Create a managed Google Play account.
See Using managed Google Play with Citrix Endpoint Management and Requirements.
-
Bind your Google Play account to Citrix Endpoint Management.
-
Plan how you want to manage devices.
-
Plan enrollment security for user devices.
See Enrollment security.
-
Prepare to deliver MDX-enabled apps.
Use the MAM SDK to develop apps. Or, if you aren’t ready to transition to the new SDK, use the command-line based MDX Toolkit to wrap the apps.
See MAM SDK overview.
At this point, you’re prepared to configure your Android Enterprise devices with app and devices policies, enrollment profiles, and apps. See the following section for guidance.
Configure devices
-
Create delivery groups.
Control who gets what resources and when they get them. See Deploy resources.
We stop delivering apps published for the legacy DA platform to devices enrolled in Android Enterprise. For Android Enterprise devices, publish apps for the Android Enterprise platform. To continue to publish legacy DA apps to devices in DA mode, create a separate delivery group for those apps. See Deprecation.
-
Add apps. You can approve the apps in Google Play directly from the Citrix Endpoint Management console.
See the Google support article, Manage apps in your organization.
-
Create enrollment profiles.
Specify device and app management enrollment options. See Device deployment scenarios and profiles and Creating enrollment profiles.
- When you deploy an Android Enterprise public app store app to an Android device user, that user is automatically enrolled in Android Enterprise.
- Zero-touch enrollment allows you to configure devices to enroll automatically when they’re first powered on. See Zero-touch enrollment.
-
Configure device and app policies.
Balance enterprise security with user privacy and user experience. See Configure Android Enterprise device and app policies.
-
Distribute apps.
You use managed Google Play to add, buy, and approve apps for deployment to the Android Enterprise workspace on a device. Users can only install apps from managed Google Play that you make available for them.
See:
-
Configure security actions to monitor and provide compliance.
See Security actions.
Using managed Google Play with Citrix Endpoint Management
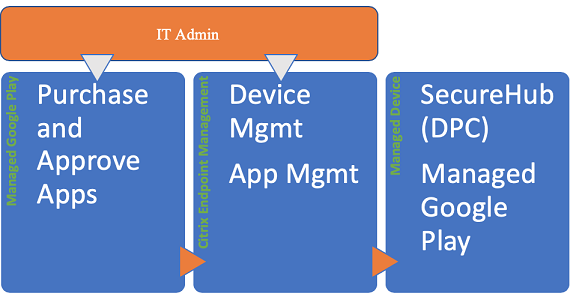
When you integrate Citrix Endpoint Management with managed Google Play to use Android Enterprise, you create an enterprise. Google defines an enterprise as binding between the organization and your enterprise mobile management (EMM) solution. All the users and devices that the organization manages through your solution belong to its enterprise.
An enterprise for Android Enterprise has three components: an EMM solution, a device policy controller (DPC) app, and a Google enterprise app platform. When you integrate Citrix Endpoint Management with Android Enterprise, the complete solution has these components:
- Citrix Endpoint Management: The Citrix EMM. Citrix Endpoint Management is the unified Citrix Endpoint Management for a secure digital workspace. Citrix Endpoint Management provides the means for IT administrators to manage devices and apps for their organizations.
- Citrix Secure Hub: The Citrix DPC app. Citrix Secure Hub is the launchpad for Citrix Endpoint Management. Citrix Secure Hub enforces policies on the device.
- Managed Google Play: A Google enterprise app platform that integrates with Citrix Endpoint Management. The Google Play EMM API sets app policies and distributes apps.
This illustration shows how administrators interact with these components and how the components interact with each other:
Note:
You can use either managed Google Play or Google Workspace (formerly G Suite) to register Citrix as your EMM provider. This article discusses using Android Enterprise with managed Google Play. If your organization uses Google Workspace to provide access to apps, you can use it with Android Enterprise. See Legacy Android Enterprise for Google Workspace customers.
When you use managed Google Play, provision managed Google Play Accounts for devices and end users. Managed Google Play Accounts provide access to managed Google Play, allowing users to install and use the apps you make available. If your organization uses a third-party identity service, you can link managed Google Play Accounts with your existing identity accounts.
Because this type of enterprise isn’t tied to a domain, you can create more than one enterprise for a single organization. For example, each department or region within an organization can enroll as a different enterprise. Using different enterprises lets you manage separate sets of devices and apps.
For Citrix Endpoint Management administrators, managed Google Play combines the user experience and app store features of Google Play with a set of management features designed for enterprises. You use managed Google Play to add, buy, and approve apps for deployment to the Android Enterprise workspace on a device. You can use Google Play to deploy public apps, private apps, and third-party apps.
For users of managed devices, managed Google Play is the enterprise app store. Users can browse apps, view app details, and install them. Unlike the public version of Google Play, users can only install apps from managed Google Play that you make available for them.
Device deployment scenarios and profiles
Device deployment scenarios refer to who owns the devices you deploy and how you manage them. Device profiles refer to how the DPC manages and enforces policies on devices.
A work profile isolates business accounts, apps, and data from personal accounts, apps, and data. Work profiles and personal profiles are separated at an OS level. For more details about work profiles, see What is a work profile.
Important:
When Android Enterprise devices update to Android 11, Google migrates devices managed as “fully managed with a work profile” to a new security-enhanced work profile experience. The new enrollment mode is called “work profile on corporate-owned devices.” For more information, see Changes ahead for Android Enterprise’s Fully Managed with Work Profile. For Android 12 devices, see Security and privacy enhancements for work profile.
| Device management | Use cases | Work profile | Personal profile | Notes |
|---|---|---|---|---|
| Company-owned devices (fully managed) | Company-owned devices intended only for work use | No | No | For new or factory reset devices only. See Provisioning Android Enterprise fully managed devices. |
| Fully managed with a work profile / Work profile on corporate-owned devices | Company-owned devices intended for work and personal use | Yes | Yes. Two copies of the DPC run on these devices: One manages the device in device owner mode and the other manages the work profile in profile owner mode. You can apply separate policies to the device and the work profile. | See Provisioning Android Enterprise fully managed devices with a work profile or work profile on corporate-owned devices. |
| Dedicated devices* | Company-owned devices configured for a single use case, such as digital signage or ticket printing | No | No | See Provisioning dedicated Android Enterprise devices. |
| BYOD work profile** | Personal devices enrolled with work profile management (also known as profile owner mode) | Yes | Yes. The DPC manages only the work profile, not the whole device. | These devices don’t need to be new or factory reset. See Provisioning Android Enterprise work profile devices. |
* Users can share a dedicated device. When a user signs on to an app on a dedicated device, the state of their work is with the app, not the device.
** Citrix Endpoint Management does not support Zebra devices as in BYOD work profile mode. Citrix Endpoint Management supports Zebra devices as fully managed devices using Android Enterprise.
Enrollment security
Enrollment profiles determine whether Android devices enroll in MAM, MDM, or MDM+MAM, with the option for users to opt out of MDM.
For information about specifying the level of security and required enrollment steps, see User accounts, roles, and enrollment.
Citrix Endpoint Management supports the following authentication methods for Android devices enrolled in MDM or MDM+MAM. For information, see the following articles:
- Domain or domain plus security token authentication
- Client certificate or certificate plus domain authentication
- Identity providers:
A rarely used authentication method is a client certificate plus security token. For information, see https://support.citrix.com/article/CTX215200.
Requirements
Before you start using Android Enterprise, you need:
-
Accounts and credentials:
- To set up Android Enterprise with managed Google Play, a corporate Google account
- To download the latest MDX files, a Citrix® customer account
-
Firebase Cloud Messaging (FCM) and a Connection scheduling device policy configured for Citrix Endpoint Management. See Firebase Cloud Messaging and Connection scheduling device policy.
Connecting Citrix Endpoint Management to Google Play
To set up Android Enterprise for your organization, register Citrix as your EMM provider through managed Google Play. That setup connects managed Google Play to Citrix Endpoint Management and creates an enterprise for Android Enterprise in Citrix Endpoint Management.
You need a corporate Google account to sign in to Google Play.
-
In the Citrix Endpoint Management console, go to Settings > Android Enterprise.
-
Click Connect. Google Play opens.
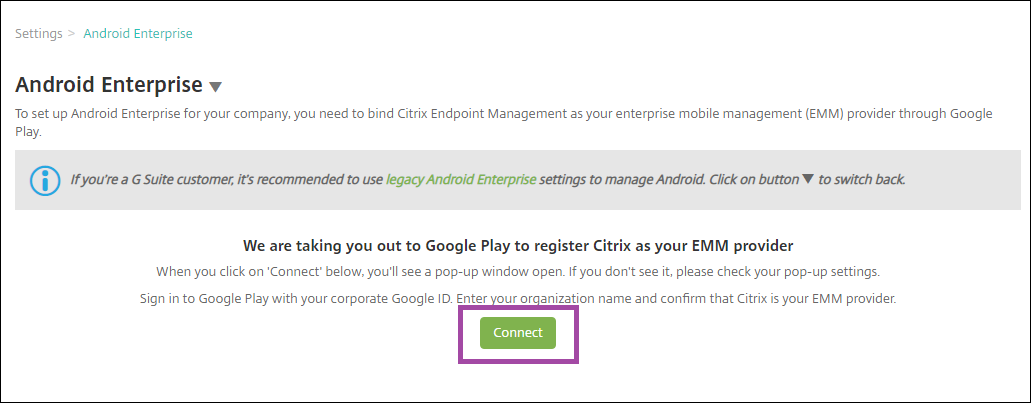
-
Sign in to Google Play with your corporate Google account credentials. Enter your organization name and confirm that Citrix is your EMM provider.
-
An enterprise ID is added for Android Enterprise. To enable Android Enterprise, slide Enable Android Enterprise to Yes.
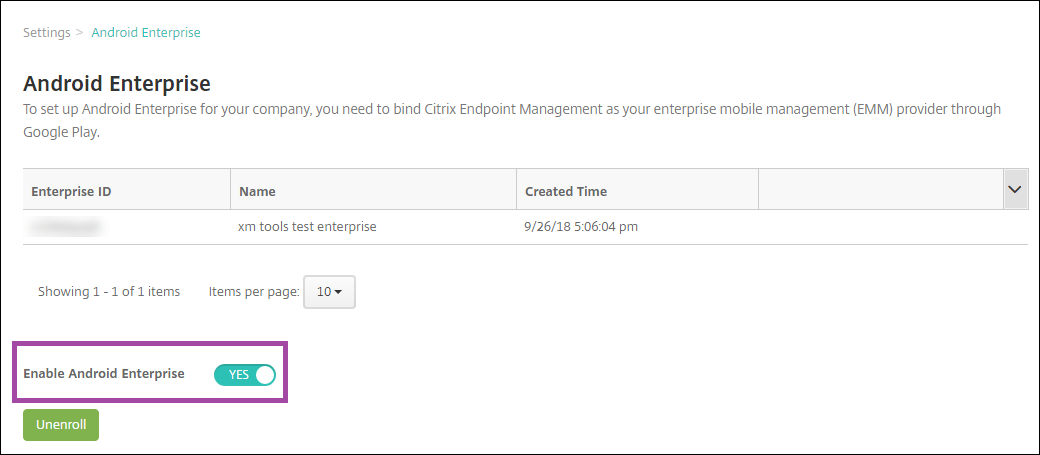
Your Enterprise ID appears in the Citrix Endpoint Management console.

Your environment is connected to Google and is ready to manage the devices. You can now provide apps for users.
Citrix Endpoint Management can provide users with Citrix mobile productivity apps, MDX apps, public app store apps, web and SaaS apps, enterprise apps, and web links. For more information on giving these types of apps to users, see Distribute Android Enterprise apps.
The following section shows how to provide mobile productivity apps.
Providing Citrix mobile productivity apps to Android Enterprise users
Giving Citrix mobile productivity apps to Android Enterprise users requires these steps.
-
Publish the apps as MDX apps. See Configure apps as MDX apps.
-
Configure the rules for the security challenges your users use to access the work profiles on their devices. See Configure security challenge policy.
The apps you publish are available to devices enrolled in your Android Enterprise enterprise.
Note:
When you deploy an Android Enterprise public app store app to an Android user, that user is automatically enrolled in Android Enterprise.
Configure apps as MDX apps
To configure a Citrix productivity app as an MDX app for Android Enterprise:
-
In the Citrix Endpoint Management console, click Configure > Apps. The Apps page appears.

-
Click Add. The Add App dialog box appears.
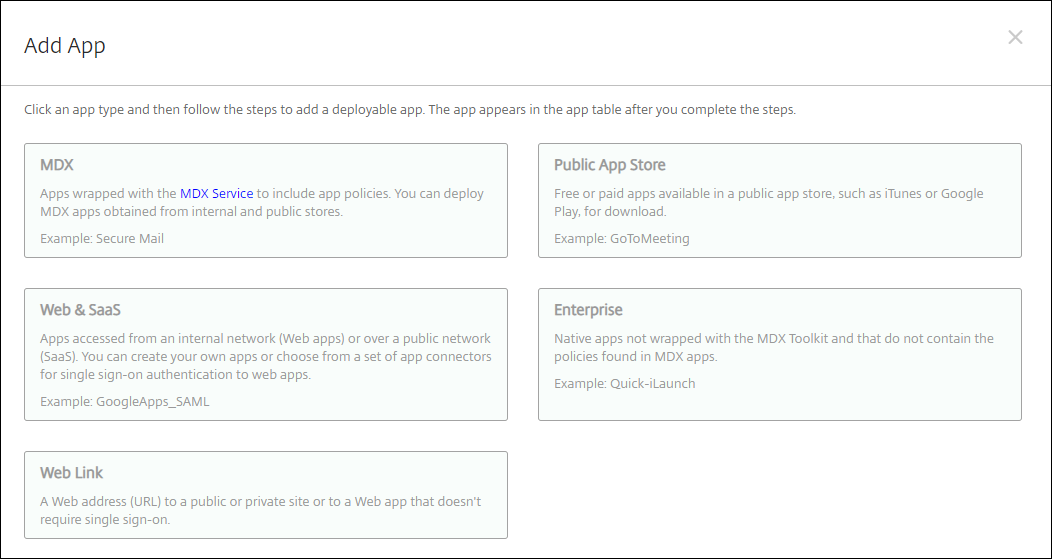
-
Click MDX. The App Information page appears.
-
On the left side of the page, select Android Enterprise as the platform.
-
On the App Information page, type the following information:
- Name: Type a descriptive name for the app. This name appears under App Name on the Apps table.
- Description: Type an optional description of the app.
- App category: Optionally, in the list, click the category to which you want to add the app. For more information about app categories, see About app categories.
-
Click Next. The Android Enterprise MDX App page appears.
-
Click Upload and navigate to the file location of the .mdx files for the app. Select the file and click Open.
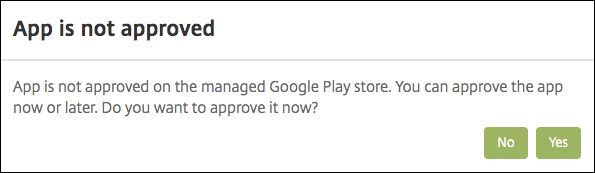
-
The UI notifies you if the attached application requires approval from the managed Google Play store. To approve the application without leaving the Citrix Endpoint Management console, click Yes.
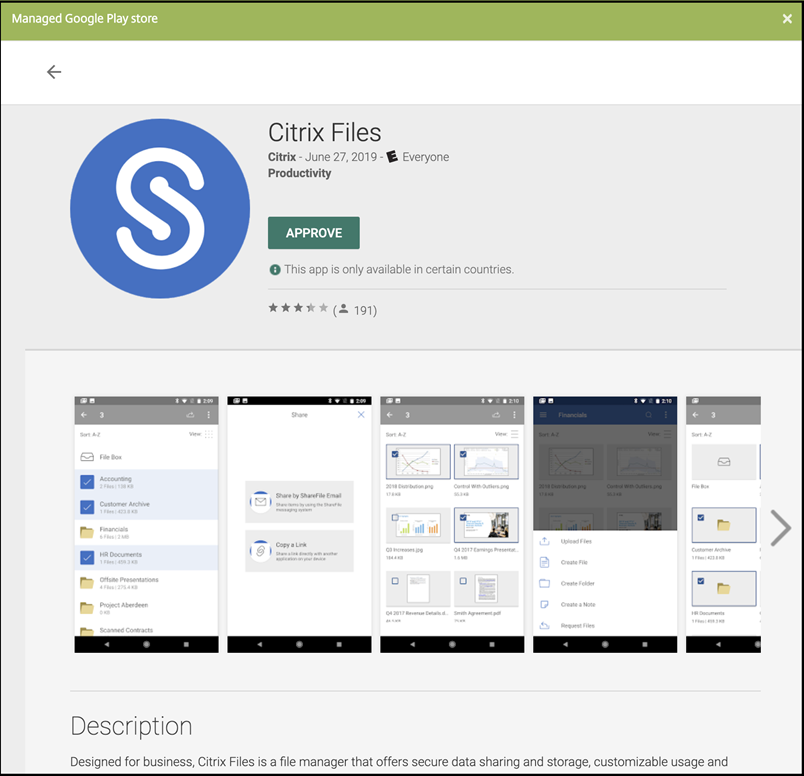
-
When the managed Google Play store page opens, click Approve.
-
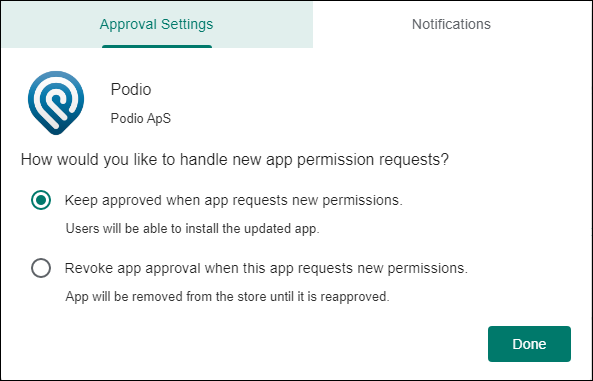
Click Approve again.
-
Select Keep approved when app requests new permissions. Click Save.
-
When the app is approved and saved, more settings appear on the page. Configure these settings:
- File name: Type the file name associated with the app.
- App Description: Type a description for the app.
- Product track: Specify which product track that you want to push to user devices. If you have a track designed for testing, you can select and assign it to your users. The default is Production.
- App version: Optionally, type the app version number.
- Package ID: The URL of the app in the Google Play store.
- Minimum OS version: Optionally, type the oldest operating system version that the device can run to use the app.
- Maximum OS version: Optionally, type the most recent operating system that the device must run to use the app.
- Excluded devices: Optionally, type the manufacturer or models of devices that can’t run the app.
-
Configure the MDX Policies. For more information about app policies for MDX apps, see MDX Policies at a Glance and MAM SDK overview.
-
Configure the deployment rules. For information, see Deploy resources.
-
Expand Store Configuration. This setting doesn’t apply to Android Enterprise apps, which appear only in managed Google Play.
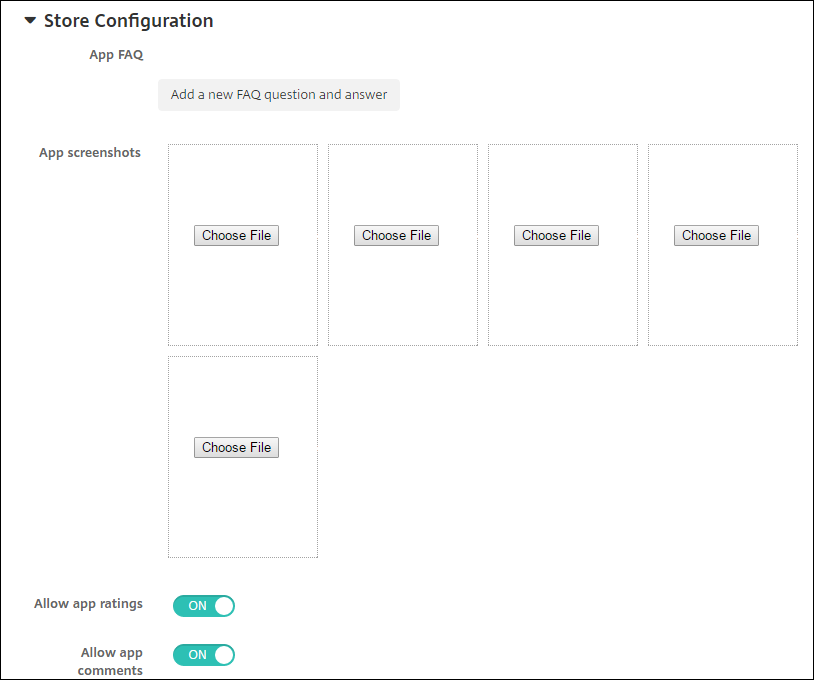
Optionally, you can add an FAQ for the app or screen captures that appear in the app store. You can also set whether users can rate or comment on the app.
- Configure these settings:
- App FAQ: Add FAQ questions and answers for the app.
- App screenshots: Add screen captures to help classify the app in the app store. The graphic you upload must be a PNG. You can’t upload a GIF or JPEG image.
- Allow app ratings: Select whether to allow a user to rate the app. The default is On. Allow app comments: Select whether to allow users to comment about the selected app. The default is On.
- Configure these settings:
-
Click Next. The Approvals page appears.
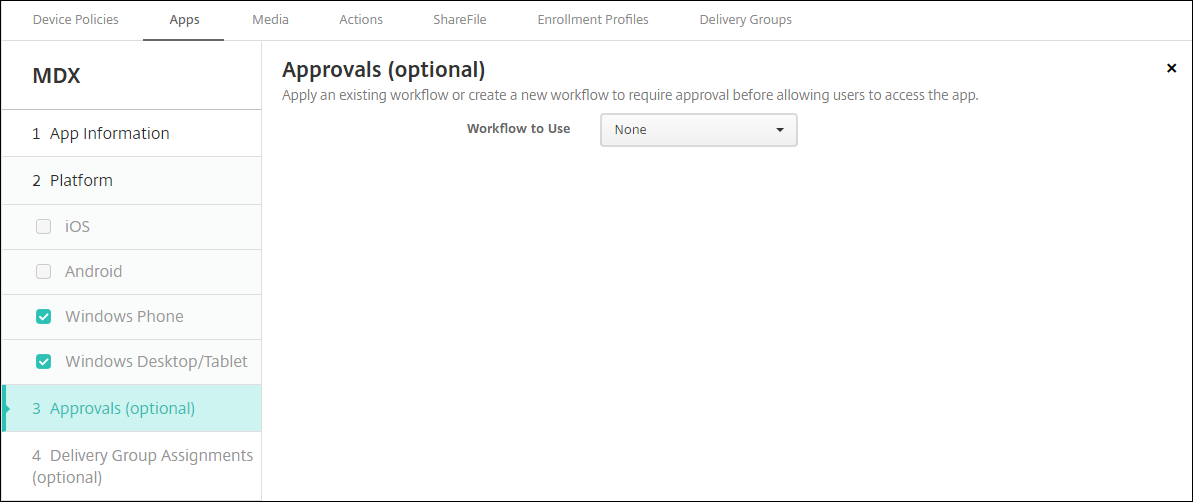
You use workflows when you need approval when creating user accounts. If you don’t want to set up approval workflows, you can skip to Step 15.
Configure these settings to assign or create a workflow:
- Workflow to Use: Click an existing workflow in the drop-down list or click Create a new workflow. The default is None.
- If you select Create a new workflow, configure these settings. For more information, see Create and manage workflows.
- Name: Type a unique name for the workflow.
- Description: Optionally, type a description for the workflow.
- Email Approval Templates: In the list, select the email approval template to be assigned. When you click the eye icon to the right of this field, a dialog box appears where you can preview the template.
-
Levels of manager approval: In the list, select the number of levels of manager approval required for this workflow. The default is 1 level. Possible options are:
- Not Needed
- 1 level
- 2 levels
- 3 levels
- Select Active Directory domain: In the list, select the appropriate Active Directory domain to be used for the workflow.
- Find additional required approvers: Type the name of the additional required person in the search field and then click Search. Names originate in the Active Directory.
- When the name appears in the field, select the checkbox next to the name. The name and email address appear in the Selected additional required approvers list.
- To remove a person from the Selected additional required approvers list, do one of the following:
- Click Search to see a list of all the persons in the selected domain.
- Type a full or partial name in the search box, and then click Search to limit the search results.
- Persons in the Selected additional required approvers list have check marks next to their name in the search results list. Scroll through the list and clear the checkbox next to each name you want to remove.
- To remove a person from the Selected additional required approvers list, do one of the following:
-
Click Next. The Delivery Group Assignment page appears.
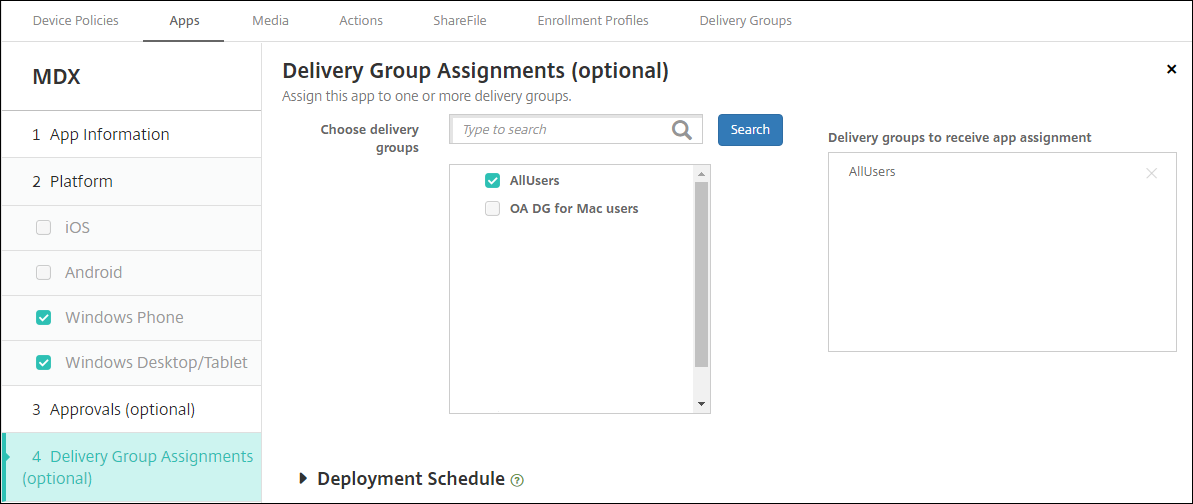
-
Next to Choose delivery groups, type to find a delivery group or select a group or groups in the list. The groups you select appear in the Delivery groups to receive app assignment list.
-
Expand Deployment Schedule and then configure the following settings:
- Next to Deploy, click On to schedule deployment or click Off to prevent deployment. The default option is set as On.
- Next to Deployment schedule, click Now, or Later. The default option is set as Now.
- If you click Later, click the calendar icon and then select the date and time for deployment.
- Next to Deployment condition, click On every connection, or click Only when previous deployment has failed. The default option is set as On every connection.
-
Next to Deploy for always-on connection, make sure that Off is selected. The default option is set as Off. The always-on connections aren’t available for Android Enterprise to customers who began using Citrix Endpoint Management with version 10.18.19 or later. We don’t recommend the connections for customers who began using Citrix Endpoint Management before version 10.18.19.
This option applies when you’ve configured the scheduling background deployment key in Settings > Server Properties.
The deployment schedule that you configure is the same for all platforms. Any changes you make apply to all platforms, except for Deploy for always-on connection.
-
Click Save.
Repeat the steps for each mobile productivity app.
Configure security challenge policy
The Citrix Endpoint Management Passcode device policy configures security challenge rules. The challenges appear when users access their devices or the Android Enterprise work profiles on their devices. A security challenge can be a passcode or biometric recognition. For more information about the Passcode policy, see Passcode device policy.
- If your Android Enterprise deployment includes BYOD devices, configure the passcode policy for the work profile.
- If your deployment includes company-owned, fully managed devices, configure the passcode policy for the device itself.
- If your deployment includes both types of devices, configure both types of passcode policy.
To configure the passcode policy:
-
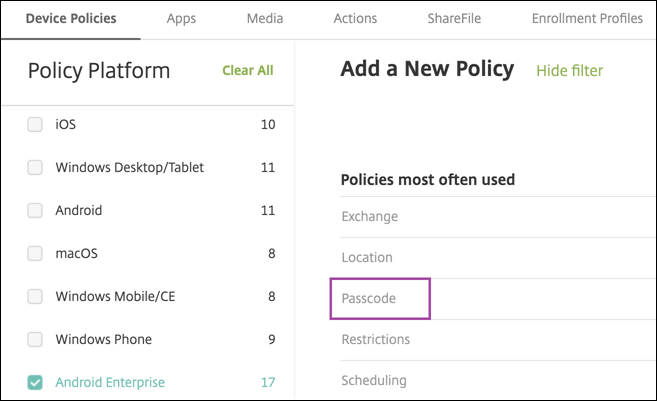
In the Citrix Endpoint Management console, go to Configure > Device Policies.
-
Click Add.
-
Click Show filter to show the Policy Platform pane. In the Policy Platform pane, select Android Enterprise.
-
Click Passcode on the right pane.
-
Enter a Policy Name. Click Next.
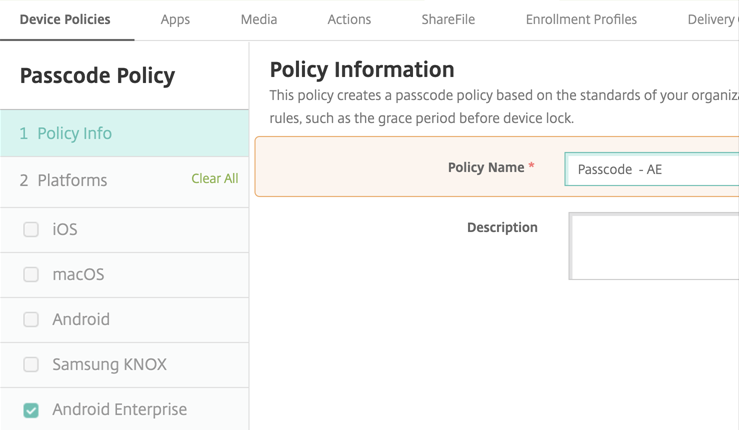
- Configure the Passcode policy settings.
- Set Device passcode required to On to see the settings available for security challenges for the device itself.
- Set Work profile security challenge to On to see the settings available for work profile security challenges.
-
Click Next.
-
Assign the policy to one or more delivery groups.
- Click Save.
Creating enrollment profiles
Enrollment profiles control how Android devices are enrolled if Android Enterprise is enabled for your Citrix Endpoint Management deployment. When you create an enrollment profile to enroll Android Enterprise devices, you can configure the enrollment profile to enroll new and factory reset devices as:
- Fully managed devices
- Dedicated devices
- Fully managed devices with a work profile/Work profile on corporate-owned devices
You can also configure each of these Android Enterprise enrollment profiles to enroll BYOD Android devices as work profile devices.
If Android Enterprise is enabled for your Citrix Endpoint Management deployment, all newly enrolled or reenrolled Android devices are enrolled as Android Enterprise devices. By default, the Global enrollment profile enrolls new and factory reset Android devices as fully managed devices and enrolls BYOD Android devices as work profile on corporate-owned devices.
When you create enrollment profiles, you assign delivery groups to them. If a user belongs to many delivery groups that have different enrollment profiles, the name of the delivery group determines the enrollment profile used. Citrix Endpoint Management selects the delivery group that appears last in an alphabetized list of delivery groups. For more information, see Enrollment profiles.
Add an enrollment profile for fully managed devices
The Global enrollment profile enrolls fully managed devices by default, but you can create more enrollment profiles to enroll fully managed devices.
-
In the Citrix Endpoint Management console, go to Configure > Enrollment Profiles.
-
To add an enrollment profile, click Add. In the Enrollment Info page, type a name for the enrollment profile.
-
Set the number of devices that members with this profile can enroll.
-
Select Android under Platforms or click Next. The Enrollment Configuration page appears.
-
Set Management to Android Enterprise.
-
Set Device owner mode to Company-owned device.
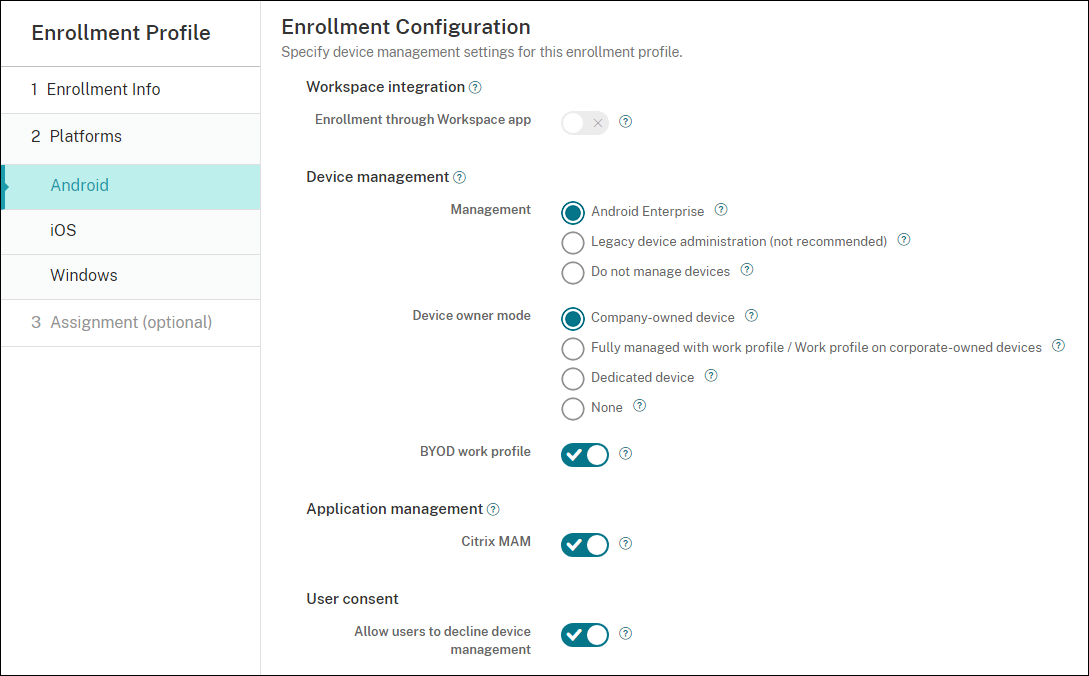
-
BYOD work profile allows you to configure the enrollment profile to enroll BYOD devices as work profile devices. New and factory reset devices are enrolled as fully managed devices. Set BYOD work profile to On to allow enrollment of BYOD devices as work profile devices. Set BYOD work profile to Off to restrict enrollment to fully managed devices. Default is On.
-
Choose whether to enroll devices in Citrix MAM.
-
If you set BYOD work profile to On, configure user consent. To allow users of BYOD work profile devices to decline device management when they enroll their devices, set Allow users to decline device management to On.
If BYOD work profile is set to On, the default value of Allow users to decline device management is On. If BYOD work profile is set to Off, then Allow users to decline device management is disabled.
-
Select Assignment (options). The Delivery Group Assignment screen appears.
-
Choose the delivery group or delivery groups that have the administrators who enroll fully managed devices. Then click Save.
The Enrollment Profile page appears with the profile that you added.
Add a dedicated device enrollment profile
When your Citrix Endpoint Management deployment includes dedicated devices, a single Citrix Endpoint Management administrator or small group of administrators enroll many dedicated devices. To make sure that these administrators can enroll all the devices required, create an enrollment profile for them with unlimited devices allowed per user.
-
In the Citrix Endpoint Management console, go to Configure > Enrollment Profiles.
-
To add an enrollment profile, click Add. In the Enrollment Info page, type a name for the enrollment profile. Set to Unlimited the number of devices members with this profile can enroll.
-
Select Android under Platforms or click Next. The Enrollment Configuration page appears.
-
Set Management to Android Enterprise.
-
Set Device owner mode to Dedicated device.
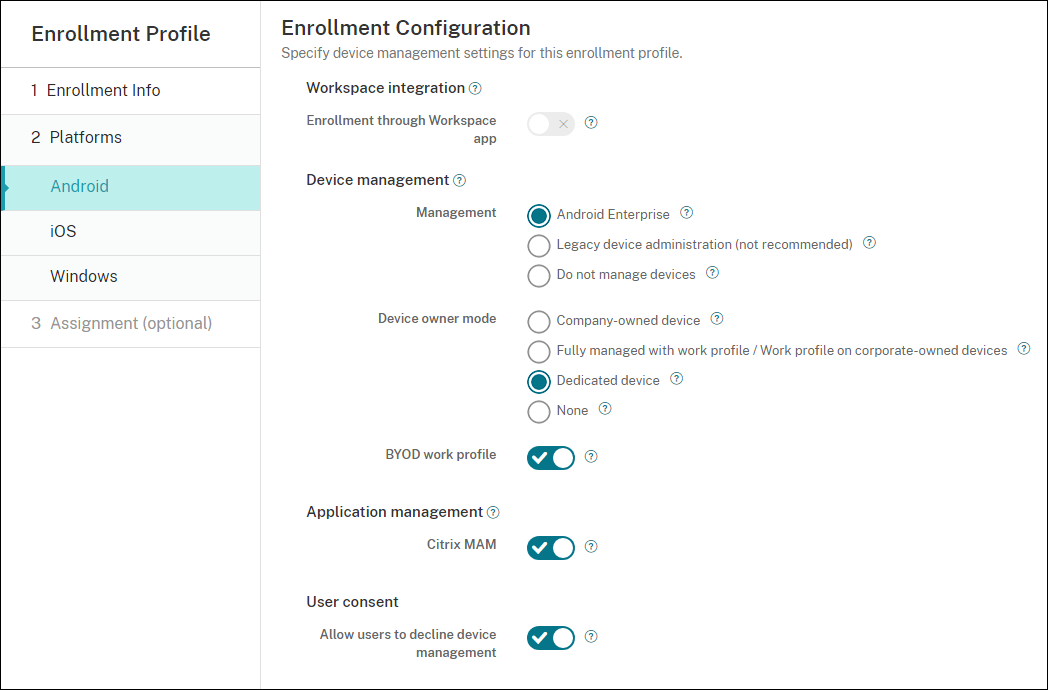
-
BYOD work profile allows you to configure the enrollment profile to enroll BYOD devices as work profile devices. New and factory reset devices are enrolled as dedicated devices. Set BYOD work profile to On to allow enrollment of BYOD devices as work profile devices. Set BYOD work profile to Off to restrict enrollment to company-owned devices. Default is On.
-
Choose whether to enroll devices in Citrix MAM.
-
If you set BYOD work profile to On, configure user consent. To allow users of BYOD work profile devices to decline device management when they enroll their devices, set Allow users to decline device management to On.
If BYOD work profile is set to On, the default value of Allow users to decline device management is On. If BYOD work profile is set to Off, then Allow users to decline device management is disabled.
-
Select Assignment (options). The Delivery Group Assignment screen appears.
-
Choose the delivery group or delivery groups that have the administrators who enroll the dedicated devices. Then click Save.
The Enrollment Profile page appears with the profile that you added.
Add an enrollment profile for fully managed devices with a work profile / work profile on corporate-owned devices
-
In the Citrix Endpoint Management console, go to Configure > Enrollment Profiles.
-
To add an enrollment profile, click Add. In the Enrollment Info page, type a name for the enrollment profile.
-
Set the number of devices that members with this profile can enroll.
-
Select Android under Platforms or click Next. The Enrollment Configuration page appears.
-
Set Management to Android Enterprise. Set Device owner mode to Fully managed with work profile / Work profile on corporate-owned devices.
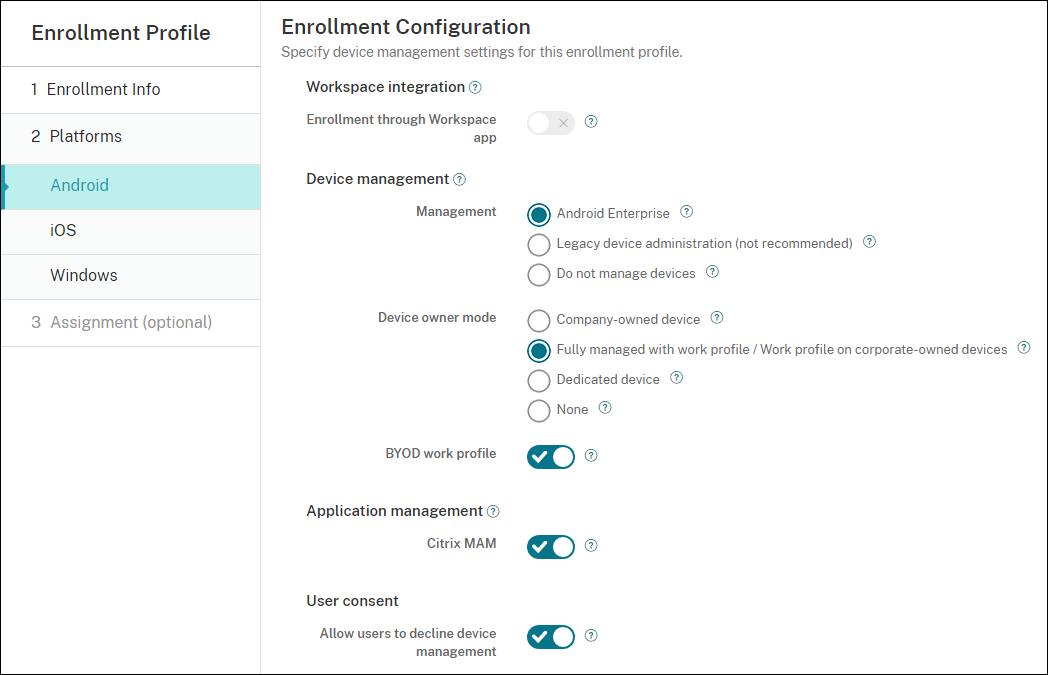
-
BYOD work profile allows you to configure the enrollment profile to enroll BYOD devices as work profile devices. New and factory reset devices are enrolled as fully managed devices with a work profile. Set BYOD work profile to On to allow enrollment of BYOD devices as work profile devices. Set BYOD work profile to Off to restrict enrollment to dedicated devices. Default is Off.
-
Choose whether to enroll devices in Citrix MAM.
-
If you set BYOD work profile to On, configure user consent. To allow users of BYOD work profile devices to decline device management when they enroll their devices, set Allow users to decline device management to On.
If BYOD work profile is set to On, the default value of Allow users to decline device management is On. If BYOD work profile is set to Off, then Allow users to decline device management is disabled.
-
Select Assignment (options). The Delivery Group Assignment screen appears.
-
Choose the delivery group or delivery groups that have the administrators who enroll fully managed devices with a work profile. Then click Save.
The Enrollment Profile page appears with the profile that you added.
Adding an enrollment profile for legacy devices
Google deprecated the device administrator mode of device management. Google encourages customers to manage all Android devices in device owner mode or profile owner mode. (See Device admin deprecation in the Google Android Enterprise developer guides.)
To support this change:
- Citrix made Android Enterprise the default enrollment option for Android devices.
- If Android Enterprise is enabled for your Citrix Endpoint Management deployment, all newly enrolled or re-enrolled Android devices are enrolled as Android Enterprise devices.
Your organization might not be ready to begin managing legacy Android devices using Android Enterprise. In that case, you can continue to manage them in device administrator mode. For devices already enrolled in device administrator mode, Citrix Endpoint Management continues to manage them in device administrator mode.
Create an enrollment profile for legacy devices to allow new Android device enrollments to use device administrator mode.
To create an enrollment profile for legacy devices:
-
In the Citrix Endpoint Management console, go to Configure > Enrollment Profiles.
-
To add an enrollment profile, click Add. In the Enrollment Info page, type a name for the enrollment profile.
-
Set the number of devices that members with this profile can enroll.
-
Select Android under Platforms or click Next. The Enrollment Configuration page appears.
-
Set Management to Legacy device administration (not recommended). Click Next.

-
Choose whether to enroll devices in Citrix MAM.
-
To allow users to decline device management when they enroll their devices, set Allow users to decline device management to On. Default is On.
-
Select Assignment (options). The Delivery Group Assignment screen appears.
-
Choose the delivery group or delivery groups that have the administrators who enroll the dedicated devices. Then click Save.
The Enrollment Profile page appears with the profile that you added.
To continue managing legacy devices in device administrator mode, enroll or re-enroll them using this profile. You enroll device administrator devices similar to work profile devices, by having users download Citrix Secure Hub and giving an enrollment server URL.
Provisioning Android Enterprise work profile devices
Android Enterprise work profile devices are enrolled in profile owner mode. These devices do not need to be new or factory reset. BYOD devices are enrolled as work profile devices. The enrollment experience is similar to Android enrollment in Citrix Endpoint Management. Users download Citrix Secure Hub from Google Play and enroll their devices.
By default, the USB Debugging and Unknown Sources settings get disabled on a device when you enroll the device in Android Enterprise as a work profile device.
When enrolling devices in Android Enterprise as work profile devices, always go to Google Play. From there, enable Citrix Secure Hub to appear in the user’s personal profile.
Provisioning Android Enterprise fully managed devices
You can enroll fully managed devices in the deployment you set up in the previous sections. Fully managed devices are company-owned devices and are enrolled in device owner mode. Only new or factory reset devices can be enrolled in device owner mode.
You can enroll devices in device owner mode using any of these enrollment methods:
-
DPC identifier token: With this enrollment method, users enter the characters
afw#xenmobilewhen setting up the device.afw#xenmobileis the Citrix DPC identifier token. This token identifies the device as managed by Citrix Endpoint Management and downloads Citrix Secure Hub from the Google Play store. See Enrolling devices using the Citrix DPC identifier token. - Near field communication (NFC) bump: The NFC bump enrollment method transfers data through between two devices using near-field communication. Bluetooth, Wi-Fi, and other communication modes are disabled on a new or factory-reset device. NFC is the only communication protocol that the device can use in this state. See Enrolling devices with NFC bump.
- QR code: QR code enrollment can be used to enroll a distributed fleet of devices that do not support NFC, such as tablets. The QR code enrollment method sets up and configures the device profile mode by scanning a QR code from the setup wizard. See Enrolling devices using a QR code.
- Zero-touch: Zero-touch enrollment allows you to configure devices to enroll automatically when they’re first powered on. Zero-touch enrollment is supported on some Android devices running Android 9.0 or later. See Zero-touch enrollment.
- Google Accounts: Users enter their Google Account credentials to start the provisioning process. This option is for enterprises using Google Workspace.
Enrolling devices using the Citrix DPC identifier token
Users enter afw#xenmobile when prompted to enter a Google account after powering on new or factory reset devices for initial setup. This action downloads and installs Citrix Secure Hub. Users then follow the Citrix Secure Hub set-up prompts to complete the enrollment.
System requirements
- Supported on all Android devices running the Android OS.
To enroll the device
-
Power on a new or factory reset device.
-
The initial device setup loads and prompts for a Google account. If the device loads the home screen of the device, check the notification bar for a Finish Setup notification.
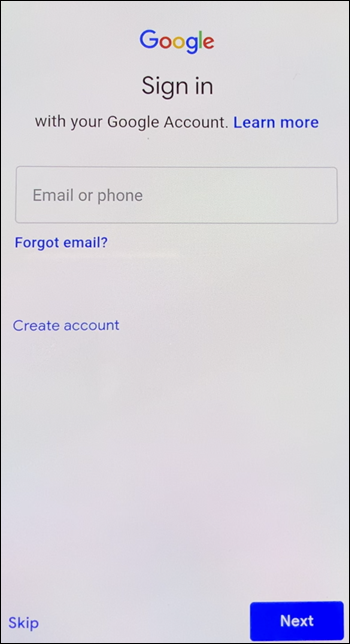
-
Enter
afw#xenmobilein the Email or phone field.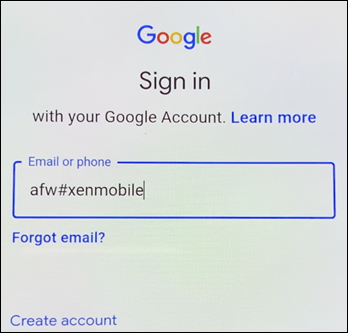
-
Tap Install on the Android Enterprise screen prompting to install Citrix Secure Hub.
-
Tap Install on the Citrix Secure Hub installer screen.
-
Tap Allow for all app permission requests.
-
Tap Accept & Continue to install Citrix Secure Hub and allow it to manage the device.
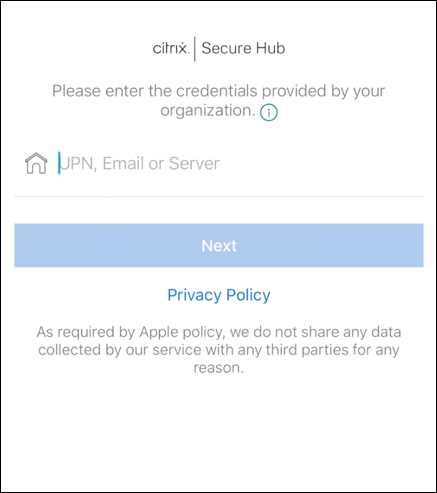
-
Citrix Secure Hub is now installed and on the default enrollment screen. In this example, AutoDiscovery isn’t set up. If it is, the user can enter their user name/email and a server can be found for them. Instead, enter the enrollment URL for the environment and tap Next.
-
The default configuration for Citrix Endpoint Management allows users to choose if they use MAM or MDM+MAM. If prompted in this way, tap Yes, Enroll to choose MDM+MAM.
-
Enter the user email address and password, then tap Next.
-
The user is prompted to configure a device passcode. Tap Set and enter a passcode.
-
The user is prompted to configure a work profile unlock method. For this example, tap Password, tap PIN, and enter a PIN.
-
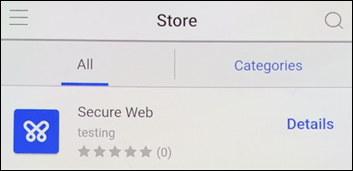
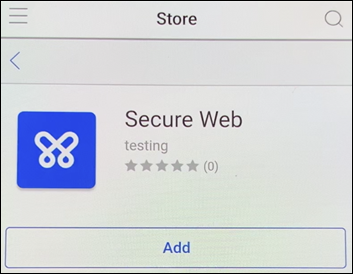
The device is now on the Citrix Secure Hub My Apps landing screen. Tap Add apps from Store.
-
To add Citrix Secure Web, tap Citrix Secure Web.
-
Tap Add.
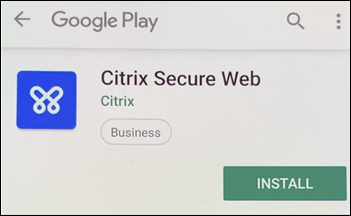
-
Citrix Secure Hub directs the user to the Google Play store to install Citrix Secure Web. Tap Install.
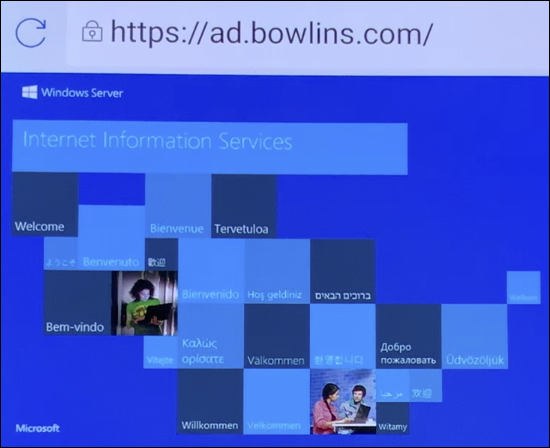
-
After Citrix Secure Web is installed, tap Open. Enter a URL from an internal site in the address bar and verify that the page loads.
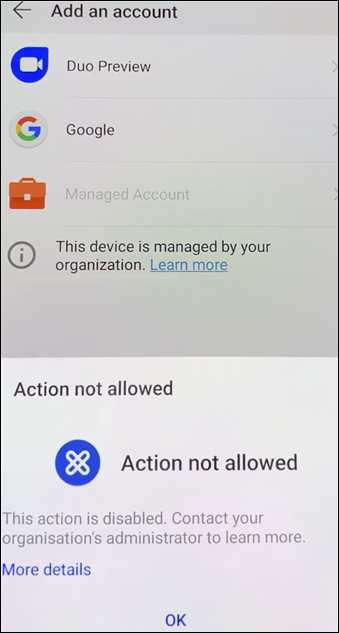
-
Go to Settings > Accounts on the device. Observe that the Managed Account can’t be modified. The developer options for sharing screen or remote debugging are also blocked.
Enrolling devices with NFC bump
To enroll a device as a fully managed device using NFC bumps requires two devices: One that is reset to its factory settings and one running the Citrix Endpoint Management Provisioning Tool.
System requirements and prerequisites
- Supported Android devices.
- A new or factory-reset device with the NFC feature, provisioned for Android Enterprise as a fully managed device. See the section on Provisioning Android Enterprise fully managed devices.
- Another device with the NFC feature, running the configured Provisioning Tool. The Provisioning Tool is available in Citrix Secure Hub or on the Citrix downloads page.
Each device can have only one Android Enterprise profile. In this case, the profile is for a managed Citrix Secure Hub. Trying to add a second DPC app removes the installed Citrix Secure Hub.
Data transferred through the NFC bump
Provisioning a factory-reset device requires you to send the following data through an NFC bump to start the Android Enterprise:
- Package name of the DPC app that acts as device owner (in this case, Citrix Secure Hub).
- Intranet/Internet location from which the device can download the DPC app.
- SHA-256 hash of the DPC app to verify if the download is successful.
- Wi-Fi connection details so that a factory-reset device can connect and download the DPC app. Note: Android now does not support 802.1x Wi-Fi for this step.
- Time zone for the device (optional).
- Geographic location for the device (optional).
When the two devices are bumped, the data from the Provisioning Tool is sent to the factory-reset device. That data is then used to download Citrix Secure Hub with administrator settings. If you don’t enter time zone and location values, Android automatically configures the values on the new device.
Configuring the Citrix Endpoint Management Provisioning Tool
Before doing an NFC bump, you must configure the Provisioning Tool. This configuration is then transferred to the factory-reset device during the NFC bump.
You can type data into the required fields or populate them by using a text file. The steps in the next procedure describe how to configure the text file with descriptions for each field. The app doesn’t save information after you type it, so you might want to create a text file to keep the information for future use.
To configure the Provisioning Tool by using a text file
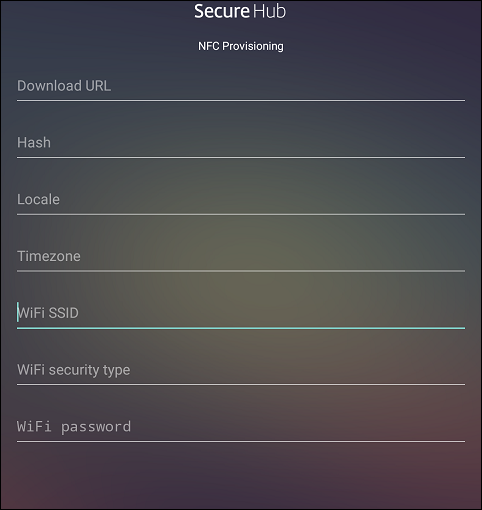
Name the file nfcprovisioning.txt and place the file in the /sdcard/ folder on the SD card of the device. The app can then read the text file and populate the values.
The text file must have the following data:
android.app.extra.PROVISIONING_DEVICE_ADMIN_PACKAGE_DOWNLOAD_LOCATION=<download_location>
This line is the intranet/internet location of the EMM provider app. After the factory-reset device connects to Wi-Fi following the NFC bump, the device must have access to this location for downloading. The URL is a regular URL, with no special formatting required.
android.app.extra.PROVISIONING_DEVICE_ADMIN_PACKAGE_CHECKSUM=<SHA-256 hash>
This line is the checksum of the EMM provider app. This checksum is used to verify that the download is successful. Steps to get the checksum are discussed later in this article.
android.app.extra.PROVISIONING_WIFI_SSID=<wifi ssid>
This line is the connected Wi-Fi SSID of the device on which the Provisioning Tool is running.
android.app.extra.PROVISIONING_WIFI_SECURITY_TYPE=<wifi security type>
Supported values are WEP and WPA2. If the Wi-Fi is unprotected, this field must be empty.
android.app.extra.PROVISIONING_WIFI_PASSWORD=<wifi password>
If the Wi-Fi is unprotected, this field must be empty.
android.app.extra.PROVISIONING_LOCALE=<locale>
Enter language and country codes. The language codes are two-letter lowercase ISO language codes (such as en) as defined by ISO 639-1. The country codes are two-letter uppercase ISO country codes (such as US) as defined by ISO 3166-1. For example, type en_US for English as spoken in the United States. If you don’t type any codes, the country and language are automatically populated.
android.app.extra.PROVISIONING_TIME_ZONE=<timezone>
The time zone in which the device is running. Type the database name of the area/location. For example, type America/Los_Angeles for Pacific time. If you don’t type a name, the time zone automatically populates.
android.app.extra.PROVISIONING_DEVICE_ADMIN_PACKAGE_NAME=<package name>
This data isn’t required, because the value is hardcoded into the app as Citrix Secure Hub. It’s mentioned here only for the sake of completion.
If there’s Wi-Fi protected using WPA2, a completed nfcprovisioning.txt file might look like the following:
android.app.extra.PROVISIONING_DEVICE_ADMIN_PACKAGE_DOWNLOAD_LOCATION=https://www.somepublicurlhere.com/path/to/securehub.apk
android.app.extra.PROVISIONING_DEVICE_ADMIN_PACKAGE_CHECKSUM=ga50TwdCmfdJ72LGRFkke4CrbAk\u003d
android.app.extra.PROVISIONING_WIFI_SSID=Protected_WiFi_Name
android.app.extra.PROVISIONING_WIFI_SECURITY_TYPE=WPA2
android.app.extra.PROVISIONING_WIFI_PASSWORD=wifiPasswordHere
android.app.extra.PROVISIONING_LOCALE=en_US
android.app.extra.PROVISIONING_TIME_ZONE=America/Los_Angeles
If there’s unprotected Wi-Fi, a completed nfcprovisioning.txt file might look like the following:
android.app.extra.PROVISIONING_DEVICE_ADMIN_PACKAGE_DOWNLOAD_LOCATION=https://www.somepublicurlhere.com/path/to/securehub.apk
android.app.extra.PROVISIONING_DEVICE_ADMIN_PACKAGE_CHECKSUM=ga50TwdCmfdJ72LGRFkke4CrbAk\u003d
android.app.extra.PROVISIONING_WIFI_SSID=Unprotected_WiFi_Name
android.app.extra.PROVISIONING_LOCALE=en_US
android.app.extra.PROVISIONING_TIME_ZONE=America/Los_Angeles
To get the checksum of Citrix Secure Hub
The checksum of Citrix Secure Hub is a constant value: qn7oZUtheu3JBAinzZRrrjCQv6LOO6Ll1OjcxT3-yKM. To download an APK file for Citrix Secure Hub, use the following Google Play store link: https://play.google.com/managed/downloadManagingApp?identifier=xenmobile.
To get an app checksum
Prerequisites:
- The apksigner tool from the Android SDK Build Tools
- OpenSSL command line
To get the checksum of any app, follow these steps:
- Download the app’s APK file from the Google Play store.
-
In the OpenSSL command line, navigate to the apksigner tool:
android-sdk/build-tools/<version>/apksignerand type the following:apksigner verify -print-certs <apk_path> | perl -nle 'print $& if m{(?<=SHA-256 digest:) .*}' | xxd -r -p | openssl base64 | tr -d '=' | tr -- '+/=' '-_' <!--NeedCopy-->The command returns a valid checksum.
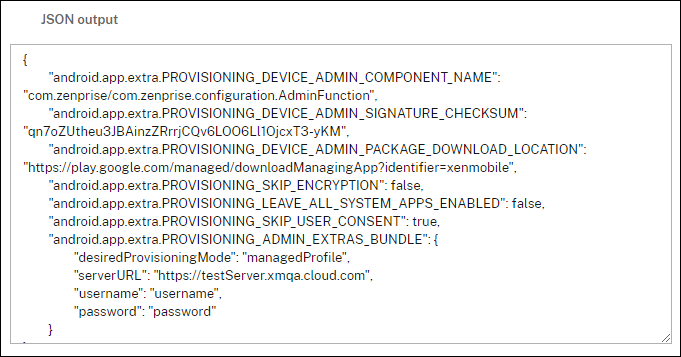
- To generate the QR code, enter the checksum in the
PROVISIONING_DEVICE_ADMIN_SIGNATURE_CHECKSUMfield. For example:
{
  "android.app.extra.PROVISIONING_DEVICE_ADMIN_COMPONENT_NAME": "com.zenprise/com.zenprise.configuration.AdminFunction",
  "android.app.extra.PROVISIONING_DEVICE_ADMIN_SIGNATURE_CHECKSUM":"qn7oZUtheu3JBAinzZRrrjCQv6LOO6Ll1OjcxT3-yKM",
  "android.app.extra.PROVISIONING_DEVICE_ADMIN_PACKAGE_DOWNLOAD_LOCATION": "https://play.google.com/managed/downloadManagingApp?identifier=xenmobile",
  "android.app.extra.PROVISIONING_ADMIN_EXTRAS_BUNDLE": {
      "serverURL": "https://supportablility.xm.cloud.com"
   }
}
<!--NeedCopy-->
Libraries used
The Provisioning Tool uses the following libraries in its source code:
-
v7
appcompatlibrary, Design Support library, and v7 palette support library by Google under Apache license 2.0For information, see Support Library Features Guide.
-
Butter Knife by Jake Wharton under Apache license 2.0
Enrolling devices using a QR code
Users can enroll a fully managed device by using the QR code you generate for them.
System requirements
Android devices that run Android 7.0 or later.
Create a QR code
You generate a QR code by specifying enrollment information as needed. After you generate a QR code, save the QR code locally. Citrix Endpoint Management doesn’t store it.
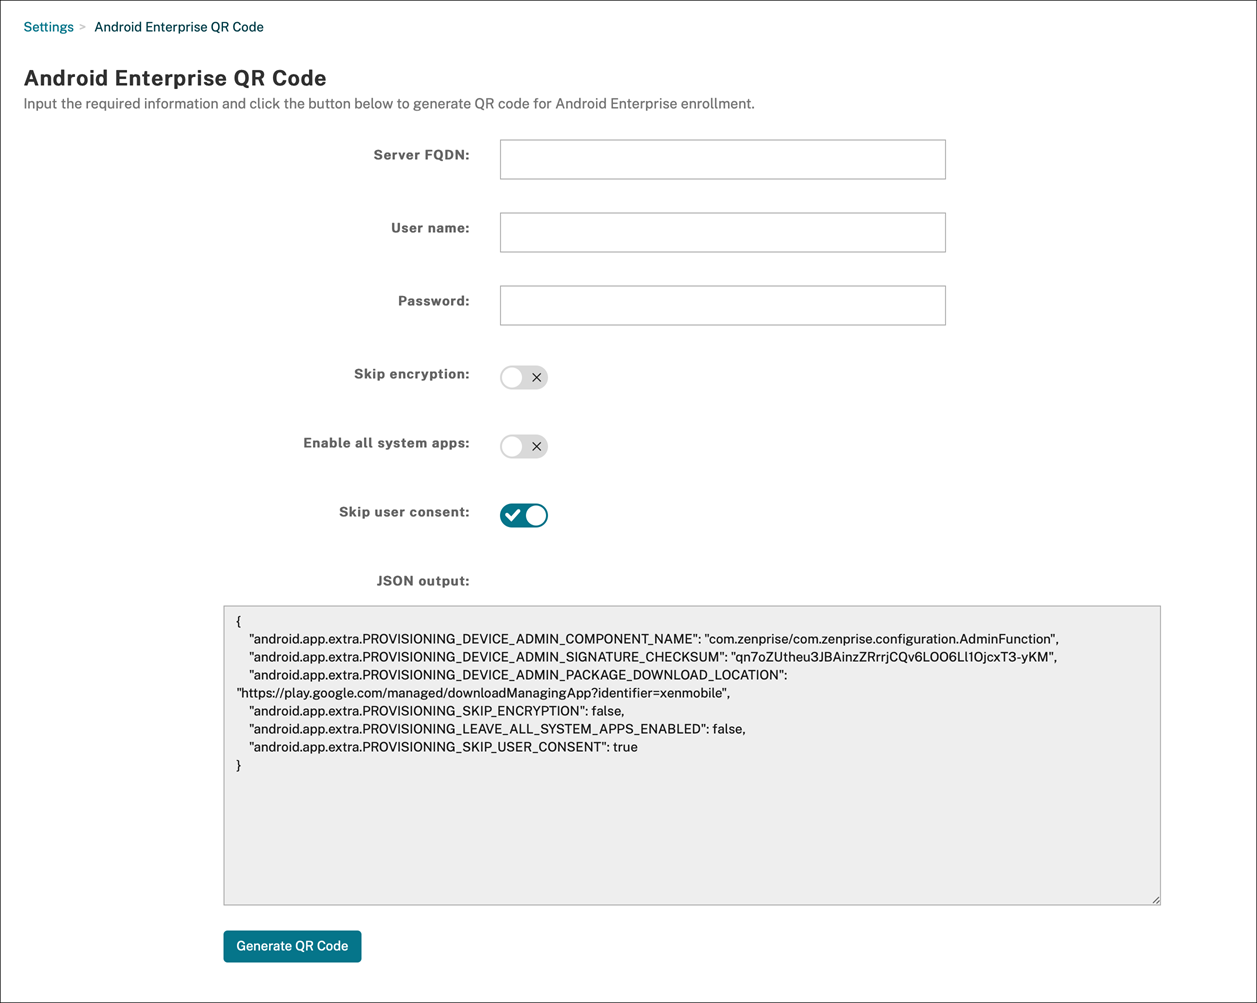
- Navigate to Settings > Android Enterprise QR Code.
- If needed, specify the following enrollment information:
-
Server FQDN: Type the FQDN of the Citrix Endpoint Management server (for example,
example.cem.cloud.com). This field is optional. If you leave it empty, users must populate this information when they enroll. - User name: Type the user name used to enroll. If you plan on distributing the QR code to more than one user, we recommend leaving this field empty. Configuring a QR code with a user name and password is useful for enrolling kiosk devices. If you leave the field empty, users must populate this information when they enroll.
- Password: Type the password associated with the user name you typed. If you leave the field empty, users must populate this information when they enroll.
- Skip encryption: If On, the device isn’t encrypted during enrollment. The default is Off.
- Enable all system apps: If On, allows access to all the system apps on the device. The default is Off.
- Skip user consent: If Off, users can opt out of device management. The default is Off.
The JSON output box displays the JSON content that corresponds to the information you specified.
-
Server FQDN: Type the FQDN of the Citrix Endpoint Management server (for example,
- To add more enrollment information, edit the JSON content in the JSON output box.
- Click Generate QR Code. The QR code appears to the right of the JSON output.
- Right-click the QR code image and save it.
- Send the image to the users for device enrollment.
A factory-reset device scans this QR code to enroll as a fully managed device.
To enroll the device
After powering up a new or factory reset device:
- Tap the screen six times on the welcome screen to launch the QR code enrollment flow.
-
When prompted, connect to Wi-Fi. The download location for Citrix Secure Hub in the QR code is accessible over this Wi-Fi network.
Once the device successfully connects to Wi-Fi, it downloads a QR code reader from Google and launches the camera.
-
Point the camera to the QR code to scan the code.
Android downloads Citrix Secure Hub from the download location in the QR code, validates the signing certificate signature, installs Citrix Secure Hub, and sets it as the device owner.
For more information, see this Google guide for Android EMM developers: https://developers.google.com/android/work/prov-devices#qr_code_method.
Zero-touch enrollment
Zero-touch enrollment lets you set up devices to provision themselves as fully managed devices when they’re powered on for the first time.
Your device reseller creates an account for you on the Android zero-touch portal, an online tool that lets you apply configurations to devices. Using the Android zero-touch portal, create one or more zero-touch enrollment configurations and apply the configurations to the devices assigned to your account. When your users power up these devices, the devices are automatically enrolled in Citrix Endpoint Management. The configuration assigned to the device defines its automatic enrollment process.
System requirements
- Support for zero-touch enrollment begins with Android 9.0.
Devices and account information from your reseller
-
Devices eligible for zero-touch enrollment are bought from an enterprise reseller or Google partner. For a list of Android Enterprise zero-touch partners, see the Android website.
-
An Android Enterprise zero-touch portal account, created by your reseller.
-
Android Enterprise zero-touch portal account login information, provided by your reseller.
Create a zero-touch configuration
When you create a zero-touch configuration, include a custom JSON to specify details of the configuration.
Use this JSON to configure the device to enroll on the Citrix Endpoint Management server you specify. Replace the URL of your server for ‘URL’ in this example.
      {
          "android.app.extra.PROVISIONING_ADMIN_EXTRAS_BUNDLE":
        {
              "serverURL":"URL"
         }
      }
<!--NeedCopy-->
You can use an optional JSON with more parameters to further customize your configuration. This example specifies the Citrix Endpoint Management server and the user name and password that devices using this configuration use to log on to the server.
     {
        "android.app.extra.PROVISIONING_ADMIN_EXTRAS_BUNDLE":
          {
              "serverURL":"URL",
              "xm_username":"username",
              "xm_password":"password"
          }
            }
  <!--NeedCopy-->
Important:
To enroll devices in the work profile on corporate-owned devices mode, add
{"desiredProvisioningMode": "managedProfile"}to the custom JSON underPROVISIONING_ADMIN_EXTRAS_BUNDLE.
-
Go to the Android zero-touch portal at https://partner.android.com/zerotouch. Log in with the account information from your zero-touch device reseller.
-
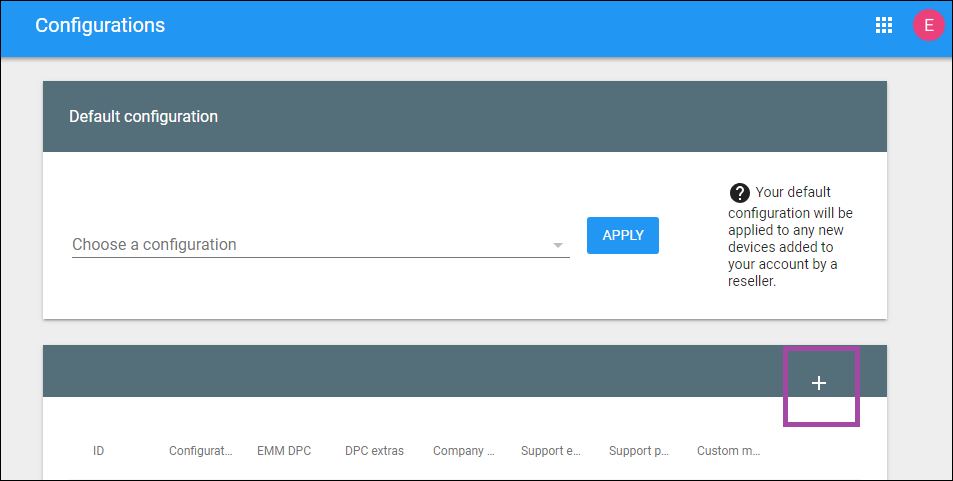
Click Configuration.
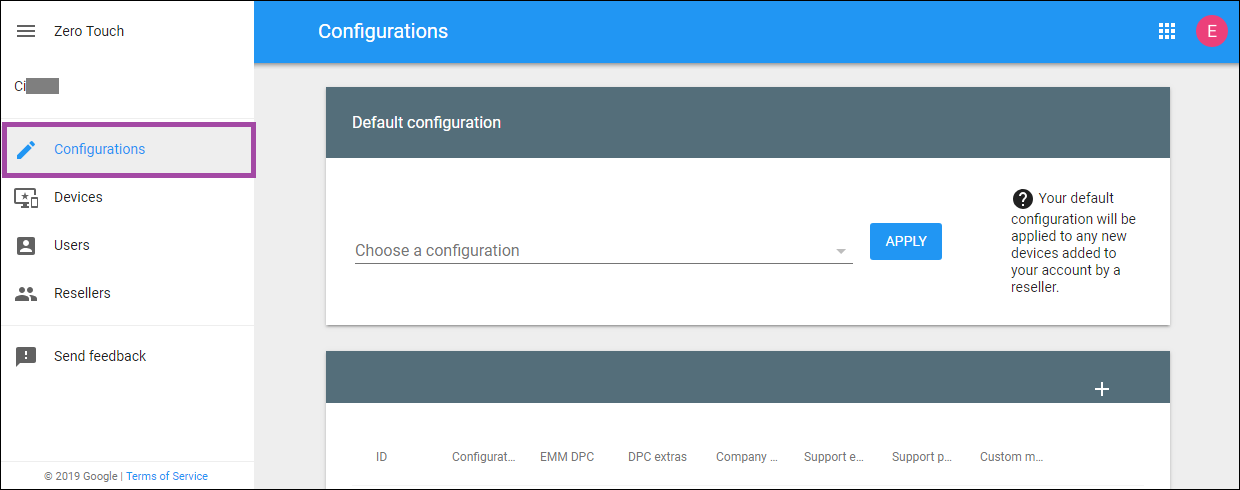
-
Click + above the configuration table.
- Enter your configuration information in the configuration window that appears.
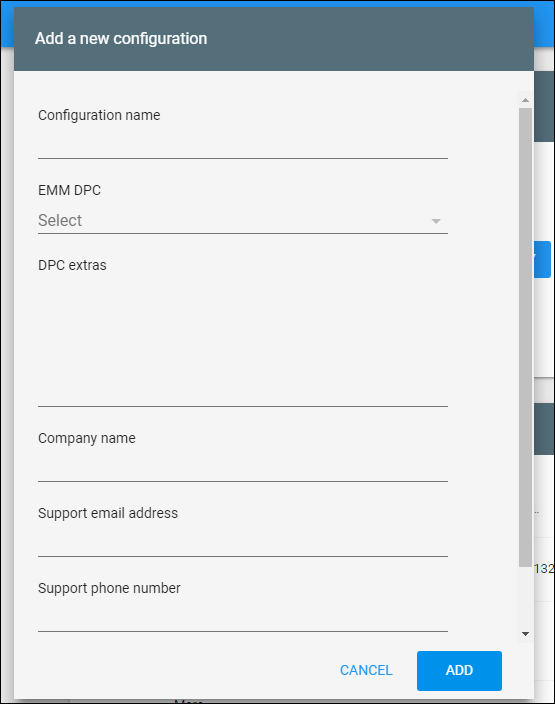
- Configuration name: Type the name that you choose for this configuration.
- EMM DPC: Choose Citrix Secure Hub.
- DPC extras: Paste your custom JSON text in this field.
- Company name: Type the name that you want to appear on your Android Enterprise zero-touch devices during device provisioning.
- Support email address: Type an email address that your users can contact for help. This address appears on your Android Enterprise zero-touch devices before device provisioning.
- Support phone number: Type a phone number that your users can contact for help. This phone number appears on your Android Enterprise zero-touch devices before device provisioning.
- Custom Message: Optionally, add one or two sentences to help your users contact you or give them more details about what’s happening to their device. This custom message appears on your Android Enterprise zero-touch devices before device provisioning.
-
Click Add.
-
To create more configurations, repeat steps 2 through 4.
-
To apply a configuration to a device:
-
In the Android zero-touch portal, click Devices.
-
Find the device in the list of devices and choose the configuration you want to assign to it.
-
Click Update.
-
You can apply a configuration to many devices using a CSV file.
For information on how to apply a configuration to many devices, see Zero-touch enrollment for IT admins. This Android Enterprise topic has more information on how to manage configurations and apply them to devices.
Provisioning dedicated Android Enterprise devices
Dedicated Android Enterprise devices are fully managed devices that are dedicated to fulfill a single use case. You restrict these devices to one app or a small set of apps required to do the tasks needed for this use case. You also prevent users from enabling other apps or doing other actions on the device.
Enroll dedicated devices using any of the enrollment methods used for other fully managed devices, as described in Provisioning Android Enterprise fully managed devices. Provisioning dedicated devices require more setup before enrollment.
To provision dedicated devices:
- Add an enrollment profile for Citrix Endpoint Management administrators that you allow to enroll dedicated devices to your Citrix Endpoint Management deployment. See Creating enrollment profiles.
- To enable a dedicated device to access apps, add them to the allow list.
- Optionally, set the allowed app to allow lock task mode. When an app is in lock task mode, the app is pinned to the device screen when the user opens it. No Home button appears and the Back button is disabled. The user exits the app using an action programmed into the app, such as signing out.
- Enroll each device in the enrollment profile that you added.
System requirements
- Support for enrolling dedicated devices begins with Android 6.0.
Allow apps and set lock task mode
The Kiosk device policy lets you allow apps and set lock task mode. By default, Citrix Secure Hub and Google Play services are on the allow list.
To add the Kiosk policy:
-
In the Citrix Endpoint Management console, click Configure > Device Policies. The Device Policies page appears.
-
Click Add. The Add a New Policy dialog box appears.
-
Expand More and then, under Security, click Kiosk. The Kiosk Policy page appears.
-
Under Platforms, select Android Enterprise. Clear other platforms.
-
In the Policy Information pane, type the Policy Name and an optional Description.
-
Click Next and then click Add.
-
To allow an app and allow or deny lock task mode for that app:
Select the app that you want to allow from the list.
Choose Allow to set the app to be pinned to the device screen when the user starts the app. Choose Deny to set the app not to be pinned. Default is Allow.
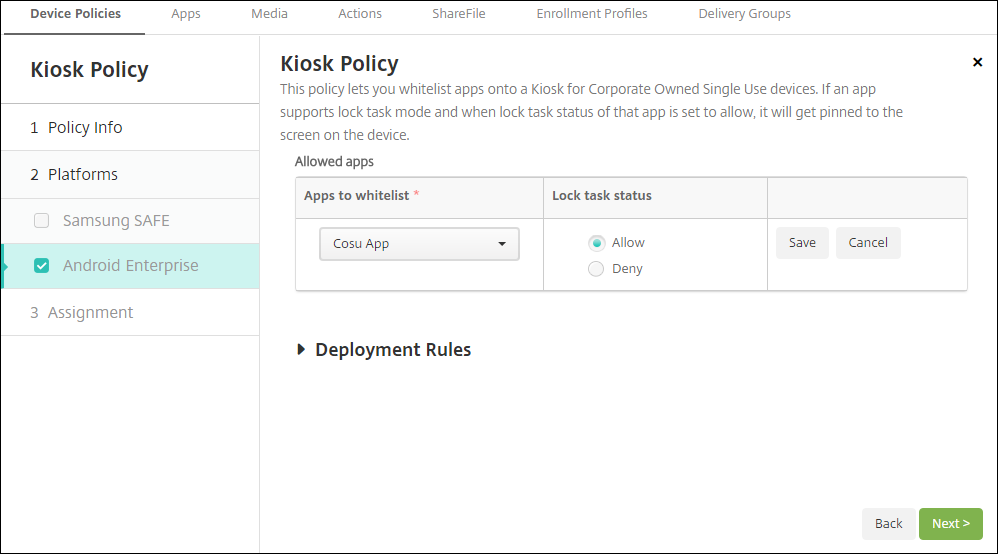
-
Click Save.
-
To allow another app and allow or deny lock task mode for that app, click Add.
-
Configure deployment rules and choose delivery groups. For more information, see Device policies.
Provisioning Android Enterprise fully managed devices with a work profile or work profile on corporate-owned devices
Devices running Android 9.0-10.x enroll as “fully managed with a work profile.” Starting with Android 11+, devices enroll as “work profile on corporate-owned devices.” All of these devices are company-owned devices that are used for both work and personal purposes. Your organization manages the entire device. You can apply one set of policies to the device and a separate set of policies to the work profile.
In the Citrix Endpoint Management console, fully managed devices with a work profile appear with these terms:
-
The device ownership is “Corporate”.
-
The device Android Enterprise install type is “Corporate Owner Personally Enabled”.
System requirements
- Support for enrolling fully managed devices with work profiles begins with Android 9.0.
To enroll the device
New and factory reset devices enroll as fully managed devices with a work profile. Those devices use any of the enrollment methods used for other fully managed devices, as described in Provisioning Android Enterprise fully managed devices. Devices running Android 11 can enroll in the work profile on corporate-owned devices mode using the QR code or zero-touch enrollment methods described in that section.
Important:
When enrolling devices in the work profile on corporate-owned devices mode using the QR code method, add the following to the JSON output, above the
serverURLfield:"desiredProvisioningMode": "managedProfile",
Devices that aren’t new or factory reset are enrolled as work profile devices as described in Provisioning Android Enterprise work profile devices.
Viewing Android Enterprise devices in the Citrix Endpoint Management console
To view Android Enterprise fully managed devices, dedicated devices, and fully managed devices with a work profile:
-
In the Citrix Endpoint Management console, go to Manage > Devices.
-
Add the Android Enterprise Enabled Device? column by clicking the menu on the right edge of the table.
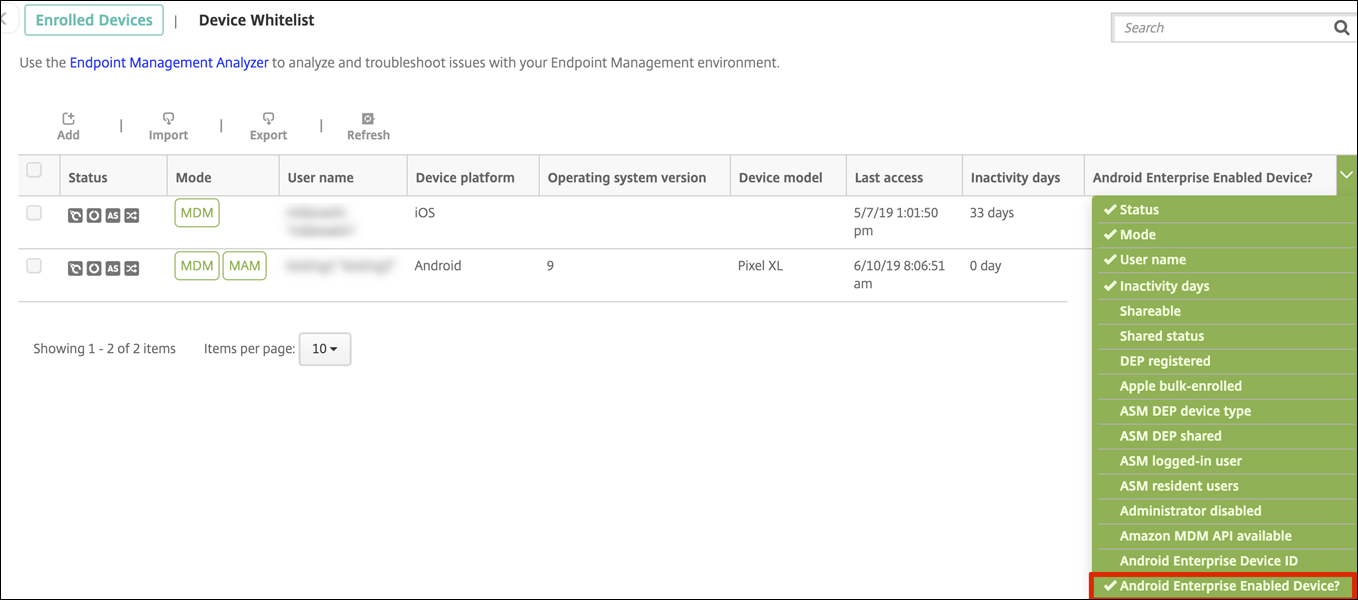
-
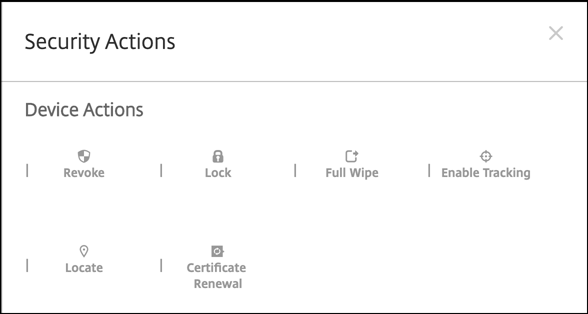
To view available security actions, select a fully managed device and click Secure. When the device is fully managed, the Full Wipe action is available but Selective Wipe isn’t. That difference is because the device only allows apps from the managed Google Play store. There isn’t an option for the user to install applications from the public store. Your organization manages all the content on the device.
Configure Android Enterprise device and app policies
For an overview of the policies controlled at both the device and app levels, see Supported device policies and MDX policies for Android Enterprise.
What to know about policies:
-
Device restrictions: Dozens of device restrictions let you control features such as:
- Use of the device camera
- Use of copy and paste between work and personal profiles
-
Per-app VPN: Use the Managed configurations device policy to configure VPN profiles for Android Enterprise.
-
Email policy: We recommend using the Managed configurations device policy to configure apps.
Device policies
This table lists all device policies available for Android Enterprise devices.
Important:
For devices that enroll in Android Enterprise and use MDX apps: You can control some settings through MDX and Android Enterprise. Use the least restrictive policy settings for MDX and control the policy through Android Enterprise.
Device policies for fully managed devices with work profile (COPE devices)
For fully managed devices with work profiles, you can use some device policies to apply separate settings to the entire device and the work profile. You can use other device policies to apply settings only to the entire device or only to the work profile of fully managed devices with work profiles. For devices enrolled in the work profile on corporate-owned devices mode, policies apply only to the work profile and not the entire device.
| Policy | Applies to |
|---|---|
| App permissions | Work profile |
| App inventory | Work profile |
| App uninstall | Work profile |
| Automatically update managed apps | Work profile |
| Connection scheduling | Work profile |
| Credentials | Work profile |
| Custom XML | N/A |
| Citrix Endpoint Management options | Work profile |
| Files | Work profile |
| Keyguard management | Device and work profile |
| Kiosk | N/A |
| Launcher configuration | Device and work profile |
| Location | Device (location mode only) |
| Managed configurations | Work profile |
| Network | Device |
| OS update | N/A |
| Passcode | Device and work profile |
| Restrictions | Device and work profile (create separate policies for the device and the work profile) |
| VPN | N/A |
See also, Supported device policies and MDX policies for Android Enterprise and MAM SDK overview.
Security actions
Android Enterprise supports the following security actions. For a description of each security action, see Security actions.
| Security action | Work profile | Fully managed |
|---|---|---|
| Certificate Renewal | Yes | Yes |
| Full Wipe | Yes (after a selective wipe) | Yes |
| Locate | Yes | Yes |
| Lock | Yes | Yes |
| Lock and Reset Password | No | Yes |
| Notify (Ring) | Yes | Yes |
| Revoke | Yes | Yes |
| Selective Wipe | Yes | Yes |
Security action notes
-
The locate security action fails unless the Location device policy sets the location mode for the device to High Accuracy or Battery Saving. See Location device policy.
-
On work profile devices that are running versions of Android earlier than Android 9.0:
- The lock and reset password action isn’t supported.
-
On work profile devices with Android 9.0 or greater:
- The passcode sent locks the work profile. The device itself isn’t locked.
- If no passcode is set on the work profile:
- If no passcode is sent, or the passcode sent doesn’t meet passcode requirements: The device is locked.
- If a passcode is set on the work profile:
- If no passcode is sent, or the passcode sent doesn’t meet passcode requirements: The work profile is locked but the device itself isn’t locked.
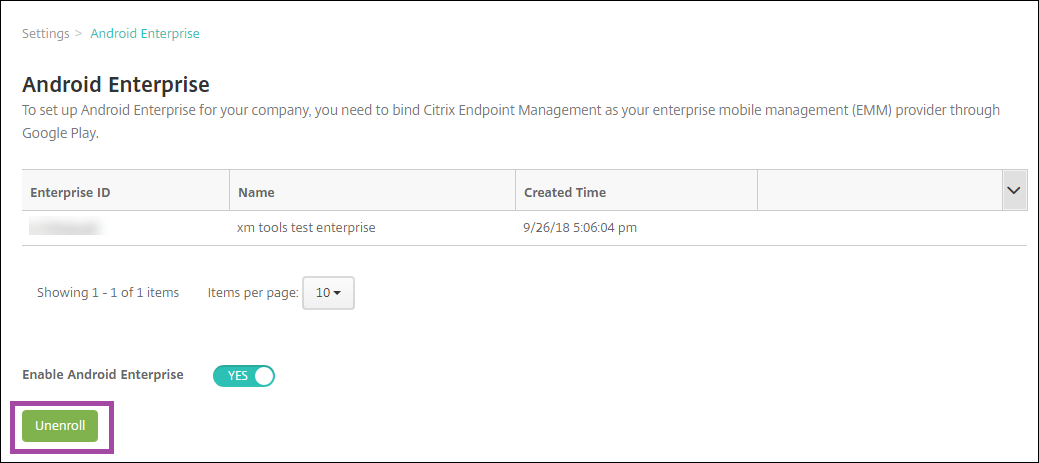
Unenroll an Android Enterprise enterprise
If you no longer want to use your Android Enterprise enterprise, you can unenroll the enterprise.
Warning:
After you unenroll an enterprise, Android Enterprise apps on devices already enrolled through it reset to their default states. Google no longer manages the devices. If you enroll into a new Android Enterprise enterprise, you must approve apps for the new organization from managed Google Play. You can then update the apps from the Citrix Endpoint Management console.
After the Android Enterprise enterprise is unenrolled:
- Devices and users enrolled through the enterprise have the Android Enterprise apps reset to their default state. Managed configurations policies previously applied no longer affect operations.
- Citrix Endpoint Management manages devices enrolled through the enterprise. From the perspective of Google, those devices are unmanaged. You can’t add new Android Enterprise apps. You can’t apply Managed configurations policies. You can apply other policies, such as Scheduling, Password, and Restrictions, to these devices.
- If you try to enroll devices in Android Enterprise, they’re enrolled as Android devices, not Android Enterprise devices.
Unenroll an Android Enterprise enterprise using the Citrix Endpoint Management server console and Citrix Endpoint Management Tools.
When you do this task, Citrix Endpoint Management opens a Tools popup window. Before you begin, make sure that your browser has permission to open popup windows. Some browsers, such as Google Chrome, require you to disable popup blocking and add the address of the Citrix Endpoint Management site to the popup allow list.
To unenroll an Android Enterprise enterprise:
-
In the Citrix Endpoint Management console, click the gear icon in the upper-right corner. The Settings page appears.
-
On the Settings page, click Android Enterprise.
-
Click Unenroll.
In this article
- Getting started with Android Enterprise
- Using managed Google Play with Citrix Endpoint Management
- Device deployment scenarios and profiles
- Enrollment security
- Requirements
- Connecting Citrix Endpoint Management to Google Play
- Providing Citrix mobile productivity apps to Android Enterprise users
- Creating enrollment profiles
- Provisioning Android Enterprise work profile devices
- Provisioning Android Enterprise fully managed devices
- Provisioning dedicated Android Enterprise devices
- Provisioning Android Enterprise fully managed devices with a work profile or work profile on corporate-owned devices
- Viewing Android Enterprise devices in the Citrix Endpoint Management console
- Configure Android Enterprise device and app policies
- Security actions
- Unenroll an Android Enterprise enterprise