Android OS
Note:
This article doesn’t apply to devices that are managed with Android Enterprise. For information about those devices, see other articles in this section.
Citrix Endpoint Management also supports Android OS devices that aren’t managed through an Android or Samsung enterprise program. To control how and when Android devices connect to the Citrix Endpoint Management service, use Firebase Cloud Messaging (FCM). For information, see Firebase Cloud Messaging.
Enrollment profiles determine whether Android devices enroll in MAM, MDM, or MDM+MAM, with the option for users to opt out of MDM. Citrix Endpoint Management supports the following authentication types for Android devices in MDM+MAM. For information, see the following articles:
- Domain or domain plus security token authentication
- Client certificate or certificate plus domain authentication
- Identity providers:
Another rarely used authentication method is a client certificate plus security token. For information, see https://support.citrix.com/article/CTX215200.
A general workflow for starting Android device management is as follows:
-
Complete the onboarding process. See Onboarding and resource setup and Prepare to enroll devices and deliver resources.
-
Choose and configure an enrollment method. See Supported enrollment methods.
-
Set up device and app security actions. See Security actions.
For supported operating systems, see Supported device operating systems.
Supported enrollment methods
The following table lists the enrollment methods that Citrix Endpoint Management supports for Android devices:
| Method | Supported |
|---|---|
| Bulk enrollment | No |
| Manual enrollment | Yes |
| Enrollment invitations | Yes |
Add an Android device manually
If you want to add an Android or iOS device manually, such as for testing purposes, follow these steps.
-
In the Citrix Endpoint Management console, click Manage > Devices. The Devices page appears.

-
Click Add. The Add Device page appears.

-
Configure these settings:
- Select platform: Click Android.
- Serial Number: Type the device serial number.
- IMEI/MEID: Optionally, type the device IMEI/MEID information.
-
Click Add. The Devices table appears with the device added to the bottom of the list. To view and confirm the device details: Choose the device that you added and then, in the menu that appears, click Edit.
Note:
When you select the checkbox next to a device, the options menu appears above the device list. When you click anywhere else in the list, the options menu appears on the right side of the listing.
-
LDAP configured
-
If using local groups and local users:
-
One or more local groups.
-
Local users assigned to local groups.
-
Delivery groups are associated with local groups.
-
-
If using Active Directory:
- Delivery groups are associated with Active Directory groups.
-
-
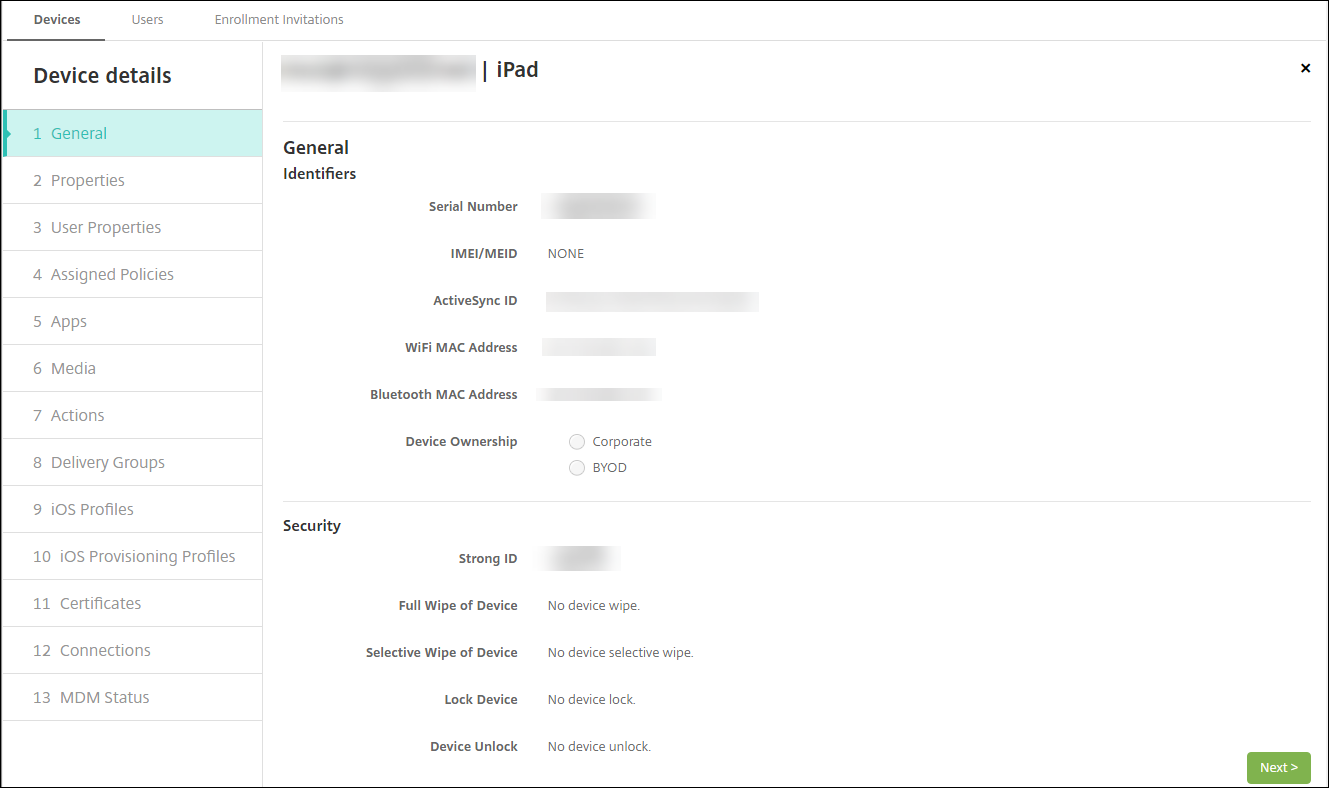
The General page lists the device Identifiers, such as the serial number and other information for the platform type. For Device Ownership, select Corporate or BYOD.
The General page also lists device Security properties, such as Strong ID, Lock Device, Activation Lock Bypass, and other information for the platform type. The Full Wipe of Device field includes the user PIN code. The user must enter that code after the device is wiped. If the user forgets the code, you can look it up here.
-
The Properties page lists the device properties that Citrix Endpoint Management is to provision. This list shows any device properties included in the provisioning file used to add the device. To add a property, click Add and then select a property from the list. For valid values for each property, see the PDF Device property names and values.
When you add a property, it initially appears under the category where you added it. After you click Next and then return to the Properties page, the property appears in the appropriate list.
To delete a property, hover over the listing and then click the X on the right side. Citrix Endpoint Management deletes the item immediately.
-
The remaining Device Details sections have summary information for the device.
- User Properties: Displays RBAC roles, group memberships, managed Google Play accounts, and properties for the user. You can retire a managed Google Play account from this page.
- Assigned Policies: Displays the number of deployed, pending, and failed policies. Provides the policy name, type, and last deployed information for each policy. Lets you reset the deployment status to pending and redeploy policies that the user removed.
- Apps: Displays, for the last inventory, the number of installed, pending, and failed app deployments. Provides the app name, identifier, type, and other information. For a description of iOS and macOS inventory keys, such as HasUpdateAvailable, see Mobile Device Management (MDM) Protocol.
- Media: Displays, for the last inventory, the number of deployed, pending, and failed media deployments.
- Actions: Displays the number of deployed, pending, and failed actions. Provides the action name and time of the last deployment.
- Delivery Groups: Displays the number of successful, pending, and failed delivery groups. For each deployment, provides the delivery group name and deployment time. Select a delivery group to view more detailed information, including status, action, and channel or user.
- iOS Profiles: Displays the last iOS profile inventory, including name, type, organization, and description.
- iOS Provisioning Profiles: Displays enterprise distribution provisioning profile information, such as the UUID, expiration date, and managed status.
- Certificates: Displays, for valid, expired, or revoked certificates, information such as the type, provider, issuer, serial number, and the number of remaining days before expiration.
- Connections: Displays the first connection status and the last connection status. Provides for each connection, the user name, penultimate (next to last) authentication time, and last authentication time.
- MDM Status: Displays information such as the MDM status, last push time, and last device reply time.
Configure Android device policies
Use these policies to configure how Citrix Endpoint Management interacts with devices running Android. This table lists all device policies available for Android devices.
Enroll Android devices
- Go to the Google Play store on your Android device, download the Citrix Secure Hub app, and then tap the app.
- When prompted to install the app, click Next and then click Install.
- After Citrix Secure Hub installs, tap Open.
-
For devices running Android 6.0 and greater, accept the required permissions:
- Allow Citrix Secure Hub to make and manage phone calls? (required)
- Allow Citrix Secure Hub to access photos, media, and files on your device? (required)
- Allow Citrix Secure Hub to access this device’s location? (optional)
- Enter your corporate credentials, such as your Citrix Endpoint Management server name, User Principal Name (UPN), or email address. Then, click Next.
-
Choose how to enroll your device:
- To enroll in MDM+MAM, tap Yes, enroll.
- To enroll in MAM, tap No.
- In the Activate device administrator screen, tap Activate.
- Enter your corporate password and then tap Sign On.
- Depending on the way Citrix Endpoint Management is configured, you might be asked to create a Citrix PIN. You can use the PIN to sign on to Citrix Secure Hub and other Citrix Endpoint Management-enabled apps, such as Citrix Secure Mail and Citrix Files. You enter your Citrix PIN twice. On the Create Citrix PIN screen, enter a PIN.
- Reenter the PIN. Citrix Secure Hub opens. You can then access the app store to view the apps you can install on your Android device.
- If you configured Citrix Endpoint Management to push apps to devices automatically after enrollment, users are prompted to install the apps. Also, the policies that you configure in Citrix Endpoint Management are deployed to the device. Tap Install to install the app.
To unenroll and reenroll an Android device
Users can unenroll from within Citrix Secure Hub. When users unenroll by using the following procedure, the device still appears in the device inventory in the Citrix Endpoint Management console. You can’t do the actions on the device, however. For example, you can’t track the device or monitor device compliance.
-
Tap to open the Citrix Secure Hub app.
-
Depending on whether you have a phone or a tablet, do the following:
On a phone:
-
Swipe from the left of the screen to open a settings pane.
-
Tap Preferences, tap Accounts, and then tap Delete Account.
On a tablet:
-
Tap the arrow next to your email address on the upper-right corner.
-
Tap Preferences, tap Accounts, and then tap Delete Account.
-
-
In the Delete Account? window, tap Yes, delete. Citrix Secure Hub unenrolls your device. Follow the on-screen instructions to re-enroll your device.
Security actions
Android supports the following security actions. For a description of each security action, see Security actions.
| App Lock | App Wipe | Certificate Renewal |
| Full Wipe | Locate | Lock |
| Lock and Reset Password | Notify | Revoke |
| Selective Wipe |
Note:
For devices running Android 6.0 and greater, the Locate security action requires the user to grant Location permission during enrollment. The user can opt not to grant Location permission. If the user doesn’t grant the permission during enrollment, Citrix Endpoint Management again requests location permission when sending the Locate command.