Integrate with Apple Education features
You can use Citrix Endpoint Management as your Mobile Device Management (MDM) solution in an environment that uses Apple Education. Citrix Endpoint Management support includes Apple School Manager (ASM) and Classroom app for the iPad. The Citrix Endpoint Management Education Configuration device policy configures instructor and student devices for use with Apple Education.
You provide preconfigured and supervised iPads to instructors and students. That configuration includes ASM enrollment in Citrix Endpoint Management, a Managed Apple ID account configured with a new password, and required Volume Purchase apps and iBooks.
For more information about Apple Education features, see the Apple Education site and the Apple Education Deployment Guide from the same site.
Apple School Manager
Follow these general steps to integrate Citrix Endpoint Management with ASM.
- Create an account for your institution in ASM to enroll your institution in ASM.
- Configure an Education Volume Purchase account for the Apple School Manager.
- Add passwords for Apple School Manager users.
- Plan and add resources and delivery groups to Citrix Endpoint Management.
- Test instructor and student device enrollments.
- Provide the preconfigured devices to instructors and students.
- Manage instructor, student, and class data
- If a device is lost or stolen, you can lock and locate the device.
For information on enrolling in ASM and connecting your account to Citrix Endpoint Management, see Deploy devices through the Apple Deployment Program.
Prerequisites
-
NetScaler Gateway
-
Enrollment profile configured for MDM+MAM.
-
Apple iPad third generation (minimum version) or iPad Mini, with iOS 9.3 (minimum version)
Note:
Citrix Endpoint Management doesn’t validate ASM user accounts against LDAP or Active Directory. However, you can connect Citrix Endpoint Management to the LDAP or Active Directory for management of users and devices not related to ASM instructors or students. For example, you can use Active Directory to provide Citrix Secure Mail and Citrix Secure Web to other ASM members, such as IT administrators and managers.
Because ASM instructors and students are local users, there is no need to deploy Citrix Secure Hub to their devices.
MAM enrollment that includes NetScaler Gateway authentication doesn’t support local users (only Active Directory users). So, Citrix Endpoint Management deploys only required Volume Purchase apps and iBooks to instructor and student devices.
Classroom app for iPad
The Classroom app for iPad enables instructors to connect to and manage student devices. You can view device screens, open apps on iPads, share, and open web links, and present a student screen on Apple TV.
Classroom is free in the App Store. You upload the app to the Citrix Endpoint Management console. You then use the Education Configuration device policy to configure the Classroom app, which you deploy to instructor devices.
For more information on how to deploy the Classroom app, see Distribute Apple apps.
For more information on Classroom app requirements, setup, and features, see the Classroom user guide on the Apple support site.
Add passwords for Apple School Manager users
After you add an ASM account, Citrix Endpoint Management imports classes and users from ASM. Citrix Endpoint Management treats classes as local groups and uses the term “group” in the console. If a class has a group name in ASM, Citrix Endpoint Management assigns the group name to the class. Otherwise, Citrix Endpoint Management uses the source system ID for the group name. Citrix Endpoint Management doesn’t use the course name for the class name because course names in ASM aren’t unique.
Citrix Endpoint Management uses the Managed Apple IDs to create local users with the user type ASM. The users are local because ASM creates the credentials independently of all external data sources. As a result, Citrix Endpoint Management doesn’t use a directory server to authenticate these new users.
ASM doesn’t send temporary user passwords to Citrix Endpoint Management. You can import them from a CSV file or add them manually. To import temporary user passwords:
-
Get the CSV file generated by ASM when creating the Managed Apple ID temporary passwords.
-
Edit the CSV file, replacing the temporary passwords with new passwords that users provide to enroll to Citrix Endpoint Management. There’s no constraint on the password type for this purpose.
The format of an entry in the CSV file is as follows:
user@appleid.citrix.com,Firstname,Middle,Lastname,Password123!Where:
User:
user@appleid.citrix.comFirst name:
FirstnameMiddle name:
MiddleLast name:
LastnamePassword:
Password123! -
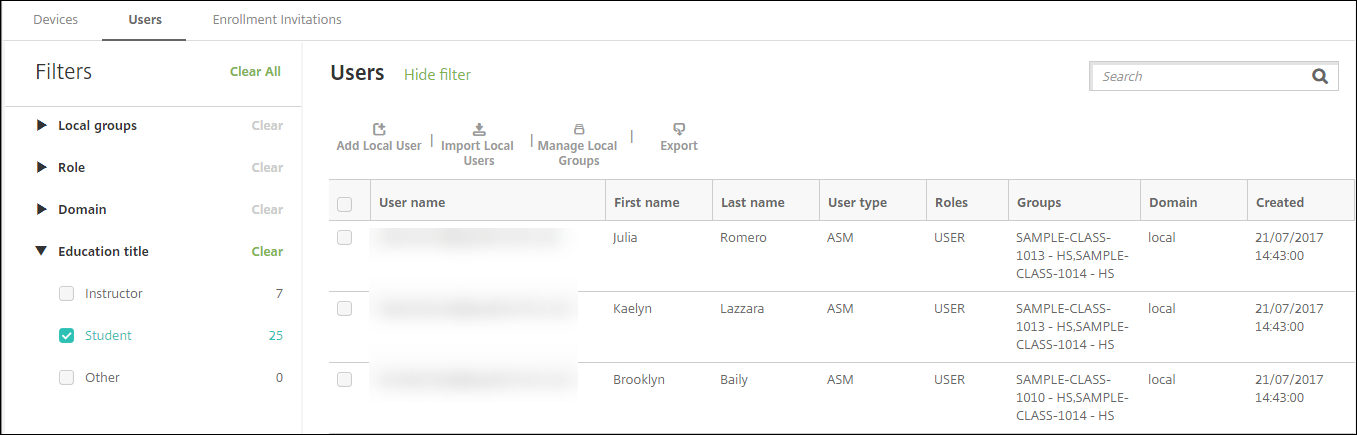
In the Citrix Endpoint Management console, click Manage > Users. The Users page appears.
The following Manage > Users screen sample shows a list of users imported from ASM. In the Users list:
-
User name shows the managed Apple ID.
-
User type is ASM, to indicate the account originated from ASM.
-
Groups show the classes.
-
-
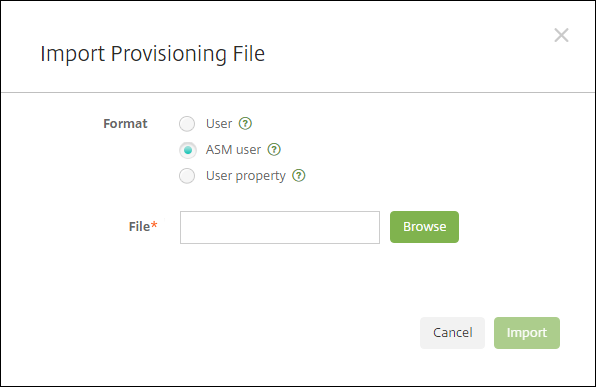
Click Import Local Users. The Import Provisioning File dialog box appears.
-
For Format, choose ASM user, navigate to the CSV file you prepared in step 2, and then click Import.
-
To view the properties for a local user, select the user and then click Edit.
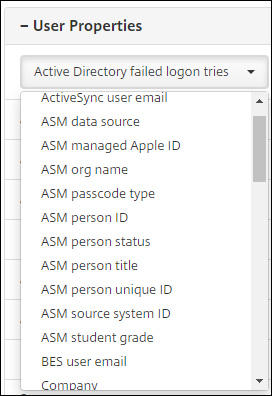
In addition to the name properties, these ASM properties are available:
- ASM data source: The data source of the class, such as CSV or SFTP.
-
ASM managed Apple ID: A Managed Apple ID might include your institution name and
appleid. For example, the ID might resemble johnappleseed@appleid.myschool.edu. Citrix Endpoint Management requires a Managed Apple ID for authentication. - ASM org name: The name you gave the account in Citrix Endpoint Management.
- ASM passcode type: Password policy of the person: complex (a non-student password of eight or more numbers and letters), four (digits), or six (digits).
- ASM person unique ID: Identifier for the user.
- ASM person status: Specifies whether the Managed Apple ID is Active or Inactive. This status becomes active after the user provides their new password for the Managed Apple ID account.
- ASM person title: Either Instructor, Student or Other.
- ASM person unique ID: Unique identifier for the user.
- ASM source system ID: Identifier for the system source.
- ASM student grade: Student grade information (not used by instructors).
Plan and add resources and delivery groups to Citrix Endpoint Management
A delivery group specifies the resources to deploy to categories of users. For example, you might create one delivery group for instructors and students. Alternatively, you might create multiple delivery groups so you can customize the apps, media, and policies sent to various instructors or students. You might create one or more delivery groups per class. You can also create one or more delivery groups for managers (other staff in your educational institution).
Resources that you deploy to user devices include device policies, Volume Purchase apps, and iBooks.
-
Device policies:
If instructors use the Classroom app, the Education Configuration device policy is required. Be sure to review other device policies to determine how you want to configure and restrict instructor and student iPads.
-
Volume Purchase apps:
Citrix Endpoint Management requires that you deploy Volume Purchase apps as required apps for education users. Citrix Endpoint Management doesn’t support deploying such Volume Purchase apps as optional.
If you use the Apple Classroom app, deploy it only to instructor devices.
Deploy any other apps that you want to provide to instructors or students. This solution doesn’t use the Citrix Secure Hub app, so there’s no need to deploy it to instructors or students.
-
Volume Purchase iBooks:
After Citrix Endpoint Management connects to your ASM account, your bought iBooks appear in the Citrix Endpoint Management console, in Configure > Media. The iBooks listed on that page are available to add to delivery groups. Citrix Endpoint Management supports adding iBooks as required media only.
After you plan the resources and delivery groups for instructors and students, you can create those items in the Citrix Endpoint Management console.
-
Create any device policies that you want to deploy to instructor or student devices. For information about the Education Configuration device policy, see Education Configuration device policy.
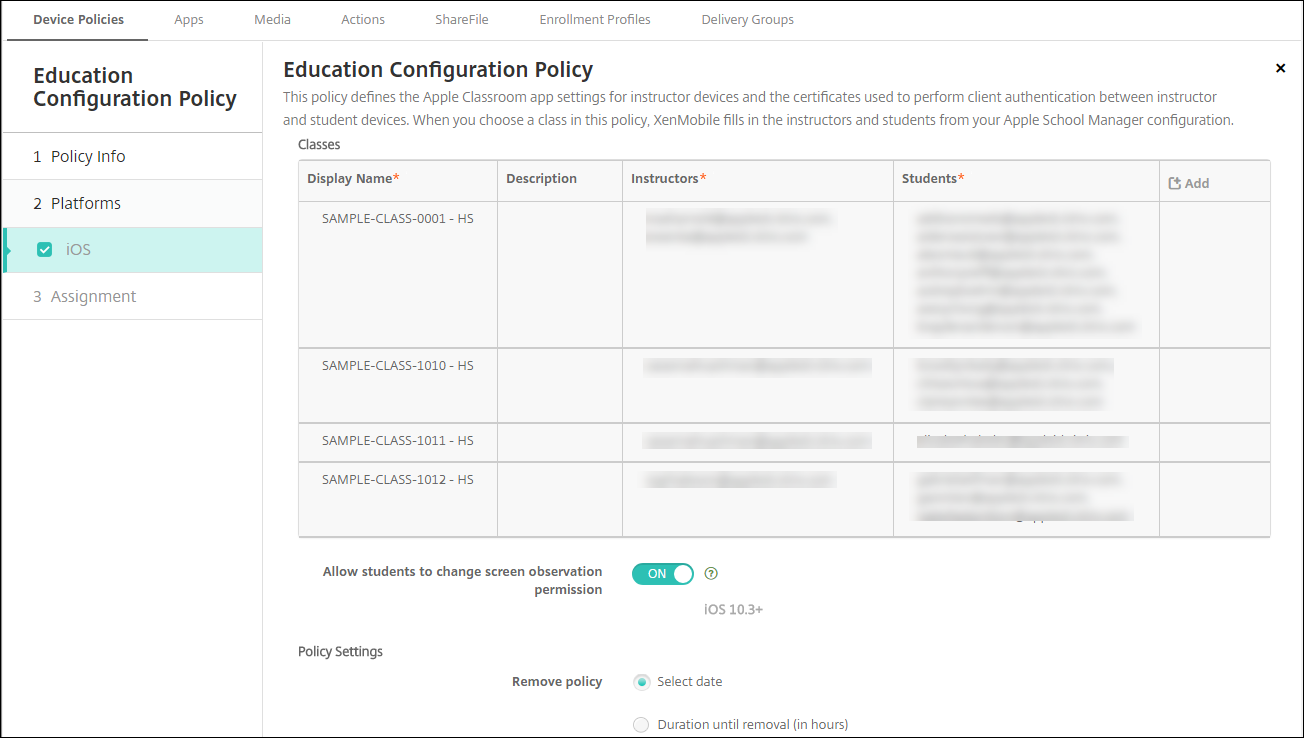
For information about device policies, see Device policies and the individual policy articles.
-
Configure apps (Configure > Apps) and iBooks (Configure > Media):
-
By default, Citrix Endpoint Management assigns apps and iBooks at the user level. During first-time deployment, instructors and students receive a prompt to register to ASM. After accepting the invitation, users receive their ASM apps and iBooks at the next deployment (within six hours). Citrix recommends that you force the deployment of apps and iBooks to new ASM users. To do that, select the delivery group and click Deploy.
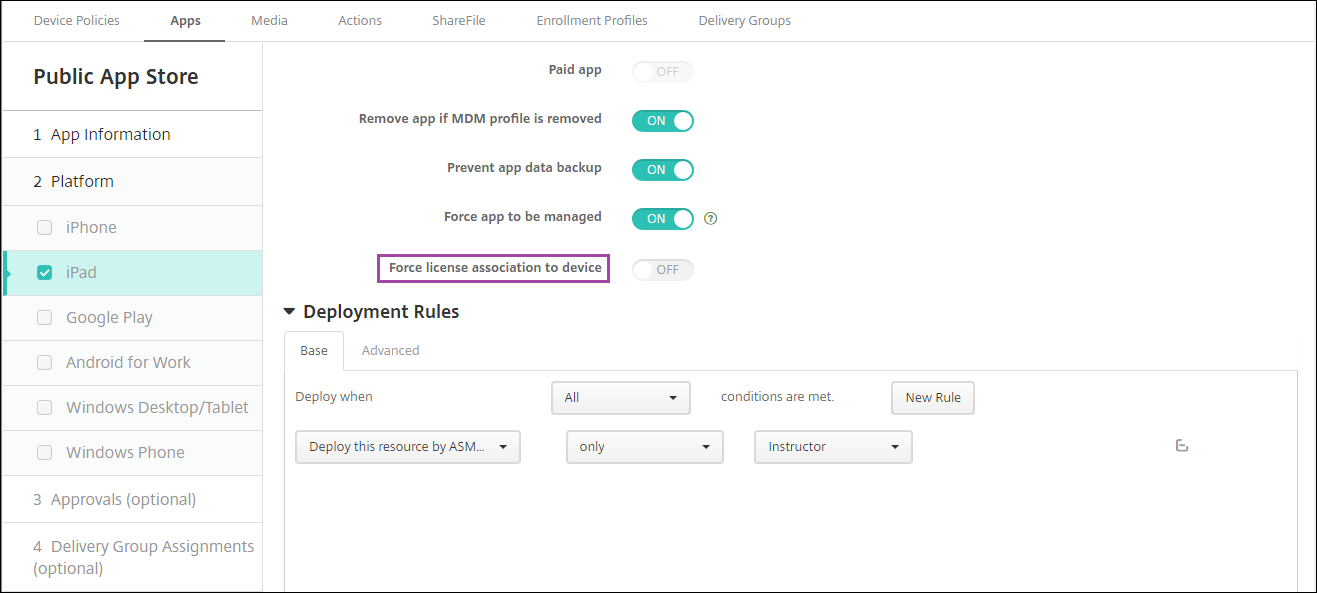
You can choose to assign apps (but not iBooks) at the device level. To do that, change the setting Force license association to device to On. When you assign apps at the device level, users don’t receive an invitation to join the Volume Purchase program.
-
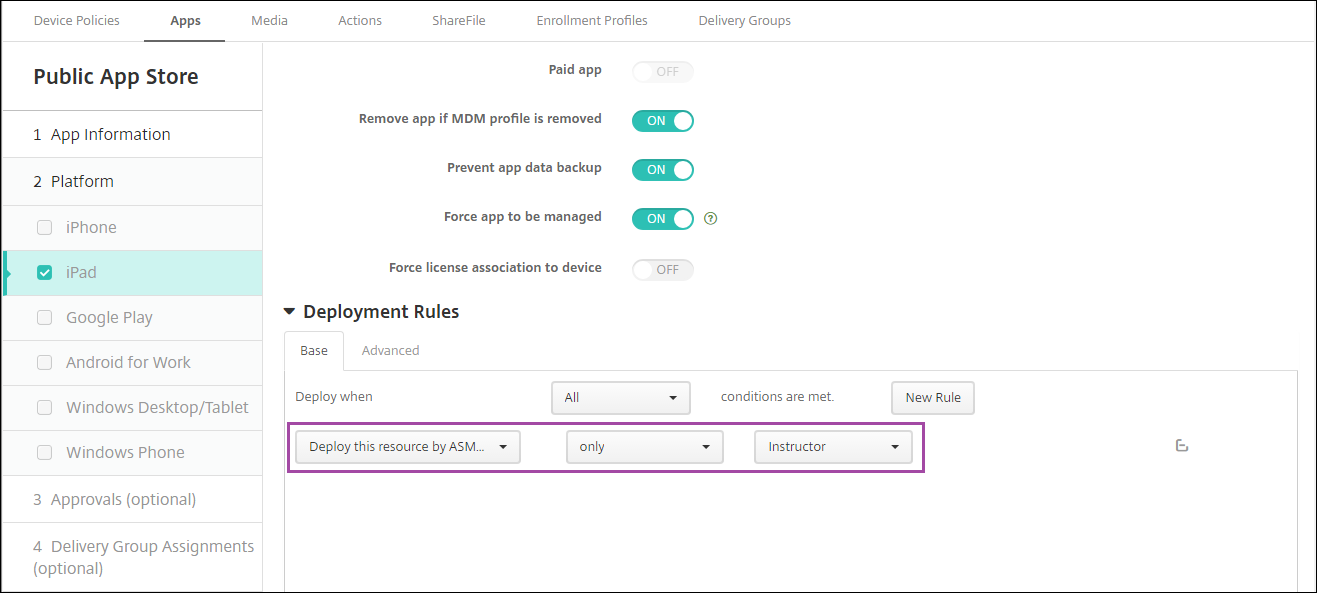
To deploy an app only to instructors, select a delivery group that includes only instructors or use the following deployment rule:
 Deploy this resource by ASM device type
 only
 Instructor
 <!--NeedCopy-->
- For help with adding Volume Purchase apps, see Add a Public App Store app.
-
-
Optional. Create actions based on ASM user properties. For example, you might create an action to send a notification to student devices when a new app installs. Alternatively, you can create an action that a user property triggers, as shown in the following example.
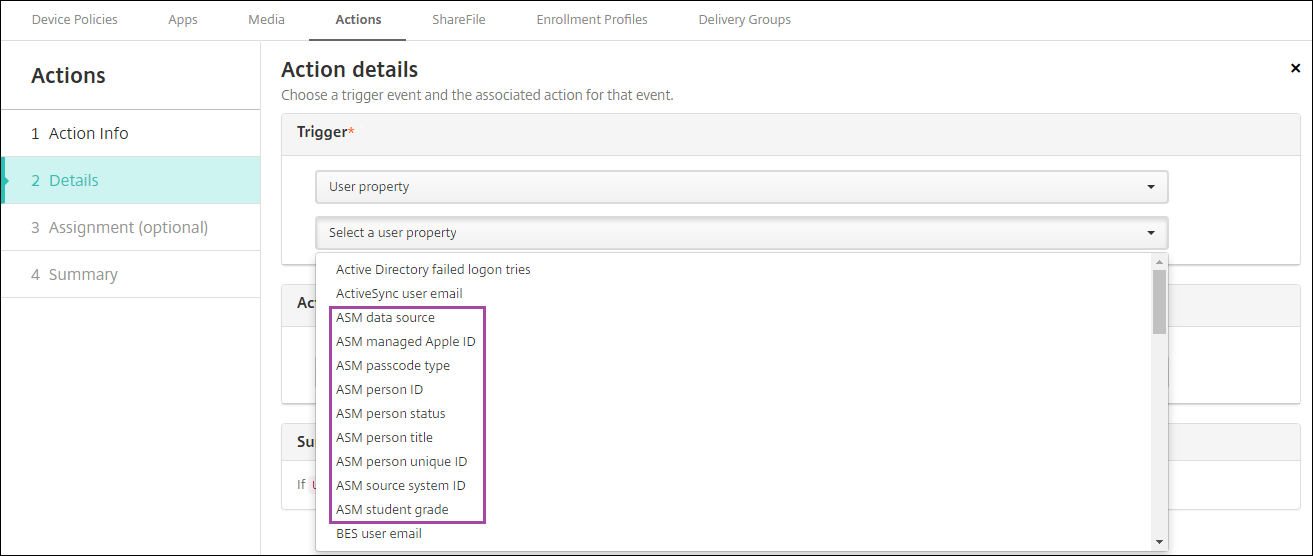
To create an action, go to Configure > Actions. For information about configuring actions, see Automated actions.
-
In Configure > Delivery Groups, create delivery groups for instructors and for students. Choose the classes that were imported from ASM. Also, create a deployment rule for instructors and students.
For example, the following user assignments are for instructors. The deployment rule is:
Limit by user property
ASM person title
is equal to
Instructor
<!--NeedCopy-->
The following user assignments are for students. The deployment rule is:
Limit by user property
ASM person title
is equal to
Student
<!--NeedCopy-->
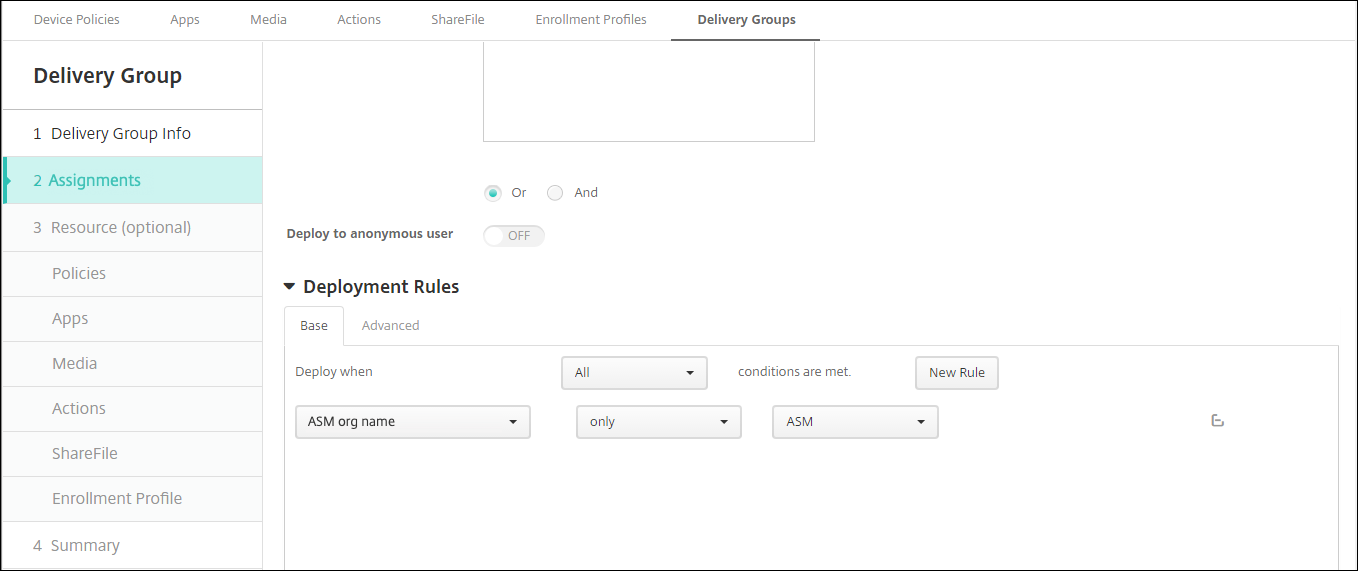
You can also filter a delivery group by using a deployment rule based on the ASM org name.
-
Assign the resources to delivery groups. The following example shows an iBook in a delivery group.

The following example shows the confirmation dialog that appears when you select a delivery group and click Deploy.
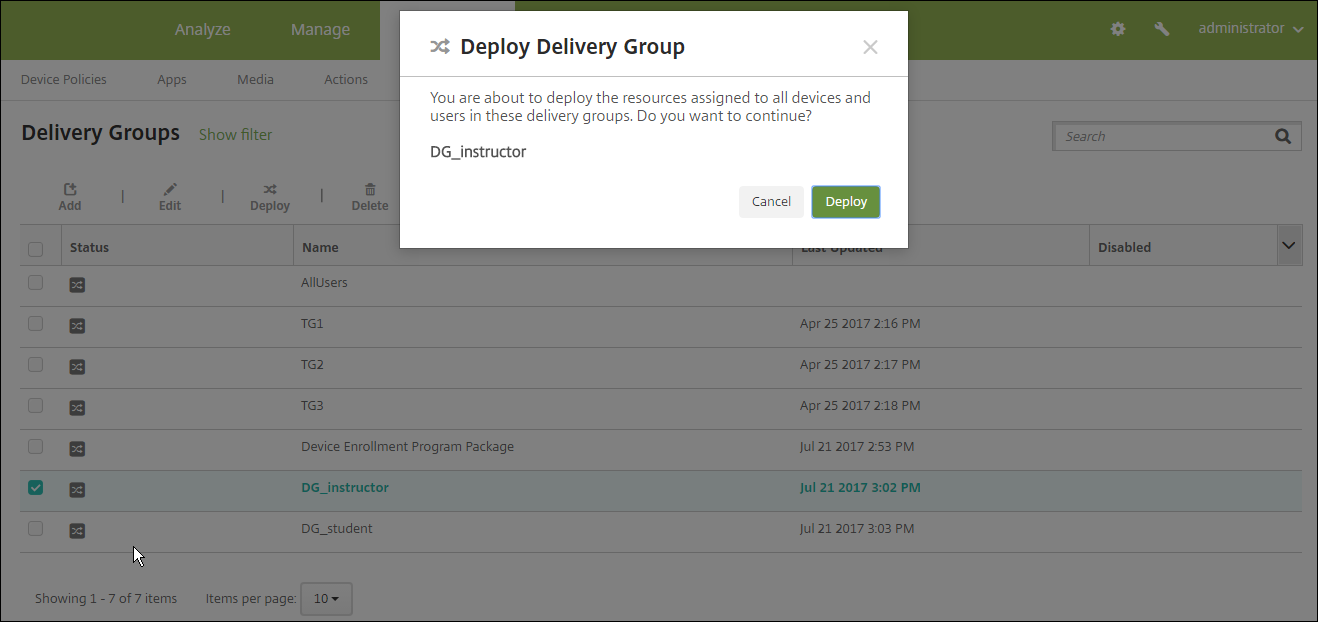
For more information, see “To edit a delivery group” and “To deploy to delivery groups” in Deploy resources.
Test instructor and student device enrollments
You can enroll devices through either of the following methods:
-
A school administrator can enroll instructor and student devices by using the user password you can set in the Citrix Endpoint Management console. As a result, you can provide users with devices that are already set up with apps and media.
-
When users receive the devices, they enroll using the user password that you provide to them. After enrollment completes, Citrix Endpoint Management sends device policies, apps, and media to the devices.
To test enrollment, use Apple Deployment Program devices that are linked to ASM.
-
If the devices aren’t linked to ASM, erase the device contents and settings by doing a hard reset.
-
Enroll an ASM device with an instructor. Then, enroll an ASM device with a student.
-
In the Manage > Devices page, check that both ASM devices are enrolled in MDM only.
You can filter the Devices page by the ASM device status: ASM registered, ASM shared, Instructor, and Student.

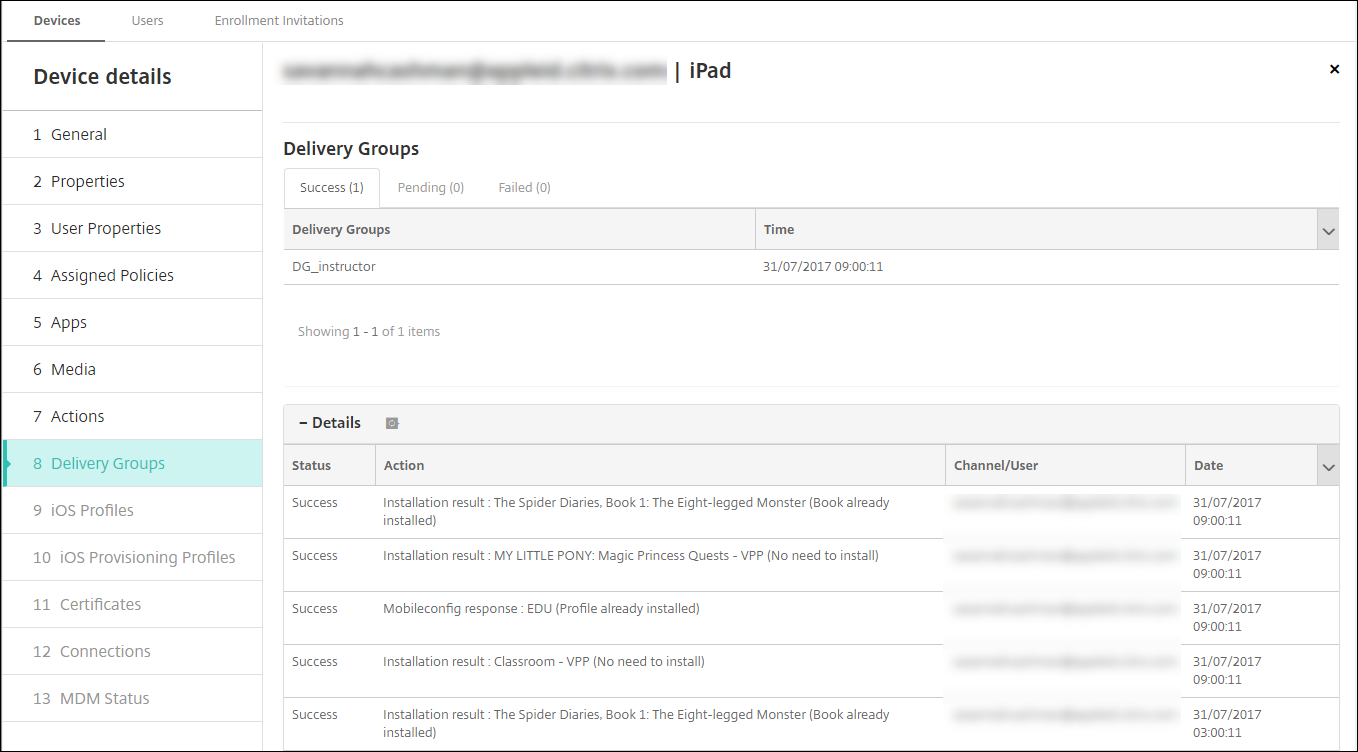
-
To verify that MDM resources deployed correctly for each device: Select the device, click Edit, and check the various pages.
Distribute devices
Apple recommends that you host an event so you can distribute the devices to instructors and students.
If you don’t distribute pre-enrolled devices, also provide the following to these users:
-
Citrix Endpoint Management passwords for enrollment
-
ASM temporary passwords for Managed Apple IDs.
The first-time user experience is as follows.
-
The first time that a user starts their device after a hard-reset, Citrix Endpoint Management prompts them in the enrollment screen to enroll their device.
-
The user provides their Managed Apple ID and Citrix Endpoint Management password used to authenticate to Citrix Endpoint Management.
-
In the Apple ID setup step, the device prompts the user to provide their Managed Apple ID and ASM temporary password. Those items authenticate the user to Apple services.
-
The device prompts the user to create a password for their Managed Apple ID, used to protect their data in iCloud.
-
At the end of the Setup Assistant, Citrix Endpoint Management starts installing the policies, apps, and media to the device. For apps and iBooks assigned at the user level, the assistant prompts instructors and students to register to Volume Purchase. After accepting the invitation, users receive their Volume Purchase apps and iBooks at the next deployment (within six hours).
Manage instructor, student, and class data
When managing instructor, student, and class data, note the following:
-
Don’t change Managed Apple IDs after you import ASM information into Citrix Endpoint Management. Citrix Endpoint Management also uses ASM user identifiers to identify users.
-
If you add or change class data in the ASM after you create one or more Education Configuration device policies: Edit the policies and then redeploy them.
-
If the instructor for a class changes after you deploy the Education Configuration device policy: Review the policy to make sure it updates in the Citrix Endpoint Management console and then redeploy the policy.
-
If you update user properties in the ASM portal, Citrix Endpoint Management also updates those properties in the console. However, Citrix Endpoint Management doesn’t receive the ASM person title property (Instructor, Student, or Other) in the same way it receives other properties. Thus, if you change the ASM person title in the ASM, complete the following steps to reflect that change in Citrix Endpoint Management.
To manage the data:
-
In the ASM portal, update the student grade and clear the instructor grade.
-
If you changed a student account to an instructor account, remove the user from the list of students in the class. Then, add the user to the list of instructors in the same or another class.
If you changed an instructor account to a student account, remove the user from the class. Then, add the user to the list of students in the same or another class. Your updates appear in the Citrix Endpoint Management console during the next sync (every five minutes by default) or fetch (every 24 hours by default).
-
Edit the Education Configuration device policy to apply the change and redeploy it.
-
If you delete a user from the ASM portal, Citrix Endpoint Management also deletes that user from the Citrix Endpoint Management console after a fetch.
You can reduce the interval between the two baselines by changing this server property value: bulk.enrollment.fetchRosterInfoDelay (default is 1440 minutes).
-
After you deploy resources: If a student joins a class, create a delivery group with just that student and deploy the resources to the student.
-
If a student or instructor loses their temporary password, have them contact the ASM administrator. The administrator can provide the temporary password or generate a new one.
-
Manage a lost or stolen device
The Apple Find My iPhone/iPad service includes an Activation Lock feature. Activation Lock prevents non-authorized users from using or reselling a lost or stolen device that’s enrolled in the Apple Deployment Program.
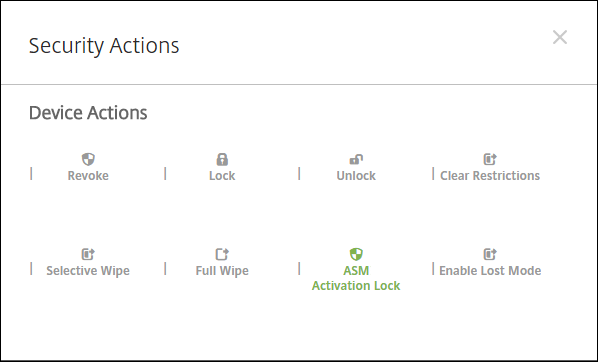
Citrix Endpoint Management includes an ASM Activation Lock security action that enables you to send a lock code to an ASM Apple Deployment Program enrolled device.
When you use the ASM Activation Lock security action, Citrix Endpoint Management can locate devices without requiring users to enable the Find My iPhone/iPad service. When an ASM device is hard-reset or fully wiped, the user provides their Managed Apple ID and password to unlock the device.
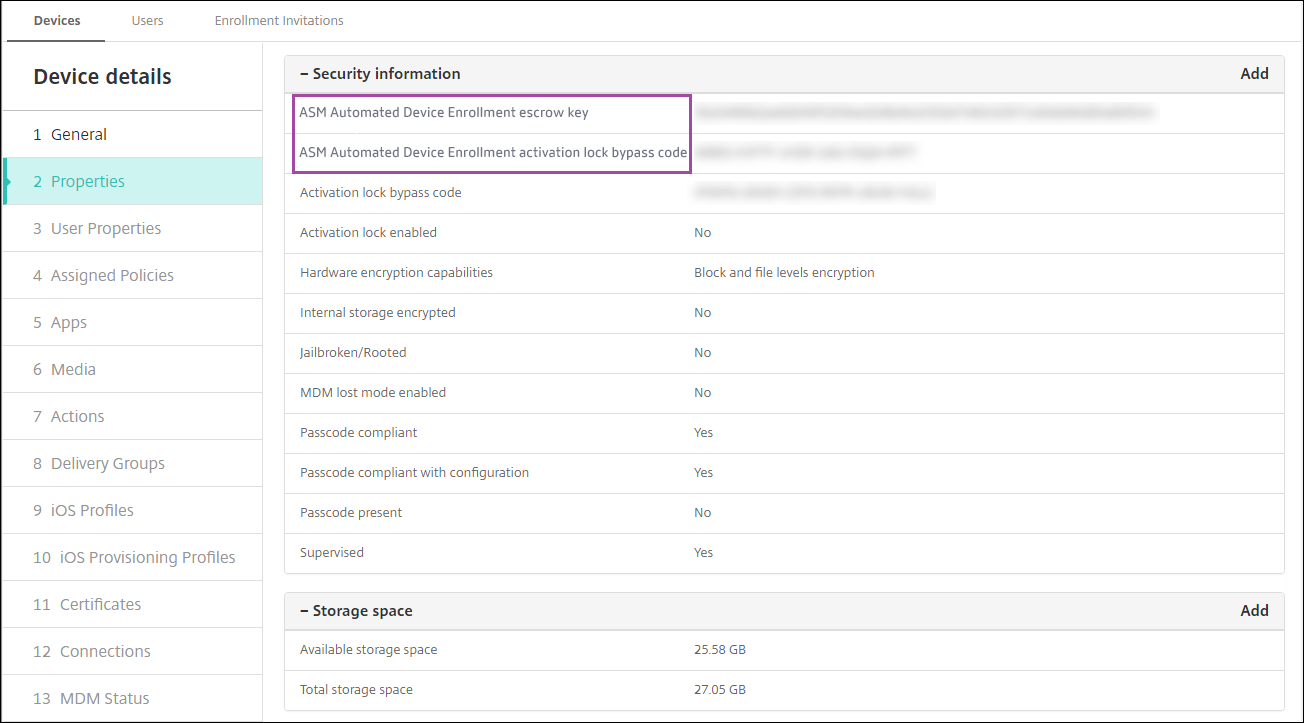
To release the lock from the console, click the security action Activation Lock Bypass. For information about bypassing an activation lock, see Bypass an iOS activation lock. The user can also leave the login blank and type the ASM activation lock bypass code as the password. That information is available in Device Details, on the Properties tab.
To set the activation lock, go to Manage > Devices, select the device, click Security, and then click ASM Activation Lock.
The properties ASM escrow key and ASM activation lock bypass code appear in Device details.
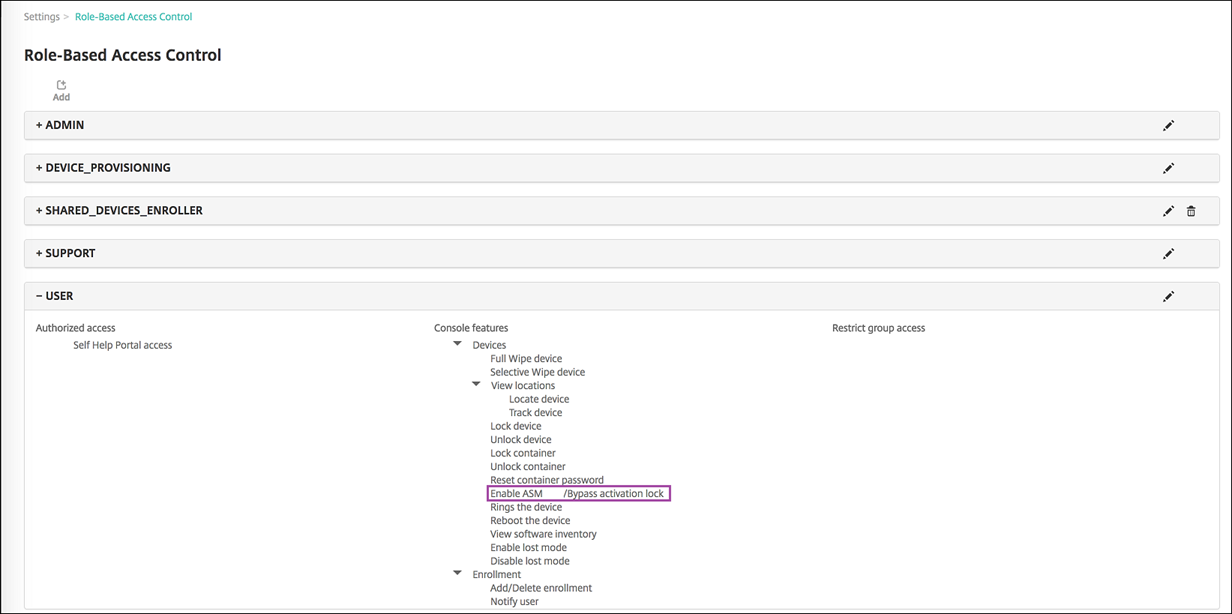
The RBAC permission for an ASM Activation Lock is Devices > Enable ASM Bypass activation lock.
In this article
- Apple School Manager
- Prerequisites
- Classroom app for iPad
- Add passwords for Apple School Manager users
- Plan and add resources and delivery groups to Citrix Endpoint Management
- Test instructor and student device enrollments
- Distribute devices
- Manage instructor, student, and class data
- Manage a lost or stolen device