-
Endpoint Management integration with Microsoft Endpoint Manager
-
Certificates and authentication
-
Client certificate or certificate plus domain authentication
-
Authentication with Azure Active Directory through Citrix Cloud™
-
Authentication with Azure Active Directory Group-Based Administration
-
Authentication with Azure Active Directory through Citrix Gateway for MAM enrollment
-
Authentication with Okta through Citrix Gateway for MAM enrollment
-
Authentication with an on-premises Citrix Gateway through Citrix Cloud
This content has been machine translated dynamically.
Dieser Inhalt ist eine maschinelle Übersetzung, die dynamisch erstellt wurde. (Haftungsausschluss)
Cet article a été traduit automatiquement de manière dynamique. (Clause de non responsabilité)
Este artículo lo ha traducido una máquina de forma dinámica. (Aviso legal)
此内容已经过机器动态翻译。 放弃
このコンテンツは動的に機械翻訳されています。免責事項
이 콘텐츠는 동적으로 기계 번역되었습니다. 책임 부인
Este texto foi traduzido automaticamente. (Aviso legal)
Questo contenuto è stato tradotto dinamicamente con traduzione automatica.(Esclusione di responsabilità))
This article has been machine translated.
Dieser Artikel wurde maschinell übersetzt. (Haftungsausschluss)
Ce article a été traduit automatiquement. (Clause de non responsabilité)
Este artículo ha sido traducido automáticamente. (Aviso legal)
この記事は機械翻訳されています.免責事項
이 기사는 기계 번역되었습니다.책임 부인
Este artigo foi traduzido automaticamente.(Aviso legal)
这篇文章已经过机器翻译.放弃
Questo articolo è stato tradotto automaticamente.(Esclusione di responsabilità))
Translation failed!
Enroll Windows devices in bulk
Citrix Endpoint Management supports bulk enrollment of Windows 10 and Windows 11 desktop and tablet devices. With bulk enrollment, you can set up many devices for Citrix Endpoint Management to manage without reimaging devices. You use the provisioning package for bulk enrollment.
A general workflow to bulk enroll Windows 10 and Windows 11 devices is as follows:
- Assign devices. You can assign devices either on a per-device basis or in bulk.
- Configure bulk enrollment.
- Create a provisioning package and apply that package per device.
Before running bulk enrollment, make sure that you assign all devices to the correct users. Do this assignment by adding the devices on a per-device basis or in bulk.
Assign devices on a per-device basis
-
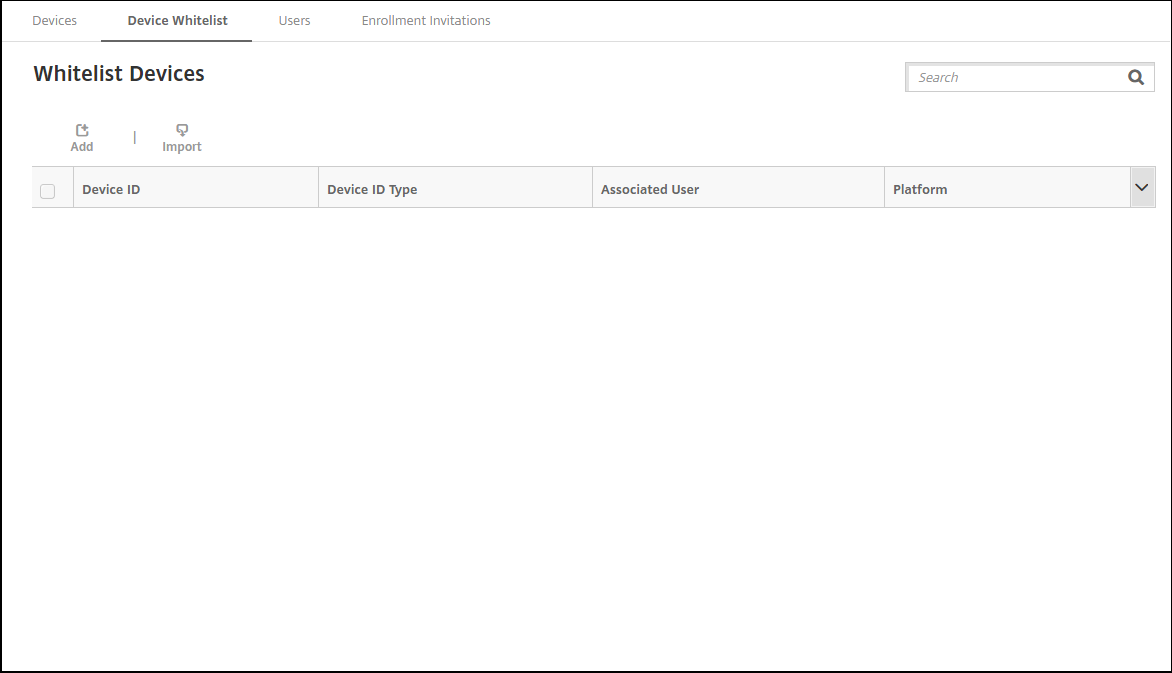
In the Citrix Endpoint Management console, navigate to Manage > Devices > Device Allow List.
-
To add each device, click Add.

-
Type the following information:
- Device platform: Select Windows.
- Device ID Type: Select an ID that identifies the device. Citrix Endpoint Management supports Hardware ID and Device Name for Windows devices.
- Device ID: Type the ID corresponding to the type that you selected previously for the device.
- Associated User: Displays the associated user for this device. This field automatically populates with the user that you select.
- Select domain: Select the domain from which you want to search for an associated user.
- Search for user Type a full or partial user name in this field and click Search to find a user to associate with this device.
-
Click Save.
Add devices in bulk
-
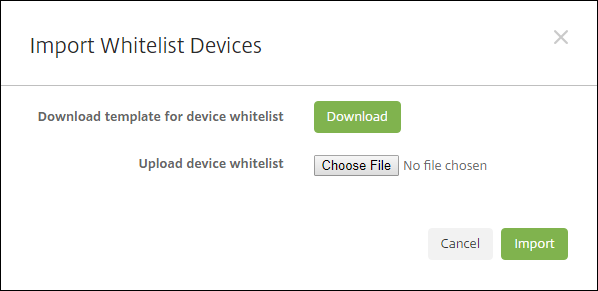
In the Citrix Endpoint Management console, navigate to Manage > Devices > Device Allow List.
-
Click Import.
-
Click Download to download a template (spreadsheet) for the device allow list. Fill out that spreadsheet and then upload the spreadsheet using Choose File and Import.
Configure bulk enrollment
-
In the Citrix Endpoint Management console, navigate to Settings > Windows Bulk Enrollment.
-
In the UPN field, type a user name through which to deploy all devices. The UPN must be a valid user in Citrix Endpoint Management that has the enrollment permissions. You can provide a UPN that is different from the associated user you selected previously.
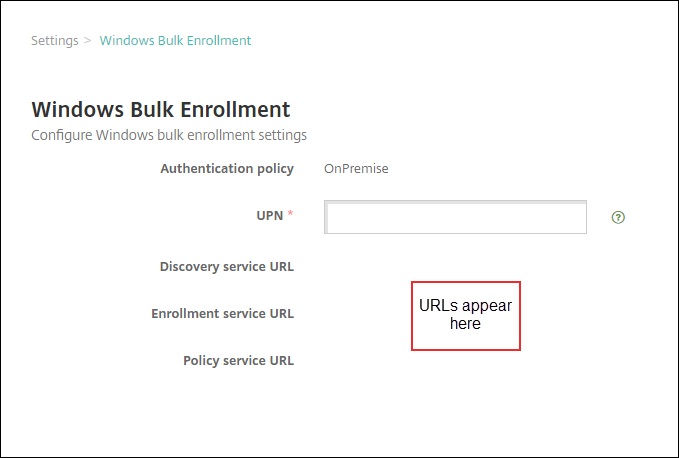
You need the URLs when creating a provisioning package in the Windows Configuration Designer.
-
Click Save.
Create and apply a provisioning package
To bulk provision devices, download the Windows Configuration Designer from the Microsoft Store. The Windows Configuration Designer creates provisioning packages used to image devices. As part of these packages, you can include Citrix Endpoint Management bulk enrollment configuration settings so that provisioned devices automatically enroll into Citrix Endpoint Management.
For information about using a provisioning package, see https://docs.microsoft.com/en-us/windows/client-management/mdm/bulk-enrollment-using-windows-provisioning-tool. Follow the steps described in the Create and apply a provisioning package for on-premises authentication section in that document. You follow those steps to include the following Citrix Endpoint Management bulk enrollment configuration settings and to apply the package to each device.
- Discovery service URL.
- Enrollment service URL.
- Policy service URL.
- Secret. Password of the UPN. You previously typed the user name in the UPN field.
Bulk enroll devices out of the box
Citrix Endpoint Management supports bulk enrollment of Windows devices out of the box. Follow these steps to set up and do bulk enrollment:
-
Use the Citrix Endpoint Management console to add devices (on a per-device basis or in bulk) and to configure bulk enrollment. For more information, see Add devices in bulk and Configure bulk enrollment.
-
Create a provisioning package, as described in Create, and apply a provisioning package.
Note:
You must configure the device name for each device when creating a provisioning package. To do so, in Windows Configuration Designer, navigate to Runtime settings > Accounts > ComputerAccount > ComputerName and specify the name of the device. The device name that you specify for each device must align with the name you used when importing allow list devices.
-
Place that provisioning package into a USB stick.
-
Insert the USB stick into the target device the first time that the user turns on the device.
Windows device automatically finds the provisioning package (.ppkg) on the USB stick. For detailed instructions, see the Microsoft documentation on how to apply a provisioning package during initial setup.
The device automatically enrolls into Citrix Endpoint Management.
For devices running Windows 10(version 2004 or later) or Windows 11, you can simplify the enrollment process by creating only one provisioning package. The package can then be applied to all devices. As a result, you no longer need to create a provisioning package on a per-device basis.
To simplify the enrollment process, do these steps when creating a provisioning package:
- In Windows Configuration Designer, navigate to Runtime settings > Accounts > ComputerAccount > ComputerName.
- In the ComputerName field, include the following string as part of the device name:
%SERIAL%. For example:Surface-%SERIAL%. The string expands to the BIOS serial number of each device.
Share
Share
This Preview product documentation is Citrix Confidential.
You agree to hold this documentation confidential pursuant to the terms of your Citrix Beta/Tech Preview Agreement.
The development, release and timing of any features or functionality described in the Preview documentation remains at our sole discretion and are subject to change without notice or consultation.
The documentation is for informational purposes only and is not a commitment, promise or legal obligation to deliver any material, code or functionality and should not be relied upon in making Citrix product purchase decisions.
If you do not agree, select I DO NOT AGREE to exit.