Windows Desktop and Tablet
Citrix Endpoint Management enrolls Windows 10 and Windows 11 devices in MDM. Citrix Endpoint Management supports the following authentication types for Windows 10 and Windows 11 devices enrolled in MDM:
- Domain-based authentication
- Active Directory
- Azure Active Directory
- Identity providers:
- Azure Active Directory
- Citrix® identity provider
For more information about the supported authentication types, see Certificates and authentication.
A general workflow for starting Windows 10 or Windows 11 device management is as follows:
-
Complete the onboarding process. See Onboarding and resource setup and Prepare to enroll devices and deliver resources.
If you plan to enroll Windows devices using the AutoDiscovery service, you must configure the Citrix AutoDiscovery service. Request Citrix Technical Support for assistance. For more information, see Request AutoDiscovery for Windows devices.
-
Choose and configure an enrollment method. See Supported enrollment methods.
-
Users enroll Windows 10 and Windows 11 devices.
-
Set up device and app security actions. See Security actions.
For supported operating systems, see Supported device operating systems.
Supported enrollment methods
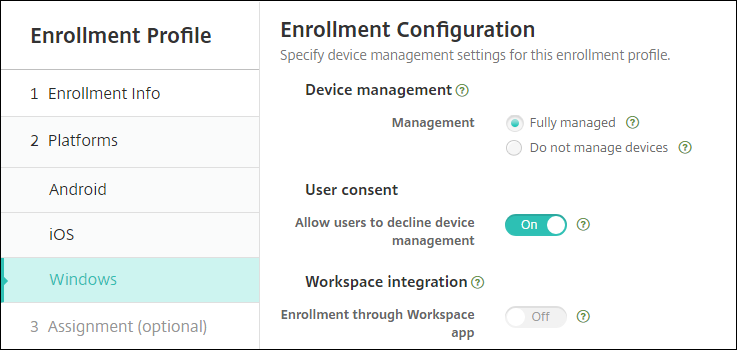
You specify how to manage Windows 10 and Windows 11 devices in the enrollment profiles. Two options are available:
- Fully managed (MDM enrollment)
- Do not manage devices (no MDM enrollment)
To configure enrollment settings for Windows 10 and Windows 11 devices, go to Configure > Enrollment Profiles > Windows. For more information about enrollment profiles, see Enrollment profiles.
The following table lists the enrollment methods that Citrix Endpoint Management supports for Windows 10 and Windows 11 devices:
| Method | Supported |
|---|---|
| Azure Active Directory enrollment | Yes |
| AutoDiscovery service enrollment | Yes |
| Windows bulk enrollment | Yes |
| Manual enrollment | Yes |
| Enrollment invitations | No |
Note:
- Manual enrollment requires users to enter a fully qualified domain name (FQDN) of the Citrix Endpoint Management server. We do not recommend using manual enrollment. Instead, use other methods to simplify the enrollment process for users.
- You cannot send enrollment invitations to Windows devices. Windows users enroll directly through their devices.
Configure Windows Desktop and Tablet device policies
Use these policies to configure how Citrix Endpoint Management interacts with desktop and tablet devices running Windows 10 or Windows 11. This table lists all device policies available for Windows desktop and tablet devices.
Enroll Windows 10 and Windows 11 devices through Azure Active Directory
Important:
Before users can enroll, you must configure Azure Active Directory (AD) settings in Azure and then configure Citrix Endpoint Management. For details, see Connect Citrix Endpoint Management to Azure AD.
Windows 10 and Windows 11 devices can enroll with Azure as a federated means of AD authentication. This enrollment requires an Azure AD Premium subscription.
You can join Windows 10 and Windows 11 devices to Microsoft Azure AD by using any of the following methods:
-
For company-owned devices:
-
Enroll in MDM when joining the device to Azure AD the first time the device is powered on. In this scenario, users complete the enrollment as described in this article: https://docs.microsoft.com/en-us/azure/active-directory/devices/azuread-joined-devices-frx.
For Windows devices that you enroll with this method, you can use Windows AutoPilot to set up and pre-configure the devices. For more information, see Use Windows AutoPilot to set up and configure devices.
-
Enroll in MDM when joining the device to Azure AD from the Windows Settings page after configuring the device. In this scenario, users complete the enrollment as described in Enroll in MDM when joining Azure AD after configuring devices.
-
-
For personal devices (BYOD or mobile devices):
- Enroll in MDM when registering to Azure AD while adding the Microsoft work account to Windows. In this scenario, users complete the enrollment as described in Enroll in MDM when registering to Azure AD.
Enroll in MDM when joining Azure AD after configuring devices
-
On a device, from the Start menu, navigate to Settings > Accounts > Access work or school and click Connect.
-
In the Set up a work or school account dialog box, under Alternate actions, click Join this device to Azure Active Directory.
-
Enter Azure AD credentials and click Sign in.
-
Accept the terms and conditions that the organization requires.
- If users click Decline, the device neither joins Azure AD nor enrolls in Citrix Endpoint Management.
-
Click Join to continue with the enrollment process.
-
Click Done to complete the enrollment process.
Enroll in MDM when registering to Azure AD
-
On a device, from the Start menu, navigate to Settings > Accounts > Access work or school and click Connect.
-
In the Set up a work or school account dialog box, enter Azure AD credentials and click Sign in.
-
Accept the terms and conditions that the organization requires. The device is registered to Azure AD and enrolled in Citrix Endpoint Management.
- If users click Decline, the device is registered to Azure AD but not enrolled into Citrix Endpoint Management. There is no Info button on the account.
-
Click Join to proceed with the enrollment process.
-
Click Done to complete the enrollment process.
Enroll Windows devices by using the AutoDiscovery service
To configure the AutoDiscovery service for Windows devices, request Citrix Technical Support for assistance. For more information, see Request AutoDiscovery for Windows devices.
Note:
For Windows devices to enroll, the SSL listener certificate must be a public certificate. Enrollment fails for self-signed SSL certificates.
Users do the following steps to complete the enrollment:
-
On a device, from the Start menu, navigate to Settings > Accounts > Access work or school and click Enroll only in device management.
-
In the Set up a work or school account dialog box, enter a corporate email address and click Next.
To enroll as a local user, enter a nonexistent email address with the correct domain name (for example,
foo\@mydomain.com). That step lets a user bypass a known Microsoft limitation where the built-in Device Management on Windows does enrollment. In the Connecting to a service dialog box, enter the user name and password associated with the local user. The device then finds an Citrix Endpoint Management server and starts the enrollment process. -
Enter the credential and click Continue.
-
In the Terms of use dialog box, agree to have the device managed and then click Accept.
Enrolling domain-joined Windows devices through the AutoDiscovery service fails if the domain policy disables MDM enrollment. Users can use either of the following methods instead:
- Remove the devices from the domain, enroll, and then rejoin them.
- Enter the FQDN of the Citrix Endpoint Management server to continue.
Windows bulk enrollment
With Windows bulk enrollment, you can set up many devices for an MDM server to manage without the need to reimage devices. You use a provisioning package for bulk enrollment for Windows 10 and Windows 11 Desktop and Laptop devices. For information, see Enroll Windows devices in bulk.
Security actions
Windows 10 and Windows 11 devices support the following security actions. For a description of each security action, see Security actions.
| Locate | Lock | Reboot |
| Revoke | Selective Wipe | Wipe |
Connect Citrix Endpoint Management to Azure AD
Windows 10 and Windows 11 devices can enroll with Azure. Users created in Azure AD can have access to the devices. Citrix Endpoint Management is deployed in Microsoft Azure as an MDM service. Connecting Citrix Endpoint Management to Azure AD enables users to automatically enroll their devices into Citrix Endpoint Management when they enroll the devices into Azure AD.
To connect Citrix Endpoint Management to Azure AD, do the following steps:
-
In the Azure portal, navigate to Azure Active Directory > Mobility (MDM and MAM) > Add application and click On-premises MDM application.
-
Provide a name for the application and click Add.
-
(Optional) Azure doesn’t allow unverified domains, such as cloud.com, to be used for IdP configuration. If your Citrix Endpoint Management Enrollment FQDN includes cloud.com, reach out to Citrix Support and provide them with the TXT record from Azure. Citrix Support verifies the subdomain, allowing you to continue your configuration. If your FQDN is under your own domain, you can verify it normally within Azure.
-
Select the application that you created, configure the following, and then click Save.
- MDM user scope. Select All.
-
MDM terms of use URL. Enter in the format,
https://<Citrix Endpoint Management Enrollment FQDN>:8443/zdm/wpe/tou. -
MDM discovery URL. Enter in the format,
https:// <Citrix Endpoint Management Enrollment FQDN>:8443/zdm/wpe.
-
Click On-premises MDM application settings.
- In the Properties pane, set APP ID URI in the format,
https:// < Citrix Endpoint Management Enrollment FQDN>:8443. This App ID URI is a unique ID that you cannot use again in any other app. - In the Required permissions pane, select Microsoft Graph and Windows Azure Active Directory.
- In the Keys pane, create the authentication key. Click Save to view the key value. The key value appears only once. Save the key for later use. You need the key in step 7.
- In the Properties pane, set APP ID URI in the format,
-
In the Citrix Endpoint Management console, go to Settings > Identity Provider (IDP) and then click Add.
-
On the Discovery URL page, configure the following and click Next.
- IDP Name. Enter a unique name to identify the IdP connection that you are creating.
- IDP Type. Select Azure Active Directory.
- Tenant ID. The Directory ID in Azure. You see it when you navigate to Azure Active Directory > Properties in Azure.
-
On the Windows MDM Info page, configure the following and click Next.
- App ID URI. The APP ID URI value you typed in Azure.
- Client ID. The Application ID that you see in the Properties pane in Azure.
- Key. The key value you created and saved in the preceding step 4.
-
On the IDP Claims Usage page, configure the following and click Next.
- User Identifier type. Select userPrincipalName.
-
User Identifier string. Enter
${id_token}.upn.
-
Click Save.
-
Add an Azure AD user as a local user and assign it to a local user group.
-
Create a terms and conditions device policy and a delivery group that includes that local user group.
Device management when integrated with Workspace Environment Management™
With Workspace Environment Management (WEM) alone, MDM deployments aren’t possible. With Citrix Endpoint Management alone, you’re limited to managing Windows 10 and Windows 11 devices. By integrating the two, WEM can access MDM features and you can manage a wider spectrum of Windows operating systems through Citrix Endpoint Management. That management takes the form of configuring Windows GPOs. Currently, administrators import an ADMX file to Citrix Endpoint Management and push it to Windows 10 and Windows 11 desktops and tablets to configure specific applications. Using the Windows GPO Configuration device policy, you can configure GPOs and push changes to the WEM service. The WEM Agent then applies the GPOs to devices and their apps.
MDM management isn’t a requirement for WEM integration. Any device that WEM supports can have GPO configurations pushed to it, even if Citrix Endpoint Management doesn’t support that device natively.
For a list of the devices supported, see Operating System requirements.
Devices which receive the Windows GPO Configuration device policy run in a new Citrix Endpoint Management mode called WEM. In the Manage > Devices list of enrolled devices, the Mode column for WEM-managed devices lists WEM.
For more information, see Windows GPO Configuration device policy.
BitLocker recovery key
Encrypting disks using BitLocker is a useful security feature. However, unlocking devices can be a challenge if the user loses their BitLocker recovery key. Citrix Endpoint Management can now automatically, securely save BitLocker recovery keys for users. Users can find their BitLocker recovery key on the Self-Help Portal. To enable and find the BitLocker recovery key:
- In the Citrix Endpoint Management console, navigate to Settings > Server Properties.
- Search for
shpand enable theshp.console.enablefeature. Make sure thatenable.new.shpstays disabled. For more information on enabling the Self-Help Portal, see Configure enrollment security modes. - Navigate to Configure > Device policies. Find your BitLocker policy or create one and enable the BitLocker Recovery backup to Citrix Endpoint Management setting.
When unlocking their device, end users see a message asking them to enter their key. The message displays the Recovery key ID as well.
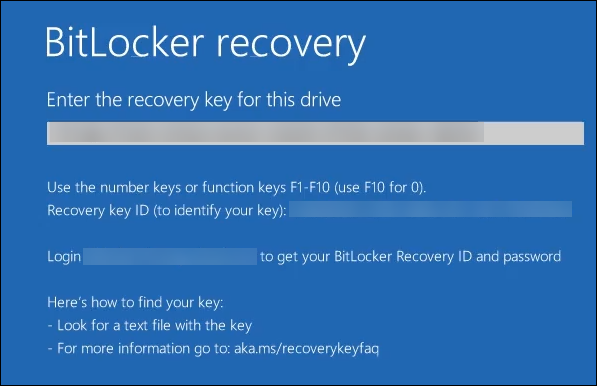
To find their BitLocker recovery key, users navigate to the Self-Help Portal.
- Under the General details, see the BitLocker Recovery Data.
- Recovery key ID: The identifier for the BitLocker recovery key used to encrypt the disk. This ID must match the key ID given in the previous message.
-
Recovery key: The key user must enter to unlock their disk. Enter this key at the unlock prompt.

For more information about the BitLocker device policy, see BitLocker device policy.
In this article
- Supported enrollment methods
- Configure Windows Desktop and Tablet device policies
- Enroll Windows 10 and Windows 11 devices through Azure Active Directory
- Enroll Windows devices by using the AutoDiscovery service
- Windows bulk enrollment
- Security actions
- Connect Citrix Endpoint Management to Azure AD
- Device management when integrated with Workspace Environment Management™
- BitLocker recovery key