-
Endpoint Management integration with Microsoft Endpoint Manager
-
Certificates and authentication
-
Client certificate or certificate plus domain authentication
-
Authentication with Azure Active Directory through Citrix Cloud™
-
Authentication with Azure Active Directory Group-Based Administration
-
Authentication with Azure Active Directory through Citrix Gateway for MAM enrollment
-
Authentication with Okta through Citrix Gateway for MAM enrollment
-
Authentication with an on-premises Citrix Gateway through Citrix Cloud
This content has been machine translated dynamically.
Dieser Inhalt ist eine maschinelle Übersetzung, die dynamisch erstellt wurde. (Haftungsausschluss)
Cet article a été traduit automatiquement de manière dynamique. (Clause de non responsabilité)
Este artículo lo ha traducido una máquina de forma dinámica. (Aviso legal)
此内容已经过机器动态翻译。 放弃
このコンテンツは動的に機械翻訳されています。免責事項
이 콘텐츠는 동적으로 기계 번역되었습니다. 책임 부인
Este texto foi traduzido automaticamente. (Aviso legal)
Questo contenuto è stato tradotto dinamicamente con traduzione automatica.(Esclusione di responsabilità))
This article has been machine translated.
Dieser Artikel wurde maschinell übersetzt. (Haftungsausschluss)
Ce article a été traduit automatiquement. (Clause de non responsabilité)
Este artículo ha sido traducido automáticamente. (Aviso legal)
この記事は機械翻訳されています.免責事項
이 기사는 기계 번역되었습니다.책임 부인
Este artigo foi traduzido automaticamente.(Aviso legal)
这篇文章已经过机器翻译.放弃
Questo articolo è stato tradotto automaticamente.(Esclusione di responsabilità))
Translation failed!
App lock device policy
The App lock device policy defines a list of apps that are either:
- Allowed to run on a device.
- Blocked from running on a device.
The exact way that the policy works differs for each supported platform. For example, you can’t block multiple apps on an iOS device.
Likewise, for iOS devices, you can select only one iOS app per policy. Users are only able to use their device to run a single app. They can’t do any other activities on the device except for the options you specifically allow when the App lock device policy is enforced.
Also, the iOS devices must be supervised to push app lock policies.
Although the device policy works on most Android L and M devices, app lock doesn’t function on Android N or later devices. It doesn’t work because Google deprecated the required API.
For managed Windows Desktops and Tablets, you can create an App lock device policy that defines the list of apps on the allow and block lists. You can allow or block executables, MSI installers, store apps, DLLs, and scripts.
To add or configure this policy, go to Configure > Device Policies. For more information, see Device policies.
iOS settings

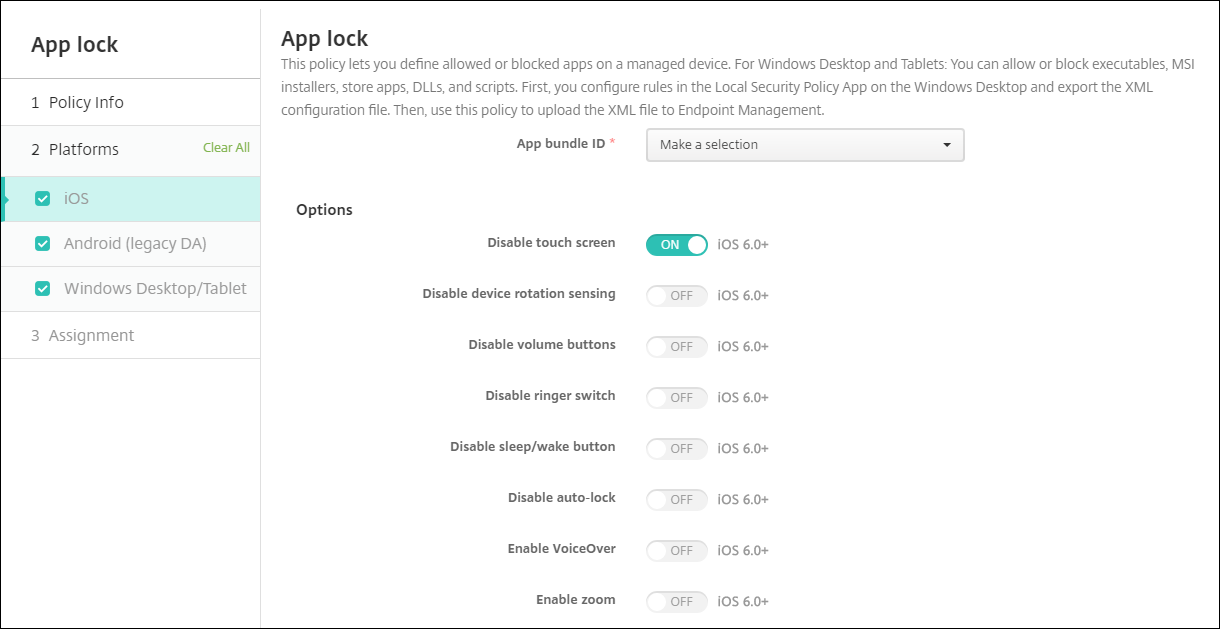
- App bundle ID: Click the app in the drop-down list to which this policy applies, or click Add new to add an app to the list. If you select Add new, type the app name in the field that appears.
-
Options: For each option, the default is Off except for Disable touch screen, which defaults to On.
- Disable touch screen
- Disable device rotation sensing
- Disable volume buttons
-
Disable ringer switch
When Disable ringer switch is On, the ringer behavior depends on what position the switch was in when it was first disabled.
- Disable sleep/wake button
- Disable auto lock
- Disable VoiceOver
- Enable zoom
- Enable invert colors
- Enable AssistiveTouch
- Enable speak selection
- Enable mono audio
- Enable voice control
-
User Enabled Options: For each option, the default is Off.
- Allow VoiceOver adjustment
- Allow zoom adjustment
- Allow invert colors adjustment
- Allow AssitiveTouch adjustment
- Allow voice control adjustment
-
Policy settings
-
Remove policy: Choose a method for scheduling policy removal. Available options are Select date and Duration until removal (in hours)
- Select date: Click the calendar to select the specific date for removal.
- Duration until removal (in hours): Type a number, in hours, until policy removal occurs. Only available for iOS 6.0 or later.
-
Remove policy: Choose a method for scheduling policy removal. Available options are Select date and Duration until removal (in hours)
Configure an iPad as a kiosk
You can use the App lock device policy to run a supervised iPad as a kiosk. Apple refers to this feature as Single App Mode. For more information about this feature, see the Apple documentation. Make sure that you deploy the app you want to run before deploying this policy.
- Navigate to Configure > Device policies and click Add.
- Select the App Lock policy.
- Type a Policy Name and optional Description.
- Select only the iOS platform.
- For App bundle ID, select the app you want to run on the iPad.
- Configure any options that you want, as described previously, and save the policy.
- Add the policy to the same delivery group as your iPad and deploy the policy.
Android (legacy DA) settings
Note:
You can’t block the Android Settings app by using the App Lock device policy.

-
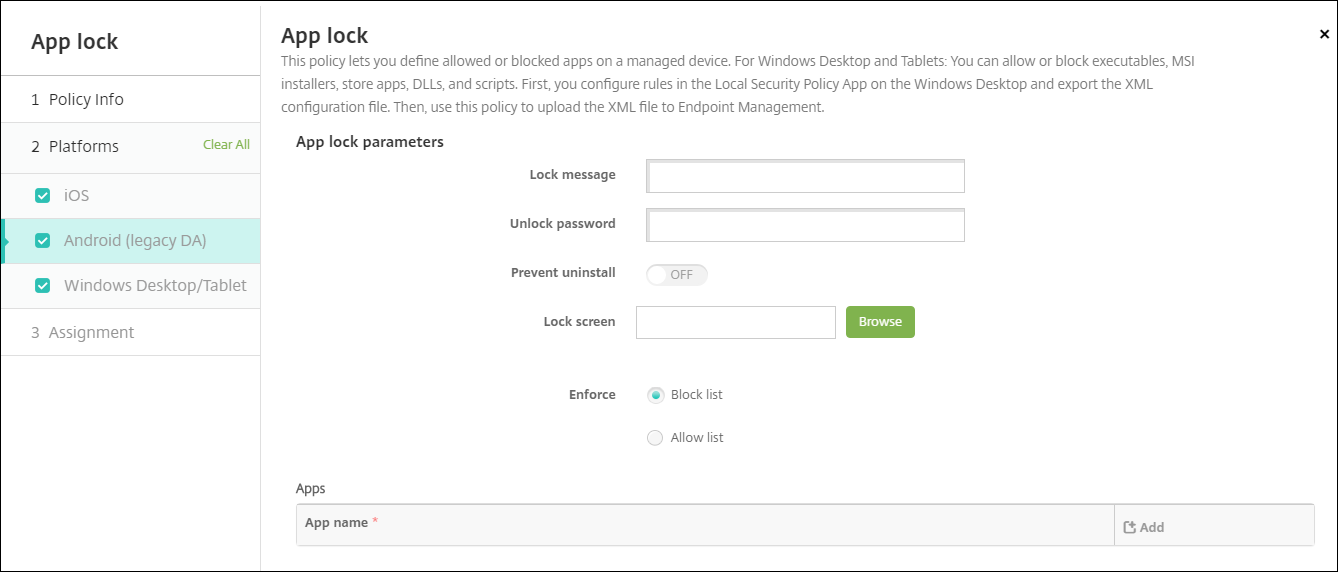
App Lock parameters
- Lock message: Type a message that users see when they try to open a locked app.
- Unlock password: Type the password to unlock the app.
- Prevent uninstall: Select whether users are allowed to uninstall apps. The default is Off.
- Lock screen: Select the image that appears on the device’s lock screen by clicking Browse and navigating to the file’s location.
- Enforce: Click Block list to create a list of apps that aren’t allowed to run on devices. Click Allow list to create a list of apps that are allowed to run on devices.
-
Apps: Click Add and then do the following:
- App name: Click the name of the app in the drop-down list that you want to add to the allow or block list. Alternatively, click Add new to add an app to the list of available apps.
- If you select Add new, type the app name in the field that appears.
- Click Save or Cancel.
- Repeat these steps each app that you want to add to the allow or block list.
Windows Desktop and Tablet settings

Prerequisites for App lock
- In Windows, configure the rules in the Local Security Policy editor on a Windows 10 or Windows 11 desktop.
- Export the policy XML file. Citrix® recommends that you create default rules in Windows to avoid locking the default configuration or causing issues on devices.
- Then, upload the XML file to Citrix Endpoint Management by using the App Lock device policy. For more information about creating rules, see this Microsoft article: https://docs.microsoft.com/en-us/windows/security/threat-protection/applocker/applocker-overview
To configure and export the policy XML file from Windows
Important:
When configuring the policy XML file through the Windows policy editor, use Audit Only mode.
- On the Windows computer, start the Local Security Policy editor. Click Start, type local security policy and then click Local Security Policy.
- In the console tree, expand Application Control Policies.
- Click AppLocker and then in the center pane, click Configure rule enforcement.
- Select Configured and then Enforce rules. When you enable a rule, Enforce rules is the default.
- Right-click AppLocker, click Export Policy, and then save the XML file.
Note:
You can create Executable Rules, Windows Installer Rules, Script Rules, and Packaged App Rules. To do so, right-click the folder and then click Create New Rule.
To import the policy XML file into Citrix Endpoint Management
Create an App Lock policy. Across from the App Lock policy file setting, click Browse and navigate to the XML file.
To stop applying an App Lock policy
After you deploy an App Lock policy in Citrix Endpoint Management: To stop applying that App Lock policy, create an empty XML file. Then, create another App Lock policy, upload the file, and deploy the policy. Devices that have an App Lock enabled aren’t affected. Devices receiving the policy for the first time do not have the App Lock policy in place.
Share
Share
This Preview product documentation is Citrix Confidential.
You agree to hold this documentation confidential pursuant to the terms of your Citrix Beta/Tech Preview Agreement.
The development, release and timing of any features or functionality described in the Preview documentation remains at our sole discretion and are subject to change without notice or consultation.
The documentation is for informational purposes only and is not a commitment, promise or legal obligation to deliver any material, code or functionality and should not be relied upon in making Citrix product purchase decisions.
If you do not agree, select I DO NOT AGREE to exit.