VPN device policy
The VPN device policy configures virtual private network (VPN) settings that enable user devices to connect securely to corporate resources. You can configure the VPN device policy for the following platforms. Each platform requires a different set of values, which are described in detail in this article.
To add or configure this policy, go to Configure > Device Policies. For more information, see Device policies.
Note:
Citrix SSO for Android and iOS are now called Citrix Secure Access. We are updating our documentation to reflect this name change.
Requirements for per-app VPNs
You configure the per-app VPN feature for the following platforms through VPN policies:
- iOS
- macOS
- Android (legacy DA)
For Android Enterprise, use the Managed configurations device policy to configure VPN profiles.
Per-app VPN options are available for certain connection types. The following table indicates when per-app VPN options are available.
| Platform | Connection type | Remark |
|---|---|---|
| iOS | Cisco Legacy AnyConnect, Juniper SSL, F5 SSL, SonicWALL Mobile Connect, Ariba VIA, Citrix SSO, or Custom SSL. | |
| macOS | Cisco AnyConnect, Juniper SSL, F5 SSL, SonicWALL Mobile Connect, Ariba VIA, or Custom SSL. | |
| Android (legacy DA) | Citrix SSO |
To create a per-app VPN for iOS and Android (legacy DA) devices using the Citrix SSO app, you need to do extra steps, in addition to the VPN policy configuration. Also, you must verify that the following prerequisites are met:
- On-premises NetScaler Gateway
- The following applications are installed on the device:
- Citrix SSO
- Citrix Secure Hub
A general workflow to configure a per-app VPN for iOS and Android devices using the Citrix SSO app is as follows:
-
Configure a VPN device policy as described in this article.
-
For iOS, see Configure Citrix SSO protocol for iOS. After you configure the Citrix SSO protocol for iOS through a VPN device policy, you also must create an App Attributes policy to associate an app to the per-app VPN policy. For more information, see Configure a per-app VPN.
- For the Authentication type for the connection field, if you select Certificate, you must first configure certificate-based authentication for Citrix Endpoint Management. See Client certificate or certificate plus domain authentication.
-
For Android (legacy DA), see Configure the Citrix SSO protocol for Android.
- For the Authentication type for the connection field, if you select Certificate or Password and Certificate, you must first configure certificate-based authentication for Citrix Endpoint Management. See Client certificate or certificate plus domain authentication.
-
-
Configure Citrix ADC to accept traffic from the per-app VPN. For details, see Full VPN setup on NetScaler Gateway.
iOS settings
The Citrix VPN connection type in the VPN device policy for iOS doesn’t support iOS 12. Do these steps to delete your existing VPN device policy and create a VPN device policy with the Citrix SSO connection type:
- Delete your VPN device policy for iOS.
- Add a VPN device policy for iOS with the following settings:
- Connection type: Citrix SSO
- Enable per-app VPN: On
- Provider type: Packet tunnel
- Add an App Attributes device policy for iOS. For Per-app VPN identifier, choose iOS_VPN.
- Connection name: Type a name for the connection.
-
Connection type: In the list, select the protocol to be used for this connection. The default is L2TP.
- L2TP: Layer 2 Tunneling Protocol with pre-shared key authentication.
- PPTP: Point-to-Point Tunneling.
- IPSec: Your corporate VPN connection.
-
Cisco Legacy AnyConnect: This connection type requires that the Cisco Legacy AnyConnect VPN client is installed on the user device. Cisco is phasing out the Cisco Legacy AnyConnect client that was based on a now deprecated VPN framework.
To use the current Cisco AnyConnect client, use a Connection type of Custom SSL. For required settings, see “Configure Custom SSL protocol” in this section.
- Juniper SSL: Juniper Networks SSL VPN client.
- F5 SSL: F5 Networks SSL VPN client.
- SonicWALL Mobile Connect: Dell unified VPN client for iOS.
- Ariba VIA: Ariba Networks Virtual Internet Access client.
- IKEv2 (iOS only): Internet Key Exchange version 2 for iOS only.
- AlwaysOn IKEv2: Always-on access using IKEv2.
- AlwaysOn IKEv2 Dual Configuration: Always-on access using IKEv2 dual configuration.
- Citrix SSO: Citrix SSO client for iOS 12 and later.
- Custom SSL: Custom Secure Socket Layer. This connection type is required for the Cisco AnyConnect client that has a bundle ID of com.cisco.anyconnect. Specify a Connection name of Cisco AnyConnect. You can also deploy the VPN policy and enable a Network Access Control (NAC) filter for iOS devices. The filter blocks a VPN connection for devices that have non-compliant apps installed. The configuration requires specific settings for the iOS VPN policy as described in the following iOS section. For more information about other settings required to enable the NAC filter, see Network Access Control.
The following sections list the configuration options for each of the preceding connection types.
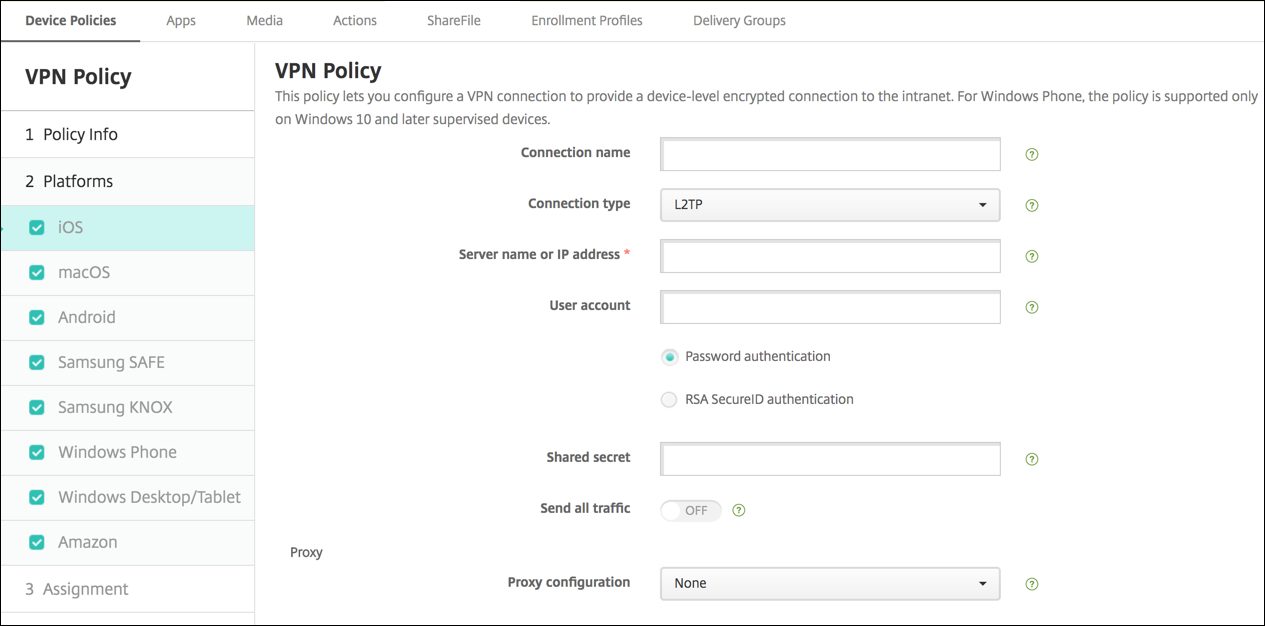
Configure L2TP Protocol for iOS
- Server name or IP address: Type the server name or IP address for the VPN server.
- User Account: Type an optional user account.
- Select either Password authentication or RSA SecurID authentication.
- Shared secret: Type the IPsec shared secret key.
- Send all traffic: Select whether to send all traffic over the VPN. The default is Off.
Configure PPTP Protocol for iOS
- Server name or IP address: Type the server name or IP address for the VPN server.
- User Account: Type an optional user account.
- Select either Password authentication or RSA SecurID authentication.
-
Encryption level: In the list, select an encryption level. The default is None.
- None: Use no encryption.
- Automatic: Use the strongest encryption level supported by the server.
- Maximum (128-bit): Always use 128-bit encryption.
- Send all traffic: Select whether to send all traffic over the VPN. The default is Off.
Configure IPsec Protocol for iOS
- Server name or IP address: Type the server name or IP address for the VPN server.
- User Account: Type an optional user account.
- Authentication type for the connection: In the list, select either Shared Secret or Certificate for the type of authentication for this connection. The default is Shared Secret.
- If you enable Shared Secret, configure these settings:
- Group name: Type an optional group name.
- Shared secret: Type an optional shared secret key.
- Use hybrid authentication: Select whether to use hybrid authentication. With hybrid authentication, the server first authenticates itself to the client, and then the client authenticates itself to the server. The default is Off.
- Prompt for password: Select whether to prompt users for their passwords when they connect to the network. The default is Off.
- If you enable Certificate, configure these settings:
- Identity credential: In the list, select the identity credential to use. The default is None.
- Prompt for PIN when connecting: Select whether to require users to enter their PIN when connecting to the network. The default is Off.
- Enable VPN on demand: Select whether to enable triggering a VPN connection when users connect to the network. The default is Off. For information on configuring the settings when Enable VPN on demand is On, see Configure Enable VPN on demand settings for iOS.
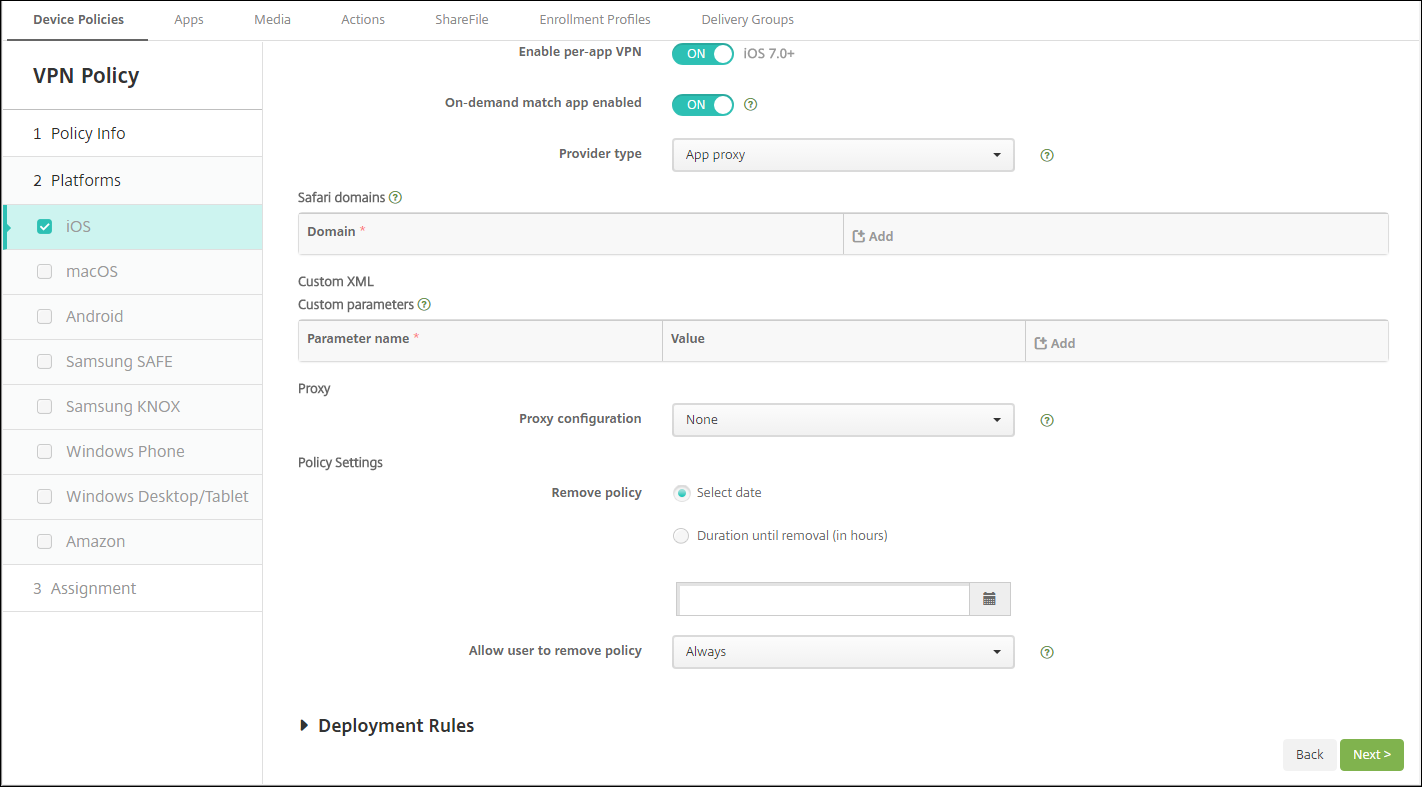
- Enable per-app VPN: Select whether to enable per-app VPN. The default is Off.
- On-demand match app enabled: Select whether per-app VPN connections trigger automatically when apps linked to the per-app VPN service initiate network communication. The default is Off.
- Safari domains: Click Add to add a Safari domain name.
Configure Cisco legacy AnyConnect Protocol for iOS
To transition from the Cisco legacy AnyConnect client to the new Cisco AnyConnect client, use the Custom SSL protocol.
- Provider bundle identifier: For the Legacy AnyConnect client, the bundle ID is com.cisco.anyconnect.gui.
- Server name or IP address: Type the server name or IP address for the VPN server.
- User Account: Type an optional user account.
- Group: Type an optional group name.
-
Authentication type for the connection: In the list, select either Password or Certificate for the type of authentication for this connection. The default is Password.
- If you enable Password, type an optional authentication password in the Authentication password field.
- If you enable Certificate, configure these settings:
- Identity credential: In the list, select the identity credential to use. The default is None.
- Prompt for PIN when connecting: Select whether to prompt users for their PIN when they connect to the network. The default is Off.
- Enable VPN on demand: Select whether to enable triggering a VPN connection when users connect to the network. The default is Off. For information on configuring the settings when Enable VPN on demand is On, see Configure Enable VPN on demand settings for iOS.
- Include All Networks: Select whether to allow all networks to use this connection. The default is Off.
- Exclude Local Networks: Select whether to exclude local networks from using the connection or to allow the networks. The default is Off.
-
Enable Per-app VPN: Select whether to enable per-app VPN. The default is Off. If you enable this option, configure these settings:
- On-demand match app enabled: Select whether per-app VPN connections trigger automatically when apps linked to the per-app VPN service start network communication. The default is Off.
- Provider type: Select whether the per-app VPN is provided as an App proxy or as a Packet tunnel. Default is App proxy.
-
Safari domains: For each Safari domain that can trigger a per-app VPN connection you want to include, click Add and do the following:
- Domain: Type the domain to be added.
- Click Save to save the domain or click Cancel to not save the domain.
Configure Juniper SSL Protocol for iOS
- Provider bundle identifier: If your per-app VPN profile has the bundle identifier of an app with multiple VPN providers of the same type, specify the provider to use here.
- Server name or IP address: Type the server name or IP address for the VPN server.
- User account: Type an optional user account.
- Realm: Type an optional realm name.
- Role: Type an optional role name.
- Authentication type for the connection: In the list, select either Password or Certificate for the type of authentication for this connection. The default is Password.
- If you enable Password, type an optional authentication password in the Authentication password field.
- If you enable Certificate, configure these settings:
- Identity credential: In the list, select the identity credential to use. The default is None.
- Prompt for PIN when connecting: Select whether to prompt users for their PIN when they connect to the network. The default is Off.
- Enable VPN on demand: Select whether to enable triggering a VPN connection when users connect to the network. The default is Off. For information on configuring the settings when Enable VPN on demand is On, see Configure Enable VPN on demand settings for iOS.
- Enable Per-app VPN: Select whether to enable per-app VPN. The default is Off. If you enable this option, configure these settings:
- On-demand match app enabled: Select whether per-app VPN connections trigger automatically when apps linked to the per-app VPN service initiate network communication. The default is Off.
- Provider type: Select whether the per-app VPN is provided as an App proxy or as a Packet tunnel. Default is App proxy.
- Safari domains: For each Safari domain that can trigger a per-app VPN connection you want to include, click Add and do the following:
- Domain: Type the domain to be added.
- Click Save to save the domain or click Cancel to not save the domain.
Configure F5 SSL Protocol for iOS
- Provider bundle identifier: If your per-app VPN profile has the bundle identifier of an app with multiple VPN providers of the same type, specify the provider to use here.
- Server name or IP address: Type the server name or IP address for the VPN server.
- User Account: Type an optional user account.
-
Authentication type for the connection: In the list, select either Password or Certificate for the type of authentication for this connection. The default is Password.
- If you enable Password, type an optional authentication password in the Authentication password field.
- If you enable Certificate, configure these settings:
- Identity credential: In the list, select the identity credential to use. The default is None.
- Prompt for PIN when connecting: Select whether to prompt users for their PIN when they connect to the network. The default is Off.
- Enable VPN on demand: Select whether to enable triggering a VPN connection when users connect to the network. The default is Off. For information on configuring the settings when Enable VPN on demand is On, see Configure Enable VPN on demand settings for iOS.
-
Enable Per-app VPN: Select whether to enable per-app VPN. The default is Off. If you enable this option, configure these settings:
- On-demand match app enabled: Select whether per-app VPN connections trigger automatically when apps linked to the per-app VPN service initiate network communication.
- Provider type: Select whether the per-app VPN is provided as an App proxy or as a Packet tunnel. Default is App proxy.
-
Safari domains: For each Safari domain that can trigger a per-app VPN connection you want to include, click Add and do the following:
- Domain: Type the domain to be added.
- Click Save to save the domain or click Cancel to not save the domain.
Configure SonicWALL Protocol for iOS
- Provider bundle identifier: If your per-app VPN profile has the bundle identifier of an app with multiple VPN providers of the same type, specify the provider to use here.
- Server name or IP address: Type the server name or IP address for the VPN server.
- User Account: Type an optional user account.
- Logon group or domain: Type an optional logon group or domain.
-
Authentication type for the connection: In the list, select either Password or Certificate for the type of authentication for this connection. The default is Password.
- If you enable Password, type an optional authentication password in the Authentication password field.
- If you enable Certificate, configure these settings:
- Identity credential: In the list, select the identity credential to use. The default is None.
- Prompt for PIN when connecting: Select whether to prompt users for their PIN when they connect to the network. The default is Off.
- Enable VPN on demand: Select whether to enable triggering a VPN connection when users connect to the network. The default is Off. For information on configuring the settings when Enable VPN on demand is On, see Configure Enable VPN on demand settings for iOS.
-
Enable Per-app VPN: Select whether to enable per-app VPN. The default is Off. If you set this option to On, configure these settings:
- On-demand match app enabled: Select whether per-app VPN connections trigger automatically when apps linked to the per-app VPN service initiate network communication.
- Provider type: Select whether the per-app VPN is provided as an App proxy or as a Packet tunnel. Default is App proxy.
-
Safari domains: For each Safari domain that can trigger a per-app VPN connection you want to include, click Add and do the following:
- Domain: Type the domain to be added.
- Click Save to save the domain or click Cancel to not save the domain.
Configure Ariba VIA protocol for iOS
- Provider bundle identifier: If your per-app VPN profile has the bundle identifier of an app with multiple VPN providers of the same type, specify the provider to use here.
- Server name or IP address: Type the server name or IP address for the VPN server.
- User Account: Type an optional user account.
-
Authentication type for the connection: In the list, select either Password or Certificate for the type of authentication for this connection. The default is Password.
- If you enable Password, type an optional authentication password in the Authentication password field.
- If you enable Certificate, configure these settings:
- Identity credential: In the list, select the identity credential to use. The default is None.
- Prompt for PIN when connecting: Select whether to prompt users for their PIN when they connect to the network. The default is Off.
- Enable VPN on demand: Select whether to enable triggering a VPN connection when users connect to the network. The default is Off. For information on configuring the settings when Enable VPN on demand is On, see Configure Enable VPN on demand settings for iOS.
-
Enable Per-app VPN: Select whether to enable per-app VPN. The default is Off. If you enable this option, configure these settings:
- On-demand match app enabled: Select whether per-app VPN connections trigger automatically when apps linked to the per-app VPN service initiate network communication.
-
Safari domains: For each Safari domain that can trigger a per-app VPN connection you want to include, click Add and do the following:
- Domain: Type the domain to be added.
- Click Save to save the domain or click Cancel to not save the domain.
Configure IKEv2 protocols for iOS
This section includes settings used for the IKEv2, Always On IKEv2, and Always On IKEv2 Dual Configuration protocols. For the Always On IKEv2 Dual Configuration protocol, configure all these settings for both Cellular and Wi-Fi networks.
-
Allow user to disable automatic connection: For the Always On protocols. Select whether to allow users to disable automatic connection to the network on their devices. The default is Off.
-
Host name or IP address for server: Type the server name or IP address for the VPN server.
-
Local Identifier: The FQDN or IP address for the IKEv2 client. This field is required.
-
Remote Identifier: The FQDN or IP address for the VPN server. This field is required.
-
Device Authentication: Choose Shared Secret, Certificate, or Device Certificate Based on Device Identifier for the type of authentication for this connection. The default is Shared Secret.
-
If you choose Shared Secret, type an optional shared secret key.
-
If you choose Certificate, choose an Identity credential to use. The default is None.
-
If you choose Device Certificate Based on Device Identifier, choose the Device identity type to use. The default is IMEI. To use this option, bulk import certificates using the REST API. See Upload certificates in bulk using the REST API. Only available when you select Always On IKEv2.
-
-
Extended Authentication Enabled: Select whether to enable Extended Authentication Protocol (EAP). If On, type the User account and Authentication password.
-
Dead Peer Detection Interval: Choose how often a peer device is contacted to make sure that the peer device stays reachable. The default is None. Options are:
-
None: Disable dead peer detection.
-
Low: Contacts peer every 30 minutes.
-
Medium: Contacts peer every 10 minutes.
-
High: Contacts peer every 1 minute.
-
-
Disable Mobility and Multihoming: Choose whether to disable this feature.
-
Use IPv4/IPv6 internal subnet attributes: Choose whether to enable this feature.
-
Disable redirects: Choose whether to disable redirects.
-
Enable Fallback: If enabled, this setting allows a tunnel over cellular data to carry traffic that is eligible for Wi-Fi Assist and requires a VPN. Default is Off.
-
Enable NAT keepalive while the device is asleep: For the Always On protocols. Keepalive packets maintain NAT mappings for IKEv2 connections. The chip sends these packets at regular intervals when the device is awake. If this setting is on, the chip sends keepalive packets even while the device is asleep. The default interval is 20 seconds over Wi-Fi and 110 seconds over cellular. You can change the interval by using the NAT keepalive interval parameter.
-
NAT keepalive Interval (seconds): Defaults to 20 seconds.
-
Enable Perfect Forward Secrecy: Choose whether to enable this feature.
-
DNS server IP addresses: Optional. A list of DNS server IP address strings. These IP addresses can include a mixture of IPv4 and IPv6 addresses. Click Add to type an address.
-
Domain name: Optional. The primary domain of the tunnel.
-
Search domains: Optional. A list of domain strings used to qualify single-label host names fully.
-
Append supplemental match domains to resolver’s list: Optional. Determines whether to add the supplemental match domains list to the resolver’s list of search domains. Default is On.
-
Supplemental match domains: Optional. A list of domain strings used to determine which DNS queries are to use the DNS resolver settings that are in the DNS server addresses. This key creates a split DNS configuration where only hosts in certain domains get resolved by using the DNS resolver of the tunnel. Hosts not in one of the domains in this list get resolved by using the default resolver of the system.
If this parameter has an empty string, then that string is the default domain. As a result, a split tunnel configuration can direct all DNS queries to the VPN DNS servers before the primary DNS servers. If the VPN tunnel is the default route of the network, the listed DNS servers become the default resolver. In that case, the supplemental match domains list is ignored.
-
IKE SA Parameters and Child SA Parameters: Configure these settings for each Security Association (SA) parameters option:
-
Encryption Algorithm: In the list, select the IKE encryption algorithm to use. The default is 3DES.
-
Integrity Algorithm: In the list, select the integrity algorithm to use. The default is SHA-256.
-
Diffie Hellman Group: In the list, select the Diffie Hellman group number. The default is 2.
-
ike LifeTime in Minutes: Type an integer between 10 and 1440 representing the SA lifetime (rekey interval). The default is 1440 minutes.
-
-
Service Exceptions: For the Always On protocols. Service exceptions are system services that are exempt from Always On VPN. Configure these service exceptions settings:
-
Voice Mail: In the list, select how to handle the voice mail exception. The default is Allow traffic via tunnel.
-
AirPrint: In the list, select how to handle the AirPrint exception. The default is Allow traffic via tunnel.
-
Allow traffic from captive web sheet outside the VPN tunnel: Select whether to allow users to connect to public hotspots outside the VPN tunnel. The default is Off.
-
Allow traffic from all captive networking apps outside the VPN tunnel: Select whether to allow all hotspot networking apps outside the VPN tunnel. The default is Off.
-
Captive networking app bundle identifiers: For each hotspot networking app bundle identifier that users are allowed to access, click Add and type the hotspot networking app Bundle Identifier. Click Save to save the app bundle identifier.
-
-
Per-app VPN: Configure these settings for IKEv2 connection types.
- Enable per-app VPN: Select whether to enable per-app VPN. The default is Off.
- On-demand match app enabled: Select whether per-app VPN connections trigger automatically when apps linked to the per-app VPN service initiate network communication. The default is Off.
- Safari domains: Click Add to add a Safari domain name.
-
Proxy configuration: Choose how the VPN connection routes through a proxy server. Default is None.
Configure Citrix SSO protocol for iOS
The Citrix SSO client is available in the Apple Store.
- Server name or IP address: Type the server name or IP address for the VPN server.
- User Account: Type an optional user account.
-
Authentication type for the connection: In the list, select either Password or Certificate for the type of authentication for this connection. The default is Password.
- If you enable Password, type an optional authentication password in the Authentication password field.
- If you enable Certificate, configure these settings:
- Identity credential: In the list, select the identity credential to use. The default is None.
- Prompt for PIN when connecting: Select whether to prompt users for their PIN when they connect to the network. The default is Off.
- Enable VPN on demand: Select whether to enable triggering a VPN connection when users connect to the network. The default is Off. For information on configuring the settings when Enable VPN on demand is On, see Configure Enable VPN on demand settings for iOS.
-
Enable Per-app VPN: Select whether to enable per-app VPN. The default is Off. If you set this option to On, configure the following settings:
- On-demand match app enabled: Select whether per-app VPN connections trigger automatically when apps linked to the per-app VPN service initiate network communication.
- Provider type: Select whether the per-app VPN is provided as an App proxy or as a Packet tunnel. Default is App proxy.
- Provider type: Set to Packet tunnel.
-
Safari domains: For each Safari domain that can trigger a per-app VPN connection you want to include, click Add and do the following:
- Domain: Type the domain to be added.
- Click Save to save the domain or click Cancel to not save the domain.
-
Custom XML: For each custom XML parameter you want to add, click Add and specify the key/value pairs. Available parameters are:
- disableL3: Disables system level VPN. Allows only per app VPN. No Value is needed.
- user agent: Associates with this device policy any NetScaler Gateway policies that are targeted to VPN plug-in clients. For requests started by the plug-in, the Value for this key is automatically added to the VPN plug-in.
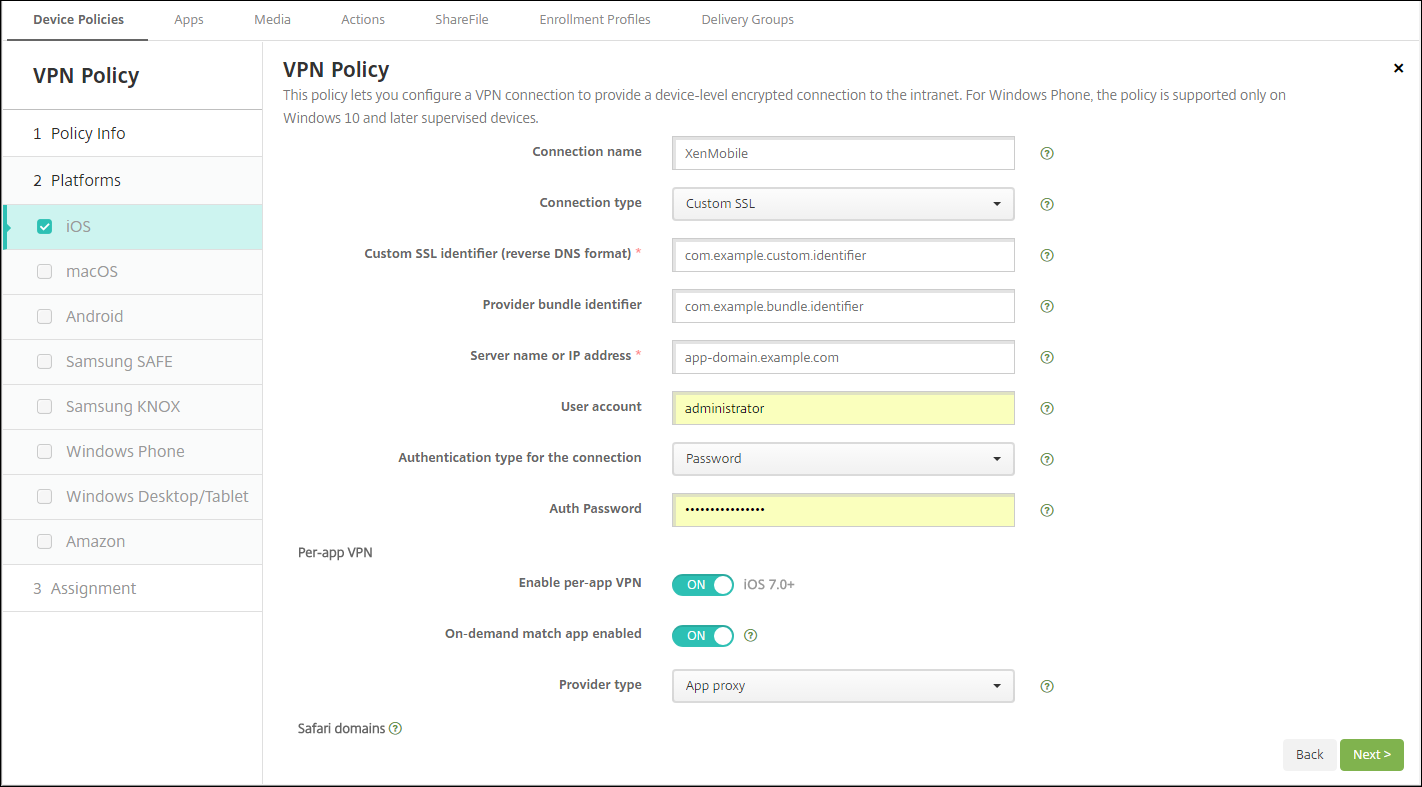
Configure Custom SSL protocol for iOS
To transition from the Cisco Legacy AnyConnect client to the Cisco AnyConnect client:
- Configure the VPN device policy with the Custom SSL protocol. Deploy the policy to iOS devices.
- Upload the Cisco AnyConnect client from https://apps.apple.com/us/app/cisco-secure-client/id1135064690, add the app to Citrix Endpoint Management, and then deploy the app to iOS devices.
- Remove the old VPN device policy from iOS devices.
Settings:
- Custom SSL identifier (reverse DNS format): Set to the bundle identifier. For the Cisco AnyConnect client, use com.cisco.anyconnect.
- Provider Bundle Identifier: If the app specified in Custom SSL identifier has multiple VPN providers of the same type (App proxy or Packet tunnel), then specify this bundle identifier. For the Cisco AnyConnect client, use com.cisco.anyconnect.
- Server name or IP address: Type the server name or IP address for the VPN server.
- User Account: Type an optional user account.
-
Authentication type for the connection: In the list, select either Password or Certificate for the type of authentication for this connection. The default is Password.
- If you enable Password, type an optional authentication password in the Authentication password field.
- If you enable Certificate, configure these settings:
- Identity credential: In the list, select the identity credential to use. The default is None.
- Prompt for PIN when connecting: Select whether to prompt users for their PIN when they connect to the network. The default is Off.
- Enable VPN on demand: Select whether to enable triggering a VPN connection when users connect to the network. The default is Off. For information on configuring the settings when Enable VPN on demand is On, see Configure Enable VPN on demand settings for iOS.
- Include All Networks: Select whether to allow all networks to use this connection. The default is Off.
- Exclude Local Networks: Select whether to exclude local networks from using the connection or to allow the networks. The default is Off.
-
Enable Per-app VPN: Select whether to enable per-app VPN. The default is Off. If you set this option to On, configure the following settings:
- On-demand match app enabled: Select whether per-app VPN connections trigger automatically when apps linked to the per-app VPN service initiate network communication.
- Provider Type: A provider type indicates whether the provider is a VPN service or proxy service. For VPN service, choose Packet tunnel. For proxy service, choose App proxy. For the Cisco AnyConnect client, choose Packet tunnel.
-
Safari domains: For each Safari domain that can trigger a per-app VPN connection you want to include, click Add and do the following:
- Domain: Type the domain to be added.
- Click Save to save the domain or click Cancel to not save the domain.
-
Custom XML: For each custom XML parameter you want to add, click Add and do the following:
- Parameter name: Type the name of the parameter to be added.
- Value: Type the value associated with the Parameter name.
- Click Save to save the parameter or click Cancel to not save the parameter.
Configure the VPN device policy to support NAC
- The Connection type of Custom SSL is required for configuring the NAC filter.
- Specify a Connection name of VPN.
- For Custom SSL identifier, type com.citrix.NetScalerGateway.ios.app
- For Provider bundle identifier, type com.citrix.NetScalerGateway.ios.app.vpnplugin
The values in steps 3 and 4 come from the required Citrix SSO installation for NAC filtering. You do not configure an authentication password. For more information on using the NAC function, see Network Access Control.
Configure enable VPN on demand options for iOS
- On Demand Domain: For each domain and associated action to take when users connect, click Add and do the following:
- Domain: Type the domain to be added.
-
Action: In the list select one of the possible actions:
- Always establish: The domain always triggers a VPN connection.
- Never establish: The domain never triggers a VPN connection.
- Establish if necessary: The domain triggers a VPN connection attempt if domain name resolution fails. Failure happens when the DNS server can’t resolve the domain, redirects to a different server, or times out.
- Click Save to save the domain or click Cancel to not save the domain.
-
On demand rules
-
Action: In the list, select the action to be taken. The default is EvaluateConnection. Possible actions are:
- Allow: Allow VPN on demand to connect when triggered.
- Connect: Unconditionally start a VPN connection.
- Disconnect: Remove the VPN connection and do not reconnect on demand as long as the rule matches.
- EvaluateConnection: Evaluate the ActionParameters array for each connection.
- Ignore: Leave any existing VPN connection up, but do not reconnect on demand as long as the rule matches.
-
DNSDomainMatch: For each domain against which a device’s search domain list can match that you want to add, click Add and do the following:
- DNS Domain: Type the domain name. You can use the wildcard “*” prefix for matching multiple domains. For example, *.example.com matches mydomain.example.com, yourdomain.example.com, and herdomain.example.com.
- Click Save to save the domain or click Cancel to not save the domain.
-
DNSServerAddressMatch: For each IP address to which any of the network’s specified DNS servers can match that you want to add, click Add and do the following:
- DNS Server Address: Type the DNS server address that you want to add. You can use the wildcard “*” suffix for matching DNS servers. For example, 17.* matches any DNS server in the class A subnet.
- Click Save to save the DNS server address or click Cancel to not save the DNS server address.
-
InterfaceTypeMatch: In the list, select the type of primary network interface hardware in use. The default is Unspecified. Possible values are:
- Unspecified: Matches any network interface hardware. This option is the default.
- Ethernet: Matches only Ethernet network interface hardware.
- WiFi: Matches only Wi-Fi network interface hardware.
- Cellular: Matches only Cellular network interface hardware.
-
SSIDMatch: For each SSID to match against the current network that you want to add, click Add and so the following.
- SSID: Type the SSID to add. If the network isn’t a Wi-Fi network, or if the SSID does not appear, the match fails. Leave this list empty to match any SSID.
- Click Save to save the SSID or click Cancel to not save the SSID.
- URLStringProbe: Type a URL to fetch. If this URL is successfully fetched without redirection, this rule matches.
-
ActionParameters : Domains: For each domain that EvaluateConnection checks that you want to add, click Add and do the following:
- Domain: Type the domain to be added.
- Click Save to save the domain or click Cancel to not save the domain.
-
ActionParameters : DomainAction: In the list, select the VPN behavior for the specified ActionParameters : Domains domains. The default is ConnectIfNeeded. Possible actions are:
- ConnectIfNeeded: The domain triggers a VPN connection attempt if domain name resolution fails. Failure happens when the DNS server can’t resolve the domain, redirects to a different server, or times out.
- NeverConnect: The domain never triggers a VPN connection.
-
Action Parameters: RequiredDNSServers: For each DNS server to use for resolving the specified domains, click Add and do the following:
- DNS Server: Valid only when ActionParameters : DomainAction = ConnectIfNeeded. Type the DNS server IP address. This server can be outside of the device’s current network configuration. If the DNS server isn’t reachable, a VPN connection is established in response. Make sure that the DNS server is either an internal DNS server or a trusted external DNS server.
- Click Save to save the DNS server or click Cancel to not save the DNS server.
- ActionParameters : RequiredURLStringProbe: Optionally, type an HTTP or HTTPS (preferred) URL to probe, using a GET request. If the URL’s host name can’t be resolved, the server is unreachable, or the server doesn’t respond, a VPN connection is established. Valid only when ActionParameters : DomainAction = ConnectIfNeeded.
-
OnDemandRules : XML content: Type, or copy and paste, the XML configuration-on-demand rules.
- Click Check Dictionary to validate the XML code. Valid XML appears below the XML content text box if the XML is valid. If it isn’t valid, an error message describes the error.
-
Action: In the list, select the action to be taken. The default is EvaluateConnection. Possible actions are:
-
Proxy
-
Proxy configuration: In the list, select how the VPN connection routes through a proxy server. The default is None.
- If you enable Manual, configure these settings:
- Host name or IP address for the proxy server: Type the host name or IP address for the proxy server. This field is required.
- Port for the proxy server: Type the proxy server port number. This field is required.
- User name: Type an optional proxy server user name.
- Password: Type an optional proxy server password.
- If you configure Automatic, configure this setting:
- Proxy server URL: Type the URL for the proxy server. This field is required.
- If you enable Manual, configure these settings:
-
Proxy configuration: In the list, select how the VPN connection routes through a proxy server. The default is None.
-
Policy settings
-
Remove policy: Choose a method for scheduling policy removal. Available options are Select date and Duration until removal (in hours)
- Select date: Click the calendar to select the specific date for removal.
- Duration until removal (in hours): Type a number, in hours, until policy removal occurs. Only available for iOS 6.0 and later.
-
Remove policy: Choose a method for scheduling policy removal. Available options are Select date and Duration until removal (in hours)
Configure a per-app VPN
Per-app VPN options for iOS are available for these connection types: Cisco Legacy AnyConnect, Juniper SSL, F5 SSL, SonicWALL Mobile Connect, Ariba VIA, Citrix VPN, Citrix SSO, and Custom SSL.
To configure a per-app VPN:
-
In Configure > Device Policies, create a VPN policy. For example:
-
In Configure > Device Policies, create an App Attributes policy to associate an app to the per-app VPN policy. For Per-app VPN identifier, choose the name of the VPN policy created in Step 1. For Managed app bundle ID, choose from the app list or type the app bundle ID. (If you deploy an iOS App Inventory policy, the app list has apps.)

macOS settings
- Connection name: Type a name for the connection.
-
Connection type: In the list, select the protocol to be used for this connection. The default is L2TP.
- L2TP: Layer 2 Tunneling Protocol with pre-shared key authentication.
- PPTP: Point-to-Point Tunneling.
- IPSec: Your corporate VPN connection.
- Cisco AnyConnect: Cisco AnyConnect VPN client.
- Juniper SSL: Juniper Networks SSL VPN client.
- F5 SSL: F5 Networks SSL VPN client.
- SonicWALL Mobile Connect: Dell unified VPN client for iOS.
- Ariba VIA: Ariba Networks Virtual Internet Access client.
- Citrix VPN: Citrix VPN client.
- Custom SSL: Custom Secure Socket Layer.
The following sections list the configuration options for each of the preceding connection types.
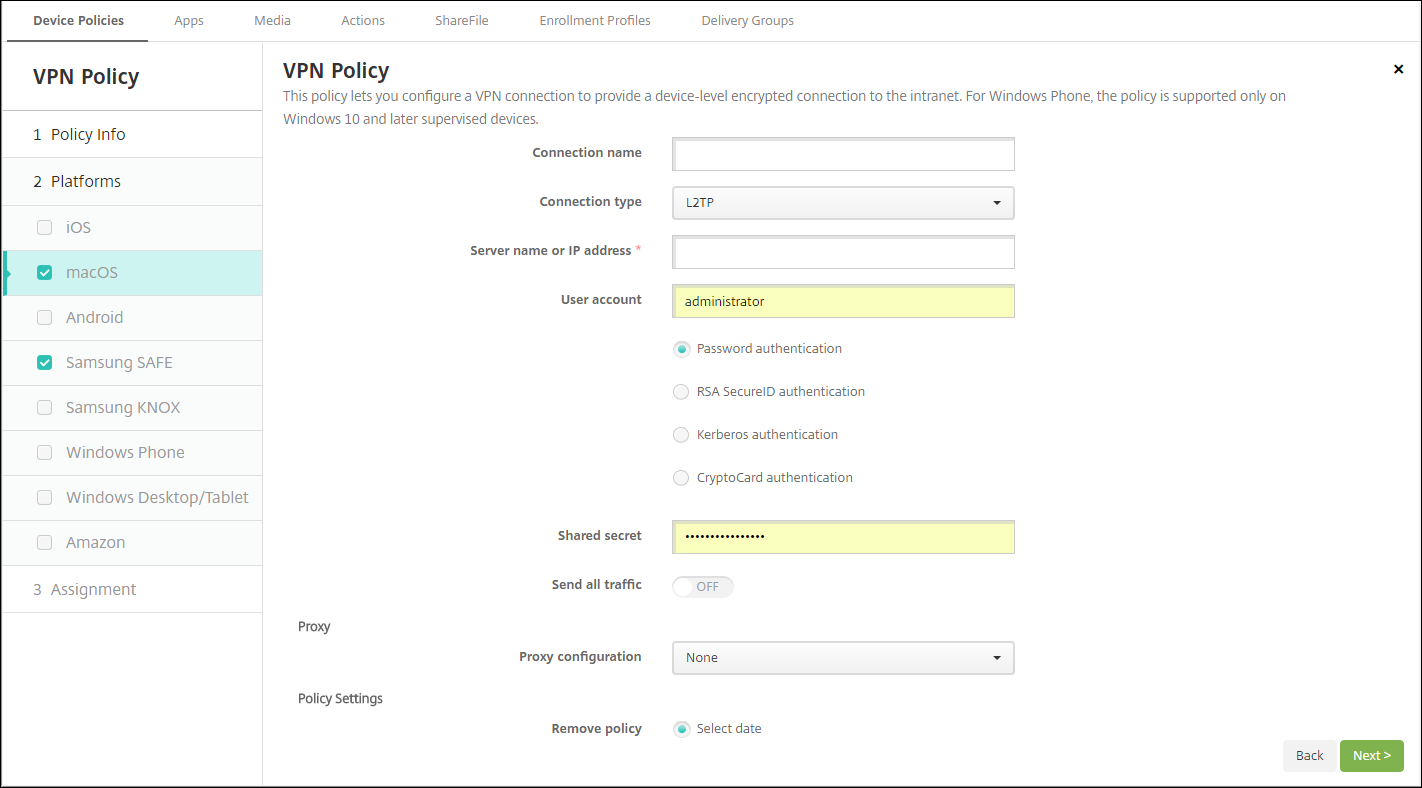
Configure L2TP Protocol for macOS
- Server name or IP address: Type the server name or IP address for the VPN server.
- User Account: Type an optional user account.
- Select Password authentication, RSA SecurID authentication, Kerberos authentication, or CryptoCard authentication. The default is Password authentication.
- Shared secret: Type the IPsec shared secret key.
- Send all traffic: Select whether to send all traffic over the VPN. The default is Off.
Configure PPTP Protocol for macOS
- Server name or IP address: Type the server name or IP address for the VPN server.
- User Account: Type an optional user account.
- Select Password authentication, RSA SecurID authentication, Kerberos authentication, or CryptoCard authentication. The default is Password authentication.
-
Encryption level: Select the desired encryption level. The default is None.
- None: Use no encryption.
- Automatic: Use the strongest encryption level supported by the server.
- Maximum (128-bit): Always use 128-bit encryption.
- Send all traffic: Select whether to send all traffic over the VPN. The default is Off.
Configure IPsec Protocol for macOS
- Server name or IP address: Type the server name or IP address for the VPN server.
- User account: Type an optional user account.
-
Authentication type for the connection: In the list, select either Shared Secret or Certificate for the type of authentication for this connection. The default is Shared Secret.
- If you enable Shared Secret authentication, configure these settings:
- Group name: Type an optional group name.
- Shared secret: Type an optional shared secret key.
- Use hybrid authentication: Select whether to use hybrid authentication. With hybrid authentication, the server first authenticates itself to the client, and then the client authenticates itself to the server. The default is Off.
- Prompt for password: Select whether to prompt users for their passwords when they connect to the network. The default is Off.
- If you enable Certificate authentication, configure these settings:
- Identity credential: In the list, select the identity credential to use. The default is None.
- Prompt for PIN when connecting: Select whether to require users to enter their PIN when connecting to the network. The default is Off.
- Enable VPN on demand: Select whether to enable triggering a VPN connection when users connect to the network. The default is Off. For information on configuring the settings when Enable VPN on demand is On, see Configure Enable VPN on demand options.
- If you enable Shared Secret authentication, configure these settings:
Configure Cisco AnyConnect Protocol for macOS
- Server name or IP address: Type the server name or IP address for the VPN server.
- User account: Type an optional user account.
- Group: Type an optional group name.
-
Authentication type for the connection: In the list, select either Password or Certificate for the type of authentication for this connection. The default is Password.
- If you enable Password, type an optional authentication password in the Authentication password field.
- If you enable Certificate, configure these settings:
- Identity credential: In the list, select the identity credential to use. The default is None.
- Prompt for PIN when connecting: Select whether to prompt users for their PIN when they connect to the network. The default is Off.
- Enable VPN on demand: Select whether to enable triggering a VPN connection when users connect to the network. The default is Off. For information on configuring the settings when Enable VPN on demand is On, see Configure Enable VPN on demand options.
-
Enable Per-app VPN: Select whether to enable per-app VPN. The default is Off. If you enable this option, configure these settings:
- On-demand match app enabled: Select whether a per-app VPN connection triggers automatically when apps linked to the per-app VPN service start network communication. The default is Off.
-
Safari domains: For each Safari domain that can trigger a per-app VPN connection you want to include, click Add and do the following:
- Domain: Type the domain to be added.
- Click Save to save the domain or click Cancel to not save the domain.
Configure Juniper SSL Protocol for macOS
- Server name or IP address: Type the server name or IP address for the VPN server.
- User account: Type an optional user account.
- Realm: Type an optional realm name.
- Role: Type an optional role name.
-
Authentication type for the connection: In the list, select either Password or Certificate for the type of authentication for this connection. The default is Password.
- If you enable Password, type an optional authentication password in the Authentication password field.
- If you enable Certificate, configure these settings:
- Identity credential: In the list, select the identity credential to use. The default is None.
- Prompt for PIN when connecting: Select whether to prompt users for their PIN when they connect to the network. The default is Off.
- Enable VPN on demand: Select whether to enable triggering a VPN connection when users connect to the network. The default is Off. For information on configuring the settings when Enable VPN on demand is On, see Configure Enable VPN on demand settings.
-
Enable per-app VPN: Select whether to enable per-app VPN. The default is Off. If you enable this option, configure the following settings:
- On-demand match app enabled: Select whether a per-app VPN connection triggers automatically when apps linked to the per-app VPN service initiate network communication. The default is Off.
-
Safari domains: For each Safari domain that can trigger a per-app VPN connection you want to include, click Add and do the following:
- Domain: Type the domain to be added.
- Click Save to save the domain or click Cancel to not save the domain.
Configure F5 SSL Protocol for macOS
- Server name or IP address: Type the server name or IP address for the VPN server.
- User account: Type an optional user account.
-
Authentication type for the connection: In the list, select either Password or Certificate for the type of authentication for this connection. The default is Password.
- If you enable Password, type an optional authentication password in the Authentication password field.
- If you enable Certificate, configure these settings:
- Identity credential: In the list, select the identity credential to use. The default is None.
- Prompt for PIN when connecting: Select whether to prompt users for their PIN when they connect to the network. The default is Off.
- Enable VPN on demand: Select whether to enable triggering a VPN connection when users connect to the network. The default is Off. For information on configuring the settings when Enable VPN on demand is On, see Configure Enable VPN on demand settings.
-
Enable per-app VPN: Select whether to enable per-app VPN. The default is Off. If you enable this option, configure these settings:
- On-demand match app enabled: Select whether per-app VPN connection triggers automatically when apps linked to the per-app VPN service start network communication. The default is Off.
-
Safari domains: For each Safari domain that can trigger a per-app VPN connection you want to include, click Add and do the following:
- Domain: Type the domain to be added.
- Click Save to save the domain or click Cancel to not save the domain.
Configure SonicWALL Mobile Connect Protocol for macOS
- Server name or IP address: Type the server name or IP address for the VPN server.
- User account: Type an optional user account.
- Logon group or domain: Type an optional logon group or domain.
-
Authentication type for the connection: In the list, select either Password or Certificate for the type of authentication for this connection. The default is Password.
- If you enable Password, type an optional authentication password in the Authentication password field.
- If you enable Certificate, configure these settings:
- Identity credential: In the list, select the identity credential to use. The default is None.
- Prompt for PIN when connecting: Select whether to prompt users for their PIN when they connect to the network. The default is Off.
- Enable VPN on demand: Select whether to enable triggering a VPN connection when users connect to the network. The default is Off. For information on configuring the settings when Enable VPN on demand is On, see Configure Enable VPN on demand settings.
-
Enable per-app VPN: Select whether to enable per-app VPN. The default is Off. If you enable this option, configure these settings:
- On-demand match app enabled: Select whether per-app VPN connection triggers automatically when apps linked to the per-app VPN service initiate network communication. The default is Off.
-
Safari domains: For each Safari domain that can trigger a per-app VPN connection you want to include, click Add and do the following:
- Domain: Type the domain to be added.
- Click Save to save the domain or click Cancel to not save the domain.
Configure Ariba VIA protocol for macOS
- Server name or IP address: Type the server name or IP address for the VPN server.
- User account: Type an optional user account.
-
Authentication type for the connection: In the list, select either Password or Certificate for the type of authentication for this connection. The default is Password.
- If you enable Password, type an optional authentication password in the Authentication password field.
- If you enable Certificate, configure these settings:
- Identity credential: In the list, select the identity credential to use. The default is None.
- Prompt for PIN when connecting: Select whether to prompt users for their PIN when they connect to the network. The default is Off.
- Enable VPN on demand: Select whether to enable triggering a VPN connection when users connect to the network. The default is Off. For information on configuring the settings when Enable VPN on demand is On, see Configure Enable VPN on demand settings.
-
Enable per-app VPN: Select whether to enable per-app VPN. The default is Off. If you enable this option, configure these settings:
- On-demand match app enabled: Select whether per-app VPN connection triggers automatically when apps linked to the per-app VPN service initiate network communication. The default is Off.
-
Safari domains: For each Safari domain that can trigger a per-app VPN connection you want to include, click Add and do the following:
- Domain: Type the domain to be added.
- Click Save to save the domain or click Cancel to not save the domain.
Configure Custom SSL protocol for macOS
- Custom SSL identifier (reverse DNS format): Type the SSL identifier in reverse DNS format. This field is required.
- Server name or IP address: Type the server name or IP address for the VPN server. This field is required.
-
User account: Type an optional user account.
- Authentication type for the connection: In the list, select either Password or Certificate for the type of authentication for this connection. The default is Password.
- If you enable Password, type an optional authentication password in the Authentication password field.
- If you enable Certificate, configure these settings:
- Identity credential: In the list, select the identity credential to use. The default is None.
- Prompt for PIN when connecting: Select whether to prompt users for their PIN when they connect to the network. The default is Off.
- Enable VPN on demand: Select whether to enable triggering a VPN connection when users connect to the network. The default is Off. For information on configuring the settings when Enable VPN on demand is On, see Configure Enable VPN on demand settings.
-
Per-app VPN: Select whether to enable per-app VPN. The default is Off. If you enable this option, configure these settings:
- On-demand match app enabled: Select whether per-app VPN connections trigger automatically when apps linked to the per-app VPN service initiate network communication.
-
Safari domains: For each Safari domain that can trigger a per-app VPN connection you want to include, click Add and do the following:
- Domain: Type the domain to be added.
- Click Save to save the domain or click Cancel to not save the domain.
-
Custom XML: For each custom XML parameter you want to add, click Add and do the following:
- Parameter name: Type the name of the parameter to be added.
- Value: Type the value associated with Parameter name.
- Click Save to save the domain or click Cancel to not save the domain.
Configure enable VPN on demand options
-
On Demand Domain: For each domain and associated action to be taken when users connect to them that you want to add, click Add to and do the following:
- Domain: Type the domain to be added.
-
Action: In the list select one of the possible actions:
- Always establish: The domain always triggers a VPN connection.
- Never establish: The domain never triggers a VPN connection.
- Establish if necessary: The domain triggers a VPN connection attempt if domain name resolution fails. Failure happens when the DNS server can’t resolve the domain, redirects to a different server, or times out.
- Click Save to save the domain or click Cancel to not save the domain.
-
On demand rules
-
Action: In the list, select the action to be taken. The default is EvaluateConnection. Possible actions are:
- Allow: Allow VPN on demand to connect when triggered.
- Connect: Unconditionally initiate a VPN connection.
- Disconnect: Remove the VPN connection and do not reconnect on demand as long as the rule matches.
- EvaluateConnection: Evaluate the ActionParameters array for each connection.
- Ignore: Leave any existing VPN connection up, but do not reconnect on demand as long as the rule matches.
-
DNSDomainMatch: For the domains against which a device’s search domain list can match, click Add to and do the following:
- DNS Domain: Type the domain name. You can use the wildcard “*” prefix for matching multiple domains. For example, *.example.com matches mydomain.example.com, yourdomain.example.com, and herdomain.example.com.
- Click Save to save the domain or click Cancel to not save the domain.
-
DNSServerAddressMatch: For each IP address to which any of the network’s specified DNS servers can match that you want to add, click Add and do the following:
- DNS Server Address: Type the DNS server address that you want to add. You can use the wildcard “*” suffix for matching DNS servers. For example, 17.* matches any DNS server in the class A subnet.
- Click Save to save the DNS server address or click Cancel to not save the DNS server address.
-
InterfaceTypeMatch: In the list, click the type of primary network interface hardware in use. The default is Unspecified. Possible values are:
- Unspecified: Matches any network interface hardware. This option is the default.
- Ethernet: Matches only Ethernet network interface hardware.
- WiFi: Matches only Wi-Fi network interface hardware.
- Cellular: Matches only Cellular network interface hardware.
-
SSIDMatch: For each SSID to match against the current network that you want to add, click Add and so the following.
- SSID: Type the SSID to add. If the network isn’t a Wi-Fi network, or if the SSID does not appear, the match fails. Leave this list empty to match any SSID.
- Click Save to save the SSID or click Cancel to not save the SSID.
- URLStringProbe: Type a URL to fetch. If this URL is successfully fetched without redirection, this rule matches.
-
ActionParameters : Domains: For each domain that EvaluateConnection checks that you want to add, click Add and do the following:
- Domain: Type the domain to be added.
- Click Save to save the domain or click Cancel to not save the domain.
-
ActionParameters : DomainAction: In the list, select the VPN behavior for the specified ActionParameters : Domains domains. The default is ConnectIfNeeded. Possible actions are:
- ConnectIfNeeded: The domain triggers a VPN connection attempt if domain name resolution fails. Failure happens when the DNS server can’t resolve the domain, redirects to a different server, or times out.
- NeverConnect: The domain never triggers a VPN connection.
-
Action Parameters: RequiredDNSServers: For each DNS server to use for resolving the specified domains, click Add and do the following:
- DNS Server: Valid only when ActionParameters : DomainAction = ConnectIfNeeded. Type the DNS server IP address to add. This server can be outside of the device’s current network configuration. If the DNS server isn’t reachable, a VPN connection is established in response. This DNS server must be either an internal DNS server or a trusted external DNS server.
- Click Save to save the DNS server or click Cancel to not save the DNS server.
- ActionParameters : RequiredURLStringProbe: Optionally, type an HTTP or HTTPS (preferred) URL to probe, using a GET request. If the URL’s host name can’t be resolved, the server is unreachable, or the server does not respond, a VPN connection is established. Valid only when ActionParameters : DomainAction = ConnectIfNeeded.
-
OnDemandRules : XML content: Type, or copy and paste the XML configure-on-demand rules.
- Click Check Dictionary to validate the XML code. Valid XML appears below the XML content text box if the XML is valid. If it isn’t valid, an error message describes the error.
-
Action: In the list, select the action to be taken. The default is EvaluateConnection. Possible actions are:
-
Proxy
-
Proxy configuration: In the list, select how the VPN connection routes through a proxy server. The default is None.
- If you enable Manual, configure these settings:
- Host name or IP address for the proxy server: Type the host name or IP address for the proxy server. This field is required.
- Port for the proxy server: Type the proxy server port number. This field is required.
- User name: Type an optional proxy server user name.
- Password: Type an optional proxy server password.
- If you configure Automatic, configure this setting:
- Proxy server URL: Type the URL for the proxy server. This field is required.
- If you enable Manual, configure these settings:
-
Proxy configuration: In the list, select how the VPN connection routes through a proxy server. The default is None.
-
Policy settings
-
Remove policy: Choose a method for scheduling policy removal. Available options are Select date and Duration until removal (in hours)
- Select date: Click the calendar to select the specific date for removal.
- Duration until removal (in hours): Type a number, in hours, until policy removal occurs.
- Allow user to remove policy: You can select when users can remove the policy from their device. Select Always, Passcode required, or Never from the menu. If you select Passcode required, type a passcode in the Removal passcode field.
- Profile scope: Select whether this policy applies to a User or an entire System. The default is User. This option is available only on macOS 10.7 and later.
-
Remove policy: Choose a method for scheduling policy removal. Available options are Select date and Duration until removal (in hours)
Android (legacy DA) settings
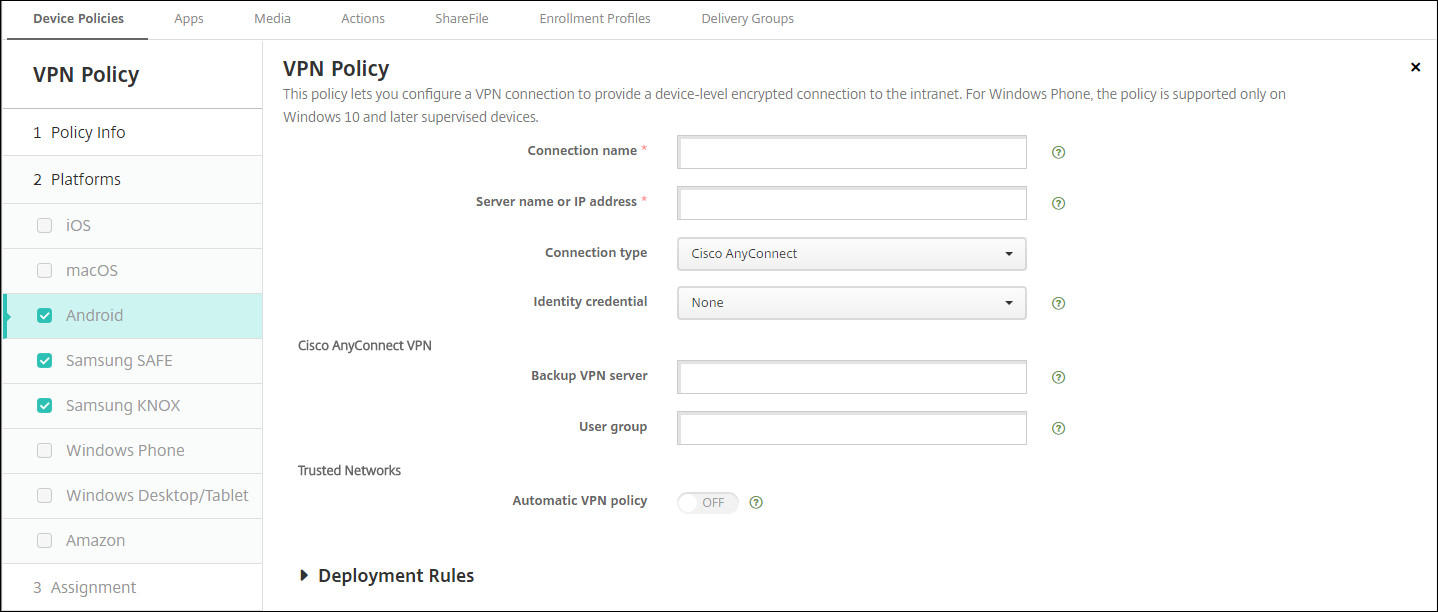
Configure Cisco AnyConnect VPN protocol for Android
- Connection name: Type a name for the Cisco AnyConnect VPN connection. This field is required.
- Server name or IP address: Type the name or IP address of the VPN server. This field is required.
- Identity credential: In the list, select an identity credential.
- Backup VPN server: Type the backup VPN server information.
- User group: Type the user group information.
-
Trusted Networks
-
Automatic VPN policy: Enable or disable this option to set how the VPN reacts to trusted and untrusted networks. If enabled, configure these settings:
-
Trusted network policy: In the list, select the desired policy. The default is Disconnect. Possible options are:
- Disconnect: The client terminates the VPN connection in the trusted network. This setting is the default.
- Connect: The client starts a VPN connection in the trusted network.
- Do Nothing: The client takes no action.
- Pause: When a user establishes a VPN session outside the trusted network then enters a network configured as trusted, the VPN session gets suspended. When the user leaves the trusted network again, the session resumes. This setting eliminates the need to establish a new VPN session after leaving a trusted network.
-
Untrusted network policy: In the list, select the desired policy. The default is Connect. Possible options are:
- Connect: The client starts a VPN connection in the untrusted network.
- Do Nothing: The client starts a VPN connection in the untrusted network. This option disables the always-on VPN.
-
Trusted network policy: In the list, select the desired policy. The default is Disconnect. Possible options are:
-
Trusted domains: For each domain suffix that the network interface has when the client is in the trusted network, click Add to do the following:
- Domain: Type the domain to be added.
- Click Save to save the domain or click Cancel to not save the domain.
-
Trusted servers: For each server address that a network interface has when the client is in the trusted network, click Add and do the following:
- Servers: Type the server to be added.
- Click Save to save the server or click Cancel to not save the server.
-
Automatic VPN policy: Enable or disable this option to set how the VPN reacts to trusted and untrusted networks. If enabled, configure these settings:
Configure the Citrix SSO protocol for Android
-
Connection name: Type a name for the VPN connection. This field is required.
-
Server name or IP address: Type the FQDN or IP address of the NetScaler Gateway.
-
Authentication type for the connection: Choose an authentication type and complete any of these fields that appear for the type:
-
User name and Password: Type your VPN credentials for the Authentication types of Password or Password and Certificate. Optional. If you don’t provide the VPN credentials, the Citrix VPN app prompts for a user name and password.
-
Identity credential: Appears for the Authentication types of Certificate or Password and Certificate. In the list, select an identity credential.
-
-
Enable per-app VPN: Select whether to enable per-app VPN. If you don’t enable a per-app VPN, all traffic goes through the Citrix VPN tunnel. If you enable a per-app VPN, specify the following settings. The default is Off.
- Allow list or Block list: If Allow list, all apps in the allow list tunnel through this VPN. If Block list, all apps except those apps on the block list tunnel through this VPN.
- Application List: The apps on an allow list or block list. Click Add and then type a comma-separated list of app package names.
-
Custom XML: Click Add and then type the custom parameters. Citrix Endpoint Management supports these parameters for Citrix VPN:
- DisableUserProfiles: Optional. To enable this parameter, type Yes for the Value. If enabled, Citrix Endpoint Management doesn’t display user-added VPN connections and the user can’t add a connection. This setting is a global restriction and applies to all VPN profiles.
- userAgent: A string value. You can specify a custom User Agent string to send in each HTTP request. The specified user agent string gets appended to the existing Citrix VPN user agent.
- IsAlwaysOnVpn: Optional. This property determines whether the VPN profile is an Always ON VPN profile or not. Set to Yes to indicate that VPN profile is an Always On VPN profile, default is No. Only one VPN profile can have this property set to Yes for Always On VPN to function reliably.
Configure VPNs to support NAC
- Use the Connection type of Custom SSL to configure the NAC filter.
- Specify a Connection name of VPN.
- For Custom XML, click Add and do the following:
- Parameter name: Type XenMobileDeviceId. This field is the device ID to use for the NAC check based on device enrollment in Citrix Endpoint Management. If Citrix Endpoint Management enrolls and manages the device, the VPN connection is allowed. Otherwise, authentication is denied at the time of VPN establishment.
- Value: Type DeviceID_${device.id}, which is the value for the parameter XenMobileDeviceId.
- Click Save to save the parameter.
Configure VPNs for Android Enterprise
To configure VPNs for Android Enterprise devices, create an Android Enterprise managed configuration device policy for the Citrix SSO app. See Configure VPN profiles for Android Enterprise.
Android Enterprise settings
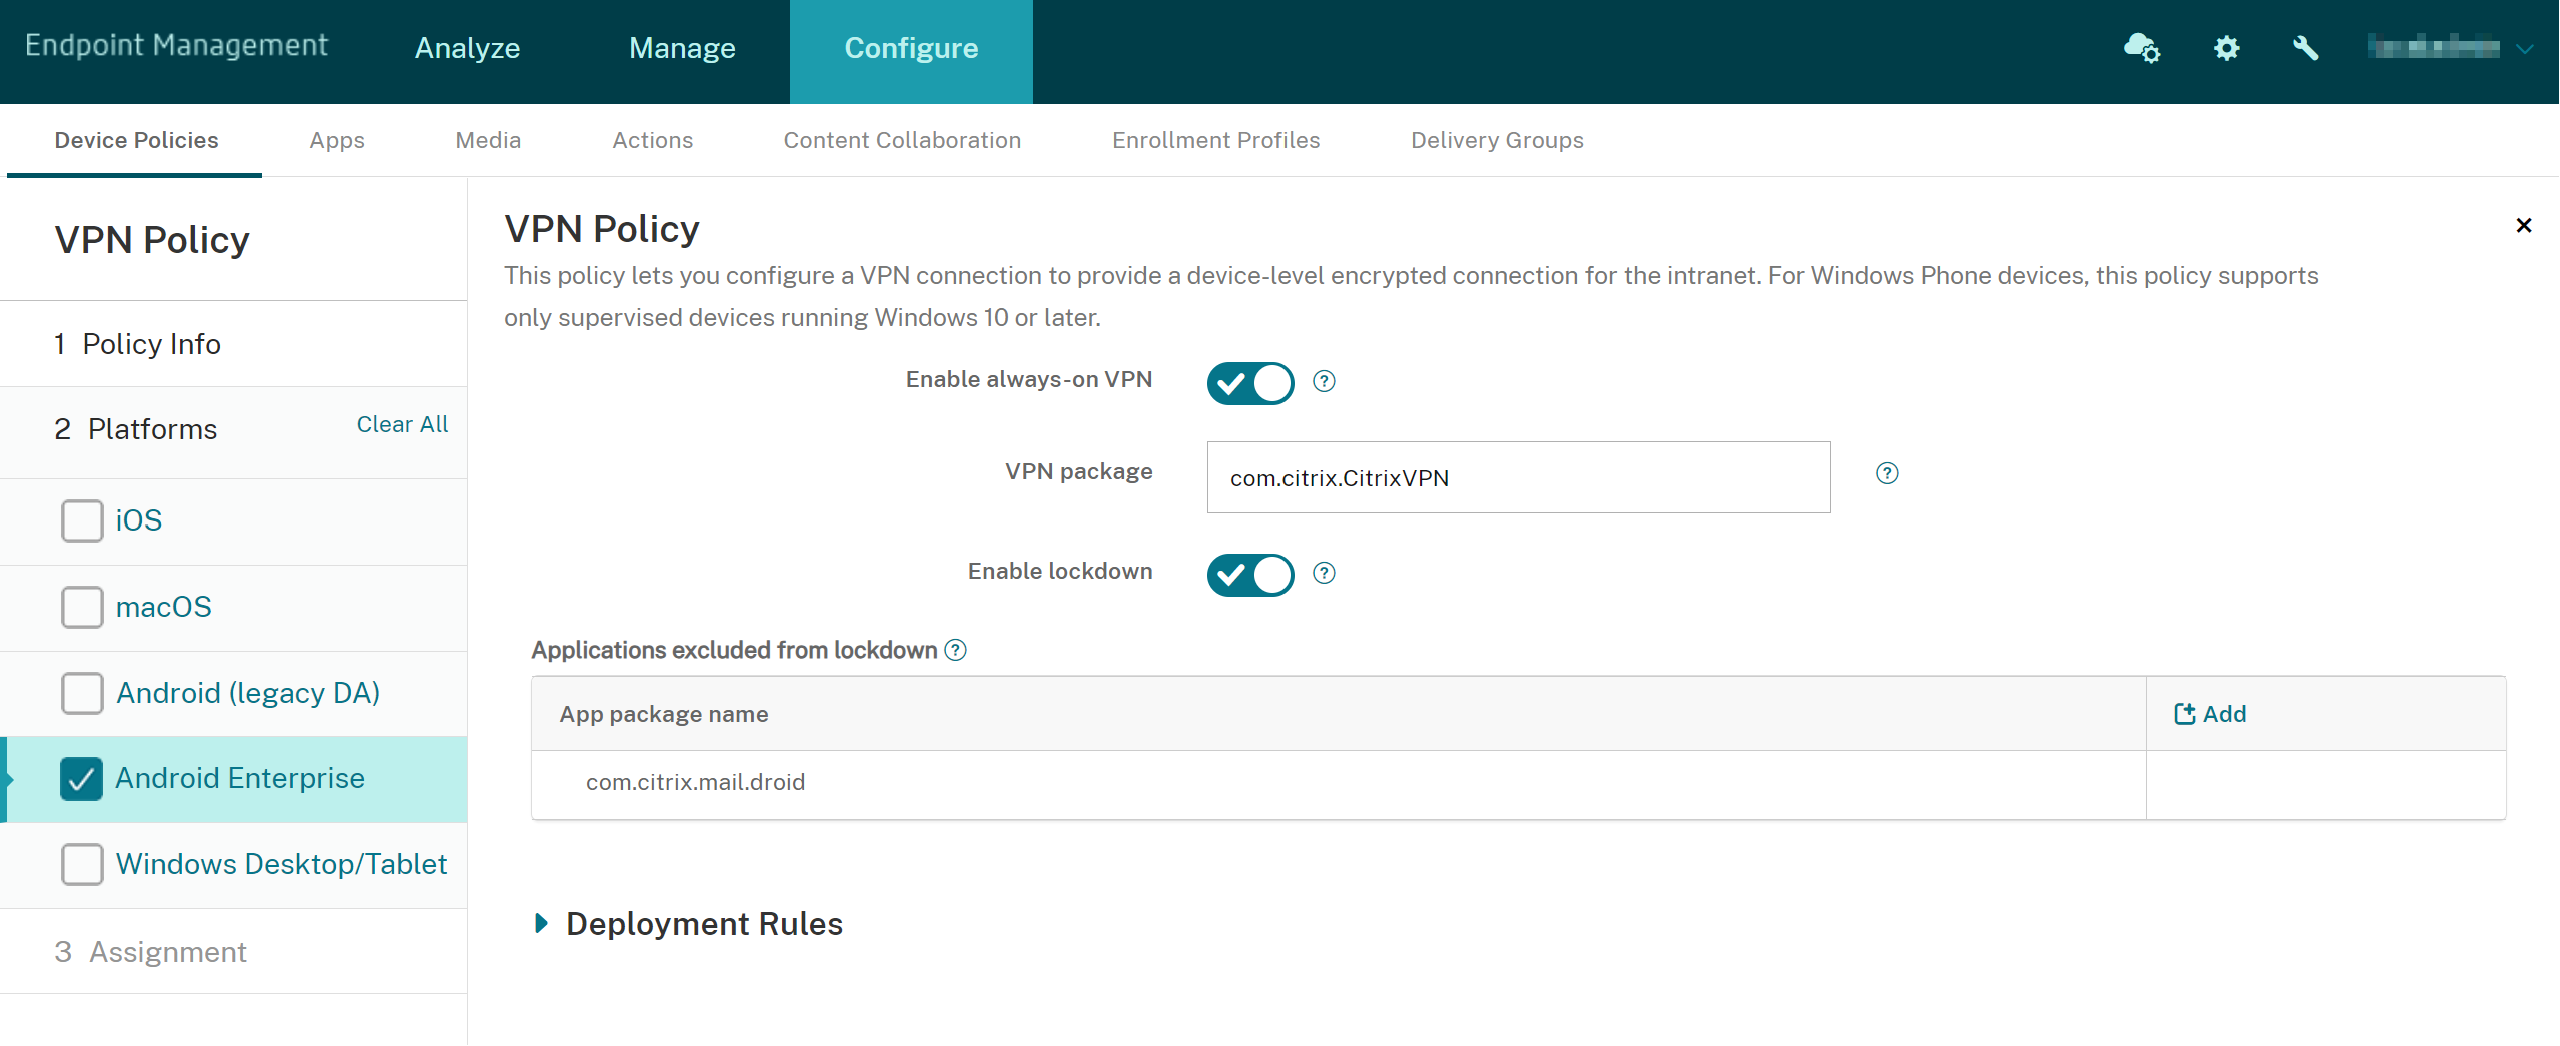
- Enable always-on VPN: Select whether the VPN is always on. The default is Off. When enabled, the VPN connection stays on until the user manually disconnects.
- VPN package Type the package name for the VPN app devices use.
- Enable lockdown: If disabled, no app can access the network if a VPN connection doesn’t exist. If enabled, the apps you configure in the following settings can access the network, even if a VPN connection doesn’t exist. Available for Android 10 and later devices.
- Applications exluded from lockdown: Click Add to type the package names of the apps that you want to bypass the lockdown setting.
Windows Desktop/Tablet settings
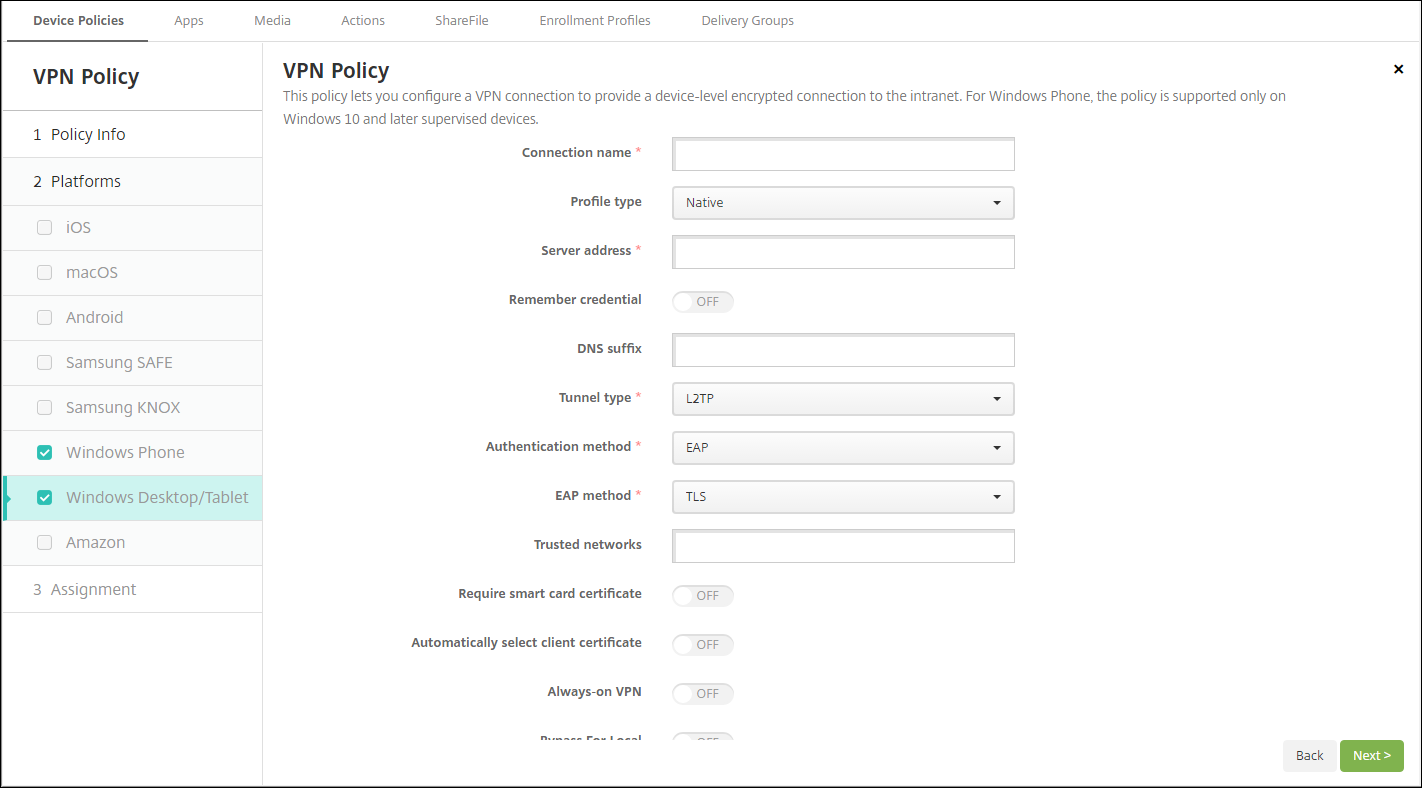
- Connection name: Enter a name for the connection. This field is required.
- Profile type: In the list, select either Native or Plugin. The default is Native.
-
Configure Native profile type: These settings apply to the VPN built into users’ Windows devices.
- Server address: Type the FQDN or IP address for the VPN server. This field is required.
- Remember credential: Select whether to cache the credential. The default is Off. When enabled, credentials are cached whenever possible.
- DNS Suffix: Type the DNS suffix.
-
Tunnel type: In the list, select the type of VPN tunnel to use. The default is L2TP. Possible options are:
- L2TP: Layer 2 Tunneling Protocol with pre-shared key authentication.
- PPTP: Point-to-Point Tunneling.
- IKEv2: Internet Key Exchange version 2.
-
Authentication method: In the list, select the authentication method to use. The default is EAP. Possible options are:
- EAP: Extended Authentication Protocol.
- MSChapV2: Use the Microsoft Challenge-Handshake Authentication Protocol for mutual authentication. This option isn’t available when you select IKEv2 for the tunnel type.
-
EAP method: In the list, select the EAP method to be used. The default is TLS. This field isn’t available when MSChapV2 authentication is enabled. Possible options are:
- TLS: Transport Layer Security
- PEAP: Protected Extensible Authentication Protocol
- Trusted networks: Type a list of networks separated by commas that do not require a VPN connection for access. For example, when users are on your company wireless network, they can access protected resources directly.
- Require smart card certificate: Select whether to require a smart card certificate. The default is Off.
- Automatically select client certificate: Select whether to automatically choose the client certificate to use for authentication. The default is Off. This option is unavailable when you enable Require smart card certificate.
- Always on VPN: Select whether the VPN is always on. The default is Off. When enabled, the VPN connection stays on until the user manually disconnects.
- Bypass For Local: Type the address and port number to allow local resources to bypass the proxy server.
-
Configure Plugin profile type: These settings apply to VPN plug-ins got from the Windows Store and installed on users’ devices.
- Server address: Type the FQDN or IP address for the VPN server. This field is required.
- Remember credential: Select whether to cache the credential. The default is Off. When enabled, credentials are cached whenever possible.
- DNS Suffix: Type the DNS suffix.
- Client app ID: Type the package family name for the VPN plug-in.
- Plugin Profile XML: Select the custom VPN plug-in profile to be used by clicking Browse and navigating to the file’s location. Contact the plug-in provider for format and details.
- Trusted networks: Type a list of networks separated by commas that do not require a VPN connection for access. For example, when users are on your company wireless network, they can access protected resources directly.
- Always on VPN: Select whether the VPN is always on. The default is Off. When enabled, the VPN connection stays on until the user manually disconnects.
- Bypass For Local: Type the address and port number to allow local resources to bypass the proxy server.
Amazon settings
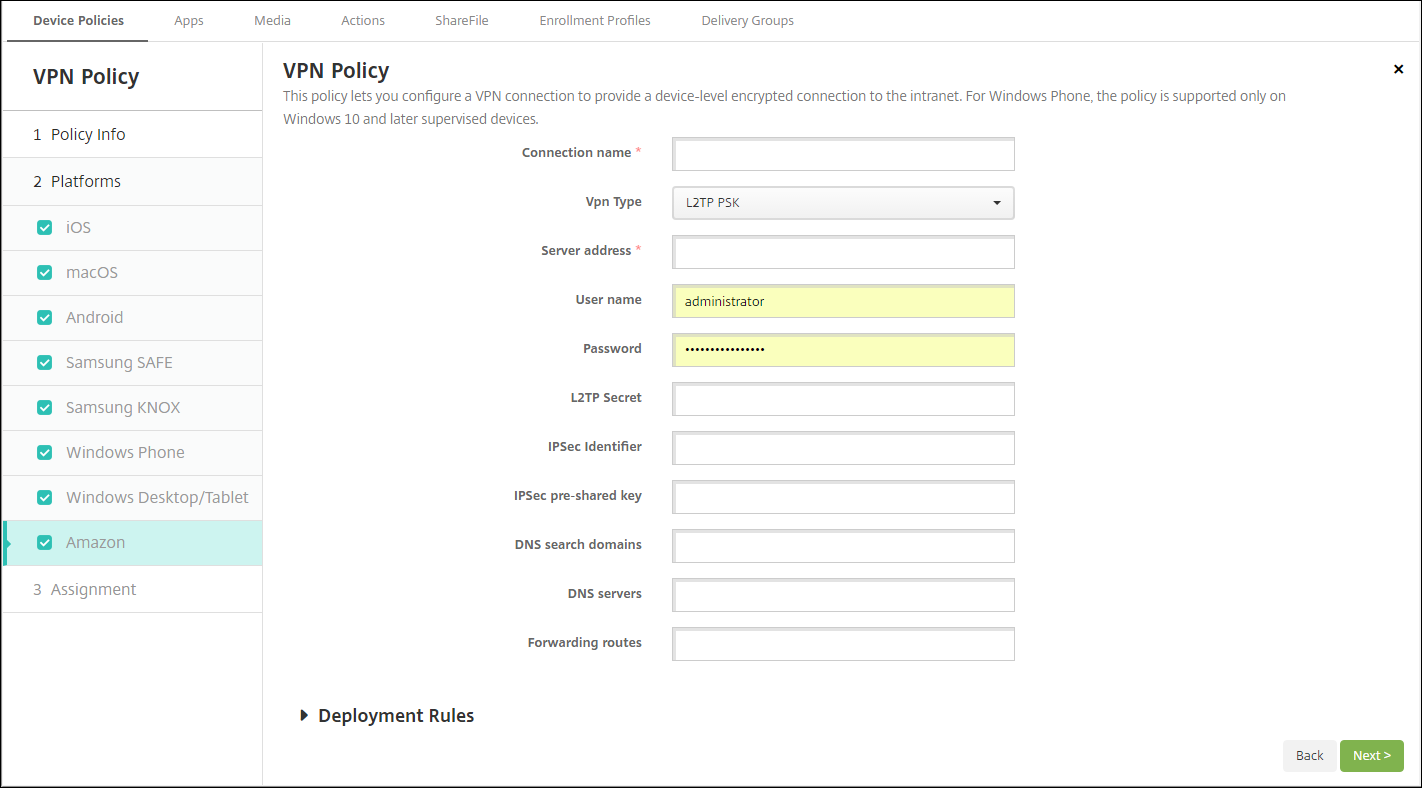
- Connection name: Enter a name for the connection.
-
VPN type: Select the connection type. Possible options are:
- L2TP PSK: Layer 2 Tunneling Protocol with pre-shared key authentication. This setting is the default.
- L2TP RSA: Layer 2 Tunneling Protocol with RSA authentication.
- IPSEC XAUTH PSK: Internet Protocol Security with pre-shared key and extended authentication.
- IPSEC HYBRID RSA: Internet Protocol Security with hybrid RSA authentication.
- PPTP: Point-to-Point Tunneling.
The following sections list the configuration options for each of the preceding connection types.
Configure L2TP PSK settings for Amazon
- Server address: Type the IP address for the VPN server.
- User name: Type an optional user name.
- Password: Type an optional password.
- L2TP Secret: Type the shared secret key.
- IPSec Identifier: Type the name of the VPN connection that users see on their devices when connecting.
- IPSec pre-shared key: Type the secret key.
- DNS search domains: Type the domains against which a user device’s search domain list can match.
- DNS servers: Type the IP addresses of DNS servers to be used for resolving the specified domains.
-
Forwarding routes: If your corporate VPN server supports forwarding routes, for each forwarding route to use, click Add and do the following:
- Forward route: Type the IP address for the forwarding route.
- Click Save to save the route or click Cancel to not save the route.
Configure L2TP RSA settings for Amazon
- Server address: Type the IP address for the VPN server.
- User name: Type an optional user name.
- Password: Type an optional password.
- L2TP Secret: Type the shared secret key.
- DNS search domains: Type the domains against which a user device’s search domain list can match.
- DNS servers: Type the IP addresses of DNS servers to be used for resolving the specified domains.
- Server certificate: In the list, select the server certificate to be used.
- CA certificate: In the list, select the CA certificate to be used.
- Identity credential: In the list, select the identity credential to be used.
-
Forwarding routes: If your corporate VPN server supports forwarding routes, for each forwarding route to use, click Add and do the following:
- Forward route: Type the IP address for the forwarding route.
- Click Save to save the route or click Cancel to not save the route.
Configure IPSEC XAUTH PSK settings for Amazon
- Server address: Type the IP address for the VPN server.
- User name: Type an optional user name.
- Password: Type an optional password.
- IPSec Identifier: Type the name of the VPN connection that users see on their devices when connecting.
- IPSec pre-shared key: Type the shared secret key.
- DNS search domains: Type the domains against which a user device’s search domain list can match.
- DNS servers: Type the IP addresses of DNS servers to be used for resolving the specified domains.
-
Forwarding routes: If your corporate VPN server supports forwarding routes, for each forwarding route to use, click Add and do the following:
- Forward route: Type the IP address for the forwarding route.
- Click Save to save the route or click Cancel to not save the route.
Configure IPSEC AUTH RSA settings for Amazon
- Server address: Type the IP address for the VPN server.
- User name: Type an optional user name.
- Password: Type an optional password.
- DNS search domains: Type the domains against which a user device’s search domain list can match.
- DNS servers: Type the IP addresses of DNS servers to be used for resolving the specified domains.
- Server certificate: In the list, select the server certificate to be used.
- CA certificate: In the list, select the CA certificate to be used.
- Identity credential: In the list, select the identity credential to be used.
-
Forwarding routes: If your corporate VPN server supports forwarding routes, for each forwarding route to use, click Add and do the following:
- Forward route: Type the IP address for the forwarding route.
- Click Save to save the route or click Cancel to not save the route.
Configure IPSEC HYBRID RSA settings for Amazon
- Server address: Type the IP address for the VPN server.
- User name: Type an optional user name.
- Password: Type an optional password.
- DNS search domains: Type the domains against which a user device’s search domain list can match.
- DNS servers: Type the IP addresses of DNS servers to be used for resolving the specified domains.
- Server certificate: In the list, select the server certificate to be used.
- CA certificate: In the list, select the CA certificate to be used.
-
Forwarding routes: If your corporate VPN server supports forwarding routes, for each forwarding route to use, click Add and do the following:
- Forward route: Type the IP address for the forwarding route.
- Click Save to save the route or click Cancel to not save the route.
Configure PPTP settings for Amazon
- Server address: Type the IP address for the VPN server.
- User name: Type an optional user name.
- Password: Type an optional password.
- DNS search domains: Type the domains against which a user device’s search domain list can match.
- DNS servers: Type the IP addresses of DNS servers to be used for resolving the specified domains.
- PPP encryption (MPPE): Select whether to enable data encryption with Microsoft Point-to-Point Encryption (MPPE). The default is Off.
-
Forwarding routes: If your corporate VPN server supports forwarding routes, for each forwarding route to use, click Add and do the following:
- Forward route: Type the IP address for the forwarding route.
- Click Save to save the route or click Cancel to not save the route.