Applications import tool - Preview
The Secure Private Access admin console includes a file import tool that allows administrators to bulk import multiple applications into the system using a CSV file or the nsconfig file. This tool is especially useful for organizations shifting from a traditional VPN to a more advanced solution like Secure Private Access. For example, organizations can use this tool to migrate applications that were delivered over a VPN to Secure Private Access and shift to a ZTNA-based architecture. Bulk upload of apps enables the organizations to eliminate the need for manual configuration.
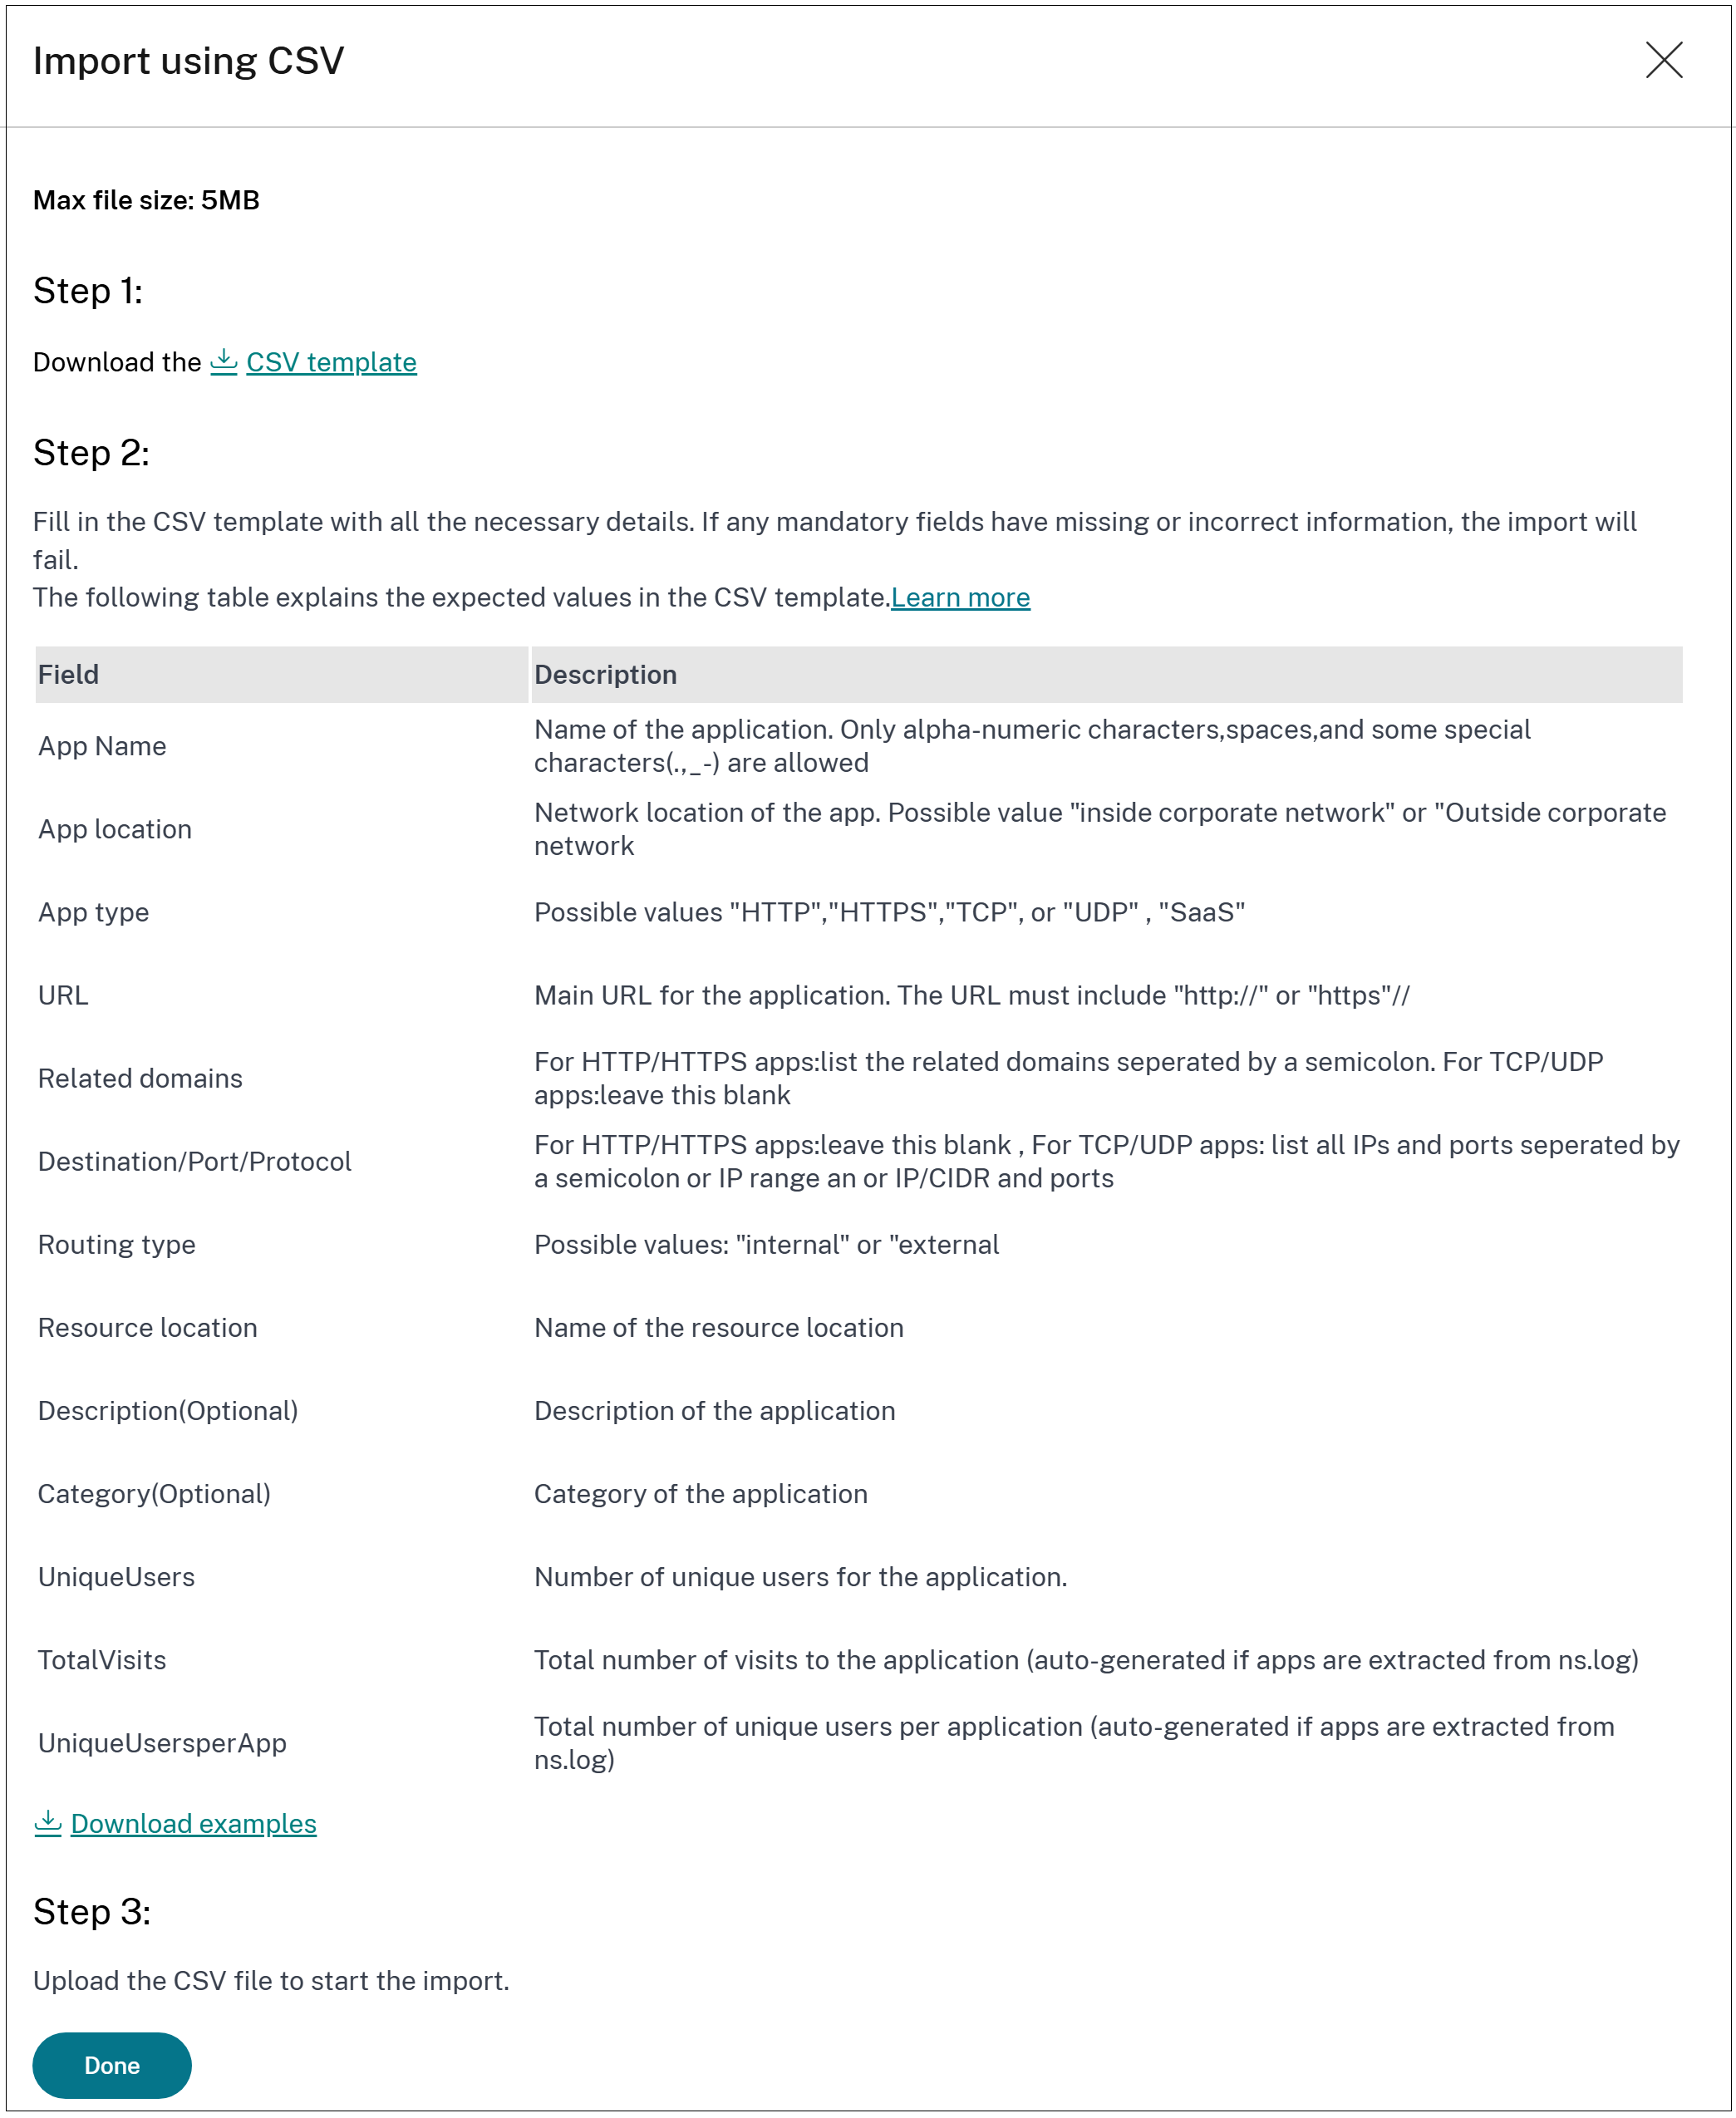
- CSV file: You must ensure that all relevant application details are included within the CSV. These details include the application name, routing type, resource location, and any other necessary configuration parameters.
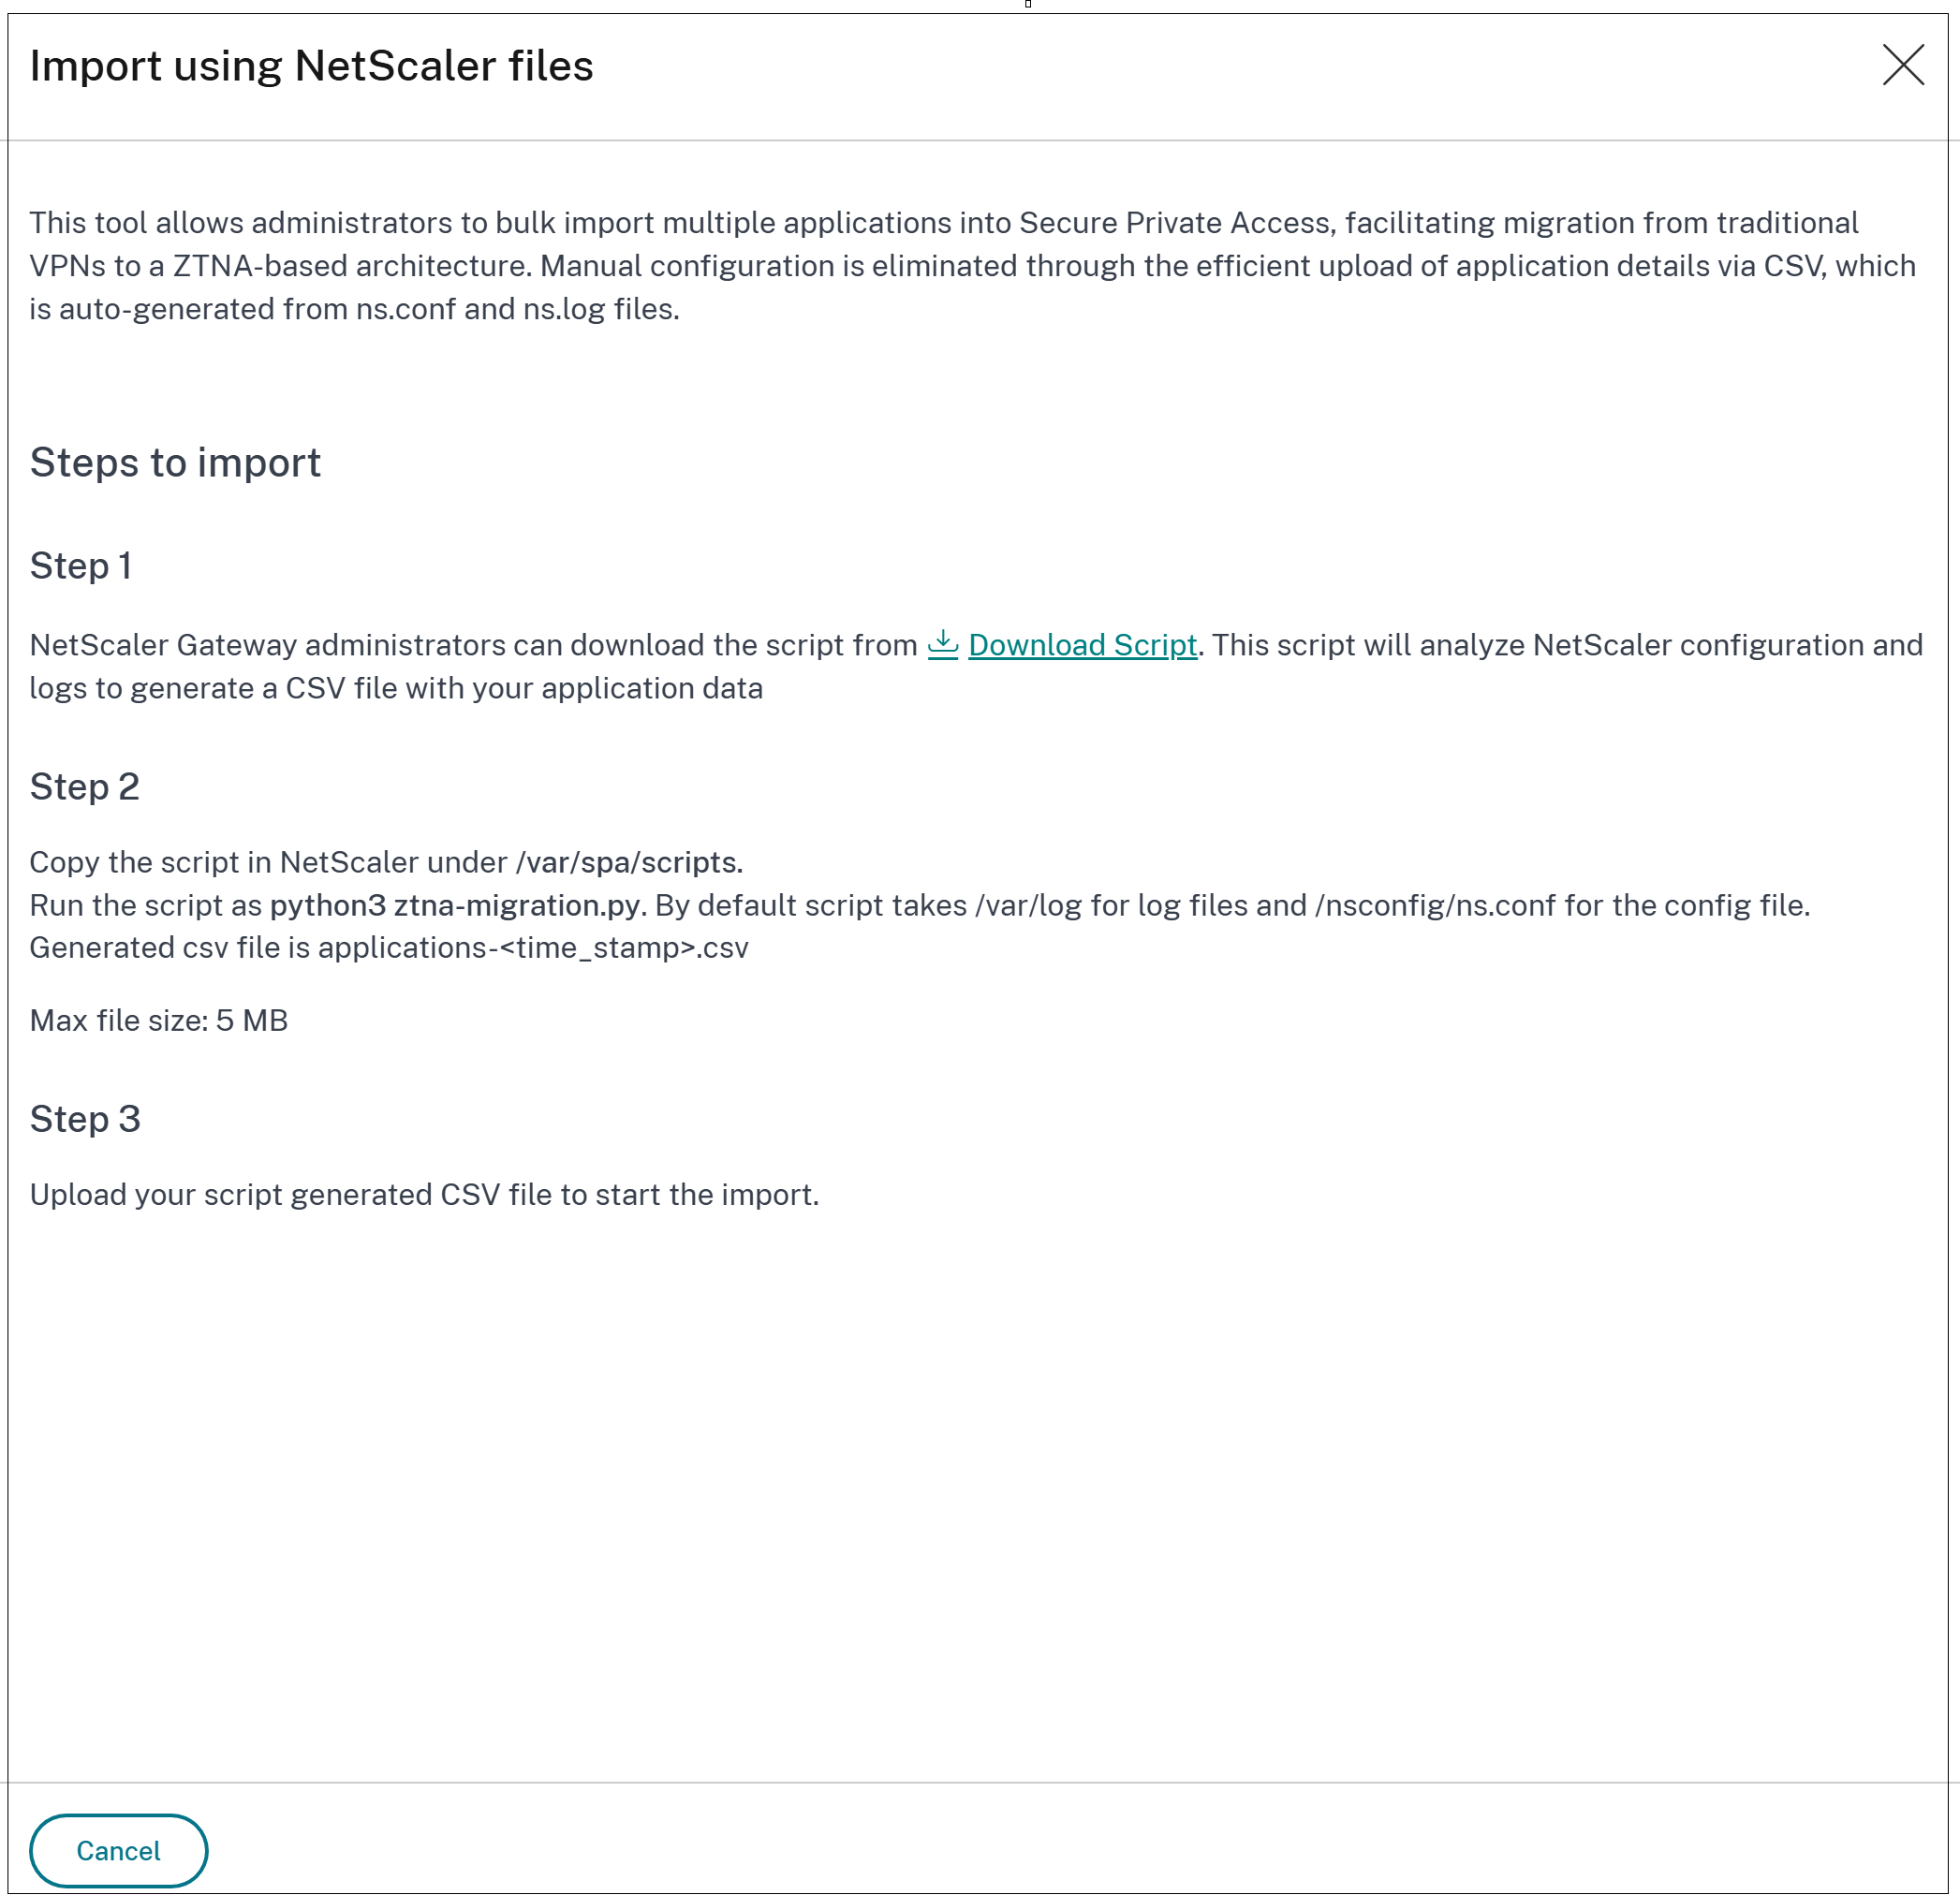
- NetScaler files: You can also import applications by using a pre-generated CSV file. This CSV file is created by a script that parses and extracts relevant application configuration from the ns.conf and ns.log files. The script-generated CSV enables efficient and accurate import of application configurations into the Citrix Secure Private Access console.
How the import works
Here are the high-level steps that an admin must perform when using the CSV-based applications import tool:
-
Prepare the CSV file: If you are manually adding the apps, populate the application details in the CSV file. For details, see Preparing the CSV file.
- Import the CSV file: Import the completed CSV file into the Secure Private Access console.
- Review the app details: Review and validate the imported application data.
- Update the routing and resource location: Review and update the routing type and resource location details, if required. Ensure that at least one connector is up in the specified resource location.
- View the applications in the Applications page: View the imported applications in the Applications page. Check if all the applications that you selected for import are imported successfully.
This structured process ensures a thorough migration and proper configuration of applications for secure and seamless access within the Secure Private Access environment.
Preparing the CSV file
Download the CSV file from the Secure Private Access console and add the application details.
- Navigate to Applications > App Configuration.
- Click Import Applications.
-
In Learn how to import using CSV and NetScaler files, click CSV or NetScaler.
The Import using CSV or the Import using NetScaler files page appears accordingly.
- CSV - Download the CSV file (CSV template) and populate the app details. The page also displays sample information on the app data that must be entered.
-
NetScaler
- Download and save the Python script to the designated folder (/var/spa/scripts) in NetScaler.
- Run the script as
python3 ztna-migration.pyto generate a CSV file from the ns.conf and ns.log files. - Once the CSV file is generated, upload it for import.
Note:
When importing a large number of applications from a CSV file, process them in batches of 50. After uploading the CSV, select the first 50 applications and complete the import, then select the next 50 and repeat until all applications are imported.
Click Download examples to view a sample CSV file with the data.
Guidelines for importing applications using the CSV file:
Guidelines for importing applications using NetScaler files:
Values to be entered in the CSV file
The following table provides guidelines on the values to be entered for each column in the CSV file when manually creating the applications:
| Column name | Value |
|---|---|
| App Location
|
Inside Corporate Network (for internal web apps, TCP, UDP apps) |
| Outside Corporate Network (for SaaS apps) | |
| App Type
|
Must be one of the following values. |
| HTTP/HTTPS | |
| TCP/UDP | |
| URL | Applicable only for HTTP/HTTPS apps. The URL of the application. The URL must include “http://” or “https:”// |
| Related Domains
|
Applicable only for HTTP/HTTPS apps. You can add multiple related domains separated by a comma (,). |
| For TCP/UDP apps, leave this field blank. | |
| DestinationPortProtocol
|
Applicable only For TCP/UDP apps. You must list all IP addresses, IP address range, or IP/CIDR and ports separated by a colon(:). |
| For HTTP/HTTPS apps, leave this field blank. | |
| The destination, port, and protocol must be formatted as follows when entering the data manually. | |
| Destination:Port:Protocol. Example: 192.0.2.254:5050:PROTOCOL_TCP. | |
| If there are multiple destinations in the TCP/UDP application, multiple destination entries are separate each with a comma (for example, X.X.X.X:5050:PROTOCOL_TCP,X.X.X.X:1-65535:PROTOCOL_UDP) | |
| The destination can be an IP address, IP address range, CIDR, host name, domain, or FQDN. The port can be a single port (example 5050) or a port range (example 1–65335). | |
| Routing Type (cloud environment)
|
Based on the app type, select one of the following values. |
| Internal – Bypass Proxy - The domain traffic is routed through Citrix Cloud Connector™, bypassing the customer’s web proxy configured on the Connector Appliance. | |
| Internal via Connector - The apps can be external or internal but the traffic must flow through the Connector Appliance. | |
| External – The traffic flows directly to the internet. | |
| Routing Type (hybrid environment) | Internal or External. |
| Primary Resource Location
|
The name of the primary resource location where the application resides. |
| Note: Not applicable for hybrid environments. | |
| Secondary Resource Location (optional)
|
The name of the secondary resource location where the application resides. The secondary resource location is applicable only if the primary resource location is explicitly specified. |
| Note: Not applicable for hybrid environments. | |
| Description | (Optional) Application description. |
| Category | (Optional) Application category. |
| UniqueUsers
|
Number of unique users for the application. |
| This value is autogenerated if the apps are extracted from ns.log files. | |
| If you are updating the CSV file manually, leave it blank. | |
| TotalVisits
|
Total number of times the application has been accessed. |
| This value is autogenerated if the apps are extracted from ns.log files. | |
| If you are updating the CSV file manually, leave it blank. | |
| UniqueUsersperApp
|
Total number of unique users accessing the application. |
| This value is autogenerated if the apps are extracted from ns.log files. | |
| If you are updating the CSV file manually, leave it blank. |
Steps to migrate applications using the CSV-based tool
You can import applications while setting up Secure Private Access or after the setup is complete.
- On the Secure Private Access service tile, click Manage.
- In the Overview page, click Continue.
- Set up identity and authentication for the users to log in to Citrix Workspace. For details, see Setup identity and authentication.
-
In Step2: Applications page, click Import application.
Alternatively, if your Secure Private Access is already set up, click Import the application from the Applications page (Secure Private Access > Applications).
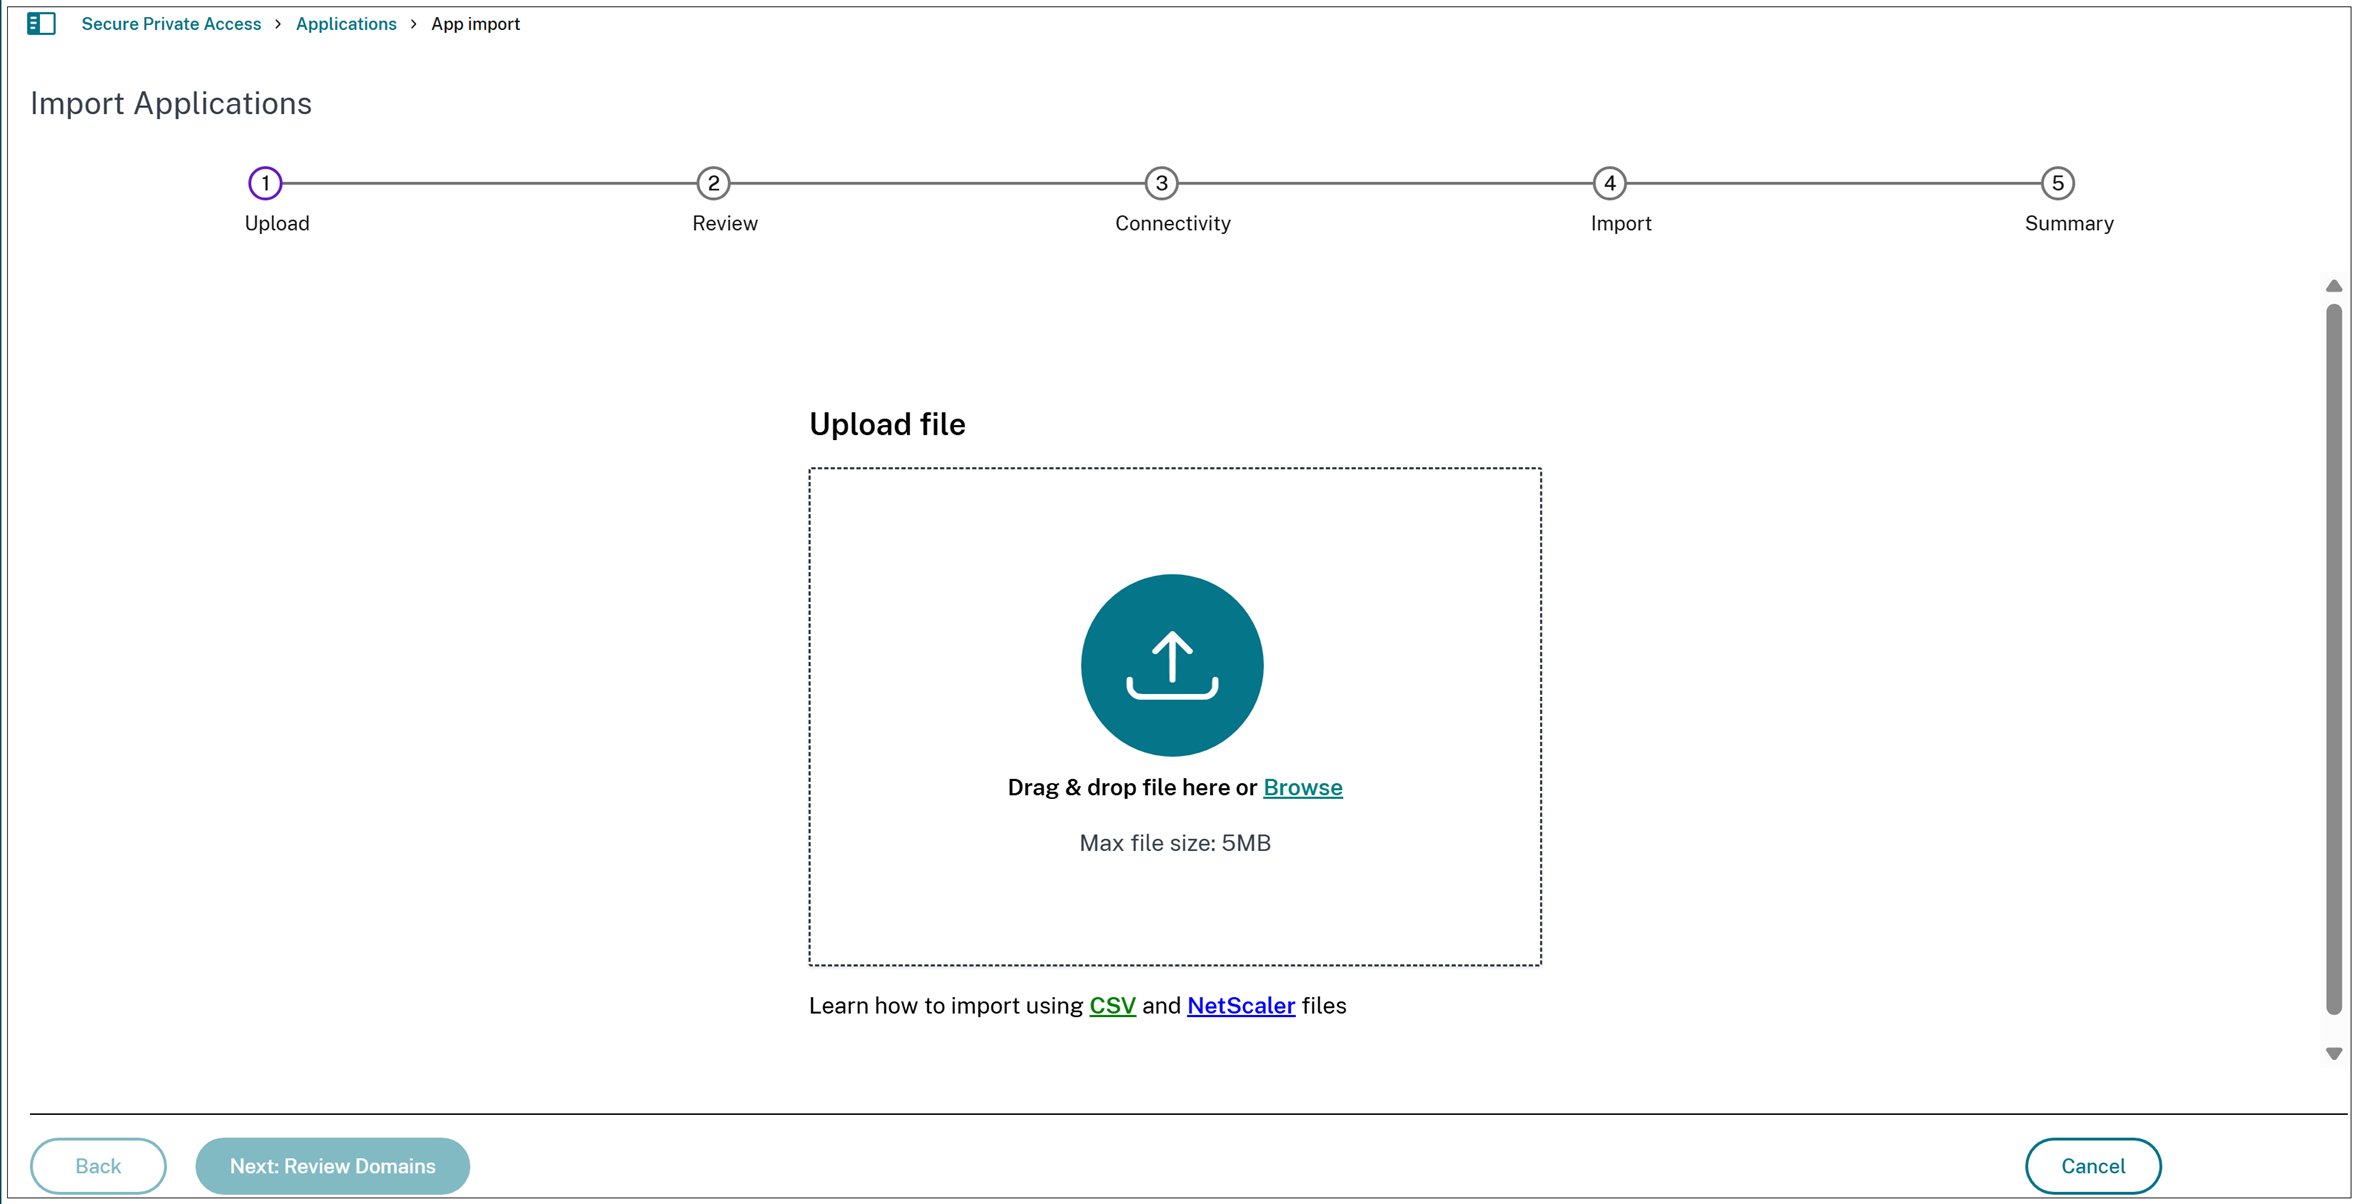
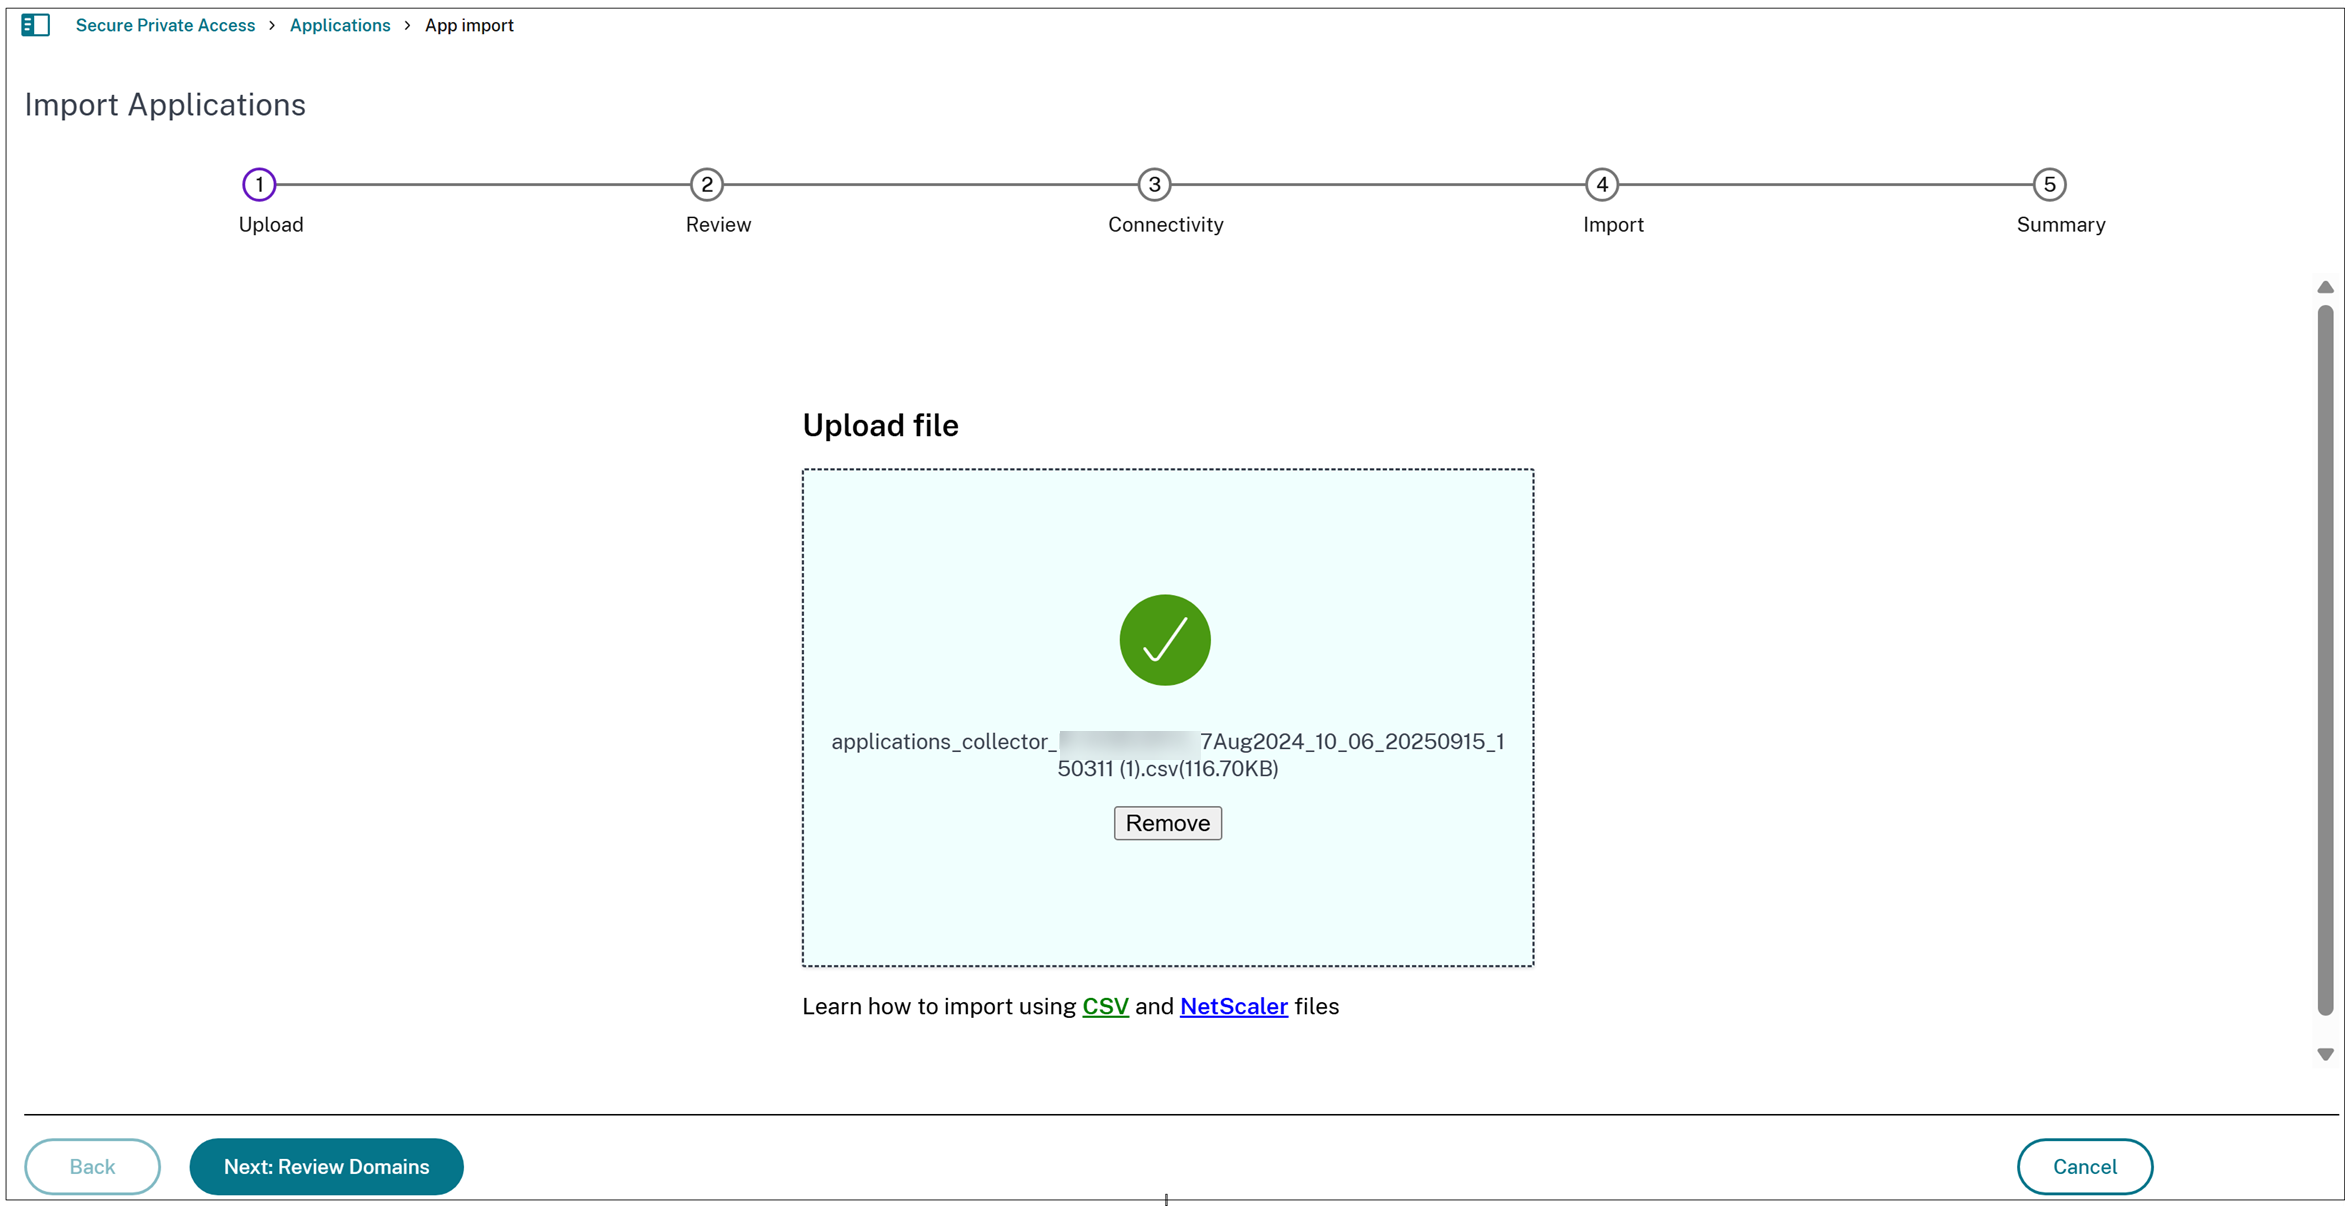
- Upload the CSV file. You can either drag the CSV file here or browse to select it.
-
Click Next: Review Domains.
Note:
- The Next: Review Domains button is enabled only if the file contains no errors.
- If you upload the same CSV/nsconfig file with additional applications, only the diff is imported.
-
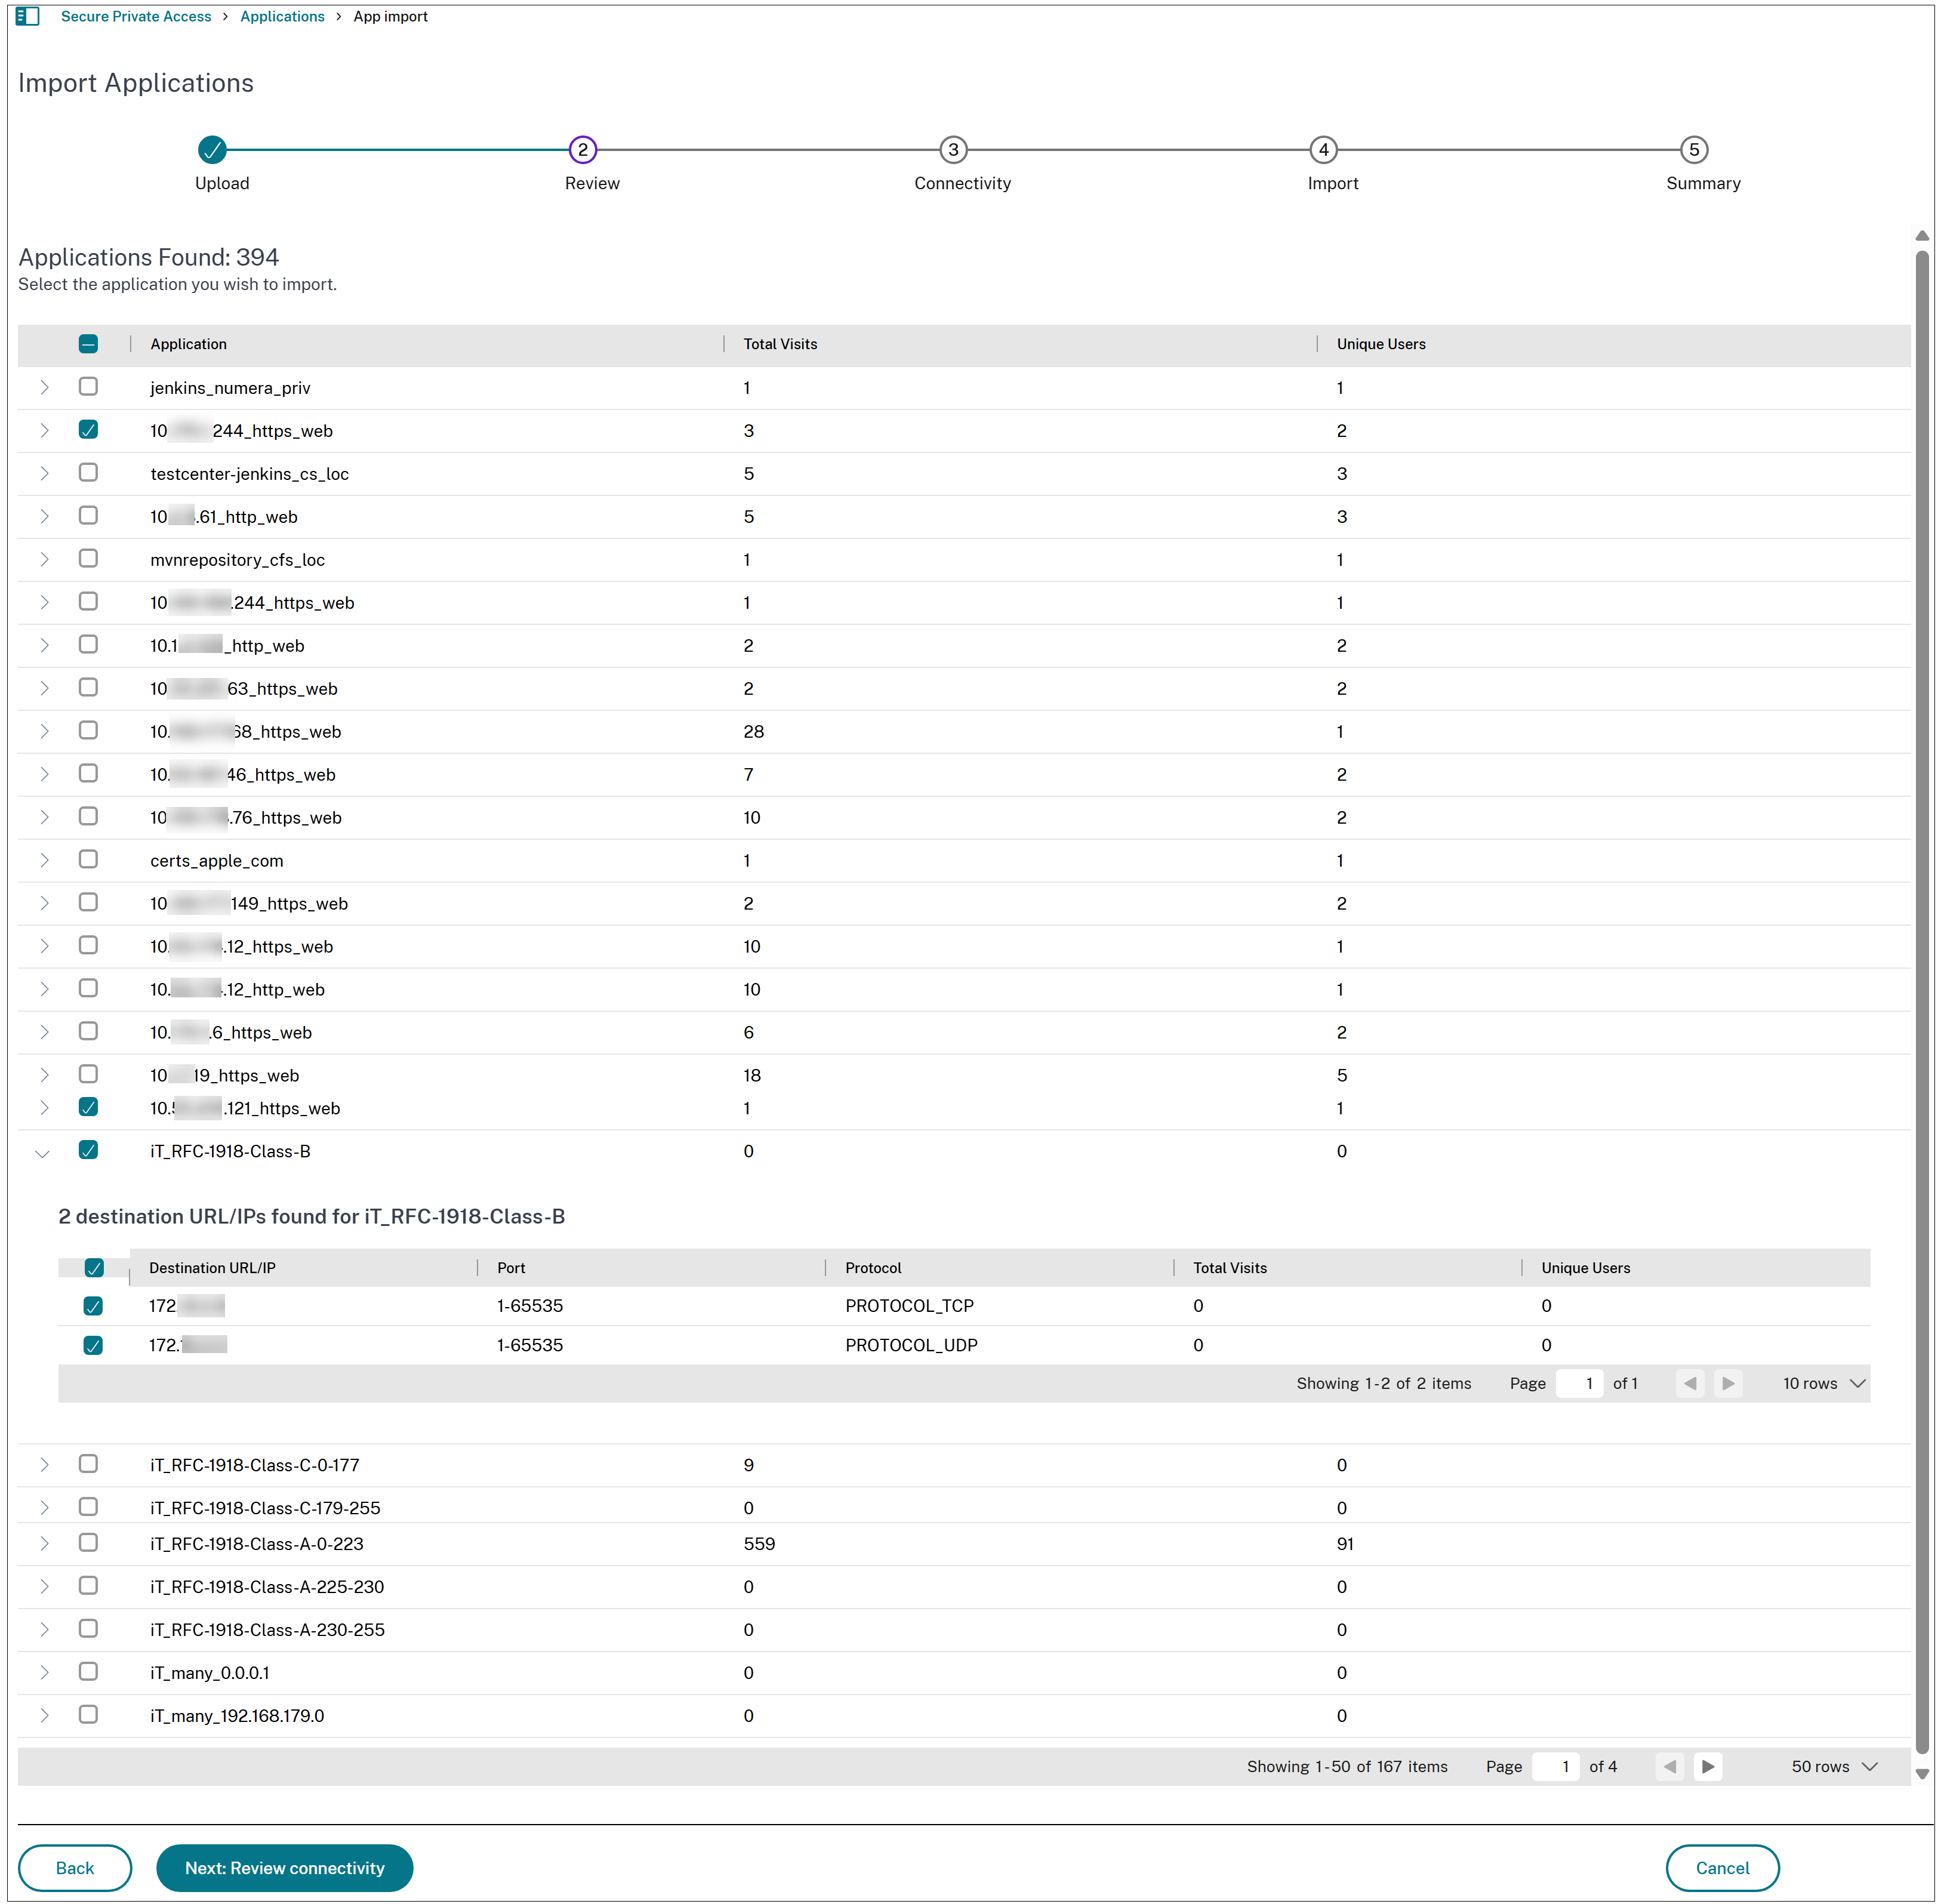
Select the applications that you want to import.
Note:
- If an application with the same domain or wildcard domain already exists, that application is disabled for import. You cannot select those applications.
- The expand icon in line with each application displays additional details regarding the app.
- For SaaS/Web and TCP/UDP applications, the Import Applications page displays the total application visits and the count of unique users (distinct users who accessed the application). Use the expand icon to view the application’s port and protocol details.
- Manually uploaded SaaS apps (outside the corporate network) via CSV are marked as unpublished and do not appear in the Import Applications UI, despite a successful upload. Therefore, to create a SaaS application by manually adding the entry in the CSV file, you must set App Location to Outside Corporate Network and App Type to HTTP/HTTPS.
- For TCP/UDP applications, the tool lists all associated destination URLs and IP addresses. By default, selecting the application automatically selects its related URLs and IP addresses for import. You cannot deselect individual destinations.
- Click Next: Review Connectivity.
- The Next: Review Connectivity button is enabled only if at least one application is selected.
-
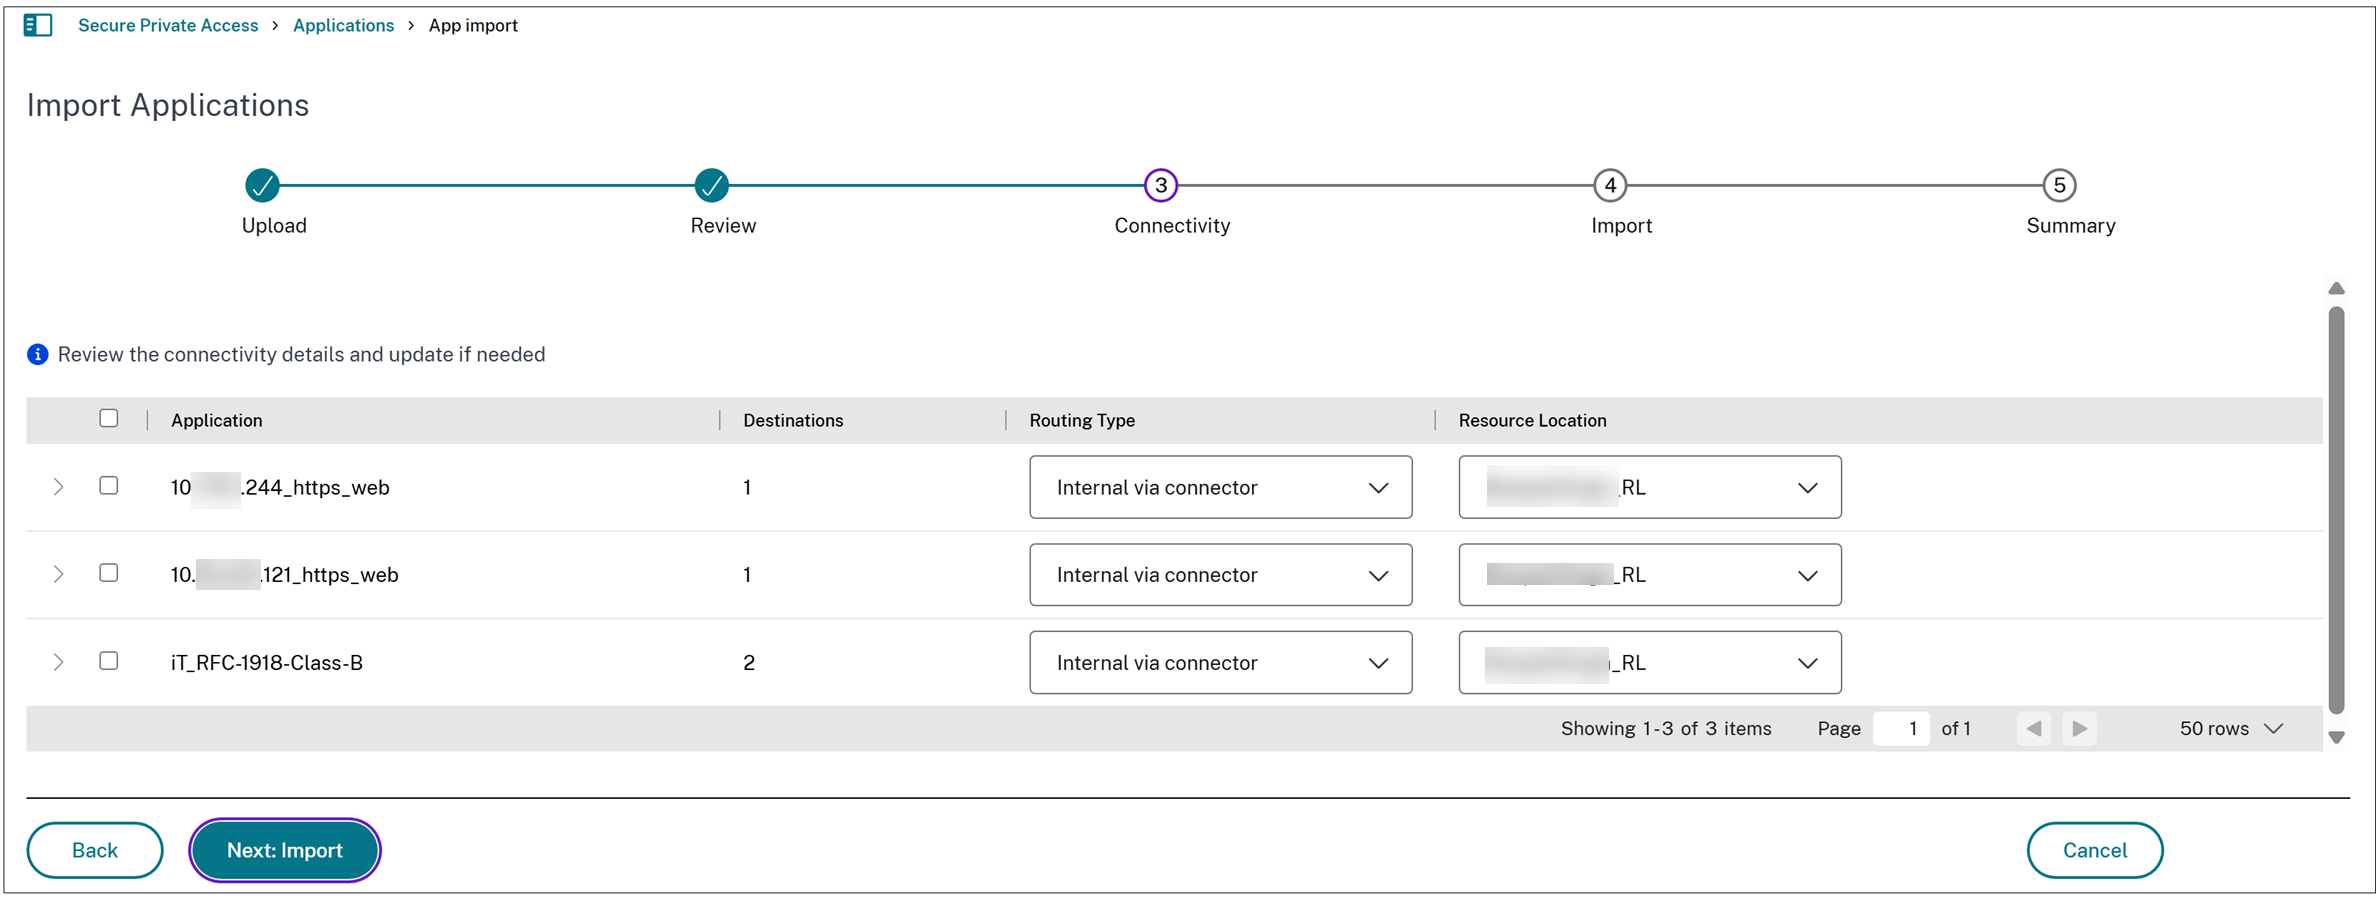
Review and update the connectivity settings. Make necessary changes to routing type and resource locations, if required and then click Done..
Note:
- If the specified resource location does not exist, the first resource location available in the list of resource locations associated with the customer is selected by default. if the Connector Appliance in the specified resource location is not up, the application creation fails.
-
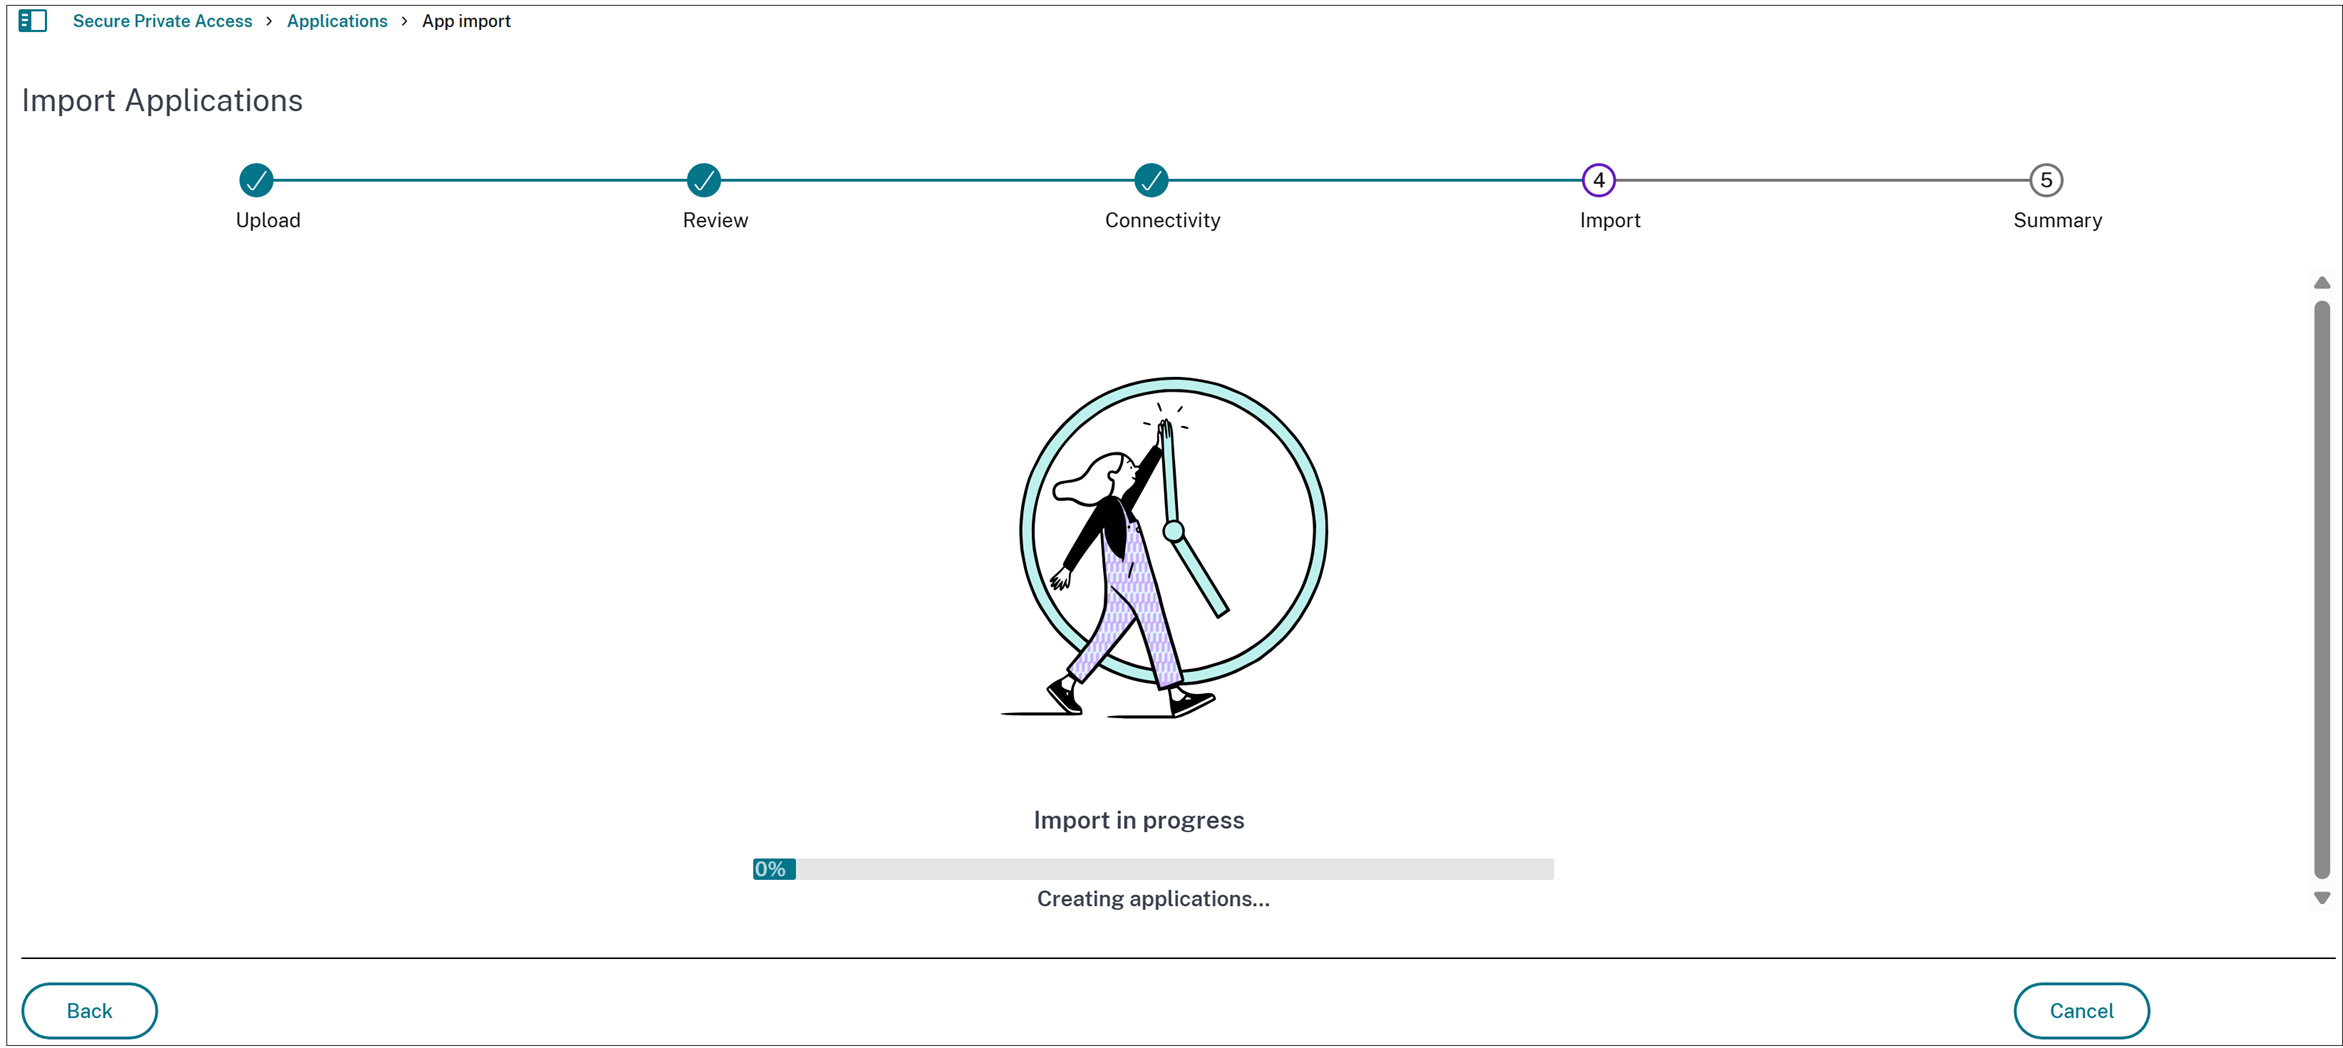
Click: Next: Import.
Note:
- The Import Applications page displays the imported application details. These applications are also added to the list of applications in the Applications page.
- For any failed application imports, the reason for failure is displayed in the Reason column. Use this information to correct the CSV file and re-import those applications.
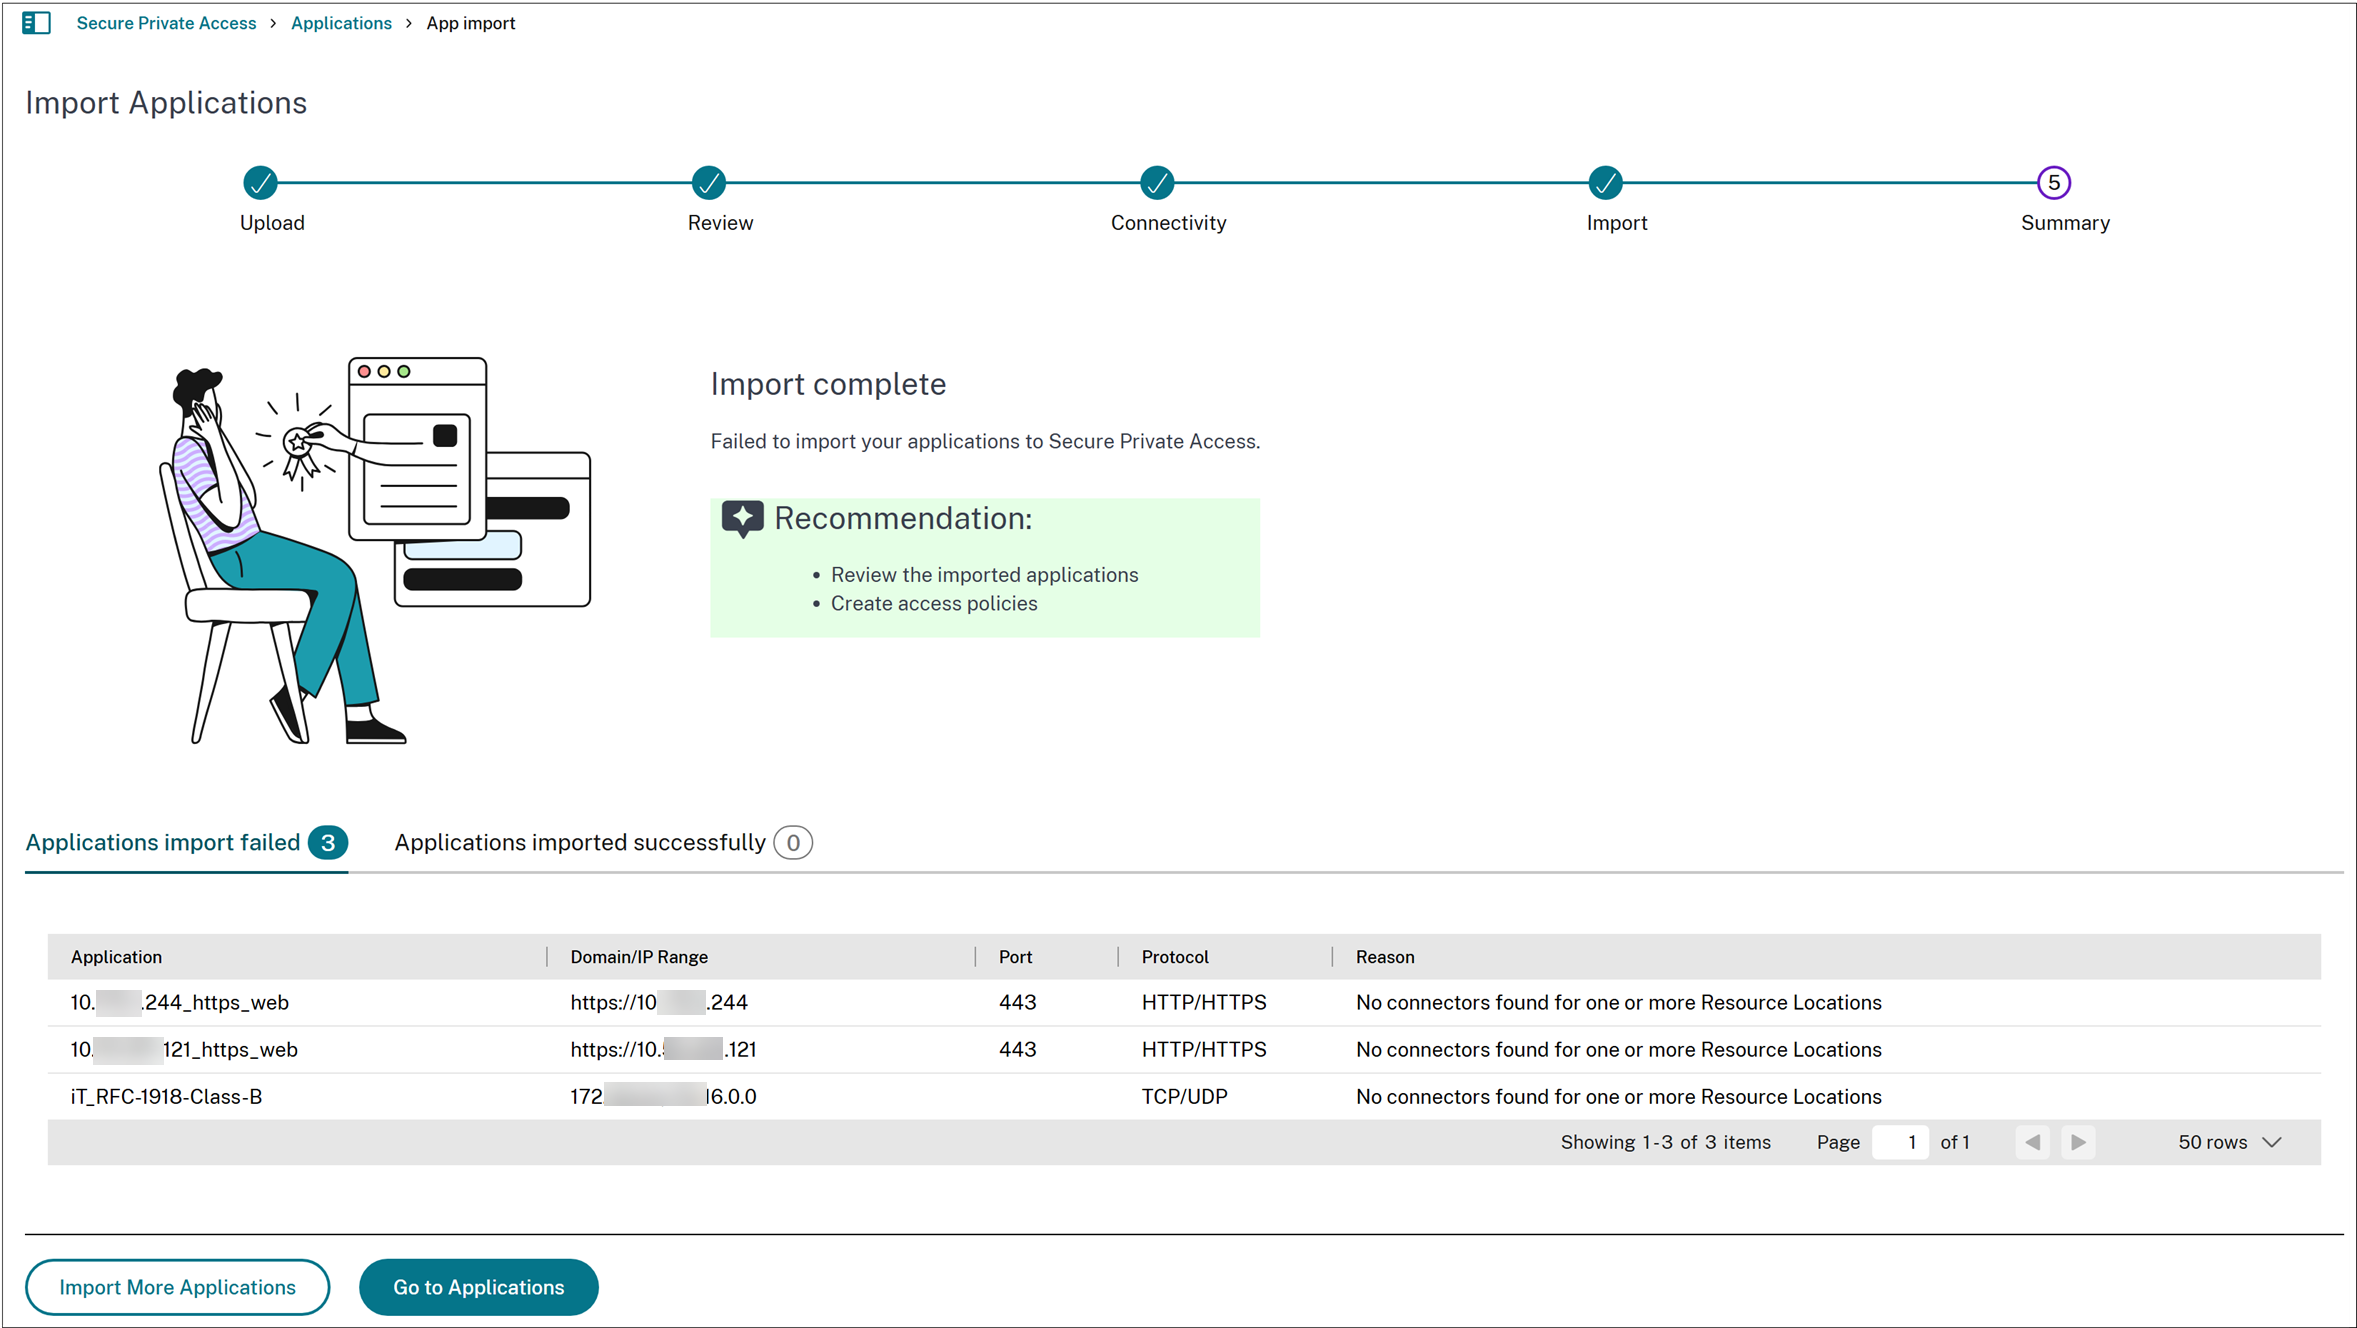
- Click Go to Applications to view the imported applications in the Applications page.
Failures to import or create applications when using the CSV file
The following issues can cause import or application creation failures when using the CSV file:
- Modifications or changes to the column names or their casing.
- Deletion or swapping of the columns in the CSV file.
- Missing mandatory application fields in the CSV file.
- An empty CSV file or a CSV file that contains only column names is imported. For an empty file, an error message appears. If the file contains only column names, the Next button remains disabled.
- No Connector Appliance is available in the resource location specified in the CSV file.
- A secondary resource location is specified while the primary resource location is missing or empty. The import fails with a validation error indicating that the primary resource location is required.
References
Refer to the following topics for information on creating applications in Secure Private Access.