Citrix Enterprise Browser to Chrome Enterprise Premium migration
The transition from Citrix Enterprise Browser (CEB) to Citrix Enterprise Premium (CEP) marks a significant step forward in Citrix’s Secure Private Access evolution to provide secure, adaptive, and high-performance Zero Trust Network Access (ZTNA) to all applications. This topic provides contains detailed information for IT administrators and Citrix professionals to plan and execute a successful gradual migration, ensuring minimal disruption and optimal user experience.
This phased migration approach allows organizations to maintain business continuity during the transition period by running both browser solutions in parallel. With the phased migration, customers can validate compatibility of existing applications and workflows with Chrome Enterprise Premium.
The following key steps are involved in the CEB to CEP migration:
- Configure Chrome Enterprise Premium
- Domain mapping for user groups without email addresses
- Secure Private Access configuration parser for CEP compatibility analysis
- Configuration changes prior to full migration to CEP
- Rollout CEP to the organization (full migration)
Configure Chrome Enterprise Premium
For existing Secure Private Access customers, the migration wizard in the Secure Private Access console facilitates CEP provisioning, extension installation for users, and a path for gradual application and user migration.
-
In the Secure Private Access admin console, navigate to Chrome Enterprise Premium > Configuration.
You can view the Google integration details.

-
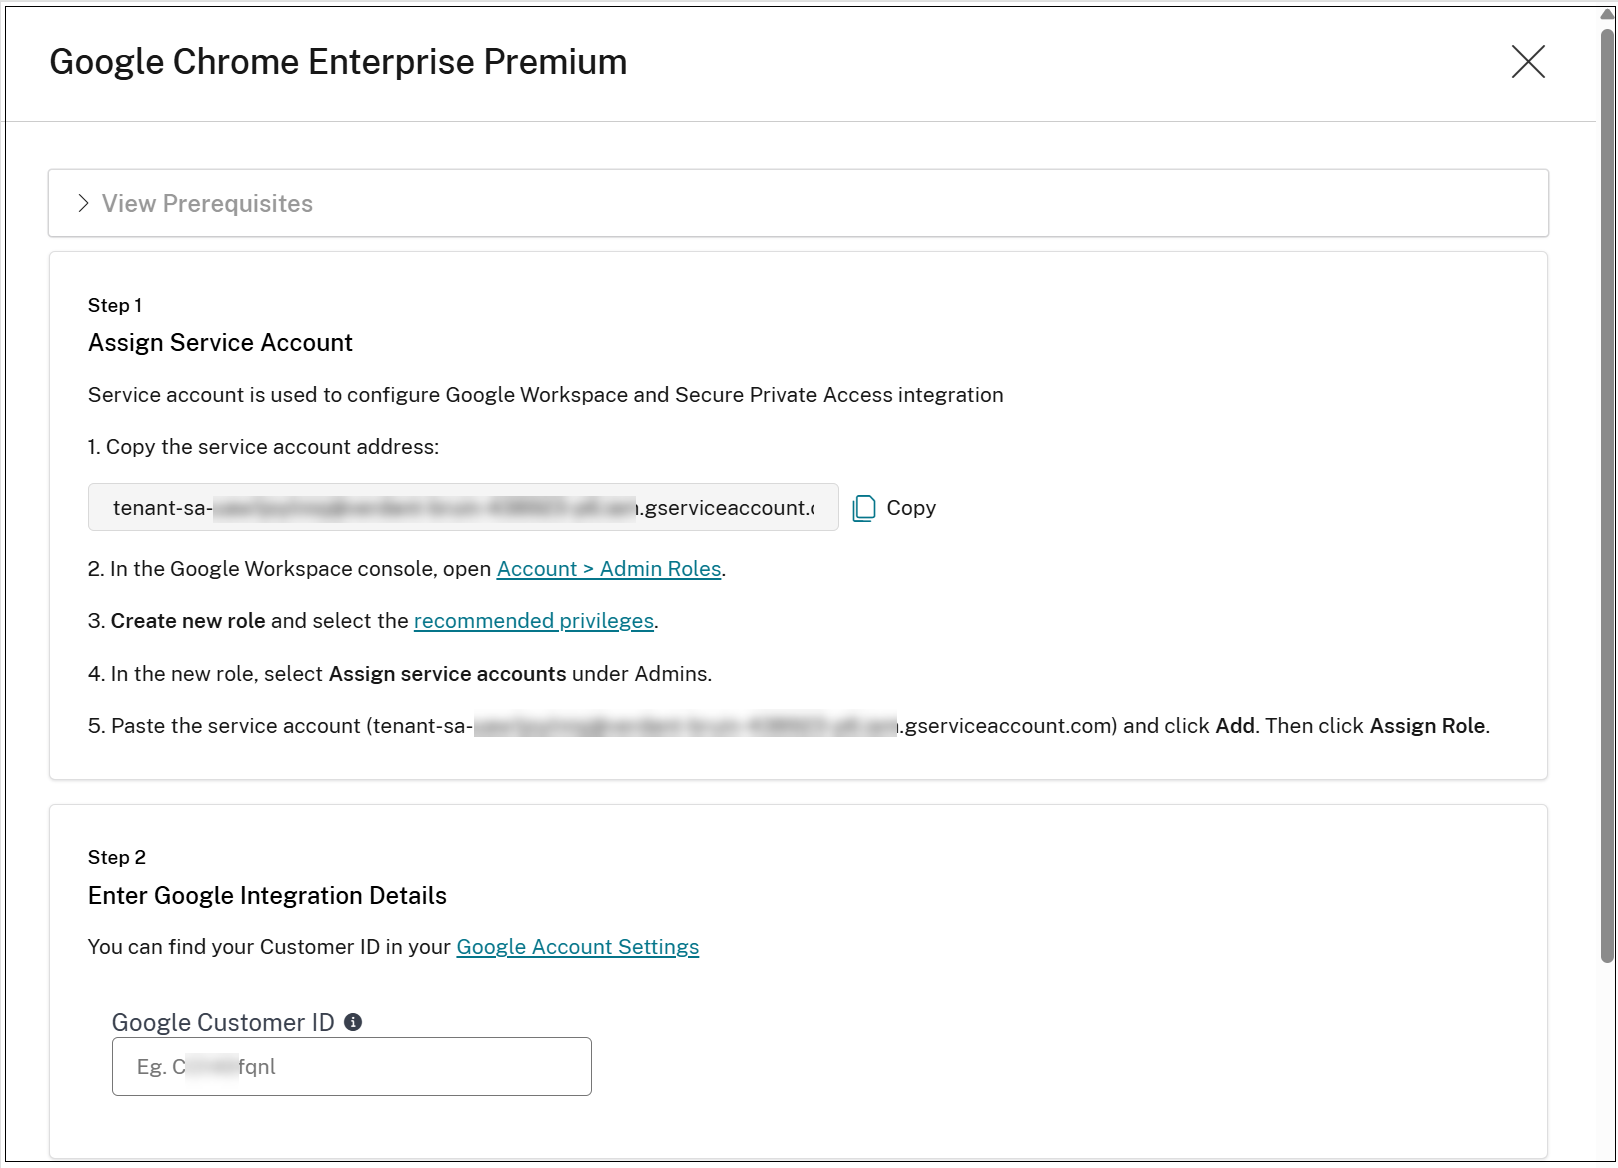
Click Set up Google CEP.
-
Assign Citrix service account details within the Google WorkSecure Private Access console. For details, see Setup Google Chrome integration.
-
Click Save and close.
The Chrome Enterprise Premium provisioning begins.
Policy enrichment for user groups without email
Once the Chrome Enterprise Premium provisioning is successfully completed, a policy update process is automatically triggered for the access policies and session policies.
This update process does the following:
- Review the existing policies (access and session).
- Check for users and user groups without emails in their rules.
- Query the CC Directory service to retrieve their emails, and add them to the policies.
For details, see Domain mapping for user groups without email addresses.
Secure Private Access configuration parser for CEP compatibility analysis
The following key policy elements are not directly supported in CEP:
-
Applications
- Single sign-on
-
Access policies
- Allow access with restrictions
- Mixed Allow/Deny actions (HTTP/HTTPS vs TCP/UDP)
- Workspace URL conditions
- Desktop/Mobile conditions
- User Risk Score conditions
-
Session policies
- Workspace URL conditions
- Desktop/Mobile conditions
- User Risk Score conditions
- Security Groups
- Web filtering
These incompatibilities must be resolved before migrating applications from CEB to CEP.
The incompatibility identification process is facilitated by the Secure Private Access configuration parser <parse_citrix_spa_configuration.py>. This tool analyzes the Citrix Secure Private Access configuration exports to identify compatibility issues such as the following during the migration to CEP.
- Applications incompatible with CEP
- Access policies incompatible with CEP
- Configured security groups
- Web filtering configuration
Note:
Security groups and web filtering are not supported in the Citrix Secure Private Access integration with CEP.
After the analysis, the tool provides different recommendations depending on whether the CEP rollout has been completed across the entire organization (migration of all applications).
How to use the tool
-
Download the script from: Python script to parse the secure private access configuration.
-
In the Secure Private Access admin console, navigate to Settings > Global Configuration > Create Report and export the existing Secure Private Access configuration into a JSON format.
-
Download the Python script and run the script using the exported report as input. You must have installed Python 3 to run this script.
# python3 parse_citrix_spa_configuration.py <path_to_spa_report>The script can be used either before or after the full migration, providing different recommendation actions.
Note:
The script does not provide recommendations for the incompatible session policies.
Sample report:
% python3 parse_citrix_spa_configuration.py CitrixSpaConfigurationDump.json

Has the CEP rollout to the entire organization been completed?

Enter yes/no (default: no): no

CEP INCOMPATIBLE APPLICATIONS (7 out of 185):

1. Application_1 ⚠️

   Reason: Has SSO configuration other than 'Don't use SSO'

2. Application_2 ⚠️

   Reason: Has SSO configuration other than 'Don't use SSO'

....

--------------------------------------------------

Mitigation guidance:

--------------------------------------------------

Has SSO configuration other than 'Don't use SSO':

  • Navigate to the application's SSO settings

  • Change the SSO setting to 'Don't use SSO'

==================================================

CEP INCOMPATIBLE POLICIES (15 out of 136):

1. Access_policy_1 ⚠️

   Reasons: Contains user(s)/group(s) without email

2. Access_policy_2 ⚠️

   Reasons: Mixed actions (HTTP/HTTPS vs TCP/UDP), Contains user(s)/group(s) without email

...

--------------------------------------------------

Mitigation guidance:

--------------------------------------------------


Platform filter (Desktop/Mobile):

  • Remove the unsupported Desktop/Mobile condition

Workspace URL:

  • Remove the unsupported Workspace URL rule


Access with restrictions:

  • Configure access controls without using restrictions


Mixed actions (HTTP/HTTPS vs TCP/UDP):

  • Ensure both actions have the same value

  • If that's not possible, create separate policies for HTTP/HTTPS and TCP/UDP applications


Policy contains user(s)/group(s) without email

  • Add email to the user(s)/group(s) without email and update the policy
<!--NeedCopy-->
Configuration changes prior to full migration to CEP
The following configuration changes must be applied manually by the Secure Private Access administrator before initiating the full migration to CEP. These updates ensure compatibility and readiness across all applications and policies.
Single sign-on configuration changes
To ensure compatibility with CEP, it is essential to update the single sign-on (SSO) configuration for all existing applications. The Secure Private Access administrators must perform the following steps:
- Navigate to the Application Configuration page (Secure Private Access > App Configuration).
-
Edit the applications to modify the single sign-on configuration.
Under the Single Sign On section, in Which single sign on type would you like to use for your Web app setup?, select Don’t use SSO.
Important:
- This update is mandatory because the SSO step is removed in CEP. By setting the application to Don’t use SSO, you ensure continued functionality and alignment with the new migration flow.
- If the single sign-on configuration is not changed as instructed, the application becomes inaccessible after the migration to CEP.
Access policies and session policies updates
To ensure that the access policies are compatible with CEP standards, specific updates are required in the access and session policies. The Secure Private Access administrators must perform the following steps:
- Navigate to Secure Private Access > Policies > Access Policies.
-
Click Edit on the relevant policy and modify the action settings.
- Within the policy, navigate to the Policy rules section, click the ellipsis icon in line with the policy rule and click Edit.
- Navigate to the Actions page and change the Action settings.
Standardizing actions across applications
When configuring actions for both HTTP/HTTPS and TCP/UDP applications, ensure the following:
- The same action, either Allow Access or Deny Access is selected in both sections.
- If the option Allow access with restrictions is currently enabled for HTTP/HTTPS applications, it must be removed, as this setting is not supported in CEP.
- Replace Allow access with restrictions with either Allow Access or Deny Access, based on your intended policy behavior.
Application requirement for policy updates
Access policies without assigned applications cannot be updated. To modify these policies, first assign an application to the policy.
Important:
If these updates are not performed, applications associated with access policies containing mixed actions become inaccessible or deny actions setting might be ignored.
Web filtering policy update (optional)
To maintain alignment with the new CEP migration standards, it is necessary to update the web filtering settings within Secure Private Access. Perform the following steps to update web filtering configuration:
- Navigate to Secure Private Access > Settings > Unsanctioned Websites.
- Delete all websites and Remote Browser Isolation (RBI) entries currently listed under this section.
- After removing these entries, disable the Web filtering is enabled toggle located at the top of the page.
These configurations are no longer relevant following the migration to CEP.
Important:
If these steps are not completed, there is no impact on the system’s operation after the full migration. However, the Unsanctioned Websites page will not be visible.
Other policy adjustments (optional)
Review and delete unused conditions:
As part of the migration and policy optimization process, it is recommended to review access and session policies for any conditions that might no longer be applicable. Examples of such conditions include:
- Workspace URL
- User Risk Score
- Desktop and Mobile options
These conditions can be deleted if they are not relevant to your current environment or business requirements.
Note:
If these policy adjustments are not made, there is no impact on the system operations.
Security Groups clean-up (optional)
Review the Security Groups configuration within Secure Private Access.
Navigate to Secure Private Access > Applications > Security Groups to assess any existing entries.
After migration, the Security Groups configuration will no longer be available. Therefore, any entries currently listed under this tab can be deleted, as they will no longer be relevant to the post-migration environment.
Note:
There is no system impact if this configuration is not updated. Removing these entries is optional and helps maintain a streamlined environment, but it is not required for continued operation.
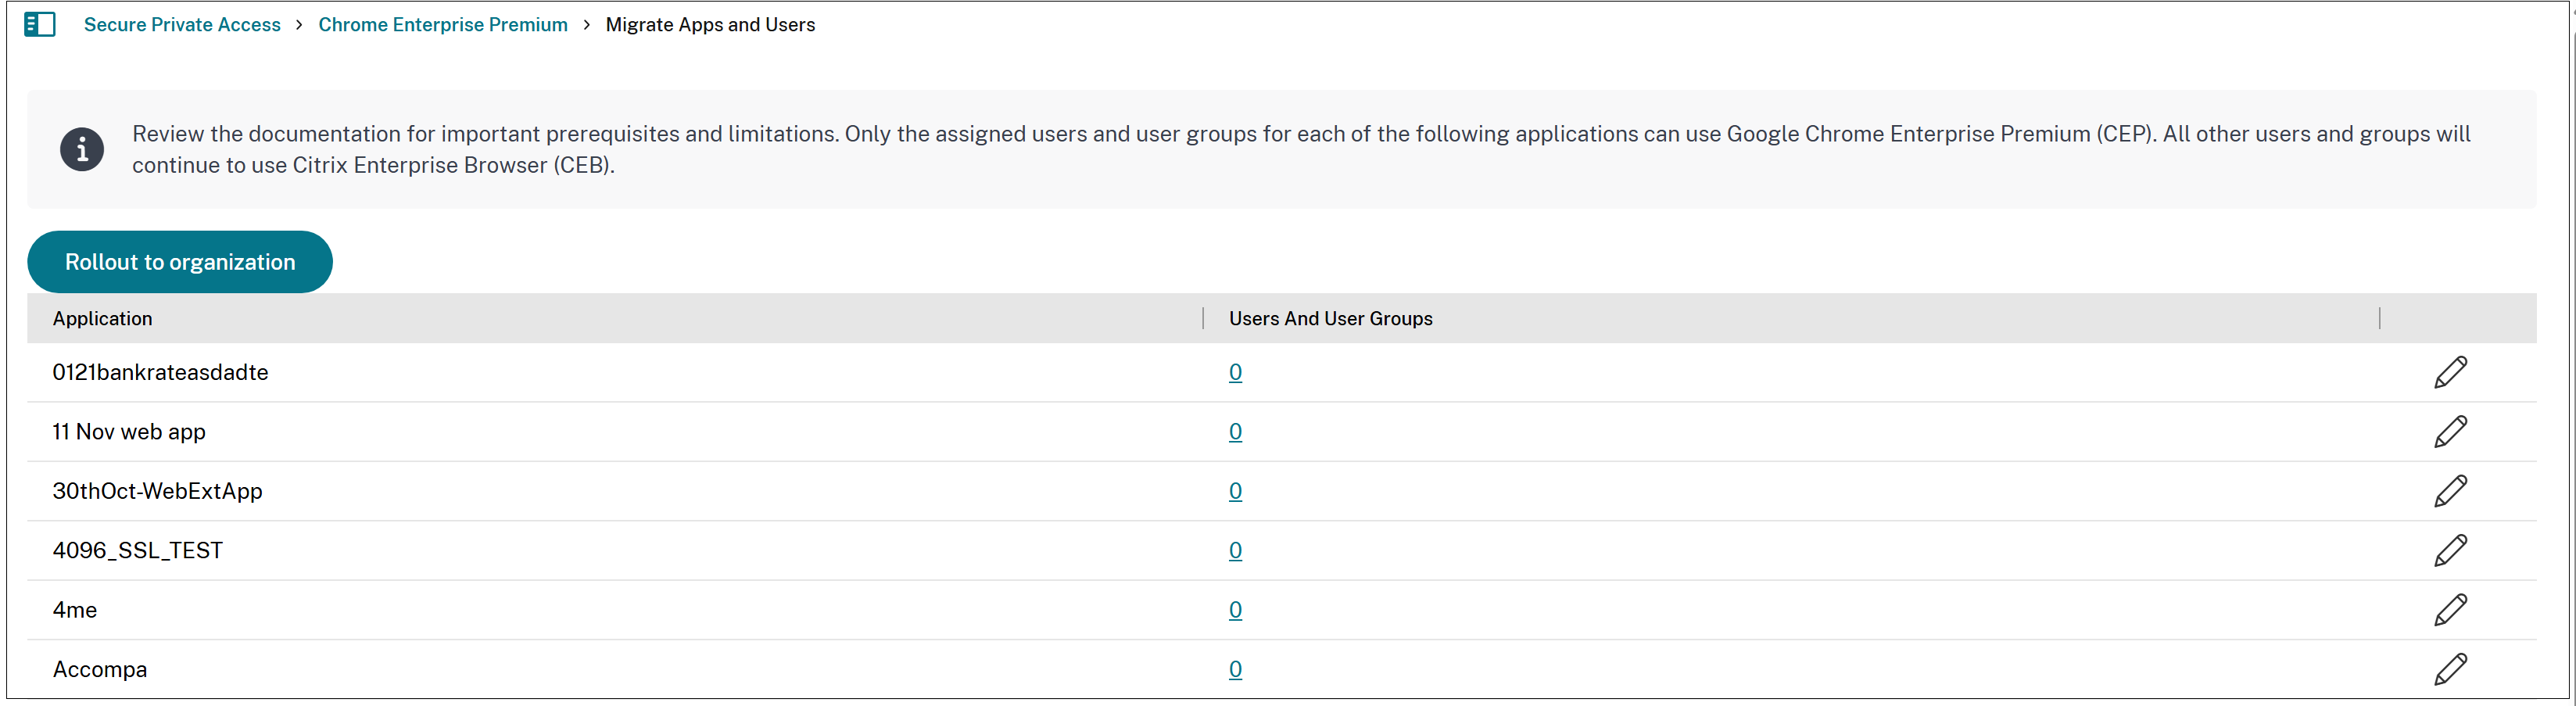
Rollout CEP to the organization (full migration)
After completing the earlier mentioned steps, click Rollout to organization in the Migrate Apps and Users page. This is the last stage of the migration process.
Important:
Once the rollout is complete, CEP becomes the default enterprise browser. Reverting to CEB is not possible, and incompatible settings are hidden in the Secure Private Access admin console.
Summary of the migration process
Follow these steps to migrate applications from CEB to CEP:
- Provision Chrome Enterprise Premium.
- Migrate one application for a specific group of users.
- Enrich the group with email (if not exists).
- Fix any incompatibilities.
- Migrate the application to CEP.
- Verify that the application is accessible via CEP (directly, CWA and WSUI).
- Enrich the users and user groups with emails.
- Migrate more applications and users and user groups.
- Rollout CEP to the organization (full migration).
-
Fix any leftover incompatibilities.
- Run the script again, indicating in the prompt that the CEP rollout has been completed.
- Fix the incompatibilities.
- Verify that the applications are accessible via CEP (directly, CWA and WSUI).
Challenges with the email enrichment process
The email enrichment task can be intricate, as it often involves collaboration among several teams to assign emails to various groups across multiple domains. The Domain Mapping feature facilitates this process. For details, see Domain mapping for user groups without email addresses.
Best practices
- Start with a pilot migration for a small user group before a full-scale rollout.
- Leverage Citrix’s official migration tools and documentation.
- Maintain clear documentation of all changes and configurations.
- Establish a rollback plan in case of critical issues.
Conclusion
Migration from CEB to CEP modernizes your Citrix environment with enhanced capabilities. Careful planning, thorough testing, and proactive user engagement ensure a smooth transition to CEP.
In this article
- Configure Chrome Enterprise Premium
- Policy enrichment for user groups without email
- Secure Private Access configuration parser for CEP compatibility analysis
- Configuration changes prior to full migration to CEP
- Web filtering policy update (optional)
- Other policy adjustments (optional)
- Security Groups clean-up (optional)
- Rollout CEP to the organization (full migration)
- Summary of the migration process
- Best practices
- Conclusion