Autoscaling tagged machines (cloud burst)
Note:
This feature was formerly Restrict Autoscale.
Introduction
Autoscale provides the flexibility to power manage only a subset of machines in a delivery group. To achieve this, apply a tag to one or more machines and then configure Autoscale to power manage only tagged machines.
This feature can be useful in cloud bursting use cases, where you want to use on-premises resources (or reserved public cloud instances) to handle workloads before cloud-based resources address additional demand (that is, burst workloads). To let on-premises machines (or reserved instances) address workloads first, you must use tag restriction along with zone preference.
Tag restriction specifies machines to be power managed by Autoscale. Zone preference specifies machines in the preferred zone to handle user launch requests. For more information, see Tags and Zone preference.
To autoscale certain tagged machines, you can use Studio or PowerShell.
Use Studio to autoscale certain tagged machines
To autoscale certain tagged machines, complete the following steps:
-
Create a tag and apply that tag to the applicable machines in the delivery group. For more information, see Manage tags and tag restrictions.
-
Select the delivery group and then open the Manage Autoscale wizard.
-
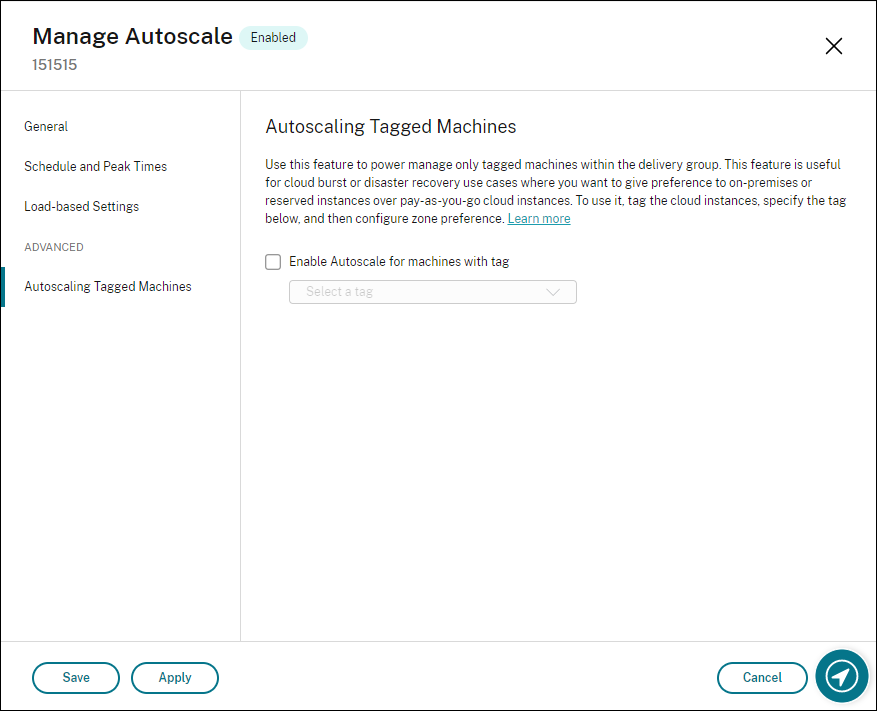
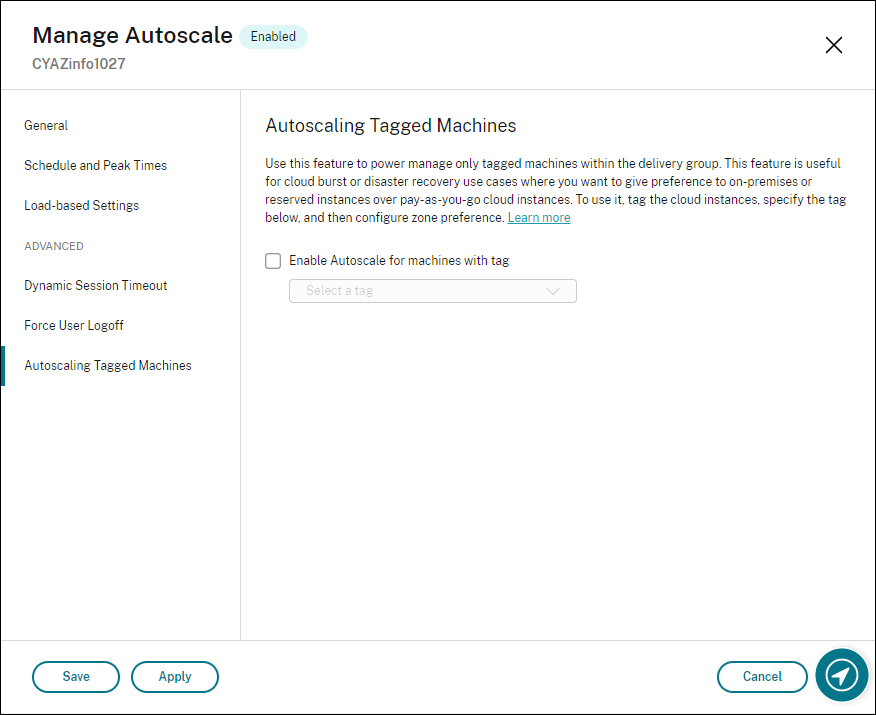
On the Autoscaling Tagged Machines page, select Enable Autoscale for machines with tag, select a tag from the list, and then click Apply to save your changes.
User interface for single-session OS static and random delivery groups:
User interface for multi-session OS delivery groups:
Warning:
- Autoscaling machines with a specific tag might cause the histogram to update automatically to reflect the number of machines per the tag. On the Schedule and Peak Times page, you can manually assign machines against each time slot if needed.
- You cannot delete a tag that is being used on tagged machines. To delete the tag, you must first remove the tag restriction.
After you apply the tag restriction, you might want to remove it from the delivery group later. To do so, go to the Manage Autoscale > Autoscaling Tagged Machines page and then clear Enable Autoscale for machines with tag.
Warning:
- If you remove the tag from the applicable machines without clearing Enable Autoscale for machines with tag, you might receive a warning when you open the Manage Autoscale wizard. Removing the tag from the machines can leave no machines for Autoscale to manage because the tag you specified in Autoscale has become invalid. To resolve the warning, go to the Autoscaling Tagged Machines page, remove the invalid tag, and then click Apply to save your changes.
Control when Autoscale powers on resources
You can also control when Autoscale starts powering on tagged machines based on the usage of untagged machines. This helps you further optimize the consumption of your tagged or public cloud workloads.
To do this, complete the following steps:
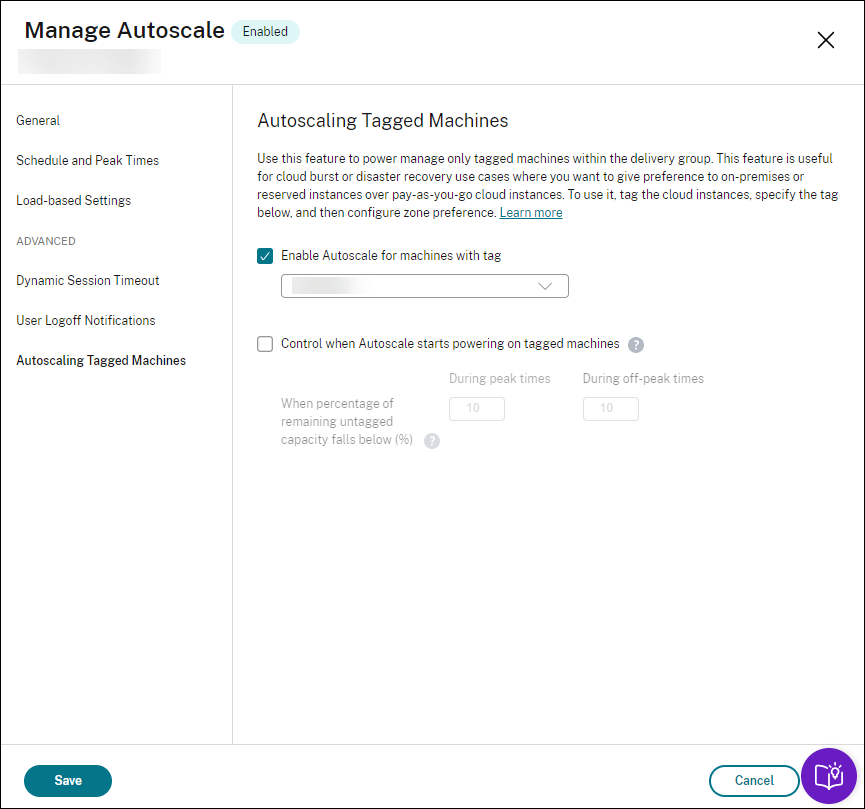
- On the Autoscaling Tagged Machines page, select Control when Autoscale starts powering on tagged machines.
- Enter the percentage amount of untagged machine usage you want to reach for both peak times and off-peak times and then click Apply. Supported values: 0–100.
Tip:
The percentage controls when Autoscale starts powering on tagged machines. When the percentage falls below the threshold (default, 10%), Autoscale starts powering on tagged machines. When the percentage exceeds the threshold, Autoscale goes into power-off mode. When entering the percentage, consider two scenarios:
- For single-session OS delivery groups: The value is defined as a percentage of the total number of untagged machines in idle state. Example: You have 10 untagged single-session OS machines. When only one is left without a session, Autoscale starts powering on a tagged machine.
- For multi-session OS delivery groups: The value is defined as a percentage of the total capacity (in terms of load index) of available untagged machines. Example: You have 10 untagged multi-session OS machines. When they are 90% loaded, Autoscale starts powering on a tagged machine.
Use PowerShell to autoscale certain tagged machines
Note:
The
Get-BrokerMachinePowerShell command is deprecated. UseGet-BrokerMachineV2as an alternative.
To use the PowerShell SDK directly, complete the following steps:
-
Create a tag. Use the New-Brokertag PowerShell command to create a tag.
- For example:
$managed = New-BrokerTag Managed. In this case, the tag is named “Managed.” For more information about the New-Brokertag PowerShell command, see https://developer-docs.citrix.com/projects/delivery-controller-sdk/en/latest/Broker/New-BrokerTag/.
- For example:
-
Apply the tag to machines. Use the
Get-BrokermachinePowerShell command to apply the tag to machines in a catalog that you want Autoscale to power manage.- For example:
Get-BrokerMachine -CatalogName "cloud" | Add-BrokerTag $managed.Name. In this case, the catalog is named “cloud.” - For more information about the Get-Brokermachine PowerShell command, see https://developer-docs.citrix.com/projects/delivery-controller-sdk/en/latest/Broker/Get-BrokerMachine/.
Note:
You might add new machines to the catalog after applying the tag. The tag is NOT automatically applied to those new machines.
- For example:
-
Add tagged machines to the delivery group that you want Autoscale to power manage. Use the Get-BrokerDesktopGroup PowerShell command to add a tag restriction to the delivery group that contains the machines (in other words, “restrict launches to machines with tag X”).
- For example:
Get-BrokerDesktopGroup -Uid 1 | Set-BrokerDesktopGroup -RestrictAutoscaleTagUid $managed.Uid. In this case, the UID of the Delivery Group is 1. - For more information about the Get-BrokerDesktopGroup PowerShell command, see https://developer-docs.citrix.com/projects/delivery-controller-sdk/en/latest/Broker/Get-BrokerDesktopGroup/.
- For example:
After you apply the tag restriction, you might want to remove it from the delivery group later. To do so, use the Get-BrokerDesktopGroup PowerShell command.
Example: Get-BrokerDesktopGroup –Uid 1 | Set-BrokerDesktopGroup –RestrictAutoscaleTagUid $null. In this case, the UID of the delivery group is 1.
Note:
Untagged machines restart automatically after users power them off. This behavior ensures that they become available to handle workloads sooner. This can be enabled or disabled on a per desktop group using the
Set-BrokerDesktopGroup’sAutomaticRestartForUntaggedMachinesproperty. For more information, see https://citrix.github.io/delivery-controller-sdk/Broker/Set-BrokerDesktopGroup/.
Example scenario
Suppose you have the following scenario:
-
Machine catalog configuration. There are two machine catalogs (C1 and C2).
- Catalog C1 contains 5 machines (M1 to M5) that are local in the on-premises deployments.
- Catalog C2 contains 5 machines (M6 to M10) that are remote in the cloud deployments.
-
Tag restriction. A tag named “Cloud” is created and applied to machines M6 to M10 in catalog C2.
-
Zone configuration. Two zones (Z1 and Z2) are created.
- Zone Z1 containing catalog C1 corresponds to the on-premises deployments.
- Zone Z2 containing catalog C2 corresponds to the cloud deployments.
-
Delivery group configuration
- The delivery group contains 10 machines (M1 to M10), 5 machines from catalogs C1 (M1 to M5) and 5 from catalog C2 (M6 to M10).
- Machines M1 to M5 are powered on manually and remain powered on throughout the schedule.
-
Autoscale configuration
- Capacity buffer is set to 10%.
- Autoscale power manages only machines with the tag “Cloud.” In this case, Autoscale power manages cloud machines M6 to M10.
-
Published application or desktop configuration. Zone preferences are configured for the published desktops (for example), where Zone Z1 is preferred over Zone Z2 for a user launch request.
- Zone Z1 is configured as the preferred zone (home zone) for the published desktops.
The scenario is executed in the following sequence:
- No user logs on.
- User sessions increase.
- User sessions increase further until all available on-premises machines are consumed.
- More user sessions start.
- User session decreases because of session termination.
- User session decreases further until the session load is handled only by on-premises machines.
See below for details about how Autoscale works in the scenario above.
- No user load (initial state)
- The on-premises machines M1 to M5 are all powered on.
- One machine in the cloud (for example, M6) is powered on. The machine is powered on because of the configured capacity buffer. In this case, 10 (number of machines) x 10,000 (load index) x 10% (configured capacity buffer) equals 10,000. Therefore, one machine is powered on.
- The load index value of all the powered-on machines (M1 to M6) is at a baseline load (load index equals 0).
- Users log on
- The sessions are directed to be hosted on machines M1 to M5 through the configured zone preference and are load-balanced across these on-premises machines.
- The load index value of the powered-on machines (M1 to M5) increases.
- The load index value of the powered-on machine M6 is at a baseline load.
- Users increase load, consuming all on-premises resources
- The sessions are directed to be hosted on machine M1 to M5 through the configured zone preference and are load-balanced across these on-premises machines.
- The load index value of all the powered-on machines (M1 to M5) has reached 10,000.
- The load index value of the powered-on machine M6 remains at a baseline load.
- One more user logs on
- The session overflows the zone preference and is directed to be hosted on cloud machine M6.
- The load index value of all the powered-on machines (M1 to M5) has reached 10,000.
- The load index value of the powered-on machine M6 increases and is no longer at a baseline load. When the total spare capacity drops to a level below 10,000 in terms of load index, Autoscale starts to power on an additional machine (M7) to meet the demand because of the configured capacity buffer. Note that it might take some time to power on machine M7. So there might be a delay until machine M7 is ready.
- More users log on
- The sessions are directed to be hosted on machine M6.
- The load index value of all the powered-on machines (M1 to M5) has reached 10,000.
- The load index value of the powered-on machine M6 increases further, but the total spare capacity is at a level above 10,000 in terms of load index.
- The load index value of the powered-on machine M7 remains at a baseline load.
- Even more users log on
- After machine M7 is ready, the sessions are directed to be hosted on machines M6 and M7 and are load-balanced across these machines.
- The load index value of all the powered-on machines (M1 to M5) has reached 10,000.
- The load index value of machine M7 is no longer at a baseline load.
- The load index value of the powered-on machines (M6 and M7) increases.
- The total spare capacity is still at a level above 10,000 in terms of load index.
- User session load decreases because of session termination
- After users log off from their sessions or idle sessions time out, the freed-up capacity on machines M1 to M7 is reused to host sessions started by other users.
- When the total spare capacity increases to a level above 10,000 in terms of load index, Autoscale puts one of the cloud machines (M6 to M7) into drain state. As a result, sessions started by other users are no longer directed to that machine (for example, M7) unless new changes occur; for example, user load increases again or other cloud machines become least loaded.
- User session load decreases further until one or more cloud machines are no longer needed
- After all sessions on machine M7 are terminated and the specified power-off delay times out, Autoscale powers off machine M7.
- The load index value of all the powered-on machines (M1 to M5) might drop to a level below 10,000.
- The load index value of the powered-on machine (M6) decreases.
- User session decreases further until no cloud machines are needed.
- Even though there are no user sessions on machine M6, Autoscale does not power it off because it is reserved as a spare capacity.
- Autoscale keeps the remaining cloud machine M6 powered on because of the configured capacity buffer. That machine is waiting to serve a desktop to an incoming user.
- Sessions are not directed to be hosted on machine M6 as long as the on-premises machines have available capacity.