Schedule-based and load-based settings
How Autoscale™ power manages machines
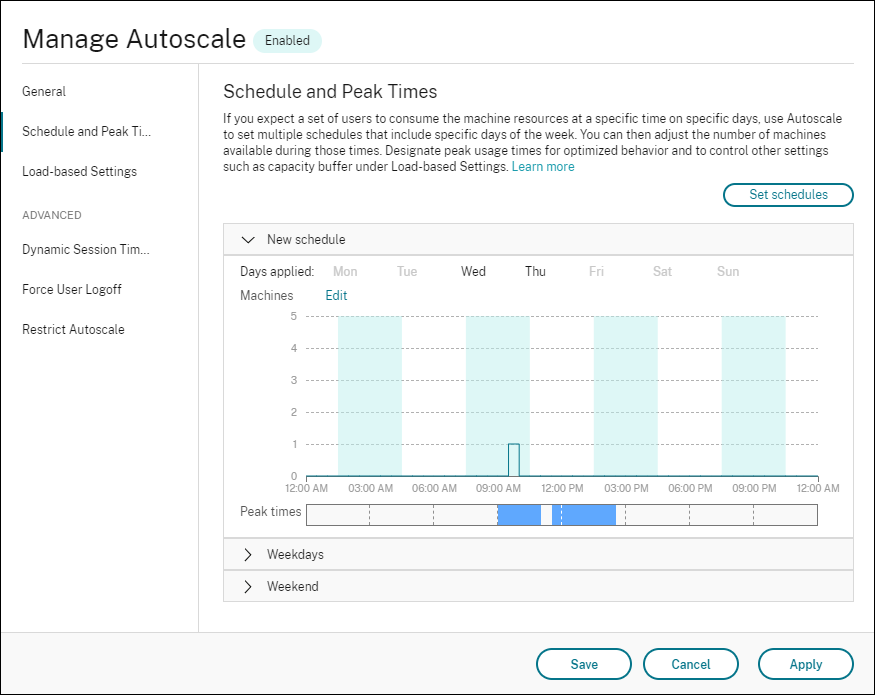
Autoscale powers machines on and off based on the selected schedule. Autoscale lets you set multiple schedules that include specific days of the week and adjust the number of machines available during those times. If you expect a set of users to consume the machine resources at a specific time on specific days, Autoscale helps provide an optimized experience. Note that those machines will be powered on during the schedule, whether or not there are sessions running on them.
Note:
Autoscale supports any power-managed machine.
The schedule is based on the time zone of the delivery group. To change the time zone, you can change user settings in a delivery group. For more information, see Manage Delivery Groups.
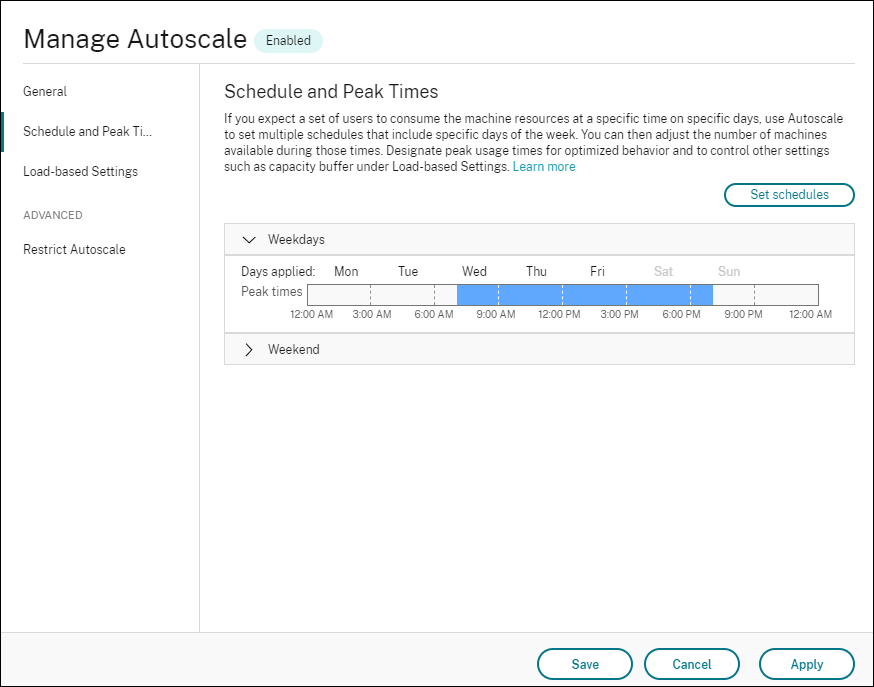
Autoscale has two default schedules: Weekdays (Monday through Friday) and Weekend (Saturday and Sunday). By default, the Weekdays schedule keeps one machine powered on from 07:00 AM to 06:30 PM during peak times and none during off-peak times. The default capacity buffer is set to 10% during peak and off-peak times. By default, the Weekend schedule keeps no machines powered on.
Note:
Autoscale treats only those machines that are registered with the site as part of the available capacity in the calculations it makes. “Registered” means that the machine is available for use or already in use. Doing so ensures that only machines that can accept user sessions are included in the capacity for the delivery group.
User interfaces
There are three types of user interfaces to be aware of.
User interface for single-session OS static delivery groups:
Autoscale user interface for single-session OS random delivery groups:
Autoscale user interface for multi-session OS delivery groups:

Schedule-based settings
Autoscale schedule. Lets you add, edit, select, and delete schedules.
Days applied. Highlights the days you applied to the selected schedule. The remaining days are grayed out.
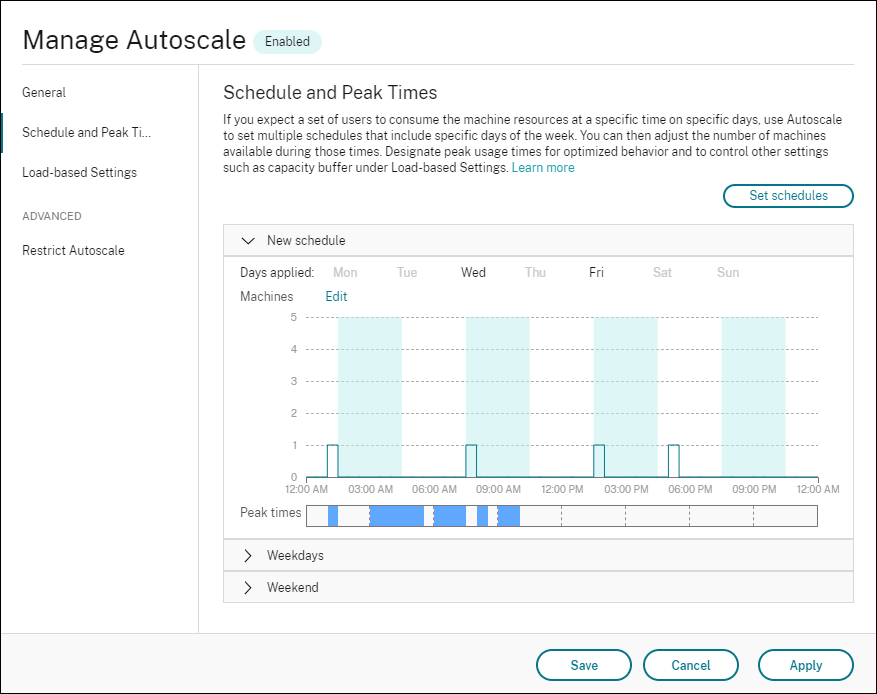
Edit. Lets you assign the machines against each hour or each half hour. You can assign the machines by numbers and by percentages.
Note:
- This option is available only in the Autoscale user interfaces for multi-session OS and single-session OS random delivery groups.
- The histogram next to Edit plots the number or percentage of machines that are running in different time slots.
- You can assign machines against each time slot by clicking Edit above Peak times. Depending on the option you selected from the menu in the Machines to start window, you can assign the machines by numbers or by percentages.
- For multi-session OS delivery groups, you can set the minimum number of running machines separately in granular increments of 30 minutes during each day. For single-session OS random delivery groups, you can set the minimum number of running machines separately in granular increments of 60 minutes during each day.
To define your own schedules, follow these steps:
-
On the Schedule and Peak Times page of the Manage Autoscale window, click Set schedules.
-
In the Edit Autoscale Schedules window, select the days you want to apply to each schedule. You can also delete schedules as applicable.
-
Click Done to save the schedules and to return to the Schedule and Peak Times page.
-
Select the applicable schedule and configure it as needed.
-
Click Apply to exit the Manage Autoscale window or configure settings on other pages.
Important:
- Autoscale does not allow the same day to overlap in different schedules. For example, if you select Monday in schedule2 after selecting Monday in schedule1, Monday is automatically cleared in schedule1.
- A schedule name is not case sensitive.
- A schedule name must not be blank or contain only spaces.
- Autoscale allows blank spaces between characters.
- A schedule name must not contain the following characters: \ / ; : # . * ? = < > | [ ] ( ) { } “ ‘ `.
- Autoscale does not support duplicate schedule names. Enter a different name for each schedule.
- Autoscale does not support empty schedules. This means that schedules without days selected are not saved.
Note:
The days included in the selected schedule are highlighted, while those not included are grayed out.
Restart schedule
Autoscale allows you to configure restart schedules to the suspended machines. This ensures that the systems remain efficient and avoid the systems being in suspended indefinitely.
To add a restart schedule for the suspended machines, do the following:
- From Studio, select Delivery Groups in the left pane.
- Right-click a delivery group that doesn’t have a restart schedule and click Manage Autoscale.
- On the General page, select the Enable Autoscale check box.
- On the Schedule and Peak Times page, select the Suspend machines option during off-peak times. A tip to configure restart schedule is shown to avoid machines being in suspended state indefinitely.
- Click Restart Schedule in the tip information.
- Configure the preferred settings for Restart frequency, Repeats every, Start date, and Begin restart at and click Done.
Load-based settings
Peak times. Lets you define the peak times for the days you applied in the selected schedule. You can do so by right-clicking the horizontal bar graph. After you define the peak times, the remaining, undefined times default to off-peak times. By default, the 7:00 AM to 7:00 PM time slot is defined as peak times for the days included in the selected schedule.
Important:
- For multi-session OS delivery groups, the peak times bar graph is used for the capacity buffer.
- For single-session OS delivery groups, the peak times bar graph is used for the capacity buffer and controls the actions to be triggered after logoff and/or disconnection.
- You can define the peak times for the days included in a schedule at a granular level of 30 minutes for both multi-session OS and single-session OS delivery groups. Alternatively, you can use the
New-BrokerPowerTimeScheme PowerShellcommand instead. For more information, see Broker PowerShell SDK commands.
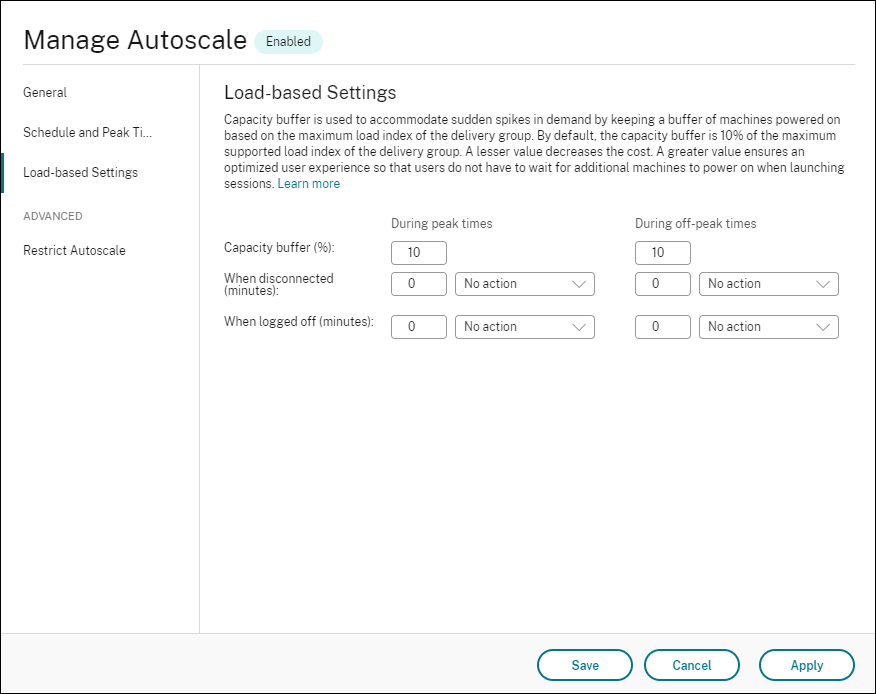
Capacity buffer. Lets you keep a buffer of powered-on machines. A lesser value decreases the cost. A greater value ensures an optimized user experience so that when launching sessions, users do not have to wait for additional machines to power on. By default, the capacity buffer is 10% for peak and off-peak times. If you set the capacity buffer to 0 (zero), users might have to wait for additional machines to power on when launching sessions. Autoscale lets you determine the capacity buffer separately for peak and off-peak times.
Exclude machines in drain state from capacity buffer. When selected, machines that are currently draining (for example, due to a scheduled restart) are excluded from the capacity buffer calculation. Only machines that are fully available to accept new sessions are counted when determining required capacity. This helps prevent over-provisioning that can occur when draining machines are included in the buffer. By default, this option is not selected. This option is available only for multi-session OS delivery groups and requires Delivery Controller version 2503 or later.
Restart schedule
Autoscale allows you to configure restart schedules to the suspended machines. This ensures that the systems remain efficient and avoid the systems being in suspended indefinitely.
To add a restart schedule for the suspended machines, do the following:
- On the Load-based Settings page, under Power policies > After disconnection, select the suspend action. A tip to configure restart schedule is shown to avoid machines being in suspended state indefinitely.
- Click Restart Schedule in the tip information.
- Configure the preferred settings for Restart frequency, Repeats every, Start date, and Begin restart at and click Done.
Miscellaneous settings
Tip:
- You can choose to configure the miscellaneous settings using the Broker PowerShell SDK. For more information, see Broker PowerShell SDK commands.
- To understand the SDK commands associated with the when disconnected and when logged off settings, see https://citrix.github.io/delivery-controller-sdk/Broker/about_Broker_PowerManagement/#power-policy.
When disconnected. Lets you specify how long a disconnected, locked machine remains powered on after session disconnection before it is suspended or shut down. If a time value is specified, the machine is suspended or shut down when the specified disconnection time elapses, depending on the action you configured. By default, no action is assigned to disconnected machines. You can define actions separately for peak and off-peak times. To do so, click the down arrow and then select one of the following options from the menu:
- No action. If selected, the machine after session disconnection remains powered on. Autoscale does not act on it.
-
Suspend. If selected, Autoscale pauses the machine without shutting it down when the specified disconnection time elapses. The following option becomes available after you select Suspend.
- When no reconnection in (minutes). Suspended machines remain available to disconnected users when they reconnect but are not available for new users. To make the machines available again to handle all workloads, shut them down. Specify the timeout, in minutes, after which Autoscale shuts them down.
- Shut down. If selected, Autoscale shuts down the machine when the specified disconnection time elapses.
Note:
This option is available only in the Autoscale user interfaces for single-session OS random and static delivery groups.
When logged off. Lets you specify how long a machine remains powered on after session logoff before it is suspended or shut down. If a time value is specified, the machine is suspended or shut down when the specified logoff time elapses, depending on the actions you configured. By default, no action is assigned to logged-off machines. You can define actions separately for peak and off-peak times. To do so, click the down arrow and then select one of the following options from the menu:
- No action. If selected, the machine after session logoff remains powered on. Autoscale does not act on it.
- Suspend. If selected, Autoscale pauses the machine without shutting it down when the specified logoff time elapses.
- Shut down. If selected, Autoscale shuts down the machine when the specified logoff time elapses.
Note:
This option is available only in the Autoscale user interface for single-session OS static delivery groups.
Power manage single-session OS machines transitioning to a different time period with disconnected sessions
Important:
- This enhancement applies only to single-session OS machines with disconnected sessions. It does not apply to single-session OS machines with logged off sessions.
- For this enhancement to take effect, you need to enable Autoscale for the applicable delivery group. Otherwise, disconnect power policy actions are not triggered on period transition.
In earlier releases, a single-session OS machine transitioning to a time period where an action (disconnect action=”Suspend” or “Shutdown”) was required remained powered on. This scenario occurred if the machine disconnected during a time period (peak or off-peak times) where no action (disconnect action=”Nothing”) was required.
Starting with this release, Autoscale suspends or powers off the machine when the specified disconnection time elapses, depending on the disconnect action configured for the destination time period.
For example, you configure the following power policies for a single-session OS delivery group:
- Set
PeakDisconnectActionto “Nothing” - Set
OffPeakDisconnectActionto “Shutdown” - Set ‘OffPeakDisconnectTimeout’ to “10”
Note:
For more information about the disconnect action power policy, see https://developer-docs.citrix.com/projects/delivery-controller-sdk/en/latest/Broker/about_Broker_PowerManagement/#power-policy and https://developer-docs.citrix.com/projects/delivery-controller-sdk/en/latest/Broker/Get-BrokerDesktopGroup/.
In earlier releases, a single-session OS machine with a session disconnected during peak times remained powered on when it transitioned from peak to off-peak. Starting with this release, the OffPeakDisconnectAction and the OffPeakDisconnectTimeout policy actions are applied to the single-session OS machine on period transition. As a result, the machine is powered off 10 minutes after it transitions to off-peak.
In case you want to revert to the previous behavior (that is, take no action on machines that transition from peak to off-peak or off-peak to peak with disconnected sessions), do one of the following:
- Set the “LegacyPeakTransitionDisconnectedBehaviour” registry value to 1 (true; enables the previous behavior). By default, the value is 0 (false; triggers disconnect power policy actions on period transition).
- Path: HKEY_LOCAL_MACHINE\SOFTWARE\Citrix\DesktopServer
- Name: LegacyPeakTransitionDisconnectedBehaviour
- Type: REG_DWORD
- Data: 0x00000001 (1)
- Configure the setting by using the
Set-BrokerServiceConfigurationDataPowerShell command. For example:PS C:\> Set-BrokerServiceConfigurationData HostingManagement.LegacyPeakTransitionDisconnectedBehaviour -SettingValue $true
A machine must meet the following criteria before power policy actions can be applied to it on period transition:
- Has a disconnected session.
- Has no pending power actions.
- Belongs to a single-session OS delivery group that transitions to a different time period.
- Has a session that disconnects during a certain time period (peak or off-peak times) and transitions to a period where a power action is assigned.
How capacity buffer works
Capacity buffer is used to add spare capacity to the current demand to account for dynamic load increases. There are two scenarios to be aware of:
-
For multi-session OS delivery groups, the capacity buffer is defined as a percentage of the total capacity of the delivery group in terms of load index. For more information about load index, see Load index.
-
For single-session OS delivery groups, the capacity buffer is defined as a percentage of the total capacity of the delivery group in terms of the number of machines.
Note:
- In scenarios where you restrict Autoscale to tagged machines, the capacity buffer is defined as a percentage of the total capacity of the tagged machines in the delivery group in terms of load index.
- For multi-session OS delivery groups, when the Exclude machines in drain state from capacity buffer option is enabled, draining machines are excluded from the total capacity calculation. Autoscale powers on additional machines as needed to maintain the configured buffer percentage, based only on machines that are fully available to accept new sessions.
Autoscale lets you set the capacity buffer separately for peak and off-peak times. A lesser value in the capacity buffer field decreases the cost because Autoscale powers on less spare capacity. A greater value ensures an optimized user experience so that users do not have to wait for additional machines to power on when launching sessions. By default, the capacity buffer is 10%.
Important:
The capacity buffer results in machines being powered on when the total spare capacity drops to a level below “X” percent of the total capacity of the delivery group. Doing so reserves the required percentage of spare capacity.
Multi-session OS delivery groups
When are machines powered on?
Important:
If a schedule is selected, Autoscale powers on all machines configured to be powered on in the schedule. Autoscale keeps this specified number of machines powered on during the schedule, regardless of the load.
When the number of powered-on machines in the delivery group can no longer meet the buffer needed for honoring the buffer capacity in terms of load index, Autoscale powers on extra machines. For example, let’s say your delivery group has 20 machines and 3 machines are scheduled to be powered on as part of schedule-based scaling with a capacity buffer of 20%. Eventually, 4 machines will be powered on when there is no load. This is because a 4 x 10k load index is needed as a buffer; therefore at least 4 machines need to be powered on. This case might occur during peak times, increased load on machines, new session launches, and when you add new machines to the delivery group. Note that Autoscale powers on only the machines that meet the following criteria:
-
The machines are not in maintenance mode.
-
The hypervisor on which the machines are running is not in maintenance mode.
-
The machines are currently powered off.
-
The machines have no pending power actions.
Exclude draining machines from capacity buffer
By default, draining machines (for example, those restarting on schedule) count toward total capacity when Autoscale calculates the buffer. You can exclude them so that the buffer is based only on machines that are fully available to accept new sessions.
To exclude machines in drain state from the capacity buffer:
-
In Web Studio, select Delivery Groups in the left pane.
-
Right-click a multi-session OS delivery group and select Manage Autoscale.
-
On the Load-based Settings page, under Capacity buffer, select Exclude machines in drain state from capacity buffer.
-
Click Save.
Note:
This option is available only for multi-session OS delivery groups and requires Delivery Controller version 2503 or later.
When are machines powered off?
Important:
- If a schedule is selected, Autoscale powers off the machines based on the schedule.
- Autoscale does not power off the machines configured in the schedule to be powered on during the schedule.
When there are more than enough machines to support the targeted number of powered-on machines (including the buffer) for the delivery group, Autoscale powers off extra machines. This case might occur during off-peak times, decreased load on machines, and session logoffs, and when you remove machines from the delivery group. Autoscale powers off only the machines that meet the following criteria:
-
The machines and the hypervisor on which the machines are running are not in maintenance mode.
-
The machines are currently powered on.
-
The machines are registered as available or waiting to register after start-up.
-
The machines have no active sessions.
-
The machines have no pending power actions.
-
The machines satisfy the specified power-off delay. This means that the machines have been powered on for at least “X” minutes, where “X” is the power-off delay specified for the delivery group.
Example scenario
Suppose you have the following scenario:
-
Delivery group configuration. The delivery group that you want Autoscale to power manage contains 10 machines (M1 to M10).
-
Autoscale configuration
- Capacity buffer is set to 10%.
- No machine is included in the selected schedule.
The scenario is executed in the following sequence:
-
No user logs on.
-
User sessions increase.
-
More user sessions start.
-
User session load decreases because of session termination.
-
User session load decreases further until the session load is handled only by on-premises resources.
See below for details about how Autoscale works in the scenario above.
- No user load (initial state)
- One machine (for example, M1) is powered on. The machine is powered on because of the configured capacity buffer. In this case, 10 (number of machines) x 10,000 (load index) x 10% (configured capacity buffer) equals 10,000. Therefore, one machine is powered on.
- The load index value of the powered-on machine (M1) is at a baseline load (load index equals 0).
- The first user logs on
- The session is directed to be hosted on machine M1.
- The load index of the powered-on machine M1 increases and machine M1 is no longer at a baseline load.
- Autoscale starts to power on an additional machine (M2) to meet the demand because of the configured capacity buffer.
- The load index value of machine M2 is at a baseline load.
- Users increase load
- The sessions are load-balanced across machines M1 and M2. As a result, the load index of the powered-on machines (M1 and M2) increases.
- The total spare capacity is still at a level above 10,000 in terms of load index.
- The load index value of machine M2 is no longer at a baseline load.
- More user sessions start
- The sessions are load-balanced across machines (M1 and M2). As a result, the load index of the powered-on machines (M1 and M2) increases further.
- When the total spare capacity drops to a level below 10,000 in terms of load index, Autoscale starts to power on an additional machine (M3) to meet the demand because of the configured capacity buffer.
- The load index value of machine M3 is at a baseline load.
- Even more user sessions start
- The sessions are load-balanced across machines (M1 to M3). As a result, the load index of the powered-on machines (M1 to M3) increases.
- The total spare capacity is at a level above 10,000 in terms of load index.
- The load index value of machine M3 is no longer at a baseline load.
- User session load decreases because of session termination
- After users log off from their sessions or idle sessions time out, the freed-up capacity on machines M1 to M3 is reused to host sessions started by other users.
- When the total spare capacity increases to a level above 10,000 in terms of load index, Autoscale puts one of the machines (for example, M3) into drain state. As a result, sessions started by other users are no longer directed to that machine unless new changes occur. For example, end-user load increases again or other machines become least loaded.
- User session load continues to decrease
- After all sessions on machine M3 are terminated and the specified power-off delay times out, Autoscale powers off machine M3.
- After more users terminate their sessions, the freed-up capacity on powered-on machines (M1 and M2) is reused to host sessions started by other users.
- When the total spare capacity increases to a level above 10,000 in terms of load index, Autoscale puts one of the machines (for example, M2) into drain state. As a result, sessions started by other users are no longer directed to that machine.
- User session load continues to decrease until there are no sessions
- After all sessions on machine M2 are terminated and the specified power-off delay times out, Autoscale powers off machine M2.
- The load index value of the powered-on machine (M1) is at a baseline load. Autoscale does not put machine M1 into drain state because of the configured capacity buffer.
Note:
For multi-session OS delivery groups, all changes to the desktop are lost when users log off sessions. However, if configured, user-specific settings are roamed along with the user profile.
Single-session OS random delivery groups
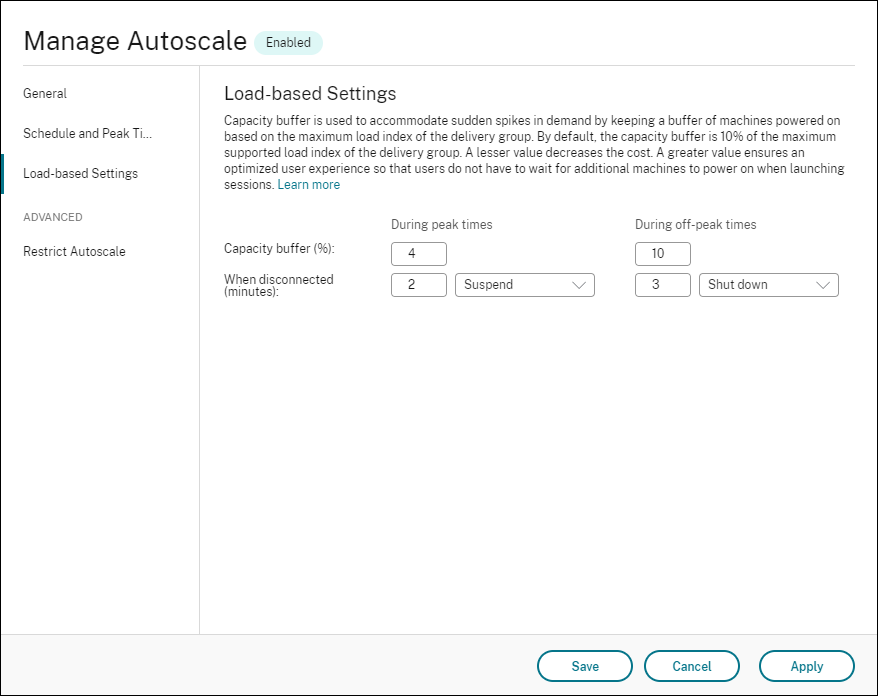
Capacity buffer is used to accommodate sudden spikes in demand by keeping a buffer of machines powered on based on the total number of machines in the delivery group. By default, the capacity buffer is 10% of the total number of machines in the delivery group.
If the number of machines (including the capacity buffer) exceeds the total number of currently powered-on machines, additional machines are powered on to meet the demand. If the number of machines (including the capacity buffer) is less than the total number of currently powered-on machines, the excess machines are shut down or suspended, depending on the actions you configured.
Power policies
Configure policies to manage the power of the machines for different scenarios. For each scenario, you can specify the wait time (in minutes) and the action to take after the specified time ends. Power policies are applicable for Single-session OS random delivery groups and Single-session OS static delivery groups.
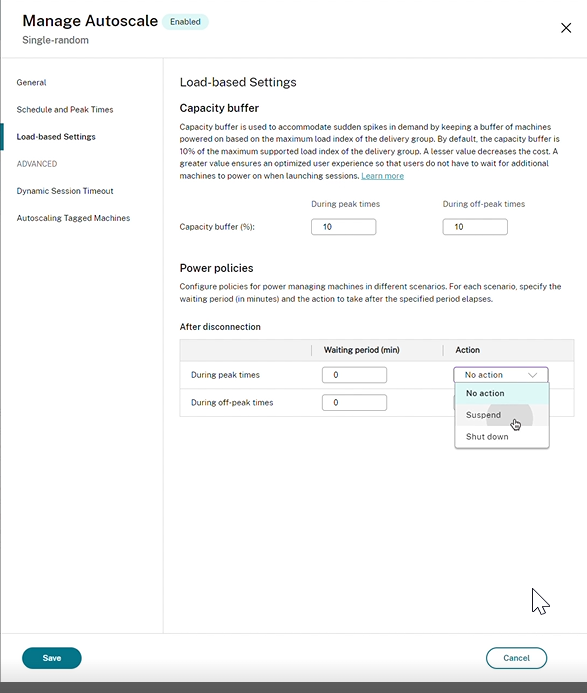
After disconnection, the following settings are applicable for both during peak times and during off-peak times: - You can set the wait time in minutes and actions like, no action, suspend, or shut down from the drop down. - If you select the suspend action, configure an additional wait time to shut down the machine.
Note:
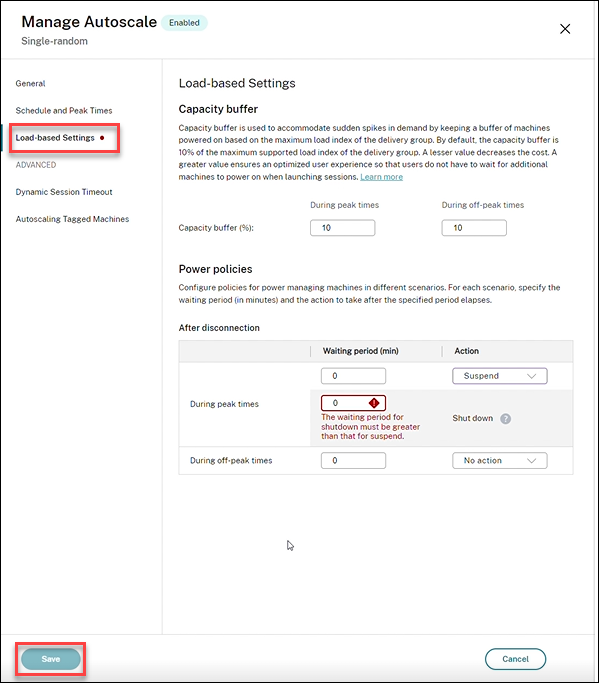
- During peak and off-peak times, the wait time for shutdown action must be greater than the wait time of suspend.
- Suspended machines are accessible only to disconnected users when they reconnect. To make the suspended machines available for new users, shut them down.
- If the time settings are incorrectly configured for suspend and shut down fields, the Save option is disabled and a red dot also appears next to the navigation items indicating setting errors.
For example
- If you set the wait time to 12 minutes and choose the first action to be no action, then after the end of 12 minutes, the machine will continue to be in powered on state.
- If you set the wait time to 15 minutes and choose the first action to be suspend and the second wait time to be 20 minutes, after the end of 15 minutes, the machine will be suspended. After the end of the second wait time, the machine will be shut down.
- If you set the wait time to 18 minutes and choose the first action to be shut down, then after the end of 18 minutes, the machine will be shut down.
Example scenario
Suppose you have the following scenario:
- Delivery group configuration. The delivery group that you want Autoscale to power manage contains 10 machines (M1 to M10).
-
Autoscale configuration
- Capacity buffer is set to 10%.
- No machine is included in the selected schedule.
The scenario is executed in the following sequence:
-
No user logs on.
-
User sessions increase.
-
More user sessions start.
-
User session load decreases because of session termination.
-
User session load decreases further until the session load is handled only by on-premises resources.
See below for details about how Autoscale works in the scenario above.
- No user load (initial state)
- One machine (M1) is powered on. The machine is powered on because of the configured capacity buffer. In this case, 10 (number of machines) x 10% (configured capacity buffer) equals 1. Therefore, one machine is powered on.
- A first user logs on
- The first time a user logs on to use a desktop, the user is assigned a desktop from a pool of desktops hosted on powered-on machines. In this case, the user is assigned a desktop from machine M1.
- Autoscale starts to power on an additional machine (M2) to meet the demand because of the configured capacity buffer.
- A second user logs on
- The user is assigned a desktop from machine M2.
- Autoscale starts to power on an additional machine (M3) to meet the demand because of the configured capacity buffer.
- A third user logs on
- The user is assigned a desktop from machine M3.
- Autoscale starts to power on an additional machine (M4) to meet the demand because of the configured capacity buffer.
- A user logs off
- After a user logs off or the user’s desktop times out, the freed-up capacity (for example, M3) is available as buffer. As a result, Autoscale starts to power off machine M4 because the capacity buffer is configured as 10%.
- More users log off until there are no users
- After more users log off, Autoscale powers off machines (for example, M2 or M3).
- Even though there are no users left, Autoscale does not power off the remaining one machine (for example, M1) because that machine is reserved as a spare capacity.
Note:
For single-session OS random delivery groups, all changes to the desktop are lost when users log off sessions. However, if configured, user-specific settings are roamed along with the user profile.
Single-session OS static delivery groups
Capacity buffer is used to accommodate sudden spikes in demand by keeping a buffer of unassigned machines powered on based on the total number of unassigned machines in the delivery group. By default, the capacity buffer is 10% of the total number of unassigned machines in the delivery group.
Important:
After all machines in the delivery group are assigned, the capacity buffer does not play a role in powering machines on or off.
If the number of machines (including the capacity buffer) exceeds the total number of currently powered-on machines, additional, unassigned machines are powered on to meet the demand. If the number of machines (including the capacity buffer) is less than the total number of currently powered-on machines, excess machines are powered off or suspended, depending on the actions you configured.
For single-session OS static delivery groups, Autoscale:
- Powers assigned machines on during peak times and off during off-peak times only when the
AutomaticPowerOnForAssignedproperty of the applicable single-session OS delivery group is set to true. - Automatically powers on a machine during peak times if it is powered off and the
AutomaticPowerOnForAssignedDuringPeakproperty of the delivery group to which it belongs is set to true.
To understand how capacity buffer works with assigned machines, consider the following:
- The capacity buffer works only when the delivery group has one or more unassigned machines.
- If the delivery group has no unassigned machines (all machines in the delivery group are assigned), the capacity buffer does not play a role in powering machines on or off.
- The
AutomaticPowerOnForAssignedDuringPeakproperty determines whether assigned machines are powered on during peak times. If it is set to true, Autoscale keeps the machines powered on during peak times. Autoscale will also power them on even if they are powered off.
Power policies
Configure policies to manage the power of the machines for different scenarios. For each scenario, you can specify the wait time (in minutes) and the action to take after the specified time ends. Power policies is applicable for Single-session OS random delivery groups and Single-session OS static delivery groups.
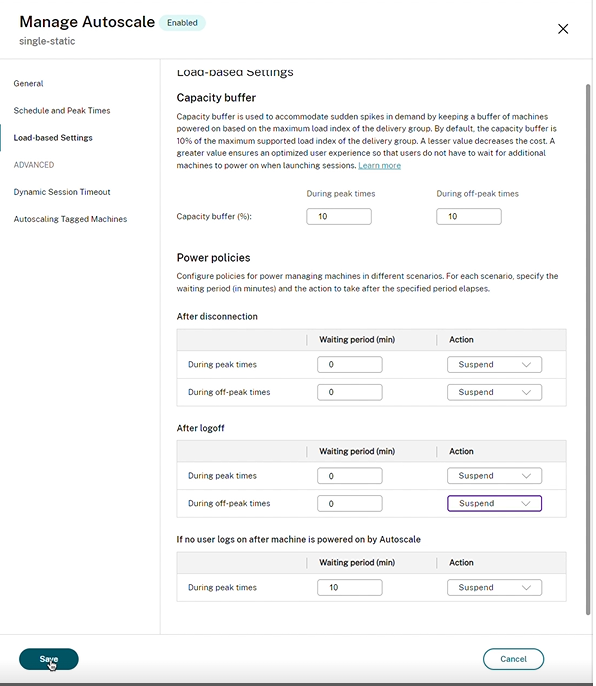
For After disconnection and After logoff, the following settings are applicable for both, during peak times and during off-peak times: You can set the wait time in minutes and actions like, no action, suspend, or shut down from the drop down.
If no user logs on after machine is powered on by Autoscale, the following settings are applicable only during peak times: You can set the wait time in minutes and actions like, no action, suspend, or shut down from the drop down during peak times.
Example scenario
Suppose you have the following scenario:
- Delivery group configuration. The delivery group that you want Autoscale to power manage contains 10 machines (M1 to M10).
-
Autoscale configuration
- Machines M1 to M3 are assigned, and machines M4 to M10 are unassigned.
- Capacity buffer set to 10% for peak and off-peak times.
- According to the selected schedule, Autoscale power manages machines between 09:00 AM and 06:00 PM.
See below for details about how Autoscale works in the scenario above.
- Start of schedule – 09:00 AM
- Autoscale powers on machines M1 to M3.
- Autoscale powers on an additional machine (for example, M4) because of the configured capacity buffer. Machine M4 is unassigned.
- A first user logs on
- The first time a user logs on to use a desktop, the user is assigned a desktop from a pool of desktops hosted on unassigned powered-on machines. In this case, the user is assigned a desktop from machine M4. Subsequent logons from that user connect to the same desktop that was assigned on first use.
- Autoscale starts to power on an additional machine (for example, M5) to meet the demand because of the configured capacity buffer.
- A second user logs on
- The user is assigned a desktop from the unassigned powered-on machines. In this case, the user is assigned a desktop from machine M5. Subsequent logons from that user connect to the same desktop that was assigned on first use.
- Autoscale starts to power on an additional machine (for example, M6) to meet the demand because of the configured capacity buffer.
- Users log off
- As users log off from their desktops or the desktops time out, Autoscale keeps the machines M1 to M5 powered on during 09:00 AM – 06:00 PM. When those users log on the next time, they connect to the same desktop that was assigned on first use.
- The unassigned machine M6 is waiting to serve a desktop to an incoming, unassigned user.
- End of schedule – 06:00 PM
- At 06:00 PM, Autoscale powers off machines M1 to M5.
- Autoscale keeps the unassigned machine M6 powered on because of the configured capacity buffer. That machine is waiting to serve a desktop to an incoming, unassigned user.
- In the delivery group, machines M6 to M10 are unassigned machines.