-
-
Deploying virtual desktops to VMs using the XenDesktop® Setup Wizard
This content has been machine translated dynamically.
Dieser Inhalt ist eine maschinelle Übersetzung, die dynamisch erstellt wurde. (Haftungsausschluss)
Cet article a été traduit automatiquement de manière dynamique. (Clause de non responsabilité)
Este artículo lo ha traducido una máquina de forma dinámica. (Aviso legal)
此内容已经过机器动态翻译。 放弃
このコンテンツは動的に機械翻訳されています。免責事項
이 콘텐츠는 동적으로 기계 번역되었습니다. 책임 부인
Este texto foi traduzido automaticamente. (Aviso legal)
Questo contenuto è stato tradotto dinamicamente con traduzione automatica.(Esclusione di responsabilità))
This article has been machine translated.
Dieser Artikel wurde maschinell übersetzt. (Haftungsausschluss)
Ce article a été traduit automatiquement. (Clause de non responsabilité)
Este artículo ha sido traducido automáticamente. (Aviso legal)
この記事は機械翻訳されています.免責事項
이 기사는 기계 번역되었습니다.책임 부인
Este artigo foi traduzido automaticamente.(Aviso legal)
这篇文章已经过机器翻译.放弃
Questo articolo è stato tradotto automaticamente.(Esclusione di responsabilità))
Translation failed!
Automating vDisk updates
Note: vDisk Update Management is intended for use with Standard Image Mode vDisks only. Private Image Mode vDisks can be updated using normal software distribution tool procedures. Attempting to register a Private Image Mode vDisk for vDisk Update Management, or switching a vdisk that is already registered, causes errors to occur.
In the Console, the vDisk Update Management feature is used to configure the automation of vDisk updates using virtual machines (VMs). Automated vDisk updates can occur on a scheduled basis, or at any time that the administrator invokes the update directly from the Console. This feature supports updates detected and delivered from WSUS and SCCM Electronic Software Delivery (ESD) servers.
When the Site node is expanded in the Console tree, the vDisk Update Management feature appears. When expanded, the vDisk Update Management feature includes the following managed components:
- Hosts
- vDisks
- Tasks
To configure a site for vDisk Update Management requires completing the following high-level tasks:
- Designate a Provisioning Server within the site to process updates. Refer to Enabling automatic vDisk updates.
- Configuring a Virtual Host Pool for Automated vDisk updates. Refer to Using the virtual host connection Wizard. Note: Supported hypervisor types include; Citrix XenServer, Microsoft SCVMM/Hyper-V, and VMWare vSphere/ESX.
- Create and configure an ESD VM that to update the vDisk. Refer to Creating and configuring ESD update VMs.
- Configuring vDisks for Automated updates.
- Creating and managing update tasks. Refer to Create and manage tasks. Note: The user that configures vDisk Update Management tasks must have permissions to create, modify, and delete Active Directory accounts.
- Run the update task by right-clicking on the task object in the Console, and then selecting the Run update now menu option. The Update VM boots, install updates, and reboot as necessary. After the update task successfully completes, the virtual machine is automatically shut down. The update status can be checked from the Console tree under vDisk **Update Management\ > vDisks>(**vDisk name)> Completed Update Status. The status can also be checked using the event viewer or in WSUS.
After the site is configured to use vDisk Update Management, managed vDisks can be updated using the following methods:
- Scheduled – the Image Update Service automatically updates a vDisk, on a scheduled basis as defined in the Update Task. For more details, refer to Create and manage tasks or Update task properties.
- User Envoked – select a managed vDisk from the Consoles Run update now menu option. This option requires that the administrator manually start, then stop the Update Device after the update is complete.
The following illustrates the basic update process for both scheduled or user invoked update methods:
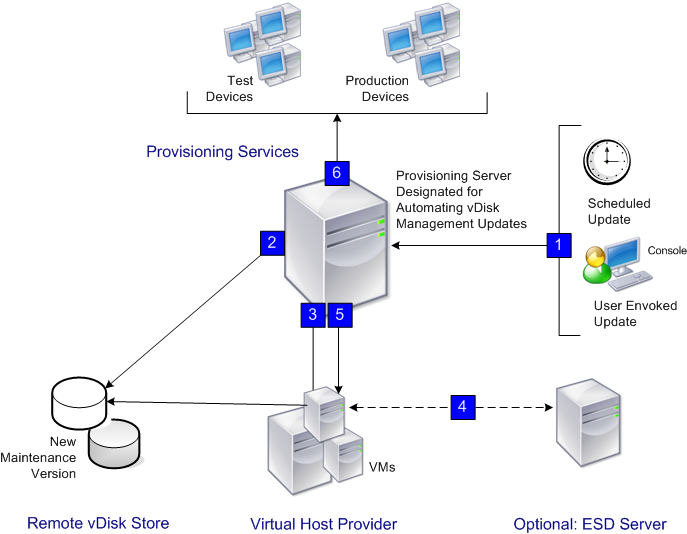
- The vDisk update process starts either automatically (scheduled), or when an administrator right-clicks on a managed vDisk, then selects the Run update now menu option.
- Provisioning Services creates a version (VHDX) and places that version in Maintenance mode (read/write).
- The virtual machine boots the assigned vDisk:
- Scheduled update – vDisk Update Management performs the boot automatically.
- User invoked update – the administrator invokes the update.
- All updates are automatically made and captured in the new version of the VHDX file.
- After you update the vDisk, the virtual machine is shut down automatically.
- The vDisk is promoted from Maintenance to either Test or Production. The availability of the new vDisk version depends on the Access mode that was selected when the Update Task Wizard was run. Or, the mode that is currently selected on the Update Task Properties’ Finish tab (Maintenance, Test, or Production). After this version is made available in production, target devices will be able to access it the next time they boot that vDisk.
Share
Share
In this article
This Preview product documentation is Citrix Confidential.
You agree to hold this documentation confidential pursuant to the terms of your Citrix Beta/Tech Preview Agreement.
The development, release and timing of any features or functionality described in the Preview documentation remains at our sole discretion and are subject to change without notice or consultation.
The documentation is for informational purposes only and is not a commitment, promise or legal obligation to deliver any material, code or functionality and should not be relied upon in making Citrix product purchase decisions.
If you do not agree, select I DO NOT AGREE to exit.