PKI entities
An Citrix Endpoint Management Public Key Infrastructure (PKI) entity configuration represents a component doing actual PKI operations (issuance, revocation, and status information). These components are either internal or external to Citrix Endpoint Management. Internal components are referred to as discretionary. External components are part of your corporate infrastructure.
Citrix Endpoint Management supports the following types of PKI entities:
-
Microsoft Certificate Services
-
Discretionary Certificate Authorities (CAs)
Citrix Endpoint Management supports the following CA servers:
- Windows Server 2016
- Windows Server 2019
- Windows Server 2022
Note:
Windows Servers 2012 R2, 2012, and 2008 R2 are no longer supported as they have reached end of life. For more information, see Microsoft products life cycle documentation.
Common PKI concepts
Regardless of its type, every PKI entity has a subset of the following capabilities:
- Sign: Issuing a new certificate, based on a Certificate Signing Request (CSR).
- Fetch: Recovering an existing certificate and key pair.
- Revoke: Revoking a client certificate.
About CA certificates
When you configure a PKI entity, indicate to Citrix Endpoint Management which CA certificate is the signer of certificates issued by (or recovered from) that entity. That PKI entity can return (fetched or newly signed) certificates signed by any number of different CAs.
Provide the certificate of each of these authorities as part of the PKI entity configuration. To do so, upload the certificates to Citrix Endpoint Management and then reference them in the PKI entity. For discretionary CAs, the certificate is implicitly the signing CA certificate. For external entities, you must specify the certificate manually.
Important:
When you create a Microsoft Certificate Services Entity template, avoid possible authentication issues with enrolled devices: Don’t use special characters in the template name. For example, don’t use:
! : $ ( ) # % + * ~ ? | { } [ ]
Microsoft Certificate Services
Citrix Endpoint Management interfaces with Microsoft Certificate Services through its web enrollment interface. Citrix Endpoint Management only supports the issuing of new certificates through that interface. If the Microsoft CA generates a NetScaler Gateway user certificate, NetScaler Gateway supports renewal and revocation for those certificates.
To create a Microsoft CA PKI entity in Citrix Endpoint Management, you must specify the base URL of the Certificate Services web interface. If you choose, use SSL client authentication to secure the connection between Citrix Endpoint Management and the Certificate Services web interface.
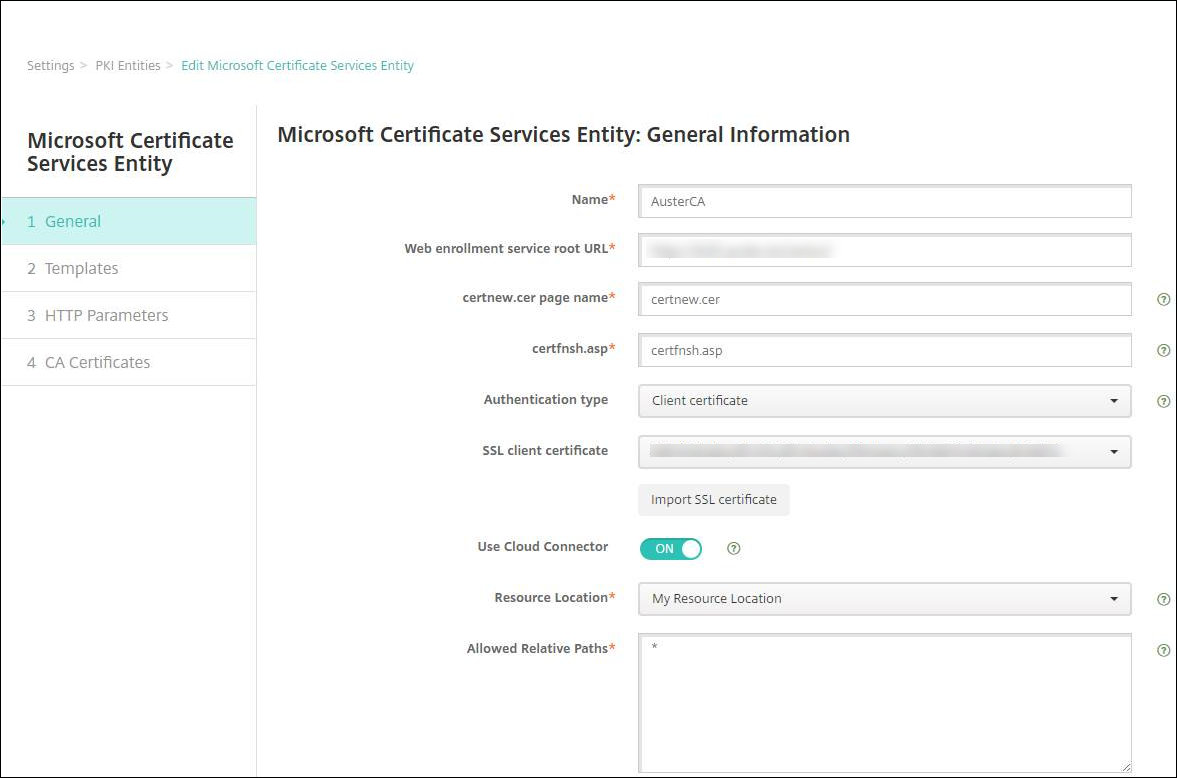
Add a Microsoft Certificate Services entity
-
In the Citrix Endpoint Management console, click the gear icon in the upper-right corner of the console and then click PKI Entities.
-
On the PKI Entities page, click Add.
A menu of PKI entity types appears.
-
Click Microsoft Certificate Services Entity.
The Microsoft Certificate Services Entity: General Information page appears.
-
On the Microsoft Certificate Services Entity: General Information page, configure these settings:
- Name: Type a name for your new entity, which you use later to refer to that entity. Entity names must be unique.
-
Web enrollment service root URL: Type the base URL of your Microsoft CA web enrollment service. For example:
https://192.0.0.1/certsrv/. The URL can use plain HTTP or HTTP-over-SSL. - certnew.cer page name: The name of the certnew.cer page. Use the default name unless you have renamed it for some reason.
- certfnsh.asp: The name of the certfnsh.asp page. Use the default name unless you have renamed it for some reason.
-
Authentication type: Choose the authentication method that you want to use.
- None
- HTTP Basic: Type the user name and password required to connect.
- Client certificate: Choose the correct SSL client certificate.
-
Use Cloud Connector: Choose On to use Cloud Connector for connections to the PKI server. Then, specify a Resource Location and Allowed Relative Paths for the connection.
- Resource Location: Choose from the resource locations defined in Citrix Cloud Connector.
-
Allowed Relative Paths: The relative paths allowed for the specified resource location. Specify one path per line. You can use the asterisk (*) wildcard.
Suppose that the resource location is
https://www.ServiceRoot/certsrv. To provide access to all URLs in that path, enter/*in Allowed Relative Paths.
-
Click Test Connection to make sure that the server is accessible. If it is not accessible, a message appears, stating that the connection failed. Check your configuration settings.
-
Click Next.
The Microsoft Certificate Services Entity: Templates page appears. On this page, you specify the internal names of the templates your Microsoft CA supports. When creating credential providers, you select a template from the list defined here. Every credential provider using this entity uses exactly one such template.
For Microsoft Certificate Services template requirements, see the Microsoft documentation for your Microsoft Server version. Citrix Endpoint Management doesn’t have requirements for the certificates it distributes other than the certificate formats noted in Certificates.
-
On the Microsoft Certificate Services Entity: Templates page, click Add, type the name of the template and then click Save. Repeat this step for each template that you want to add.
-
Click Next.
The Microsoft Certificate Services Entity: HTTP parameters page appears. On this page, you specify custom parameters for Citrix Endpoint Management to add to the HTTP request to the Microsoft Web Enrollment interface. Custom parameters are useful only for customized scripts running on the CA.
-
On the Microsoft Certificate Services Entity: HTTP parameters page, click Add, type the name and value of the HTTP parameters you want to add, and then click Next.
The Microsoft Certificate Services Entity: CA Certificates page appears. On this page, you must inform Citrix Endpoint Management of the signers of the certificates that the system gets through this entity. When your CA certificate is renewed, update it in Citrix Endpoint Management. Citrix Endpoint Management applies the change to the entity transparently.
-
On the Microsoft Certificate Services Entity: CA Certificates page, select the certificates you want to use for this entity.
-
Click Save.
The entity appears on the PKI Entities table.
NetScaler Gateway Certificate Revocation List (CRL)
Citrix Endpoint Management supports Certificate Revocation List (CRL) only for a third-party Certificate Authority. If you have a Microsoft CA configured, Citrix Endpoint Management uses NetScaler Gateway to manage revocation.
When you configure client certificate-based authentication, consider whether to configure the NetScaler Gateway Certificate Revocation List (CRL) setting Enable CRL Auto Refresh. This step makes sure that the user of a device in MAM-only mode can’t authenticate using an existing certificate on the device.
Citrix Endpoint Management reissues a new certificate, because it doesn’t restrict a user from generating a user certificate after one is revoked. This setting increases the security of PKI entities when the CRL checks for expired PKI entities.
Discretionary CAs
A discretionary CA is created when you provide Citrix Endpoint Management with a CA certificate and the associated private key. Citrix Endpoint Management handles certificate issuance, revocation, and status information internally, according to the parameters you specify.
When configuring a discretionary CA, you can activate Online Certificate Status Protocol (OCSP) support for that CA. If you enable OCSP support, the CA adds the extension id-pe-authorityInfoAccess to the certificates that the CA issues. The extension points to the Citrix Endpoint Management internal OCSP Responder at the following location:
https://<server>/<instance>/ocsp
When configuring the OCSP service, specify an OCSP signing certificate for the discretionary entity in question. You can use the CA certificate itself as the signer. To avoid the unnecessary exposure of your CA private key (recommended): Create a delegate OCSP signing certificate, signed by the CA certificate, and include this extension: id-kp-OCSPSigning extendedKeyUsage.
The Citrix Endpoint Management OCSP responder service supports basic OCSP responses and the following hashing algorithms in requests:
- SHA-256
- SHA-384
- SHA-512
Responses are signed with SHA-256 and the signing certificate key algorithm (DSA, RSA, or ECDSA).
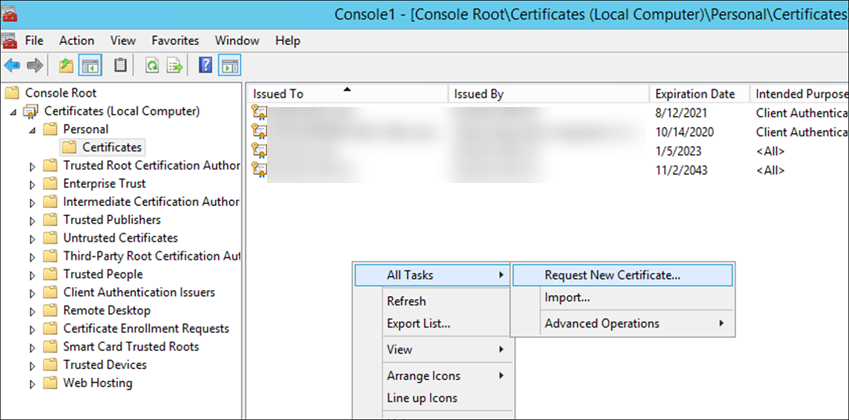
Generate and import a certificate for your CA
-
On your server, open the Microsoft Management Console (MMC) with your Local System account, and open the certificate snap-in. In the pane on the right, right-click and then click All Tasks > Request New Certificate.
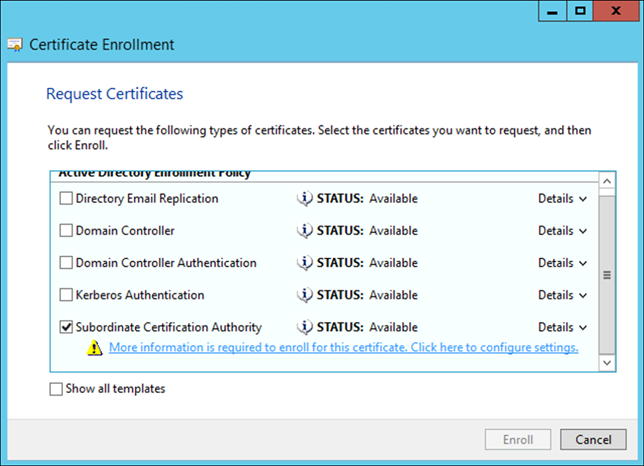
-
In the wizard that opens, click Next twice. In the Request Certificates list, select Subordinate Certification Authority and then click the More information link.
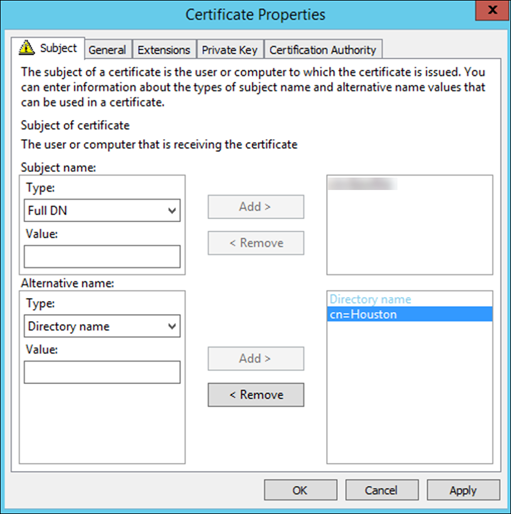
-
In the window, type a Subject name and Alternative name. Click OK.
-
Click Enroll, and then click Finish.
-
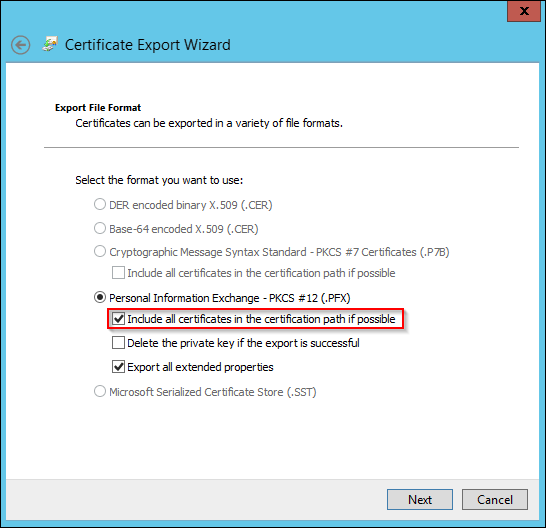
In the MMC, right-click the certificate you created. Click All Tasks > Export. Export the certificate as a .pfx file with a private key. Select the option to Include all certificates in the certification path if possible.
-
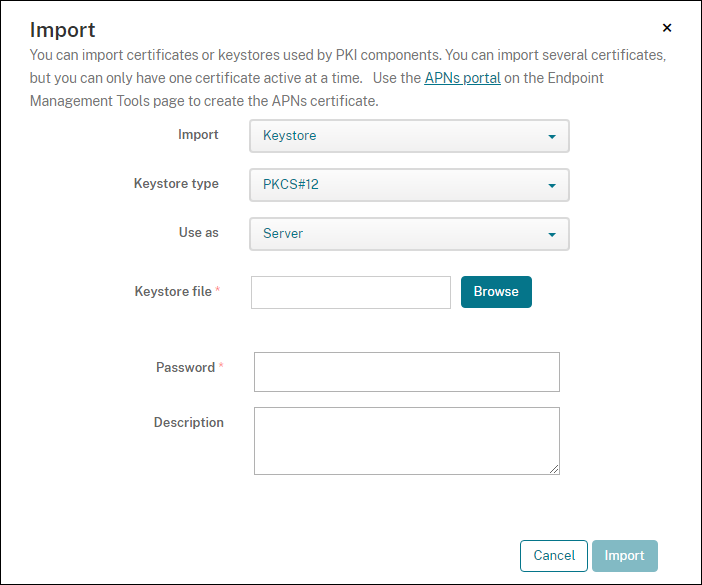
In the Citrix Endpoint Management console, navigate to Settings > Certificates.

-
Click Import. In the window that opens, browse for the certificate and private key files you exported previously.
-
Click Import. The certificate is added to the table.
Add discretionary CAs
-
In the Citrix Endpoint Management console, click the gear icon in the upper-right corner of the console and then click More > PKI Entities.
-
On the PKI Entities page, click Add.
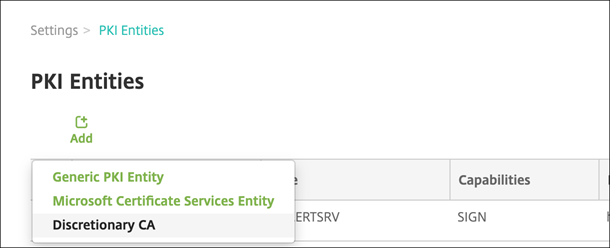
-
Click Discretionary CA.
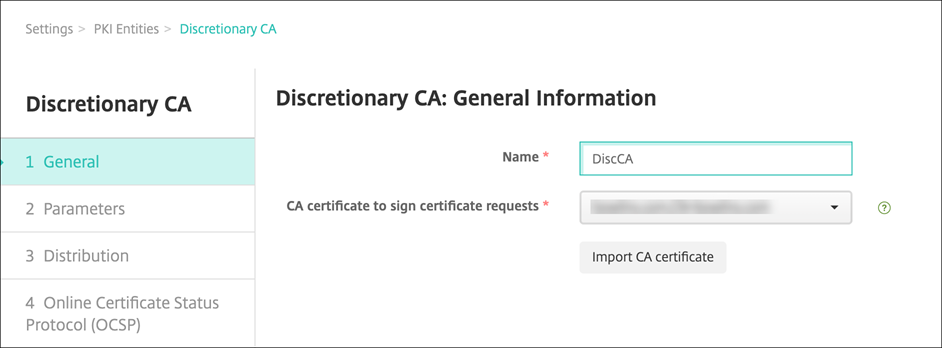
-
On the Discretionary CA: General Information page, configure the following:
- Name: Type a descriptive name for the discretionary CA.
-
CA certificate to sign certificate requests: Click a certificate for the discretionary CA to use to sign certificate requests.
This list of certificates is generated from the CA certificates with private keys you uploaded at Citrix Endpoint Management at Configure > Settings > Certificates.
-
Click Next.
-
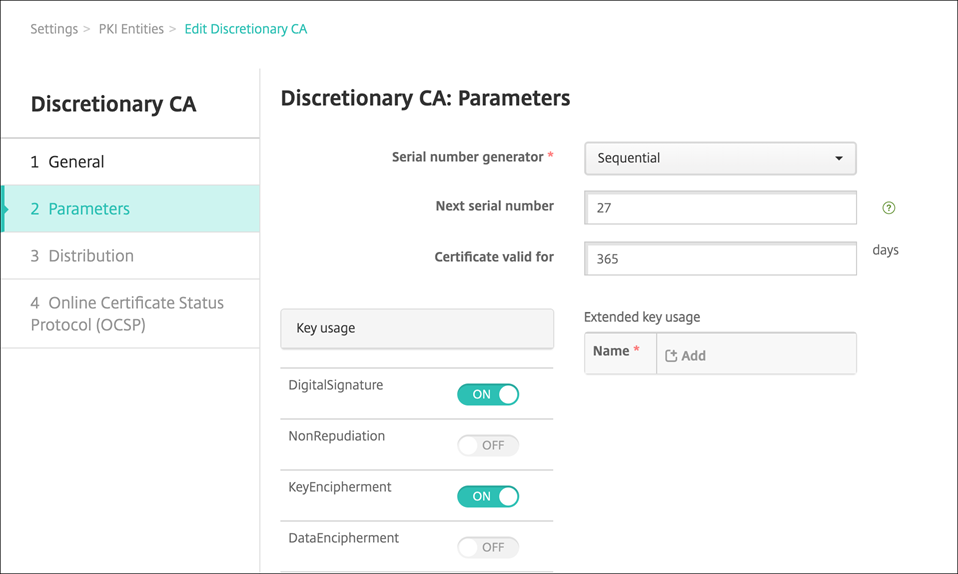
On the Discretionary CA: Parameters page, configure the following:
- Serial number generator: The discretionary CA generates serial numbers for the certificates it issues. From this list, click Sequential or Non-sequential to determine how the numbers are generated.
- Next serial number: Type a value to determine the next number issued.
- Certificate valid for: Type the number of days the certificate is valid.
- Key usage: Identify the purpose of the certificates issued by the discretionary CA by setting the appropriate keys to On. Once set, the CA is limited to issuing certificates for those purposes.
- Extended key usage: To add more parameters, click Add, type the key name and then click Save.
-
Click Next.
-
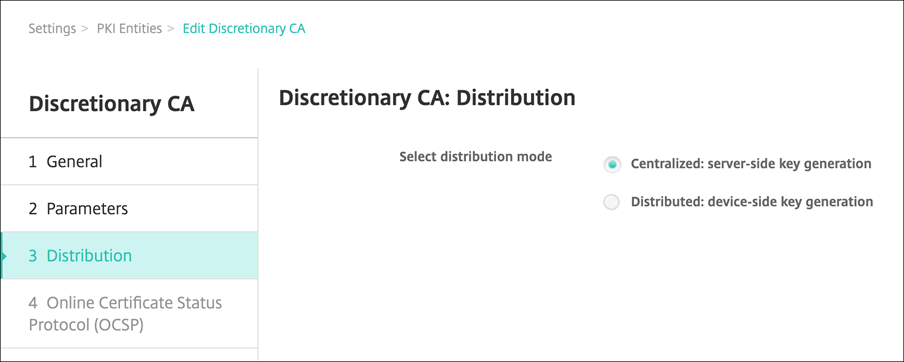
On the Discretionary CA: Distribution page, select a distribution mode:
- Centralized: server-side key generation. Citrix® recommends the centralized option. The private keys are generated and stored on the server and distributed to user devices.
- Distributed: device-side key generation. The private keys are generated on the user devices. This distributed mode uses SCEP and requires an RA encryption certificate with the keyUsage keyEncryption extension and an RA signing certificate with the keyUsage digitalSignature extension. The same certificate can be used for both encryption and signing.
-
Click Next.
-
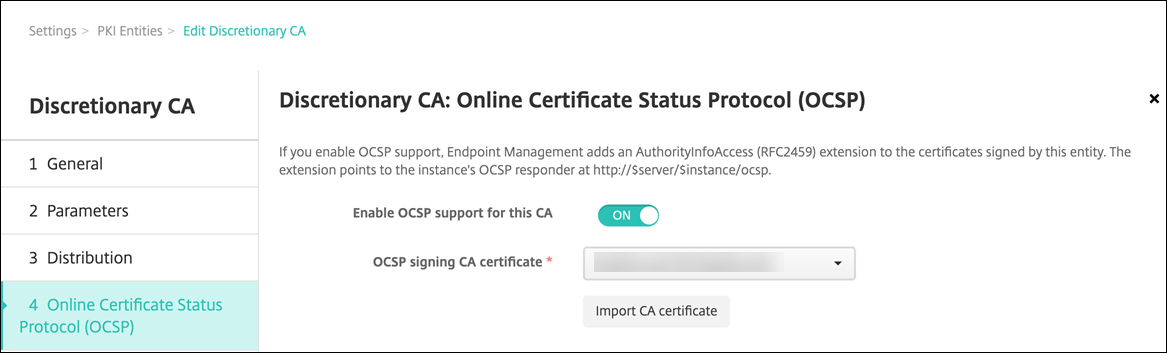
On the Discretionary CA: Online Certificate Status Protocol (OCSP) page, configure the following:
- If you want to add an
AuthorityInfoAccess(RFC2459) extension to the certificates signed by this CA, set Enable OCSP support for this CA to On. This extension points to the CA OCSP responder athttps://<server>/<instance>/ocsp. - If you enabled OCSP support, select an OSCP signing CA certificate. This list of certificates is generated from the CA certificates you uploaded to Citrix Endpoint Management.
Enabling the feature gives the Citrix ADC an opportunity to check the status of certificates. Citrix recommends that you enable this feature.
- If you want to add an
-
Click Save.
The discretionary CA appears on the PKI Entities table.
Configure a credential provider
-
In the Citrix Endpoint Management console, navigate to Settings > Credential Provider, and click Add.
-
On the Credential Providers: General Information page, configure the following:

- Name: Type a unique name for the new provider configuration. This name is used later to identify the configuration in other parts of the Citrix Endpoint Management console.
- Description: Describe the credential provider. Although this field is optional, a description can provide useful details about this credential provider.
- Issuing entity: Select Discretionary CA.
- Issuing method: Click Sign or Fetch to serve as the method that the system uses to get certificates from the configured entity. For client certificate authentication, use Sign.
-
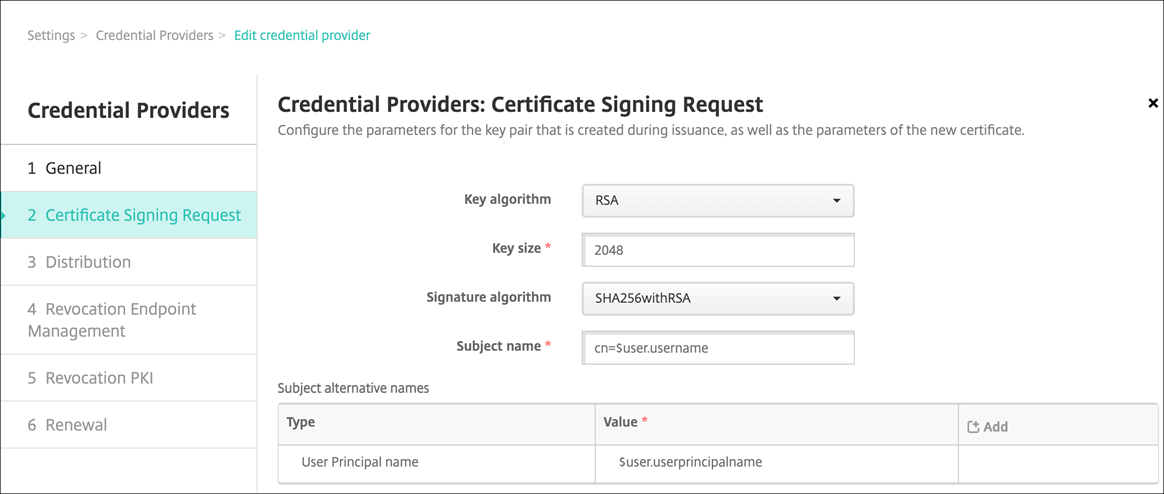
Click Next. On the Credential Providers: Certificate Signing Request page, configure the following according to your certificate configuration:
-
Key algorithm: Choose the key algorithm for the new key pair. Available values are RSA, DSA, and ECDSA.
-
Key size: Type the size, in bits, of the key pair. This field is required. Citrix recommends using 2048 bits.
-
Signature algorithm: Click a value for the new certificate. Values depend on the key algorithm. Citrix recommends SHA256withRSA.
-
Subject name: Required. Type the Distinguished Name (DN) of the new certificate subject. Use
CN=${user.username}for the user name orCN=${user.samaccountname}to use the sAMAccountName. -
To add an entry to the Subject alternative names table, click Add. Select the type of alternative name and then type a value in the second column.
Add the following:
- Type: User Principal name
-
Value:
$user.userprincipalname
As with the subject name, you can use Citrix Endpoint Management macros in the value field.
-
-
Click Next. On the Credential Providers: Distribution page, configure the following:
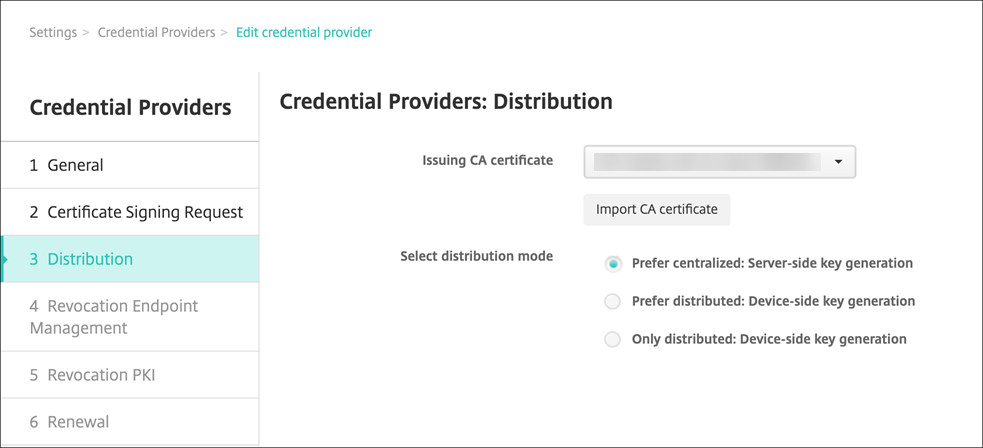
- Issuing CA certificate: Select the discretionary CA certificate that you added previously.
-
Select distribution mode: Select one of the following ways of generating and distributing keys:
- Prefer centralized: Server-side key generation: Citrix recommends this centralized option. It supports all platforms supported by Citrix Endpoint Management and is required when using NetScaler Gateway authentication. The private keys are generated and stored on the server and distributed to user devices.
- Prefer distributed: Device-side key generation: The private keys are generated and stored on the user devices. This distributed mode uses SCEP and requires an RA encryption certificate with the keyUsage keyEncryption and an RA signing certificate with the KeyUsage digitalSignature. The same certificate can be used for both encryption and signing.
- Only distributed: Device-side key generation: This option works the same as Prefer distributed: Device-side key generation, except that no option is available if device-side key generation fails or is unavailable.
If you selected Prefer distributed: Device-side key generation or Only distributed: Device-side key generation, click the RA signing certificate and RA encryption certificate. The same certificate can be used for both. New fields appear for these certificates.
-
Click Next. On the Credential Providers: Revocation Citrix Endpoint Management page, configure the conditions under which Citrix Endpoint Management internally flags certificates, issued through this provider configuration, as revoked. Configure the following:
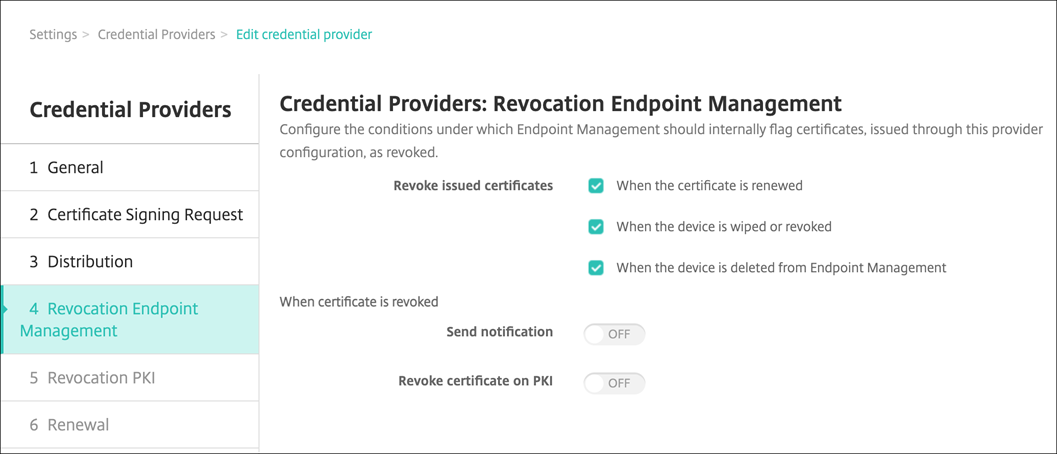
- In Revoke issued certificates, select one of the options indicating when to revoke certificates.
-
To direct Citrix Endpoint Management to send a notification when the certificate is revoked: Set the value of Send notification to On and choose a notification template.
- Revoke certificate on PKI doesn’t work when using Citrix Endpoint Management as your discretionary PKI.
-
Click Next. On the Credential Providers: Revocation PKI page, identify what actions to take on the PKI if the certificate is revoked. You also have the option of creating a notification message. Configure the following:

- Enable external revocation checks: Turn this setting On. More fields related to revocation PKI appear.
-
In the OCSP responder CA certificate list, select the distinguished name (DN) of the certificate’s subject.
You can use Citrix Endpoint Management macros for the DN field values. For example:
CN=${user.username}, OU=${user.department}, O=${user.companyname}, C=${user.c}\endquotation -
In the When certificate is revoked list, click one of the following actions to take on the PKI entity when the certificate is revoked:
- Do nothing.
- Renew the certificate.
- Revoke and wipe the device.
-
To direct Citrix Endpoint Management to send a notification when the certificate is revoked: Set the value of Send notification to On.
You can choose between two notification options:
- If you select Select notification template, you can select a pre-written notification message which you can then customize. These templates are in the Notification template list.
- If you select Enter notification details, you can write your own notification message. In addition to providing the recipient’s email address and the message, you can set how often the notification is sent.
-
Click Next. On the Credential Providers: Renewal page, configure the following:
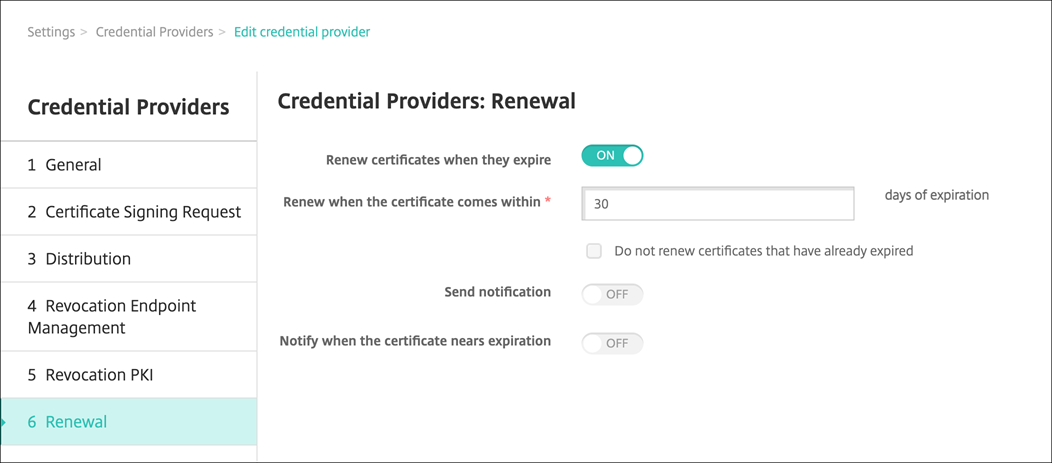
Set Renew certificates when they expire to On. More fields appear.
- In the Renew when the certificate comes within field, type how many days before expiration to renew the certificate.
- Optionally, select Do not renew certificates that have already expired. In this case, “already expired” means that the
NotAfterdate is in the past, not that it has been revoked. Citrix Endpoint Management doesn’t renew certificates after they are internally revoked.
To direct Citrix Endpoint Management to send a notification when the certificate has been renewed: Set Send notification to On. To direct Citrix Endpoint Management to send a notification when the certification nears expiration: Set Notify when certificate nears expiration to On. For either of those choices, you can choose between two notification options:
- Select notification template: Select a pre-written notification message which you can then customize. These templates are in the Notification template list.
- Enter notification details: Write your own notification message. Provide the recipient’s email address, a message, and a frequency for sending the notification.
-
Click Save.