
在 Azure 中创建预准备映像计算机目录
创建准备好的映像,并使用这些准备好的映像通过以下方式创建 MCS 计算机目录:
-
(#use-powershell)
使用准备好的镜像创建 MCS 计算机目录的关键步骤如下:
-
创建镜像定义和初始镜像版本。
-
使用镜像版本作为准备好的镜像来创建目录
使用 Web Studio
创建镜像定义和初始镜像版本
要创建镜像定义和初始镜像版本,请执行以下操作:
-
在 Web Studio 中,转到映像节点,然后单击创建映像定义。在简介页面上单击下一步。
-
在映像定义页面上,为映像定义指定操作系统类型和会话类型。
-
选择一个现有资源组或创建一个新资源组来保存映像资源。要启用映像共享,请在 Azure 计算库中选择放置映像版本,然后选择创建新库或使用现有库来保存其映像版本。
-
在映像页面上,选择资源(仅列出适用于所设置连接的资源)和用作创建映像版本模板的主映像。您可以选中使用计算机配置文件复选框并选择一个计算机配置文件。注意:在选择映像之前,请验证主映像是否已安装 VDA 2311 或更高版本,并且 VDA 上是否已安装 MCSIO 驱动程序。
-
在存储和许可证类型页面上,选择要在映像准备过程中使用的存储和许可证类型。注意:如果在映像页面上选择计算机配置文件,则计算机配置文件的许可证类型会根据配置文件设置预先选择。
-
在计算机规范页面上,选择计算机大小。如果在映像页面上选择计算机配置文件,则默认选择计算机配置文件的计算机大小。
-
在网卡页面上,为准备映像选择或添加网卡。对于每个网卡,选择一个关联的虚拟网络。
-
在磁盘设置页面上,选择客户管理的加密密钥 (CMEK)。如果计算机配置文件没有 CMEK 但主映像有,则会预先选择主映像中的 CMEK。
-
在版本描述页面上,输入所创建的初始映像版本的描述。
-
在摘要页面上,检查映像定义和所创建的初始映像版本的详细信息。输入映像定义的名称和描述。单击完成。
创建映像版本
映像版本允许管理特定映像的不同迭代或更新。此功能使您能够维护映像的多个版本以用于不同目的。
要从初始映像版本创建映像版本,请执行以下操作:
注意:
所有映像版本的主机单元必须相同。
-
转到映像节点,选择一个映像版本或映像定义,然后单击创建映像版本。
-
在“映像定义”页面上,您可以更改主机单元,并为该映像版本重新选择主映像和计算机配置文件。
-
如果您希望映像版本的配置与初始配置的映像版本不同,请在“创建映像版本”对话框的“存储和许可证类型”、“计算机规范”、“NIC”和“磁盘设置”页面上配置设置。
-
添加映像版本的描述。单击完成。
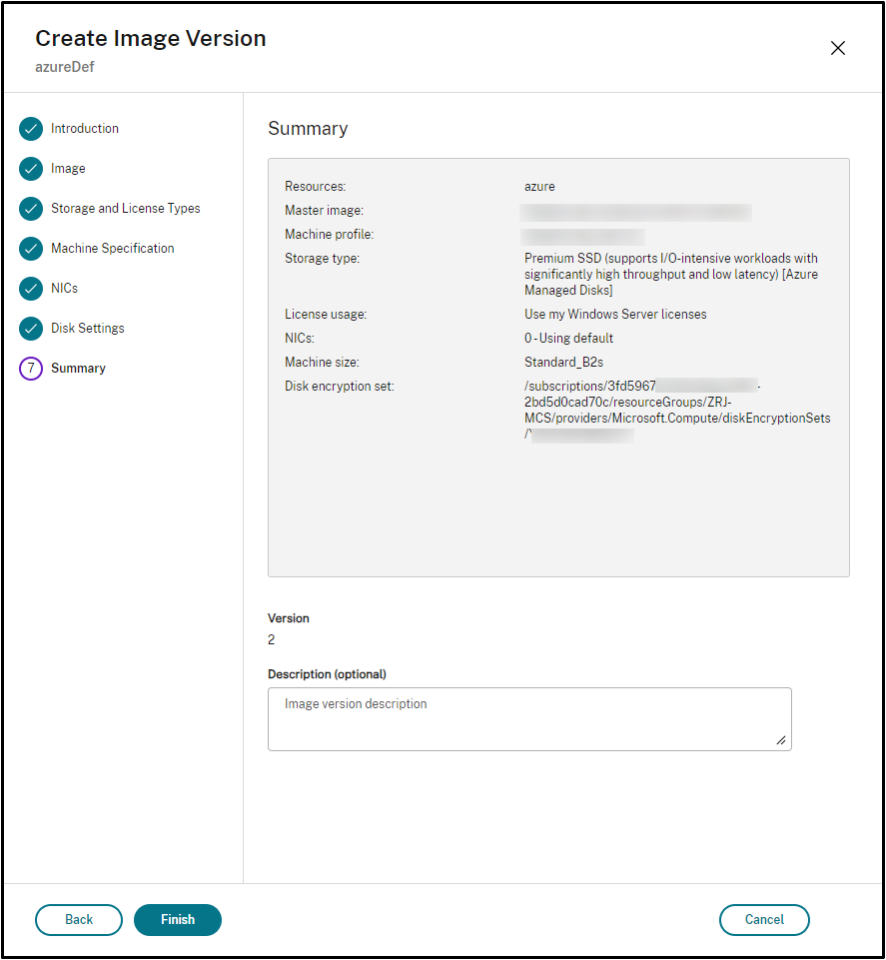
注意:
如果映像版本创建因任何原因失败,底部“故障排除”选项卡提供“重试”选项。
共享预准备映像
要在 Azure 的不同主机单元之间共享准备好的映像,请按照以下步骤操作:
-
右键单击映像版本并选择“管理映像共享”。Azure 环境中的所有主机单元都会显示。创建映像版本的资源将禁用任何操作。
-
选择要共享映像的托管单元,然后单击保存。共享状态列显示“正在进行中”。
-
单击“资源”选项卡以获取有关共享状态的更多详细信息。
注意:
当映像版本共享状态为进行中时,删除映像版本或管理映像共享选项将被禁用。
从“映像”节点创建计算机目录
使用“映像”节点中的“创建目录”选项,使用映像版本创建目录。
或者,您可以在计算机目录节点中创建目录时选择版本,链接到目录创建工作流中的准备好的映像选项。请参阅从计算机目录节点创建计算机目录
要从映像节点创建 MCS 计算机目录,请执行以下操作:
-
选择一个映像版本,然后单击创建目录。在简介页面上单击下一步。
-
在桌面体验页面上,选择所需的桌面体验。
-
从“映像”页面到“磁盘设置”页面,设置将根据所选映像版本预先选择。
-
在“资源组”页面上,您可以选择创建新的资源组或使用现有资源组来放置此目录的资源。
-
在以下页面上完成设置。
-
在摘要页面上,检查计算机目录的详细信息。输入计算机目录的名称和描述。单击完成。
-
转到计算机目录节点以查看创建的计算机目录。
从计算机目录节点创建计算机目录
要从计算机目录节点创建 MCS 计算机目录,请执行以下操作:
-
在左侧导航窗格中单击计算机目录。
-
单击创建计算机目录。此时将显示计算机目录设置页面。依次单击简介、计算机类型和计算机管理页面上的下一步。
-
在“计算机管理”页面上,选择以下设置:
-
选择“已进行电源管理的计算机(例如,虚拟机或刀片式电脑)”。
-
选择“Citrix 预配技术”。然后,选择“Citrix Machine Creation Services™”。
-
在“资源”字段中,列出了属于不同区域的资源。选择任意 Azure 网络资源,然后单击“下一步”。
-
-
在映像页面上:对于主映像类型,请按照以下步骤操作:
-
选择主映像。
-
在主映像下,选择一个映像。该边栏列出了与资源属于同一区域的所有映像。
-
点击 完成。
-
对于预准备映像类型,选择预准备映像。
-
在“准备好的映像”下,选择映像定义的映像版本。
-
单击映像版本名称。要查看有关所选映像版本的更多详细信息,请单击带下划线的版本号。
-
如果所选映像版本配置了计算机配置文件,请选择一个计算机配置文件。如果所选映像版本未配置计算机配置文件,则无法选择使用计算机配置文件。
-
-
配置以下页面上的设置。
-
在“磁盘设置”页面上,如果所选的准备好的映像使用磁盘加密集,则无法删除加密集,但可以将密钥更改为另一个加密密钥。
-
在“资源组”页面上,您可以选择创建新的资源组或使用现有资源组来放置此目录的资源。
-
在以下页面上完成设置。
-
在摘要页面上,检查计算机目录的详细信息。输入计算机目录的名称和描述。单击完成。
使用 PowerShell
创建准备好的映像
用于创建准备好的映像版本规范的详细 PowerShell 命令如下:
-
使用
Test-ProvImageDefinitionNameAvailable command检查可用的映像定义名称。例如,Test-ProvImageDefinitionNameAvailable -ImageDefinitionName <string[]> -
使用
New-ProvImageDefinition命令创建映像定义。例如,New-ProvImageDefinition -ImageDefinitionName image1 -OsType Windows -VdaSessionSupport MultiSession -
使用
Add-ProvImageDefinitionConnection命令在指定的托管连接中为映像定义创建新配置。Add-ProvImageDefinitionConnection的CustomProperties可以包括以下内容。如果不使用这些参数,则使用默认值。-
ResourceGroups:包含基础磁盘的资源组。 -
UseSharedImageGallery:基础磁盘类型的指示器。对于 ACG(映像共享),请使用true;对于快照,请使用false。 -
ImageGallery:当基础磁盘是 ACG 映像版本时的库名称。
例如,-
在快照和客户提供的资源组的情况下:
$CustomerOwnRsourceGroupProperties = @"
 <CustomProperties xmlns="http:// schemas.citrix.com/2014/xd/machinecreation" xmlns:xsi="http://www.w3.org/2001/XMLSchema-instance">
 <Property xsi:type="StringProperty" Name="ResourceGroups" Value="yangj_image" />
 </CustomProperties>
"@ -
在 ACG 和客户提供的资源组以及映像库的情况下:
$CustomerOwnAllProperties = @"
 <CustomProperties xmlns="http://schemas.citrix.com/2014/xd/machinecreation" xmlns:xsi="http://www.w3.org/2001/XMLSchema-instance">
 <Property xsi:type="StringProperty" Name="UseSharedImageGallery" Value="true" />
 <Property xsi:type="StringProperty" Name="ResourceGroups" Value="rg" />
 <Property xsi:type="StringProperty" Name="ImageGallery" Value="gallery" />
 </CustomProperties>
"@ -
在 ACG 和客户提供的资源组的情况下:
$CustomerOwnResourceGroupProperties = @"
 <CustomProperties xmlns="http://schemas.citrix.com/2014/xd/machinecreation" xmlns:xsi="http://www.w3.org/2001/XMLSchema-instance">
 <Property xsi:type="StringProperty" Name="UseSharedImageGallery" Value="true" />
 <Property xsi:type="StringProperty" Name="ResourceGroups" Value="rg" />
 </CustomProperties>
"@ -
在 ACG 和 Citrix 管理的资源组以及映像库的情况下:
$CustomerOwnResourceGroupNothingProperties = @"
 <CustomProperties xmlns="http://schemas.citrix.com/2014/xd/machinecreation" xmlns:xsi="http://www.w3.org/2001/XMLSchema-instance">
 <Property xsi:type="StringProperty" Name="UseSharedImageGallery" Value="true" />
 </CustomProperties>
 "@
Add-ProvImageDefinitionConnection -ImageDefinitionName image1 -HypervisorConnectionName Azure28 [-CustomProperties $CustomProperties] -
-
使用
New-ProvImageVersion命令创建映像版本。例如,New-ProvImageVersion -ImageDefinitionName image1 -Description "version 1" -
使用
Add-ProvImageVersionSpec命令将主映像版本规范添加到映像版本。例如,Add-ProvImageVersionSpec -ImageDefinitionName image1 -ImageVersionNumber 1 -HostingUnitName azure -MasterImagePath "XDHyp:\HostingUnits\azure\image.folder\azureresourcegroup.resourcegroup\win2022-snapshot.snapshot"注意:您只能为一个主机单元的一个映像版本添加一个主映像版本规范。 -
使用
New-ProvImageVersionSpec命令从主映像版本规范创建准备好的映像版本规范。例如,New-ProvImageVersionSpec
-SourceImageVersionSpecUid c6e7384c-b2f8-46d6-9519-29a2c57ed3cb
-NetworkMapping @{"0"="XDHyp:\HostingUnits\azure\virtualprivatecloud.folder\azureresourcegroup.resourcegroup\azure-vnet-eastus.virtualprivatecloud\dev.network"}
-ServiceOffering"XDHyp:\HostingUnits\azure\serviceoffering.folder\Standard_B2ms.serviceoffering" -CustomProperties "<CustomProperties xmlns=`"http://schemas.citrix.com/2014/xd/machinecreation`" xmlns:xsi=`"http://www.w3.org/2001/XMLSchema-instance`"></CustomProperties>" -RunAsynchronously -
您还可以使用
Add-ProvImageVersionSpecHostingUnit命令在所有托管连接中与另一个托管单元共享预准备映像版本规范。例如,Add-ProvImageVersionSpecHostingUnit -ImageVersionSpecUid xxxxxxx -HostingUnitName AzureWest注意:一个托管单元和准备类型只能有一个准备好的实例。
创建映像定义、映像版本和准备好的映像版本规范的完整 PowerShell 命令集示例:
New-ProvImageDefinition -ImageDefinitionName image1 -OsType Windows -VdaSessionSupport MultiSession

 $CustomProperties = @"
 <CustomProperties xmlns="http://schemas.citrix.com/2014/xd/machinecreation" xmlns:xsi="http://www.w3.org/2001/XMLSchema-instance">
     <Property xsi:type="StringProperty" Name="UseSharedImageGallery" Value="true" />
     <Property xsi:type="StringProperty" Name="ResourceGroups" Value="rg" />
     <Property xsi:type="StringProperty" Name="ImageGallery" Value="gallery" />
 </CustomProperties>
 "@

 Add-ProvImageDefinitionConnection -ImageDefinitionName image1 -HypervisorConnectionName Azure28 -CustomProperties $CustomProperties

 $imageVersion = New-ProvImageVersion -ImageDefinitionName image1 -Description "version 1"

 $SourceImageVersionSpec = Add-ProvImageVersionSpec -ImageVersionUid $imageVersion.ImageVersionUid `
     -HostingUnitUid $hostingunit.HostingUnitUid `
     -MasterImagePath "XDHyp:\HostingUnits\azure28\image.folder\abc.resourcegroup\def-snapshot.snapshot"

 New-ProvImageVersionSpec -NetworkMapping @{"0" = "XDHyp:\HostingUnits\azure28\virtualprivatecloud.folder\East US.region\virtualprivatecloud.folder\studio-mcs-infrastructure.resourcegroup\studio-mcs-vnet-eastus.virtualprivatecloud\mcs-dev.network" } -CustomProperties "<CustomProperties xmlns=`"http://schemas.citrix.com/2014/xd/machinecreation`" xmlns:xsi=`"http://www.w3.org/2001/XMLSchema-instance`"><Property xsi:type=`"StringProperty`" Name=`"LicenseType`" Value=`"Windows_Server`" /></CustomProperties>" -ServiceOffering "XDHyp:\HostingUnits\azure28\serviceoffering.folder\Standard_B2s.serviceoffering" -SourceImageVersionSpecUid $SourceImageVersionSpec.ImageVersionSpecUid
 Add-ProvImageVersionSpecHostingUnit -ImageVersionSpecUid xxxxxxx -HostingUnitName AzureWest
 $PreparedImageVersionSpec = Get-ProvImageVersionSpec -ImageVersionUid $imageVersion.ImageVersionUid | Where SourceImageVersionSpecUid-eq $SourceImageVersionSpec.ImageVersionSpecUid
注意:
-
映像定义中的所有映像版本规范必须属于同一托管单元。
-
一个映像版本只能有一个主映像版本规范和一个准备好的映像版本规范。
-
所有映像版本规范必须具有计算机配置文件,或者所有映像版本规范都不能具有计算机配置文件。
使用准备好的映像版本规范创建目录
使用
New-ProvScheme 命令从准备好的映像版本规范创建 MCS 计算机目录。例如,
New-ProvScheme -ProvisioningSchemeName <string> -ImageVersionSpecUid <Guid> -HostingUnitUid <Guid> -IdentityPoolUid <Guid> [-VMCpuCount <int>] [-VMMemoryMB <int>] [-UseWriteBackCache] [-NetworkMapping <Hashtable>] [-CleanOnBoot] [-Scope <string[]>] [-Metadata <Hashtable>] [-ServiceOffering <string>] [-SecurityGroup <string[]>] [-TenancyType <string>] [-MachineProfile <string>] [-CustomProperties <string>] [-ResetAdministratorPasswords] [-UseFullDiskCloneProvisioning] [-RunAsynchronously] [-PurgeJobOnSuccess] [-ProvisioningSchemeType <ProvisioningSchemeType>]
或者,
New-ProvScheme -ProvisioningSchemeName <string> -ImageVersionSpecUid <Guid> -HostingUnitName <string> -IdentityPoolName <string> [-VMCpuCount <int>] [-VMMemoryMB <int>] [-UseWriteBackCache] [-NetworkMapping <Hashtable>] [-CleanOnBoot] [-Scope <string[]>] [-Metadata <Hashtable>] [-ServiceOffering <string>] [-SecurityGroup <string[]>] [-TenancyType <string>] [-MachineProfile <string>] [-CustomProperties <string>] [-ResetAdministratorPasswords] [-UseFullDiskCloneProvisioning] [-RunAsynchronously] [-PurgeJobOnSuccess] [-ProvisioningSchemeType <ProvisioningSchemeType>]
如果要使用 ACG 映像版本规范,请将
UseSharedImageGallery 设置为 true。例如,
$provSchemeCustomProperties= @"
 <CustomProperties xmlns="http://schemas.citrix.com/2014/xd/machinecreation" xmlns:xsi="http://www.w3.org/2001/XMLSchema-instance">
     <Property xsi:type="StringProperty" Name="UseSharedImageGallery" Value="true" />
     <Property xsi:type="StringProperty" Name="StorageAccountType" Value="StandardSSD_LRS" />
 </CustomProperties>
 "@
 New-ProvScheme -ProvisioningSchemeName assignimage -ImageVersionSpecUid $PreparedImageVersionSpec.ImageVersionSpecUid `
     -HostingUnitUid $hostingunit.HostingUnitUid `
     -IdentityPoolUid $IdentityPool.IdentityPoolUid `
     -CleanOnBoot -Scope @() -SecurityGroup @() `
     -ServiceOffering "XDHyp:\HostingUnits\azure28\serviceoffering.folder\Standard_B2s.serviceoffering" `
     -NetworkMapping @{"0"="XDHyp:\HostingUnits\azure28\virtualprivatecloud.folder\East US.region\virtualprivatecloud.folder\studio-mcs-infrastructure.resourcegroup\studio-mcs-vnet-eastus.virtualprivatecloud\mcs-dev.network"} `
     -CustomProperties $provSchemeCustomProperties
创建目录的完整 Powershell 命令集示例:
$Catalog = New-BrokerCatalog  -AllocationType "Random"  -IsRemotePC $False  -MinimumFunctionalLevel "L7_20" -Name "azurecatalog" -PersistUserChanges "Discard" -ProvisioningType "MCS" -Scope @() -SessionSupport "MultiSession"

 $IdentityPool = New-AcctIdentityPool  -AllowUnicode  -Domain "azure.local" -IdentityPoolName "azurecatalog" -IdentityType "ActiveDirectory"  -NamingScheme "azure##" -NamingSchemeType "Numeric" -Scope @()

 $PreparedImageVersionSpec = Get-ProvImageVersionSpec -ImageDefinitionName image1 -ImageVersionNumber 1 -Filter "PreparationType -eq 'Mcs'"

 $Task = New-ProvScheme -ProvisioningSchemeName azurecatalog -ImageVersionSpecUid $PreparedImageVersionSpec.ImageVersionSpecUid -HostingUnitName azure -IdentityPoolName azurecatalog -CleanOnBoot -Scope @() -SecurityGroup @() -ServiceOffering "XDHyp:\HostingUnits\azure\serviceoffering.folder\Standard_B2s.serviceoffering" -NetworkMapping @{"0"="XDHyp:\HostingUnits\azure\virtualprivatecloud.folder\azureresourcegroup.resourcegroup\azure-vnet-eastus.virtualprivatecloud\dev.network"} -CustomProperties "<CustomProperties xmlns=`"http://schemas.citrix.com/2014/xd/machinecreation`" xmlns:xsi=`"http://www.w3.org/2001/XMLSchema-instance`">    <Property xsi:type="StringProperty" Name="UseSharedImageGallery" Value="true" /><Property xsi:type=`"StringProperty`" Name=`"StorageAccountType`" Value=`"StandardSSD_LRS`" /></CustomProperties>" -RunAsynchronously

 Get-ProvTask -TaskId $Task.TaskId
 $ProvScheme = Get-ProvScheme -ProvisioningSchemeName azurecatalog

 Set-BrokerCatalog -Name $Catalog.Name -ProvisioningSchemeId $ProvScheme.ProvisioningSchemeUid
更多信息
-
映像管理
下一步操作
-
管理预准备映像计算机目录