Connection to Microsoft Azure
Create and manage connections and resources describes the wizards that create a connection. The following information covers details specific to Azure Resource Manager cloud environments.
Note:
Before creating a connection to Microsoft Azure, you must finish setting up your Azure account as a resource location. See Microsoft Azure Resource Manager virtualization environments.
Create service principals and connections
Before creating connections, you must set up service principals that connections use to access Azure resources. You can create a connection in two ways:
- Create a service principal and a connection together using Studio
- Create a connection using a previously created service principal
This section shows you how to complete these tasks:
- Create a service principal and connection using Studio
- Create a service principal using PowerShell
- Get the application secret in Azure
- Create a connection using an existing service principal
Considerations
Before you start, be aware of these considerations:
- Citrix® recommends using service principals with a Contributor role. However, see the Minimum permissions section to get the list of minimum permissions.
- When creating the first connection, Azure prompts you to grant it the necessary permissions. For future connections you must still authenticate, but Azure remembers your previous consent and does not display the prompt again.
- After you authenticate with Azure for the first time, a Citrix owned multi-tenant application (ID:
08b70dc3-76c5-4611-ba7d-3312ba36cb2b) is invited to your Microsoft Entra ID on behalf of the authenticated account. - Accounts used for authentication must have permissions to assign roles in the subscription using Azure RBAC. Example, Owner, Role Based Access Control Administrator, or User Access Administrator of the subscription.
- The account used for authentication must be a member of the subscription’s directory. There are two types of accounts to be aware of: ‘Work or School’ and ‘personal Microsoft account.’ See CTX219211 for details.
-
While you can use an existing Microsoft account by adding it as a member of the subscription’s directory, there can be complications if the user was previously granted guest access to one of the directory’s resources. In this case, they might have a placeholder entry in the directory that does not grant them the necessary permissions, and an error is returned.
Rectify this by removing the resources from the directory and adding them back explicitly. However, exercise this option carefully, because it has unintended effects on other resources that this account can access.
- There is a known issue where certain accounts are detected as directory guests when they are actually members. Configurations like this typically occur with older established directory accounts. Workaround: add an account to the directory, which takes the proper membership value.
- Resource groups are simply containers for resources, and they can contain resources from regions other than their own region. This can potentially be confusing if you expect resources displayed in a resource group’s region to be available.
- Ensure that your network and subnet are large enough to host the number of machines you require. This requires some foresight, but Microsoft helps you specify the right values, with guidance about the address space capacity.
Create a service principal and connection using Studio
Important:
This feature is not yet available for Azure China subscriptions.
With Studio, you can create both a service principal and a connection in a single workflow. Service principals give connections access to Azure resources. When you authenticate to Azure to create a service principal, an application is registered in Azure. A secret key (called client secret or application secret) is created for the registered application. The registered application (a connection in this case) uses the client secret to authenticate to Microsoft Entra ID.
Before you start, make sure that you’ve met these prerequisites:
- You have a user account in your subscription’s Microsoft Entra tenant.
- Accounts used for authentication must have permissions to assign roles in the subscription using Azure RBAC. Example, Owner, Role Based Access Control Administrator, or User Access Administrator of the subscription.
- You have global administrator, application administrator, or application developer permissions for authentication. The permissions can be revoked after you create a host connection. For more information about roles, see Microsoft Entra built-in roles.
Use the Add Connection and Resources wizard to create a service principal and a connection together:
-
On the Connection page, select Create a new connection, the Microsoft Azure connection type, and your Azure environment.
-
Select which tools to use to create the virtual machines and then select Next.
-
On the Connection Details page, select the Application client secret authentication mode, then create a service principal and set the connection name as follows:
- Enter your Azure subscription ID and a name for the connection. After you enter the subscription ID, the Create new button is enabled.
Note:
The connection name can contain 1–64 characters, and cannot contain only blank spaces or the characters
\/;:#.*?=<>|[]{}"'()'.- Select Create new and then enter the Microsoft Entra account user name and password.
- Select Sign in.
- Select Accept to give Citrix DaaS™ the listed permissions. Azure creates a service principal that allows Citrix DaaS to manage Azure resources on behalf of the specified user.
> **Note:** > > Citrix DaaS requires the following permissions to create a new service principal: > > - **Access Azure Service Management as you** > - **Read and write applications** > - **Sign you in and read your profile** > - **Maintain access to data you have given it access to**-
After you select Accept, you’re taken back to the Connection Details page.
Note:
After you successfully authenticate to Azure, the Create new and Use existing buttons disappear. The Connection successful text appears with a green check mark, indicating the successful connection to your Azure subscription.
-
To route API requests to Azure through Citrix Cloud™ Connectors, select the Route traffic through Citrix Cloud Connectors checkbox. When Cloud Connectors have no direct internet access, you can select Use the proxy configured on Citrix Cloud Connectors to ensure Azure connectivity works properly through Citrix Cloud Connectors.
Alternatively, you can enable this feature using PowerShell. For more information, see Create a secure environment for Azure-managed traffic.
Note:
This option is available only when there are active Citrix Cloud Connectors in your deployment. Currently, this feature is not supported for Connector Appliances.
-
Select Next.
Note:
You cannot proceed to the next page until you successfully authenticate to Azure and consent to giving the required permissions.
-
Configure the resources for the connection as follows:
- On the Region page, select a region.
- On the Network page, do the following:
- Type a 1–64 character resource name to help identify the region and network combination. A resource name cannot contain only blank spaces or the characters
\/;:#.*?=<>|[]{}"'()'. - Select a virtual network/resource group pair. (If you have more than one virtual network with the same name, pairing the network name with the resource group provides unique combinations.) If the region you selected on the previous page does not have any virtual networks, return to that page and select a region that has virtual networks.
- Type a 1–64 character resource name to help identify the region and network combination. A resource name cannot contain only blank spaces or the characters
-
On the Summary page, view a summary of settings and select Finish to complete your setup.
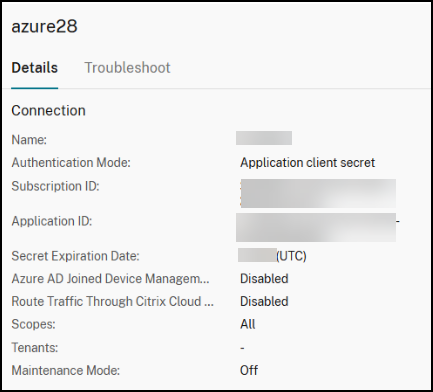
View the application ID
After you create a connection, you can view the application ID that the connection uses to access Azure resources.
In the Connection and Resources list, select the connection to view the details. The Details tab shows the Application ID.
Create a service principal using PowerShell
To create a service principal using PowerShell, connect to your Azure Resource Manager subscription and use the PowerShell cmdlets provided in the following sections.
Make sure that you have these items ready:
-
SubscriptionId: Azure Resource Manager
SubscriptionIDfor the subscription where you want to provision VDAs. - ActiveDirectoryID: Tenant ID of the application that you registered with Microsoft Entra ID.
- ApplicationName: Name for the application to be created in Microsoft Entra ID.
Detailed steps are as follows:
-
Connect to your Azure Resource Manager subscription.
Connect-AzAccount -
Select the Azure Resource Manager subscription where you want to create the service principal.
Get-AzSubscription -SubscriptionId $subscriptionId | Select-AzSubscription -
Create the application in your AD tenant.
$AzureADApplication = New-AzADApplication -DisplayName $ApplicationName -
Create a service principal.
New-AzADServicePrincipal -ApplicationId $AzureADApplication.AppId -
Assign a role to the service principal.
New-AzRoleAssignment -RoleDefinitionName Contributor -ServicePrincipalName $AzureADApplication.AppId –scope /subscriptions/$SubscriptionId -
From the output window of the PowerShell console, note the ApplicationId. You provide that ID when creating the host connection.
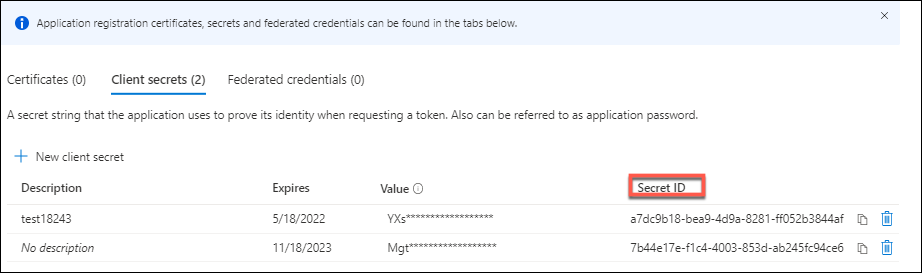
Get the application secret in Azure
To create a connection using an existing service principal, you must first get the application ID and secret of the service principal in the Azure portal.
Detailed steps are as follows:
- Get the Application ID from Studio or using PowerShell.
- Sign in to the Azure portal.
- In Azure, select Microsoft Entra ID.
- From App registrations in Microsoft Entra ID, select your application.
- Go to Certificates & secrets.
- Click Client secrets.
Create a connection using an existing service principal
If you already have a service principal, you can use it to create a connection using Studio.
Make sure that you have these items ready:
- SubscriptionId
- ActiveDirectoryID (tenant ID)
- Application ID
-
Application secret
For more information, see Get the application secret.
- Secret expiration date
Detailed steps are as follows:
In the Add Connection and Resources wizard:
-
On the Connection page, select Create a new connection, the Microsoft Azure connection type, and your Azure environment.
-
Select which tools to use to create the virtual machines and then select Next.
-
On the Connection Details page, select the Application client secret authentication mode, then enter your Azure subscription ID and a name for the connection.
Note:
The connection name can contain 1–64 characters, and cannot contain only blank spaces or the characters
\/;:#.*?=<>|[]{}"'()'. -
Select Use existing. In the Existing Service Principal Details window, enter the following settings for the existing service principal. After you enter the details, the Save button is enabled. Select Save. You cannot progress beyond this page until you provide valid details.
- Subscription ID. Enter your Azure subscription ID. To obtain your subscription ID, sign in to the Azure portal and navigate to Subscriptions > Overview.
- Active Directory ID (tenant ID). Enter the Directory (tenant) ID of the application that you registered with Microsoft Entra ID.
- Application ID. Enter the Application (client) ID of the application that you registered with Microsoft Entra ID.
- Application secret. Enter a secret key (client secret). The registered application uses the key to authenticate to Microsoft Entra ID. We recommend that you change keys regularly for security purposes. Be sure to save the key because you cannot retrieve the key later.
-
Secret expiration date. Enter the date after which the application secret expires. You receive an alert on the console starting 14 days before the secret key expires. However, if the secret key expires, you receive errors.
Note:
For security purposes, the expiration period cannot be more than two years from now.
- Authentication URL. This field is automatically populated and isn’t editable.
- Management URL. This field is automatically populated and isn’t editable.
- Storage suffix. This field is automatically populated and isn’t editable.
- Azure blob storage endpoint to upload or download disks or snapshots. This field is automatically populated and isn’t editable.
- Key Vault Service. This field is automatically populated and isn’t editable.
-
Service bus suffix. This field is automatically populated and isn’t editable.
Access to the following endpoints is required for creating an MCS catalog in Azure. Access to these endpoints optimizes connectivity between your network and the Azure portal and its services.
- Authentication URL:
https://login.microsoftonline.com - Management URL:
https://management.azure.com. This is a request URL for Azure Resource Manager provider APIs. The endpoint for management depends on the environment. For example, for Azure Global, it ishttps://management.azure.com, and for Azure US Government, it ishttps://management.usgovcloudapi.net. - Storage suffix:
https://*.core.windows.net. This (*) is a wildcard character for storage suffix. For example,https://demo.table.core.windows.net. - Azure blob storage endpoint to upload or download disks or snapshots:
https://*.storage.azure.net. This (*) is a wildcard character for blob storage import and export operations. For example,https://md-impexp-xxxxx.z[00-50].blob.storage.azure.net. - Key vault service:
https://*.vault.azure.net. This (*) is a wildcard character for the key vault name. For example,https://<your-key-vault-name>.vault.azure.net. - Service bus suffix:
https://*.servicebus.windows.net. This (*) is a wildcard character for namespaces created in the global Azure cloud. For example,https://{serviceNamespace}.servicebus.windows.net/{path}.
- Authentication URL:
-
After selecting Save, you’re taken back to the Connection Details page. Select Next to proceed to the next page.
-
Configure the resources for the connection as follows:
- On the Region page, select a region.
- On the Network page, do the following:
- Type a 1–64 character resource name to help identify the region and network combination. A resource name cannot contain only blank spaces or the characters
\/;:#.*?=<>|[]{}"'()'. - Select a virtual network/resource group pair. (If you have more than one virtual network with the same name, pairing the network name with the resource group provides unique combinations.) If the region you selected on the previous page does not have any virtual networks, return to that page and select a region that has virtual networks.
- Type a 1–64 character resource name to help identify the region and network combination. A resource name cannot contain only blank spaces or the characters
-
On the Summary page, view a summary of settings and select Finish to complete your setup.
Manage service principals and connections
This section details how you can manage service principals and connections:
- Configure Azure throttling settings
- Manage service principal of an existing hosting connection
- Enable image sharing in Azure
- Add shared tenants to a connection using Studio
- Implement image sharing using PowerShell
- Create a secure environment for Azure-managed traffic
- Manage the application secret and secret expiration date
Configure Azure throttling settings
Azure Resource Manager throttles requests for subscriptions and tenants, routing traffic based on defined limits, tailored to the specific needs of the provider. See Throttling Resource Manager requests on the Microsoft site for more information. Limits exist for subscriptions and tenants, where managing many machines can become problematic. For example, a subscription containing many machines might experience performance problems related to power operations.
Tip:
For more information, see Improving Azure performance with Machine Creation Services.
To help mitigate these issues, Citrix DaaS allows you to remove MCS internal throttling to use more of the available request quota from Azure.
We recommend the following optimal settings when powering VMs on or off in large subscriptions, for example, those containing 1,000 VMs:
- Absolute simultaneous operations: 500
- Maximum new operations per minute: 2000
- Max concurrency of operations: 500
Use Studio to configure Azure operations for a given host connection:
- From Studio, select Hosting in the left pane.
- Select an Azure-related connection to edit it.
- In the Edit Connection wizard, select Advanced.
- On the Advanced page, use the configuration options to specify the number of simultaneous actions and maximum new actions per minute, and any additional connection options.

MCS supports 500 maximum concurrent operations by default. Alternatively, you can use the Remote PowerShell SDK to set the maximum number of concurrent operations.
Use the PowerShell property, MaximumConcurrentProvisioningOperations, to specify the maximum number of concurrent Azure provisioning operations. When using this property, consider:
- Default value of
MaximumConcurrentProvisioningOperationsis 500. - Configure the
MaximumConcurrentProvisioningOperationsparameter using the PowerShell commandSet-item.
Manage the service principal of an existing hosting connection
After creating a hosting connection using a service principal, you can choose to edit the hosting connection to have:
- New service principal
- Use another existing service principal
- From Studio, select Hosting from the left pane.
- Select the connection and then select Edit Connection in the action bar.
- Select Connection Properties from the left pane.
-
On the Connection Properties page that appears, click Edit conenction settings. You can now choose to create a new service principal or use another existing service principal.
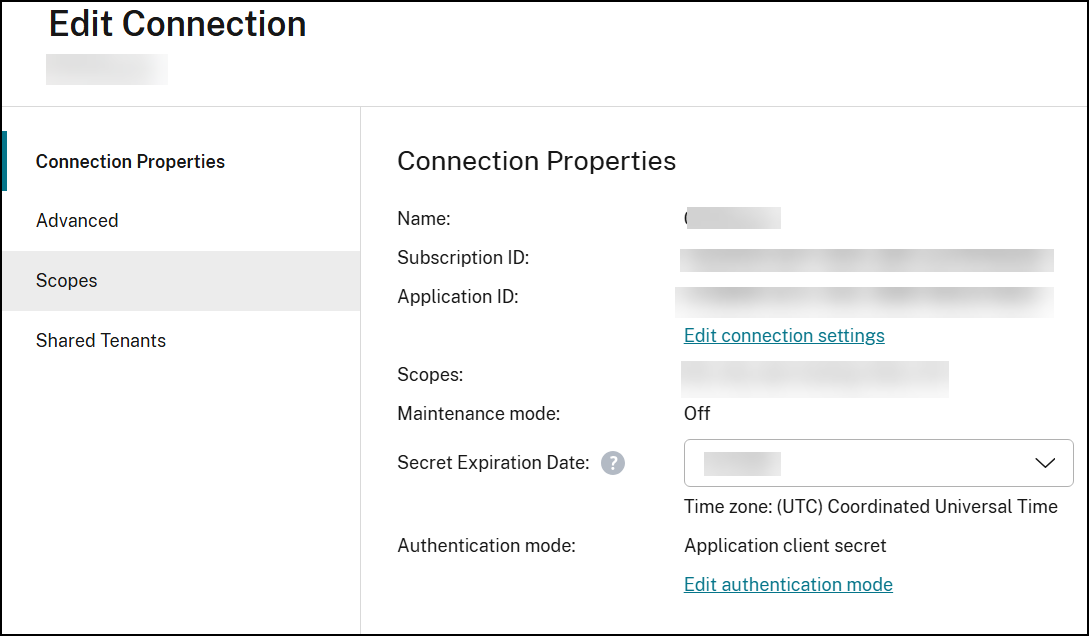
- Click Create service principal to create a new service principal. Follow the prompt to log in to your Microsoft Entra user account. Citrix uses the multi-tenant application ID
08b70dc3-76c5-4611-ba7d-3312ba36cb2bto create a new service principal for the existing host connection and grant proper permissions. - Click Use existing to use another existing service principal for that hosting connection.
- Click Create service principal to create a new service principal. Follow the prompt to log in to your Microsoft Entra user account. Citrix uses the multi-tenant application ID
Enable image sharing in Azure
When creating or updating machine catalogs, you can select shared images from different Azure tenants and subscriptions (shared through the Azure Compute Gallery). To enable image sharing within or across tenants, you must make the necessary settings in Azure:
Share images within a tenant (across subscriptions)
To select an image in Azure Compute Gallery that belongs to a different subscription, the image must be shared with the service principal (SPN) of that subscription.
For example, if there is a service principal (SPN 1), which is configured in Studio as:
Service principal: SPN 1
Subscription: subscription 1
Tenant: tenant 1
The image is in a different subscription, which is configured in Studio as:
Subscription: subscription 2
Tenant: tenant 1
If you want to share the image in subscription 2 with subscription 1 (SPN 1), go to subscription 2, and share the resource group with SPN1.
The image must be shared with another SPN using Azure role-based access control (RBAC). Azure RBAC is the authorization system used to manage access to Azure resources. For more information on Azure RBAC, see the Microsoft document What is Azure role-based access control (Azure RBAC). To grant access, you assign roles to service principals at resource group scope with the Contributor role. To assign Azure roles, you must have Microsoft.Authorization/roleAssignments/write permission, such as User Access Administrator or Owner. For more information on sharing images with another SPN, see the Microsoft document Assign Azure roles using the Azure portal.
Share images across tenants
To share images across tenants with Azure Compute Gallery, create or update the application registration and use this application to create hosting connection.
For example, if there are two tenants (Tenant 1 and Tenant 2) and you want to share your image gallery with Tenant 1, then:
-
Create an application registration for Tenant 1. For more information, see Create the app registration.
-
Give Tenant 2 access to the application by requesting a sign-in using a browser. Replace
Tenant2 IDwith the tenant ID of Tenant 1. ReplaceApplication (client) IDwith the application ID of the application registration that you created. When done making the replacements, paste the URL into a browser and follow the sign-in prompts to sign into Tenant 2. For example:https://login.microsoftonline.com/<Tenant 2 ID>/oauth2/authorize?client_id=<Application (client) ID>&response_type=code&redirect_uri=https%3A%2F%2Fwww.microsoft.com%2F <!--NeedCopy-->For more information, see Give Tenant 2 access.
-
Give the application access to the Tenant 2 resource group. Sign in as Tenant 2 and give the application registration access to the resource group that has the gallery image. For more information, see Authenticate requests across tenants.
Add shared tenants to a connection using Studio
When creating or updating machine catalogs in Studio, you can select shared images from different Azure tenants and subscriptions (shared through the Azure Compute Gallery). The feature requires that you provide shared tenant and subscription information for associated host connections.
Note:
Make sure you’ve configured the necessary settings in Azure to enable image sharing across tenants. For more information, see Share images across tenants.
Complete the following steps for a connection:
- From Studio, select Hosting in the left pane.
-
Select the connection and then select Edit Connection in the action bar.

- In Shared Tenants, do the following:
- Provide the application ID and application secret associated with the subscription of the connection. DaaS uses this information to authenticate to Microsoft Entra ID.
- Add tenants and subscriptions that share the Azure Compute Gallery with the subscription of the connection. You can add up to eight shared tenants and eight subscriptions for each tenant.
- When you are finished, select Apply to apply the changes you made and keep the window open, or select OK to apply the changes and close the window.
Implement image sharing using PowerShell
This section guides you through the processes of sharing images using PowerShell:
- Select an image from a different subscription
- Update hosting connection custom properties with shared tenant IDs
- Select an image from a different tenant
Select an image from a different subscription
You can select an image in Azure Compute Gallery that belongs to a different shared subscription in the same Azure tenant to create and update MCS catalogs using PowerShell commands.
- In the hosting unit root folder, Citrix creates a new shared subscription folder called
sharedsubscription. -
List all shared subscriptions in a tenant.
Get-ChildItem -Path "XDhyp:\HostingUnits\azres\sharedsubscription.folder" <!--NeedCopy--> -
Select one shared subscription, and then list all shared resource groups of that shared subscription.
Get-ChildItem -Path "XDhyp:\HostingUnits\azres\image.folder\abc123.sharedsubscription" <!--NeedCopy--> -
Select a resource group, and then list all galleries of that resource group.
Get-ChildItem -Path "XDhyp:\HostingUnits\azres\image.folder\abc123.sharedsubscription\ xyz.resourcegroup" <!--NeedCopy--> -
Select a gallery, and then list all image definitions of that gallery.
Get-ChildItem -Path "XDhyp:\HostingUnits\azres\image.folder\abc123.sharedsubscription\xyz.resourcegroup\testgallery.gallery" <!--NeedCopy--> -
Select one image definition, and then list all image versions of that image definition.
Get-ChildItem -Path "XDhyp:\HostingUnits\azres\image.folder\abc123.sharedsubscription\xyz.resourcegroup\sigtestdef.imagedefinition" <!--NeedCopy--> -
Create and update an MCS catalog using the following elements:
- Resource group
- Gallery
- Gallery image definition
- Gallery image version
Update hosting connection custom properties with shared tenant IDs
Use Set-Item to update the hosting connection custom properties with shared tenant IDs and subscription IDs. Add a property SharedTenants in CustomProperties. The format of Shared Tenants is:
[{"Tenant":"94367291-119e-457c-bc10-25337231f7bd","Subscriptions":["7bb42f40-8d7f-4230-a920-be2781f6d5d9"]},{"Tenant":"50e83564-c4e5-4209-b43d-815c45659564","Subscriptions":["06ab8944-6a88-47ee-a975-43dd491a37d0"]}]
<!--NeedCopy-->
For example:
Set-Item -CustomProperties "<CustomProperties xmlns=`"http://schemas.citrix.com/2014/xd/machinecreation`" xmlns:xsi=`"http://www.w3.org/2001/XMLSchema-instance`">
<Property xsi:type=`"StringProperty`" Name=`"SubscriptionId`" Value=`"123`" />
<Property xsi:type=`"StringProperty`" Name=`"ManagementEndpoint`" Value=`"https://management.azure.com/`" />
<Property xsi:type=`"StringProperty`" Name=`"AuthenticationAuthority`" Value=`"https://login.microsoftonline.com/`" />
<Property xsi:type=`"StringProperty`" Name=`"StorageSuffix`" Value=`"core.windows.net`" />
<Property xsi:type=`"StringProperty`" Name=`"TenantId`" Value=`"123abc`" />
<Property xsi:type=`"StringProperty`" Name=`"SharedTenants`" Value=`"`[ { 'Tenant':'123abc', 'Subscriptions':['345', '567'] } ]`"` />
</CustomProperties>"
-LiteralPath @("XDHyp:\Connections\aazure") -PassThru -UserName "advc345" -SecurePassword
$psd
<!--NeedCopy-->
Note:
You can add more than one tenant. Each tenant can have more than one subscription.
Select an image from a different tenant
You can select an image in the Azure Compute Gallery that belongs to a different Azure tenant to create and update MCS catalogs using PowerShell commands.
- In the hosting unit root folder, Citrix creates a new shared subscription folder called
sharedsubscription. -
List all shared subscriptions.
Get-ChildItem XDHyp:\HostingUnits\azres\sharedsubscription.folder <!--NeedCopy--> -
Select one shared subscription, and then list all shared resource groups of that shared subscription.
Get-ChildItem XDHyp:\HostingUnits\azres\image.folder\abc123.sharedsubscription <!--NeedCopy--> -
Select a resource group, and then list all galleries of that resource group.
Get-ChildItem XDHyp:\HostingUnits\azres\image.folder\abc123.sharedsubscription\ xyz.resourcegroup <!--NeedCopy--> -
Select a gallery, and then list all image definitions of that gallery.
Get-ChildItem XDHyp:\HostingUnits\azres\image.folder\abc123.sharedsubscription\xyz.resourcegroup\efg.gallery <!--NeedCopy--> -
Select one image definition, and then list all image versions of that image definition.
Get-ChildItem XDHyp:\HostingUnits\azres\image.folder\abc123.sharedsubscription\xyz.resourcegroup\efg.gallery\hij.imagedefinition <!--NeedCopy--> -
Create and update an MCS catalog using the following elements:
- Resource group
- Gallery
- Gallery image definition
- Gallery image version
Create a secure environment for Azure-managed traffic
MCS enables network traffic (API calls from Citrix Cloud to Azure hypervisor) to be routed through Cloud Connectors in your environment. This implementation helps you lock down your Azure subscription to allow network traffic from specific IP addresses. To do this, add ProxyHypervisorTrafficThroughConnector in CustomProperties. After you set the custom properties, you can configure Azure policies to have private disk access to Azure managed disks.
If you configure the Azure policy to create Disk Accesses automatically for each new disk to use private endpoints, you cannot upload or download more than five disks or snapshots at the same time with the same disk access object as enforced by Azure. This limit is for each machine catalog if you configure Azure policy at resource group level, and for all machine catalogs if you configure Azure policy at subscription level. If you do not configure the Azure policy to create Disk Accesses automatically for each new disk to use private endpoints, the limit of five concurrent operations is not enforced.
Note:
Currently, this feature is not supported for Connector Appliance. For Azure limitations related to this feature, see Restrict import/export access for managed disks using Azure Private Link.
Enable the proxy
To enable the proxy, set the custom properties as follows on the host connection:
- Open a PowerShell window using the Remote PowerShell SDK. For more information, see https://docs.citrix.com/en-us/citrix-daas/sdk-api.html#citrix-virtual-apps-and-desktops-remote-powershell-sdk/.
-
Run the following commands:
Add-PSSnapin citrix*. cd XDHyp:\Connections\ dir <!--NeedCopy--> -
Copy the
CustomPropertiesfrom the connection to a notepad and append property setting<Property xsi:type="StringProperty" Name="ProxyHypervisorTrafficThroughConnector" Value="True" />to theCustomPropertiesto enable the proxy. For example:<CustomProperties xmlns:xsi="http://www.w3.org/2001/XMLSchema-instance" xmlns="http://schemas.citrix.com/2014/xd/machinecreation"> <Property xsi:type="StringProperty" Name="SubscriptionId" Value="4991xxxx-2xxx-4xxx-8xxx-ff59a830xxxx" /> <Property xsi:type="StringProperty" Name="ManagementEndpoint" Value="https://management.azure.com/" /> <Property xsi:type="StringProperty" Name="AuthenticationAuthority" Value="https://login.microsoftonline.com/" /> <Property xsi:type="StringProperty" Name="StorageSuffix" Value="core.windows.net" /> <Property xsi:type="StringProperty" Name="TenantId" Value="5cxxxxx-9xxx-4xxx-8xxx-dffe3efdxxxx" /> <Property xsi:type="StringProperty" Name="ProxyHypervisorTrafficThroughConnector" Value="True" /> </CustomProperties> <!--NeedCopy--> -
In the PowerShell window, assign a variable to the modified custom properties. For example:
$customProperty = '<CustomProperties xmlns:xsi="http://www.w3.org/2001/XMLSchema-instance" xmlns="http://schemas.citrix.com/2014/xd/machinecreation"> <Property xsi:type="StringProperty" Name="SubscriptionId" Value="4991xxxx-2xxx-4xxx-8xxx-ff59a830xxxx" /> <Property xsi:type="StringProperty" Name="ManagementEndpoint" Value="https://management.azure.com/" /> <Property xsi:type="StringProperty" Name="AuthenticationAuthority" Value="https://login.microsoftonline.com/" /> <Property xsi:type="StringProperty" Name="StorageSuffix" Value="core.windows.net" /> <Property xsi:type="StringProperty" Name="TenantId" Value="5cxxxxx-9xxx-4xxx-8xxx-dffe3efdxxxx" /> <Property xsi:type="StringProperty" Name="ProxyHypervisorTrafficThroughConnector" Value="True" /> </CustomProperties>' <!--NeedCopy--> - Run
$cred = Get-Credential. If prompted, provide the connection credentials. The credentials are Azure Application ID and secret. -
Run
Set-Item -PSPath XDHyp:\Connections\<Connection_Name> -CustomProperties $customProperty -username $cred.username -Securepassword $cred.password.Important:
If you get a message stating
SubscriptionIdis missing, then replace all double quotes (“) with backtick followed by double quotes (`”) in the custom property. For example:<CustomProperties xmlns:xsi=`"http://www.w3.org/2001/XMLSchema-instance`" xmlns=`"http://schemas.citrix.com/2014/xd/machinecreation`"> <Property xsi:type=`"StringProperty`" Name=`"SubscriptionId`" Value=`"4991xxxx-2xxx-4xxx-8xxx-ff59a830xxxx`" /> <Property xsi:type=`"StringProperty`" Name=`"ManagementEndpoint`" Value=`"https://management.azure.com/`" /> <Property xsi:type=`"StringProperty`" Name=`"AuthenticationAuthority`" Value=`"https://login.microsoftonline.com/`" /> <Property xsi:type=`"StringProperty`" Name=`"StorageSuffix`" Value=`"core.windows.net`" /> <Property xsi:type=`"StringProperty`" Name=`"TenantId`" Value=`"5cxxxxx-9xxx-4xxx-8xxx-dffe3efdxxxx`" /> <Property xsi:type=`"StringProperty`" Name=`"ProxyHypervisorTrafficThroughConnector`" Value=`"True`" /> </CustomProperties> <!--NeedCopy--> - Run
dirto verify the updatedCustomPropertiessettings.
Option to use system proxy on Citrix Cloud Connectors for redirected Azure API traffic
To route all external traffic through a non-transparent proxy, configure the host connection with the custom property UseSystemProxyForHypervisorTrafficOnConnectors. This redirects Azure API internet traffic on Citrix Cloud Connectors through the system proxy.
Do the same steps as outlined in Enable the proxy to configure the host connection with the custom property. However, make sure to append property setting <Property xsi:type="StringProperty" Name="UseSystemProxyForHypervisorTrafficOnConnectors" Value="True" /> to the CustomProperties to enable the proxy.
<Property xsi:type="StringProperty" Name="UseSystemProxyForHypervisorTrafficOnConnectors" Value="True" />
<!--NeedCopy-->
Example:
<CustomProperties xmlns:xsi="http://www.w3.org/2001/XMLSchema-instance" xmlns="http://schemas.citrix.com/2014/xd/machinecreation">
<Property xsi:type="StringProperty" Name="SubscriptionId" Value="4991xxxx-2xxx-4xxx-8xxx-ff59a830xxxx" />
<Property xsi:type="StringProperty" Name="ManagementEndpoint" Value="https://management.azure.com/" />
<Property xsi:type="StringProperty" Name="AuthenticationAuthority" Value="https://login.microsoftonline.com/" />
<Property xsi:type="StringProperty" Name="StorageSuffix" Value="core.windows.net" />
<Property xsi:type="StringProperty" Name="TenantId" Value="5cxxxxx-9xxx-4xxx-8xxx-dffe3efdxxxx" />
<Property xsi:type="StringProperty" Name="ProxyHypervisorTrafficThroughConnector" Value="True" />
<Property xsi:type="StringProperty" Name="UseSystemProxyForHypervisorTrafficOnConnectors" Value="True" />
</CustomProperties>
<!--NeedCopy-->
Note:
After you set this property, the proxy configured in the
netsh winhttpsettings on the Citrix Cloud Connectors is used for outbound traffic to the cloud service provider.
Manage the application secret and secret expiration date
Be sure to change the application secret for a connection before the secret expires. You receive an alert on Studio before the secret key expires.
Create an application secret in Azure
You can create an application secret for a connection through the Azure portal.
- Select Microsoft Entra ID.
- From App registrations in Microsoft Entra ID, select your application.
- Go to Certificates & secrets.
-
Click Client secrets > New client secret.
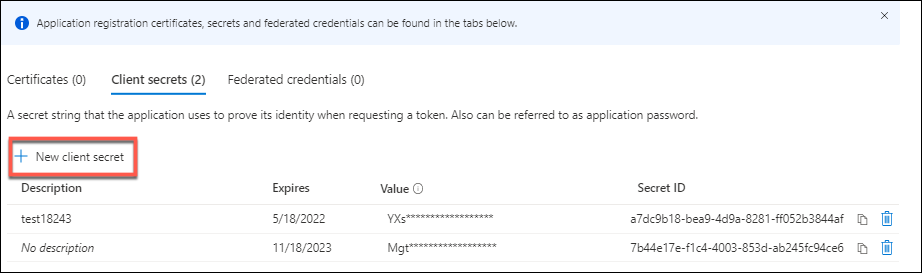
-
Provide a description of the secret and specify a duration. When you’re done, select Add.
Note:
Be sure to save the client secret because you cannot retrieve it later.
- Copy the client secret value and the expiration date.
- In Studio, edit the corresponding connection and replace the content in the Application secret and Secret expiration date field with the values you copied.
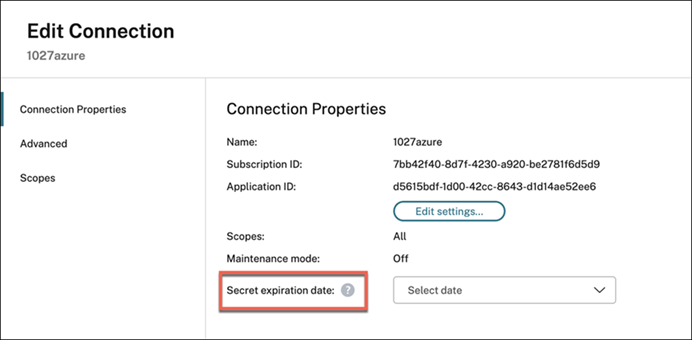
Change the secret expiration date
You can use Studio to add or modify the expiration date for the application secret in use.
- In the Add Connection and Resources wizard, right-click a connection, and click Edit Connection.
- On the Connection Properties page, click Secret expiration date to add or modify the expiration date for the application secret in use.
Create a host connection using Azure Managed Identity
You can create a host connection to Microsoft Azure Resource Manager using Azure Managed Identity. The Azure managed identities offer a secure and scalable way to access Azure services without the need to manage credentials. This approach eliminates the risks associated with storing, rotating, and managing secrets.
The Authentication Mode has three options:
- AppClientSecret
- SystemAssignedManagedIdentity
- UserAssignedManagedIdentity
Before you begin
Following are the steps you must do before creating the host connection using the Azure Managed Identity:
- Install a Citrix Cloud Connector™ in an Azure VM.
-
Enable Azure Managed Identity on that Cloud Connector VM.
-
For the user assigned managed identity:
- On the Azure portal, create a user assigned managed identity. For information, see Create and assign a User Assigned Managed Identity.
- Assign Azure roles to the managed identity. See Required Azure permissions.
- Create an Azure VM as a Cloud Connector and add the user assigned identity to it.
-
For the system assigned managed identity:
- Open the Azure portal and go to your VM.
- Select the Identity blade in the VM’s settings.
- Under the System assigned tab, set the status to On.
- Click Save.
- Grant Required Azure permissions.
Note:
If you enable the system assigned managed identity on a Cloud Connector VM and use it to create a host connection, you can still create host connections with the system assigned managed identity even after disabling it on the Cloud Connector VM. The creation of host connections can succeed even 24 hours after the identity has been disabled. This happens because managed identity tokens are cached by the underlying Azure infrastructure. For more information, see Are managed identities tokens cached?.
-
Create the host connection with Azure Managed Identity using Studio
In the Add Connection and Resources wizard:
- On the Connection page:
- Select Create a new connection, the Microsoft Azure connection type, and your Azure environment.
- Select which tools to use to create the virtual machines and then select Next.
-
On the Connection Details page, select the Authentication mode.
-
For the User assigned managed identity, enter the following settings. After you enter the details, select Next to proceed to the following pages. You cannot progress beyond this page until you provide valid details.
- Subscription ID: Enter your Azure subscription ID. To obtain your subscription ID, sign in to the Azure portal and navigate to Subscriptions > Overview.
- Active Directory ID (tenant ID): Enter the Directory (tenant) ID of the application that you registered with Microsoft Entra ID.
- Client ID: Enter the Client ID of the Managed Identity that you created in the Azure portal.
- Authentication URL: This field is automatically populated and isn’t editable.
- Management URL: This field is automatically populated and isn’t editable.
- Storage suffix: This field is automatically populated and isn’t editable.
-
For the System assigned managed identity, enter the following settings. After you enter the details, select Next to proceed to the following pages. You cannot progress beyond this page until you provide valid details.
- Subscription ID: Enter your Azure subscription ID. To obtain your subscription ID, sign in to the Azure portal and navigate to Subscriptions > Overview.
- Active Directory ID (tenant ID): Enter the Directory (tenant) ID of the application that you registered with Microsoft Entra ID.
- Authentication URL: This field is automatically populated and isn’t editable.
- Management URL: This field is automatically populated and isn’t editable.
- Storage suffix: This field is automatically populated and isn’t editable.
-
Create the host connection with Azure Managed Identity using PowerShell
You can create this host connection using a new CustomProperty AuthenticationMode. The AuthenticationMode has three options: AppClientSecret, SystemAssignedManagedIdentity, and UserAssignedManagedIdentity. The following is the description of the authentication mode options:
-
AppClientSecret: This is the default value. This needs an Application ID and secret. -
UserAssignedManagedIdentity: This needs a client ID to be provided through a UserName. -
SystemAssignedManagedIdentity: This doesn’t need any input. Even if you provide a client id, it is ignored.
Note:
While using PowerShell, the parameter
ProxyHypervisorTrafficThroughConnectormust be true to use managed identity.
- Open a PowerShell window.
- Run
asnp citrix*to load the Citrix-specific PowerShell modules. -
Create host connections. For example:
-
For the user assigned managed identity:
$UserName = "should be the Client ID of the user-assigned managed identity" $Password = "It can be any string.Not used" $CustomProperties = '<CustomProperties xmlns="http://schemas.citrix.com/2014/xd/machinecreation" xmlns:xsi="http://www.w3.org/2001/XMLSchema-instance">' ` + '<Property xsi:type="StringProperty" Name="SubscriptionId" Value="' + $SubscriptionId + '" />'` + '<Property xsi:type="StringProperty" Name="ManagementEndpoint" Value="https://management.azure.com/" />'` + '<Property xsi:type="StringProperty" Name="AuthenticationAuthority" Value="https://login.microsoftonline.com/" />'` + '<Property xsi:type="StringProperty" Name="StorageSuffix" Value="core.windows.net" />'` + '<Property xsi:type="StringProperty" Name="TenantId" Value="' + $TenantId + '" />'` + '<Property xsi:type="StringProperty" Name="ProxyHypervisorTrafficThroughConnector" Value="True" />'` + '<Property xsi:type="StringProperty" Name="AuthenticationMode" Value="UserAssignedManagedIdentity" />'` + '</CustomProperties>' New-Item -ConnectionType "Custom" ` -CustomProperties $CustomProperties ` -HypervisorAddress @($HypervisorAddress) ` -Path @("XDHyp:\Connections\$($ConnectionName)") ` -Metadata $Metadata ` -Persist ` -PluginId "AzureRmFactory" ` -Scope @() ` -Password $Password ` -UserName $UserName ` -ZoneUid $zoneUid <!--NeedCopy--> -
For the system assigned managed identity:
 $UserName = "It can be any string. Not used"
 $Password = "It can be any string. Not used"
 $CustomProperties = '<CustomProperties xmlns="http://schemas.citrix.com/2014/xd/machinecreation" xmlns:xsi="http://www.w3.org/2001/XMLSchema-instance">' `
 + '<Property xsi:type="StringProperty" Name="SubscriptionId" Value="' + $SubscriptionId + '" />'`
 + '<Property xsi:type="StringProperty" Name="ManagementEndpoint" Value="https://management.azure.com/" />'`
 + '<Property xsi:type="StringProperty" Name="AuthenticationAuthority" Value="https://login.microsoftonline.com/" />'`
 + '<Property xsi:type="StringProperty" Name="StorageSuffix" Value="core.windows.net" />'`
 + '<Property xsi:type="StringProperty" Name="TenantId" Value="' + $TenantId + '" />'`
 + '<Property xsi:type="StringProperty" Name="ProxyHypervisorTrafficThroughConnector" Value="True" />'`
 + '<Property xsi:type="StringProperty" Name="AuthenticationMode" Value="SystemAssignedManagedIdentity" />'`
 + '</CustomProperties>'

 New-Item -ConnectionType "Custom" `
 -CustomProperties $CustomProperties `
 -HypervisorAddress @($HypervisorAddress) `
 -Path @("XDHyp:\Connections\$($ConnectionName)") `
 -Metadata $Metadata `
 -Persist `
 -PluginId "AzureRmFactory" `
 -Scope @() `
 -Password $Password `
 -UserName $UserName `
 -ZoneUid $zoneUid
 <!--NeedCopy-->
-
Manage Azure Managed Identity of an existing hosting connection
Use Studio
After creating a hosting connection, you can choose to update the existing hosting connection to have:
- System assigned managed identity
- User assigned managed identity
- A new user assigned managed identity
- From Studio, select Hosting from the left pane.
- Select the connection and then select Edit Connection in the action bar.
-
On the Connection Properties page that appears, click Edit authentication mode. You can now choose to update the authentication mode.
- Click User assigned managed identity to use User assigned managed identity for that hosting connection. Follow the Client ID to be filled.
- Click System assigned managed identity to use System assigned managed identity for that hosting connection.
Use PowerShell
You can also update an existing host connection using PowerShell to use a system assigned identity or user assigned managed identity. For example, run the following PowerShell commands:
- Open a PowerShell window.
- Run
asnp citrix*to load the Citrix-specific PowerShell modules. -
Run the following commands:
$connName = "ConnectionName" $conn = get-item XDHyp:\Connections\$connName $conn.CustomProperties <!--NeedCopy--> -
Change
ProxyHypervisorTrafficThroughConnectortoTrueand add the custom property forAuthenticationModeset toSystemAssignedManagedIdentityorUserAssignedManagedIdentity. For example:$customProps = '<CustomProperties xmlns:xsi="http://www.w3.org/2001/XMLSchema-instance" xmlns="http://schemas.citrix.com/2014/xd/machinecreation"><Property xsi:type="StringProperty" Name="SubscriptionId" Value="subscriptionId" /><Property xsi:type="StringProperty" Name="ManagementEndpoint" Value="https://management.azure.com/" /><Property xsi:type="StringProperty" Name="AuthenticationAuthority" Value="https://login.microsoftonline.com/" /><Property xsi:type="StringProperty" Name="StorageSuffix" Value="core.windows.net" /><Property xsi:type="StringProperty" Name="TenantId" Value="tenantId" /><Property xsi:type="StringProperty" Name="AzureAdDeviceManagement" Value="false" /><Property xsi:type="StringProperty" Name="ProxyHypervisorTrafficThroughConnector" Value="true" /><Property xsi:type="StringProperty" Name="AuthenticationMode" Value="SystemAssignedManagedIdentity" /></CustomProperties>' <!--NeedCopy--> - Run
$cred = Get-Credential. Enter anything here. - Run
Set-Item -PSPath XDHyp:\Connections\$connName -CustomProperties $CustomProperties -username $cred.username -Securepassword $cred.password.
Azure Extended Zones
Azure Extended Zones are small-footprint extensions of existing Azure regions, enabling organizations to run workloads closer to their users for improved performance and compliance. MCS on Azure now supports provisioning and power management for VMs in Extended Zones.
To learn more about Azure Extended Zones, see the Microsoft documentation: Azure Extended Zones documentation.
Use cases
This feature is applicable for persistent and non-persistent catalogs:
-
Power-managed only VMs: You can import your existing extended zone VMs into a power-managed-only catalog and power-manage them with Citrix MCS.
-
MCS Provisioned VMs: You can provision new VMs into an Extended Zone and manage them with MCS. This feature also includes support for image management workflows.
Limitations
There are currently several limitations for using Azure Extended Zones. Many of these limitations are due to current Azure constraints:
- Dedicated hosts are not supported.
- Capacity reservations are not supported.
- Proximity placement groups are not supported.
- Spot VMs are not supported.
- Availability Zones are not supported in Extended Zones.
- Only StandardSSD_LRS and Premium_LRS storage types are supported.
- You cannot currently use the UseSharedImageGallery feature to save a mastered image into an Azure Compute Gallery (or Shared Image Gallery) in an Extended Zone. As a byproduct, Ephemeral OS disks are also not supported.
- If you are using an Azure Compute Gallery image version as your master image, ensure that replication has fully completed in the Extended Zone before attempting to use it. Attempting to use the image version before replication completes might result in deployment failure.
Prerequisites
Before using Extended Zones, ensure you have completed the following prerequisite steps:
-
Register with Azure:
- Extended Zones are not enabled by default.
- Register the
Microsoft.EdgeZonesresource provider in your Azure subscription: Register your subscription for resource provider Microsoft.EdgeZones. - Register each required Extended Zone separately (ex: LosAngeles, Perth): Register for an Azure Extended Zone.
-
Prepare Citrix resources:
- Create a virtual network in your Extended Zone.
- Create master images and snapshots as needed.
Required permissions
To create a catalog in an Extended Zone, your service principal must have the following permission: Microsoft.EdgeZones/extendedZones/read.
For more on minimum required permissions, see Minimum permissions.
Configuration steps
-
Create a Hosting Unit in an Extended Zone
Extended Zones, which use the
.extendedzonetype, are listed alongside regions in the Citrix MCS inventory. To provision into an extended zone, you must create a new hosting unit tied to that extended zone.Example: To create a hosting Unit in Los Angeles Extended Zone
$RootPath = "XDHyp:\Connections\MyConnectionName\Los Angeles.extendedzone" $NetworkPath = "XDHyp:\Connections\MyConnectionName\Los Angeles.extendedzone\virtualprivatecloud.folder\MyResourceGroup.resourcegroup\MyExtendedZoneNetwork.virtualprivatecloud\MyExtendedZoneSubnet.network" $HostingUnitPath = "XDHyp:\HostingUnits\MyHostingUnitName" New-Item -HypervisorConnectionName MyConnectionName -NetworkPath @($NetworkPath) -Path @($HostingUnitPath) -RootPath $RootPath -StoragePath @() <!--NeedCopy--> -
Create an MCS Catalog in an Extended Zone
After creating your Hosting Unit, proceed with catalog creation using Studio or PowerShell. Ensure your catalog references the Extended Zone Hosting Unit.
Troubleshooting
If you encounter issues, check the following:
- Ensure your subscription is registered for extended zones.
- Confirm your subscription is registered with the Microsoft.EdgeZones resource provider.
- Ensure that each Extended Zone is registered individually.
-
Verify your service principal has the new permission.
- Your service principal must have the
Microsoft.EdgeZones/extendedZones/readpermission.
- Your service principal must have the
Inventory items in Extended Zones may be shown as “Unknown Extended Zone” if registration or permissions are missing.
Note:
If creating a catalog in the parent region using a master image from an Extended Zone, registration and permissions for the Extended Zone are still required.
Use a pre-created network security group
Create a Deny-All network security group for image preparation instead of requesting Citrix to create and modify NSG. Edit the custom properties of the hosting unit using a PowerShell command Set-Item to include the parameter NsgForPreparation to provide the Deny-All network security group.
Prerequisites
Configure the following permissions required for a service principal:
-
Microsoft.Network/networkSecurityGroups/join/action: Associate a network security group to a subnet or network interface -
Microsoft.Network/networkSecurityGroups/read: Gets network security group -
Microsoft.Network/networkSecurityGroups/securityRules/read: Gets rule
Add the pre-created Deny-All network security group
To add the pre-created Deny-All network security group, set the custom properties as follows on the hosting unit:
- Open a PowerShell window using the Remote PowerShell SDK.
-
Run the following commands:
Add-PSSnapin citrix*. cd XDHyp:\HostingUnits\ Dir <!--NeedCopy--> -
Select a hosting unit to retrieve the details:
Get-Item "XDHyp:\HostingUnits\<hostingunitname>" <!--NeedCopy--> -
Copy the CustomProperties to a notepad and append property setting
<Property xsi:type="StringProperty” Name="NsgForPreparation” Value="{ResourceGroupName}/{NetworkSecurityGroupName}"/>. For example:<CustomProperties xmlns=`"http://schemas.citrix.com/2014/xd/machinecreation`" xmlns:xsi=`"http://www.w3.org/2001/XMLSchema-instance`"><Property xsi:type=`"StringProperty`" Name=`"NsgForPreparation`" Value=`{ResourceGroupName}/{NetworkSecurityGroupName}`"/></CustomProperties> <!--NeedCopy--> -
In the PowerShell window, assign a variable to the modified custom properties. For example:
$customProperty = "<CustomProperties xmlns=`"http://schemas.citrix.com/2014/xd/machinecreation`" xmlns:xsi=`"http://www.w3.org/2001/XMLSchema-instance`"><Property xsi:type=`"StringProperty`" Name=`"NsgForPreparation`" Value=`"{ResourceGroupName}/{NetworkSecurityGroupName}`"/></CustomProperties>" <!--NeedCopy--> - Run
$cred = Get-Credential. If prompted, provide the connection credentials. The credentials are Azure Application ID and secret. -
Run the following command.
Set-Item -PSPath XDHyp:\HostingUnits\<hostingunitname> -CustomProperties $customProperty -username $cred.username -Securepassword $cred.password
<!--NeedCopy-->
Important:
If you get a message stating SubscriptionId is missing, then replace all double quotes (“) with backtick followed by double quotes (`”) in the custom property.
- Run
dirto verify the updatedCustomPropertiessettings.
Note:
It takes more than a minute for the updates to reflect.
Retrieve network security group details
To retrieve the network security group details, first retrieve the resource groups containing the network security group, and then retrieve the network security group based on the resource group name.
-
Retrieve the resource groups containing network security group. For example:
Get-HypInventoryItem -LiteralPath "XDHyp:\HostingUnits\ctx04con01unit01" -ResourceType resourceGroup -MaxRecords 5 -AdditionalDataFilter '{"containedresourcetypes": ["networksecuritygroup"]}' <!--NeedCopy--> -
Retrieve the network security group based on the resource group name. For example:
Get-HypInventoryItem -LiteralPath "XDHyp:\HostingUnits\ctx04con01unit01" -ResourceType securitygroup -MaxRecords 5 -AdditionalDataFilter '{"location": ["eastus", "westus"], "resourcegroup":["resourcegroupname"]}'
<!--NeedCopy-->
Filter empty resource groups
Use the PowerShell command Get-HypInventoryItem to filter empty resource groups while selecting a master image, machine profile, or prepared image during the machine catalog creation.
Examples:
-
Retrieve the maximum records in a page:
Get-HypInventoryItem -LiteralPath "XDHyp:\HostingUnits\ctx04con01unit01" -ResourceType resourceGroup -MaxRecords 5 <!--NeedCopy--> -
Retrieve the maximum records in a page, and filter to find resource containers that have specific resources.
Get-HypInventoryItem -LiteralPath "XDHyp:\HostingUnits\ctx04con01unit01" -ResourceType resourceGroup -MaxRecords 5 -AdditionalDataFilter '{"containedresourcetypes": ["vm", "manageddisk", "snapshot", "imageversion", "storageaccount"]}' <!--NeedCopy--> -
Retrieve with skip to directly indicate the page, and filter to find resource containers that have specific resources.
Get-HypInventoryItem -LiteralPath "XDHyp:\HostingUnits\ctx04con01unit01" -ResourceType resourceGroup -MaxRecords 5 -skip 20 -AdditionalDataFilter '{"containedresourcetypes": ["vm", "manageddisk", "snapshot", "imageversion", "storageaccount"]}' <!--NeedCopy--> -
Use a token to retrieve the next page, and filter to find resource containers that have specific resources.
Get-HypInventoryItem -LiteralPath "XDHyp:\HostingUnits\ctx04con01unit01" -ResourceType resourceGroup -MaxRecords 5 -AdditionalDataFilter '{"containedresourcetypes": ["vm", "manageddisk", "snapshot", "imageversion", "storageaccount"]}' -ContinuationToken 'ew0KICAiJGlkIjogIjEiLA0KICAiTWF4Um93cyI6IDUsDQogICJSb3dzVG9Ta2lwIjogMjUsDQogICJLdXN0b0NsdXN0ZXJVcmwiOiAiaHR0cHM6Ly9hcmctbmV1LTEzLXNmLmFyZy5jb3JlLndpbmRvd3MubmV0Ig0KfQ==' <!--NeedCopy--> -
Retrieve all resource groups with tag Citrix internal tag and limit max records with
MaxRecords.Get-HypInventoryItem -LiteralPath "XDHyp:\HostingUnits\ctx04con01unit01" -ResourceType resourceGroup -MaxRecords 5 <!--NeedCopy--> -
Filter for machine profile (master image) with tag Citrix internal tag and limit max records with
MaxRecords.Get-HypInventoryItem -LiteralPath "XDHyp:\HostingUnits\ctx04con01unit01" -ResourceType resourceGroup -MaxRecords 5 -AdditionalDataFilter '{"containedresourcetypes": ["vm", "templatespecversion"]}' <!--NeedCopy--> -
Filter for Prepared image with tag Citrix internal tag and limit max records with
MaxRecords.Get-HypInventoryItem -LiteralPath "XDHyp:\HostingUnits\ctx04con01unit01" -ResourceType resourceGroup -MaxRecords 5 -AdditionalDataFilter '{"containedresourcetypes": ["manageddisk", "snapshot", "imageversion"]}' <!--NeedCopy--> -
Filter for machine profile (Prepared image) with tag Citrix internal tag and limit max records with
MaxRecords.Get-HypInventoryItem -LiteralPath "XDHyp:\HostingUnits\ctx04con01unit01" -ResourceType resourceGroup -MaxRecords 5 -AdditionalDataFilter '{"containedresourcetypes": ["vm", "templatespecversion"]}' <!--NeedCopy--> -
Filter for Image with tag Citrix internal tag and limit max records with
MaxRecordsand location.Get-HypInventoryItem -LiteralPath "XDHyp:\HostingUnits\ctx04con01unit01" -ResourceType resourceGroup -MaxRecords 5 -AdditionalDataFilter '{"containedresourcetypes": ["manageddisk", "snapshot", "imageversion", "storageaccount"], "location": ["eastus", "westus"]}' <!--NeedCopy--> -
Retrieve all resource group without consideration on tags
CitrixResource.Get-HypInventoryItem -LiteralPath "XDHyp:\HostingUnits\ctx04con01unit01" -ResourceType resourceGroup -MaxRecords 50 -AdditionalDataFilter '{"containedresourcetypes": ["manageddisk", "snapshot", "imageversion", "storageaccount"]}' -Force $true <!--NeedCopy-->
Required Azure permissions
This section details the minimum permissions and general permissions required for Azure.
Minimum permissions
Minimum permissions give better security control. However, new features that require additional permissions fail if only minimum permissions are given. This section lists minimum permissions by action.
Creating a host connection
Add a host connection using the information obtained from Azure.
"Microsoft.Network/virtualNetworks/read",
"Microsoft.Compute/virtualMachines/read",
"Microsoft.Compute/disks/read",
"Microsoft.Resources/providers/read",
"Microsoft.Resources/subscriptions/locations/read",
"Microsoft.Resources/tenants/read",
"Microsoft.Network/networkSecurityGroups/join/action",
"Microsoft.Network/networkSecurityGroups/read",
"Microsoft.Network/networkSecurityGroups/securityRules/read",
"Microsoft.EdgeZones/extendedZones/read"
<!--NeedCopy-->
Power management of VMs
Power on or off the machine instances.
"Microsoft.Compute/virtualMachines/read",
"Microsoft.Resources/subscriptions/resourceGroups/read",
"Microsoft.Compute/virtualMachines/deallocate/action",
"Microsoft.Compute/virtualMachines/start/action",
"Microsoft.Compute/virtualMachines/restart/action",
"Microsoft.Insights/diagnosticsettings/delete",
"Microsoft.Insights/diagnosticsettings/read",
"Microsoft.Insights/diagnosticsettings/write",
<!--NeedCopy-->
Creating, updating, or deleting VMs
Create a machine catalog, then add, delete, update machines, and delete the machine catalog.
Following is the list of minimum permissions required when the master images are managed disks or snapshots that are in the same region as the hosting connection.
"Microsoft.Resources/subscriptions/resourceGroups/read",
"Microsoft.Resources/deployments/validate/action",
"Microsoft.Resources/tags/read",
"Microsoft.Resources/tags/write",
"Microsoft.Compute/virtualMachines/read",
"Microsoft.Compute/virtualMachines/write",
"Microsoft.Compute/virtualMachines/delete",
"Microsoft.Compute/virtualMachines/deallocate/action",
"Microsoft.Compute/snapshots/read",
"Microsoft.Compute/snapshots/write",
"Microsoft.Compute/snapshots/delete",
"Microsoft.Compute/snapshots/beginGetAccess/action",
"Microsoft.Compute/snapshots/endGetAccess/action",
"Microsoft.Compute/disks/read",
"Microsoft.Compute/disks/write",
"Microsoft.Compute/disks/delete",
"Microsoft.Compute/disks/beginGetAccess/action",
"Microsoft.Compute/disks/endGetAccess/action",
"Microsoft.Compute/locations/publishers/artifacttypes/types/versions/read",
"Microsoft.Compute/skus/read",
"Microsoft.Compute/virtualMachines/extensions/read",
"Microsoft.Compute/virtualMachines/extensions/write",
"Microsoft.Features/providers/features/read",
"Microsoft.Network/virtualNetworks/read",
"Microsoft.Network/virtualNetworks/subnets/join/action",
"Microsoft.Network/virtualNetworks/subnets/read",
"Microsoft.Network/networkSecurityGroups/read",
"Microsoft.Network/networkSecurityGroups/write",
"Microsoft.Network/networkSecurityGroups/delete",
"Microsoft.Network/networkSecurityGroups/join/action",
"Microsoft.Network/networkInterfaces/read",
"Microsoft.Network/networkInterfaces/write",
"Microsoft.Network/networkInterfaces/delete",
"Microsoft.Network/networkInterfaces/join/action",
"Microsoft.Network/locations/usages/read",
"Microsoft.Compute/capacityReservationGroups/capacityReservations/read",
"Microsoft.Compute/capacityReservationGroups/deploy/action"
<!--NeedCopy-->
You need the following extra permissions based on minimal permissions for the following features:
-
If the master image is a VHD in a storage account in the same region as the hosting connection:
"Microsoft.Storage/storageAccounts/read", "Microsoft.Storage/storageAccounts/listKeys/action", <!--NeedCopy--> -
If the master image is an ImageVersion from the Azure Compute Gallery (formerly Shared Image Gallery):
"Microsoft.Compute/galleries/read", "Microsoft.Compute/galleries/images/read", "Microsoft.Compute/galleries/images/versions/read", <!--NeedCopy--> -
If the master image is a managed disk, snapshot, or VHD is in a region different from the region of the hosting connection:
"Microsoft.Storage/storageAccounts/read", "Microsoft.Storage/storageAccounts/listKeys/action", "Microsoft.Storage/storageAccounts/write", "Microsoft.Storage/storageAccounts/delete", "Microsoft.Storage/checknameavailability/read", "Microsoft.Storage/locations/usages/read", "Microsoft.Storage/skus/read", <!--NeedCopy--> -
If you use the Citrix-managed resource group:
"Microsoft.Resources/subscriptions/resourceGroups/write", "Microsoft.Resources/subscriptions/resourceGroups/delete", <!--NeedCopy--> -
If you put the master image in Azure Compute Gallery (formerly Shared Image Gallery) in a shared tenant or subscription:
"Microsoft.Compute/galleries/write", "Microsoft.Compute/galleries/images/write", "Microsoft.Compute/galleries/images/versions/write", "Microsoft.Compute/galleries/read", "Microsoft.Compute/galleries/images/read", "Microsoft.Compute/galleries/images/versions/read", "Microsoft.Compute/galleries/delete", "Microsoft.Compute/galleries/images/delete", "Microsoft.Compute/galleries/images/versions/delete", "Microsoft.Resources/subscriptions/read", <!--NeedCopy--> -
If you use Azure dedicated host support:
"Microsoft.Compute/hostGroups/read", "Microsoft.Compute/hostGroups/write", "Microsoft.Compute/hostGroups/hosts/read", <!--NeedCopy--> -
If you use Server Side Encryption (SSE) with Customer-Managed Keys (CMK):
"Microsoft.Compute/diskEncryptionSets/read", <!--NeedCopy--> -
If you deploy VMs using ARM templates (machine profile):
"Microsoft.Resources/deployments/write", "Microsoft.Resources/deployments/operationstatuses/read", "Microsoft.Resources/deployments/read", "Microsoft.Resources/deployments/delete", "Microsoft.Insights/DataCollectionRuleAssociations/Read", "Microsoft.Insights/dataCollectionRules/read", <!--NeedCopy--> -
If you use Azure template spec as a machine profile:
 "Microsoft.Resources/templateSpecs/read",
 "Microsoft.Resources/templateSpecs/versions/read",
 <!--NeedCopy-->
Creating, updating, and deleting machines with unmanaged disk
Following is the list of minimum permissions required when the master image is VHD and use resource group as provided by admin:
"Microsoft.Resources/subscriptions/resourceGroups/read",
"Microsoft.Resources/tags/read",
"Microsoft.Resources/tags/write",
"Microsoft.Storage/storageAccounts/delete",
"Microsoft.Storage/storageAccounts/listKeys/action",
"Microsoft.Storage/storageAccounts/read",
"Microsoft.Storage/storageAccounts/write",
"Microsoft.Storage/checknameavailability/read",
"Microsoft.Storage/locations/usages/read",
"Microsoft.Storage/skus/read",
"Microsoft.Compute/virtualMachines/deallocate/action",
"Microsoft.Compute/virtualMachines/delete",
"Microsoft.Compute/virtualMachines/read",
"Microsoft.Compute/virtualMachines/write",
"Microsoft.Resources/deployments/validate/action",
"Microsoft.Network/networkInterfaces/delete",
"Microsoft.Network/networkInterfaces/join/action",
"Microsoft.Network/networkInterfaces/read",
"Microsoft.Network/networkInterfaces/write",
"Microsoft.Network/networkSecurityGroups/delete",
"Microsoft.Network/networkSecurityGroups/join/action",
"Microsoft.Network/networkSecurityGroups/read",
"Microsoft.Network/networkSecurityGroups/write",
"Microsoft.Network/virtualNetworks/subnets/read",
"Microsoft.Network/virtualNetworks/read",
"Microsoft.Network/virtualNetworks/subnets/join/action",
"Microsoft.Network/locations/usages/read"
<!--NeedCopy-->
Cost Management
Following is the minimum permission required to retrieve VM pricing:
"Microsoft.Consumption/pricesheets/read"
<!--NeedCopy-->
Following is the minimum permission required to retrieve VM cost:
"Microsoft.CostManagement/query/read"
<!--NeedCopy-->
Note:
To view the Cost Insights tab for an Azure machine catalog, you must have Cost Management > Manage > Read cost permission (default for Cloud Administrators). For information on Cost Insights tab, see View catalog details.
General permissions
Contributor role has full access to manage all resources. This set of permissions does not block you from getting new features.
The following set of permissions provides the best compatibility going forward although it does include more permissions than needed with the current feature set:
"Microsoft.Compute/diskEncryptionSets/read",
"Microsoft.Compute/disks/beginGetAccess/action",
"Microsoft.Compute/disks/delete",
"Microsoft.Compute/disks/endGetAccess/action",
"Microsoft.Compute/disks/read",
"Microsoft.Compute/disks/write",
"Microsoft.Compute/galleries/delete",
"Microsoft.Compute/galleries/images/delete",
"Microsoft.Compute/galleries/images/read",
"Microsoft.Compute/galleries/images/versions/delete",
"Microsoft.Compute/galleries/images/versions/read",
"Microsoft.Compute/galleries/images/versions/write",
"Microsoft.Compute/galleries/images/write",
"Microsoft.Compute/galleries/read",
"Microsoft.Compute/galleries/write",
"Microsoft.Compute/hostGroups/hosts/read",
"Microsoft.Compute/hostGroups/read",
"Microsoft.Compute/hostGroups/write",
"Microsoft.Compute/snapshots/beginGetAccess/action",
"Microsoft.Compute/snapshots/delete",
"Microsoft.Compute/snapshots/endGetAccess/action",
"Microsoft.Compute/snapshots/read",
"Microsoft.Compute/snapshots/write",
"Microsoft.Compute/virtualMachines/deallocate/action",
"Microsoft.Compute/virtualMachines/delete",
"Microsoft.Compute/virtualMachines/read",
"Microsoft.Compute/virtualMachines/restart/action",
"Microsoft.Compute/virtualMachines/start/action",
"Microsoft.Compute/virtualMachines/write",
"Microsoft.Compute/locations/publishers/artifacttypes/types/versions/read",
"Microsoft.Compute/skus/read",
"Microsoft.Compute/virtualMachines/extensions/read",
"Microsoft.Compute/virtualMachines/extensions/write",
"Microsoft.Network/networkInterfaces/delete",
"Microsoft.Network/networkInterfaces/join/action",
"Microsoft.Network/networkInterfaces/read",
"Microsoft.Network/networkInterfaces/write",
"Microsoft.Network/networkSecurityGroups/delete",
"Microsoft.Network/networkSecurityGroups/join/action",
"Microsoft.Network/networkSecurityGroups/read",
"Microsoft.Network/networkSecurityGroups/write",
"Microsoft.Network/virtualNetworks/subnets/read",
"Microsoft.Network/virtualNetworks/read",
"Microsoft.Network/virtualNetworks/subnets/join/action",
"Microsoft.Network/locations/usages/read",
"Microsoft.Resources/deployments/operationstatuses/read",
"Microsoft.Resources/deployments/read",
"Microsoft.Resources/deployments/validate/action",
"Microsoft.Resources/deployments/write",
"Microsoft.Resources/deployments/delete",
"Microsoft.Resources/subscriptions/resourceGroups/read",
"Microsoft.Resources/subscriptions/resourceGroups/write",
"Microsoft.Resources/subscriptions/resourceGroups/delete",
"Microsoft.Resources/providers/read",
"Microsoft.Resources/subscriptions/locations/read",
"Microsoft.Resources/subscriptions/read",
"Microsoft.Resources/tags/read",
"Microsoft.Resources/tags/write",
"Microsoft.Resources/tenants/read",
"Microsoft.Resources/templateSpecs/read",
"Microsoft.Resources/templateSpecs/versions/read",
"Microsoft.Storage/storageAccounts/delete",
"Microsoft.Storage/storageAccounts/listKeys/action",
"Microsoft.Storage/storageAccounts/read",
"Microsoft.Storage/storageAccounts/write",
"Microsoft.Storage/checknameavailability/read",
"Microsoft.Storage/locations/usages/read",
"Microsoft.Storage/skus/read",
"Microsoft.Features/providers/features/read",
"Microsoft.Insights/DataCollectionRuleAssociations/Read",
"Microsoft.Insights/dataCollectionRules/read",
"Microsoft.Insights/diagnosticsettings/delete",
"Microsoft.Insights/diagnosticsettings/read",
"Microsoft.Insights/diagnosticsettings/write",
"Microsoft.Compute/capacityReservationGroups/capacityReservations/read",
"Microsoft.Consumption/pricesheets/read",
"Microsoft.Network/networkSecurityGroups/join/action",
"Microsoft.Network/networkSecurityGroups/read",
"Microsoft.Network/networkSecurityGroups/securityRules/read",
"Microsoft.Compute/capacityReservationGroups/deploy/action",
"Microsoft.EdgeZones/extendedZones/read"

<!--NeedCopy-->
Configure required Azure host connection permissions
You can easily configure all the minimum permissions required for a service principal or user account in Azure tied to a host connection to perform all MCS operations using an ARM template. This ARM template automates the following:
- Creation of an Azure Role with minimal permissions necessary for operations.
- Assignment of this role to an existing Azure Service Principal at the subscription level.
You can deploy this ARM template using the Azure Portal or PowerShell commands. For more information, see ARM Template for Citrix Virtual Apps and Desktops Operations.
Validate permissions on host connection
You can validate permissions on a host connection to do tasks related to creating and managing MCS machine catalogs. This implementation helps you to find out the missing permissions required for different scenarios such as creating, deleting, and updating VMs, power management of VMs, ahead of time so that you can avoid being blocked at critical times.
You can validate the permissions on a host connection using the PowerShell command Test-HypHypervisorConnection. The result from the command is captured as a list where each item in the list is broken into three sections.
- Category: The action or task a user can do to create and manage an MCS machine catalog.
- Corrective Action: The step an admin must do to resolve a users’ missing permissions discrepancy.
- Missing permission: The list of missing permissions for a category.
To validate the permissions, do the following:
- Create a host connection to Azure.
- Open a PowerShell window from the Delivery Controller™ host.
- Run
asnp citrix*to load the Citrix-specific PowerShell modules. -
Run the following command to verify if you have the required permissions to test a connection.
Test-HypHypervisorConnection -LiteralPath "XDHyp:\Connections\AzureCon"
<!--NeedCopy-->
Role level permission required for the SPN:
- Microsoft.Authorization/roleDefinitions/read (at subscription level or the resource group level if resource group is provided)
- Microsoft.Authorization/roleAssignments/read (at subscription level or the resource group level if resource group is provided)
API level permissions required for the SPN:
Microsoft.Graph:
- Application.Read.All
- Directory.Read.All
- ServicePrincipalEndpoint.Read.All
-
After you add the missing permissions required to look up your permissions, run the following command to verify if you have permissions in the various categories.
Example:
To test a connection at the subscription level with a higher level of authorization required:
Test-HypHypervisorConnection -LiteralPath XDHyp:\Connections\ AzureCon -SecurePassword $password -UserName 922e65d5-38ae-4cf5-xxxx-xxxxxxxxx
 <!--NeedCopy-->
Example:
To test a connection at the resource group level without a high level of authorization:
Test-HypHypervisorConnection -LiteralPath XDHyp:\Connections\testles -CustomProperties $customProperties | Format-List
<!--NeedCopy-->
Note:
The
CustomPropertiesparameter is used to provide the resource group level because resource group is a connection specific information.Example:
To test a connection with the higher level of authorization at resource group level:
Test-HypHypervisorConnection -LiteralPath XDHyp:\Connections\testles -SecurePassword $password -UserName 922e65d5-38ae-4cf5-832b-54122196b7dd -CustomProperties $customProperties
<!--NeedCopy-->
For information on permissions, see Required Azure permissions.
Where to go next
- If you’re in the initial deployment process, see Create machine catalogs.
- For Azure-specific information, see Create a Microsoft Azure catalog.
More information
In this article
- Create service principals and connections
- Manage service principals and connections
- Create a host connection using Azure Managed Identity
- Manage Azure Managed Identity of an existing hosting connection
- Azure Extended Zones
- Use a pre-created network security group
- Filter empty resource groups
- Required Azure permissions
- Configure required Azure host connection permissions
- Validate permissions on host connection
- Where to go next
- More information