Upgrade VDAs
Introduction
Citrix maintains all the Citrix DaaS (formerly Citrix Virtual Apps and Desktops service) components in your deployment, except VDAs.
Before beginning a VDA upgrade:
- Review this entire article, so you know what to expect.
- Review the Lifecycle policy for Citrix DaaS.
To upgrade a VDA, download a VDA installer and run it on the machine or image. You can use the installer’s graphical or command-line interface. For guidance, see:
If the VDA was originally installed using VDAWorkstationCoreSetup.exe:
- You retain that configuration if you upgrade the VDA with the latest version of the same installer.
- If you run
VDAWorkstationSetup.exeon that machine, you can enable the features that are not supported inVDAWorkstationCoreSetup.exe. Keep in mind that some of those features might be enabled by default in theVDAWorkstationSetup.exeinstaller. You can also install Citrix Workspace app.
Note:
When upgrading a VDA to version 7.17 or a later supported version, a machine restart occurs during the upgrade process. This restart cannot be avoided. The upgrade resumes automatically after the restart (unless you specify
/noresumeon the command line).
After you upgrade VDAs, update the images and catalogs that use that VDA.
Upgrade VDAs using Studio
Important:
- As a best practice, we recommend that you test VDA upgrades thoroughly before moving into production.
- You can switch between the CR VDA and the LTSR VDA as long as you switch from an earlier version to a later version. You cannot switch from a later version to an earlier version because that is considered a downgrade. For example, you cannot downgrade from 2212 CR to 2203 LTSR (any CU) but you can upgrade from 2112 CR to 2203 LTSR (any CU).
- On-demand updates (such as hotfixes and patches between major releases) are not supported.
- CVAD 2402 VDA is available through VDA Upgrade Service.
- The VDA Upgrade Service is not supported for control planes hosted in Google Cloud Platform (GCP).
Using Studio, you can upgrade VDAs on a per-catalog or a per-machine basis. You can upgrade them immediately or at a scheduled time.
To learn more about the VDA Upgrade service, see Tech Brief: Citrix VDA Upgrade service. There, you will find an overview of the service, detailed information on how it works, and other useful resources.
Prerequisites
- Control plane: Citrix DaaS
- VDA type: Single-session or multi-session OS VDA. Only Windows VDA is currently supported.
-
VDA version: 2109 or later, or 2203 LTSR or later
Note:
We recommend using the latest CR VDA or the latest LTSR CU VDA.
- Provisioning type: Persistent machines (such as MCS-provisioned machines, Remote PC Access machines, Citrix HDX Plus for Windows 365). See Supported machine types.
- The VDAs must have the VDA Upgrade Agent installed and the service must be running.
- You have permissions to upgrade VDAs.
- The VDA upgrade is configured with the proper CR or LTSR track in Studio.
-
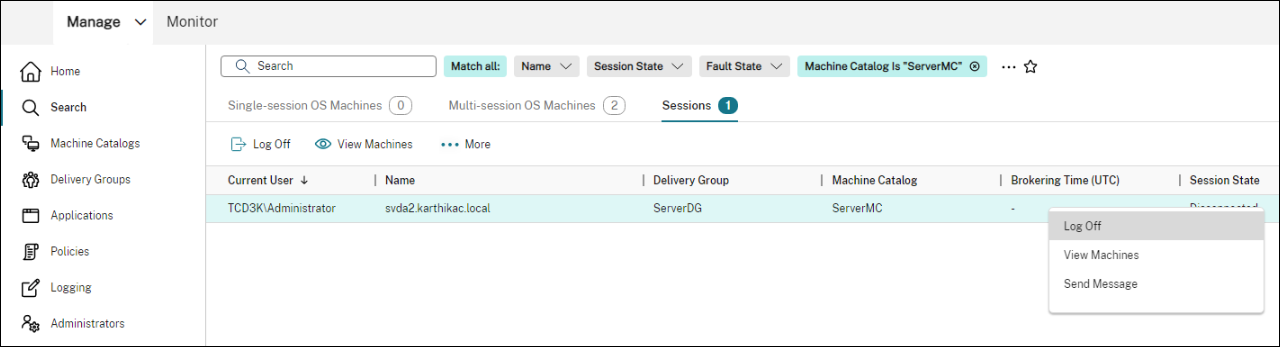
The VDAs are not in use. (Users must sign off from them.)
Note:
Upgrades are skipped for any VDAs that are in use or in disconnected state. We recommend scheduling an upgrade window and requesting users to log off from the VDAs.
- The VDAs are not in maintenance mode. (A VDA can be put into maintenance mode by an administrator. A VDA can also be automatically put into maintenance mode if it has exceeded maximum allowed registration attempts.)
- Relevant URLs have been added to the allow list if URL filtering is in place. See VDA upgrade requirement.
- The VDAs must belong to a delivery group and be registered with DaaS.
- The destination VDA supports the operating system of the current VDA.
Known issues
Issue 1: Failed to upgrade LTSR VDAs to LTSR Cumulative Update (CU) versions
Attempts to upgrade LTSR VDAs to LTSR Cumulative Update (CU) versions might fail. Although the upgrade process appears to complete successfully in Studio, the installed version of the VDA does not change and the status changes back to Upgrade Available after a minute or two. The issue occurs with VDAs that have VDA Upgrade Agent version 7.35.0.7 or earlier installed.
To work around the issue, log on to the VDA and upgrade the VDA Upgrade Agent to version 7.37.0.7 or later (using the VDA installer version 2303 or later). Starting with version 7.37.0.7, the VDA Upgrade Agent supports the upgrade so that agents of earlier versions running on the VDAs can automatically upgrade to the latest version. With this auto-update feature, the VDA upgrade service checks the VDA version reported by the agent and then schedules upgrades within one hour to automatically upgrade the agent to the latest version. This upgrade feature reduces your maintenance effort.
For the agent on the VDA to upgrade automatically, be sure to log off sessions so that the VDA upgrade service can initiate upgrades. You can log off sessions in Studio.
If the agent fails to upgrade automatically, log on to the VDA and upgrade the agent manually as follows:
-
Run the following cmdlet to show the VDA Upgrade Agent in Control Panel > Uninstall or change a program.
(Get-ChildItem -Path 'HKLM:\SOFTWARE\Microsoft\Windows\CurrentVersion\Uninstall' | ? { $_.GetValue('DisplayName') -eq 'Citrix VDA Upgrade Agent Service - x64' }).GetValue('SystemComponent') (Get-ChildItem -Path 'HKLM:\SOFTWARE\Microsoft\Windows\CurrentVersion\Uninstall' | ? { $_.GetValue('DisplayName') -eq 'Citrix VDA Upgrade Agent Service - x64' }) | Set-ItemProperty -Name SystemComponent -Value 0 -
Install the latest VDA Upgrade Agent. To perform quiet installation, use the following cmdlet:
msiexec /i CitrixUpgradeAgent_x64.msi /q
You can identify the version of the VDA Upgrade Agent by using the cmdlet or a script. See Troubleshoot.
General workflow
A general workflow to upgrade VDAs using Studio is as follows:
-
Enable VDA upgrade for a catalog.
- You can enable VDA upgrade when creating a catalog.
- You can enable VDA upgrade when editing a catalog.
-
Upgrade VDAs on a per-catalog or a per-machine basis. For more information, see Upgrade VDAs.
Note:
When scheduling VDA upgrades for a catalog, be aware that all machines in the catalog will be included in the upgrade scope. Therefore, we recommend backing up those machines before initiating the upgrade.
Troubleshoot
If there are upgrade failures, you can use the following logs to troubleshoot issues on your own or provide the logs when you contact Citrix Technical Support for assistance.
-
Installation logs for initial VDA installation under
%temp%/Citrix/XenDesktop Installer -
Upgrade logs under
C:\Windows\Temp\Citrix\XenDesktop Installer
To check VDA Upgrade Agent versions, use the following cmdlet: Get-VusComponentVersion -ComponentType VUS. It lists all VDAs and their VDA Upgrade Agent versions.
To get the VDA names, use the following cmdlet: Get-BrokerMachine -UUID "<version number>", where <version number> is the VDA Upgrade Agent version that you get from the Get-VusComponentVersion cmdlet.
To check VDA Upgrade Agent versions at a catalog level, you can use the following script:
Note:
The script is intended as an example and might need to be adapted to suit your specific environment. We recommend that you test the script thoroughly before using it in a production environment.
Param(
    [Parameter (Mandatory=$true)]
    [string] $CatalogName
)

try
{
    $Uuids = Get-BrokerMachine -CatalogName $CatalogName | Select-Object -Property UUID

    if($Uuids -eq $null)
    {
        throw "Cannot find CatalogName "+$CatalogName
    }
    Write-Output("Catalog Name passed is "+$CatalogName)

   foreach($Uuid in $Uuids)
    {
        $compVersion = Get-VusComponentVersion -MachineId $machine.UUID -ComponentType VUS
        $Machine = Get-BrokerMachine -UUID $compVersion.MachineId
        Write-Output("MachineName: "+$Machine.MachineName+", Machine UUID:"+$machine.MachineId+", VUA Version:"+$compVersion.Version)
    }
}
catch
{
    Write-Output("Exception Occured")
    Write-Host $_
}
Logs related to the VDA Upgrade Agent
You can also collect logs related to the VDA Upgrade Agent. Logs you can collect include:
-
Citrix Diagnostic Facility (CDF) traces. The CDF module name is
VdaUpgradeAgent. - Windows event logs. Information written to the Windows Event Log. View logs in the Event Viewer > Windows Logs > Applications > Citrix VDA Upgrade Agent Service.
If needed, you can modify the VDA Upgrade Agent configuration file so that the logs are continuously written to a file. To enable logging to a file, follow these steps:
-
Go to the folder
C:\Program Files\Citrix\CitrixUpgradeAgent. -
Open the file
Citrix.UpdateServices.UpdateAgent.exe.config. -
Change the value of
LogToFileto1. -
Restart the Citrix VDA Upgrade Agent service. This creates a log file at:
C:\ProgramData\Citrix\Update Services\Logs.
Note:
- Enabling logging to a file continuously writes logs, potentially consuming storage space. Remember to disable logging after the issue is resolved. To disable logging, first set
LogToFileto0and then restart the Citrix VDA Upgrade Agent Service.- When
LogToFile=1is set, logs are written only to the file. They will not appear in the CDF traces.
Troubleshoot VDA upgrade download failures
Follow the steps below to troubleshoot and resolve download failures related to the VDA upgrade feature:
-
Make sure that relevant URLs have been added to the allow list if URL filtering is in place. See VDA upgrade requirement.
-
After adding the necessary URLs to the allow list, try rescheduling the VDA upgrade.
You can enable CDF tracing or set LogToFile to 1 to capture detailed logs for analysis. If the download failure issue persists, check the errors. If you see the following error message “Download Failed: This access control list is not in canonical form and therefore cannot be modified,” it indicates that the permissions on the folder C:/ProgramData/Citrix/UpgradeServices/Downloads/VDA are incorrect. To address the issue, do either of the following:
-
Option 1: Reset access control lists (ACLs) on the folder using the following command. (The command reset the ACLs with default inherited ACLs for all matching files.)
icacls.exe "C:\ProgramData\Citrix\UpgradeServices\Downloads\VDA" /reset /T /C /L /Q
-
Option 2: Delete the VDA folder under Downloads and then schedule the VDA upgrade.
Troubleshoot VDA upgrade validation failures
Follow the steps below to troubleshoot and resolve download failures related to the VDA upgrade feature:
-
Make sure that relevant URLs have been added to the allow list if URL filtering is in place, especially the Certificate Revocation List (CRL) or Online Certificate Status Protocol (OCSP) URLs needed for the revocation check. See VDA upgrade requirement.
-
After adding the necessary URLs to the allow list, try rescheduling the VDA upgrade.
We suggest enabling CDF tracing or setting LogToFile to 1 to capture detailed logs for analysis. The logs can include the following errors:
- RevocationStatusUnknown
- The revocation function was unable to check the revocation status for the certificate.
- The revocation function was unable to check revocation because the revocation server was offline.
The VDA Upgrade Agent relies on Windows system calls to validate certificates and perform revocation checks. The errors above indicate that the agent is unable to establish a connection to the CRL or OCSP URLs.
Note that the VDA Upgrade Agent does not currently support proxy settings. The outbound CRL and OCSP calls made by the CryptoAPI are not aware of proxy configurations, which can result in failures.
If your environment has a proxy setup, you can configure the system proxy on the VDA to facilitate outbound CRL calls. Follow the steps below to configure the system proxy:
netsh winhttp import proxy source=ie

Or

netsh winhttp set proxy proxy-server=http://Proxy_Server:Port
Upgrade VDAs using PowerShell
You can configure VDA upgrades using the Remote PowerShell SDK. For more information about the Remote PowerShell SDK, see Citrix DaaS Remote PowerShell SDK.
The following are the PowerShell cmdlets:
-
Get-VusCatalog
Use this cmdlet to get details of a catalog such as
Name,Uid,Uuid,UpgradeState(Available,UpToDate,Scheduled,Unknown),UpgradeType(CR/LTSR),Upgrade scheduled, andStateId(status ofUpgrade scheduled). -
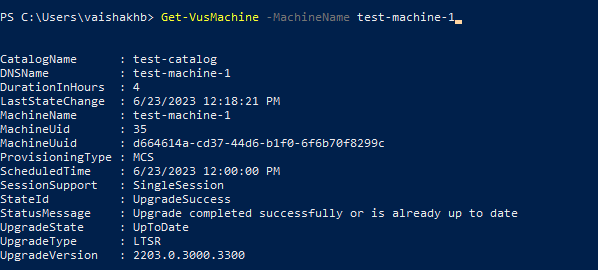
Get-VusMachine
Use this cmdlet to get details of a machine such as
MachineName,Uid,Uuid,UpgradeState(Available,UpToDate,Scheduled,Unknown),UpgradeType(CR/LTSR), andStateId(status ofUpgrade scheduled). -
Get-VusComponentVersion
Use this cmdlet to check if VDAs have reported the component versions. Use the
MachineIdto filter the VDAs.MachineIdis the UUID fromGet-BrokerMachine. -
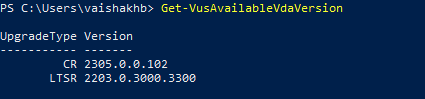
Get-VusAvailableVdaVersion
Use this cmdlet to check the latest CR/LTSR version released through the VDA Update Service.
-
Set-VusCatalogUpgradeType
Use this cmdlet to set the upgrade type of a catalog to CR or LTSR. The upgrade type can be set only at the machine catalog level.
-
New-VusMachineUpgrade
Use this cmdlet to configure VDA upgrades at the machine level.
-
New-VusCatalogSchedule
Use this cmdlet to schedule VDA upgrades at the machine catalog level.
VUS Multi Release Support
Previously VUS only allowed upgrades to the most recent version of the VDA released in each of the Upgrade Track. This new feature enables you to upgrade to new as well as previously released versions of the VDA. This feature is supported for catalog level Upgrades and individual machine Level VDA upgrades.
Prerequisites
- Remote PowerShell SDK version 7.43 or later. Go to Citrix Downloads to download the latest version of the Citrix Remote PowerShell SDK.
The following are the PowerShell cmdlets:
-
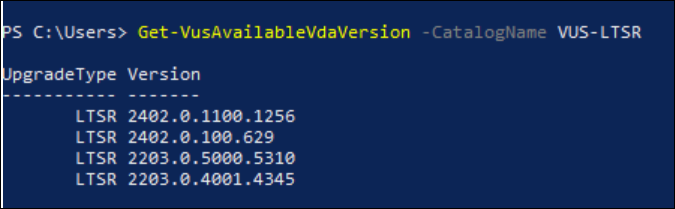
Get-VusAvailableVdaVersion
Use this cmdlet to find the compatible VDA versions that the catalog or the machine can be upgraded to.
The cmdlet uses the lowest VDA version in the catalog to compute the compatible versions that the catalog can be Upgraded to.
-
Compatible Versions for the Catalog can be obtained by passing CatalogName or CatalogUid or CatalogUuid.
-
-
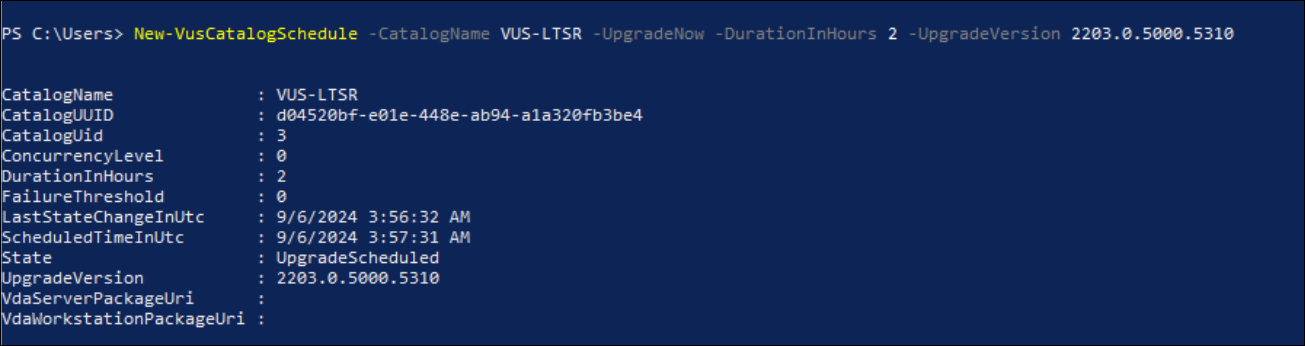
New-VusCatalogSchedule
Use this cmdlet to schedule VDA upgrades at the catalog level.
Using this parameter, you can upgrade the catalog to a supported compatible version.
Example: Upgrading a Catalog to 2203 LTSR CU 5:
-
New-VusMachineSchedule
Use this cmdlet to schedule VDA upgrades at the machine level. The cmdlet now supports
UpgradeVersionParameter.Using this parameter, you can upgrade the machine to a supported compatible version.
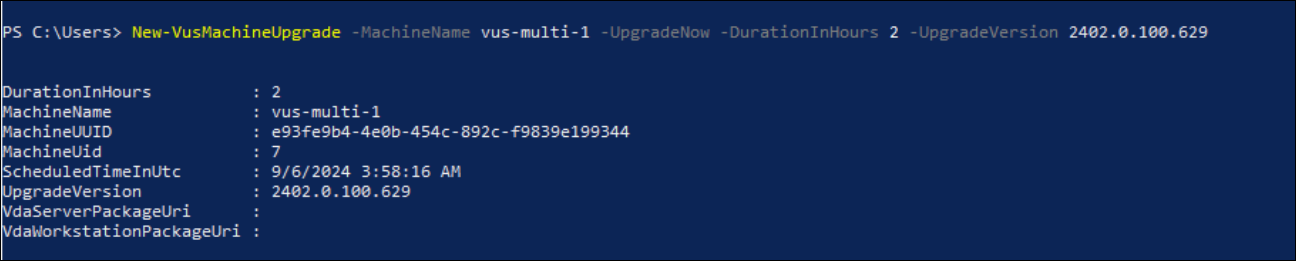
Example: Upgrading a Machine to 2402 LTSR CU 1:
Note:
-
The
UpgradeVersionpassed to theNew-VusCatalogScheduleorNew-VusMachineSchedulemust match the versions found inGet-VusAvailableVdaVersion. -
Status of the Upgrades can be monitored using
Get-VusCatalogandGet-VusMachinecmdlets.
-
Machine-level cmdlet examples
-
Set the upgrade type.
Example: -
Set-VusCatalogUpgradeType -CatalogName test-catalog -UpgradeType LTSR -
Use
Get-VusMachineto checkUpgradeStateof machines in a catalog.Example: -
Get-VusMachine -CatalogName test-catalog
If you see that the
UpgradeStateisUnknown, one possible reason is that the Citrix VDA Upgrade Agent installed on the VDA has not reported the version to the VDA Update Service. You can use theGet-VusComponentVersioncmdlet to check if the VDA has reported component versions. -Get-VusComponentVersion -MachineId ""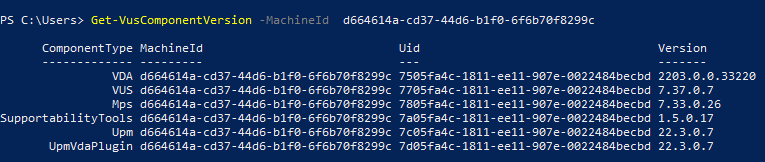
If no results are shown, verify the following:
- The VDA is part of a catalog and delivery group.
- The VDA Upgrade Agent is installed on the VDA and running. If necessary, try restarting the agent.
Note: If there remain no results, collect Citrix Diagnostic Facility traces while restarting the VDA Upgrade Agent and troubleshoot the issues.
-
Schedule VDA upgrades. Before you start, be aware of the following:
-
DurationInHours: Lets you provide the duration in hours for the upgrade process. VDAs will be put in to maintenance mode. The VDA installer will be downloaded and the upgrade will be performed. Provide longer duration if there are many VDAs to be upgraded. -
UpgradeNow: Use this switch to schedule an upgrade immediately or setScheduledTimeInUtc. -
ScheduledTimeInUtc: Lets you schedule an upgrade for a specific date and time.
Example:
New-VusMachineUpgrade -MachineUuid d664614a-cd37-44d6-b1f0-6f6b70f8299c -ScheduledTimeInUtc ([System.DateTime]::ParseExact("06/23/2023 03:35 PM", 'MM/dd/yyyy hh:mm tt', $null)) -DurationInHours 2
You can use
MachineUuid,MachineUid, andMachineNameto schedule the VDA upgrade.
-
-
Check the upgrade status.
Example: -
Get-VusMachine -MachineName test-machine-1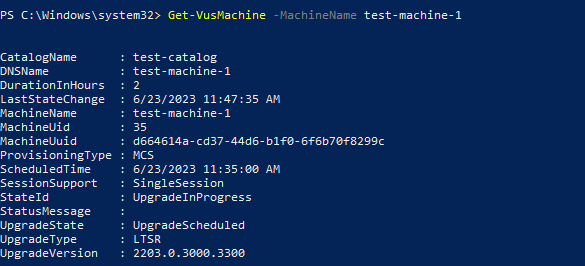
Catalog-level cmdlet examples
-
Set the upgrade type at the machine catalog level.
Example: -
Set-VusCatalogUpgradeType -CatalogName test-catalog -UpgradeType LTSR -
Use
Get-VusCatalogto checkUpgradeStateof the machines in a catalog:Example: -
Get-VusCatalog -Name test-catalog
If you see that the
UpgradeStateisUnknown, one possible reason is that the Citrix VDA Upgrade Agent installed on the VDA has not reported the version to the VDA Update Service. You can use theGet-VusComponentVersioncmdlet to check if the VDA has reported component versions. -Get-VusComponentVersion -MachineId ""If no results are shown, verify the following:
- The VDA is part of a catalog and delivery group.
- The VDA Upgrade Agent is installed on the VDA and running. If necessary, try restarting the agent.
Note: If there remain no results, collect Citrix Diagnostic Facility traces while restarting the VDA Upgrade Agent and troubleshoot the issues.
-
Schedule VDA upgrades. Before you start, be aware of the following:
-
DurationInHours: Lets you provide the duration in hours for the upgrade process. VDAs in the catalog will be put into maintenance mode. The VDA installer will be downloaded and the upgrade will be performed on each VDA. Provide longer duration if the catalog contains many VDAs. -
UpgradeNow: Use this switch to schedule an upgrade immediately or setScheduledTimeInUtc. -
ScheduledTimeInUtc: Lets you schedule an upgrade for a specific date and time.
Example:
New-VusCatalogSchedule -CatalogName test-catalog -ScheduledTimeInUtc ([System.DateTime]::ParseExact("06/23/2023 04:00 PM", 'MM/dd/yyyy hh:mm tt', $null)) -DurationInHours 4
You can use
CatalogName,Uid, andUuidto schedule the upgrade.
-
-
Check the upgrade status. Use the
Get-VusCatalogorGet-VusMachinecmdlet to check the VDA upgrade status periodically. Use theMachineUuid,MachineUid, andMachineNameto filter the VDAs.Example: -
Get-VusCatalog -Name test-catalog
Use
Get-VusMachineto see the VDA upgrade status of each machine in a catalog.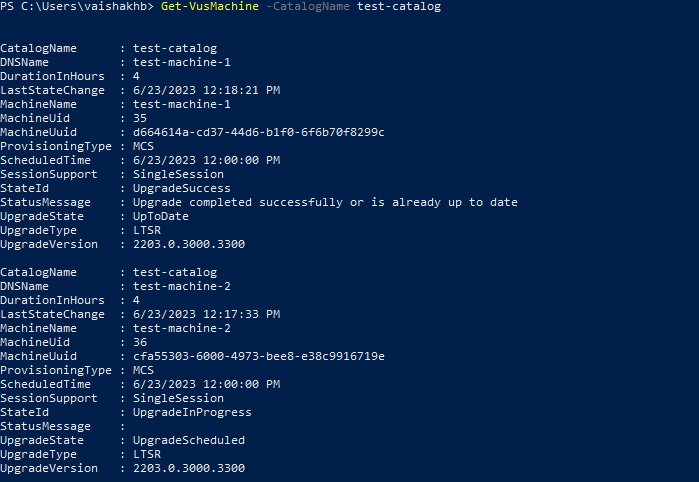
If the VDA has Personal vDisk installed
If the Personal vDisk (PvD) component was ever installed on a VDA, that VDA cannot be upgraded to version 1912 LTSR or later until you remove that component.
This instruction applies even if you never used PvD. Here’s how the PvD component might have been installed in earlier versions:
- In the VDA installer’s graphical interface, PvD was an option on the Additional Components page. The 7.15 LTSR and earlier 7.x releases enabled this option by default. So, if you accepted the defaults (or explicitly enabled the option in any release), PvD was installed.
- On the command line, the
/baseimageoption installed PvD. If you specified this option, or used a script that contained this option, PvD was installed.
What to do
If the VDA installer does not detect the PvD component in the currently installed VDA, the upgrade proceeds as usual.
If the installer detects the PvD component in the currently installed VDA:
-
Graphical interface: The upgrade pauses. A message asks if you want the unsupported component removed automatically. When you click OK, the component is removed automatically and the upgrade proceeds.
-
CLI: The command fails if the installer detects the PvD component. To avoid command failure, include the following option in the command:
/remove_pvd_ack.
If you want to continue using PvD on your Windows 10 (1607 and earlier, without updates) machines, VDA 7.15 LTSR is the latest supported version. Be aware that the Extended Support program for XenApp and XenDesktop 7.15 LTSR doesn’t apply to VDAs used with Citrix DaaS. For more information, see the Extended Support Customer Guide in the Citrix Support Knowledge Center.
Earlier operating systems
The System requirements article lists the supported Windows operating systems for current release VDAs.
- For LTSR VDAs, see the system requirements article for your LTSR version.
- For Linux VDAs, see the Linux Virtual Delivery Agent documentation.
For Windows machines with OSs that are no longer supported for installation of the latest VDA, you have the following options.
For non-WVD environments:
- Reimage the machine to a supported Windows version, and then install the new VDA.
- If reimaging the machine is not an option but you want to upgrade the OS, uninstall the VDA before upgrading the OS. Otherwise, the VDA will be in an unsupported state. After upgrading the OS, install the new VDA.
- If the machine has version 7.15 LTSR installed (and you try to install a newer version), a message informs you that you’re using the latest supported version.
- If the machine has a version earlier than 7.15 LTSR installed, a message guides you to CTX139030 for information. You can download 7.15 LTSR VDAs from the Citrix website.