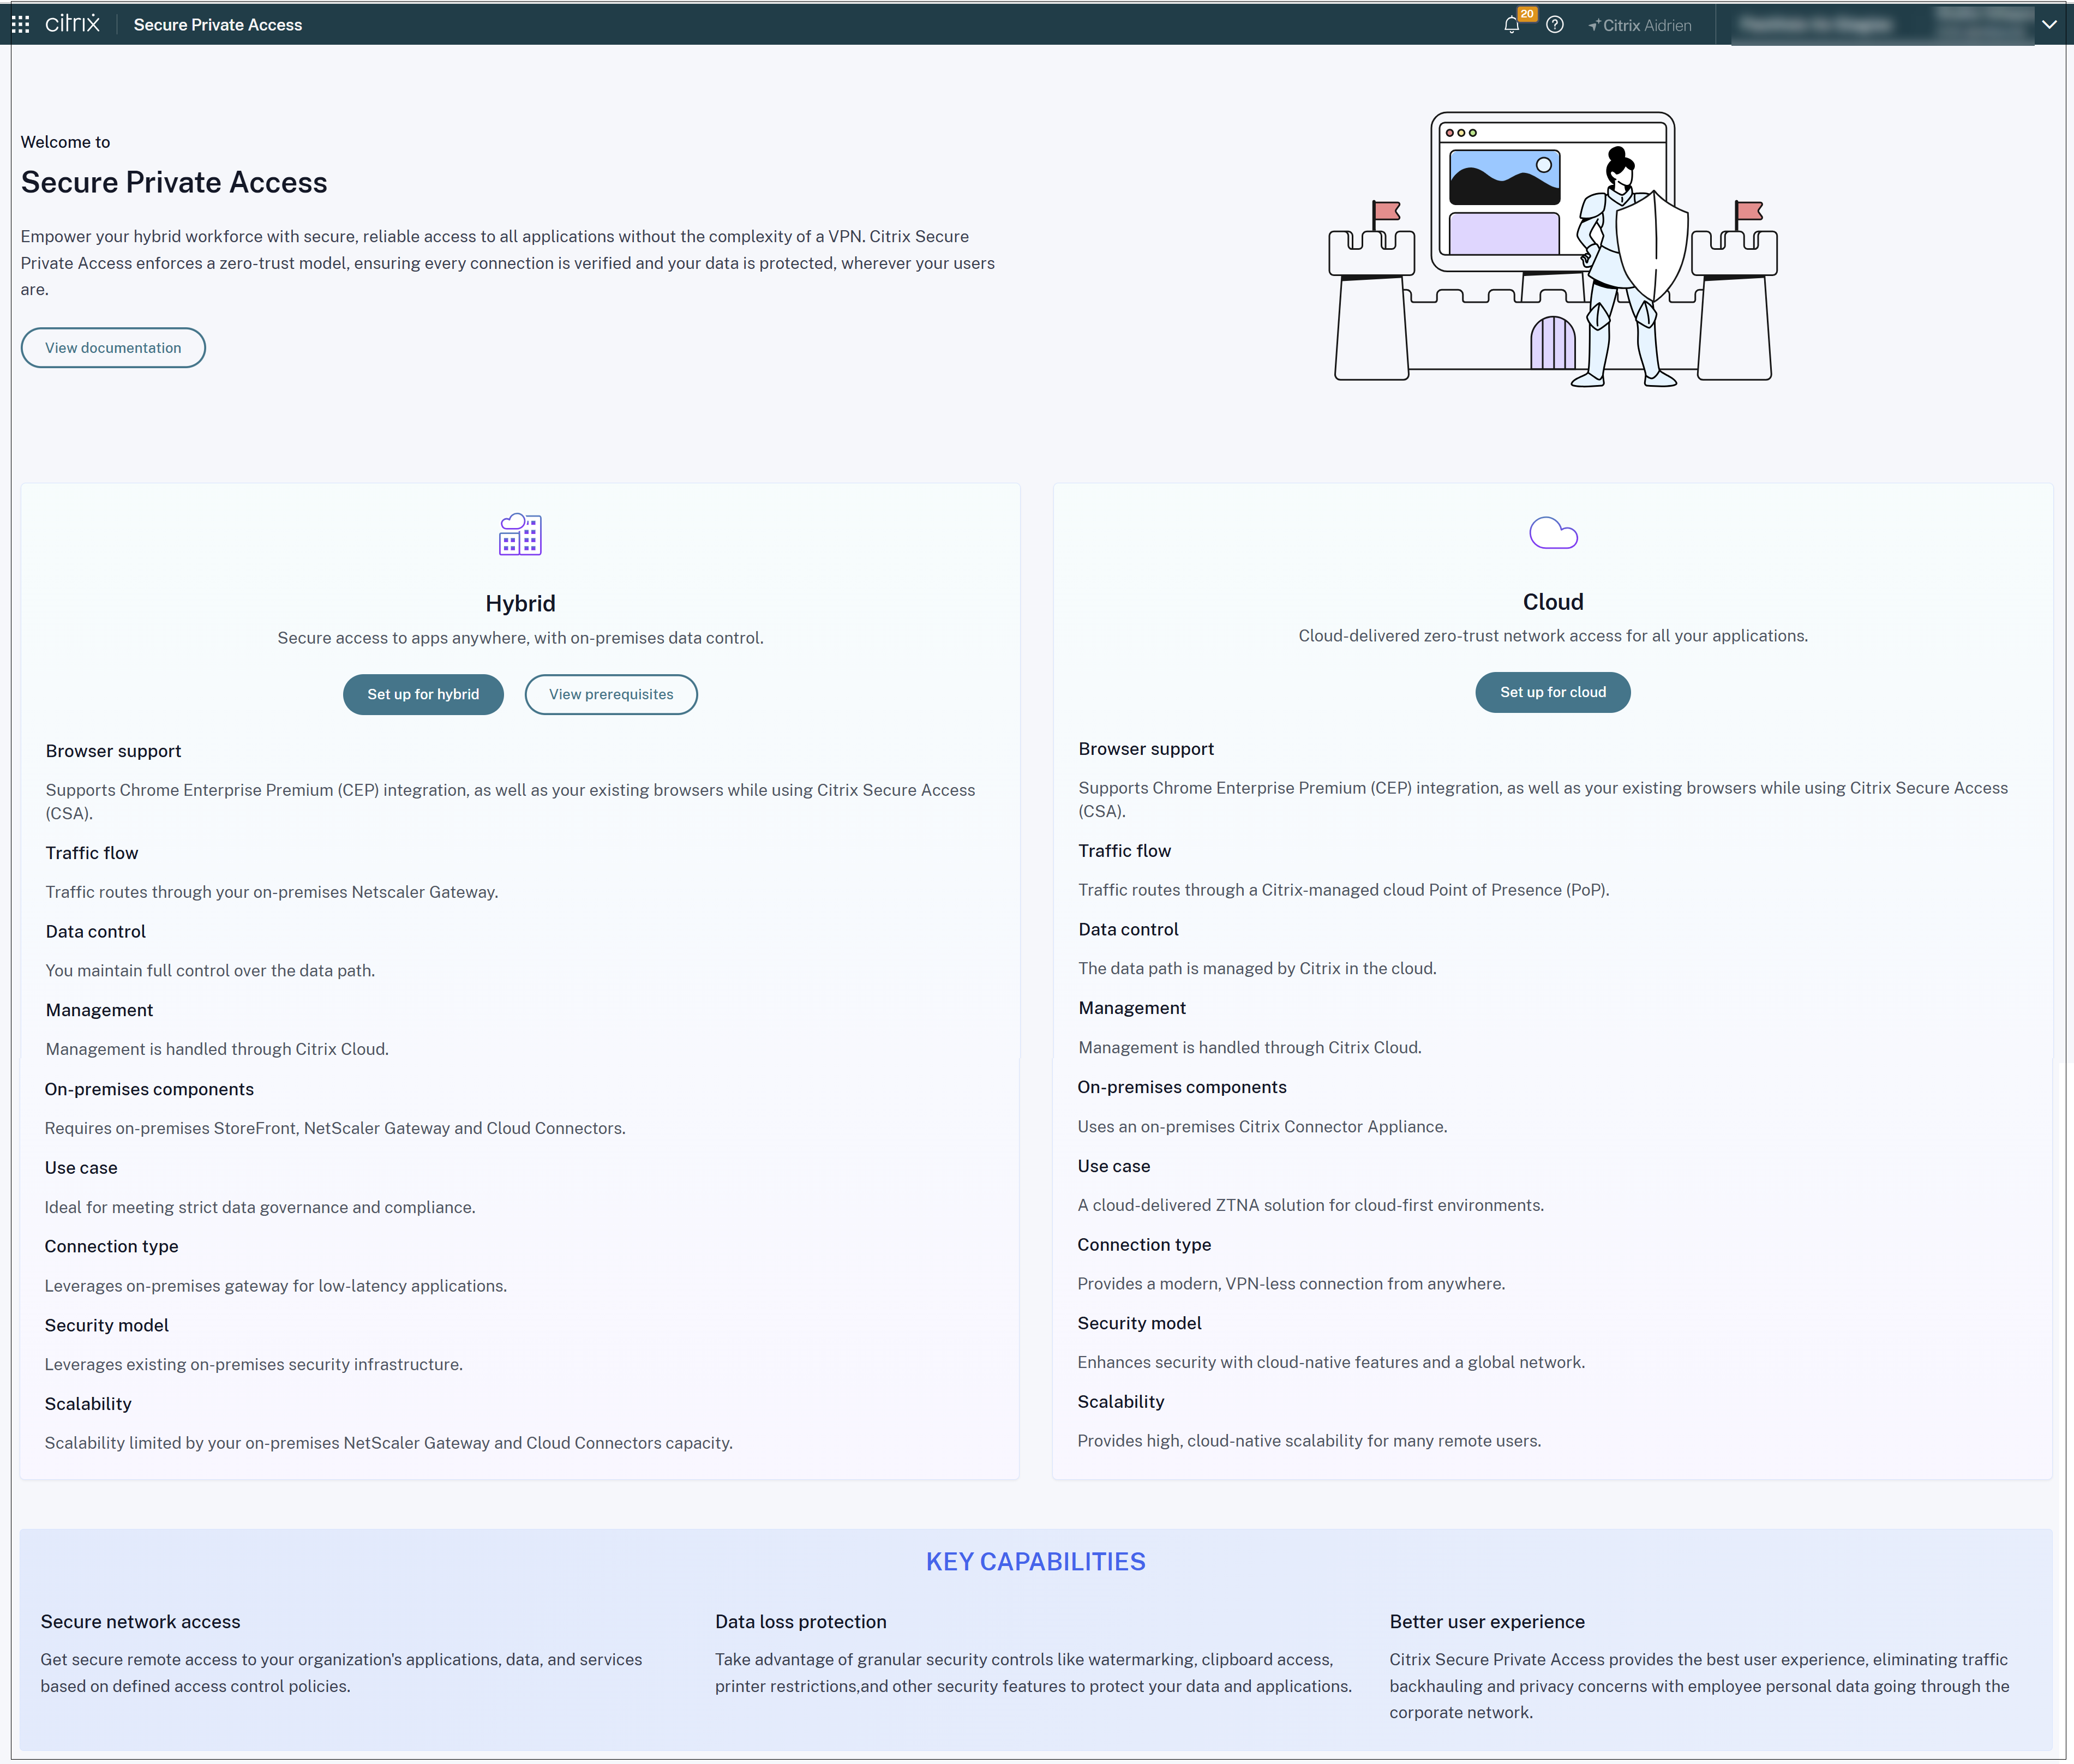
Wizard to configure zero trust access to the Enterprise Web and SaaS apps
The admin-guided workflow wizard helps the admins to configure the zero trust access to the Enterprise Web apps and SaaS apps seamlessly from a single page.
- Choose the authentication method for the subscribers to log in to Citrix Workspace.
- Add applications for your users.
- Assigns permissions for app access by creating the required access policies.
- Review the app configuration
Access the Secure Private Access admin-guided workflow wizard
Perform the following steps to access the wizard.
- On the Secure Private Access service tile, click Manage.
- In the Overview page, click Continue.
Step 1: Set up identity and authentication
Select the authentication method for the subscribers to log in to Citrix Workspace. Use the adaptive authentication method or you can use an existing workspace authentication method. Adaptive authentication is a Citrix Cloud™ service that enables advanced authentication for customers and users logging in to Citrix Workspace. Adaptive Authentication service is Citrix hosted, Citrix managed, Cloud hosted Citrix ADC that provides all the advanced authentication capabilities such as the following.
- Multifactor authentication
- Device posture scans
- Conditional authentication
- Contextual access to Citrix Virtual Apps and Desktops™
To use the Adaptive Authentication method, click Manage and configure the adaptive authentication method.

To use an existing authentication method, click Workspace Configuration and select an authentication method as per your requirement.

Step 2: Add and manage applications
After you have selected the authentication method, configure the applications. For the first-time users, the Applications landing page does not display any applications. Add an app by clicking Add an app. You can add SaaS apps, Web apps, and TCP/UDP apps from this page. To add an app, click Add an app.
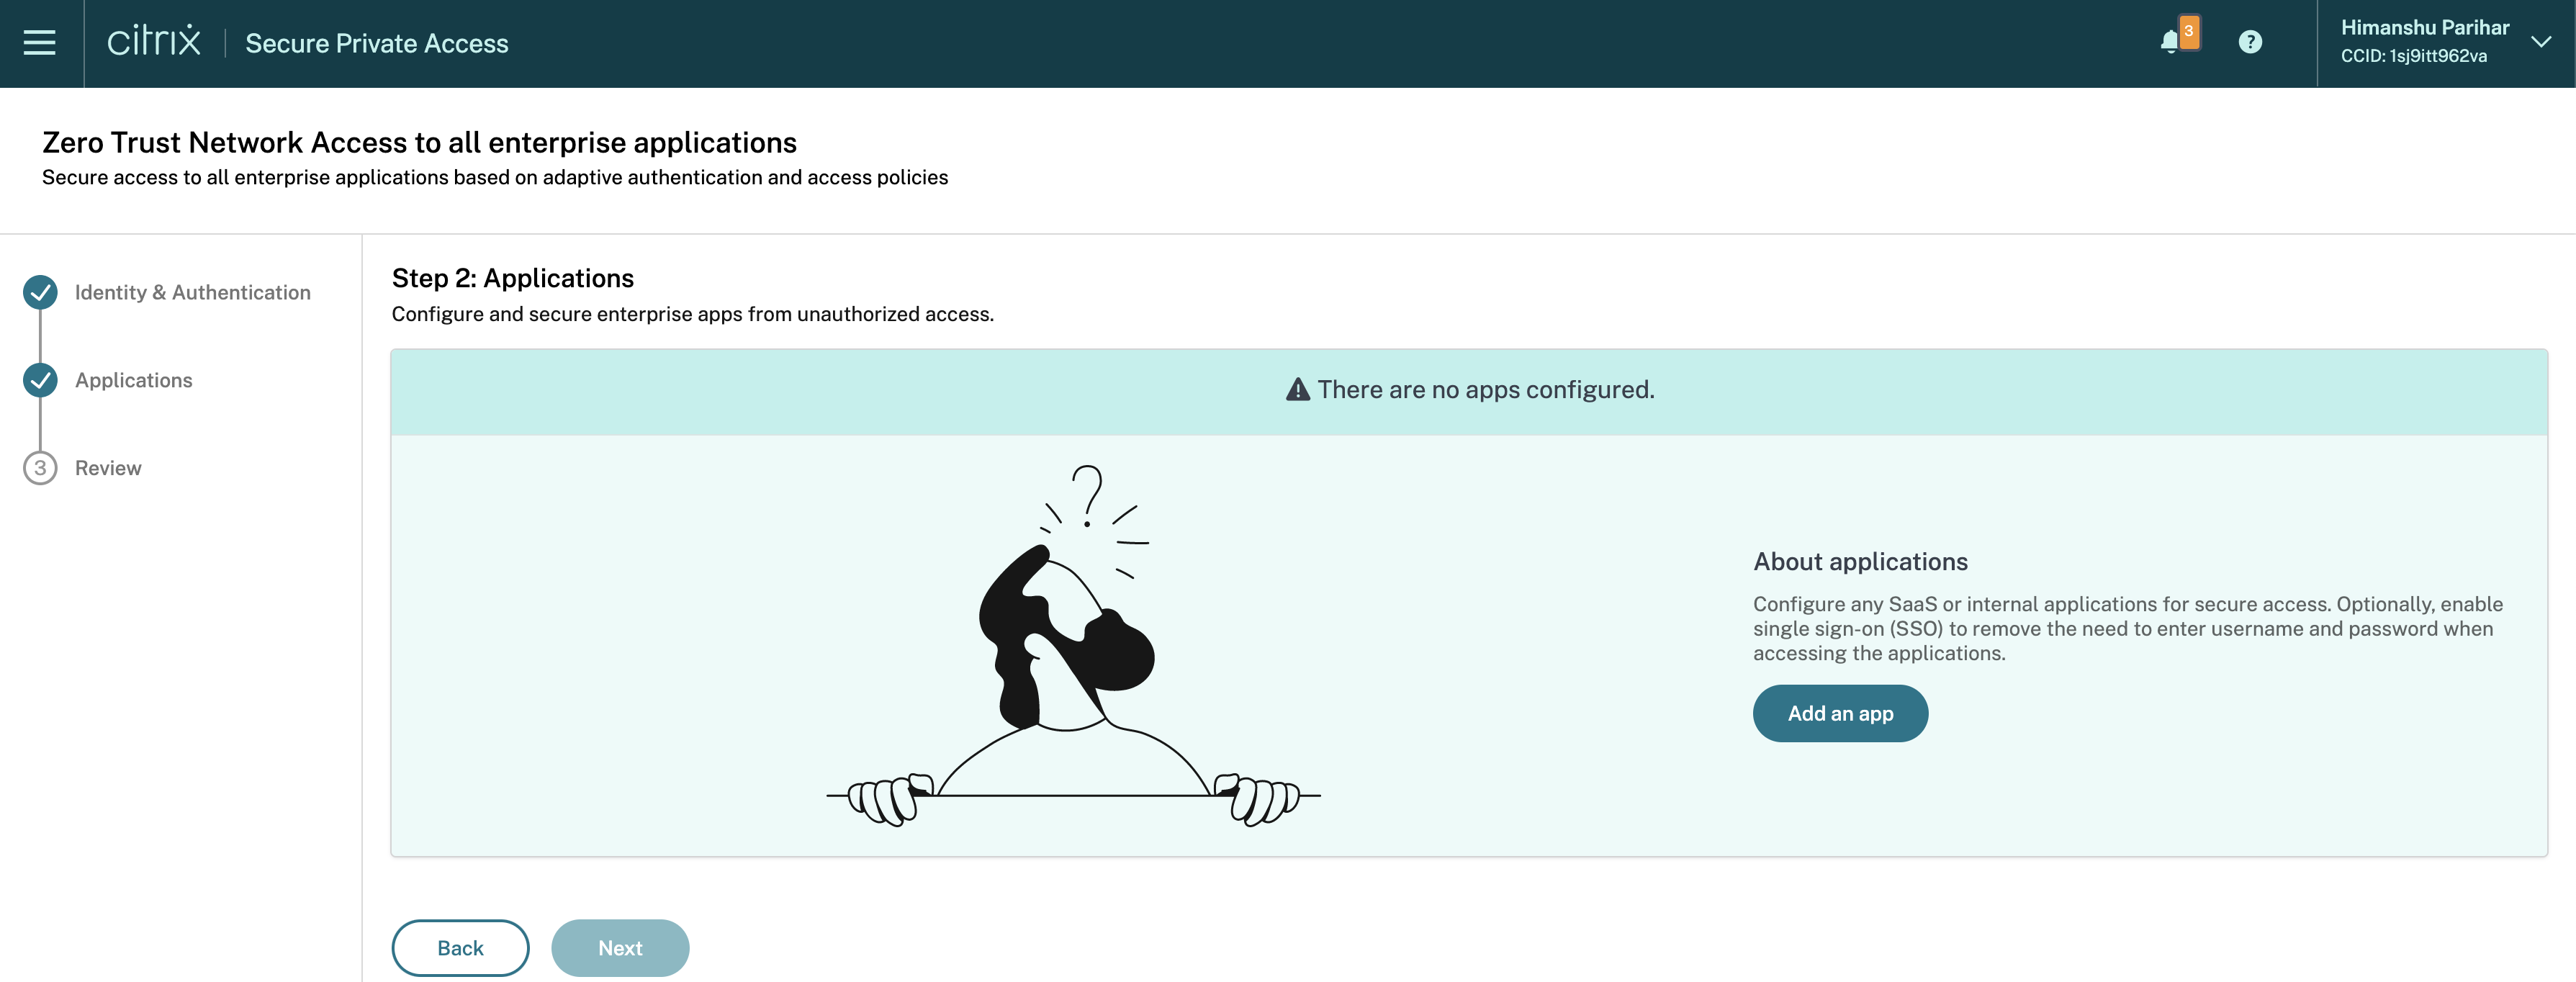
- Add a Web app
- Add a SaaS app
- Configure an app using a template
- Configure client-server apps
- Launch an app
- Enable read-only access to admins
Manage subscribers from the Add an app page
After you have added the apps, you can directly assign users or groups to the app from the App Subscribers section. For details, see Assign users or user groups for the published apps.
You can also assign users to the apps from the Step 2: Applications page after you have added the app successfully.
- In the Step 2: Applications screen, select the app to assign users.
- Click the ellipsis button and then click Manage Subscribers.
After you have configured the apps and assigned users or user groups to the apps, click Next to configure access policies.
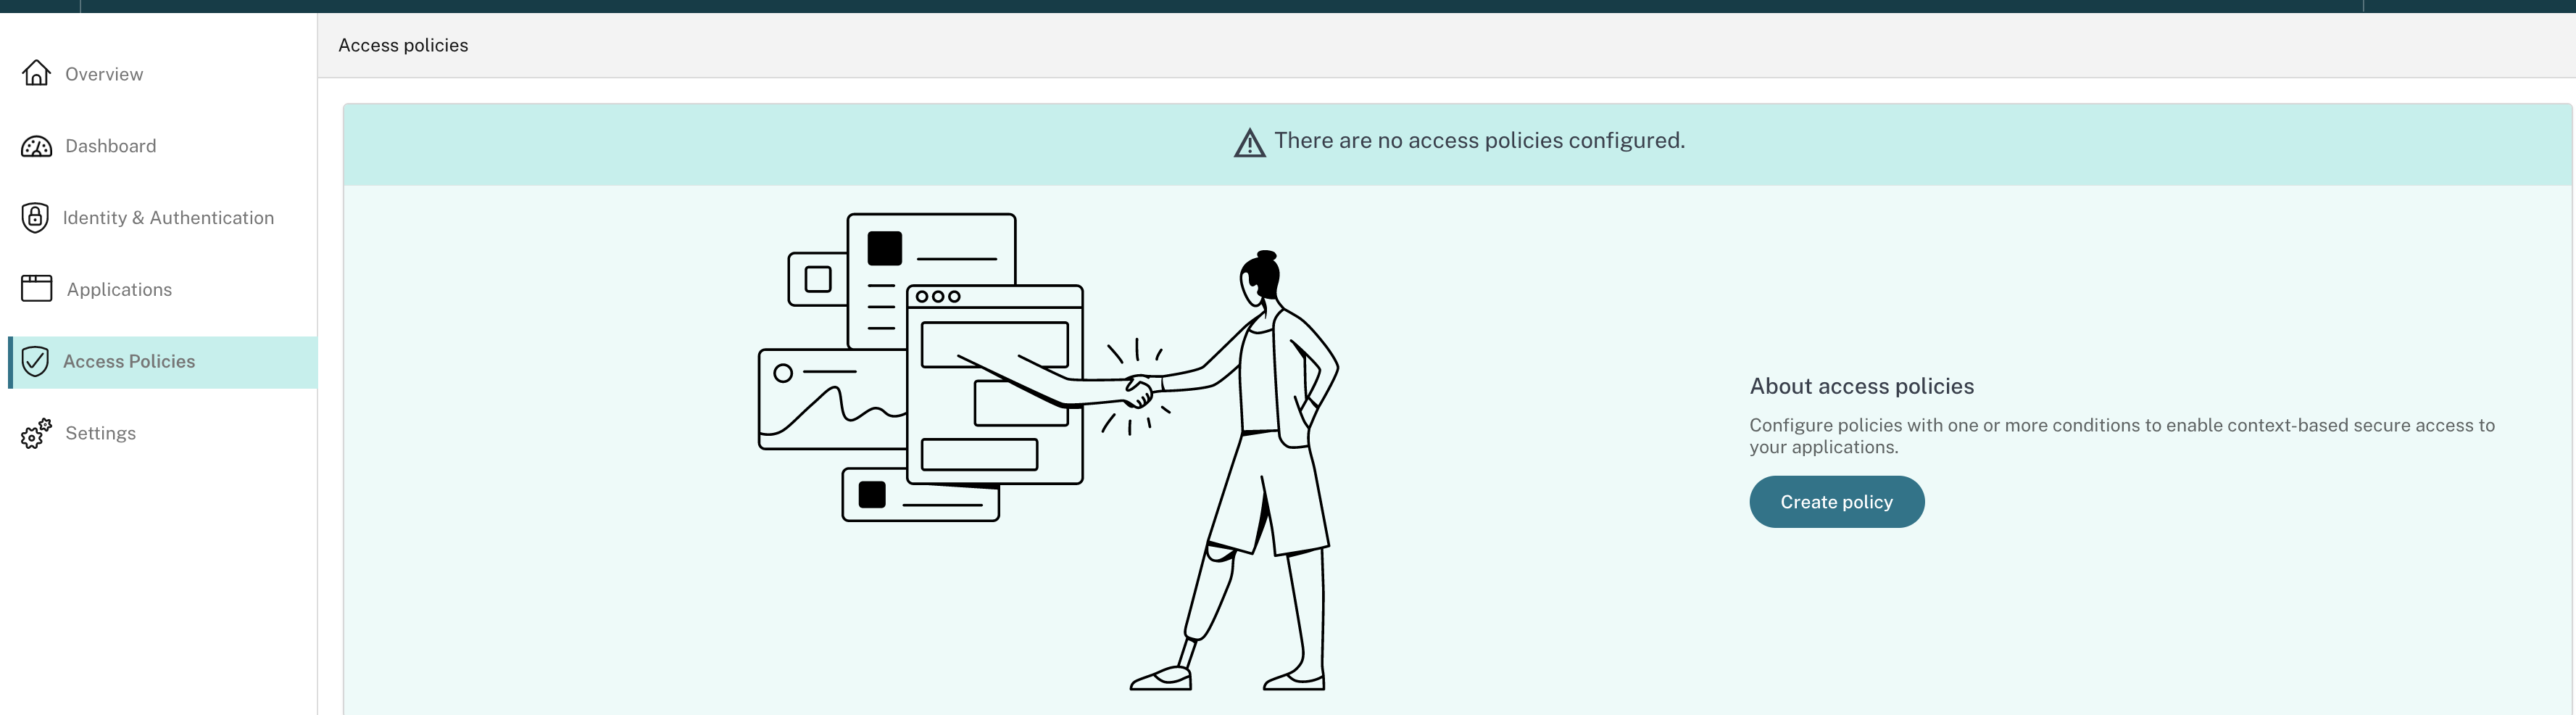
Step 3: Create access policies
For the first-time users, the Access Policies landing page does not display any policies. Click Create Policy to create a policy.
-
For users of these applications - This field lists all the applications that an admin has configured in the Secure Private Access service. Admins can select the applications to which this contextual policy must be applied.
-
If the following condition is met - Select the condition for which this adaptive access policy must be evaluated. Select the subsequent options based on the selected condition.

-
Click Add Condition to add more conditions.
An AND operation is performed between the conditions, and then the contextual policy is evaluated.
-
Then do the following - If the set condition matches, admins can select the action to be performed for the users accessing the application.
- Allow access without restrictions - Allow access without any preset conditions.
-
Allow access with restrictions - Select one of the preset security policy combinations. These security policy combinations are predefined in the system. Admins cannot modify or add other combinations
Note:
-
The options Preset 4, Preset 5, and Preset 6 are enabled only for Enterprise web apps. If an admin has selected a SaaS app along with web apps in the list of apps, then the options Preset 4, Preset 5, and Preset 6 are disabled.
-
Admins can select a preset security policy and also select the option to launch an application through the secure browser in the same policy. >Both the conditions are independent of each other.
-
- Deny access – When selected, access to the apps is denied. All other options are grayed out.

- Select Open in secure browser to always launch an application in the Remote Browser Isolation service regardless of other enhanced security settings.
- Select Access only from Citrix Workspace to always launch an application from Citrix Workspace.
- In Policy name, enter the name of the policy.
-
Slide the toggle switch ON to enable the policy. The policy is disabled by default.
Note: You can also enable the policy from the Access Policies page by enabling the toggle switch from the Status column. Click Create Policy.
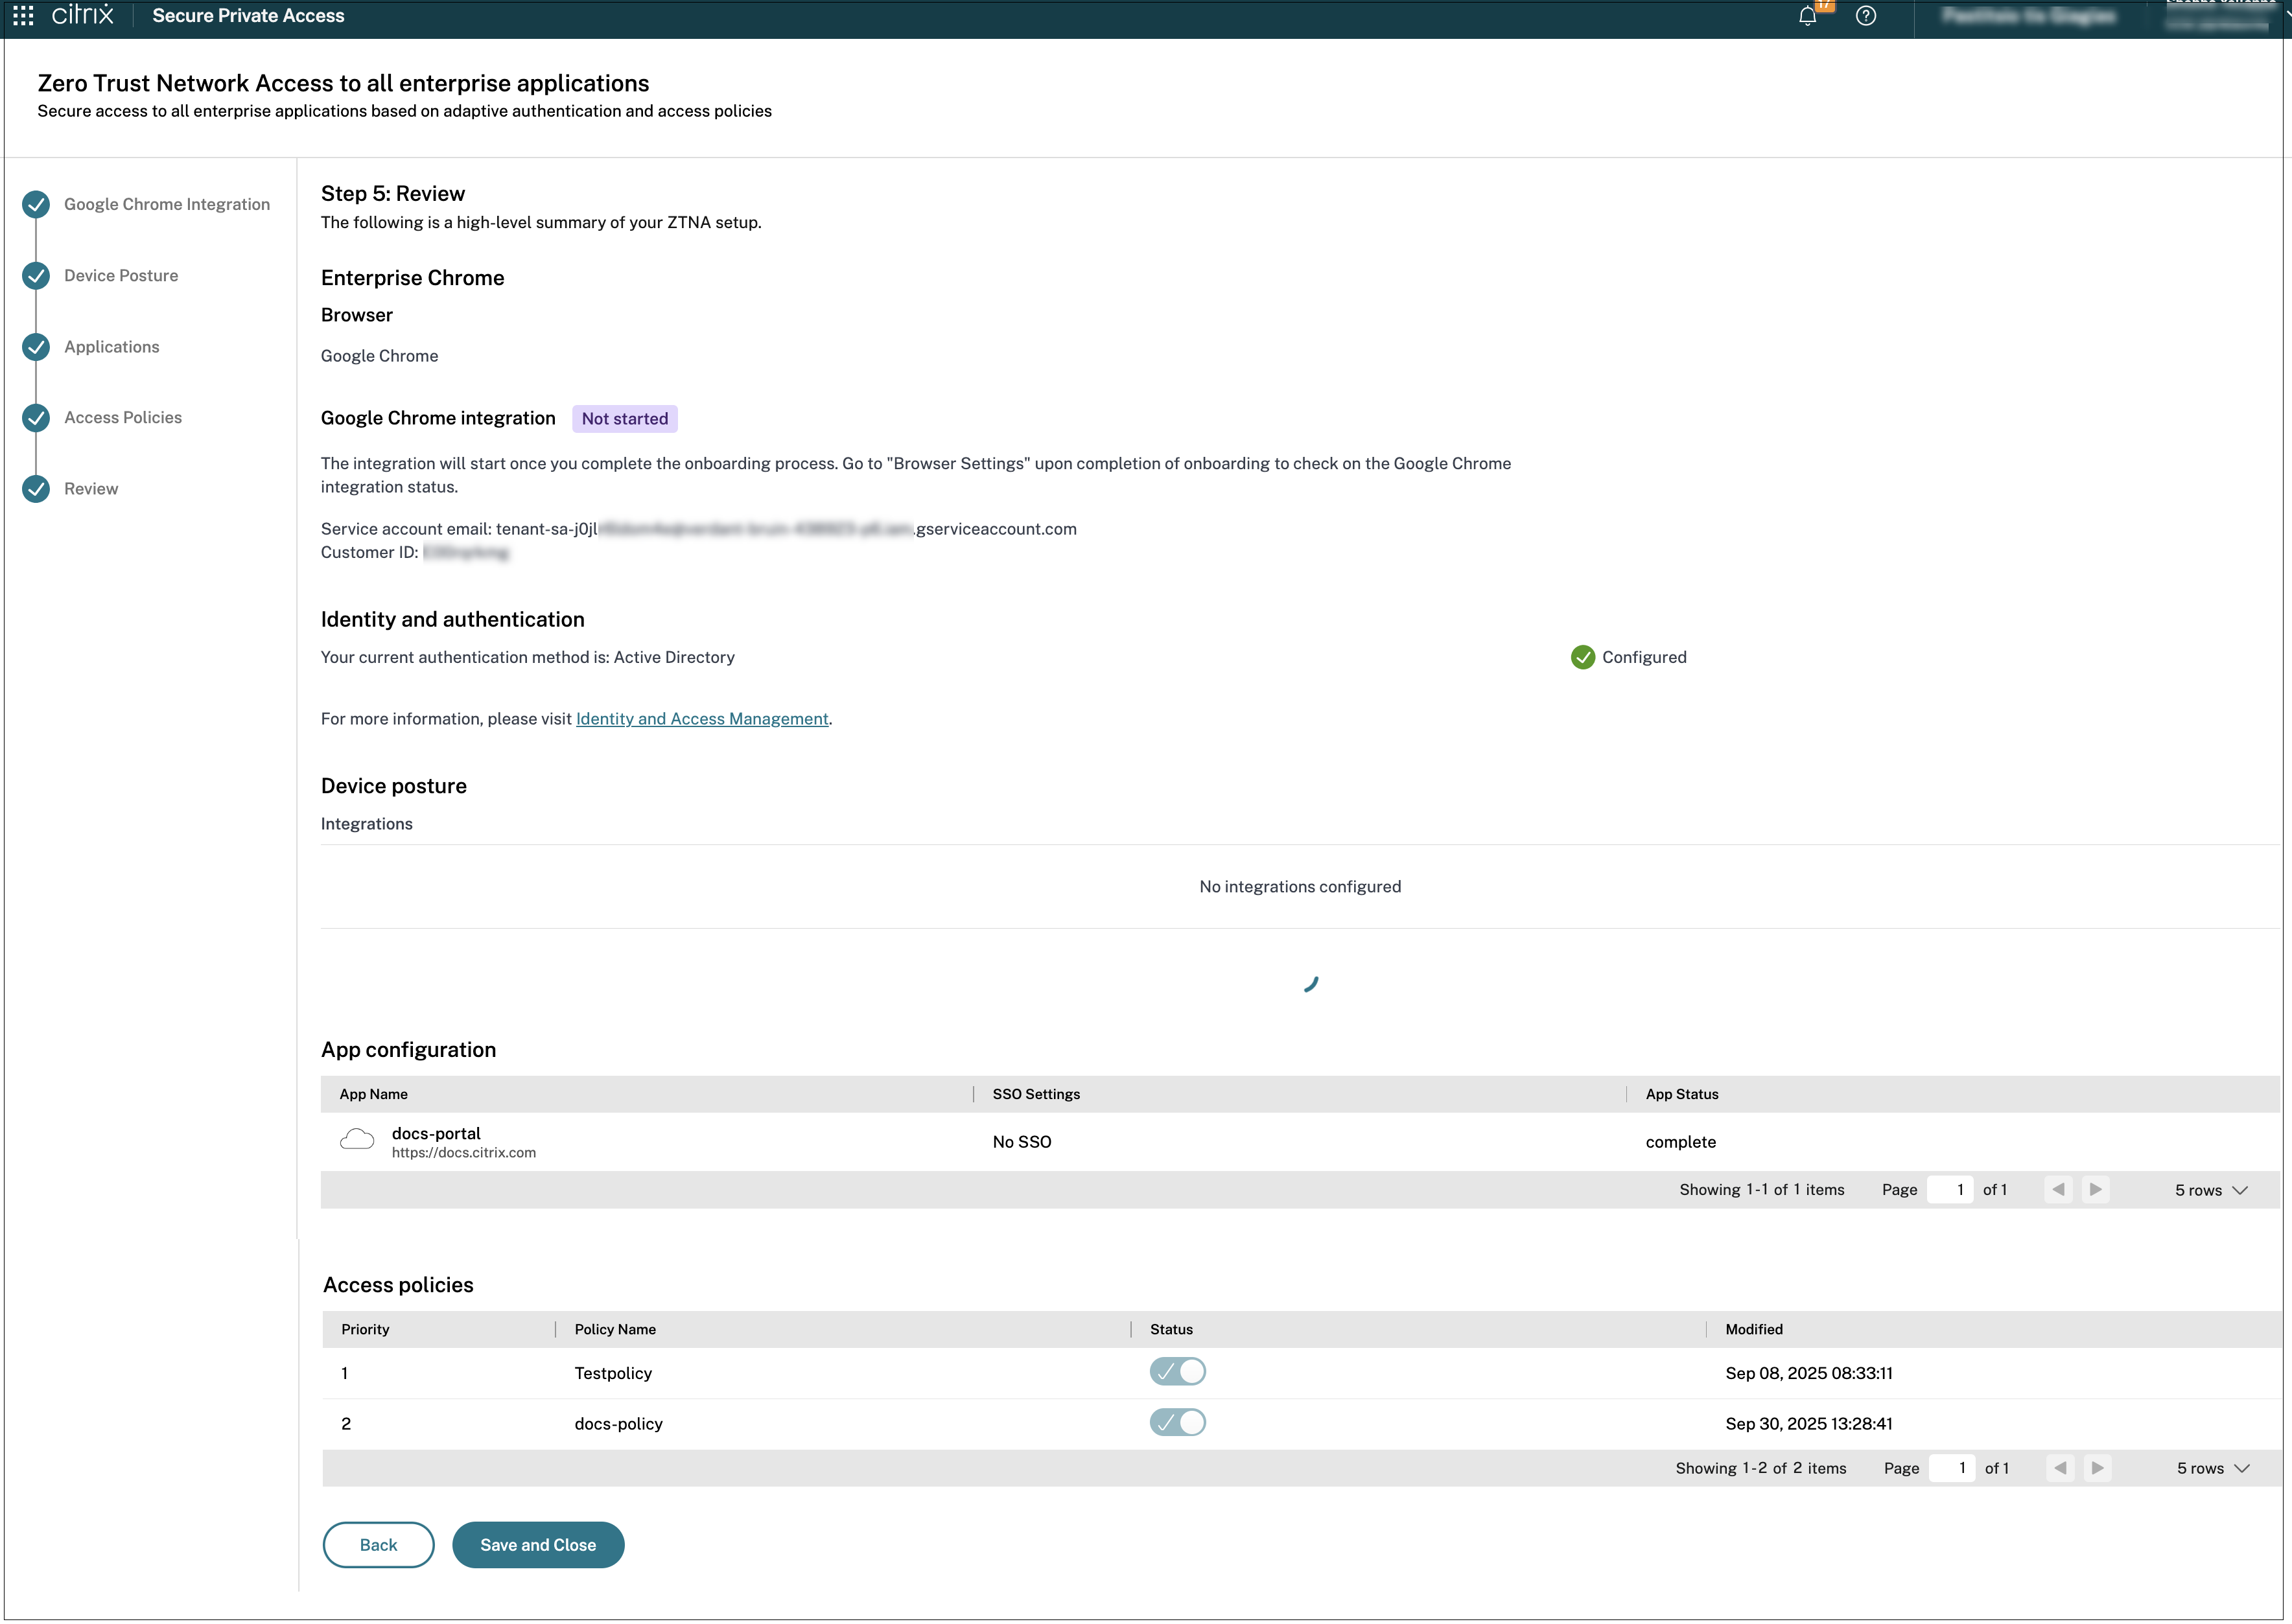
Step 4: Review summary of each configuration
From the Review page, you can view the complete app configuration and then click Close.
Important:
- After you have completed the configuration using the wizard, you can modify the configuration in any step by directly going to that page. You do not have to follow the sequence.
- If you delete all the configured apps or the policies, you must add them again. In this case, the following screen appears if you have deleted all the policies.
The following figure displays the page after you have completed the 4-step configuration.
Dashboard
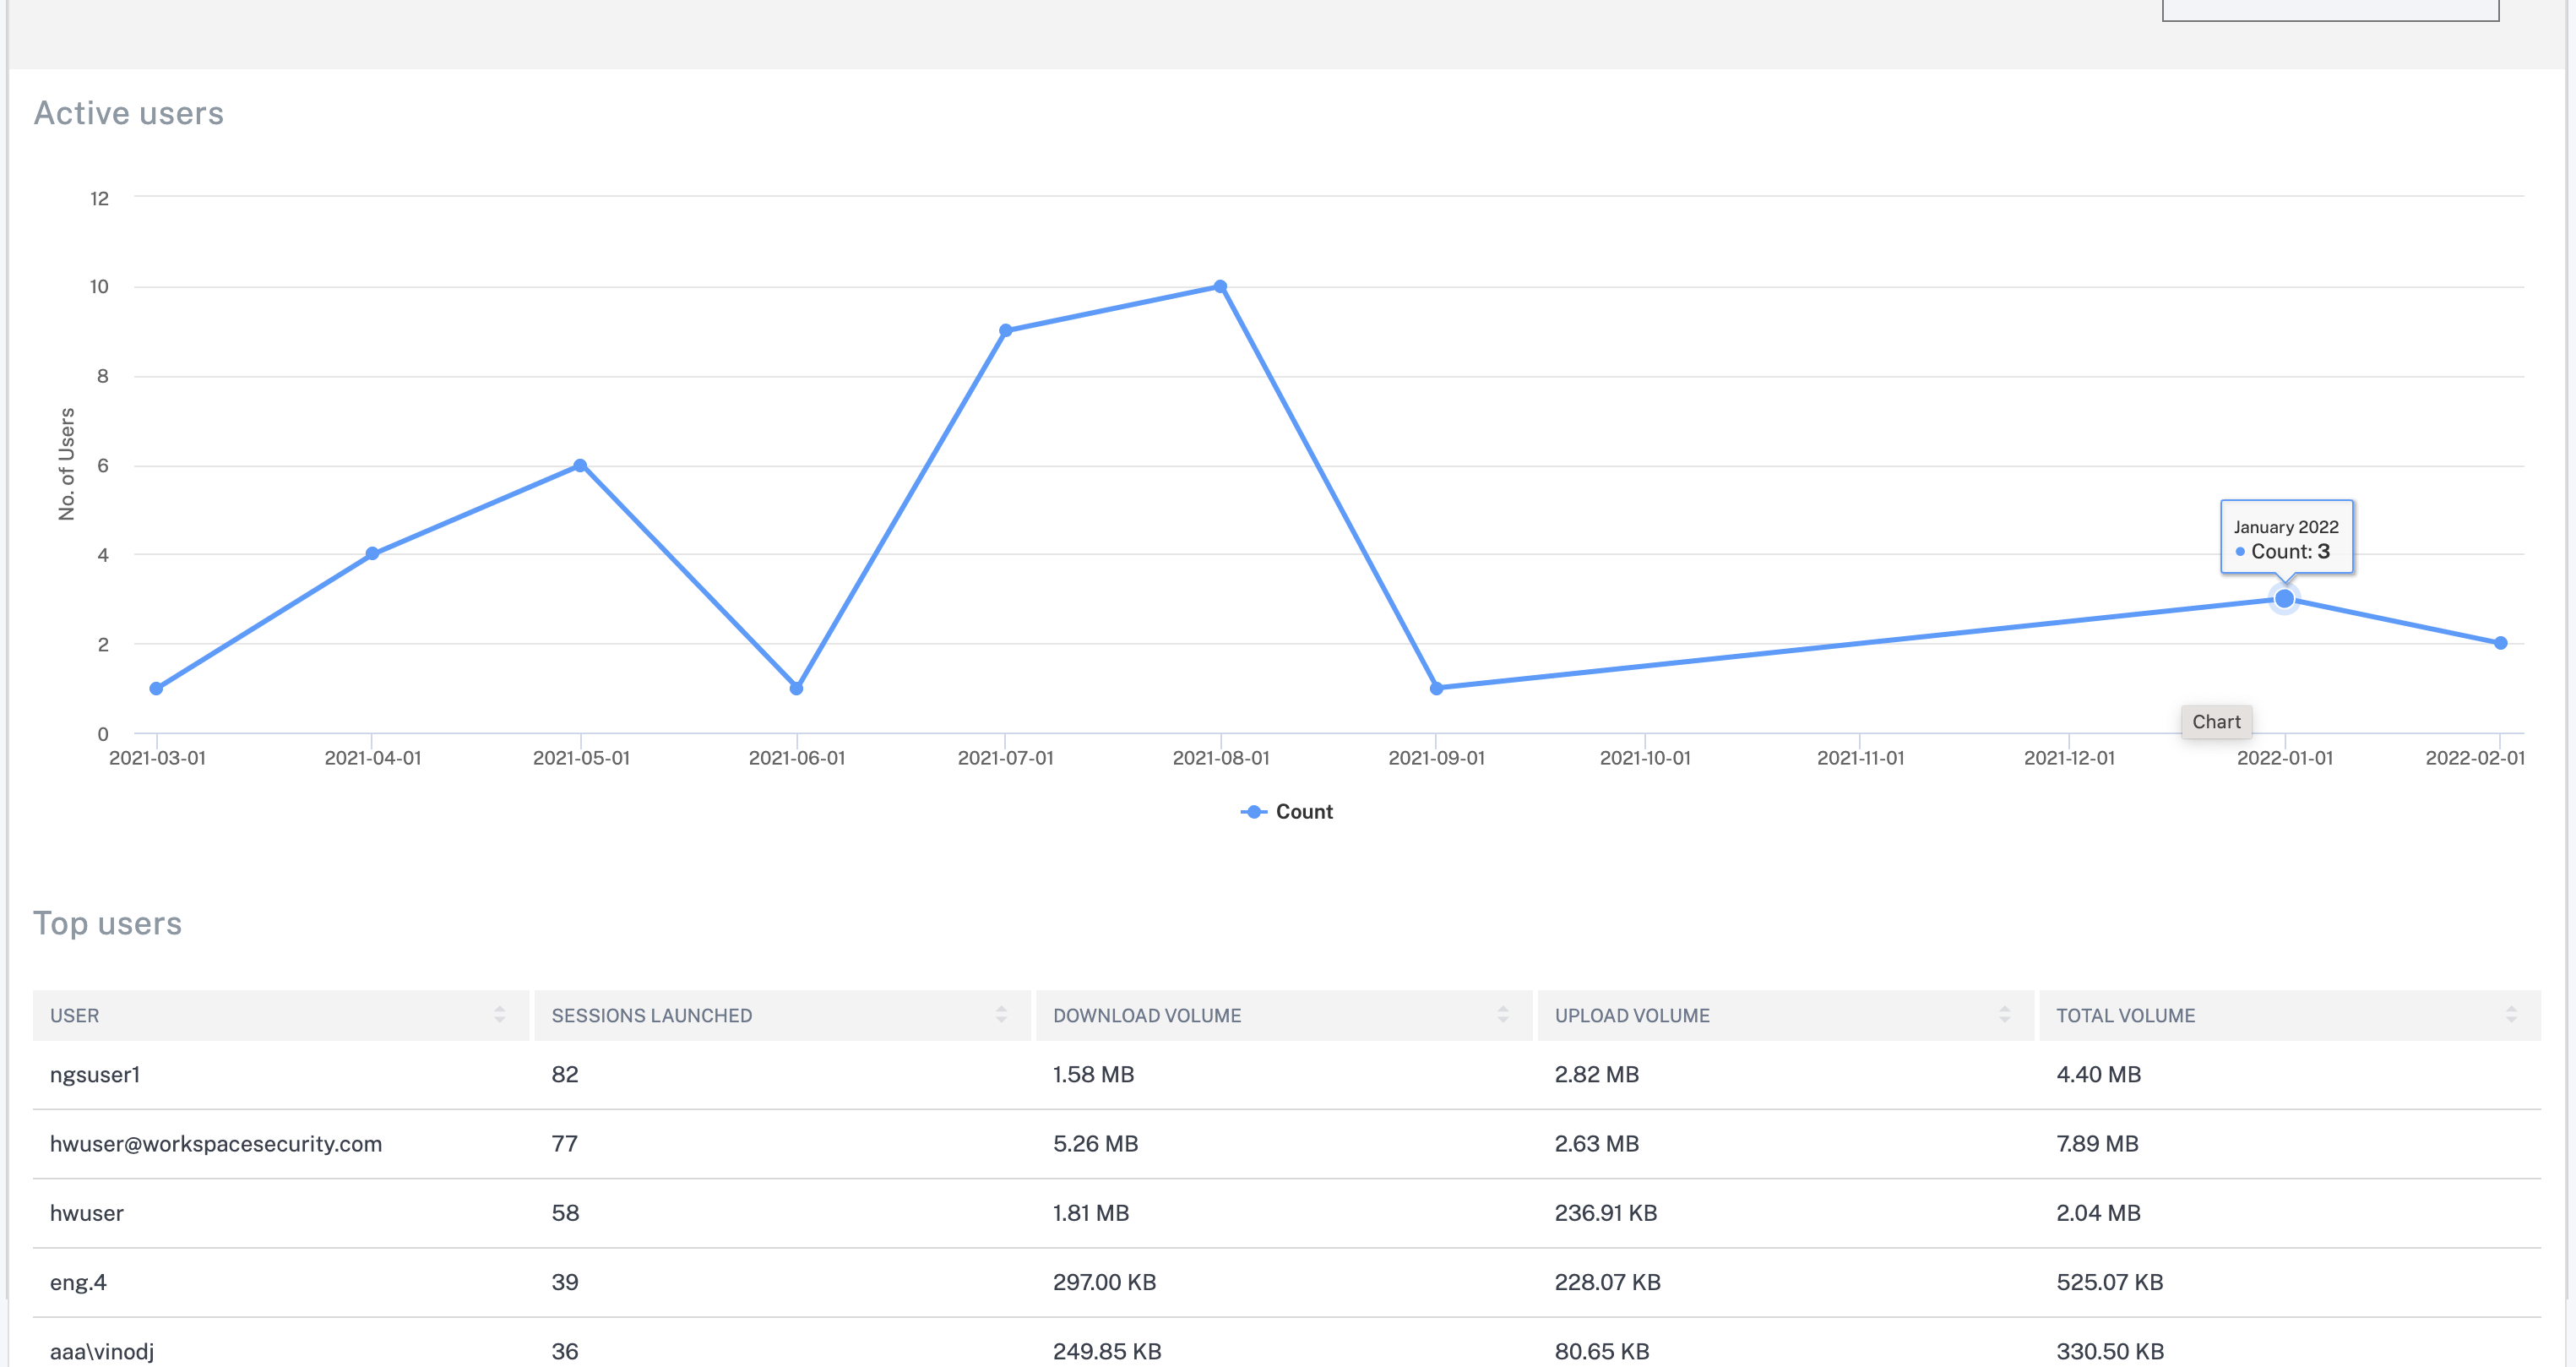
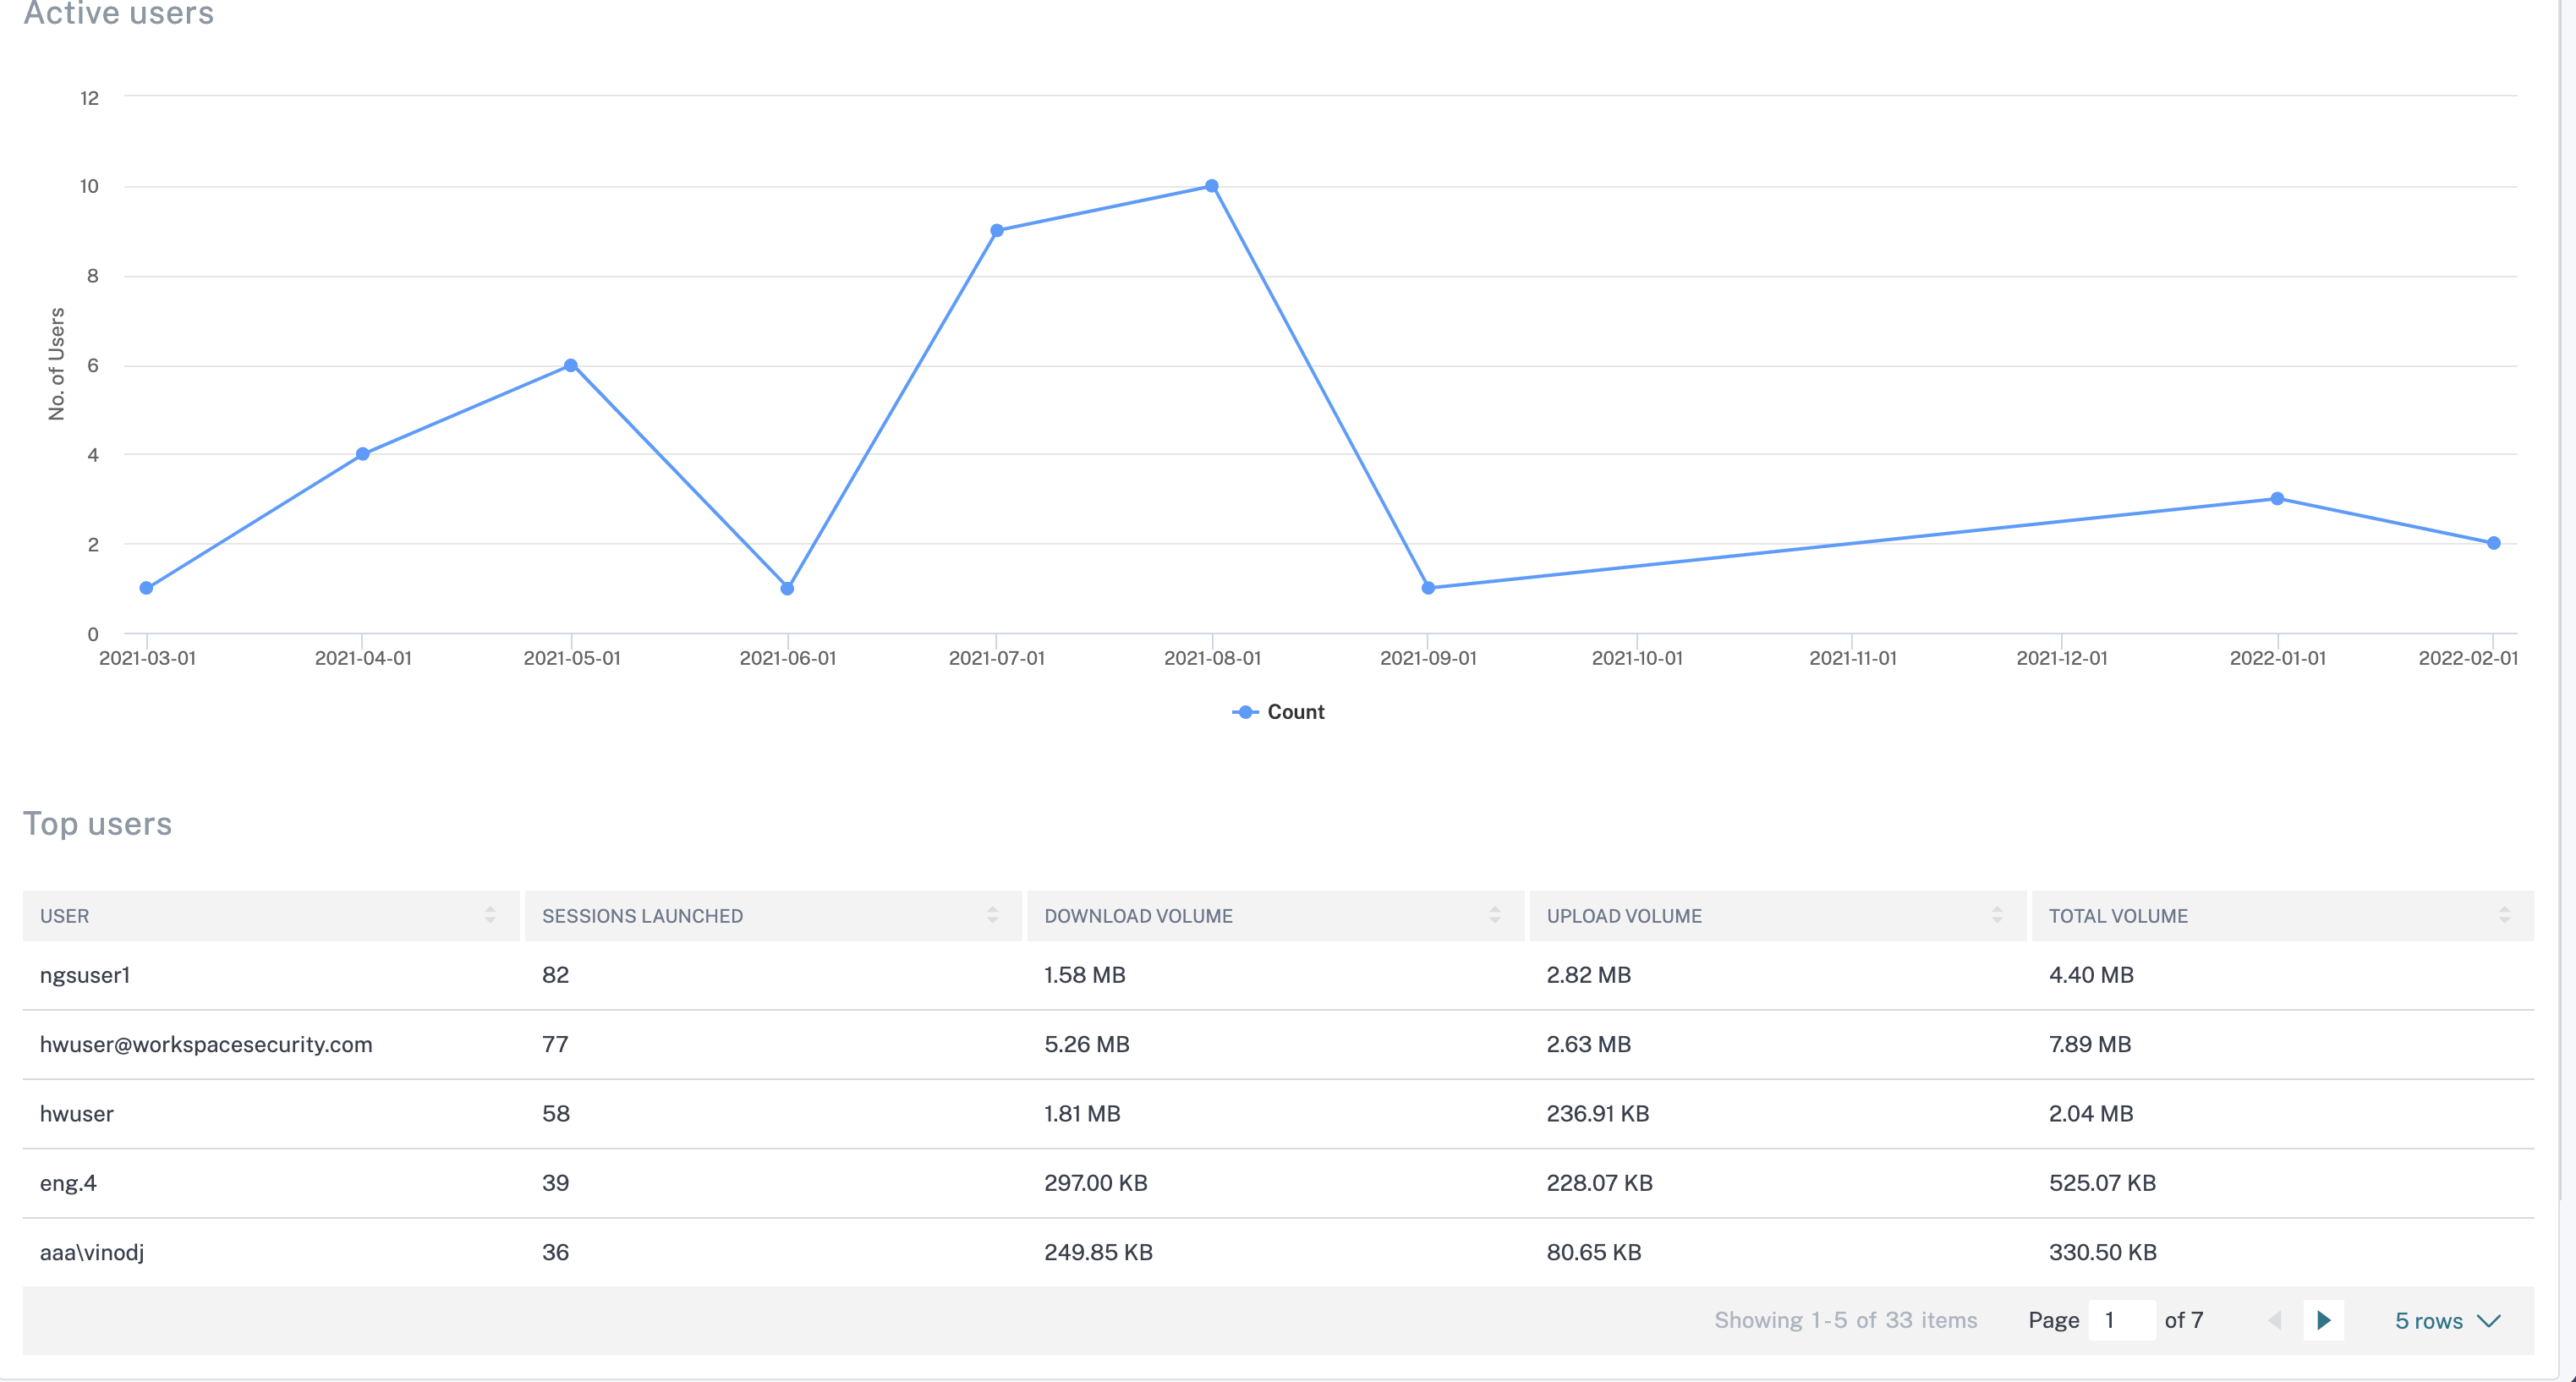
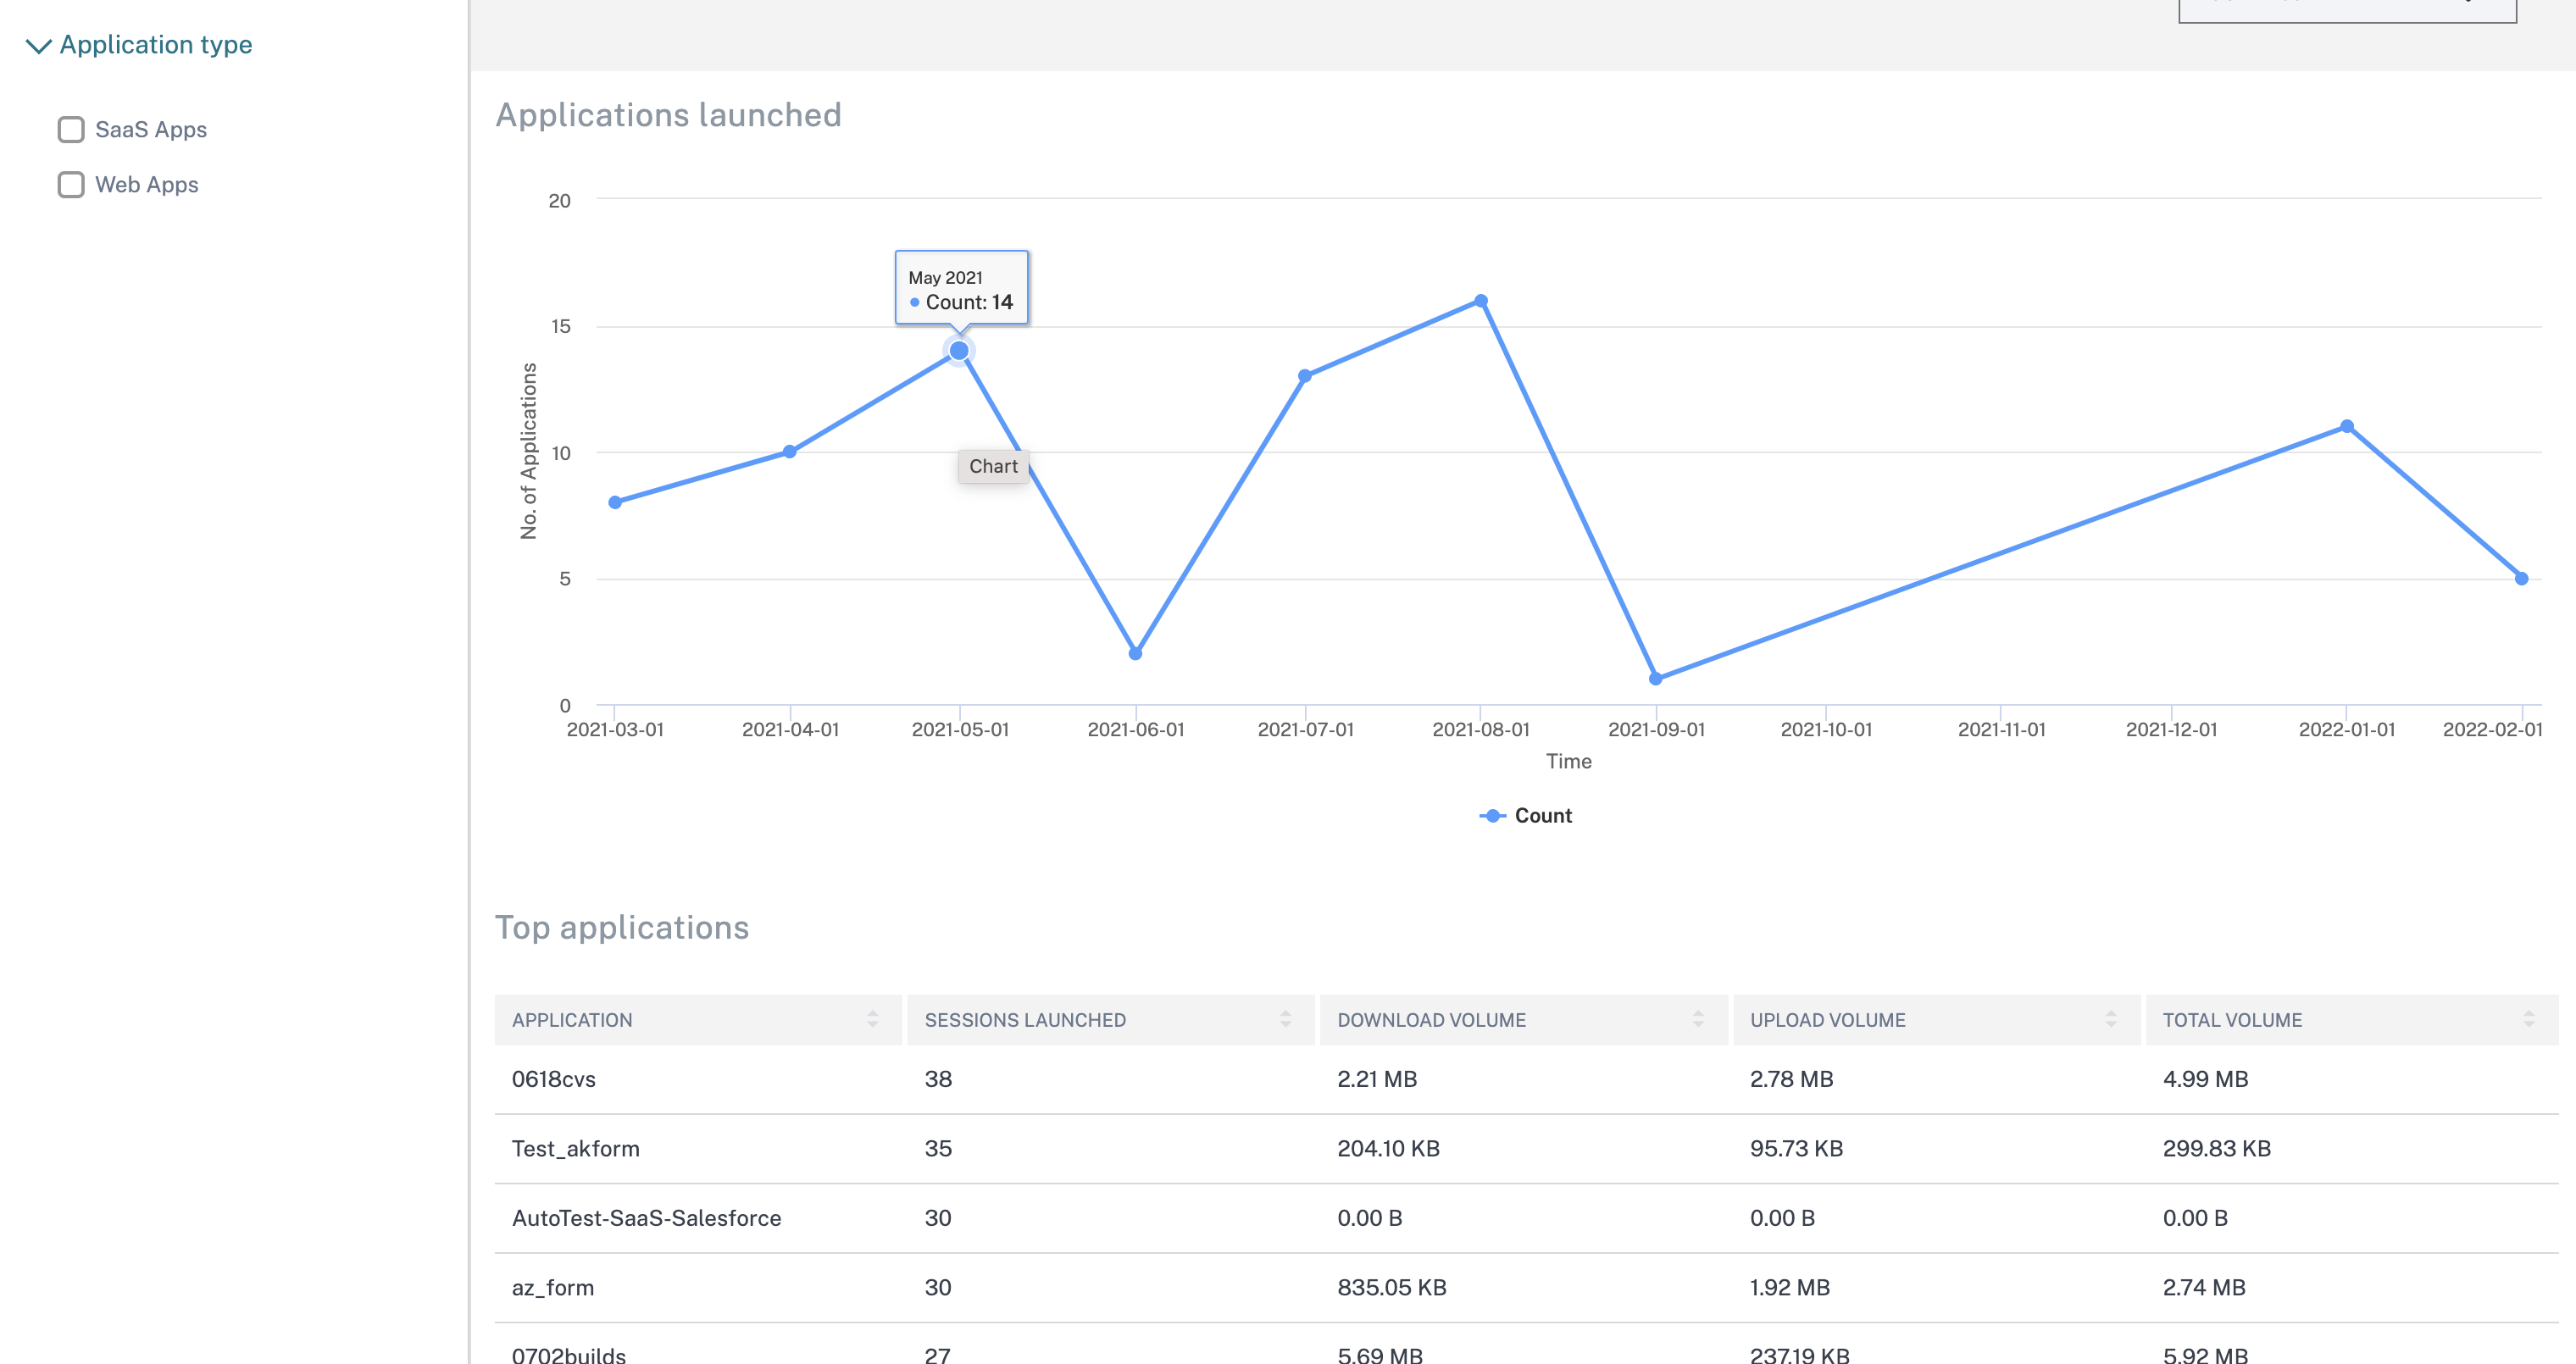
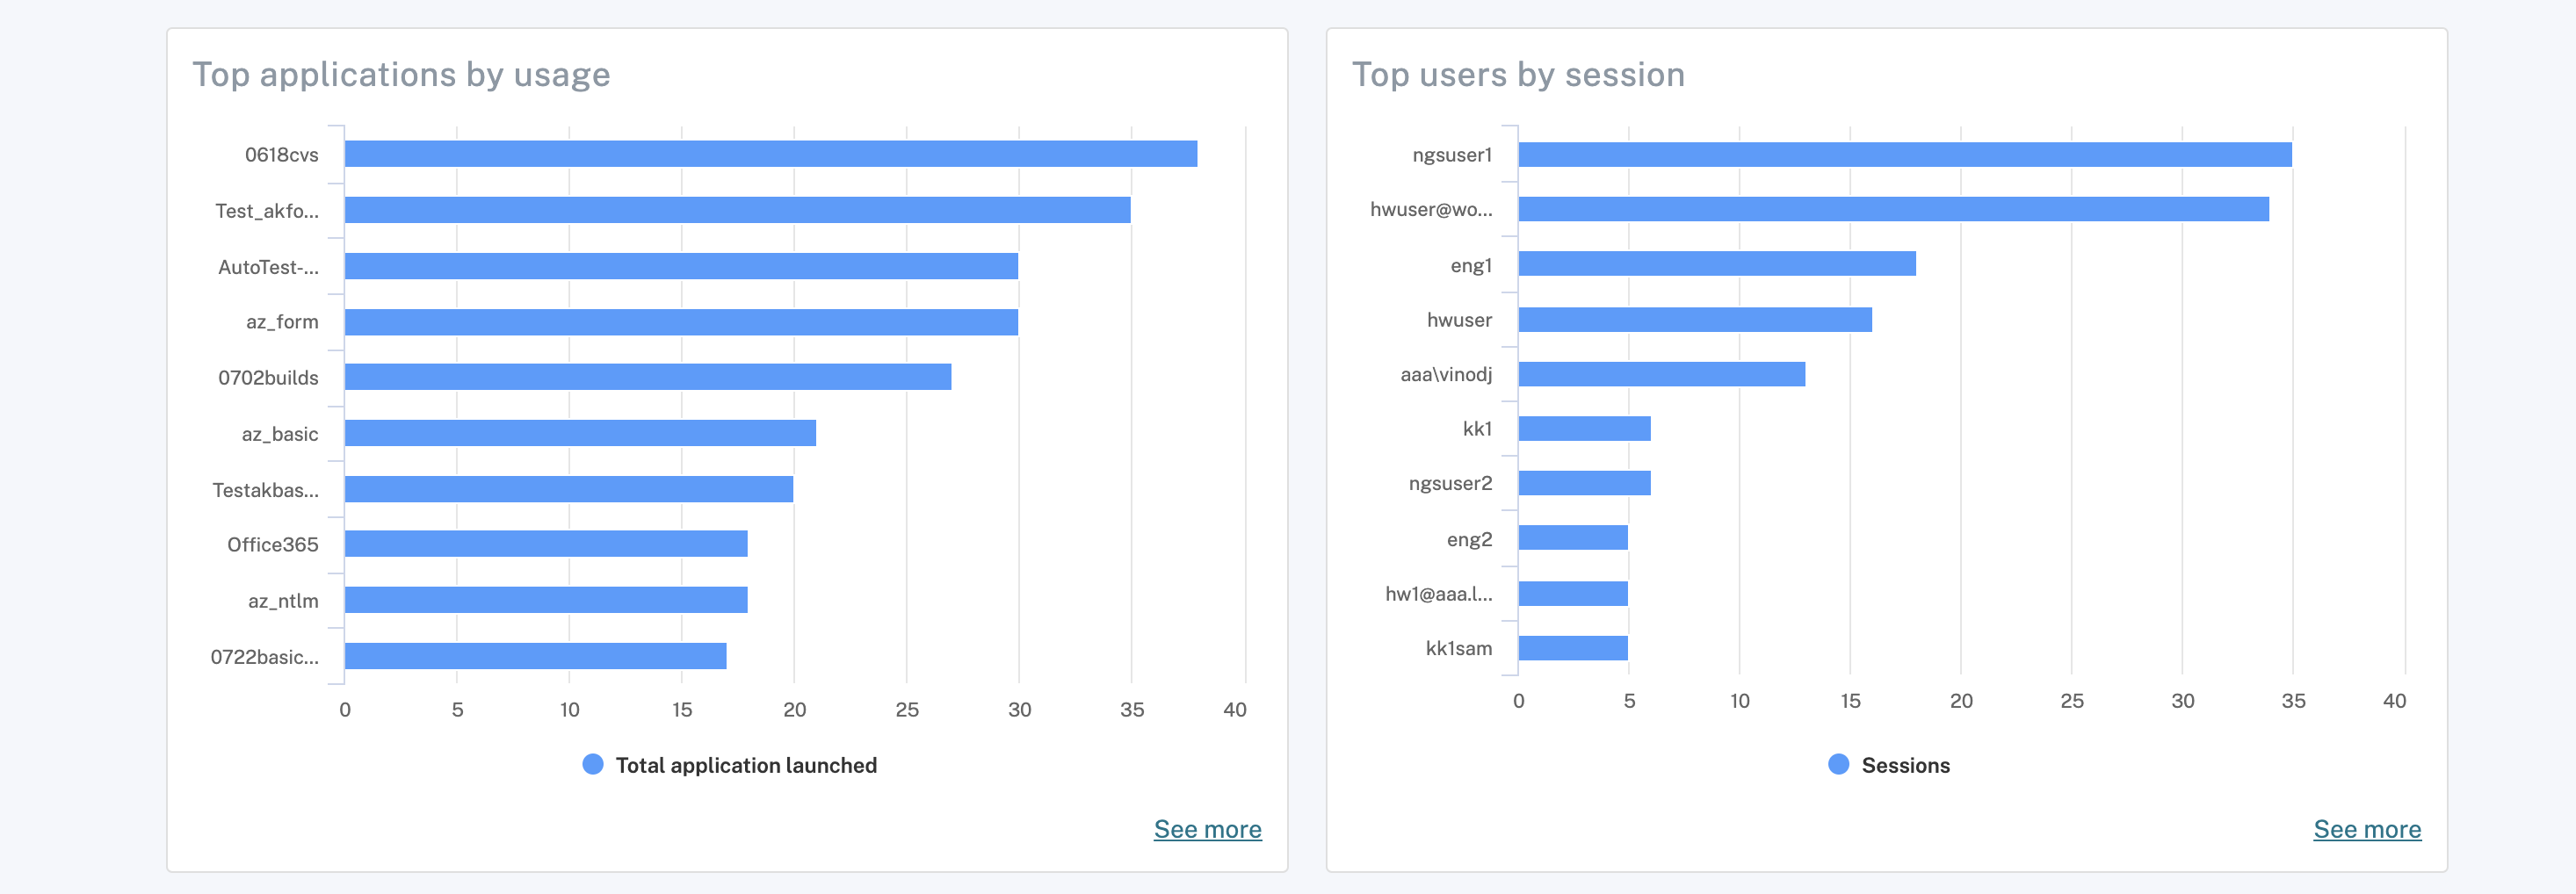
The dashboard displays a brief overview of the following entities. This data is fetched from Citrix Analytics. The data for the various entities can be viewed for the preset time or for a custom timeline. For each entity, you can also drilldown to view further details.
- Users: Provides details about the active users using the applications (SaaS and Web).
- Applications: Provides details about the applications (SaaS and Web) launched over the selected period.
- Application sessions: Provides details about the total applications launched versus usage and number of sessions versus users.
- Uploads: Displays the upload volume of each app.
- Downloads: Displays the download volume of each app.
- Domains: Summarizes the details of the domains, URLs, and apps accessed by the users.
- Connector insights: Provides insights into the connector statuses.