Create delivery groups
Introduction
A delivery group is a collection of machines chosen from one or more machine catalogs. Delivery groups define which users can access those machines, and the applications and desktops available to them.
Creating a delivery group is the next step after setting up your site and machine catalogs. You can later modify the initial settings or create additional delivery groups as needed.
Some features and settings are only configurable when editing an existing delivery group. For more details, see Manage delivery groups.
Before you begin
Before creating a delivery group:
- Review this article to understand the required choices and information.
- Ensure that you have created a connection to the hypervisor, cloud service, or other resource hosting your machines.
- Make sure a machine catalog with virtual or physical machines is available.
Pages of the Wizard
If you have created a site and a machine catalog but not a delivery group, Web Studio guides you to the correct starting point to create one.
If you have already created a delivery group and want to create another, follow these steps:
- Select Delivery groups.
- In the action pane, select Create Delivery Group.
- To organize delivery groups, you can create folders under the default Delivery Groups folder. For more information, see Create a folder.
- Select the folder where you want to create the group, then click Create Delivery Group. The group creation wizard opens.
- The wizard starts with an Introduction page, which you can choose to skip in future launches. It then guides you through several pages, as described in the following table. After completing each page, click Next to proceed until you reach the final page.
| Multi-session OS | Single-session OS static (assigned) | Single-session OS shared (pooled) | Remote PC Access | |
|---|---|---|---|---|
|
Pages
|
Machines | Machines | Machines | Machines |
| Load Balancing | Delivery Type | Users | Users | |
| Users | Users | Applications | Applications | |
| Applications | Applications | Desktops | Desktop Assignment Rules | |
| Desktops | Desktop Assignment Rules | App Protection | App Protection | |
| App Protection | App Protection | Scopes | Scopes | |
| Scopes | Scopes | License agreement | License agreement | |
| License agreement | License agreement | Policy Set | Policy Set | |
| Policy Set | Policy Set | Local Host Cache | Summary
|
|
| Summary | Summary | Summary |
Note:
- You see the Machine Allocation page (just after the Machines page) if there is any available assigned machine in the selected single-session OS static machine catalog.
- The Local Host Cache mode page is available only for delivery groups containing power-managed single-session pooled machines.
Machines page
-
To create a delivery group with single-session suspend-capable only VMs, select Make suspend capability required for this delivery group.
Note:
This feature is applicable to only single-session suspend-capable machines.
-
Select a machine catalog and select the number of machines you want to use from that catalog.
Important considerations
- When choosing a catalog, the list only shows catalogs with at least one unused machine.
- A catalog can provide machines to more than one delivery group. A machine can be used in only one delivery group. When you add more machines to the delivery group, Web Studio suggests the same catalog by default.
- A delivery group can use machines from more than one catalog; however, those catalogs must contain the same machine types (multi-session OS, single-session OS, or Remote PC Access). All machines within a delivery group must have the same assignment type (pooled or static). In other words, you cannot mix machine types in a delivery group.
- Citrix® recommends using the latest VDA version on all machines.
- For Remote PC Access, when you create a site, a catalog named Remote PC Access Machines and a delivery group named Remote PC Access Desktops are created automatically. Each machine in a Remote PC Access Machines catalog is automatically associated with a delivery group.
-
The following compatibility checks are performed:
- MinimumFunctionalLevel must be compatible
- SessionSupport must be compatible
- AllocationType must be compatible for SingleSession
- Remote PC Access is only compatible with Remote PC Access catalog
Machine Allocation page
The Machine Allocation page is available if there is any available assigned machine in the single-session OS static machine catalog selected on the Machines page.
Using this page, manage user assignments and desktop display names for machines in this delivery group.
- Use the Display name field to manage the desktop display name.
- Click Browse and select users or groups.
Load Balancing page
The Load Balancing Sessions on Machines page is available for multi-session OS machines.
Using this page, configure the load-balancing setting you want this delivery group to use. By default, delivery groups use the site-wide setting.
- To configure a load balancing setting for this delivery group, select the Override site-wide setting checkbox.
- Select either Horizontal load balancing or Vertical load balancing option as required. For information on Horizontal and Vertical load balancing methods, see Load balance machines.
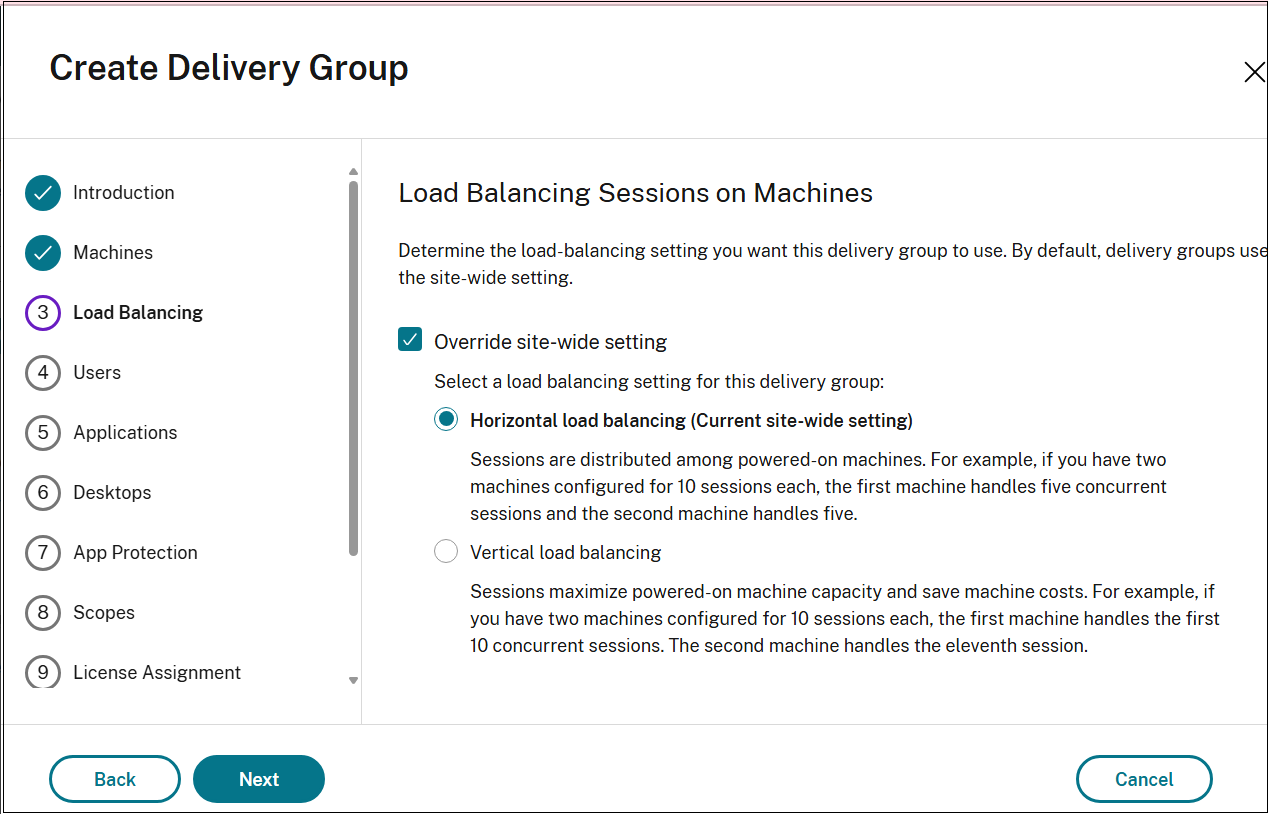
If you select Vertical load balancing, make sure that the Concurrent logon tolerance and Maximum number of sessions policies are configured appropriately.
Delivery Type page
The Delivery Type page appears only for single-session OS static (assigned) machines.
Using this page, configure the machines in the catalog to deliver desktops or applications to your users.
-
Select either Applications or Desktops. You cannot enable both.
Note:
If you select machines from a multi-session OS or single-session OS random (pooled) catalog, the delivery type is assumed to be applications and desktops. You can deliver applications, desktops, or both.
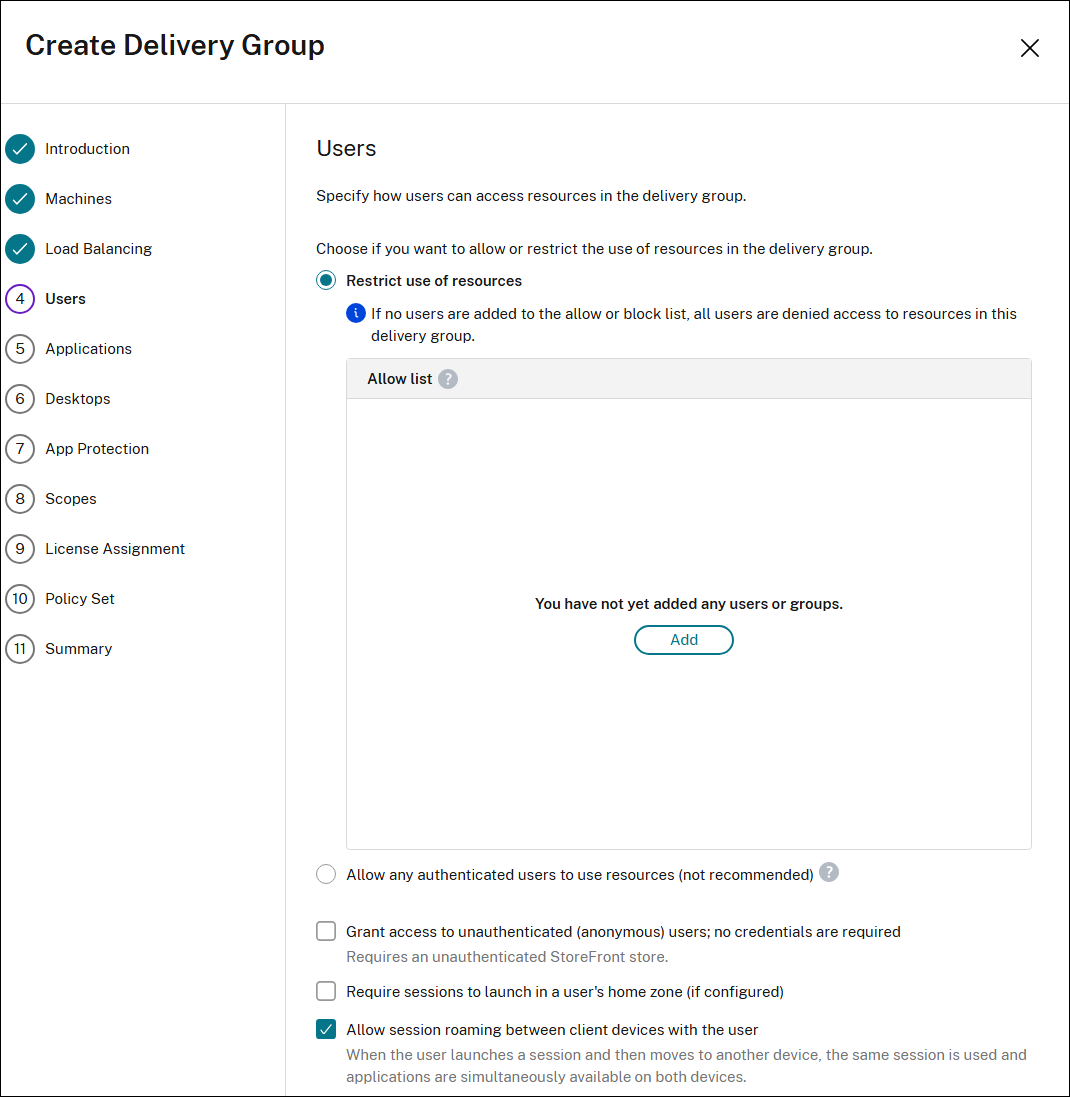
Users page
The Users page is available for all machine types. However, the options of the page vary with different types of machines.
Using this page, specify how users can access resources in the delivery group.
For multi-session OS machines:
For single-session OS static machines:
For single-session OS shared machines:
How user access control works
User access in a delivery group is controlled through specified user lists when you create or edit access settings.
-
Users who meet all of the following conditions can access applications in a delivery group:
- Have access to resources (apps and desktops) in this delivery group. By default, access is determined by the deployment’s user access list (users in the Active Directory), which is not configured through Studio. See Add or remove users in a delivery group.
- Have access to applications in this group. By default, the application entitlement policy rule includes everyone. See the PowerShell SDK
BrokerAppEntitlementPolicyRulecmdlets for details. If needed, you can restrict user access to applications in a delivery group using Delivery Groups > Edit Application Assignment Rule. - Have access to application groups that include this application.
-
Users who meet both of the following conditions can access desktops in a delivery group:
- Have access to resources (apps and desktops) in this delivery group. By default, access is determined by the deployment’s user access list (users in the Active Directory), which is not configured through Studio. You can add or remove users from the default user scope. See Add or remove users in a delivery group.
- Have access to desktops in this group. For more information, see Desktops (or Desktop Assignment Rules page).
Note:
- When specifying a user or group list, you can select accounts from any connected identity types, including Active Directory, Microsoft Entra ID, or Okta. Additionally, you can select accounts from multiple providers of the same identity type.
Configuration steps
-
Select one of the options to allow or restrict the use of resources in the delivery group.
- Allow any authenticated users to use resources: To access applications and desktops, the users and group members you specify by name must present credentials such as smart card or user name and password to StoreFront™ or Citrix Workspace™ app. (For delivery groups containing single-session OS machines, you can import user data (a list of users) later by editing the delivery group.)
- Restrict use of resources: Alternatively, you can restrict use of a delivery group by adding users or user groups to the Allow list. Only users on the Allow list can access apps and desktops in the delivery group. You can also add users and user groups to a block list by clicking Add block list, which prevents users from using apps and desktops in the selected delivery group. A block list is meaningful only when used to block users in the allow list.
- For multi-session OS machines, select Grant access to unauthenticated (anonymous) users; no credentials are required if you want users to access applications and desktops without presenting credentials to StoreFront or Citrix Workspace app. For example, at kiosks, the application might require credentials, but the Citrix access portal and tools do not.
- Unauthenticated user accounts are created on demand when a session is launched, and named AnonXYZ, in which XYZ is a unique three-digit value.
- Unauthenticated user sessions have a default idle timeout of 10 minutes, and are logged off automatically when the client disconnects. Reconnection, roaming between clients, and Workspace Control are not supported.
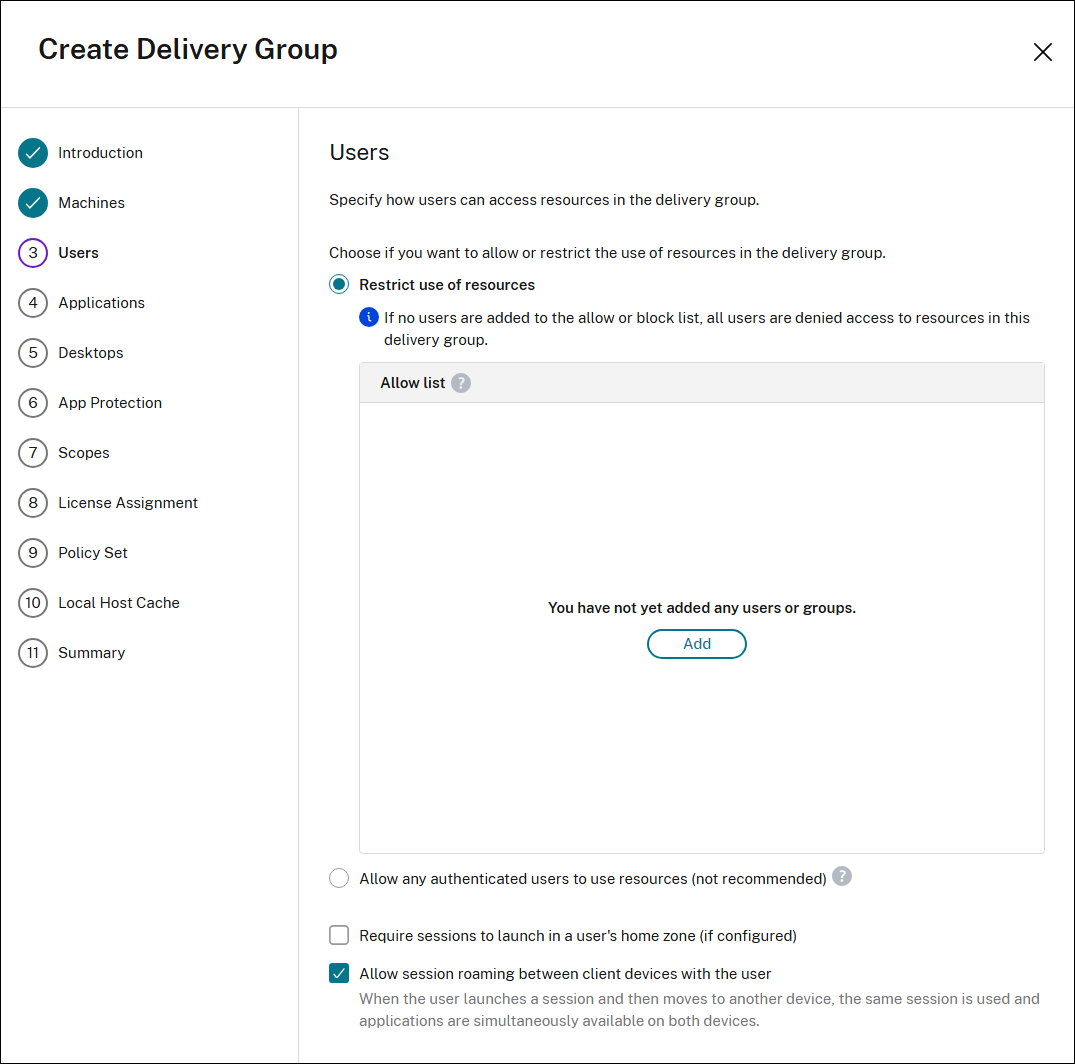
- Select Require sessions to launch in a user’s home zone (if configured) to prevent sessions from defaulting to other available zones if the user’s home zone has sufficient resources.
- Select Allow session roaming between client devices with the user if you want the sessions to follow, regardless of the device or whether current sessions exist.See Session roaming.
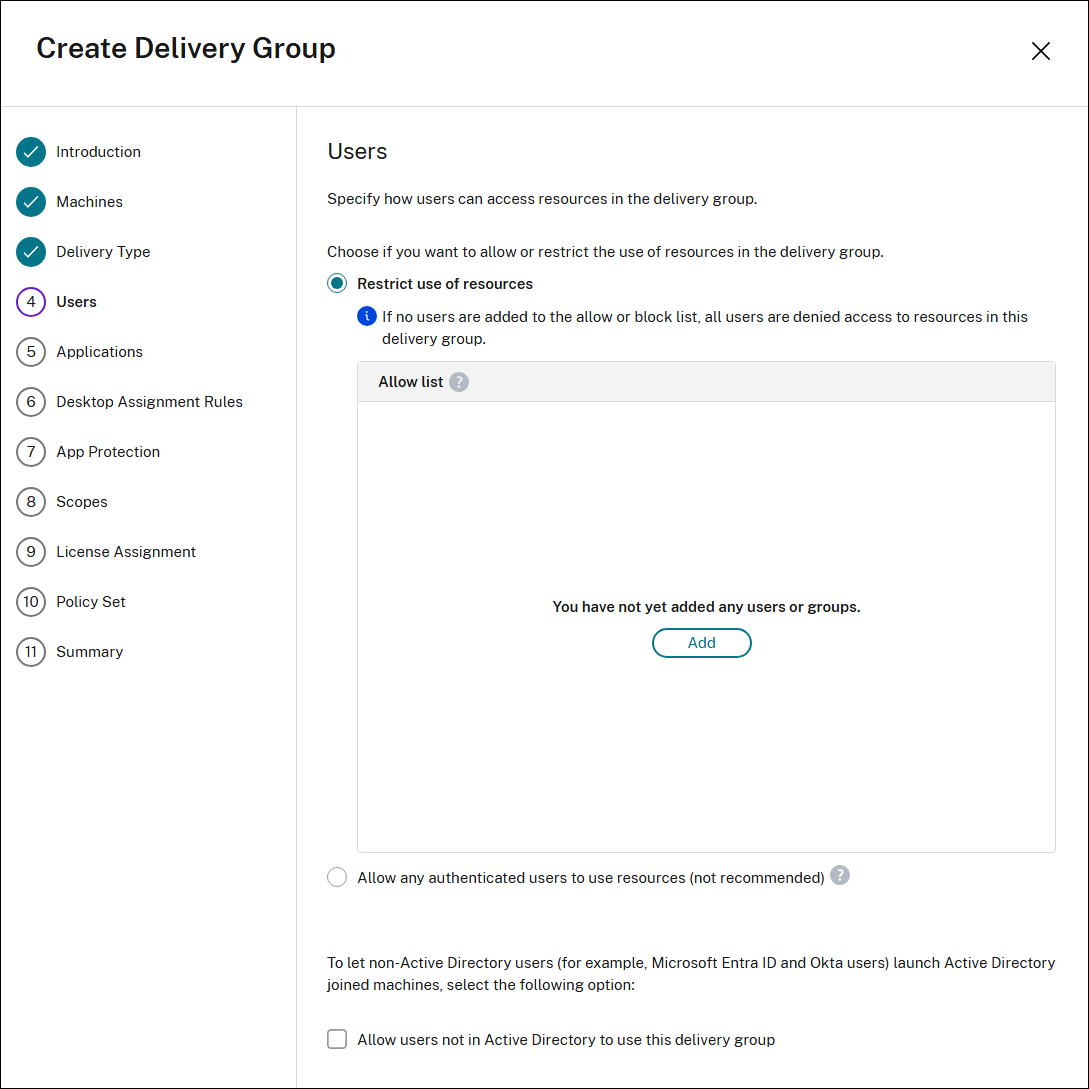
-
To enable non-Active Directory users to launch sessions on machines using a local account, select Allow users not in Active Directory to use this delivery group checkbox. This action facilitates the automatic creation and mapping of a local Windows account to the logged-in user. Consequently, all logins for this delivery group will use a mapped local account on the VDAs for log in. While allowing non-Active Directory users to access a local account on the VDA is one use case, this functionality also extends to Active Directory logins.
Note:
If the user’s Azure UPN contains a dot as the twentieth character, the Windows Server VDA is unable to create a local user account.
The following table describes your choices on the Users page:
| Enable access for | Add/assign users and user groups? | Enable the “Give access to unauthenticated users” checkbox? |
|---|---|---|
| Only authenticated users | Yes | No |
| Only unauthenticated users | No | Yes |
| Both authenticated and unauthenticated users | Yes | Yes |
Applications page
The Applications page is available for all machine types. However, the applications that you can add vary with different types of machines.
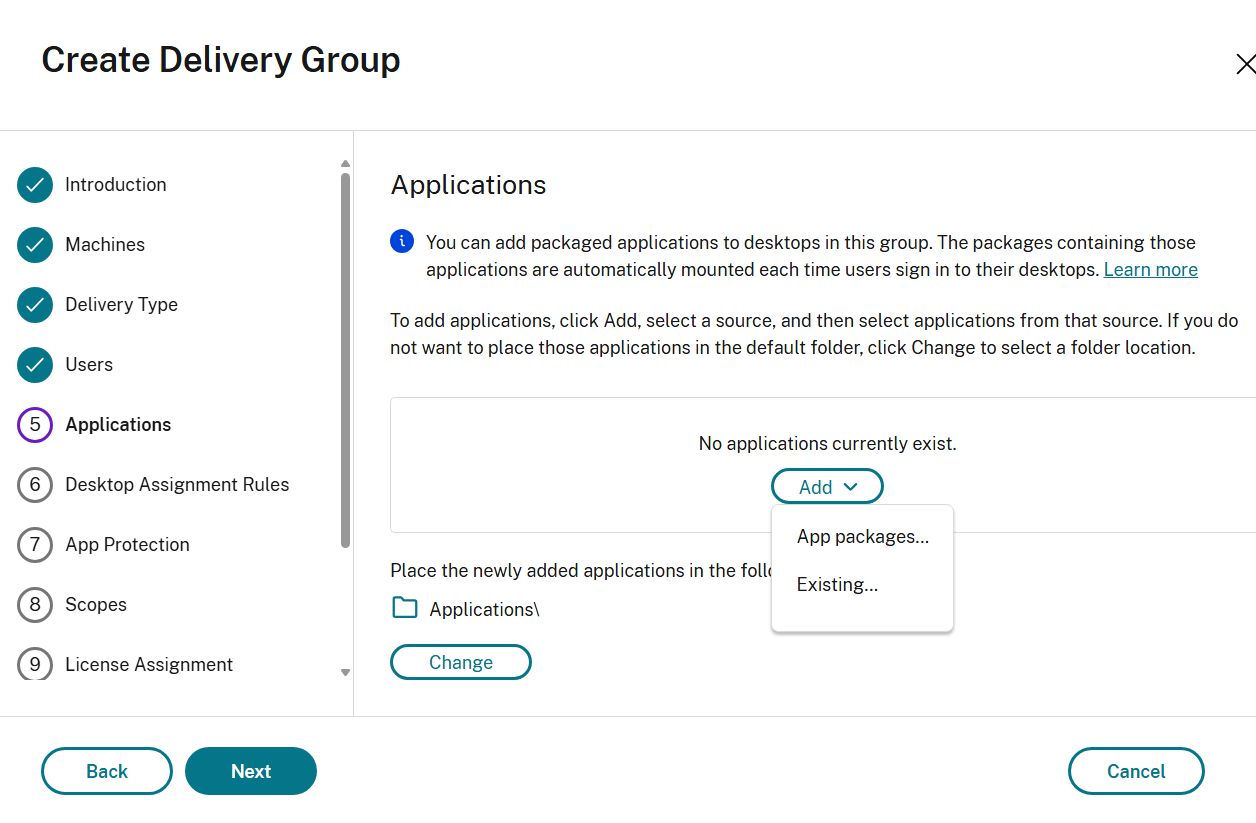
Using this page you can add packaged applications to desktops in this group.
For multi-session and single-session shared OS machines:
For single-session static OS machines:
Important considerations
- You can add packaged applications to delivery groups. The packages containing those applications are automatically mounted each time users sign in to their desktops or Remote PCs.
- By default, new applications you add are placed in a folder named Applications. You can specify a different folder. For details, see the Applications article.
- You can change the properties for an application when you add it to a delivery group, or later. For details, see the Applications article.
- If you try to add an application and one with the same name exists in that folder, you are prompted to rename the application you are adding. If you decline, the application is added with a suffix that makes it unique within that application folder.
- When you add an application to more than one delivery group, a visibility issue can occur if you do not have permission to view the application in all those delivery groups. In such cases, either consult an administrator with greater permissions or have your scope extended to include all the delivery groups to which the application was added.
- If you publish two applications with the same name to the same users, change the Application name (for user) property. Otherwise, users see duplicate names in the Citrix Workspace app.
Configuration steps
-
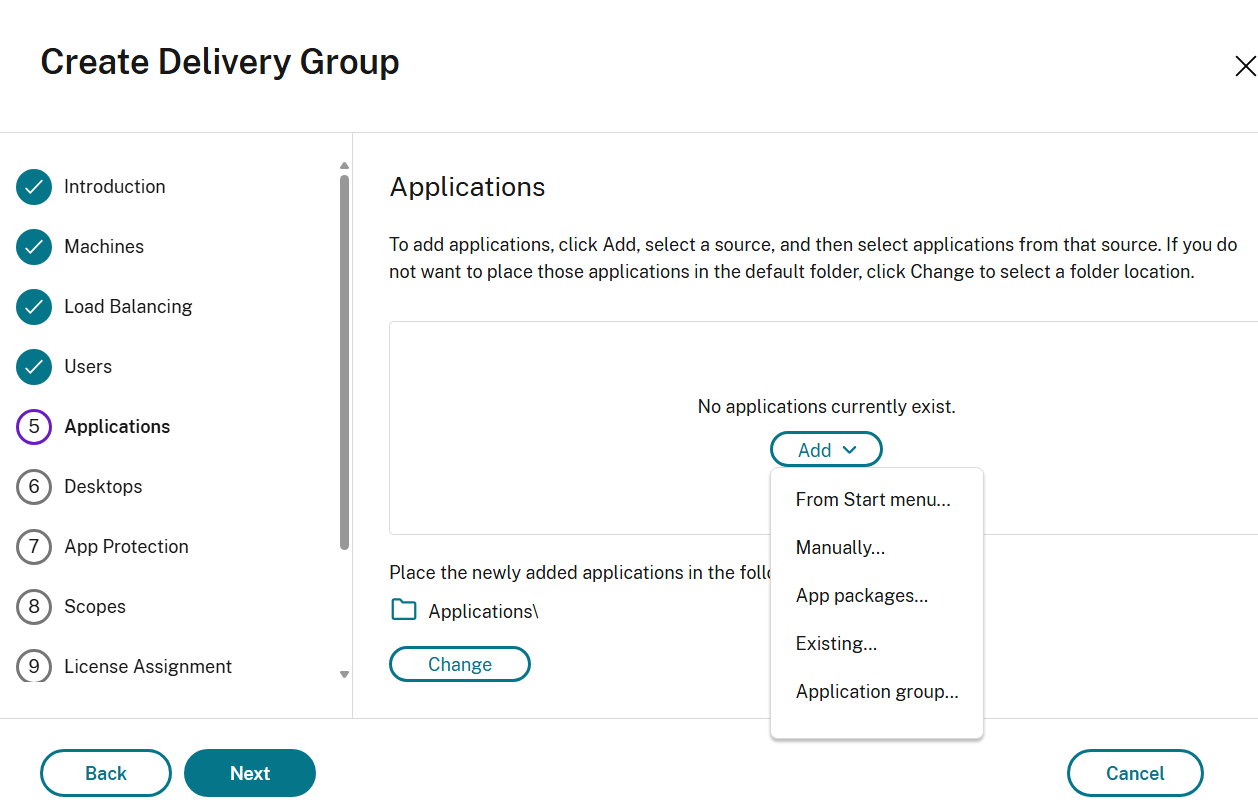
Select the Add menu to display the application sources.
- From Start menu: Applications are discovered through one of the currently registered VDAs that are assigned to the delivery group. When you select this source, a new page launches with a list of discovered applications; select those you want to add and then select OK.
- Manually: Applications located in the deployment or elsewhere in your network. When you select this source, a new page launches where you type the path to the executable, working directory, optional command line arguments, and display names for administrators and users. After entering this information, select OK.
- Existing: Applications previously added to the deployment, perhaps in another delivery group. When you select this source, a new page launches with a list of discovered applications; select those you want to add and then select OK.
-
Application packages: Applications in App-V, MSIX, MSIX app attach, or FlexApp application packages. When you select this source, the Add Applications from Packages page launches. Select an application package source, select the applications you want to add from the resulting display, and then select OK.
Note:
- This option is dimmed if no application package is configured for the site.
- To publish MSIX or MSIX app attach apps, the delivery group’s functional level must be 2106 or later. For FlexApp apps, the functional level must be 2206 or later. When a functional level requirement isn’t met, the corresponding options in the Application package source drop-down list are dimmed.
- Application group: Application groups that exist in the deployment.
If an application source or application is not available or valid, it is either not visible or cannot be selected. For example, the Existing source is not available if no applications have been added to the deployment. Or, an application might not be compatible with the supported session types on machines in the selected machine catalog.
Desktops (or Desktop Assignment Rules) page
The title of this page depends on the machine catalog that you chose earlier in the wizard:
- If you choose a catalog containing multi-session or pooled single-session machines, this page is titled Desktops.
-
If you choose a catalog containing single-session static machines and specified “Desktops” on the Delivery Type page, this page is titled Desktop Assignment Rules.
Note:
- If you choose a catalog containing single-session static machines and specified “Applications” on the Delivery Type page, then you do not see the page.
-
(Optional) To update the default desktop icon for the delivery group, select Change. You can extract the icon from an
.icofile or an.exefile. The maximum supported icon file size is 500 KB. This icon applies to all desktops in the group unless a different icon is set for an individual desktop. -
Select Add. In the dialog box:
- In the Display name and Description fields, type the information to be displayed in the Citrix Workspace app.
- For multi-session or pooled single-session OS machines: To add a tag restriction to a desktop, select Restrict launches to machines with this tag and then select the tag from the menu.
-
Using the radio buttons, you can either:
- Allow everyone with access to this delivery group to use a desktop. All users in the delivery group can launch a desktop (for groups with pooled machines) or be assigned a machine when they launch the desktop (for groups with single-session static machines).
- Restrict desktop use by adding users and user groups to the Allow list. Only users on the Allow list can access a desktop. You can also add users and user groups to a block list by clicking Add block list, which prevents users from using desktops in the selected delivery group. A block list is meaningful only when used to block users in the allow list.
- If the group contains single-session static machines, specify the maximum number of desktops per user. This must be a value of one or greater. The setting is not mandatory. You can assign machines manually or use RemotePC to have the machines assigned automatically.
- (Optional) Select Change to update the desktop icon for pooled desktops or the desktop assignment rule for single-session static desktops. You can browse to select an icon from an
.icoor an.exefile.The specified icon overrides the default icon set at the delivery group level. - Enable or disable the desktop (for multi-session machines) or desktop assignment rule (for single-session static machines): Disabling a desktop stops desktop delivery. Disabling a desktop assignment rule stops desktop auto-assignment to users.
- When you are finished with the dialog box, select OK.
App Protection page
The App Protection page is available for all machine types.
Using this page, you provide enhanced security for Citrix published apps and desktops.
The following information is supplemental to the App protection article in the Citrix Virtual Apps and Desktops documentation. To use app protection in a Citrix DaaS deployment, follow the general guidance in that article, minding the following details.
- You must have a valid Citrix Cloud™ subscription and valid app protection entitlements. To purchase the app protection feature, you can contact your Citrix sales representative. (For on-premises: You must have a valid App Protection entitlement. To purchase the App Protection feature, contact your Citrix sales representative.)
- App protection requires XML trust. To enable XML trust, go to Settings > Site settings > Enable XML trust.
Protection is applied under the following conditions:
-
Anti-screen capture:
- On Windows and macOS, only the window of the protected content is blank. App protection is active when a protected window is not minimized.
- On Linux, the entire capture is blank. App protection is active whether a protected window is minimized or not.
-
Anti-keylogging: Enabled if a protected window is in focus. To disable protection, change focus to another window.
Scopes page
The Scopes page is available for all machine types.
Using this page, group objects (for example, connections, catalogs, and delivery groups) in a way that is relevant to your organization.
License assignment page
The License assignment page is available for all machine types.
Using this page, specify which license you want the delivery group to use. By default, the delivery group uses the site license. For more information, see Multi-type licensing.
Policy Set page
The Policy Set page is available for all machine types.
Using this page, specify which policy set you want this delivery group to use.
Local Host Cache mode page
This page is available only for delivery groups containing power-managed single-session pooled machines.
By default, pooled machines that are power managed can be used for only one session when in Local Host Cache (LHC) mode. To change the default behavior and make them always available for new user connections when in LHC mode, select Use machines for subsequent sessions.
Alternatively, you can change the default behavior using PowerShell commands. For more information, see Application and desktop support.
Important:
Enabling access to power-managed single-session pooled machines can cause data and changes from previous user sessions being present in subsequent sessions.
One-time use pooled desktops in Local Host Cache
During a Local Host Cache (LHC) outage, pooled desktops can be used on a one-time basis. This is achieved by issuing a hygiene blob to capable VDAs and initiating reboots. This process guarantees a clean state for the desktops upon recovery from the outage. For machines that are not capable or legacy, participation only occurs if reuse is explicitly enabled. The feature improves customer sentiment during outages by making availability more seamless.
Prerequisites
- VDA version 2407 or later for full hygiene enforcement. Legacy VDAs (prior to VDA version 2407) can be used only when reuse is enabled. These VDAs do not receive the hygiene blob or enforced reboots.
- Machine catalogs with single session machines.
Configure one-time use of pooled desktops
- Create an MCS catalog with single session machines using VDA build 2407 or greater.
-
Create a corresponding delivery group. Set the
ReuseMachinesWithoutShutdownInOutagedesktop group setting tofalsefor the delivery group from Remote PowerShell or select Make resources unavailable in Studio on the Local Host Cache mode page when creating a delivery group.Set-BrokerDesktopGroup -Name "name" -ReuseMachinesWithoutShutdownInOutage $false <!--NeedCopy-->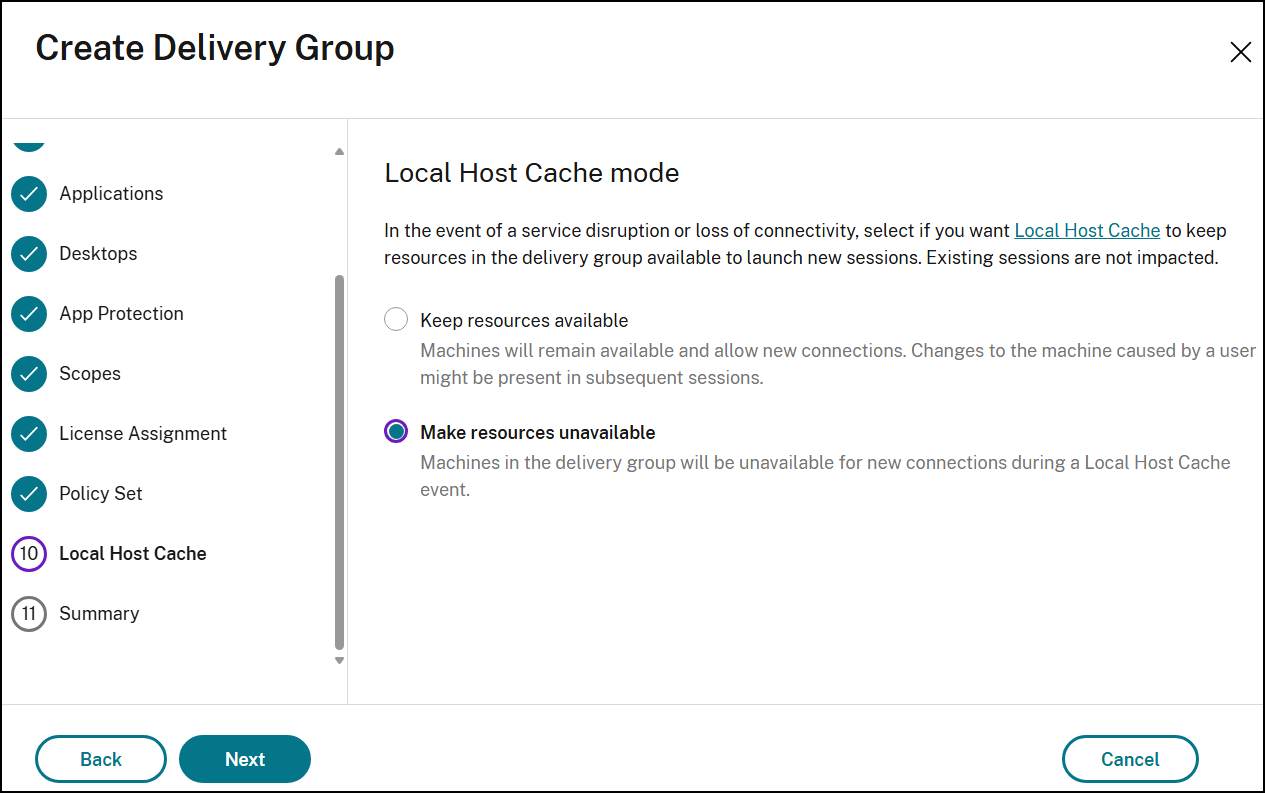
-
After you complete the configuration, during LHC outage mode, machines are available for one-time use. When out of LHC outage mode, machines that were tainted are rebooted and available to be used again.
Note:
A machine is classified as tainted once a user session has been initiated following its most recent power-on. An untainted machine refers to a machine that has not launched any user sessions since its latest power-on event.
Summary page
Enter a name for the delivery group. You can also (optionally) enter a description, which appears in the Citrix Workspace app and in Studio.
Review the summary information and then click Finish.
Limitation
Assignment of a desktop to a client IP address only works with a limited set of client types and configurations. Performing access filtering based on the client IP address uses the public IP address for cloud clients.
More information
In this article
- Introduction
- Pages of the Wizard
- Machines page
- Machine Allocation page
- Load Balancing page
- Delivery Type page
- Users page
- Applications page
- Desktops (or Desktop Assignment Rules) page
- App Protection page
- Scopes page
- License assignment page
- Policy Set page
- Local Host Cache mode page
- Summary page
- Limitation
- More information